EN
Odoo 18
Manufacturing
Odoo Manufacturing helps manufacturers schedule, plan, and process manufacturing orders. With the work center control panel, put tablets on the shop floor to control work orders in real-time and allow workers to trigger maintenance operations, feedback loops, quality issues, etc.
See also
- Odoo Tutorials: MRP
- Odoo Tutorials: Barcode Scanner
- IoT Boxes (MES)
- Basic setup
- Advanced configuration
- Workflows
- Shop Floor
- Subcontracting
- Reporting
Get Help
Contact Support Ask the Odoo Community
![]()
- User Docs
- Database management
- Developer
- Contributing
EN
Odoo 18
Manufacturing product configuration
In order to manufacture a product in Odoo Manufacturing, the product must be properly configured. Doing so consists of enabling the Manufacturing route and configuring a bill of materials (BoM) for the product. Once these steps are completed, the product is selectable when creating a new manufacturing order.
Activate the Manufacture route
The Manufacture route is activated for each product on its own product page. To do so, begin by navigating to Manufacturing ‣ Products ‣ Products. Then, select an existing product, or create a new one by clicking New.
On the product page, select the Inventory tab, then enable the Manufacture checkbox in the Routes section. This tells Odoo the product can be manufactured.

Lot/serial number tracking
The assignment of lots or serial numbers to newly manufactured products is optional. To optionally assign lots or serial numbers to newly manufactured products, go to the Traceability section in the Inventory tab. In the Tracking field, select By Unique Serial Number or By Lots.
Doing so enables the Lot/Serial Number field on a manufacturing order, or the Register Production instruction on a work order card in the Shop Floor app.
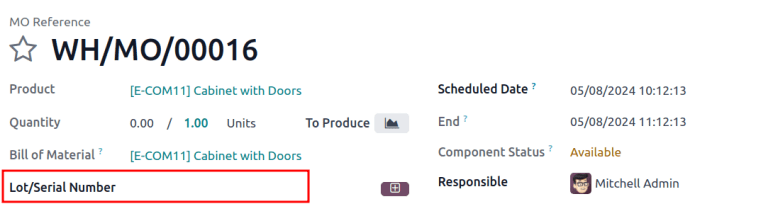
Lot/Serial Number field on the MO.

Register Production option to generate lot/serial number on a work order card.
Configure a bill of materials (BoM)
Next, a BoM must be configured for the product so Odoo knows how it is manufactured. A BoM is a list of the components and operations required to manufacture a product.
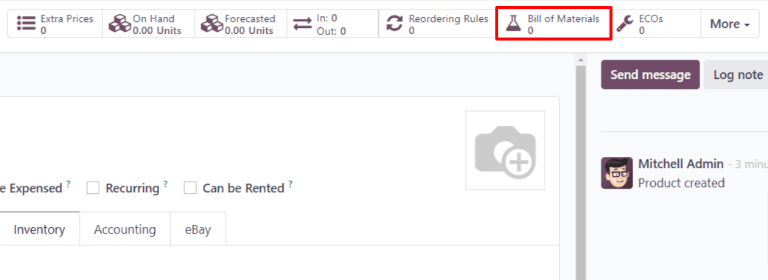
To create a BoM for a specific product, navigate to Manufacturing ‣ Products ‣ Products, then select the product. On the product page, click the Bill of Materials smart button at the top of the page, then select New to configure a new BoM.
On the BoM, the Product field auto-populates with the product. In the Quantity field, specify the number of units that the BoM produces.
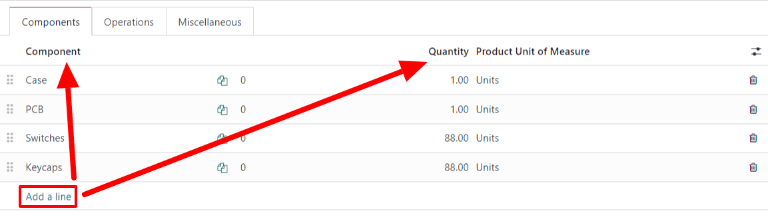
Add a component to the BoM by selecting the Components tab and clicking Add a line. Select a component from the Component drop-down menu, then enter the quantity in the Quantity field. Continue adding components on new lines until all components have been added.
Next, select the Operations tab. Click Add a line and a Create Operations pop-up window appears. In the Operation field, specify the name of the operation being added (e.g. Assemble, Cut, etc.). Select the work center where the operation will be carried out from the Work Center drop-down menu. Finally, click Save & Close to finish adding operations, or Save & New to add more.
Important
The Operations tab only appears if the Work Orders setting is enabled. To do so, navigate to Manufacturing ‣ Configuration ‣ Settings, then enable the Work Orders checkbox.

Learn more
The section above provides instructions for creating a basic BoM that allows a product to be manufactured in Odoo. However, it is by no means an exhaustive summary of all the options available when configuring a BoM. For more information about bills of materials, see the documentation on how to create a bill of materials.
On this page
Get Help
Contact Support Ask the Odoo Community
![]()
- User Docs
- Database management
- Developer
- Contributing
EN
Odoo 18
Bill of materials
A bill of materials (or BoM for short) documents specific components, along with their respective quantities, that are needed to produce or repair a product. In Odoo, BoMs as blueprints for manufactured goods and kits, and often include production operations and step-by-step guidelines, as well.
BoM setup
To create a BoM, go to Manufacturing app ‣ Products ‣ Bills of Materials and click New.
Next, set the BoM Type to Manufacture this Product.
Then, specify required components and, if necessary, define any manufacturing operations.
Tip
Individual BoMs can also be quickly accessed or created by clicking the Bill of Materials smart button on any product form, as accessible through the Sales, Inventory, and Manufacturing apps, as well as through any internal links where a product is referenced (such as in a field or a line item).
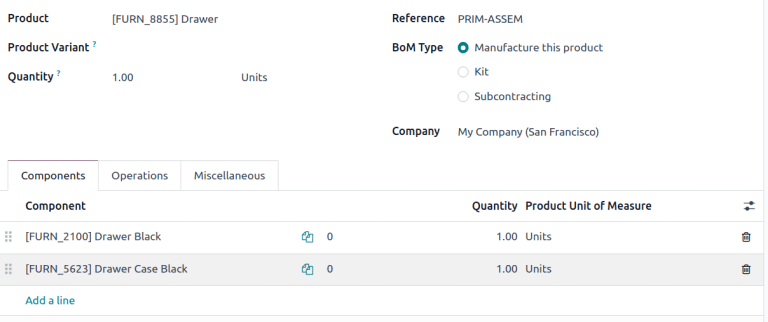
BoM for Drawer, displaying the Components tab.
See also
Components
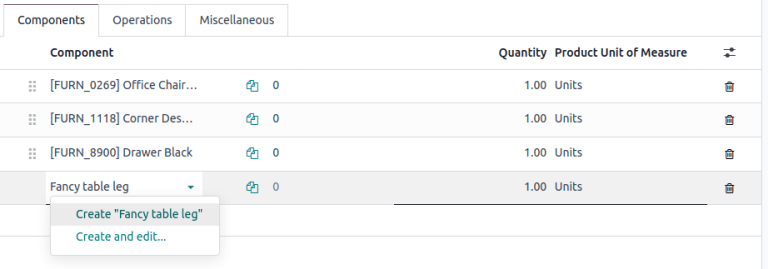
In the Components tab of a BoM, specify components used to manufacture the product by clicking Add a line. From the Components drop-down menu, select from existing products or create a new product by typing the name and selecting either the Create ” “ option to quickly add the line item, or the Create and edit… option to add the component and continue to its configuration form.
Optionally, access additional fields by clicking the (settings adjust) icon to the far-right of the Components tab. Tick the checkboxes for the following features to enable these columns:
- Apply on Variants: specify which product variant each component is used in. When the field is left blank, the component is used in all product variants.
- Consumed in Operation: specify the operation using the component. Useful for determining manufacturing readiness.
- Manual Consumption: tick the checkbox to force operators to check the Consumed checkbox on a manufacturing order (MO).

Not doing so triggers the Consumption Warning error message, where the consumed component quantity must be manually inputted. Otherwise, the operation cannot be completed.
Operations
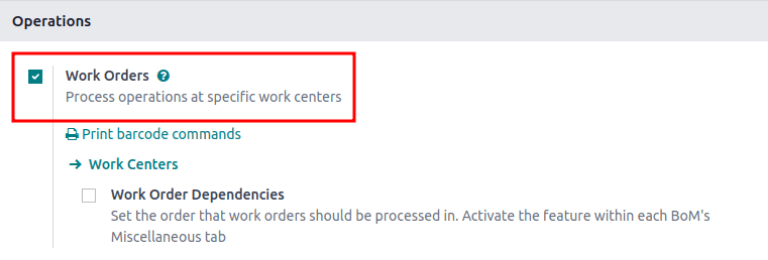
Add an operation to a BoM to specify instructions for production and register time spent on an operation. To use this feature, first enable the Work Orders feature by going to Manufacturing app ‣ Configuration ‣ Settings. In the Operations section, tick the Work Orders checkbox to enable the feature.
See also
Next, navigate to the BoM by going to Manufacturing app ‣ Products ‣ Bill of Materials and selecting the desired BoM. To add a new operation, go to the Operations tab, and click Add a line.
Doing so opens the Create Operations pop-up window, where the various fields of the operation are configured:
- Operation: name of the operation.
- Work Center: select existing locations to perform the operation, or create a new work center by typing the name and selecting the Create ” “ option.
- Apply on Variants: specify if this operation is only available for certain product variants. If the operation applies to all product variants, leave this field blank.
See also
Configuring BoMs for product variants - Duration Computation: choose how time spent on the operation is tracked. Opt for Compute based on tracked time to use the operation’s time tracker or Set duration manually if operators can record and modify time themselves.
Choosing the Compute based on tracked time option enables the Based on last __ work orders option, which automatically estimates the time to complete this operation based on the last few operations. Choosing Set duration manually enables the Default Duration field instead. - Default Duration: estimated amount of time to complete the operation; used for planning manufacturing orders and determining work center availability.
- Company: specify the company the BoM is available in.
Include operation details in the Work Sheet tab. Choose PDF to attach a file or Google Slide with public access to share a link. Select Text to type instructions in the Description text field.
Tip
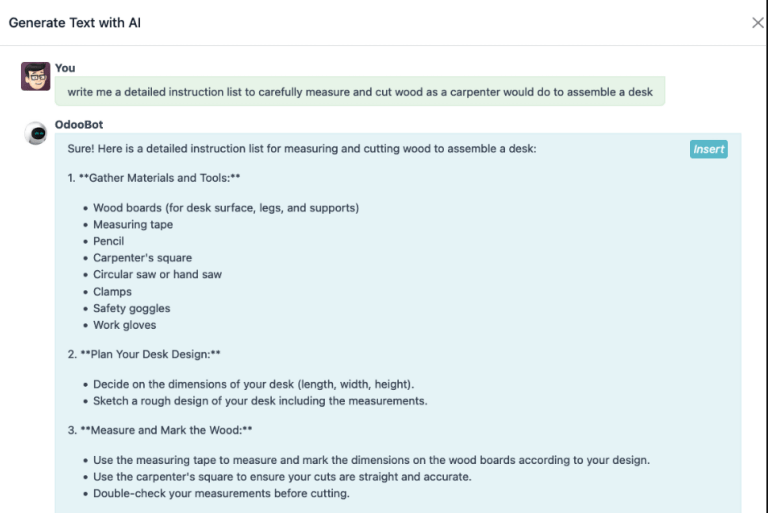
Type / for a list of formatting options and features, including ChatGPT.

Finally, click Save & Close to close the pop-up window. To add more operations, click Save & New and repeat the same steps above to configure another operation.
Note
Each operation is unique, as it is always exclusively linked to one BoM.
Tip
After creating an operation, click the Copy Existing Operations button to choose an operation to duplicate.

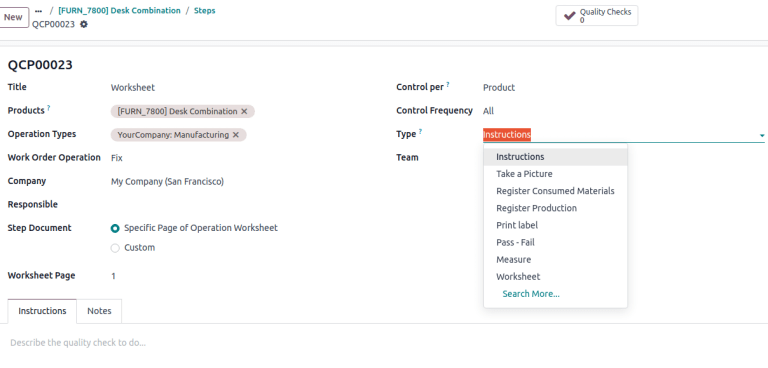
Instructions
Important
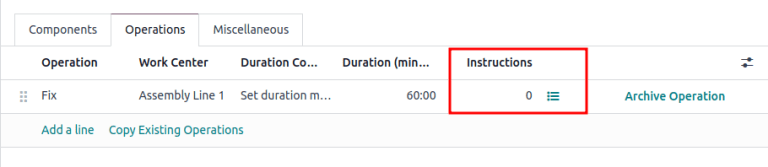
To add detailed instructions to operations, the Quality app must be installed.
Add specific instructions to an existing operation by clicking the operation’s (list) icon in the Instructions column. The number in the Instructions column shows the number of existing detailed instructions there are for the operation.
On the Steps dashboard, click New to open a blank quality control point form where the new manufacturing step can be created. Here, give the specific instruction a Title and set the Type to Instructions. In the Instructions tab of the form, write out the directions for the step in the operation.
Note
Further customizations can be made here on this form, beyond ordinary instructions, to also include specific types of quality control points that carry specific (or complex) conditions. For more details about quality control points refer the Instruction check documentation.
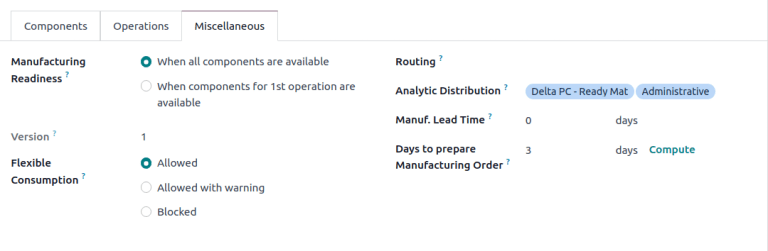
Miscellaneous
The Miscellaneous tab contains more BoM configurations to customize procurement, calculate costs, and define how components are consumed.
- Manufacturing Readiness: choosing When components for the 1st operation are available shows the Component Status as a green Not Available, when only the components that are consumed in the first operation are in stock. This indicates that although not all components are available, operators can at least begin with the first operation. Choosing When all components are available displays a red Not Available component status unless all components are in available.
Tip
Specify which operation consumes each component on the BoM in the Manual Consumption field.
- Version: displays the current BoM version, visible with the Odoo PLM app installed for managing BoM changes.
- Flexible Consumption: specifies if components used can deviate from the quantity defined on the BoM. Choose Blocked if operators must adhere strictly to the BoM quantity. Otherwise, choose Allowed or Allowed with Warning.
- Routing: select the preferred warehouse’s manufacturing operation type for products produced in multiple warehouses. If left blank, this warehouse’s Manufacturing operation type is used by default.
- Analytic Distribution: select pre-created analytic distribution models from the list to automatically record the cost of manufacturing products in the chosen journal.
- Manuf Lead Time: define the number of days needed to complete a MO from the date of confirmation.
- Days to prepare Manufacturing Order: number of days needed to replenish components, or manufacture sub-assemblies of the product.
See also
Add by-products to BoMs
A by-product is a residual product that is created during production in addition to the main product of a BoM. Unlike the primary product, there can be more than one by-product on a BoM.
To add by-products to a BoM, first enable the By-Products feature in Manufacturing app ‣ Configuration ‣ Settings. In the Operations section, tick the checkbox for By-Products to enable the feature.
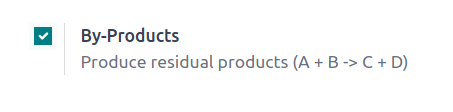
Once the feature is enabled, add by-products to a BoM by clicking the By-products tab. Click Add a line, and fill in the By-product, Quantity, and Unit of Measure. Optionally, specify a Produced in Operation for the by-product.
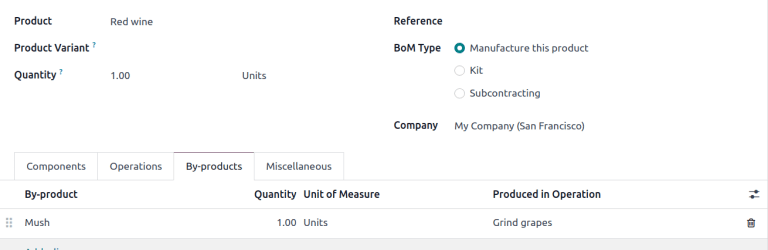
Example
The by-product, Mush, is created in the Grind grapes operation when producing Red Wine.
On this page
Get Help
Contact Support Ask the Odoo Community
![]()
- User Docs
- Database management
- Developer
- Contributing
EN
Odoo 18
One-step manufacturing
Odoo Manufacturing allows users to manufacture products using one, two, or three steps. When using one-step manufacturing, Odoo creates a manufacturing order (MO), but does not generate transfers for the movement of components out of inventory or finished products into stock. Inventory counts still update based on the number of components used and products manufactured, but the act of transferring them to and from inventory is not tracked.
Tip
The number of steps used in manufacturing is set at the warehouse level, allowing for each warehouse to use a different number of steps. To change the number of steps used for a specific warehouse, begin by navigating to Inventory ‣ Configuration ‣ Warehouses, and then select a warehouse from the Warehouses screen.
On the Warehouse Configuration tab, find the Manufacture radio input field, and select one of the three options: Manufacture (1 step), Pick components and then manufacture (2 steps), or Pick components, manufacture and then store products (3 steps).

Important
Products must be properly configured before they can be manufactured in Odoo. For details on how to do so, see the documentation on how to configure a product for manufacturing.
Create manufacturing order
To manufacture a product in Odoo Manufacturing, begin by navigating to Manufacturing ‣ Operations ‣ Manufacturing Orders, and then click New to create a new MO.
On the new MO, select the product to be produced from the Product drop-down menu. The Bill of Material field auto-populates with the associated bill of materials (BoM).
If a product has more than one BoM configured for it, the specific BoM can be selected in the Bill of Material field, and the Product field auto-populates with the associated product.
After a BoM has been selected, the Components and Work Orders tabs auto-populate with the components and operations specified on the BoM. If additional components or operations are required for the MO being configured, add them to the Components and Work Orders tabs by clicking Add a line.
Finally, click Confirm to confirm the MO.
Process manufacturing order
An MO is processed by completing all of the work orders listed under its Work Orders tab. This can be done on the MO itself, or from the work order tablet view.
Basic workflow
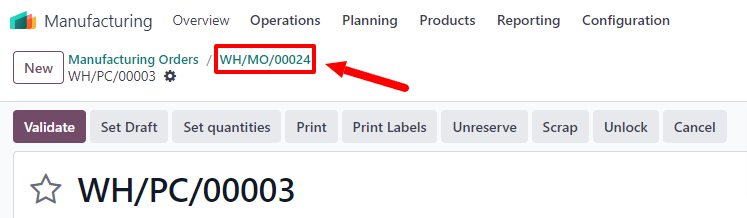
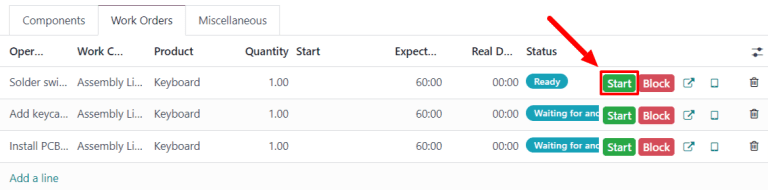
To complete work orders from the MO itself, begin by navigating to Manufacturing ‣ Operations ‣ Manufacturing Orders, and then select an MO.
On the MO page, select the Work Orders tab. Once work begins on the first work order that needs to be completed, click the Start button for that work order. Odoo Manufacturing then starts a timer that keeps track of how long the work order takes to complete.

When the work order is completed, click the Done button for that work order. Repeat the same process for each work order listed on the Work Orders tab.

After completing all of the work orders, click Produce All at the top of the screen to mark the MO as Done, and register the manufactured product(s) into inventory.
Shop Floor workflow
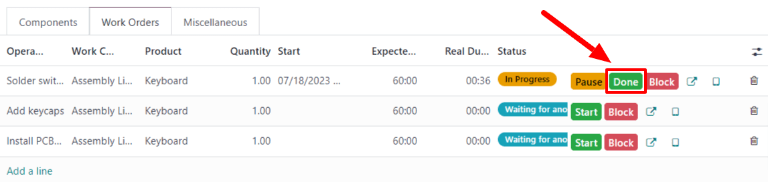
To complete the work orders for an MO using the Shop Floor module, begin by navigating to Manufacturing ‣ Operations ‣ Manufacturing Orders, and then select an MO.
On the MO, click on the Work Orders tab, and then select the ↗️ (square with arrow coming out of it) button on the line of the first work order to be processed. Doing so opens a Work Orders pop-up window, with details and processing options for the work order.
On the pop-up window, select the Open Shop Floor button at the top-left of the window to open the Shop Floor module.

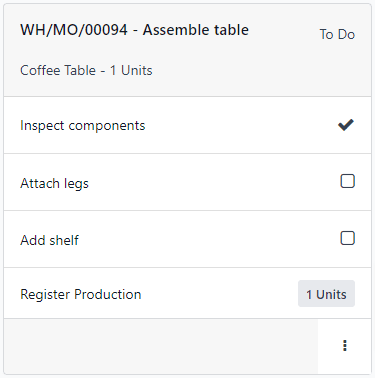
When accessed directly from a specific work order within an MO, Shop Floor defaults to the page for the work center where the work order is configured to be carried out. The page shows a card for the work order that displays the MO number, the product and number of units to be produced, and the steps required to complete the work order.

A work order is processed by completing each step listed on its card. This can be done by clicking on a step and following the instructions listed on the pop-up window that appears. Once the step is completed, click Next to move on to the next step, if any are required.
Alternatively, work order steps can be completed by clicking the checkbox that appears on the right side of the step’s line on the work order card. When using this method, the step is automatically marked as completed, without a pop-up window appearing.
The final step on a work order card is titled Register Production. This step is used to register the number of product units that were produced. If the number produced is equal to the number that the MO was created for, click the # Units button on the right side of the line to automatically register that number as the quantity produced.
If a different number must be entered, click the Register Production step to open a pop-up window. Enter the number of units produced in the Units field, and then click Validate to register that number.
Note
The Register Production step appears on every work order card. It must be completed for the first work order that is processed. After doing so, the step appears as already completed for each remaining work order in the MO.
After completing all of the steps for a work order, a button appears on the footer of the work order card. If any other work orders must be completed before the MO can be closed, the button is titled Mark as Done. If there are no additional work orders to complete, the button is titled Close Production.
Clicking Mark as Done causes the work order card to fade away. Once it disappears completely, the work order’s status is marked as Finished on the MO, and the next work order appears in the Shop Floor module, on the page of the work center where it is configured to be carried out. Any additional work orders can be processed using the instructions detailed in this section.
Clicking Close Production causes the work order card to fade away. Once it disappears, the MO is marked as Done, and the units of the product that were produced are entered into inventory.
After clicking Mark as Done or Close Production, each button is replaced by an Undo button. Click the Undo button before the work order card fades away to keep the work order open.
Tip
This section details the basic workflow for processing an MO in the Shop Floor module. For a more in-depth explanation of the module and all of its features, please see the Shop Floor overview documentation.
On this page
Get Help
Contact Support Ask the Odoo Community
![]()
- User Docs
- Database management
- Developer
- Contributing
EN
Odoo 18
Two-step manufacturing
Odoo Manufacturing allows users to manufacture products using one, two, or three steps. When using two-step manufacturing, Odoo creates a manufacturing order (MO) and a pick components transfer, but does not generate a transfer for the movement of finished products into stock. Inventory counts still update based on the number of products manufactured, but the act of transferring them to and from inventory is not tracked.
Tip
The number of steps used in manufacturing is set at the warehouse level, allowing for each warehouse to use a different number of steps. To change the number of steps used for a specific warehouse, begin by navigating to Inventory ‣ Configuration ‣ Warehouses, and then select a warehouse from the Warehouses screen.
On the Warehouse Configuration tab, find the Manufacture radio input field, and select one of the three options: Manufacture (1 step), Pick components and then manufacture (2 steps), or Pick components, manufacture and then store products (3 steps).

Important
Products must be properly configured before they can be manufactured in Odoo. For details on how to do so, see the documentation on how to configure a product for manufacturing.
Create manufacturing order
To manufacture a product in Odoo Manufacturing, begin by navigating to Manufacturing ‣ Operations ‣ Manufacturing Orders, and then click New to create a new MO.
On the new MO, select the product to be produced from the Product drop-down menu. The Bill of Material field auto-populates with the associated Bill of Materials (BoM).
If a product has more than one BoM configured for it, the specific BoM can be selected in the Bill of Material field, and the Product field auto-populates with the associated product.
After a BoM has been selected, the Components and Work Orders tabs auto-populate with the components and operations specified on the BoM. If additional components or operations are required for the MO being configured, add them to the Components and Work Orders tabs by clicking Add a line.
Finally, click Confirm to confirm the MO.
Process pick components transfer
After confirming a two-step MO, a Transfers smart button appears at the top of the page. Click it to open the pick components transfer for the MO. This transfer is used to track the movement of components from the locations where they are stored to the location where they are used to manufacture the product.
After transferring the components out of their storage location, click Validate at the top of the transfer, followed by Apply on the Immediate Transfer? pop-up window that appears. Doing so marks the transfer as Done, and updates inventory counts to reflect the quantity of components transferred.
Finally, return to the MO by clicking the WH/MO/XXXXX breadcrumb at the top of the page.
Process manufacturing order
An MO is processed by completing all of the work orders listed under its Work Orders tab. This can be done on the MO itself, or from the work order tablet view.
Basic workflow
To complete work orders from the MO itself, begin by navigating to Manufacturing ‣ Operations ‣ Manufacturing Orders, and then select an MO.
On the MO page, select the Work Orders tab. Once work begins on the first work order that needs to be completed, click the Start button for that operation. Odoo Manufacturing then starts a timer that keeps track of how long the work order takes to complete.

When the work order is completed, click the Done button for that work order. Repeat the same process for each work order listed on the Work Orders tab.

After completing all of the work orders, click Produce All at the top of the screen to mark the MO as Done, and register the manufactured product(s) into inventory.
Shop Floor workflow
To complete the work orders for an MO using the Shop Floor module, begin by navigating to Manufacturing ‣ Operations ‣ Manufacturing Orders, and then select an MO.
On the MO, click on the Work Orders tab, and then select the ↗️ (square with arrow coming out of it) button on the line of the first work order to be processed. Doing so opens a Work Orders pop-up window, with details and processing options for the work order.
On the pop-up window, select the Open Shop Floor button at the top-left of the window to open the Shop Floor module.

When accessed directly from a specific work order within an MO, Shop Floor defaults to the page for the work center where the work order is configured to be carried out. The page shows a card for the work order that displays the MO number, the product and number of units to be produced, and the steps required to complete the work order.

A work order is processed by completing each step listed on its card. This can be done by clicking on a step and following the instructions listed on the pop-up window that appears. Once the step is completed, click Next to move on to the next step, if any are required.
Alternatively, work order steps can be completed by clicking the checkbox that appears on the right side of the step’s line on the work order card. When using this method, the step is automatically marked as completed, without a pop-up window appearing.
The final step on a work order card is titled Register Production. This step is used to register the number of product units that were produced. If the number produced is equal to the number that the MO was created for, click the # Units button on the right side of the line to automatically register that number as the quantity produced.
If a different number must be entered, click the Register Production step to open a pop-up window. Enter the number of units produced in the Units field, and then click Validate to register that number.
Note
The Register Production step appears on every work order card. It must be completed for the first work order that is processed. After doing so, the step appears as already completed for each remaining work order in the MO.
After completing all of the steps for a work order, a button appears on the footer of the work order card. If any other work orders must be completed before the MO can be closed, the button is titled Mark as Done. If there are no additional work orders to complete, the button is titled Close Production.
Clicking Mark as Done causes the work order card to fade away. Once it disappears completely, the work order’s status is marked as Finished on the MO, and the next work order appears in the Shop Floor module, on the page of the work center where it is configured to be carried out. Any additional work orders can be processed using the instructions detailed in this section.
Clicking Close Production causes the work order card to fade away. Once it disappears, the MO is marked as Done, and the units of the product that were produced are entered into inventory.
After clicking Mark as Done or Close Production, each button is replaced by an Undo button. Click the Undo button before the work order card fades away to keep the work order open.
Tip
This section details the basic workflow for processing an MO in the Shop Floor module. For a more in-depth explanation of the module and all of its features, please see the Shop Floor overview documentation.
On this page
Get Help
Contact Support Ask the Odoo Community
![]()
- User Docs
- Database management
- Developer
- Contributing
EN
Odoo 18
Three-step manufacturing
Odoo Manufacturing allows users to manufacture products using one, two, or three steps. When using three-step manufacturing, Odoo creates a pick components transfer, a manufacturing order (MO), and a store finished products transfer, and updates inventory counts based on the number of components removed, and finished products created.
Tip
The number of steps used in manufacturing is set at the warehouse level, allowing for each warehouse to use a different number of steps. To change the number of steps used for a specific warehouse, begin by navigating to Inventory ‣ Configuration ‣ Warehouses, and then select a warehouse from the Warehouses screen.
On the Warehouse Configuration tab, find the Manufacture radio input field, and select one of the three options: Manufacture (1 step), Pick components and then manufacture (2 steps), or Pick components, manufacture and then store products (3 steps).

Important
Products must be properly configured before they can be manufactured in Odoo. For details on how to do so, see the documentation on how to configure a product for manufacturing.
Create manufacturing order
To manufacture a product in Odoo Manufacturing, begin by navigating to Manufacturing ‣ Operations ‣ Manufacturing Orders, and then click New to create a new MO.
On the new MO, select the product to be produced from the Product drop-down menu. The Bill of Material field auto-populates with the associated Bill of Materials (BoM).
If a product has more than one BoM configured for it, the specific BoM can be selected in the Bill of Material field, and the Product field auto-populates with the associated product.
After a BoM has been selected, the Components and Work Orders tabs auto-populate with the components and operations specified on the BoM. If additional components or operations are required for the MO being configured, add them to the Components and Work Orders tabs by clicking Add a line.
Finally, click Confirm to confirm the MO.
Process pick components transfer
After confirming a three-step MO, a Transfers smart button appears at the top of the page. Click it to be taken to the Transfers page for the MO. The page lists two transfers: WH/PC/XXXXX (the pick components transfer), and WH/SFP/XXXXX (the store finished products transfer).
Select WH/PC/XXXXX to open the pick components transfer for the MO. This transfer is used to track the movement of components from the locations where they are stored to the location where they are used to manufacture the product.
After transferring the components out of their storage location, click Validate at the top of the transfer, followed by Apply on the Immediate Transfer? pop-up window that appears. Doing so marks the transfer as Done, and updates inventory counts to reflect the quantity of components transferred.
Finally, return to the MO by clicking the WH/MO/XXXXX breadcrumb at the top of the page.

Process manufacturing order
An MO is processed by completing all of the work orders listed under its Work Orders tab. This can be done on the MO itself, or from the work order tablet view.
Basic workflow
To complete work orders from the MO itself, begin by navigating to Manufacturing ‣ Operations ‣ Manufacturing Orders, and then select a manufacturing order.
On the MO page, select the Work Orders tab. Once work begins on the first work order that needs to be completed, click the Start button for that work order. Odoo Manufacturing then starts a timer that keeps track of how long the work order takes to complete.
When the work order is completed, click the Done button for that work order. Repeat the same process for each work order listed on the Work Orders tab.
After completing all of the work orders, click Produce All at the top of the screen to mark the MO as Done, and register the manufactured product(s) into inventory.
Shop Floor workflow
To complete the work orders for an MO using the Shop Floor module, begin by navigating to Manufacturing ‣ Operations ‣ Manufacturing Orders, and then select an MO.
On the MO, click on the Work Orders tab, and then select the ↗️ (square with arrow coming out of it) button on the line of the first work order to be processed. Doing so opens a Work Orders pop-up window, with details and processing options for the work order.
On the pop-up window, select the Open Shop Floor button at the top-left of the window to open the Shop Floor module.
When accessed directly from a specific work order within an MO, Shop Floor defaults to the page for the work center where the work order is configured to be carried out. The page shows a card for the work order that displays the MO number, the product and number of units to be produced, and the steps required to complete the work order.
A work order is processed by completing each step listed on its card. This can be done by clicking on a step, and following the instructions listed on the pop-up window that appears. Once the step is completed, click Next to move on to the next step, if any are required.
Alternatively, work order steps can be completed by clicking the checkbox that appears on the right side of the step’s line on the work order card. When using this method, the step is automatically marked as completed, without a pop-up window appearing.
The final step on a work order card is titled Register Production. This step is used to register the number of product units that were produced. If the number produced is equal to the number that the MO was created for, click the # Units button on the right side of the line to automatically register that number as the quantity produced.
If a different number must be entered, click the Register Production step to open a pop-up window. Enter the number of units produced in the Units field, and then click Validate to register that number.
Note
The Register Production step appears on every work order card. It must be completed for the first work order that is processed. After doing so, the step appears as already completed for each remaining work order in the MO.
After completing all of the steps for a work order, a button appears on the footer of the work order card. If any other work orders must be completed before the MO can be closed, the button is titled Mark as Done. If there are no additional work orders to complete, the button is titled Close Production.
Clicking Mark as Done causes the work order card to fade away. Once it disappears completely, the work order’s status is marked as Finished on the MO, and the next work order appears in the Shop Floor module, on the page of the work center where it is configured to be carried out. Any additional work orders can be processed using the instructions detailed in this section.
Clicking Close Production causes the work order card to fade away. Once it disappears, the MO is marked as Done, and the units of the product that were produced are entered into inventory.
After clicking Mark as Done or Close Production, each button is replaced by an Undo button. Click the Undo button before the work order card fades away to keep the work order open.
Tip
This section details the basic workflow for processing an MO in the Shop Floor module. For a more in-depth explanation of the module and all of its features, please see the Shop Floor overview documentation.
Process finished product transfer
After completing the MO, return to the order’s Transfers page by clicking the Transfers button at the top of the order. This time, select WH/SFP/XXXXX to open the store finished products transfer. This transfer is used to track the movement of finished products from the location where they were manufactured to the location where they are stored.
After transferring the finished products to their storage location, click Validate at the top of the transfer, followed by Apply on the Immediate Transfer? pop-up window that appears. Doing so marks the transfer as Done, and updates inventory counts to reflect the quantity of finished products transferred.
On this page
Get Help
Contact Support Ask the Odoo Community
![]()
- User Docs
- Database management
- Developer
- Contributing
EN
Odoo 18
Manufacturing order costs
The ability to accurately calculate the cost of manufacturing a product is critical when determining product profitability. Odoo’s Manufacturing app simplifies this calculation by automatically calculating the cost to complete each manufacturing order (MO), as well as the average production cost of a product, based on all completed MOs.
Important
Odoo’s Manufacturing app distinguishes between the MO cost and the real cost of an MO.
The MO cost represents how much it should cost to complete an MO, based on the configuration of the product’s bill of materials (BoM). This takes into account the cost and quantity of components, as well as the cost of completing the necessary operations.
The real cost represents how much it actually costs to complete the MO. A few factors can cause the real cost to differ from the MO cost. For example, an operation may take longer to complete than estimated, a greater component quantity might be needed than was specified on the BoM, or the price of components may change during manufacturing.
Cost configuration
Odoo computes MO costs based on the configuration of the BoM used to manufacture a product. This calculation includes the cost and quantity of components and operations listed on the BoM, in addition to the operating costs of the work centers where those operations are carried out, and the amount paid to each employee who works on an operation.
Component cost
Component cost is calculated automatically, based on the average purchase cost of a component across all purchase orders (POs). To view a component’s cost, navigate to Inventory app –> Products –> Products, and select a component product. The cost is displayed in the Cost field of the General Information tab, on the component’s product form.
It is possible to set the cost of a component manually, by clicking the Cost field on the component’s product form and entering a value. However, any future POs for the component override a manually entered value, resetting the Cost field back to an automatically computed value.
Work center cost
To set the operating cost for a specific work center, navigate to Manufacturing app ‣ Configuration ‣ Work Centers, and select a work center.
To set the cost of operating the work center for one hour, enter a value in the per workcenter field, located beside the Cost per hour section on the work center’s General Information tab.
To set the hourly cost of each employee that operates the work center, enter a value in the per employee field, located beside the Cost per hour section on the work center’s General Information tab. For example, if 25.00 is entered in the per employee field, it costs $25.00 per hour for each employee working at the work center.
Important
The value entered in the per employee field is only used to calculate the MO cost, which is the estimated cost of completing the MO.
The actual cost of completing the MO is represented by the real cost. Instead of using the value entered in the per employee field, the real cost is calculated using the hourly cost specific to each employee.
For example, if the per employee cost of a work center is ‘$50.00’, and an employee with an hourly cost of ‘$60.00’ completes a work order there, the MO cost (estimated) is calculated using the $50/hr cost, while the real cost is calculated using the $60/hr cost.
See the employee cost section below for information on how to set the cost for specific employees.
Employee cost
To set the hourly cost for a specific employee, navigate to the Employees app, and select an employee. On the employee’s form, select the Settings tab, and enter the employee’s rate in the Hourly Cost field of the Application Settings section.
Important
As detailed in the work center cost section above, the value entered in the Hourly Cost field on the employee’s form is used to calculate the real cost of an MO. The estimated cost of an MO, referred to as the MO cost, uses the per employee cost set on each work center’s form.
BoM configuration
Configuring a BoM so Odoo can accurately calculate the cost of MOs that use it requires two steps. First, components must be added, and the required quantity specified. Second, operations must be added, along with the work centers where they are carried out.
Begin by navigating to Manufacturing app ‣ Products ‣ Bills of Materials. Select a BoM, or create a new one by clicking New.
In the Components tab of the BoM form, add each component by clicking Add a line, selecting the component from the drop-down menu in the Component column, and entering the quantity in the Quantity column.
In the Operations tab, add an operation by clicking Add a line to open the Create Operations pop-up window. Enter a title for the operation in the Operation field.
Select the Work Center where the operation is carried out. Then, add a Default Duration, which is the estimated amount of time the operation takes to complete.
By default, the Duration Computation field is set to Set duration manually, which means that the number entered in Default Duration field is always used as the expected duration of the operation.
Selecting Compute based on tracked time causes Odoo to automatically compute the Default Duration based on a certain number of work orders, which is set in the Based on field. Before there are work orders to compute this duration, the value in the Default Duration field is used instead.
The hourly cost of operating the work center, and the duration of the operation, are used to calculate the operation’s cost.
Finally, click Save & Close to add the operation to the BoM, and close the Create Operations pop-up window. Alternatively, click Save & New to add the operation to the BoM, and open a blank Create Operations pop-up window to add another operation.
See also
For a full overview of BoM configuration, see the documentation on bills of materials.
MO overview
Each MO has an overview page, which lists a variety of information about the MO, including MO cost and real cost. To view the overview for an MO, navigate to Manufacturing app ‣ Operations ‣ Manufacturing Orders, and select an MO. Then, click the Overview smart button at the top of the MO.
Both the MO cost and real cost take into account the cost and quantity of components, as well as the cost of completing each work order. The overview page lists a row for each of these values, with the sum of them listed at the bottom of the MO Cost and Real Cost columns.
Before work begins on an MO, the MO Cost and Real Cost columns display the same costs. This is the estimated cost of completing the MO.
However, once work commences, the values in the Real Cost column may begin to diverge from the values in the MO Cost column. This happens if a different component quantity is used than was listed on the MO, the duration of a work order is different than expected, or the hourly cost of the employee performing a work order differs from the employee cost set on the work center.
Once the MO has been completed by clicking Produce All, the values in the MO Cost column update to match those displayed in the Real Cost column.
Average manufacturing cost
In addition to the cost of each individual MO for a product, Odoo also tracks the average cost of manufacturing the product, taking into account the cost of every completed MO. To view this, navigate to Inventory app ‣ Products ‣ Products, and select a product.
The manufacturing cost of the product is displayed per unit of measure in the Cost field, located in the General Information tab. The value continues to update as the costs of additional MOs are factored into the average cost.
To the right of the Cost field is a Compute Price from BoM button, which only appears for products with at least one BoM. Click this button to reset the cost of the product to the expected cost, which only takes into account the components and operations listed on the BoM.
Important
Be aware that clicking Compute Price from BoM does not set the price permanently. The cost continues to update based on the average of the BoM price and the real cost of any future MOs.
Example workflow: manufacturing cost
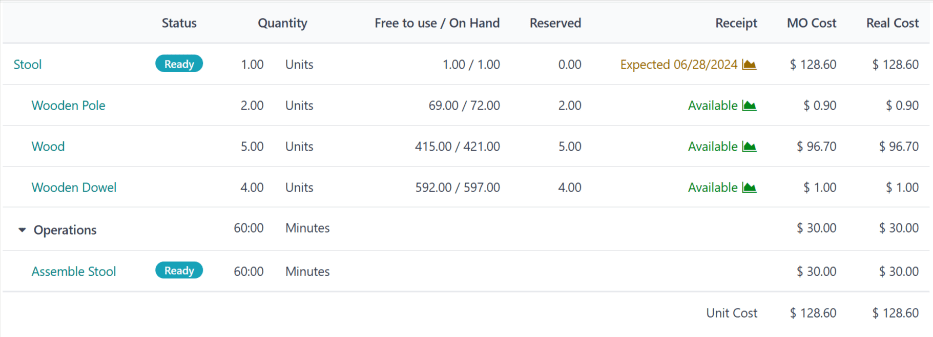
Golf product manufacturer Fairway Fields produces a variety of golf products, including an indoor putting green. They have configured a BoM for the putting green, so Odoo automatically calculates the manufacturing cost of each putting green MO.
The BoM lists two components:
- One unit of green felt, which costs $20.00.
- One unit of a rubber pad, which costs $30.00.
The BoM also lists four operations, all of which are carried out at Assembly Station 1, which has an hourly operating cost of $30.00. Those operations are as follows:
- Cut felt: default duration of seven minutes, for a total cost of $3.50.
- Cut rubber pad: default duration of five minutes, for a total cost of $2.50.
- Attach pad to felt: default duration of 15 minutes, for a total cost of $7.50.
- Cut holes: default duration of three minutes, for a total cost of $1.50.
Altogether, the components required to produce one putting green cost $50.00, and the operations required cost $15.00, for a total manufacturing cost of $65.00. This cost is reflected in the Cost field on the putting green’s product form.
Fairway Fields confirms an MO for one putting green. Before manufacturing starts, the MO overview lists a cost of $65.00 in both the MO Cost and Real Cost fields.
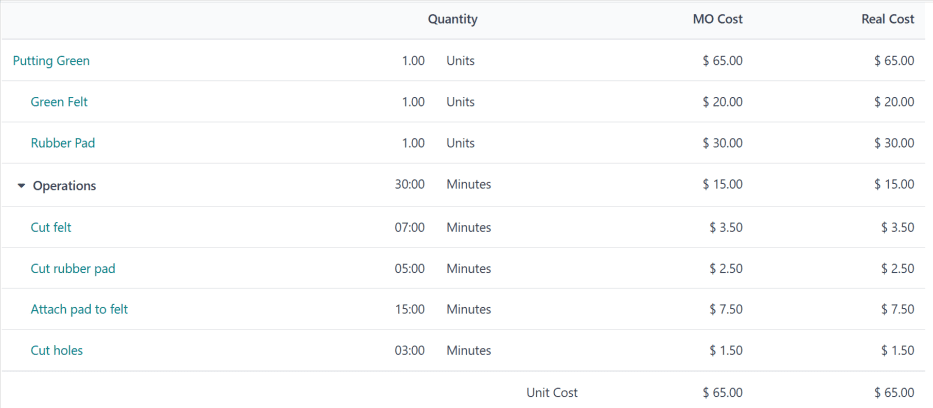
Manufacturing begins, and the operations take ten minutes longer than expected, for a total manufacturing time of 40 minutes. This deviation from the BoM is reflected on the MO overview, which now lists a Real Cost of $70.00.
Once manufacturing is finished, and the MO is marked as Done, the MO overview updates again, so the values in the MO Cost and Real Cost columns match, each displaying a value of $70.00.
On the putting green’s product page, the Cost field now displays a cost of $67.50, the average of the original cost of $65.00 and the real cost of $70.00 from the MO.
On this page
Get Help
Contact Support Ask the Odoo Community
![]()
- User Docs
- Database management
- Developer
- Contributing
EN
Odoo 18
Managing BoMs for product variants
Odoo allows one bill of materials (BoM) to be used for multiple variants of the same product. Having a consolidated BoM for a product with variants saves time by preventing the need to manage multiple BoMs.
Activate product variants
To activate the product variants feature, navigate to Inventory app ‣ Configuration ‣ Settings, and scroll down to the Products section. Then, click the checkbox to enable the Variants option. After that, click Save to apply the setting.
For more information on configuring product variants, refer to the product variants documentation.

Create custom product attributes
Once the product variants feature is activated, create and edit product attributes on the Attributes page.
The Attributes page is accessible either from Inventory app ‣ Configuration ‣ Settings by clicking the Attributes button, or by clicking Inventory app ‣ Configuration ‣ Attributes.
Once on the Attributes page, either click into an existing attribute, or click Create to create a new one. Clicking Create reveals a new, blank form for customizing an attribute. For an existing attribute, click Edit on its form to make changes.
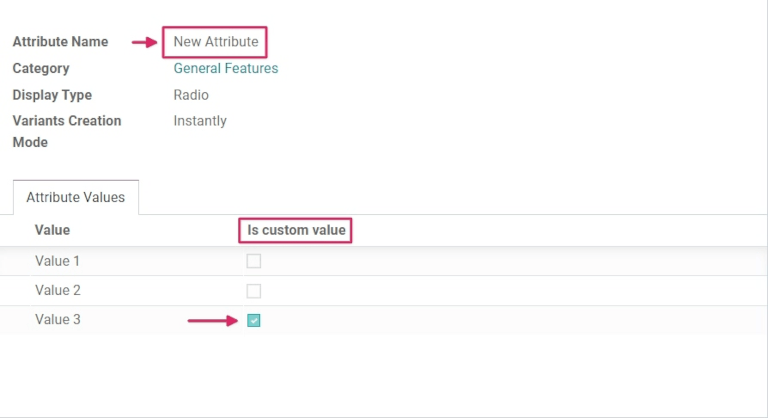
Assign an Attribute Name, and choose a category from the Category field’s drop-down menu. Then, select the desired options next to the Display Type and Variants Creation Mode fields. Once the desired options are selected, click Add a line under the Attribute Values tab to add a new value.
Tip
Included on the Value row is a Is custom value checkbox. If selected, this value will be recognized as a custom value, which allows customers to type special customization requests upon ordering a custom variant of a product.
Example
Once all desired Values have been added, click Save to save the new attribute.
Add product variants on the product form
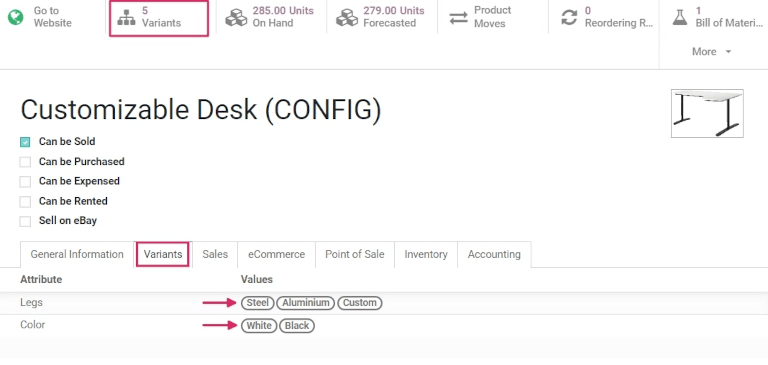
Created attributes can be applied on specific variants for particular products. To add product variants to a product, navigate to the product form by going to Inventory app ‣ Products ‣ Products. To make changes to the product, click Edit. Then, click the Variants tab.
Under the Attribute header, click Add a line to add a new attribute, and select one to add from the drop-down menu.
Then, under the Values header, click the drop-down menu to choose from the list of existing values. Click on each desired value to add them, and repeat this process for any additional attributes that should be added to the product.
Once finished, click Save to save changes.
Tip
BoM products with multiple variants that are manufactured in-house should either have a 0,0 reordering rule set up, or have their replenishment routes set to Replenish on Order (MTO).
Apply BoM components to product variants
Next, create a new BoM. Or, edit an existing one, by going to Manufacturing app ‣ Products ‣ Bills of Materials. Then, click Create to open a new Bills of Materials form to configure from scratch.
Add a product to the BoM by clicking the drop-down menu in the Product field and selecting the desired product.
Then, add components by clicking Add a line under the Component section of the Components tab, and choosing the desired components from the drop-down menu.
Choose the desired values in the Quantity and Product Unit of Measure columns. Then, choose the desired values in the Apply on Variants column.
Note
The Apply on Variants option to assign components to specific product variants on the BoM is available once the Variants setting is activated from the Inventory application. If the Apply on Variants field is not immediately visible, activate it from the additional options menu (three-dots icon, to the right of the header row).
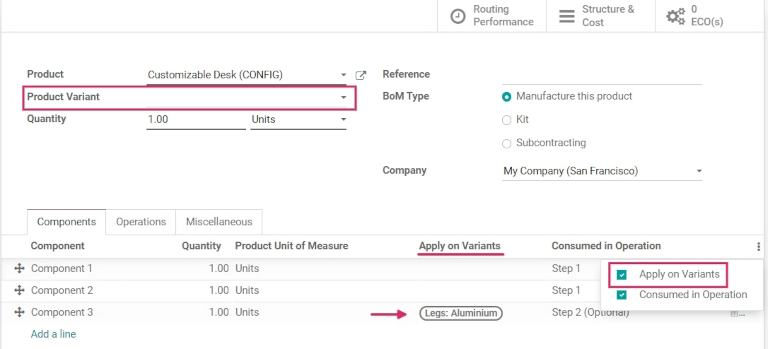
Each component can be assigned to multiple variants. Components with no variants specified are used in every variant of the product. The same principle applies when configuring operations and by-products.
When defining variant BoMs by component assignment, the Product Variant field in the main section of the BoM should be left blank. This field is only used when creating a BoM specifically for one product variant.
When all desired configurations have been made to the BoM, click Save at the top of the form to save changes.
Tip
For components that only apply for specific variants, choose which operations the components should be consumed in. If the Consumed in Operation column is not immediately visible, activate it from the additional options menu (three-dots icon, to the right of the header row).
Sell and manufacture variants of BoM products
To sell and manufacture variants of BoM products to order, navigate to Sales app ‣ Create to create a new quotation.
Sell variant of BoM product
Once on the blank Quotation form, click the drop-down next to the Customer field to add a customer.
Then, under the Order Lines tab, click Add a product, and select the previously-created BoM product with variants from the drop-down menu. Doing so reveals a Configure a product pop-up.
From the pop-up window, click the desired attribute options to configure the correct variant of the product to manufacture. Then, click the green + or - icons next to the 1 to change the quantity to sell and manufacture, if desired.
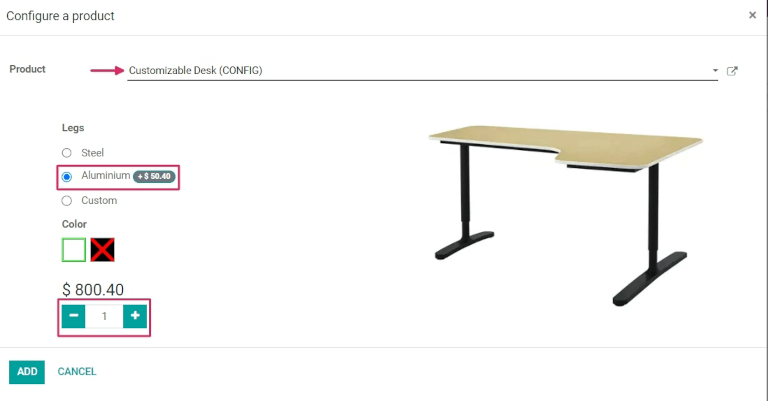
Once all the specifications have been chosen, click Add. This will change the pop-up to a second Configure pop-up, where available optional products will appear, if they have been created previously.
Once ready, click Confirm to close the pop-up.
Then, click Save to save all changes, and click Confirm at the top of the Quotation form to create and confirm a new sales order (SO).
Manufacture variant of BoM product
Once the SO is confirmed, a Manufacturing smart button appears at the top of the SO form. Click the Manufacturing smart button to open the Manufacturing Order form.
On this form, under the Components tab, the appropriate components for the chosen variant are listed. And, depending on the variant, different components will be listed. To see any mandatory or optional Operation steps, click the Work Orders tab.
To enter the tablet view work order screen, click the tablet icon to the right of the row for the desired operation to be completed.
From the tablet view, click Mark as Done as the operation progresses to complete the operation steps.
Alternatively, click the Mark as Done button at the top of the manufacturing order form to complete the order.
Then, navigate back to the SO via the breadcrumbs at the top of the page.
Now that the product has been manufactured, click the Delivery smart button to deliver the product to the customer. From the Delivery Order form, click Validate, then click Apply to deliver the product.
To finish the sale, click back to the SO via the breadcrumbs at the top of the page again. Then, click Create Invoice followed by Create Invoice again to invoice the customer for the order.
On this page
Get Help
Contact Support Ask the Odoo Community
![]()
- User Docs
- Database management
- Developer
- Contributing
EN
Odoo 18
Kits
In Odoo, a kit is a type of bill of materials (BoM) that can be manufactured and sold. Kits are sets of unassembled components sold to customers. They may be sold as standalone products, and are also useful tools for managing more complex bills of materials (BoMs).
Note
To use, manufacture, and sell kits, both the Manufacturing and Inventory apps need to be installed.
Create the kit as a product
To use a kit as a sellable product, or as a component organization tool, the kit should first be created as a product.
To create a kit product, go to Inventory app ‣ Products ‣ Products, and then click New.
Then, assign a name to the new kit product. Next, set the kit’s product type depending on inventory tracking needs and accounting requirements. To do this, under the General Information tab, set the Product Type to Goods and either check the box next Track Inventory if inventory tracking is required, or leave it unchecked if inventory tracking for the kit is not necessary.
See also
Learn more about tracked versus untracked products.
The kit’s components must also be configured as products via Inventory app ‣ Products ‣ Products. These components require no specific configuration.
Untracked kit inventory setup details
Consider leaving tracking for the kit’s inventory untracked when the kit is used in other manufacturing processes or when tracking inventory for the kit itself is not needed.
- Recommended for Continental Accounting: If costs are expensed immediately upon purchase, then leaving the kit’s inventory as untracked is recommended.
- Replenishment via Components: Inventory count is managed at the component level, so reordering rules must be set to individual components.
- Selling & Stock Constraints: Kits cannot be sold if any required component is out of stock. Since availability depends on individual components, a sales order may appear valid, but delivery can be delayed if components are unavailable.
Tracked kit inventory setup details
Consider turning on tracking for the kit’s inventory when the kit is a tangible product or warehouse and inventory tracking is essential.
- Recommended for Angle-Saxon Accounting: If the Cost of Goods Sold (COGS) needs to be recorded in journals, then tracking the kit’s inventory is recommended.
- Component Purchase Constraints: Only the kit’s minimum required components can be added to an eCommerce cart unless the option to continue selling is disabled.
- No Kit Serial Numbers: Serial number tracking does not track the kit, only its shipped components.
- Reordering Rule Recommendation: Reordering rules should be set at the component-level.
- Stock Replenishment Recommendation: Stock replenishment should also be done at the component-level.
Kit setup similarities
Regardless of which setup is used, there are some similarities between the two options.
- No Kit-Level Stock Adjustments: Stock adjustments cannot be handled at the kit-level.
- Kit Value Does Not Change: The stock’s value is the same whether the kit’s is tracked.
- Kit Internal Transfers: An internal transfer for the kit breaks it into components.
Set up the kit BoM
After fully configuring the kit product and its components, a new BoM can be created for the kit product.
To do so, go to Manufacturing app ‣ Products ‣ Bills of Materials, and then click New. Next to the Product field, click the drop-down menu to reveal a list of products, and then select the previously configured kit product.
Then, for the BoM Type field, click the Kit option. Finally, under the Components tab, click Add a line, and add each desired component, and specify their quantities under the Quantity column.
Once ready, click Save to save the newly created BoM.
If the kit is solely being used as a sellable product, then only components need to be added under the Components tab, and configuring manufacturing operations is not necessary.
Note
When a kit is sold as a product, it appears as a single line item on the quotation and sales order. However, on delivery orders, each component of the kit is listed.
Use kits to manage complex BoMs
Kits can also be used for complex BoMs. This method nests BoMs within other BoMs, organizing complex products while simplifying manufacturing by defining each procurement and production step separately.
Sublevel BoMs (subassemblies or semi-finished products) streamline these workflows, helping with traceability efforts.
See also
On this page
Get Help
Contact Support Ask the Odoo Community
![]()
- User Docs
- Database management
- Developer
- Contributing
EN
Odoo 18
Multilevel BoMs
Use a multilevel bill of materials (BoM) when a manufactured product is part of another assembly. This method nests BoMs within other BoMs, organizing complex products while simplifying manufacturing by defining each procurement and production step separately.
Sublevel BoMs (subassemblies or semifinished products) streamline these production workflows, and are beneficial when the subassembly is used across multiple finished products (meaning they’d appear on multiple top-level BoMs). The more complicated a product is to build or procure, the more value a multilevel BoM can provide. Because of this, component and subassembly replenishment planning is vital to ensuring multilevel BoMs run smoothly.
Why replenishment planning is important
Replenishment is critical for multilevel BoMs to prevent bottlenecks, manage lead times, and optimize inventory. Without it, missing components can halt production, delay orders, and increase costs. A well-planned replenishment strategy ensures just-in-time availability, automates procurement, balances stock levels, and keeps supply chains efficient. This minimizes delays, reduces manual effort, and ensures smooth manufacturing.
Manufacturing orders (MO)s that come from a BoM require all components to be available before the MO can be completed. The Component Status for that MO provides this information. Learn how to check an MO’s component status.
Create a multilevel BoM
To set up a multilevel BoM, the top-level product and sublevel products’s BoMs must be created. If starting from scratch, build the BoMs from the bottom up. Start with the lowest-level product BoMs, then include those products as components in higher-level BoMs.
Example
A printed circuit board (PCB) for a custom keyboard is composed of hundreds of electronic components, such as transistors, resistors, and capacitors. Instead of listing all of those components out, a sublevel product and BoM for a PCB is created, to track the quantities of transistors and other small components, without needing to overcrowd the top-level BoM for the custom keyboard by listing them. Instead, the custom keyboard’s BoM consists of an assortment of components and sublevel BoMs alike, like key caps, switches, the PCB, and keyboard plate.
Learn how to build a simple bill of materials. For the PCB, this would include the transistors, resistors, and other components.

After the sublevel products (like the PCB, key caps, and keyboard plate) are fully configured, create the top-level product by navigating to Manufacturing app ‣ Products ‣ Products, and then selecting New. From here, configure the product’s specifications as needed.
Once the top-level product (the keyboard) is configured, click the Bill of Materials smart button on the product form, and then select New to make a BoM for the top-level product. Add the sublevel products to this BoM, along with any other necessary components.

Manage production planning
The two options below are two of the best ways to manage manufacturing order automation for products with multilevel BoMs.
Note
Complex BoMs are specifically used to manage products that require manufactured components. If a BoM is being created to organize components or bundle sellable products, use a kit instead.
To automatically trigger manufacturing orders for sublevel products after confirming a manufacturing order for the main product, there are two options:
- Option 1 (recommended): Create Reordering Rules for the sublevel products and set both the minimum and maximum needed stock quantities to 0.
- Option 2: Activate the Replenish on Order (MTO) and Manufacture routes under the Inventory tab of the sublevel product’s product form.
See also
Option 1 is more flexible than Option 2 and is recommended. Reordering rules do not directly link demand to replenishment, allowing stock to be unreserved and reassigned as needed. The Replenish on Order (MTO) route, however, uniquely links sublevel and top-level products, reserving quantities for the confirmed top-level manufacturing order.
In both methods, sublevel products must be fully manufactured before starting the top-level product.
Multilevel BoM setup flow
The following section details how to set up multilevel BoMs, set the initial inventory, establish a 0/0/1 reordering rule (the recommended production plan), configure lead times, and set up production options.
Creating a 0/0/1 reordering rule for the sublevel products (minimum stock set at zero, maximum stock set at zero, reorder one automatically) regardless of whether they are a component or subassembly is the recommended approach for managing a multilevel BoM. This setup uses the Inventory, Manufacturing, and Purchase apps.
Important
This is only one example of how to set up a multilevel BoM in Odoo. Consider any unique circumstances that need to be addressed during the configuration, and make sure they are included in the setup. If any specific help is needed during setup, consider purchasing a success pack.
Create the BoMs
Follow the steps in the Create a multilevel BoM section to build the BoMs.
Make sure to build the multilevel BoM from the bottom up. Start by creating the lowest-level component products in Odoo, then the subassembly products that those are used for, then the BoM for that subassembly, and repeat until every level of the multilevel BoM is created.
Set the initial inventory
Note
If there’s no initial inventory to configure, then skip this section and begin configuring the procurement method for the multilevel BoM.
Update the quantity on hand for each of the products configured in the prior step (both components, subassemblies, and the final product). To do this, open the Inventory app, and then find the products with filters, the search bar, or scrolling, and then click on them to open their product form. From here, click the On Hand smart button, select the variant if that was configured, and then enter the quantity on hand.
See also
Configure the procurement method
Now it is time to pick the procurement method this multilevel BoM uses. The two options below are preferred, but unique circumstances may lead to another procurement method making more sense.
- Option 1 (recommended): Create Reordering Rules for the sublevel products and set both the minimum and maximum needed stock quantities to 0.
- Option 2: Activate the Replenish on Order (MTO) and Manufacture routes under the Inventory tab of the sublevel product’s product form.
See also
Reordering rules are recommended because they do not tie the manufactured product to a specific sales order, allowing that manufactured product to fulfill a different sales order if the original gets cancelled.
Making the product to order is not recommended because the manufactured product cannot be used to fulfill another sales order. However, this could be helpful if strict tracking is necessary for the business.
Enter vendor and manufacturing lead times
Vendor and manufacturing lead times are used by Odoo to coordinate production and procurement actions to fulfill orders on time. Set vendor lead times for components that are purchased. These can appear at any level in a multilevel BoM except the final product. Set manufacturing lead times for products that are built using a BoM. These can appear at any level in a multilevel BoM except the lowest level (when individual components are procured).
See also
Build out operations to handle the production flow
First, determine the current manufacturing flow for the business, then match the corresponding Odoo setup. The list below are only some of the configuration pieces that could be involved in this step.
- Manufacturing Steps: Consider how many manufacturing steps are taken (one-, two-, or three-step manufacturing).
- Work Centers: Decide if any work centers need to be configured.
- Master Production Schedule: If manually planned manufacturing orders are needed (e.g., to handle seasonal demand), make a master production schedule (MPS).
Tip
Manufacturing operations is an art and a science, so configuring an established flow into Odoo is the recommended approach for this step. Read more about manufacturing in Odoo
Configuration summary
At the end of this process, the multilevel BoM is configured, and the top-level product has its inventory counts, procurement method set, procurement lead times, and manufacturing operations configured. From here, sales orders can include the top-level product, automatic procurement through vendors or manufacturing can begin, the top-level product can be included in an eCommerce store.
See also
On this page
Get Help
Contact Support Ask the Odoo Community
![]()
- User Docs
- Database management
- Developer
- Contributing
EN
Odoo 18
Manage work orders using work centers
Odoo Manufacturing allows for work orders to be carried out at specific work centers. When a manufacturing order is created for a product, any work orders listed in the Operations tab of the product bill of materials (BoM) will be automatically created as well and assigned to the specified work center. Work orders can be managed in the Manufacturing module by selecting Operations ‣ Work Orders.
In order to use work centers, the Work Orders feature must first be enabled. To do so, go to the Manufacturing module, select Configuration ‣ Settings, and activate the checkbox next to Work Orders. Work centers can then be created and managed by selecting Configuration ‣ Work Centers.
Create a work center
Within the Manufacturing module, select Configuration ‣ Work Centers ‣ Create. The work center form can then be filled out as follows:
- Work Center Name: give the work center a concise name that describes the type of operations it will be used for
- Alternative Workcenters: specify an alternative work center for operations to be carried out at if the main work center is not available
- Code: assign the work center a reference code
- Working Hours: define the number of hours that the work center can be in use each week
- Company: select the company that the work center belongs to
Set standards for work center productivity
The General Information tab on the work center form allows for productivity goals to be assigned to a work center:
- Time Efficiency: used to calculate the expected duration of a work order at the work center; for example, if a work order normally takes one hour and the efficiency is set to 200%, the work order will take 30 minutes
- Capacity: the number of products that can be processed at the work center simultaneously
- OEE Target: the target for efficiency at the work center
- Time before prod.: setup time required before work can commence
- Time after prod.: breakdown or cleanup time required after work is finished
- Cost per hour: the cost of operating the work center for one hour
- Analytic Account: the account where the cost of the work center should be recorded
Assign equipment to a work center
Using the Equipment tab, it is possible for specific pieces of equipment to be assigned to a work center. The following information will be displayed for each piece of equipment added:
- Equipment Name: the name of the piece of equipment
- Technician: the technician responsible for servicing the equipment
- Equipment Category: the category the equipment belongs to
- MTBF: mean time between failures; the average time that the piece of equipment will operate before failing
- MTTR: mean time to recovery; the average time it takes for the equipment to become fully operational again
- Est. Next Failure: an estimate of when the next equipment failure will occur
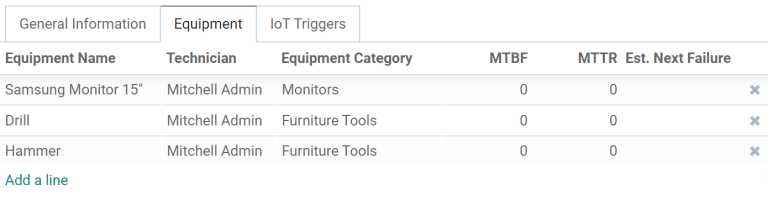
Note
MTBF, MTTR, and Est. Next Failure are all calculated automatically based on past failure data, if any exists.
Integrate IoT devices
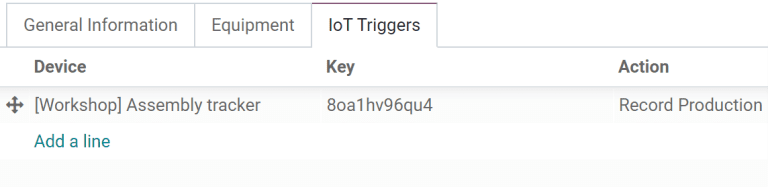
The IoT Triggers tab enables the integration of IoT devices with a work center:
- Device: specifies the IoT device to be triggered
- Key: the security key for the device
- Action: the IoT device action triggered
Use case: configure an alternative work center
When a work center is at capacity, it cannot accept any new work orders. Instead of waiting for the work center to become available, it is possible to specify an alternative work center where surplus work orders should be carried out.
Begin by creating a new work center. Configure the Equipment tab so that it has all of the same equipment as the main work center. This will ensure that the same tasks can be carried out at both work centers. Navigate to the main work center and include the new work center in the Alternative Workcenters selection field.
Now, create a new manufacturing order that uses the main work center for one of its operations. The main work center will automatically be selected for the operation in the Work Orders tab. After confirming the manufacturing order, click the Plan button that appears at the top left of the form.

If the main work center is at capacity, the work center selected for the operation will be automatically changed to the alternative work center.

Monitor work center performance
Performance for an individual work center can be viewed by selecting Configuration ‣ Work Centers, and clicking on a work center. A variety of metrics showing work center performance can be viewed at the top right of the form:
- OEE: overall effective efficiency, the percentage of time that the work center has been fully productive
- Lost: the amount of time lost due to work stoppages
- Load: the amount of time it will take to complete the current workload
- Performance: the real duration of work time, shown as a percentage of the expected duration
On this page
Get Help
Contact Support Ask the Odoo Community
![]()
- User Docs
- Database management
- Developer
- Contributing
EN
Odoo 18
Work order dependencies
When manufacturing certain products, specific operations may need to be completed before others can begin. In order to ensure operations are carried out in the correct order, Odoo Manufacturing features a work order dependencies setting. Enabling this setting allows for operations on a Bill of Materials (BoM) to be blocked by other operations that should occur first.
Configuration
The work order dependencies setting is not enabled by default. To enable it, begin by navigating to Manufacturing ‣ Configuration ‣ Settings. Then, enable the Work Orders setting, if it is not already active.
After enabling the Work Orders setting, the Work Order Dependencies setting appears below it. Enable Work Order Dependencies, then click Save to confirm the changes.
Add dependencies to BoM
Work order dependencies are configured on a product’s BoM. To do so, navigate to Manufacturing ‣ Products ‣ Bills of Materials, then select a BoM, or create a new one by clicking New.
Learn more
For a complete guide on how to properly configure a new BoM, see the documentation on creating a bill of materials.
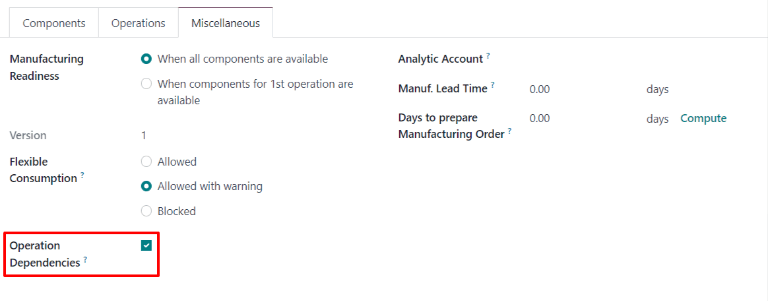
On the BoM, click on the Miscellaneous tab, then enable the Operation Dependencies checkbox. This makes a new Blocked By option available in the settings of the Operations tab.
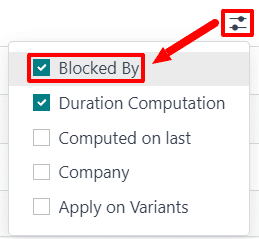
Next, click on the Operations tab. On the top-right of the tab, click on the tab’s settings button, then enable the Blocked By checkbox. This makes a Blocked By field appear for each operation on the Operations tab.
In the line of the operation that should be blocked by another operation, click the Blocked By field, and an Open: Operations pop-up window appears. In the Blocked By drop-down field on the pop-up window, select the blocking operation that must be completed before the operation that is blocked.
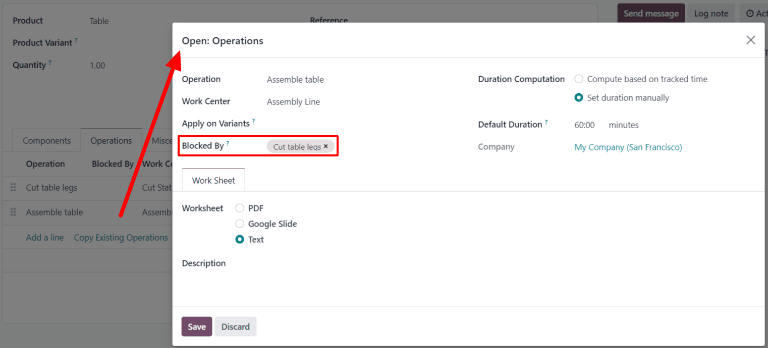
Finally, save the BoM by clicking Save.
Plan work orders using dependencies
Once work order dependencies have been configured on a BoM, Odoo Manufacturing is able to plan when work orders are scheduled, based on their dependencies. To plan the work orders for a manufacturing order, begin by navigating to Manufacturing ‣ Operations ‣ Manufacturing Orders.
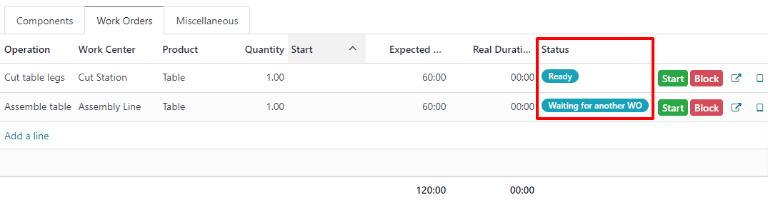
Next, select a manufacturing order for a product with work order dependencies set on its BoM, or create a new manufacturing order by clicking New. If a new manufacturing order is created, select a BoM configured with work order dependencies from the Bill of Material drop-down field, then click Confirm.
After confirming the manufacturing order, select the Work Orders tab to view the work orders required to complete it. Any work orders that are not blocked by a different work order display a Ready tag in the Status section.
Work orders that are blocked by one or more work orders display a Waiting for another WO tag instead. Once the blocking work order(s) are completed, the tag updates to Ready.
To schedule the manufacturing order’s work orders, click the Plan button at the top of the page. After doing so, the Scheduled Start Date field for each work order on the Work Orders tab auto-fills with the scheduled start date and time. A blocked work order is scheduled at the end of the time period specified in the Expected Duration field of the work order that precedes it.
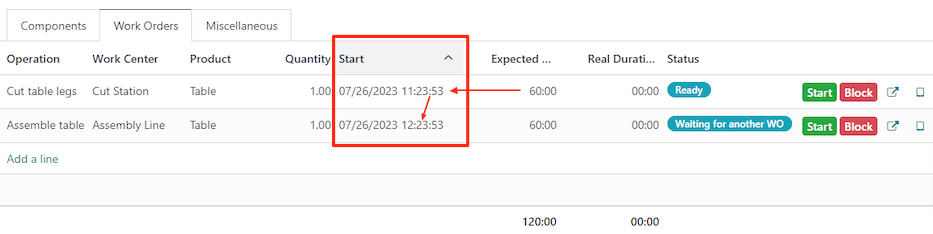
Example
A manufacturing order is created for Product A. The manufacturing order has two operations: Cut and Assemble. Each operation has an expected duration of 60 minutes, and the Assemble operation is blocked by the Cut operation.
The Plan button for the manufacturing order is clicked at 1:30 pm, and the Cut operation is scheduled to begin immediately. Since the Cut operation has an expected duration of 60 minutes, the Assemble operation is scheduled to begin at 2:30 pm.
Planning by workcenter
To see a visual representation of how work orders are planned, navigate to the Work Orders Planning page by going to Manufacturing ‣ Planning ‣ Planning by Workcenter. This page shows a timeline of all the work orders scheduled for each operation.
If one work order is blocked by the completion of another, the work order that is blocked is shown as scheduled to start after the work order blocking it. In addition, an arrow connects the two work orders, leading from the blocking operation to the blocked operation.
![]()
On this page
Get Help
Contact Support Ask the Odoo Community
![]()
- User Docs
- Database management
- Developer
- Contributing
EN
Odoo 18
Master production schedule
In Odoo’s Manufacturing app, the master production schedule (MPS) is used to manually plan manufacturing orders (MOs) and purchase orders (POs), based on forecasted quantities of products and components.
By considering the impact of confirmed MOs and POs, along with manually adjusted demand forecasts, the MPS can be used to manage long-term product replenishment. This ensures the continued availability of the necessary products and components.
Since the MPS allows for manual intervention, it is useful for replenishing products where the demand of existing sales orders (SOs) does not reflect probable future demand.
Example
A retail store sells artificial Christmas trees during the holiday season. It is currently September, and the store has less than ten Christmas tree MOs confirmed for the month of December.
Despite the number of confirmed MOs, the procurement manager knows that the demand for Christmas trees in December is going to be much higher, once the holiday season starts. As a result, they manually enter a greater demand in the MPS, so they can properly replenish the product in time for the increase in customer demand.
Important
It is essential to remember that the MPS is a MANUAL tool. Adding a product to the MPS does not cause it to be manufactured or purchased automatically. The MPS simply suggests the amount of the product that should be replenished, but requires user input to create the MOs or POs that are used to replenish it.
For this reason, it is recommended that the MPS NOT be used alongside reordering rules for the same product. Because reordering rules are an automated workflow, they conflict with the manual replenishment method of MPS. Using both, in unison, can lead to inaccurate forecasts and the creation of unnecessary replenishment orders.
Enable and configure MPS
To use the MPS feature, navigate to Manufacturing app ‣ Configuration ‣ Settings, and tick the Master Production Schedule checkbox in the Planning section. Finally, click Save.
After enabling the Master Production Schedule feature, two new fields appear under it on the Settings page: Time Range and Number of Columns.
The Time Range field is used to select the period of time over which planning takes place, and offers three options: Monthly, Weekly, and Daily. For example, if Monthly is selected, the MPS plans the production requirements of products and components on a monthly basis.
The Number of Columns field is used to specify the quantity of the selected Time Range units shown on the MPS page. For example, if the Time Range field is set to Monthly, and 12 is entered in the Number of Columns field, the MPS shows one column for the next 12 months, starting with the current month.
If the values of the Time Range or Number of Columns fields are altered, click Save again to save the changes.
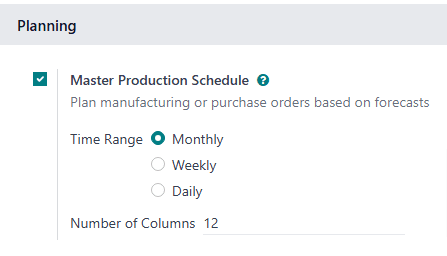
MPS dashboard
To open the MPS, navigate to Manufacturing app ‣ Planning ‣ Master Production Schedule. The MPS view appears as follows:

The grey column on the left side of the screen shows a section for every product added to the MPS, with each product section being broken down into smaller rows. The information shown in the rows depends on the filters selected in the Search… bar drop-down menu at the top of the page. The default categories that appear in the rows are:
- [Product] by [unit] : the forecasted stock quantity at the beginning of each time period. [Product] and are selectable buttons which open the product’s page, or the forecast report for the product, respectively.
- - Forecasted Demand: the demand forecast, which is entered manually. This represents an estimate of the demand for the product during each time period.
- - Indirect Demand Forecast: while this is a default category, it only appears for products that are components of other products. It represents the demand for the component from existing MOs.
- + Suggested Replenishment: the quantity of the product that is suggested to be replenished through MOs or POs. To the right of the category title is a Replenish button, which is used to manually replenish the product, based on the quantity suggested to be replenished.

The “Replenish” button on the “+ Suggested Replenishment” row. - = Forecasted Stock: the quantity of the product forecasted to be in stock at the end of each time period, assuming that suggested replenishment numbers are fulfilled.
Altogether, these default categories form an equation:
Forecasted Demand+Suggested Replenishment=Forecasted Stock
In the case of components, the Indirect Demand Forecast is taken into account as well.
The - Forecasted Demand and + Suggested Replenishment fields can be edited for any of the time periods to the right of the product column. Doing so changes the equation, and updates the value displayed in the Forecasted Stock field.
Changing the value in the + Suggested Replenishment field also makes an (reset) button appear to the left of the field. Click the (reset) button next to the field to reset its value back to the one calculated by the MPS.
Important
While the MPS can be used with only the default categories enabled, it is advisable to also enable the Actual Demand category. This is done by clicking the (down arrow) on the right side of the Search… bar, and enabling the Actual Demand option under the Rows header.
With the Actual Demand option enabled, the - Forecasted Demand category changes to the - Actual / Forecasted Demand category. In addition to the manually entered forecasted demand, this category also displays the confirmed demand for the product, which is based on confirmed SOs.
Each column to the right of the products column lists one unit of the time period selected in the Time Range field on the Manufacturing app Settings page (ex. months). The number of time period columns corresponds to the value entered in the Number of Columns field.
The first time period column represents the current time period. For example, if the MPS is configured to use months, the first column displays data for the current month. On this first column, the + Suggested Replenishment field appears in one of five colors:
- Green: a replenishment order must be generated to keep stock at the Safety Stock Target.
- Gray: a replenishment order has already been generated to keep stock at the Safety Stock Target.
- Yellow: a replenishment order has already been generated, but the quantity it was created for is not enough to keep stock at the Safety Stock Target.
- Red: a replenishment order has already been generated, but the quantity it was created for puts the amount of stock above the Safety Stock Target.
The + Suggested Replenishment field appears white, if no replenishment order has been generated, and it is not necessary to generate one at the current moment.
Add a product
To use MPS to manage the replenishment of a product, navigate to Manufacturing app ‣ Planning ‣ Master Production Schedule. At the top of the MPS page, click Add a Product to open the Add a Product pop-up window.
Important
Products must be properly configured to be replenished through the MPS.
In the case of manufactured products, the Manufacture route must be selected in the Routes section of the Inventory tab, on the product’s form.
In the case of products that are purchased, the Buy route must be selected in the Routes section of the Inventory tab, on the product’s form. Additionally, a vendor and the price they sell the product for must also be specified on the Purchase tab.
On the pop-up window, select the product to add in the Product drop-down menu. If the product is replenished through manufacturing, select the product’s BoM in the Bill of Materials field.
Note
Selecting a BoM when adding a product to the MPS also adds any components listed on the BoM. If it is not necessary to manage the replenishment of components through the MPS, simply leave the Bill of Materials field blank.
If the database is configured with multiple warehouses, a Production Warehouse field appears on the Add a Product pop-up window. Use this field to specify which warehouse the product is replenished to.
In the Safety Stock Target field, specify the minimum quantity of the product that should be kept available for orders at all times. For example, if there should always be 20 units of the product available for order fulfillment, enter 20 in the Safety Stock Target field.
In the Minimum to Replenish field, enter the minimum product quantity for orders created to replenish the product. For example, if 5 is entered in this field, replenishment orders for the product include a minimum of five units.
In the Maximum to Replenish field, enter the maximum product quantity for orders created to replenish the product. For example, if 100 is entered in this field, replenishment orders for the product include a maximum of 100 units.
Finally, click Save to add the product to the MPS. The product now appears on the MPS page each time it is opened. If a BoM was selected in the Bill of Materials field of the Add a Product pop-up window, any components listed on the BoM appear on the page, as well.
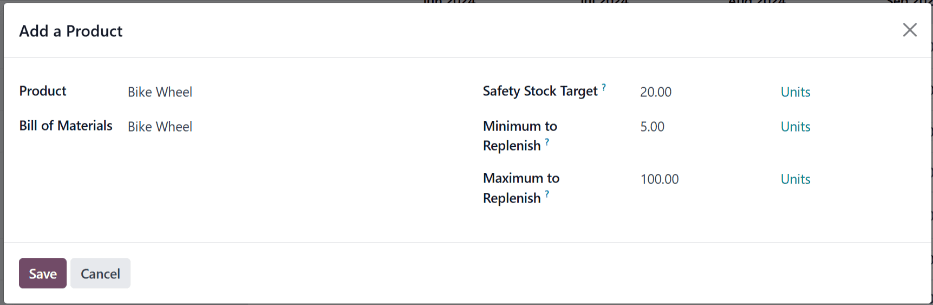
Edit a product
After adding a product to the MPS, it may be necessary to change the replenishment values entered on the Add a Product pop-up window. To do so, click the # ≤…≤ # button to the immediate right of the Replenish button, on the + Suggested Replenishment row, below the product’s name.
Note
The first and second number displayed on the # ≤…≤ # button correspond to the values entered in the Minimum to Replenish and Maximum to Replenish fields when adding the product to the MPS.
For example, if 5 was entered in the Minimum to Replenish field, and 100 was entered in the Maximum to Replenish field, the button appears as 5 ≤…≤ 100.
Clicking the # ≤…≤ # button opens the Edit Production Schedule pop-up window. This pop-up window is the same as the Add a Product pop-up window, except that the Product and Bill of Materials fields cannot be edited.
On the Edit Production Schedule pop-up window, enter the desired values in the Safety Stock Target, Minimum to Replenish, and Maximum to Replenish fields. Then, click Save to save the changes.
Remove a product
To remove a product from the MPS, tick the checkbox to the left of its name. Then, click the Actions button at the top of the screen, and select Delete from the resulting drop-down menu. Finally, click Ok on the Confirmation pop-up window.
Deleting a product from the MPS removes it, along with all of its data. If the product is re-added, its replenishment values must be reconfigured.
MPS replenishment
Products in the MPS can be replenished in one of three ways:
- Click the Replenish button at the top of the screen to generate replenishment orders for every product below its Safety Stock Target for the current month.
- Click the Replenish button on the right side of the + Suggested Replenishment row of a specific product, to generate a replenishment order for that specific product.
- Tick the checkbox to the left of the product name of one or more products. Then, click the Actions button at the top of the screen, and select Replenish from the resulting drop-down menu. Doing so generates a replenishment order for each selected product.
The type of replenishment order generated corresponds to the route selected on the Inventory tab of the product’s form:
- If the Buy route is selected, an RfQ is generated to replenish the product. RfQs can be selected by navigating to the Purchase app. Any RfQ generated by the MPS lists MPS in its Source Document field.
- If the Manufacture route is selected, an MO is generated to replenish the product. MOs can be selected by navigating to Manufacturing app ‣ Operations ‣ Manufacturing Orders. Any MO generated by the MPS lists MPS in its Source Document field.
On this page
Get Help
Contact Support Ask the Odoo Community
![]()
- User Docs
- Database management
- Developer
- Contributing
EN
Odoo 18
Work center time off
In Odoo, work centers are used to carry out manufacturing operations at specific locations. However, if a work center cannot be used for some reason, work orders begin to pile up at the work center until it is operational again.
As a result, it is necessary to make the work center unavailable in Odoo so new work orders are routed to alternative work centers that are operational. Using Odoo’s Time Off app, it is possible to designate a work center as being unavailable for a set period of time. Doing so ensures manufacturing operations can continue until the impacted work center is available again.
Configuration
Before a work center can be designated as unavailable, the Odoo platform must be properly configured. First, it is necessary to enable developer mode. This allows the Time Off smart button to appear on each work center’s Working Hours page.
Next, install the Time Off app. This is the app used for managing time off for all resources within Odoo, including employees and work centers.
To do so, navigate to the Apps app, then search Time Off in the search bar. The card for the Time Off app should be the only one that appears on the page. Click the Install button on the card to install the app.
The last step is to properly configure work centers. For this workflow, it is necessary to have at least two work centers: one that is made unavailable, and a second that receives the work orders that the other cannot accept. If no second work center is configured, Odoo cannot route work orders away from the unavailable work center, and they pile up in its queue.
To create a work center, navigate to Manufacturing app ‣ Configuration ‣ Work Centers ‣ New.
See also
For a full guide to work center creation, refer to the documentation on work centers.
Make sure both work centers have the same equipment listed under the Equipment tab. This ensures operations carried out at one work center can also be performed at the other.
On the work center that is made unavailable, select the second work center from the Alternative Workcenters drop-down menu. Now, Odoo knows to send work orders to the second work center when the first is unavailable for any reason.
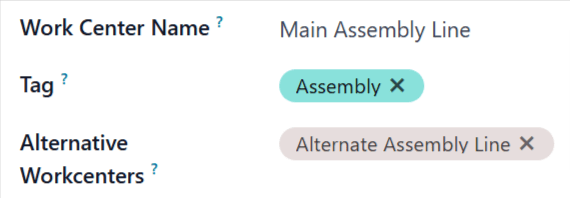
Add time off for a work center
With configuration completed, time off can now be assigned to a work center. Begin by navigating to Manufacturing app ‣ Configuration ‣ Work Centers, and selecting the affected work center. Click the (Internal link) button on the right side of the Working Hours drop-down menu, to open the working hours page for the work center.
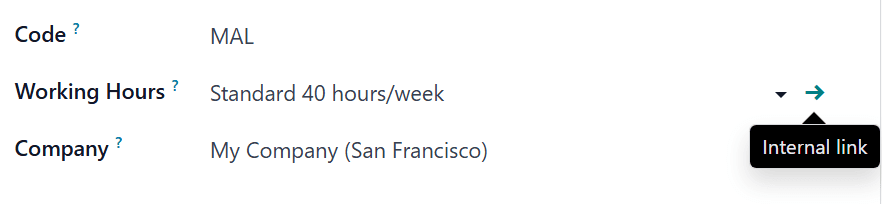
The working hours page displays the standard working hours for the work center. With developer mode activated, a Time Off smart button appears at the top of the page. Click it to open the Resource Time Off page.
On this page, click New to configure a new time-off entry. On the time-off form, note the Reason for the work center closure (e.g. broken equipment, maintenance, etc.), select the affected work center as the Resource, and choose a Start Date and End Date to specify the period during which the work center is unavailable.
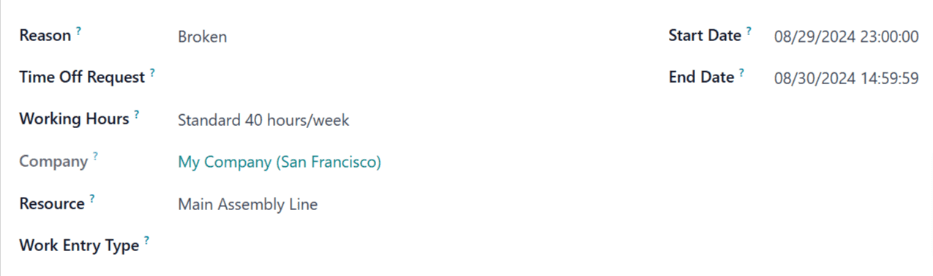
Alternative work center planning
Once a work center is within its specified time-off period, work orders sent to it can be automatically routed to an alternative work center using the Plan button.
Begin by creating a new manufacturing order (MO), by navigating to Manufacturing app ‣ Operations ‣ Manufacturing Orders ‣ New. On the MO form, specify a Product that uses the unavailable work center for one of its operations. Click Confirm to confirm the MO.
On the confirmed MO, select the Work Orders tab. By default, the unavailable work center is specified in the Work Center column. There is also a Plan button at the top left of the page.
Click Plan, and the work center listed in the Work Center column of the Work Orders tab is automatically changed to the alternative work center.
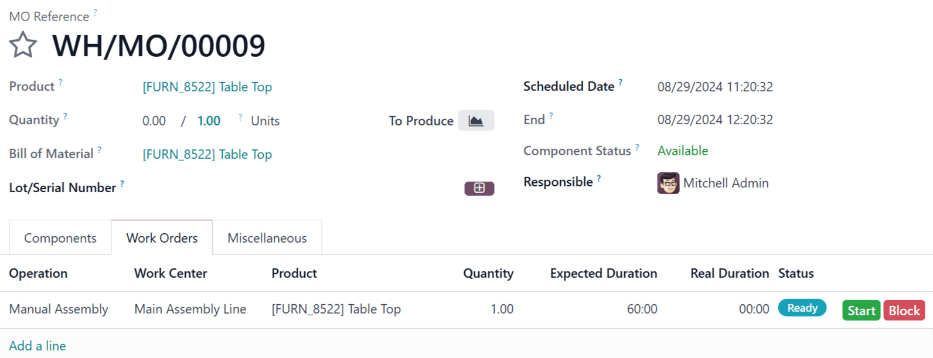
Before clicking Plan, the work order is scheduled at Main Assembly Line.
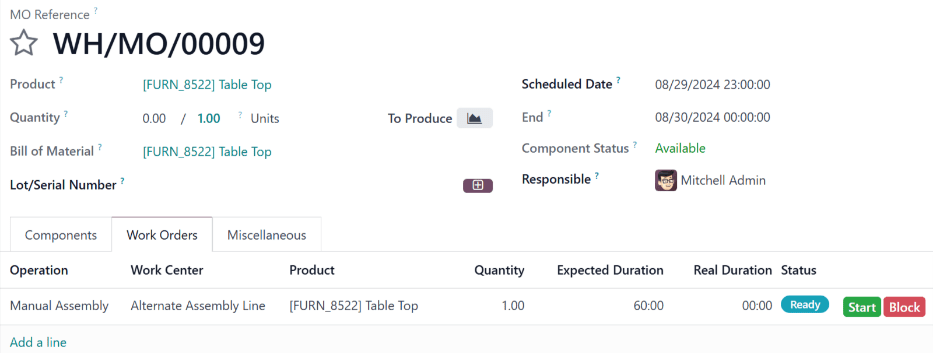
After clicking Plan, the work order is rescheduled at Alternative Assembly Line.
Once the time-off period for the unavailable work center ends, Odoo recognizes the work center is available again. At this point, clicking the Plan button does not route work orders to an alternative work center unless the first one is at capacity.
On this page
Get Help
Contact Support Ask the Odoo Community
![]()
- User Docs
- Database management
- Developer
- Contributing
EN
Odoo 18
Scrap during manufacturing
During the manufacturing process, the need to scrap manufacturing components or finished products may arise. This can be necessary if a component or product is damaged, or unusable for any other reason.
By default, scrapping a component or finished product removes it from physical inventory and places it in a virtual location titled Virtual Locations/Scrap. A virtual location is not a physical space, but rather a designation in Odoo that is used to track items that are no longer in physical inventory.
See also
For more information, see the documentation about the different types of locations.
Components can be scrapped from both the Manufacturing app and the Shop Floor module, before the associated manufacturing order (MO) is closed. Finished products can only be scrapped from the Manufacturing app, and only after closing the associated MO.
Tip
Scrap orders can be viewed by navigating to Inventory ‣ Operations ‣ Scrap. Each scrap order shows the date and time the order was created, along with the product and quantity that was scrapped.
To view the total quantity of each item scrapped, navigate to Inventory ‣ Configuration ‣ Locations, then remove the Internal filter from the Search… bar to display all virtual locations. From the list, select the Virtual Locations/Scrap location.
Scrap pop-up window
Scrapping components and finished products is done through the Scrap pop-up window. The pop-up window can be accessed from an MO in the backend, or the Shop Floor module.
Scrap component from Manufacturing
To scrap a component from an MO, begin by navigating to Manufacturing ‣ Operations ‣ Manufacturing Orders, and then select an MO. At the top of the MO, click the Scrap button to open the Scrap pop-up window.
Scrap finished product from Manufacturing
To scrap a finished product from an MO, begin by navigating to Manufacturing ‣ Operations ‣ Manufacturing Orders. Select an open MO, and then click the Produce All button to close it.
To select an MO that has already been closed, navigate to Manufacturing ‣ Operations ‣ Manufacturing Orders, remove the To Do filter from the Search… bar, and then select the desired MO.
Once closed, click the Scrap button at the top of the MO to open the Scrap pop-up window.
Scrap component from Shop Floor
To scrap a component from the Shop Floor module, begin by navigating to Shop Floor. Then, either click the ⋮ (three vertical dots) button on an MO card, or select a work center from the top navigation, and click the ⋮ (three vertical dots) button on a work order card.
Either method opens the What do you want to do? pop-up window. Click the Scrap button on the window to open the Scrap pop-up window.
Scrap pop-up window
After opening the scrap pop-up window using one of the methods detailed above, select the component or finished product being scrapped, from the Product drop-down menu.
In the Quantity field, enter the quantity being scrapped.
By default, the Source Location field is set to the warehouse’s pre-production location, while the Scrap Location field is set to the Virtual Locations/Scrap location. If either the source or scrap location should be changed, select a different location from their respective drop-down menus.
Enable the Replenish Scrapped Quantities checkbox if a picking order should be created to replace the scrapped component(s) upon confirmation of the scrap order. This option should only be enabled for warehouses with two-step or three-step manufacturing enabled, since components are not picked as part of the one-step manufacturing process.
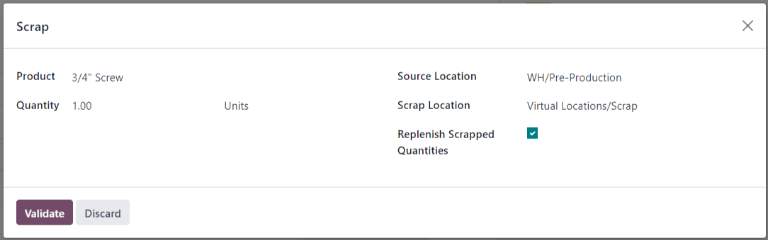
Click the Scrap button to scrap the selected component. After one or more scrap orders have been created, a Scraps smart button appears at the top of the screen. Click it to view a list of all scrap orders for the MO.
If a picking order was automatically created to replenish the scrapped components, it can be accessed by opening the Inventory app, clicking the # To Process button on the Pick Components card, and selecting the order.
On this page
Get Help
Contact Support Ask the Odoo Community
![]()
- User Docs
- Database management
- Developer
- Contributing
EN
Odoo 18
Manufacturing backorders
In some cases, the full quantity of a manufacturing order cannot be produced immediately. When this happens, Odoo Manufacturing allows for the manufacturing of partial quantities of the order and creates a backorder for the remaining amount.
In the Manufacturing app, creating a backorder splits the original manufacturing order into two orders. The reference tag for each order is the tag used for the original order, followed by a hyphen and then an additional number to indicate that it’s a backorder.
Example
A company creates a manufacturing order with the reference tag WH/MO/00175, for 10 units of Product X. After starting work on the manufacturing order, the employee working the production line realizes there are only enough components in stock to produce five units of the product.
Instead of waiting for additional stock of the components, they manufacture five units and create a backorder for the remaining five. This splits the manufacturing order into two separate orders: WH/MO/00175-001 and WH/MO/00175-002.
Order 001 contains the five units that have been manufactured, and is immediately marked as Done. Order 002 contains the five units that still need to be manufactured and is marked as In Progress. Once the remaining components are available, the employee returns to order 002 and manufactures the remaining units before closing the order.
Create a manufacturing backorder
To create a backorder for part of a manufacturing order, begin by navigating to Manufacturing ‣ Operations ‣ Manufacturing Orders. Select a manufacturing order with a quantity of two or more or create one by clicking Create.
If a new manufacturing order is created, select a product from the Product drop-down menu and enter a quantity of two or more in the Quantity field, then click Confirm to confirm the order.
After manufacturing the quantity that is being produced immediately, enter that number in the Quantity field at the top of the manufacturing order.
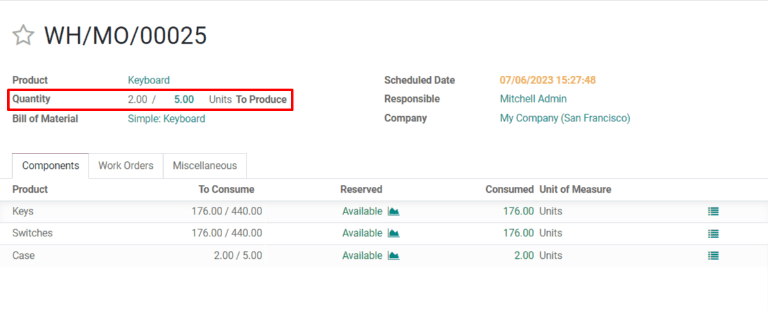
Next, click Validate, and a You produced less than initial demand pop-up window appears, from which a backorder can be created. Click Create Backorder to split the manufacturing order into two separate orders, with the reference tags WH/MO/XXXXX-001 and WH/MO/XXXXX-002.
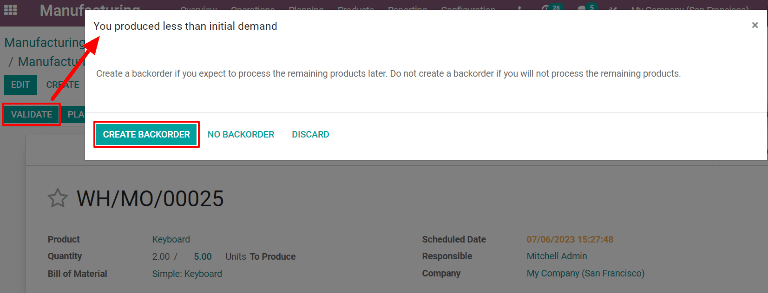
Order 001 contains the items that have been manufactured, and is closed immediately. Order 002 is the backorder that contains the items that have yet to be manufactured, and remains open, to be completed at a later date.
Once the remaining units can be manufactured, navigate to Manufacturing ‣ Operations ‣ Manufacturing Orders, and then select the backorder manufacturing order. If all of the remaining units are manufactured immediately, simply click Validate to close the order.
If only some of the remaining units are manufactured immediately, create another backorder for the remainder by following the steps detailed in this section.
Create a backorder in Shop Floor
Backorders for manufacturing orders can also be created from the Shop Floor module.
Note
In order to use the Shop Floor module, the Work Orders setting must be enabled. To do so, navigate to Manufacturing ‣ Configuration ‣ Settings, enable the Work Orders checkbox, and then click Save.
To create a backorder from the Shop Floor module, begin by navigating to Manufacturing ‣ Operations ‣ Manufacturing Orders. Select an MO for multiple units of a product, for which a backorder needs to be created.
On the MO, select the Work Orders tab, and then click the Open Work Order (external link icon) button on the line of the work order to be processed. On the resulting Work Orders pop-up window, click the Open Shop Floor button to open the Shop Floor module.
When accessed from a specific work order, the Shop Floor module opens to the page for the work center where the order is configured to be processed, and isolates the work order’s card so that no other cards are shown.
Complete the steps on the work order’s card until the Register Production step is reached, and then click on it to open the Register Production pop-up window.
Important
Do not click the # Units button on the right side of the step. Doing so automatically registers the full amount of units as having been produced.
On the Register Production pop-up window, enter the number of units produced in the Quantity field. Make sure the number entered is less than the number of units listed to the right of the field. Then, click Validate.
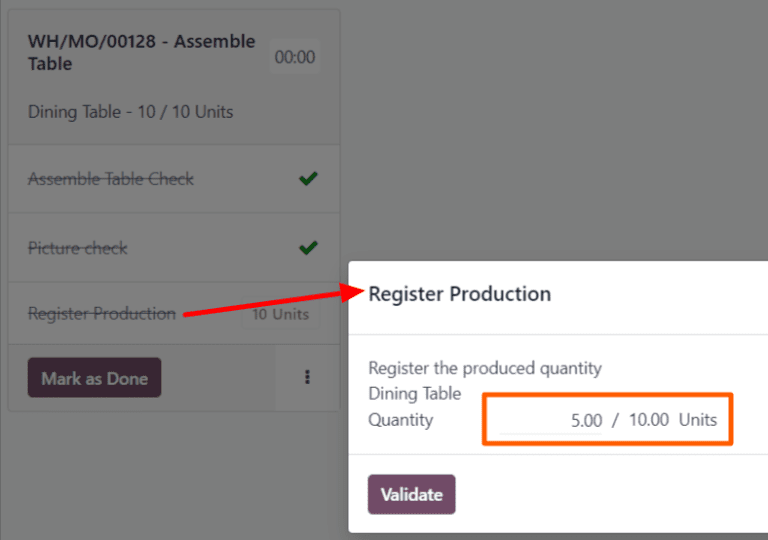
The pop-up window disappears and the # Units button on the work order’s card updates to reflect the number of units produced, as a fraction of the number of units for which the MO was originally created.
Next, click the Mark as Done button at the bottom-right of the work order’s card. The work order card begins to fade away. Once it disappears completely, a new work order card appears, titled with the original MO’s reference number with a -002 tag added to the end of it.
This new reference number represents the backorder MO. The original MO’s reference number now appears with a -001 tag added to the end of it to distinguish it from the backorder MO.
If the original MO has no remaining work orders, it can be closed by selecting the All filter in the top navigation of the Shop Floor module, and then clicking Close Production at the bottom of the MO’s card.
If the original MO has remaining work orders that must be completed before it can be closed, cards for these work orders appear on the Shop Floor pages for the work centers where they are configured to be carried out. They can be processed as normal, and additional backorders can be created from their work order cards using the instructions detailed in this section.
Once the current work order for the backorder MO is ready to be processed, this can also be completed as normal, and an additional backorder can be created from its work order card by following the instructions detailed in this section.
After the final work order for the backorder MO has been completed, the MO can be closed by clicking the Close Production button at the bottom of the work order’s card.
On this page
Get Help
Contact Support Ask the Odoo Community
![]()
- User Docs
- Database management
- Developer
- Contributing
EN
Odoo 18
Split and merge manufacturing orders
In Odoo Manufacturing, it is possible to create manufacturing orders for a single unit of an item, or multiple units of the same item. In some cases, it may be necessary to split a manufacturing order that contains multiple units into two or more orders, or to merge two or more orders into a single order.
Important
A manufacturing order can only contain one unit of a product, or multiple units of a single product that all use the same Bill of Materials (BoM). As a result, it is only possible to merge manufacturing orders when every order contains the same product being manufactured with the same BoM.
Split manufacturing orders
To split a manufacturing order into multiple orders, begin by navigating to Manufacturing ‣ Operations ‣ Manufacturing Orders, then select a manufacturing order. At the top of the page, next to the New button, the manufacturing order’s reference number appears with a ⚙️ (settings) button next to it.
Click the ⚙️ (settings) button to open the general settings for the manufacturing order, then select Split.
After selecting Split, a Split production pop-up window appears. In the Split # field, enter the number of manufacturing orders that the original order should be split into, then click outside of the field. A table appears below, with a line for each new manufacturing order that will be created by the split. In the Quantity To Produce column, enter the number of units that will be assigned to each new manufacturing order. Finally, click Split to split the manufacturing order.
After clicking Split, the original manufacturing order is split into the number of orders that was specified in the Split # field. The reference numbers for the new manufacturing orders are the reference number for the original order with -### tags added to the end.
Example
Manufacturing order WH/MO/00012 is split into three separate orders. The reference numbers for the new orders are WH/MO/00012-001, WH/MO/00012-002, and WH/MO/00012-003.
Merge manufacturing orders
To merge two or more manufacturing orders into a single order, begin by navigating to Manufacturing ‣ Operations ‣ Manufacturing Orders. Select the manufacturing orders that will be merged by activating the checkbox to the left of the name of each order.
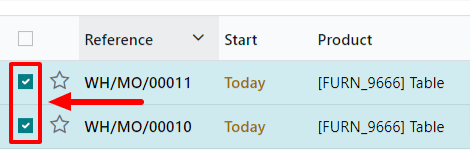
Once all manufacturing orders have been selected, click the Actions button at the top of the page, then select Merge from the drop-down menu.
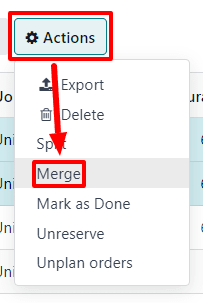
The selected manufacturing orders are merged into a single order. The reference number for the new manufacturing order is the next sequential number that has not already been assigned to an order.
Example
The last reference number used for a manufacturing order was WH/MO/00012. Two manufacturing orders, WH/MO/00008 and WH/MO/00009, are merged into a single order. The reference number for the manufacturing order created by the merger is WH/MO/00013.
In the Source field for the manufacturing order created by the merger, the reference numbers of the manufacturing orders that were merged are listed.
Example
Manufacturing orders WH/MO/00009 and WH/MO/00010 are merged to create WH/MO/00011. The source field for WH/MO/00011 lists both WH/MO/00009 and WH/MO/00010.
On this page
Get Help
Contact Support Ask the Odoo Community
![]()
- User Docs
- Database management
- Developer
- Contributing
EN
Odoo 18
Unbuild orders
In some cases, it is necessary to dismantle manufactured products into their individual components. This may be required if too many units of a product were built, or if the components of one product must be reclaimed to use in the manufacturing of another.
In Odoo Manufacturing, products can be dismantled, and their components returned to inventory, using unbuild orders. By using unbuild orders to accomplish this task, inventory counts for the finished product and its components remain accurate, based on the quantity of products dismantled, and the quantity of components reclaimed.
Create unbuild order
A new unbuild order can be created by navigating to Manufacturing app ‣ Operations ‣ Unbuild Orders, and clicking New.
Begin filling out the new unbuild order by selecting a Product to unbuild. After doing so, the Bill of Material field auto-populates with the corresponding bill of materials (BoM). If a different BoM should be used, click on the Bill of Material field, and select it from the drop-down menu.
Alternatively, a specific BoM can be selected in the Bill of Material field before selecting a product, which causes the corresponding product to auto-populate in the Product field.
Next, specify the Quantity of the product that is being unbuilt.
If the product being unbuilt was originally manufactured in a specific manufacturing order (MO), select it in the Manufacturing Order field.
In the Source Location field, select the location where the product being unbuilt is currently stored.
In the Destination Location field, select the location where the reclaimed components are stored after the unbuild order is completed.
If the Lots & Serial Numbers feature is enabled in the settings of the Inventory app, a Lot/Serial Number field appears on the unbuild order, which can be used to specify the lot(s) or serial number(s) of the product being unbuilt, if any are assigned.
If the Odoo database has been configured with multiple companies, a Company field appears on the unbuild order, which can be used to specify the company that owns the product being unbuilt.
Finally, once the product has been unbuilt, click the Unbuild button at the top of the order to confirm that it has been completed.
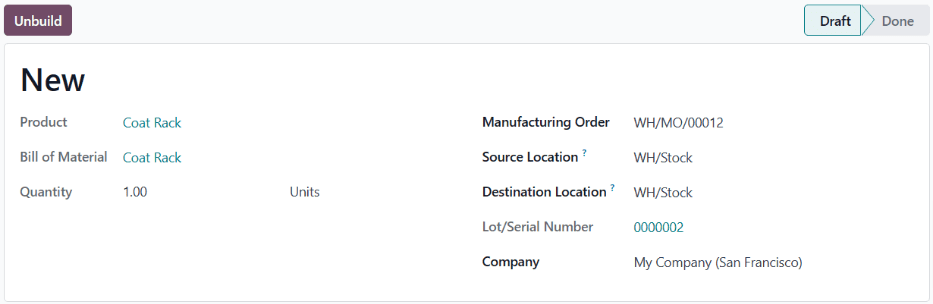
Warning
While it is possible to create unbuild orders for products that have zero (or fewer) units on-hand, this is not advised, since it can lead to inventory inconsistencies.
If an unbuild order is created for a product with zero (or fewer) units on-hand, a pop-up window appears, warning the user that there is an insufficient quantity to unbuild.
To ignore the warning, and proceed with the unbuild order, click Confirm at the bottom of the pop-up window. To return to the unconfirmed unbuild order, click Discard, instead.
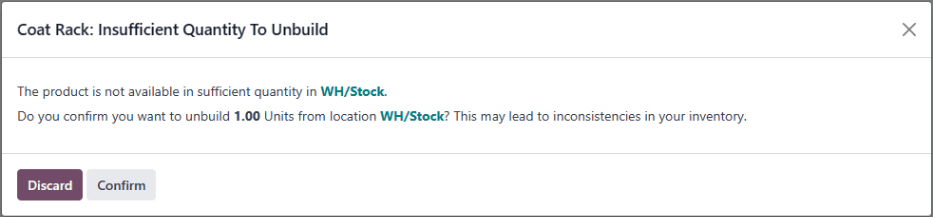
After completing an unbuild order, inventory counts automatically update, based on the quantity of products unbuilt, and the quantity of components reclaimed.
Example
A Coat Rack product is comprised of one Wooden Pole component and six Wooden Dowel components.
An unbuild order is created for one unit of the Coat Rack. Once the order is completed, the on-hand quantity of Coat Racks decreases by one, while the on-hand quantities of Wooden Poles and Wooden Dowels increase by one and six, respectively.
Scrap unusable components
In some cases, components may be unusable after the unbuilding process is completed. To ensure that inventory counts accurately reflect the quantity of usable components on-hand, any component that can no longer be used should be removed from inventory using a scrap order.
On this page
Get Help
Contact Support Ask the Odoo Community
![]()
- User Docs
- Database management
- Developer
- Contributing
EN
Odoo 18
By-Products
When manufacturing certain products, it is common to be left with residual materials, in addition to the finished product. These materials are known as by-products. By specifying the by-products created during manufacturing on a product’s bill of materials (BoM), the quantity of by-products on-hand is tracked by Odoo.
Example
Manufacturing a rocking chair requires ten pieces of wood. During production, five pieces of scrap wood are created, in addition to the rocking chair. By designating the scrap wood as a by-product on the rocking chair’s BoM, Odoo tracks the on-hand count of scrap wood, as well as the quantity of rocking chairs produced.
Configuration
To specify by-products on a product’s BoM, the By-Products setting must be enabled. To do so, navigate to Manufacturing app ‣ Configuration ‣ Settings, and tick the By-Products checkbox, located under the Operations heading. Then, click Save to apply the change.
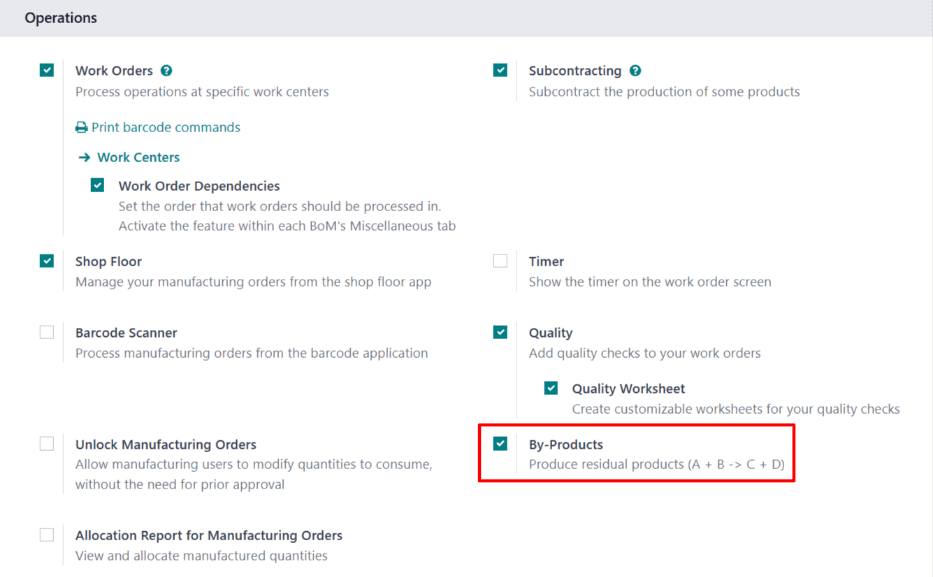
With the By-Products setting enabled, a By-products tab appears on product BoMs.
Add byproduct to BoM
To add by-products to a BoM, navigate to Manufacturing app ‣ Products ‣ Bills of Materials, and select a BoM.
On the BoM, select the By-products tab. Click Add a line, and select the by-product in the By-product drop-down field. In the Quantity field, enter the quantity of the by-product produced during manufacturing.
If the by-product is produced during a specific operation of a manufacturing order (MO), select the operation in the Produced in Operation field. For example, if a scrap wood by-product is produced during an Assemble operation, select that operation in the Produced in Operation field.
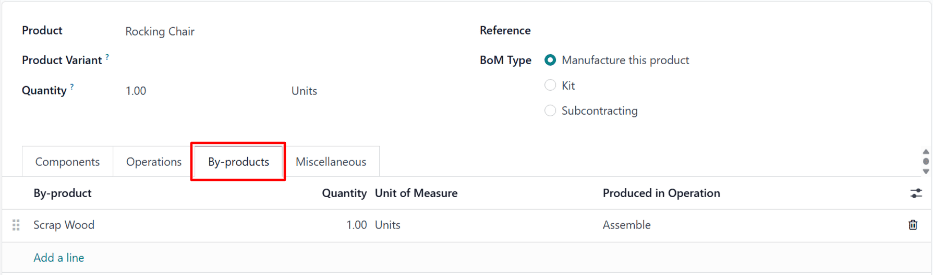
Manufacture by-product
When an MO is completed and marked as Done, Odoo registers the quantity of by-products created during the manufacturing process. To create a new MO, navigate to Manufacturing app ‣ Operations ‣ Manufacturing Orders, and click New.
In the Bill of Material field, select a BoM on which by-products have been specified. After doing so, the Product field auto-populates with the corresponding product. Click Confirm to confirm the MO.
When manufacturing is completed, click the Produce All button at the top of the MO. After doing so, inventory counts update to reflect the quantity of by-product(s) produced, as well as the quantity of the product.
Click the Product Moves smart button at the top of the MO page to see the movements of components and products. Each by-product is listed on the resulting Inventory Moves page, with the From column displaying the virtual production location, and the To column displaying the location where the by-product is stored.

On this page
Get Help
Contact Support Ask the Odoo Community
![]()
- User Docs
- Database management
- Developer
- Contributing
EN
Odoo 18
Continuous product improvement
Continuous improvement is a general philosophy intended to help individuals and organizations constantly improve themselves and the work they produce.
There are a variety of different methodologies that fall under the umbrella of continuous improvement. These include kaizen, six sigma, and lean, among others. While the specific steps of each method differ, their goal remains the same: implement a process by which improvement is a perpetual goal, rather than a one-time accomplishment.
The sections below contain details about how Odoo can be used to implement four general steps common to many of the most popular continuous improvement strategies, with links to documentation about configuring the necessary features. The final section details how a specific company might configure these Odoo implementations within their organization.
Important
Continuous improvement is not a one-size-fits-all methodology. While most strategies include between four and six steps, proper implementation requires developing a system tailored to the specific needs of each company.
This is not a limitation, but rather a benefit, as it makes the methodology flexible enough to adapt to almost any use case. Odoo, in particular, adapts well to this flexibility, as it can be configured to meet the needs of almost any workflow.
As such, it is important to remember the content below only provides examples of how Odoo might be used. They should be viewed as more of a starting point, rather than a concrete outline that every organization must follow.
Identify problems
Before improvement can begin, it is necessary to determine where improvement is necessary. This is where identifying problems comes into play. Two of the best Odoo apps for identifying problems with products or processes are Helpdesk and Quality.
Helpdesk
The Helpdesk app is useful for receiving feedback from outside of the organization, like from clients or customers. This is accomplished by implementing one (or more) of the methods for receiving tickets, including email aliases, live chat conversations, and website forms.
Using these methods, customers can submit feedback about problems, which is then reviewed by a member of a helpdesk team. Depending on the outcome of the review, the team member may decide to take further action to ensure the issue is addressed. This can include creating a quality alert.
Quality
The Quality app is useful for receiving feedback from within the organization, like from employees.
One method for accomplishing this is to set up a quality control point (QCP). A QCP is used to automatically create quality checks at regular intervals, prompting employees to inspect, and confirm, the quality of a product.
If an issue is found, an employee can then create a quality alert to notify a quality team. Quality alerts can also be created independent of a QCP, in the event that an employee discovers an issue without being prompted to check for one. This is a great way for customer support employees to notify a quality team of an issue brought to their attention by a customer ticket.
Suggest improvements
Once a problem is identified, the next step is to put forward ideas for how to address the problem. As with identifying problems, the Quality app is also useful for suggesting improvements. In addition, the PLM (Product Lifecycle Management) app can be used for this purpose, as well.
Quality
When creating a quality alert to bring an issue to the attention of a quality team, the Corrective Actions and Preventive Actions tabs can be used to provide feedback about how the issue can be addressed.
The Corrective Actions tab is used to suggest a method for fixing items affected by the issue. For example, Screw the bolts on tighter, so the seat stays in place.
The Preventive Actions tab is used to suggest a method for preventing the issue from occurring in the future. For example, Do not tighten the screws too much, or they will be stripped.
The quality team that reviews the alert sees these suggested actions, and can take them into account when deciding how to address the issue.
PLM
The PLM app is used to manage the lifecycle of a product from its introduction through each successive version. As such, it is useful for testing ideas for product improvements.
Using engineering change orders, product management teams can create new iterations of product BoMs, adding or removing specific components or operations, as needed. The products created using these BoMs are put through a review process to confirm the effectiveness of the changes.
Implement strategies
Implementing strategies involves putting the proposed solutions from the suggest improvements step into action. The PLM app continues to be useful during this step, as it can be configured to make BoM updates. The Field Service app can also be used by certain companies to make improvements to products that have already been sold to customers.
PLM
Once BoM changes have gone through the proper review process, they can be approved, and the updated BoM put into use. This is accomplished by configuring one of the ECO review stages to apply the changes made to the BoM, at which point the updated BoM becomes available for new MOs.
Product BoMs can continue to be updated, as needed. The version control features of the PLM app allow for easy management of all versions of a given BoM.
Field Service
The PLM app is a great way to make changes to product BoMs. However, these changes only affect products produced using the new BoM. If a defective product has already been sold to a customer, it may be necessary to repair (or update) that product.
In such a case, the Field Service app can be used to schedule onsite interventions. These interventions allow service technicians (or other employees) to be sent to a customer’s location to address an issue with a product.
Review actions
Reviewing actions is where the “continuous” part of continuous improvement comes into play, as it allows an organization to evaluate the decisions made in the previous steps. As such, this step is, essentially, returning to the beginning of the process, so that additional problems can be identified and addressed.
This means that the Helpdesk and Quality apps should be used again to receive customer and employee feedback. Another app that may be useful at this stage is the Surveys app.
Surveys
After implementing changes to a product or process, it may be wise to solicit customers for their feedback directly, rather than waiting to hear from them of their own volition. This may bring to light feedback that customers may have otherwise neglected to share.
One of the best ways to accomplish this is through the Surveys app. Creating a survey, and sending it to customers who receive an updated product, increases the likelihood of receiving relevant feedback about the product.
Example workflow: coat rack product improvement
Wood Hut is a manufacturer of fine wood products. They are committed to manufacturing products of the highest-possible quality, and are always looking for ways to improve the products they sell, along with the processes used to create them.
Wood Hut uses the Odoo platform to manage every element of their production, fulfillment, and customer satisfaction processes. They have developed a custom product improvement workflow that incorporates the Helpdesk, Quality, PLM, and Manufacturing apps.
One of Wood Hut’s most popular products is their coat rack. It’s made entirely of oak, and customers describe it as “sleek and elegant.” However, recent customer feedback about the coat rack has brought attention to quality issues that necessitate revising the current manufacturing process.
The product revision workflow begins when the customer service team receives a ticket in the Helpdesk app from a customer having problems with the coat rack she purchased. The customer, Abigail Peterson, has found that her coat rack falls over when more than five coats are hanging from it. This is a major issue, as the coat rack has enough dowels for six coats.
Marc, the customer service employee assigned to the helpdesk ticket, opens the Quality app, and creates a new quality alert. He tags the Production Quality Team and assigns Julie Andreson as the quality employee responsible for the alert.
Julie reviews the alert, and consults with her team about the best course of action. They decide that it is necessary to revise the product’s BoM to prevent the issue from occurring in the future, which Julie notes in the Corrective Actions tab of the quality alert.
Then, Julie messages product engineer, Joe Kazan in the chatter of the quality alert to bring it to his attention. Joe opens the PLM app and creates a new ECO, noting the problem with the coat rack, and suggesting that a change to the product’s BoM may be necessary.
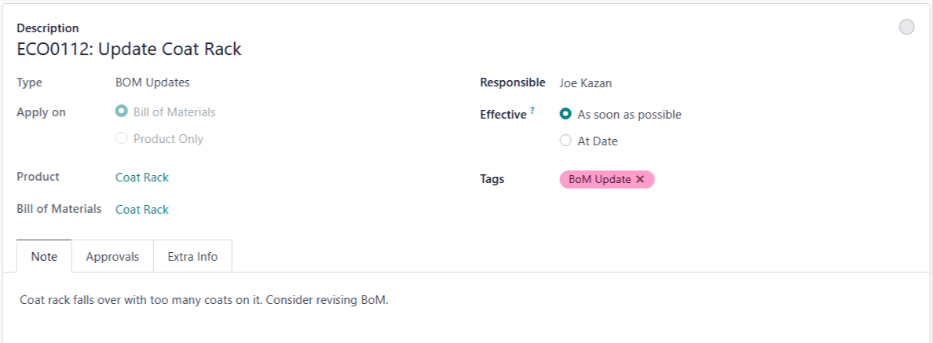
Joe clicks Start Revision, and then the Revision smart button to open version two of the coat rack’s BoM. This BoM was created alongside the ECO, and remains archived until it is approved.
After some testing, Joe discovers that adding a metal support rod to the coat rack strengthens it, allowing the rack to hold six or more coats without falling over. He updates the BoM to include the support rod as one of the components, and adds an extra operation to make sure it is installed during the manufacturing process. Finally, he leaves a message in the chatter of the ECO, letting his manager, Jose, know that it is ready for review.
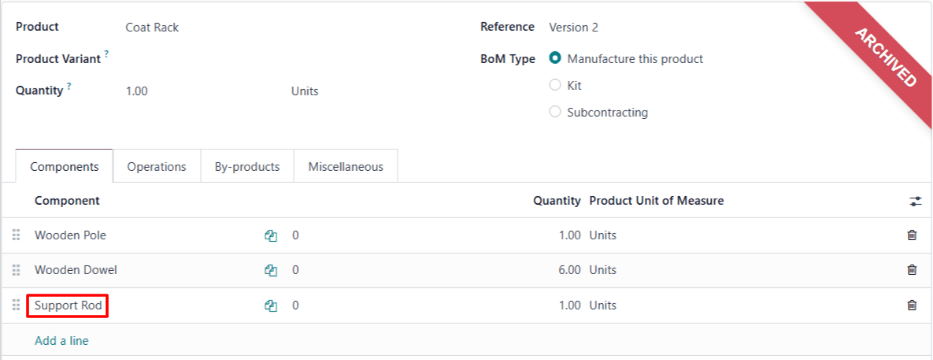
Jose reviews the changes, and confirms they are an effective method for addressing the problem with the coat rack. He moves the ECO to the Approved stage, which makes version two of the coat rack BoM the current version.
Now, each time an MO is created to produce a coat rack, the updated BoM is automatically selected. Wood Hut begins producing the improved coat rack, and customer feedback confirms that the new version has addressed the problem with its predecessor.
Using the Odoo platform, Wood Hut has implemented an end-to-end product improvement process. Since the essential elements of this process (customer feedback, quality control, etc.) are always functioning, it can be reused to continuously update products and processes.
On this page
Get Help
Contact Support Ask the Odoo Community
![]()
- User Docs
- Database management
- Developer
- Contributing
EN
Odoo 18
Manufacture with lots and serial numbers
In Odoo, lot numbers and serial numbers are used to identify and track products in Odoo. Serial numbers are used to assign unique numbers to individual products, while lot numbers are used to assign a single number to multiple units of a specific product.
When manufacturing products tracked using lots or serial numbers, Odoo requires the lot or serial number to be assigned to each product before manufacturing can be completed. This ensures that each product is properly tracked from the moment it enters inventory.
Configure products for tracking
By default, Odoo tracks the quantity of each product on hand, but does not track individual units of a product. Lot or serial number tracking must be enabled for each product individually.
To track a product using lots or serial numbers, begin by navigating to Inventory ‣ Configuration ‣ Settings, then scroll down to the Traceability section, and tick the Lots & Serial Numbers checkbox. Finally, click Save to save the change.
Next, click on Products ‣ Products, and select a product to track. Make sure the Track Inventory checkbox is ticked in the General Information tab. Since lot and serial number functionality is enabled, a drop-down menu appears next to the ticked checkbox.
Click on the Track Inventory drop-down menu. By default, By Quantity is selected, which only tracks the quantity on hand. Select By Lots to track the product using lot numbers, or By Unique Serial Number to track the product using serial numbers.
See also
Lot number manufacturing
To manufacture a product tracked with lots, begin by navigating to Manufacturing ‣ Operations ‣ Manufacturing Orders. Click New to create a new manufacturing order (MO).
In the Product field, select a product tracked using lots, and enter the desired Quantity. Click Confirm to confirm the MO.
Once the MO is confirmed, a Lot/Serial Number field appears in the top section of the MO form. By default, this field is empty.
To populate the Lot/Serial Number field with a lot number, click the (plus) icon to the right of the field. Doing so automatically generates a lot, using the next available number, and enters it in the field.
Alternatively, click on the Lot/Serial Number field and select an existing lot number, or manually enter a new lot number and click Create “#” in the drop-down menu.

Either of these methods assign the product(s) in the MO a lot number before production is finished. It is also possible to complete production and close the MO by clicking Produce All, without assigning a lot number. Doing so automatically generates and assigns a lot, using the next available number.
Serial number manufacturing
To manufacture a product tracked with serial numbers, begin by navigating to Manufacturing ‣ Operations ‣ Manufacturing Orders. Click New to create a new MO.
In the Product field, select a product tracked using serial numbers, and enter the desired Quantity. Click Confirm to confirm the MO.
Once the MO is confirmed, a Lot/Serial Number field appears in the top section of the MO form. By default, this field is empty.
The rest of the manufacturing process depends on how many units the MO contains.
Manufacture single unit
If a single unit of the product is being manufactured, clicking Produce All closes the MO, and automatically generates and assigns the next available serial number, which appears in the Lot/Serial Number field.
To assign a serial number without closing the MO, enter a number manually in the Lot/Serial Number field, and click Create “#”, or click the (plus) icon to the right of the field to auto-fill it with the next available number.
Manufacture multiple units
Important
When manufacturing a product tracked using serial numbers, an MO can be created for multiple units. However, when serial numbers are assigned to each unit, either at the end of production or before, the MO is split into multiple MOs, each containing one unit of the product.
Each of the split MOs is identified by a numerical tag added to the end of the original MO number.
Example
MO WH/MO/00109 contains two units of a Chair, a product tracked using serial numbers. A serial number is assigned to each unit of the chair. This causes the MO to be split into two MOs, each containing one unit of the chair. The MOs are titled WH/MO/00109-001 and WH/MO/00109-002.
To assign serial numbers to each unit of an MO, click Produce All to open the Batch Production pop-up window.
The First Lot/SN field of the pop-up window is auto-filled with the next available serial number. The Number of SN field defaults to the number of units being manufactured. The values of either field can be changed manually.
Click Generate to generate the specified number of serial numbers, beginning with the number entered in the First Lot/SN field. The serial numbers are displayed in the text box at the bottom of the pop-up window, and can be manually changed after generation.
To assign serial numbers without completing production, click the Prepare MO button. Doing so splits the MO into individual MOs, one for each unit in the original MO. Each MO is left open, and can be closed individually.
To assign serial numbers and complete production, click the Produce button. Doing so splits the MO into individual MOs, one for each unit in the original MO. All of the MOs are closed, since production is complete.

After clicking Prepare MO or Produce, the Manufacturing app automatically shows the first of the split MOs (ex. WH/MO/00109-001). To view and access the rest the split MOs, click the Backorders smart button at the top of the screen.
On this page
Get Help
Contact Support Ask the Odoo Community
![]()
- User Docs
- Database management
- Developer
- Contributing
EN
Odoo 18
Shop Floor overview
The Shop Floor module is a companion module to the Manufacturing app. Shop Floor provides a visual interface for processing manufacturing orders (MOs) and work orders. It also allows manufacturing employees to track the amount of time spent working on manufacturing and work orders.
The Shop Floor module is installed alongside the Manufacturing app. It cannot be installed by itself. To install the Manufacturing app, navigate to Apps, search for manufacturing in the Search… bar, and then click Install on the Manufacturing app card.
Important
The Shop Floor module replaces the tablet view functionality of the Manufacturing app, and is only available in Odoo versions 16.4 and later.
To check the version number of an Odoo database, navigate to Settings and scroll down to the About section at the bottom of the page. The version number is displayed there.
To switch to a newer version of Odoo, see the documentation on upgrading a database.
Navigation
Shop Floor is broken down into three main views, which can be selected from the navigation bar at the top of the module:
- The All page serves as the main dashboard for the module, and displays information cards for MOs.
- Each work center also has a dedicated page, which shows information cards for work orders assigned to that work center. Work center pages can be toggled on or off by clicking the + (plus) button in the navigation bar, selecting or deselecting them on the pop-up window that appears, and then clicking Confirm.
- The My page shows information cards for all work orders assigned to the employee whose profile is currently active in the operator panel on the left side of the module. Other than only showing work orders assigned to the active employee, this page functions the same as the pages for each work center.
Tip
To isolate an MO or work order, so that no other orders appear, simply search the reference number of the MO in the Search… bar at the top of the module. This search filter remains active while switching between the different module views.
On the left side of the module is the operator panel, which shows all of the employees currently signed in to Shop Floor, and allows new employees to sign in. The operator panel is always available in the module, regardless of which view is selected. It can be toggled on or off by clicking the sidebar button at the extreme left of the navigation bar.
All page
By default, the All page shows an information card for every MO that is ready to start. An MO is considered ready to start once it has been confirmed, and all required components are available.
To view every confirmed MO regardless of readiness, click the x button on the Ready to Start filter to remove it from the Search… bar.
MO information card
An MO information card on the All page shows all of the relevant details of the associated MO, and also provides employees with options for processing the MO.
The header for an MO card shows the MO number, the product and number of units being produced, and the status of the MO. If work has not yet begun on the MO, the status appears as Confirmed. Once work has begun, the status updates to In Progress. If all work orders for an MO have been completed and the MO is ready to close, the status updates to To Close.
The main body of an MO card shows a line for each completed work order, if any, followed by the current work order that needs to be completed. Completed work orders are indicated by a green check mark to the right of title of the work order. The current work order is indicated by a button that opens the page for the work center to which the order is assigned.
Below the current work order is a line titled Register Production, which is used to record the number of product units produced. To manually enter the number of units produced, click on the Register Production line, enter a value in the Units field of the resulting pop-up window, then click Validate.
Alternatively, click the # Units button on the right side of the line, which automatically records the number of units the MO was created for as the number of units produced. For example, if an MO is created for 10 units of a dining table, clicking the 10 units button records that 10 units were produced.
The footer of the MO card displays a Close Production button. This is used to close the MO once production is completed. However, if there are any quality checks required for the MO as a whole (not the work orders within it), a Quality Checks button appears instead. Clicking Quality Checks opens a pop-up window, from which any required quality checks can be completed.
After clicking Close Production, the MO card begins to fade away, and an Undo button appears on the footer. Clicking Undo causes the MO to remain open. Once the MO card disappears completely, the work order is closed.
On the right side of the footer is an ⋮ (options) button, which opens a pop-up window with additional options for the MO:
- Scrap is used to send components to a scrap location when they are found to be defective.
- Add Work Order is used to add an additional work order to the MO.
- Add Component is used to add an additional component to the MO.
- Open Backend MO opens the MO in the Manufacturing app.
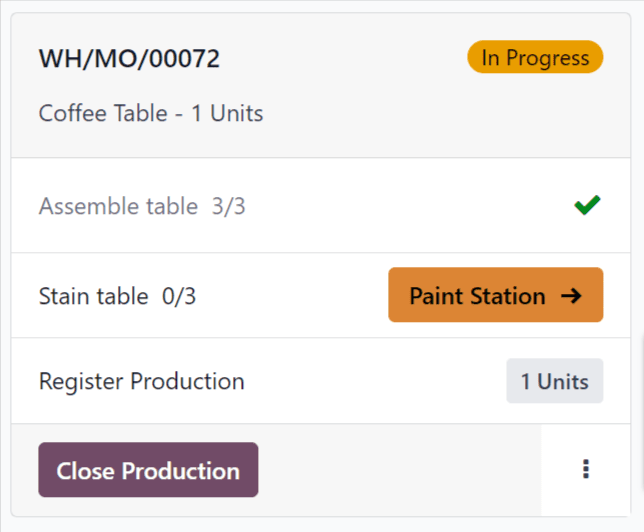
Work center pages
By default, the page for each work center shows an information card for every work order assigned to it that is ready to start. A work order is considered ready to start once the MO it is a part of is ready to start, and any preceding work orders have been completed.
To view every confirmed work order assigned to a work center regardless of readiness, click the x button on the Ready to Start filter to remove it from the Search… bar.
Work order information card
A work order information card on a work center’s page shows all of the relevant details of the associated work order, and also provides employees with options for processing the work order.
The header for a work order card shows the reference number of the MO that the work order is a part of, the product and number of units being produced, and the status of the work order. If work has not yet begun on the work order, the status appears as To Do. Once work has begun, the status updates to display a timer showing the total time the work order has been worked on.
The main body of a work order card shows a line for each step required to complete the work order. Work order steps can be completed by clicking on the line, then following the instructions on the pop-up window that appears. Alternatively, clicking the checkbox on the right side of each line automatically marks the step as completed.
Below the final step of the work order is a line titled Register Production, which functions the same as the Register Production line on an MO card. Registering the number of units produced using the Register Production line on a work order card also completes the step for the associated MO card.
If the work order being processed is the final work order for the MO, a Close Production button appears on the footer of the work order card. Clicking Close Production closes both the work order and the MO, unless a quality check is required for the MO. In this case, the quality check must be completed from the MO card before the MO can be closed.
Alternatively, if the MO requires the completion of additional work orders, a Mark as Done button appears instead. Clicking Mark as Done marks the current work order as completed, and causes the next work order to appear on the page for the work center it is assigned to.
After clicking Close Production or Mark as Done, the work order card begins to fade away, and an Undo button appears on the footer. Clicking Undo causes the work order to remain open. Once the work order card disappears completely, the work order is marked as Finished on the MO.
On the right side of the footer is an ⋮ (options) button, which opens a pop-up window with additional options for the work order:
- Scrap is used to send components to a scrap location when they are found to be defective.
- Add Component is used to add an additional component to the MO.
- Move to work center is used to transfer the work order to a different work center.
- Suggest a Worksheet improvement allows the user to propose a change to the work order’s instructions or steps.
- Create a Quality Alert opens a quality alert form that can be filled out to alert a quality team about a potential issue.
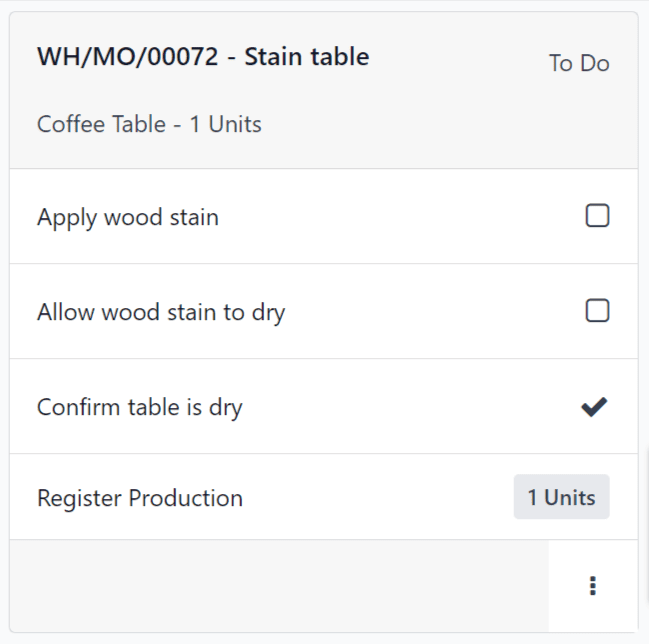
Operator panel
The operator panel is used to manage the employees that are signed in to the Shop Floor module. The panel shows the name and profile picture of every employee that is currently signed in across all instances of the database.
To interact with Shop Floor as a specific employee, click the employee’s name to activate their profile. Profiles that are not active appear with their names and profile pictures greyed-out.
When an employee is selected in the operator panel, they can begin working on a work order by clicking the work order’s heading. If an employee is working on one or more work orders, the work order title(s) appear under their name, along with a timer showing how long they’ve been working on each order.
To add a new employee to the operator panel, click the + Add Operator button at the bottom of the panel. Then, select an employee from the Select Employee pop-up window.
To remove an employee from the operator panel, simply click the x button next to their name in the panel.
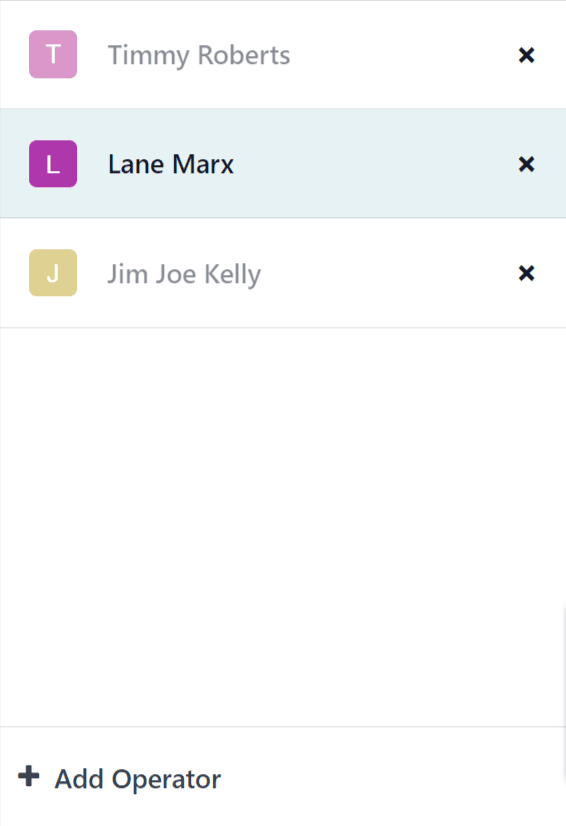
MO/WO prioritization
The Shop Floor module uses the scheduled date entered on MOs to prioritize the MOs and work orders that appear on the module’s dashboard and work center pages. MOs and work orders scheduled sooner are more highly prioritized, and appear before orders which are scheduled further out.
To specify the scheduled date on an MO, begin by navigating to Manufacturing app ‣ Operations ‣ Manufacturing Orders, and click New to create a new MO.
Click on the Scheduled Date field to open a calendar popover window. By default, the Scheduled Date field, and its corresponding pop-up window, show the current date and time.
Use the calendar to select the date on which processing should begin for the MO. In the two fields at the bottom of the popover window, enter the hour and minute at which processing should begin, using the 24-hour clock format.
Finally, click Apply at the bottom of the popover window to set the date and time for the Scheduled Date field. Then, click the Confirm button at the top of the MO to confirm it.
Once the MO is confirmed, it appears in the Shop Floor module, as long is it has the Ready status, which means all components are available.
On the Odoo dashboard, click on the Shop Floor module to open it. The All MO # page of the dashboard displays Ready MOs, organized in order of their scheduled dates.
At the top of the module, select a work center to see the work orders assigned to it. The page for each work center organizes work orders, based on the scheduled dates of their corresponding MOs.
Example
Three MOs are confirmed for a Bookcase product:
- WH/MO/00411 has a Scheduled Date of August 16th.
- WH/MO/00412 has a Scheduled Date of August 20th.
- WH/MO/00413 has a Scheduled Date of August 18th.
On the All MO # page of the Shop Floor module, the cards for each MO appear in this order: WH/MO/00411, WH/MO/00413, WH/MO/00412.

Each MO requires one work order, carried out at Assembly Station 1. Clicking on the Assembly Station 1 button at the top of the screen opens the page for the work center, which displays one card for each work order, appearing in the same order as their corresponding MOs.
On this page
Get Help
Contact Support Ask the Odoo Community
![]()
- User Docs
- Database management
- Developer
- Contributing
EN
Odoo 18
Shop Floor time tracking
By signing in to the Odoo Shop Floor module as operators, employees are able to track the amount of time they spend working on each work order.
Odoo tracks the time it takes to complete each work order, as well as the time each operator spends on each work order.
Operator sign in
To sign in to the Shop Floor module as an operator, sign in to the Odoo database, and open the Shop Floor module. The employee profile that is signed in to the database is automatically signed in as an operator.
All active operators are listed in the operator panel on the left side of the module. The panel can be opened or collapsed by clicking the show/hide panel (white square with black column on left side) button, located in the top-left corner of the module.
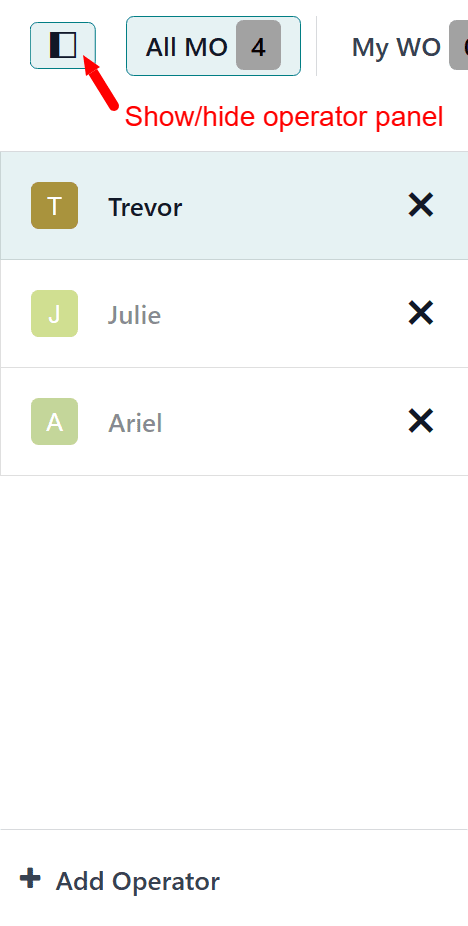
To sign in to Shop Floor as a different employee, click the + Add Operator button at the bottom of the panel. Doing so opens the Select Employee pop-up window, which lists every employee that is able to sign in to the module.
Click on a specific employee to sign in using their profile. If no PIN code is required to sign in as that employee, the profile will be signed in automatically.
If a PIN code is required, a Password? pop-up window appears, showing a number pad, from which the code can be entered. Enter the code using the number pad, and click Confirm to sign in to the Shop Floor module.
Note
A PIN code can be set for each employee, which must be entered each time they sign in to the Shop Floor module, check in or out in the Kiosk Mode of the Attendances application, or sign in as a cashier in the Point of Sale application.
To set an employee PIN, navigate to the Employees app, and select a specific employee. At the bottom of the employee’s form, click on the HR Settings tab, and enter a numerical code in the PIN Code field.
Once an employee is signed in to the module, their name appears in the operator panel, along with every other employee that has signed in. While the panel can list multiple employees, only one employee can be active at any given time, on a single instance of the Shop Floor module.
Click on an employee’s name to make their profile active. The active employee appears highlighted in blue, while employees that are signed in, but not active, have their names faded out.
To sign out a specific employee from the module, click the X (remove) button next to their name, in the operator panel.
Track work order duration
To track time spent working on a work order, begin by selecting the employee working on it from the operator panel.
Next, navigate to the page for the work center where the work order is scheduled to be carried out. This can be done by selecting the work center from the top navigation in the Shop Floor module, or by clicking the name of the work center on the card for the manufacturing order (MO) that the work order is a part of.
On the page for the work center, find the card for the work order. Once work begins, click the header of the work order card to start timing the duration it takes to complete. This duration is displayed by a timer on the header of the work order card, which tracks the collective time spent working on the work order, by all employees.
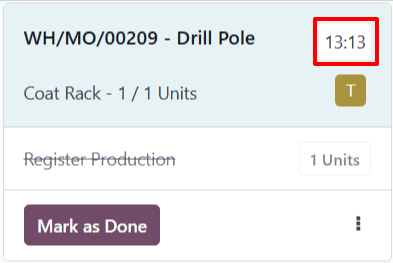
In addition, the reference number of the work order appears in the operator panel, under the name of the employee working on it, along with a second timer, which tracks the amount of time the employee has spent on the work order individually. This timer only reflects work done during the current session, even if the employee has previously worked on the work order.
Employees are able to work on multiple work orders simultaneously, and track their time for each. The reference number for each work order being worked on appears below the employee’s name, along with a timer.
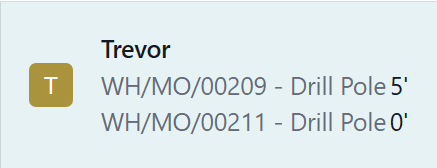
To pause the timer on the work order card, and remove the work order from below the employee’s name on the operator panel, click the header a second time.
Once the work order is completed, click the Mark as Done button at the bottom of the work order card, which causes the card to fade away. If the timer is still active, it stops once the card disappears completely.
View work order duration
To view the duration of a work order, navigate to Manufacturing app ‣ Operations ‣ Manufacturing Orders, and select an MO.
To view and select MOs that have been completed and marked as Done, remove the To Do filter from the Search… bar, by clicking on the X (close) button on the right side of the filter.
On the page for the MO, click on the Work Orders tab to see a list of all work orders included in the MO. The time it took to complete each work order is displayed in the Real Duration column of the tab.
The Real Duration represents the total time spent working on the work order by all workers who worked on it. It includes time tracked in the Shop Floor module, as well as time tracked on the Work Orders tab of the MO itself.
On this page
Get Help
Contact Support Ask the Odoo Community
![]()
- User Docs
- Database management
- Developer
- Contributing
EN
Odoo 18
Subcontracting
In manufacturing, subcontracting is the process of a company engaging a third-party manufacturer, or subcontractor, to manufacture products that are then sold by the contracting company.
Subcontracting provides a variety of benefits for both the contracting company and the subcontractor.
For the contracting company, subcontracting allows them to sell a wide variety of manufactured products, without having to worry about investing in and maintaining the equipment and labor required to handle the manufacturing themselves.
This helps contracting companies stay flexible throughout economic cycles, as they can easily increase or decrease their engagements with subcontractors, as necessitated by the current moment. It also means they are able to focus on tasks they excel at, while delegating more specialized work to subcontractors.
On the other side of the relationship, subcontracting allows subcontractors to specialize in more niche areas of production, which might not be as profitable outside the bounds of a subcontracting engagement. In certain arrangements, it also provides them with the flexibility to choose which projects they accept or decline, and how many they work on at any given time.
In Odoo, companies can configure their subcontracting workflows based on a variety of different factors, including how components are sourced, and what happens to finished products once they are manufactured.
Basic subcontracting
Subcontract products without supplying the subcontractor with components.Resupply subcontractor
Ship components to a subcontractor each time a PO for a subcontracted product is confirmed.Dropship to subcontractor
Dropship components to a subcontractor each time a PO for a subcontracted product is confirmed.Configuration
To enable subcontracting in Odoo, navigate to Manufacturing app ‣ Configuration ‣ Settings, and tick the checkbox next to the Subcontracting setting, under the Operations heading. Then, click Save.
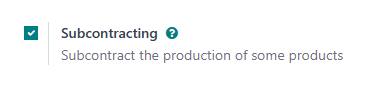
With subcontracting enabled, a few different features become available in Odoo:
- On bills of materials (BoMs), the BoM Type field now includes a Subcontracting option. Enabling the Subcontracting BoM type designates the BoM’s product as a subcontracted product, which means Odoo knows that it is produced by a subcontractor, and not by the company that owns the Odoo database.
- Two subcontracting routes become available in the Inventory app, and can be assigned to specific products, on the Inventory tab of their product pages:
- Resupply Subcontractor on Order
- Dropship Subcontractor on Order
Subcontracting workflows
In Odoo, there are three subcontracting workflows, the main difference between them being how the subcontractor obtains the necessary components:
- In the basic subcontracting workflow, the subcontractor is fully responsible for obtaining the components. This workflow is outlined in the Basic subcontracting documentation.
- In the Resupply Subcontractor on Order workflow, the contracting company sends the components from their warehouse to the subcontractor. This workflow is outlined in the Resupply subcontractor documentation.
- In the Dropship Subcontractor on Order workflow, the contracting company purchases the components from a vendor, and has them delivered directly to the subcontractor. This workflow is outlined in the Dropship to subcontractor documentation.
In addition to how a subcontractor obtains components, it is also necessary to consider why a product is being subcontracted, as well as what happens to products once they are manufactured by the subcontractor.
In terms of why a product is being subcontracted, the two main reasons are to fulfill a customer order, or to replenish the quantity of stock on-hand.
In terms of what happens to products once they are manufactured, they can either be shipped to the contracting company, or dropshipped directly to an end customer.
Each of the three subcontracting workflows described above can be configured to facilitate any of these possibilities, and the methods for doing so are outlined in their respective documentation.
Subcontracted product valuation
The valuation of a subcontracted product depends upon a few different variables:
- The cost of the required components, if provided by the contracting company; from here on referred to as C.
- The price paid to the subcontractor for the service of manufacturing the subcontracted product; from here on referred to as M.
- The cost of shipping components to the subcontractor, and having them shipped back to the contracting company; from here on referred to as S.
- The cost of dropshipping, if the components are shipped by the subcontractor to the end customer; from here on referred to as D.
- Any other associated costs, like import taxes, etc.; from here on referred to as x.
Therefore, the total valuation of a subcontracted product (P) can be represented by the following equation:
P=C+M+S+D+x
It is important to note that not every subcontracted product valuation will include all of these variables. For example, if the product is not dropshipped to the end customer, then there is no need to factor in the cost of dropshipping.
On this page
Get Help
Contact Support Ask the Odoo Community
![]()
- User Docs
- Database management
- Developer
- Contributing
EN
Odoo 18
Basic subcontracting lead times
In Odoo, lead times are used to predict how long it takes to complete a certain action. For example, a delivery lead time can be set for a purchased product, which specifies the number of days it usually takes for the product’s vendor to delivery the product to the purchasing company.
For subcontracted products specifically, delivery lead times can be configured to take into account the amount of time required for the subcontractor to manufacture a product. Doing so allows the contracting company to better predict the delivery dates of subcontracted products.
Important
Like all lead times in Odoo, lead times for subcontracted products are only an estimate, and are based on how long actions are expected to take.
Unforeseen circumstances can impact the completion of these actions, which means that lead times should not be viewed as guarantees.
Configuration
When using the basic subcontracting workflow to manufacture a product, a company is not responsible for supplying the subcontractor with the necessary components. This means that the only factors affecting the delivery date of a product are the amount of time it takes the subcontractor to manufacture and deliver it.
By assigning a product’s subcontractor a delivery lead time that considers both of these factors, the Expected Arrival date displayed on purchase orders (POs) for the product more accurately reflects the amount of time required for both manufacturing and delivery.
Product delivery lead time
To set a delivery lead time for a product’s subcontractor, navigate to Inventory app ‣ Products ‣ Products, and select a subcontracted product.
Then, select the Purchase tab on the product’s page. If the subcontractor has not already been added as a vendor, do so now by clicking Add a line, and selecting the subcontractor in the Vendor column.
Once the subcontractor has been added, enter the number of days it takes them to manufacture and deliver the product, in the Delivery Lead Time column.
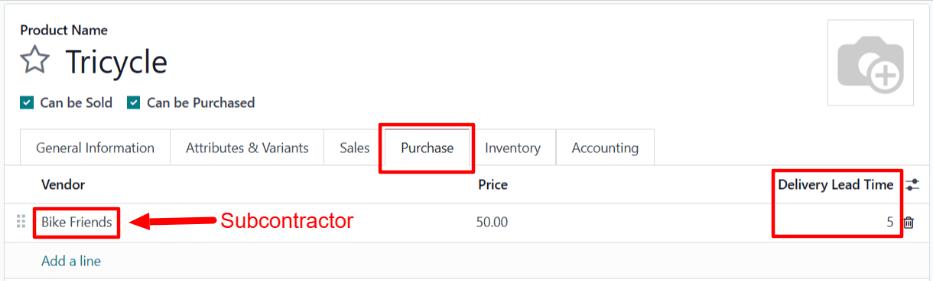
Note
Multiple subcontractors can be added to the Purchase tab on a product’s page, and a different Delivery Lead Time can be set for each.
Lead time workflow
After setting a delivery lead time for a product’s vendor, create an RfQ by navigating to Purchase app ‣ Orders ‣ Purchase Orders, and clicking New.
Specify the subcontractor in the Vendor field. Then, add the product in the Products tab by clicking Add a product, selecting the product in the Product column, and adding a quantity in the Quantity column.
Once a product has been added, the Expected Arrival field on the RfQ auto-populates with a date that reflects the vendor’s delivery lead time, as specified on the product’s page.
If the date needs to be adjusted, click on the Expected Arrival field to open a calendar popover, and select the desired date. Make sure not to choose a date sooner than the one that was auto-populated, unless the subcontractor has confirmed that they are able to deliver the product by that date.
Finally, click Confirm Order on the RfQ to turn it into a PO. At this point, the subcontractor should begin manufacturing the subcontracted product, before delivering it to the contracting company.
Example
Bike retailer Mike’s Bikes works with a subcontractor — Bike Friends — to produce units of their Tricycle product.
On average, Bike Friends requires three days to manufacture a tricycle, plus an additional two days to deliver it to Mike’s Bikes.
As a result, Mike’s Bikes sets a delivery lead time of five days for tricycles manufactured by Bike Friends: three days for manufacturing, plus two days for delivery.
On May 3rd, Mike’s Bikes confirms a PO to purchase one tricycle from Bike Friends.
The Expected Arrival date listed on the PO is May 8th, five days after the Confirmation Date.
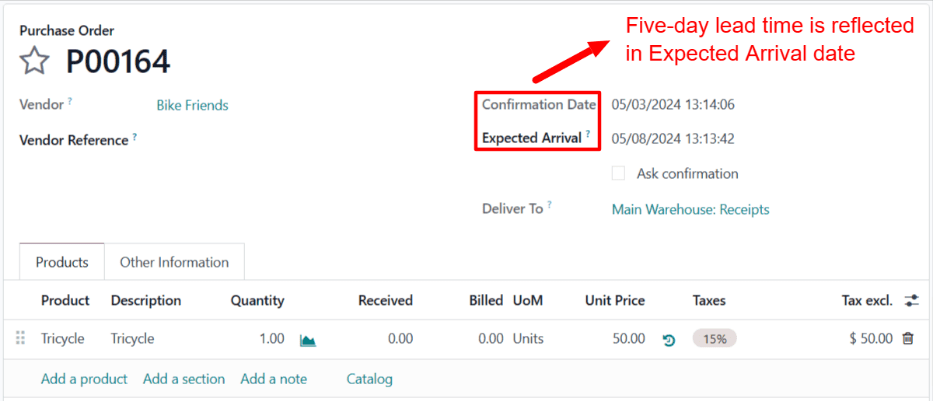
Bike Friends begins manufacturing the tricycle on May 3rd — the day that the PO is confirmed — and finishes on May 6th, three days later.
The tricycle is then shipped to Mike’s Bikes the same day, and they receive it on May 8th, two days later.
On this page
Get Help
Contact Support Ask the Odoo Community
![]()
- User Docs
- Database management
- Developer
- Contributing
EN
Odoo 18
Resupply subcontractor
In manufacturing, subcontracting is the process of a company engaging a third-party manufacturer, or subcontractor, to manufacture products that are then sold by the contracting company.
In Odoo, the Resupply Subcontractor on Order route is used to deliver the necessary components for a subcontracted product to the subcontractor, each time a purchase order (PO) for that product is confirmed.
The subcontractor then uses the components to manufacture the desired product, before shipping it back to the contracting company, or dropshipping it to the end customer.
Important
It is necessary to understand the differences between the Resupply Subcontractor on Order and the Dropship Subcontractor on Order routes.
While both routes are used to supply a subcontractor with the components required for manufacturing a product, they differ in how the components are sourced.
When using Resupply Subcontractor on Order, components are shipped from the warehouse of the contracting company.
When using Dropship Subcontractor on Order, components are purchased from a vendor and shipped directly to the subcontractor.
The choice of which route to use depends upon the specific requirements of the subcontracting company and their subcontractors.
See the Dropship to subcontractor documentation for a full overview of the Dropship Subcontractor on Order route.
Configuration
To use the Resupply Subcontractor on Order route, navigate to Manufacturing app ‣ Configuration ‣ Settings, and enable the checkbox next to Subcontracting, under the Operations heading.
Once the Subcontracting setting is enabled, it is also necessary to properly configure the subcontracted product, the product’s bill of materials (BoM), and the components listed on the BoM.
Configure product
To configure a product for the Resupply Subcontractor on Order route, navigate to Inventory app ‣ Products ‣ Products, and select a product, or create a new one by clicking New.
Select the Purchase tab, and add the product’s subcontractor as a vendor by clicking Add a line, selecting the subcontractor in the Vendor drop-down menu, and entering a price in the Price field.
Note
The value entered in the Price field on the Purchase tab of the of the subcontracted product’s page is the amount paid to the subcontractor for the manufacturing of the product.
This does not represent the total cost of the product, which includes other elements, like the cost of the product’s components.
Then, click on the Inventory tab to configure a route that determines what happens to the finished product, once it has been manufactured by the subcontractor.
If the finished product is shipped back to the contracting company, make sure that the Buy route is selected. In addition, select the Replenish on Order (MTO) route to automatically create a PO for the product upon confirmation of a sales order (SO), unless there is enough stock on-hand to fulfill the SO.
If the finished product is shipped directly to the customer by the subcontractor, make sure that only the Dropship route is selected.
Configure BoM
To configure a BoM for the Resupply Subcontractor on Order route, click the Bill of Materials smart button on the product’s page, and select the BoM.
Alternatively, navigate to Manufacturing app ‣ Products ‣ Bills of Materials, and select the BoM for the subcontracted product.
See also
For a full overview of BoM configuration, see the Bill of materials documentation.
In the BoM Type field, select the Subcontracting option. Then, add one or more subcontractors in the Subcontractors field that appears below.

Finally, make sure that all necessary components are specified on the Components tab. To add a new component, click Add a line, select the component in the Component drop-down menu, and specify the required quantity in the Quantity field.
Configure components
To configure components for the Resupply Subcontractor on Order route, navigate to each component from the BoM by selecting the component’s name in the Components tab, and clicking the ➡️ (right arrow) button to the right of the name.
Alternatively, navigate to each component by going to Inventory app ‣ Products ‣ Products, and selecting the component.
On the component product form, click on the Inventory tab and select the Resupply Subcontractor on Order route in the Routes section.
Repeat the process for every component that must be sent to the subcontractor.
Resupply subcontractor on order workflow
The resupply subcontractor on order workflow consists of up to five steps:
- Create an SO for the subcontracted product; doing so creates a PO to purchase the product from the subcontractor.
- Confirm the PO created in the previous step, or create a new PO; doing so creates a Resupply Subcontractor order, as well as a receipt order or a dropship order.
- Process the Resupply Subcontractor order once components for the subcontracted product have been sent to the subcontractor.
- Process the receipt once the subcontractor has finished manufacturing the subcontracted product, and shipped it back to the contracting company OR process the dropship order to ship the product directly to the customer.
- If the workflow was started by creating an SO, and the finished product is not dropshipped to the end customer, process the delivery order once the product is shipped to the customer.
The specific number of steps depends on the reason that the subcontracted product is being purchased from the subcontractor.
If the reason is to fulfill a specific customer order, the process starts with creating an SO, and ends with delivering the product to the customer, or having the subcontractor dropship it to them.
If the reason is to increase the quantity of stock on-hand, the process starts with creating a PO, and ends with receiving the product into inventory.
Important
While the Resupply Subcontractor on Order route can be used to automatically resupply a subcontractor upon confirmation of a PO, it is also possible to create a resupply order manually. This workflow is useful when it is necessary to resupply the subcontractor without creating a PO.
To resupply a subcontractor manually, navigate to the Inventory app, and click on the Resupply Subcontractor card. Create a new Resupply Subcontractor order by clicking New.
In the Delivery Address field, select the subcontractor to whom the components should be sent.
Then, add each component to the Operations tab by clicking Add a line, selecting the component in the Product drop-down field, and specifying a quantity in the Demand field.
Finally, click Mark as Todo to register the order. Once the components have been sent to the subcontractor, click Validate to confirm that the order has been sent.
Create SO
It is only necessary to complete this step if the product is being purchased from the subcontractor to fulfill a customer need. If the product is being purchased to increase the quantity of stock on-hand, move on to the next step.
To create a new SO, navigate to Sales app ‣ Orders ‣ Orders, and click New.
Select the customer in the Customer drop-down menu. Then, click Add a product on the Order Lines tab, select a subcontracted product in the Product drop-down menu, and enter a quantity in the Quantity field.
Click Confirm to confirm the SO, at which point a Purchase smart button appears at the top of the page. This opens the PO created to purchase the subcontracted product from the subcontractor.
Note
An SO for the product only creates a PO if the Replenish on Order (MTO) route is enabled on the product’s page, and there is not enough stock of the product on-hand to fulfill the SO.
If there is enough stock on-hand, confirming an SO for the product instead creates a delivery order, because Odoo assumes that the SO is fulfilled using the stock in the warehouse.
This is not the case for subcontracted products that are dropshipped to the end customer. In that case, a PO is always created, even if there is enough stock on-hand.
Process PO
If a PO was created in the previous step, navigate to Purchase app –> Orders –> Purchase Orders, and select the PO. Then, click Confirm Order to confirm it.
If a PO was not created in the previous step, do so now by navigating to Purchase app ‣ Orders ‣ Purchase Orders, and clicking New.
Begin filling out the PO by selecting a subcontractor from the Vendor drop-down menu. In the Products tab, click Add a product to create a new product line. Select a subcontracted product in the Product field, and enter the quantity in the Quantity field. Finally, click Confirm Order to confirm the PO.
When a PO is confirmed for a product that requires resupplying a subcontractor with components, a receipt or dropship order is automatically created, and can be accessed from the corresponding Receipt or Dropship smart button that appears at the top of the PO.
In addition, a Resupply Subcontractor order is created to ship the required components to the subcontractor. This order can also be accessed from the PO, by clicking the Resupply smart button at the top of the page.
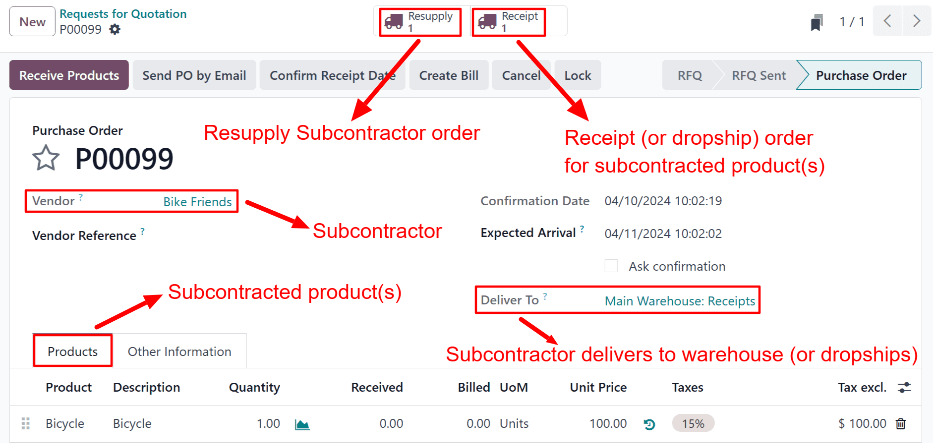
A PO for a Resupply Subcontractor on Order product, with Resupply and Receipt smart buttons at the top of the page.
Process Resupply Subcontractor order
Once the subcontracted product’s components have been sent to the subcontractor, navigate to Purchase app ‣ Orders ‣ Purchase Orders, and select the PO.
Click the Resupply smart button at the top of the screen to open the Resupply Subcontractor order, and click Validate to confirm that the components have been sent to the subcontractor.
Alternatively, navigate to the Inventory app, click the # To Process button on the Resupply Subcontractor card, and select the Resupply Subcontractor order. Then, click Validate to confirm that the components have been sent to the subcontractor.
Process receipt or dropship order
Once the subcontractor has finished manufacturing the product, they either ship it to the contracting company, or dropship it to the end customer, depending on how the product was configured.
Process receipt
If the subcontractor ships the finished product to the contracting company, once it has been received, navigate to Purchase app ‣ Orders ‣ Purchase Orders, and select the PO.
Click the Receive Products button at the top of the PO, or the Receipt smart button at the top of the page, to open the receipt. Then, click Validate at the top of the receipt to enter the product into inventory.
Process dropship order
If the subcontractor dropships the product, once they have sent it, navigate to Purchase app ‣ Orders ‣ Purchase Orders, and select the PO.
Select the Dropship smart button at the top of the page to open the dropship order, and click Validate at the top of the order to confirm that the product has been sent to the customer.
Process delivery order
If the subcontracting workflow was started by a customer SO, and the finished product was NOT dropshipped to the customer, but rather delivered to the contracting company, it is necessary to ship the product to the customer, and process the delivery order.
Once the product has been shipped to the customer, navigate to the Sales app, and select the SO. Select the Delivery smart button at the top of the page to open the delivery order, and click Validate on the order to confirm that the product has been shipped to the customer.
On this page
Get Help
Contact Support Ask the Odoo Community
![]()
- User Docs
- Database management
- Developer
- Contributing
EN
Odoo 18
Resupply subcontracting lead times
In Odoo, lead times are used to predict how long it takes to complete a certain action. For example, a delivery lead time can be set for a purchased product, which specifies the number of days it usually takes for the product’s vendor to deliver the product to the purchasing company.
For subcontracted products specifically, delivery lead times can be configured to take into account the amount of time required for the subcontractor to manufacture a product. Doing so allows the contracting company to better predict the delivery dates of subcontracted products.
Certain subcontracted products require the contracting company to supply the subcontractor with manufacturing components. In this case, a manufacturing lead time can be used, in addition to the delivery lead time, to generate the date on which the subcontractor must receive the required components, in order to manufacture the product and deliver it on time.
Important
Like all lead times in Odoo, lead times for subcontracted products are only an estimate, and are based on how long actions are expected to take.
Unforeseen circumstances can impact the completion of these actions, which means that lead times should not be viewed as guarantees.
Configuration
When using the Resupply Subcontractor on Order route, a company is responsible for supplying the subcontractor with the necessary components. As a result, the subcontractor cannot begin manufacturing until the components have been received.
This means that, in addition to the amount of time it takes the subcontractor to manufacture and deliver the product, the date they receive the components must also be considered.
By assigning a product’s subcontractor a delivery lead time, and specifying a manufacturing lead time on the product’s bill of materials (BoM), Resupply Subcontractor orders for the product’s components display the deadline by which the subcontractor must receive the components.
Product delivery lead time
To set a delivery lead time for a product’s subcontractor, navigate to Inventory app ‣ Products ‣ Products, and select a subcontracted product.
Then, select the Purchase tab on the product’s page. If the subcontractor has not already been added as a vendor, do so now by clicking Add a line, and selecting the subcontractor in the Vendor field.
Once the subcontractor has been added, enter the number of days it takes them to manufacture and deliver the product, in the Delivery Lead Time column.
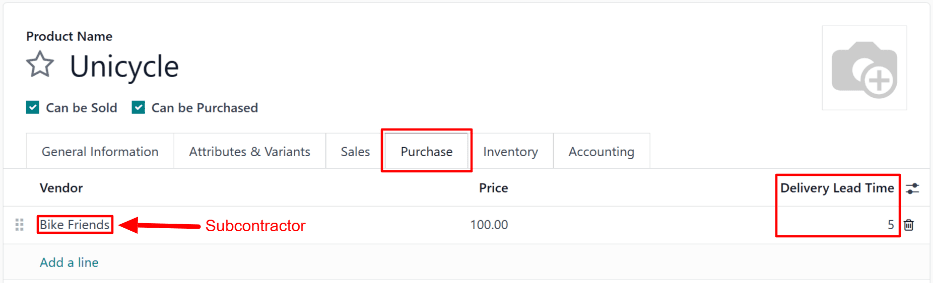
Product manufacturing lead time
Next, navigate to the product’s BoM by clicking the Bill of Materials smart button at the top of the product’s page. Then, select a BoM from the list.
On the BoM, select the Miscellaneous tab. In the Manuf. Lead Time field, enter the same number of days that was entered in the Delivery Lead Time field of the BoM’s product.

While not all of these days are actually used for manufacturing by the subcontractor, setting the same number of days in each field tells Odoo that the subcontractor must receive the components and begin production by the start of the product’s delivery lead time. This gives the subcontractor enough time to both manufacture and deliver the product.
Resupply subcontracting workflow
Create a request for quotation (RfQ) for the product by navigating to Purchase app ‣ Orders ‣ Requests for Quotation, and clicking New.
Specify the subcontractor in Vendor field. Then, add the product in the Products tab by clicking Add a product, selecting the product in the Product column, and specifying a quantity in the Quantity column.
In the Expected Arrival field, enter a date that provides enough time for the subcontractor to receive the components, manufacture the product, and deliver it back to the subcontracting company.
Important
When a product is added to an RfQ, the Expected Arrival field auto-populates with a date that is today’s date plus the delivery lead time of the product. However, this does not consider the time it takes to ship the components to the subcontractor.
When purchasing a product subcontracted using the Resupply Subcontractor on Order route, it is necessary to adjust this date to take into account the extra time needed for the components to be shipped to the subcontractor.
Since production does not begin until they receive the components, leaving the date as is results in the finished product arriving after the date listed on the RfQ.
Next, click Confirm Order to turn the RfQ into a PO. Doing so causes a Resupply smart button to appear at the top of the page.
Click the Resupply smart button to open the resupply subcontractor order, which is the order created to send components to the subcontractor.
The Deadline field on the resupply subcontractor order shows the deadline for the subcontractor to receive the components, in order for them to have enough time to manufacture and deliver the finished product by the Expected Arrival date.
The Scheduled Date field should display the latest date on which components can be shipped, while still arriving to the subcontractor by the Deadline. However, by default, the date displayed is the same as the date in the Deadline field, and must be updated to take into account the time required for shipping.
Click on the Scheduled Date field to open a calendar popover from which a date can be selected. Select a date that allows for the components to be delivered by the Deadline on the resupply subcontractor order.
After the components are shipped, click the Validate button at the top of the order to confirm they have been sent to the subcontractor.
Once the subcontractor receives the components, they begin manufacturing the component, before delivering it to the contracting company.
Example
Bike retailer Mike’s Bikes works with a subcontractor — Bike Friends — to produce units of their Unicycle product.
Mike’s Bikes must supply Bike Friends with the necessary components for manufacturing the unicycles.
On average, Bike Friends takes three days to manufacture each unicycle, plus an additional two days to deliver it to Mike’s Bikes.
As a result, Mike’s Bikes sets a delivery lead time of five days for unicycles manufactured by Bike Friends: three days for manufacturing, plus two days for delivery.
On the unicycle’s BoM, they enter a manufacturing lead time of five days, as well, to remind themselves of the date that components must be delivered to the subcontractor.
They confirm a PO for one unicycle, with an expected arrival date of May 30th.
The resupply subcontractor order for shipping the components to the subcontractor shows a Deadline of May 25th. The subcontractor must receive the components by this date, in order to have enough time to manufacture the unicycle, and deliver it by May 30th.
It takes Mike’s Bikes two days to deliver the components, so they update the Scheduled Date field on the resupply subcontractor order to May 23rd, two days before the Deadline.
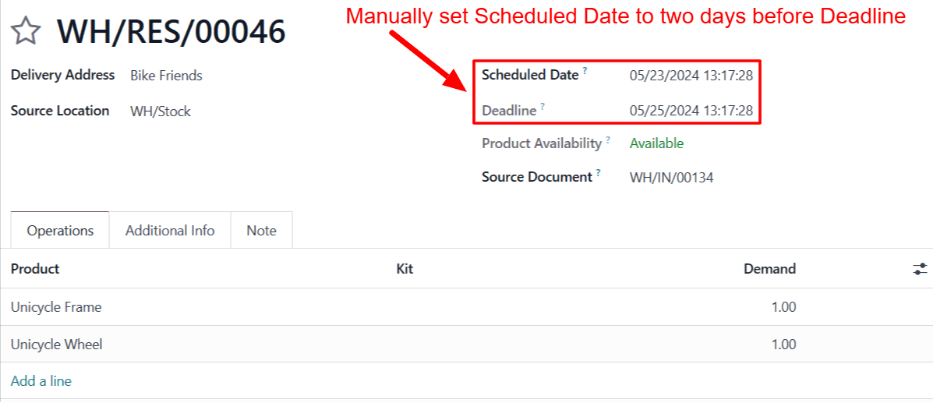
Mike’s Bikes ships the components to Bike Friends on the scheduled date of May 23rd, and they arrive on the deadline of May 25th. This gives Bike Friends enough time to manufacture the unicycle, and ship it back to Mike’s Bikes by the expected arrival date of May 30th.
On this page
Get Help
Contact Support Ask the Odoo Community
![]()
- User Docs
- Database management
- Developer
- Contributing
EN
Odoo 18
Dropship to subcontractor
In manufacturing, subcontracting is the process of a company engaging a third-party manufacturer, or subcontractor, to manufacture products that are then sold by the contracting company.
In Odoo, the Dropship Subcontractor on Order route is used to purchase the necessary components for a subcontracted product from the vendor, and have them delivered directly to the subcontractor, each time a purchase order (PO) for that product is confirmed.
The subcontractor then uses the components to manufacture the desired product, before shipping it back to the contracting company.
Important
It is necessary to understand the differences between the Dropship and Dropship Subcontractor on Order routes. While both routes involve dropshipping, they are used for different purposes.
The Dropship route is used to purchase products from a vendor, and have them shipped directly to the end customer.
The Dropship Subcontractor on Order route is used to purchase components from a vendor, and have them shipped directly to a subcontractor. By default, finished products are then sent from the subcontractor back to the contracting company.
However, it is possible to combine both the Dropship and Dropship Subcontractor on Order routes so they are used for the same product. In this workflow, components are dropshipped to the subcontractor, who then ships the finished product directly to the end customer.
This can be achieved by following steps one through five in the workflow section of this doc.
Configuration
To use the Dropship Subcontractor on Order route, navigate to Manufacturing app ‣ Configuration ‣ Settings, and enable the checkbox next to Subcontracting, under the Operations heading.
Once the Subcontracting setting is enabled, it is also necessary to properly configure the subcontracted product, the product’s BoM, and the components listed on the BoM.
Configure product
To configure a product for the Dropship Subcontractor on Order route, navigate to Inventory app ‣ Products ‣ Products, and select a product, or create a new one by clicking New.
Select the Purchase tab, and add the product’s subcontractor as a vendor by clicking Add a line, selecting the subcontractor in the Vendor drop-down menu, and entering a price in the Price field.
Then, click on the Inventory tab to configure a route that determines what happens to the finished product, once it has been manufactured by the subcontractor.
If the finished product is shipped back to the contracting company, make sure that the Buy route is selected. In addition, select the Replenish on Order (MTO) route to automatically create a PO for the product upon confirmation of a SO, unless there is enough stock on-hand to fulfill the SO.
If the finished product is shipped directly to the customer by the subcontractor, make sure that only the Dropship route is selected.
Configure bill of materials
To configure a BoM for the Dropship Subcontractor on Order route, click the Bill of Materials smart button on the product’s page, and select the BoM.
Alternatively, navigate to Manufacturing app ‣ Products ‣ Bills of Materials, and select the BoM for the subcontracted product.
See also
For a full overview of BoM configuration, see the Bill of materials documentation.
In the BoM Type field, select the Subcontracting option. Then, add one or more subcontractors in the Subcontractors field that appears below.
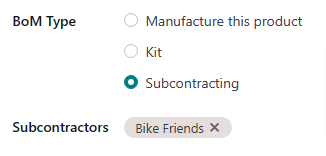
Finally, make sure that all necessary components are specified on the Components tab. To add a new component, click Add a line, select the component in the Component drop-down menu, and specify the required quantity in the Quantity field.
Configure Components
To configure components for the Dropship Subcontractor on Order route, navigate to each component from the BoM by selecting the component’s name in the Components tab, and clicking the ➡️ (right arrow) button to the right of the name.
Alternatively, navigate to each component by going to Inventory app ‣ Products ‣ Products, and selecting the component.
On the component product form, select the Purchase tab, and add a vendor by clicking Add a line, selecting the vendor in the Vendor field, and adding the price they sell the product for in the Price field. This is the vendor that sends components to the subcontractor, once they are purchased.
Then, click on the Inventory tab and select the Dropship Subcontractor on Order route in the Routes section.
Repeat the process for every component that must be dropshipped to the subcontractor.
Dropship subcontractor on order workflow
The dropship subcontractor on order workflow consists of up to six steps:
- Create a sales order (SO) for the subcontracted product; doing so creates a subcontractor PO to purchase the product from the subcontractor.
- Confirm the PO created in the previous step, or create a new PO; doing so creates a request for quotation (RfQ) to purchase the components from the vendor, as well as a receipt order or a dropship order.
- Confirm the RfQ to turn it into a second PO (vendor PO); doing so creates a Dropship Subcontractor order.
- Process the Dropship Subcontractor order once the vendor has sent the components to the subcontractor.
- Process the receipt once the subcontractor has finished manufacturing the subcontracted product, and shipped it back to the contracting company OR process the dropship order to ship the product directly to the end customer.
- If the workflow was started by creating an SO, and the finished product is not dropshipped to the end customer, process the delivery order once the product has been shipped to the customer.
The specific number of steps depends on the reason that the subcontracted product is being purchased from the subcontractor.
If the reason is to fulfill a specific customer order, the process starts with creating an SO, and ends with delivering the product to the customer, or having the subcontractor dropship it to them.
If the reason is to increase quantity of stock on-hand, the process starts with creating a PO, and ends with receiving the product into inventory.
Create an SO
It is only necessary to complete this step if the product is being purchased from the subcontractor to fulfill a customer need. If the product is being purchased to increase the quantity of stock on-hand, move on to the next step.
To create a new SO, navigate to Sales app ‣ Orders ‣ Orders, and click New.
Select the customer in the Customer drop-down menu. Then, click Add a product on the Order Lines tab, select the product in the Product drop-down menu, and enter a quantity in the Quantity field.
Click Confirm to confirm the SO, at which point a Purchase smart button appears at the top of the page. This is the subcontractor PO, or the PO created to purchase the subcontracted product from the subcontractor.
Note
An SO for the product only creates a subcontractor PO if the Replenish on Order (MTO) route is enabled on the product’s page, and there is no stock of the product on-hand.
If there is stock on-hand, confirming an SO for the product will instead create a delivery order, because Odoo assumes that the SO is fulfilled using the stock in the warehouse.
This is not the case for subcontracted products that are dropshipped to the end customer. In that case, a subcontractor PO is always created, even if there is stock on-hand.
Process subcontractor PO
If a subcontractor PO was not created in the previous step, do so now by navigating to Purchase app ‣ Orders ‣ Purchase Orders, and clicking New.
Begin filling out the PO by selecting a subcontractor from the Vendor drop-down menu.
In the Products tab, click Add a product to create a new product line. Select a product produced by the subcontractor in the Product field, and enter the quantity in the Quantity field.
Finally, click Confirm Order to confirm the subcontractor PO.
When a PO is confirmed for a product that requires dropshipping components to a subcontractor, a receipt or dropship order is automatically created, and can be accessed from the corresponding Receipt or Dropship smart button that appears at the top of the PO.
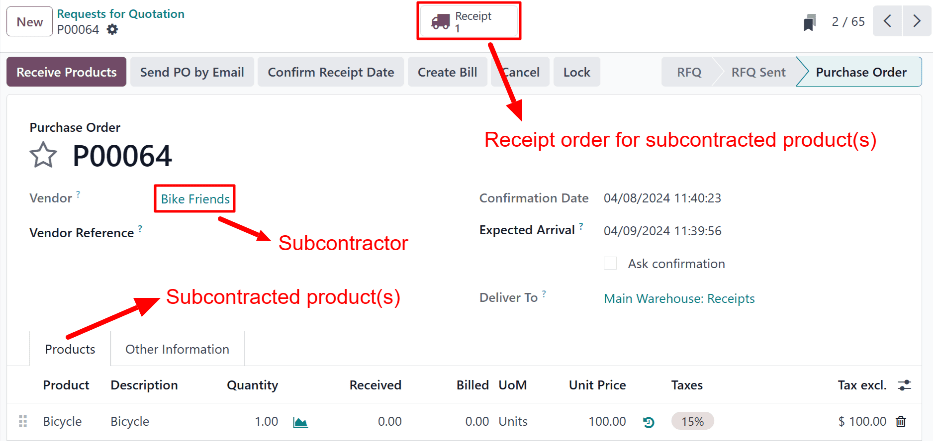
In addition, an RfQ is created for the components that are purchased from the vendor and sent to the subcontractor. However, the RfQ IS NOT automatically linked to the subcontractor PO.
Once the RfQ is confirmed and becomes a vendor PO, a Dropship Subcontractor order is created. This order is linked to both the vendor PO and the subcontractor PO.
Confirm vendor RfQ
To access the RfQ created by confirming the subcontractor PO, navigate to Purchase app ‣ Orders ‣ Requests for Quotation. Select the RfQ that lists the correct vendor in the Vendor field, and the reference number of the receipt that was created after confirming subcontractor PO, in the Source Document field.
On the RfQ, the Deliver To field reads Dropship Subcontractor, and the Dropship Address field shows the name of the subcontractor to whom components are being dropshipped.
Click Confirm Order to turn the RfQ into a vendor PO, and confirm the purchase of components from the vendor. After doing so, a Dropship smart button appears at the top of the vendor PO, and a Resupply smart button appears at the top of the subcontractor PO.
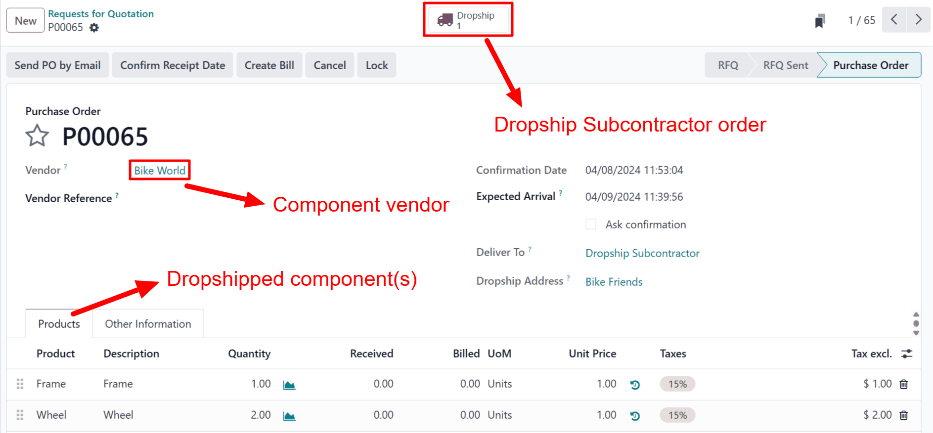
Process Dropship Subcontractor order
Once the components have been delivered to the subcontractor, navigate to Purchase app ‣ Orders ‣ Purchase Orders, and select the vendor PO or the subcontractor PO. Then, click the Dropship smart button or the Resupply smart button, respectively.
Clicking either button opens the Dropship Subcontractor order. Click the Validate button at the top of the order to confirm that the subcontractor has received the components.
Process receipt or dropship order
Once the subcontractor has manufactured the finished product, navigate to Purchase app ‣ Orders ‣ Purchase Orders, and select the subcontractor PO.
If the subcontracted product should be received into inventory, once the product arrives, click the Receive Products button at the top of the subcontractor PO to open the receipt. Then, click Validate at the top of the receipt to register the product into inventory.
Alternatively, select the Receipt smart button at the top of the subcontractor PO, and click Validate at the top of the receipt.
If the subcontracted product should be dropshipped, select the Dropship button at the top of the page to open the dropship order, and click Validate once the subcontractor has sent the product to the customer.
Process delivery order
If the subcontracting workflow was started by a customer SO, and the finished product was not dropshipped to the customer, but rather delivered to the contracting company, it is necessary to ship the product to the customer, and process the delivery order.
Once the product has been shipped to the customer, navigate to the Sales app, and select the SO. Select the Delivery smart button at the top of the page to open the delivery order, and click Validate to confirm that the product has been shipped to the customer.
On this page
Get Help
Contact Support Ask the Odoo Community
![]()
- User Docs
- Database management
- Developer
- Contributing
EN
Odoo 18
Dropship subcontracting lead times
In Odoo, lead times are used to predict how long it takes to complete a certain action. For example, a delivery lead time can be set for a purchased product, which specifies the number of days it usually takes for the product’s vendor to deliver the product to the purchasing company.
For subcontracted products specifically, delivery lead times can be configured to take into account the amount of time required for the subcontractor to manufacture a product. Doing so allows the contracting company to better predict the delivery dates of subcontracted products.
Certain subcontracted products require the contracting company to supply the subcontractor with manufacturing components. In this case, a manufacturing lead time can be used, in addition to the delivery lead time, to generate the date on which the subcontractor must receive the required components, in order to manufacture the product and deliver it on time.
In cases where components are dropshipped to the subcontractor, an additional delivery lead time can be set for each component. This should be set to the amount of time it takes the vendor to deliver components to the subcontractor.
Once a delivery lead time has been set on a component, dropship orders for the component display the date by which the order must be confirmed, so that it can be dropshipped to the subcontractor by the date on which manufacturing must begin.
Important
Like all lead times in Odoo, lead times for subcontracted products are only an estimate, and are based on how long actions are expected to take.
Unforeseen circumstances can impact the completion of these actions, which means that lead times should not be viewed as guarantees.
Configuration
When using the Dropship Subcontractor on Order route, a company is responsible for purchasing the necessary components from a vendor, and having them dropshipped directly to the subcontractor.
This means that, in addition to the amount of time it takes the subcontractor to manufacture and deliver the product, it is also necessary to consider how long it takes the component vendor to dropship the components to the subcontractor.
By assigning a product’s subcontractor a delivery lead time, specifying a manufacturing lead time on the product’s BoM, and assigning the vendor of the components an additional delivery lead time, Dropship Subcontractor orders for the product’s components display the deadline for confirming a dropship order to send the components to the subcontractor.
Product delivery lead time
To set a delivery lead time for a product’s subcontractor, navigate to Inventory app –> Products –> Products, and select a subcontracted product.
Then, select the Purchase tab on the product’s page. If the subcontractor has not already been added as a vendor, do so now by clicking Add a line, and selecting the subcontractor in the Vendor column.
Once the subcontractor has been added, enter the number of days it takes them to manufacture and deliver the product, in the Delivery Lead Time column.
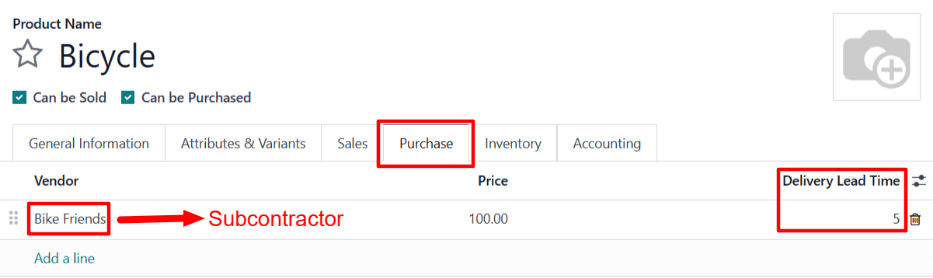
Product manufacturing lead time
Next, navigate to the product’s BoM by clicking the Bill of Materials smart button at the top of the product’s page. Then, select a BoM from the list.
On the BoM, select the Miscellaneous tab. In the Manuf. Lead Time field, enter the same number of days that was entered in the Delivery Lead Time field of the BoM’s product.
While not all of these days are actually used for manufacturing by the subcontractor, setting the same number of days in each field tells Odoo that the subcontractor must receive the components and begin production by the start of the product’s delivery lead time. This gives the subcontractor enough time to both manufacture and deliver the product.
Component delivery lead time
From the product’s BoM, navigate to each component by clicking on the component in the Components tab, and then clicking the (right arrow) button to the right of the component.
On the product page for each component, select the Purchase tab. If the vendor has not already been added, do so now by clicking Add a line, and selecting the subcontractor in the Vendor column.
Once the vendor has been added, enter the number of days it takes them to dropship the product to the subcontractor, in the Delivery Lead Time column.
Dropship subcontracting workflow
Create a request for quotation (RfQ) for the product by navigating to Purchase app ‣ Orders ‣ Requests for Quotation, and clicking New.
Specify the subcontractor in Vendor field. Then, add the product in the Products tab by clicking Add a product, selecting the product in the Product column, and specifying a quantity in the Quantity column.
In the Expected Arrival field, enter a date that provides enough time for the component vendor to dropship the components, and the subcontractor to manufacture and deliver the product.
Important
When a product is added to an RfQ, the Expected Arrival field auto-populates with a date that is today’s date plus the delivery lead time of the product. However, this does not consider the time it takes to dropship the components to the subcontractor.
When purchasing a product subcontracted using the Dropship Subcontractor on Order route, it is necessary to adjust this date to take into account the extra time needed for the components to be delivered to the subcontractor.
Since production does not begin until they receive the components, leaving the date as is results in the finished product arriving after the date listed on the RfQ.
Next, click Confirm Order to turn the RfQ into a PO. Doing so creates a second RfQ to purchase the components from the dropshipper, and have them sent to the subcontractor.
Navigate to Purchase app ‣ Orders ‣ Requests for Quotation, and select the RfQ that lists the dropshipper in the Vendor column.
On the RfQ, the Expected Arrival field lists the date on which the subcontractor must receive the components, in order to deliver the finished product by the Expected Arrival date listed on the subcontractor PO.
The Order Deadline field lists the latest date on which the RfQ can be confirmed, in order for the dropshipper to deliver the components to the subcontractor by the Expected Arrival date.
Click Confirm Order to turn the RfQ into a PO, and confirm the purchase of the components from the dropshipper. Doing so causes a Dropship smart button to appear at the top of the page.
Click the Dropship smart button to open the dropship order. This order can also be accessed from the Resupply smart button that now appears on the subcontractor PO.
After the dropshipper has delivered the components to the subcontractor, click the Validate button at the top of the dropship order to confirm that the subcontractor has received the components.
Once the subcontractor receives the components, they begin manufacturing the component, before delivering it to the contracting company.
Example
Bike retailer Mike’s Bikes works with a subcontractor — Bike Friends — to produce units of their Bicycle product.
Mike’s Bikes must purchase the required components from vendor Bike World, and have them dropshipped to Bike Friends.
On average, Bike Friends takes three days to manufacture each bicycle, plus an addition two days to deliver it to Mike’s Bikes.
As a result, Mike’s Bikes sets a delivery lead time of five days for bicycle manufactured by Bike Friends: three days for manufacturing, plus two days for delivery.
On the bicycle’s BoM, they enter a manufacturing lead time of five days as well, to remind themselves of the date that components must be delivered to the subcontractor.
On the product pages for each of the bicycle’s components, they assign Bike World a delivery lead time of two days. This is the amount of time it takes Bike World to dropship each component directly to the subcontractor.
On May 10th, Mike’s Bikes confirms a PO for one bicycle, with an expected delivery date of May 17th.
The RfQ for purchasing the components from Bike World and having them dropshipped to Bike Friends has an Expected Arrival date of May 12th, and a Deadline of May 10th. The RfQ must be confirmed by the deadline in order for Bike Friends to receive the components by the Expected Arrival date, giving them enough time to deliver the finished bicycle to Mike’s Bikes by May 17th.
Mike’s Bikes confirms the RfQ on May 10th, and Bike World delivers the components to Bike Friends on May 12th. Bike Friends manufactures the bicycle, and delivers it to Mike’s Bikes on May 17th.
On this page
Get Help
Contact Support Ask the Odoo Community
![]()
- User Docs
- Database management
- Developer
- Contributing
EN
Odoo 18
Allocation reports
When fulfilling sales orders (SOs), or sourcing components for manufacturing orders (MOs), it is sometimes necessary to prioritize one SO or MO over another. In situations where there is insufficient stock on-hand to fulfill every SO or MO, ensuring that products and components are reserved for priority orders is essential.
In Odoo Manufacturing, allocation reports are used on MOs to assign products to specific sales orders SOs, or components to specific MOs. This ensures the products or components are available for those orders, and are not used by mistake.
Configuration
To use allocation reports, the Allocation Report for Manufacturing Orders feature must be enabled. To do so, navigate to Manufacturing app ‣ Configuration ‣ Settings, and tick the checkbox next to Allocation Report for Manufacturing Orders. Then, click Save.
For products that are sold, it is also necessary to configure them so they can be included in SOs. To do so, begin by navigating to Inventory ‣ Products ‣ Products, and select a product. Under the Product Name field on the product form, make sure that the Can Be Sold checkbox is ticked.
Allocate products
To allocate products or components from an MO to an SO, or to a different MO, begin by navigating to Manufacturing app ‣ Operations ‣ Manufacturing Orders. Click New to create a new MO.
On the MO form, select a product in the Product field, and specify the quantity to be produced in the Quantity field. Finally, click Confirm to confirm the MO.
The rest of the allocation workflow depends on the current on-hand quantity of the product being manufactured, and whether or not there are any SOs or MOs which require the product, but have not already been allocated units.
If there are existing SOs and MOs that require the product, and there are too few units of the product on-hand to fulfill those orders, then an Allocation smart button appears at the top of the page as soon as the MO is confirmed.
If there are existing SOs and MOs that require the product, and there are enough units of the product on-hand to fulfill those orders, then the Allocation smart button only appears at the top of the page once the MO has been marked as done, by clicking Produce All.
Note
If there are not any existing SOs and MOs that require the product, the Allocation smart button does not appear, even when the MO has been marked as done.
Click the Allocation smart button to open the MRP Reception Report for the MO. This report lists open delivery orders or MOs, depending on the type of product produced in the original MO.
Allocate to delivery order
If the MO contains a finished product, the report lists any open delivery orders for which quantities of the product have yet to be reserved.
Example
An MO is created to produce three units of a rocking chair. Clicking the Allocation smart button on the MO opens an allocation report that lists open delivery orders that require one or more rocking chairs.
Click the Assign All button to the right of a specific order to assign products for each quantity required to fulfill that order.
Example
If an order requires one quantity of four units of the product, and one quantity of one unit of the product, clicking Assign All assigns five units of the product to fulfill both quantities.
Alternatively, click Assign next to a specific quantity to only assign products to that quantity, and not any others in the order.
Example
If an order requires one quantity of four units of the product, and one quantity of one unit of the product, clicking Assign next to the quantity of one unit assigns a product to that quantity, but leaves the quantity of four units without any products assigned.
Allocate to MO
If the MO contains a component, the report lists any open MOs for which quantities of the component have yet to be reserved.
Example
An MO is created to produce three units of wood, which is used as a component for the rocking chair product. Clicking the Allocation smart button on the MO opens an allocation report that lists open rocking chair MOs that require one or more pieces of wood.
Click the Assign All or Assign button to the right of a specific MO to assign components to that MO.
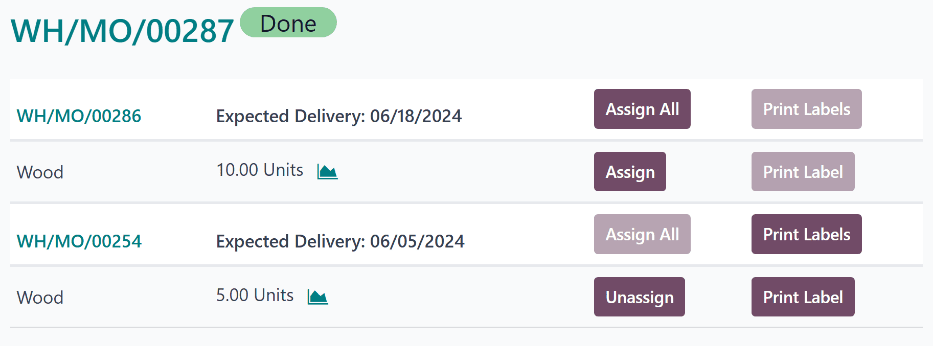
Unassign products
After assigning products to a quantity within a delivery order, or components to an MO, the Assign button turns into an Unassign button. Click Unassign to unreserve the assigned products from that quantity, making them available for other quantities.
Print labels
After clicking Assign All or Assign, the Print Labels or Print Label button to the right of either button becomes selectable. Selecting either button generates and downloads a PDF document with one label for each product that was assigned. These labels are used to designate each product as being reserved for that specific order.
On this page
Get Help
Contact Support Ask the Odoo Community
![]()
- User Docs
- Database management
- Developer
- Contributing
EN
Odoo 18
Overall equipment effectiveness
In Odoo’s Manufacturing app, overall equipment effectiveness (OEE) represents the amount of time a work center is fully productive. OEE is displayed as a percentage of the total time a work center is active.
Fully productive time is considered to be time when the work center is operational and processing work orders that have not exceeded their expected duration.
OEE helps manufacturing teams understand the efficiency of work centers, and the causes of manufacturing downtime.
Important
Since OEE tracks work center productivity, using it requires enabling the work centers feature in the settings of the Manufacturing app.
To do so, navigate to Manufacturing app ‣ Configuration ‣ Settings, and tick the checkbox next to Work Orders, under the Operations heading. Then, click Save.
Efficiency standards
For OEE to accurately reflect the percentage of fully productive time for a work center, the work center must be properly configured with the correct productivity metrics. These include the work center’s time efficiency, capacity, and OEE target.
Time efficiency
Time efficiency represents the efficiency of a work center when processing work orders, and is represented as a percentage. A time efficiency value of 100% signifies that the work center processes work orders at the speed of the expected duration, as listed on a product’s BoM. A value less than or greater than 100% signifies that the work center processes work orders slower or faster than an operation’s expected duration, respectively.
To set the time efficiency for a work center, navigate to Manufacturing app ‣ Configuration ‣ Work Centers, and select a work center. On the General Information tab, enter a numerical value in the Time Efficiency field.
Example
Manufacturing a chair product requires two operations: cut and assemble. The product’s BoM lists an expected duration of 30 minutes for each operation.
The cut operation is carried out at the cut station work center, which has a time efficiency value of 50%. This means it takes twice as long to complete the operation, for a total time of one hour.
The assemble operation is carried out at the assembly line work center, which has a time efficiency value of 200%. This means it takes half as long to complete the operation, for a total time of 15 minutes.
Capacity
Capacity represents how many units of a product can be produced in parallel at a work center. The duration of work orders for multiple units increases or decreases, based on how many units the work center can handle.
To set the capacity for a work center, navigate to Manufacturing app ‣ Configuration ‣ Work Centers, and select a work center. On the General Information tab, enter a numerical value in the Capacity field.
Example
A drill station work center has a capacity of one unit. An MO is confirmed for 10 units of a chair, a product manufactured using the drill station.
Since there are ten times as many units to produce than the work center can handle at once, the operation time is ten times the duration listed on the product’s BoM.
OEE target
The OEE target is the goal for how much of a work center’s operating time should be fully productive time. It is displayed as a percentage, and should only be set as high as 100%.
To set the OEE target for a work center, navigate to Manufacturing app ‣ Configuration ‣ Settings ‣ Work Centers, and select a work center. On the General Information tab, enter a numerical value of 100.00 or less in the OEE Target field.
Calculating OEE
OEE is represented as a percentage value between zero and 100. The value signifies the amount of time that a work center was fully productive. The remainder signifies the amount of time that the work center was operating at less than full efficiency. This can occur for a number of reasons, including reduced speed, material availability, and equipment failure.
Fully productive time
For a work center to be considered fully productive, it must be able to receive work orders, have the components necessary to process work orders, and be operating within the expected duration of the work order it is processing.
Example
An assembly line work center is not blocked, and receives a work order to assemble a bicycle. The required components are available, so production begins as soon as they are picked and delivered to the work center. The work order has an expected duration of 30 minutes, and is completed in 27 minutes. All of this time is considered fully productive time.
Reduced speed
When a work center is operating at reduced speed, it means that it is processing a work order that has exceeded its expected duration. While the work center may be operational, this is not considered fully productive time.
Example
A cutting station work center receives a work order to cut boards for a table. The expected duration of the work order is 15 minutes. The work order ends up taking 18 minutes to complete. The work center is considered to have been operating at reduced speed during the three minutes that exceeded the expected duration.
Material availability
Material availability refers to situations where a work center is able to accept a work order, but the required components are not available. This can occur because the components are not in stock, or are reserved for a different order.
Example
Manufacturing of a bench requires 20 units of wood. A manufacturing order (MO) is confirmed for 10 units of the bench, but there is not enough wood in stock to begin manufacturing. The time it takes to acquire the wood is recorded as material availability downtime.
Equipment failure
Equipment failure signifies any period of time when a work center is unusable due to maintenance issues with its equipment. This can be due to equipment breaking down, or when a work center is shut down for scheduled maintenance. In these cases, a work center can be blocked using a maintenance request.
Example
The drill at a drill station work center breaks down, causing the work center to be unusable. A maintenance request is created to fix the drill, and the work center is blocked from receiving work orders. It takes two hours to fix the drill, and make the work center available again. This two-hour period is recorded as equipment failure downtime.
OEE reporting
To view OEE reporting metrics for every work center, navigate to Manufacturing app ‣ Reporting ‣ Overall Equipment Effectiveness. This page shows the metrics for each work center with OEE data.
Alternatively, to see OEE reporting metrics for a single work center, navigate to Manufacturing app ‣ Configuration ‣ Work Centers, and select a work center. At the top of the work center’s form, click the OEE smart button.
By default, the main OEE reporting page shows data in a bar chart, while the page for a specific work center shows it in a pie chart. To select a different chart type on either page, click the (bar chart), (line chart), or (pie chart) button above the displayed chart.
It is also possible to see OEE data in a pivot view, or a list displaying each time entry, by clicking the (pivot view) or (list view) buttons at the top-right corner of the page.
On this page
Get Help
Contact Support Ask the Odoo Community
![]()
- User Docs
- Database management
- Developer
- Contributing
EN
Odoo 18
Production analysis
The Production Analysis report provides statistics about products manufactured using Odoo’s Manufacturing app. The report is useful when trying to understand production costs, manufacturing durations, and other important statistics about manufactured products.
To open the Production Analysis report, navigate to Manufacturing app ‣ Reporting ‣ Production Analysis.
Important
The Production Analysis report is one of many reports available across the Odoo app suite. This documentation only covers the measures specific to the Production Analysis report, along with a few use case examples.
For a full overview of the basic features available in most Odoo reports, see the documentation on reporting essentials.
Measures
Measures are the datasets that can be selected in the Production Analysis report. Each dataset represents a specific statistic about MOs in the database. Choose a measure by clicking the Measures button, and selecting one of the options from the drop-down menu:
The options displayed in the Measures drop-down menu, and the order they appear in, differ depending on the filters, groupings, and comparisons enabled in the Search… bar. By default, the available measures appear as follows:
- Average Employee Cost/Unit: the average cost paid to employees to produce one unit of the product.
- By-Products Total Cost: the total value of all by-products created by manufacturing the product.
- Component Cost/Unit: the average cost of the components required to produce one unit of the product.
- Cost/Unit: the average cost of producing one unit of the product, including component, employee, operation, and subcontracting costs.
- Duration of Operations/Unit: the average total duration of operations required to produce one unit of the product.
- Quantity Demanded: the total number of units of the product included in MOs.
- Quantity Produced: the total number of units of the product that have actually been produced.
- Total Component Cost: the total amount spent on the product’s components, across every MO for the product.
- Total Cost: the total amount spent manufacturing every unit of the product produced so far.
- Total Duration of Operations: the cumulative duration of every operation completed while manufacturing the product.
- Total Employee Cost: the cumulative amount paid to employees to manufacture the product.
- Total Operation Cost: the cumulative amount spent on operations required to produce the product.
- Total Operation Cost/Unit: the average cost of the operations required to produce one unit of the product.
- Total Subcontracting Cost: the cumulative amount paid to subcontractors to produce the product.
- Total Subcontracting Cost/Unit: the average cost of engaging a subcontractor to produce one unit of the product.
- Yield Percentage (%): the total quantity of the product produced versus the total quantity demanded, represented as a percentage.
- Count: the total count of MOs created for the product.
Tip
Only one measure can be selected at a time when one of the (graph view) options is enabled. However, multiple measures, and varying group-by criteria (on the x and y axes), can be selected when using the (pivot table).
Use case: compare products
One of the best uses for the Production Analysis report is comparing statistics about two or more products. This is accomplished by entering the products into the Search… bar, then selecting the necessary measure, filter, and grouping, to see the desired data.
Example
Toy manufacturer Tommy’s Toys is trying to reduce their manufacturing operation costs. To accomplish this, they have decided to identify redundant products and cease manufacturing the ones with higher operational costs.
Two of the toys that have been singled out for analysis are the pogo stick and moon shoes. Tommy’s Toys believes these two toys are so similar that they can stop manufacturing one, without significantly impacting their product offering.
To compare operation costs for the toys, business analyst Mike opens the Manufacturing app, and navigates to the Production Analysis page. In the Search… bar, he enters the names of both products. Then, he opens the Search… bar drop-down menu, and clicks Product in the Group By section.
Below the Search… bar, Mike clicks on the Measures drop-down menu, and selects the Total Operation Cost/Unit option. Finally, he selects the (bar chart) graph type.
With these options selected, the Production Analysis report shows a bar chart for the current year, with one bar for each product, signifying the average operation cost for one unit of the product.
With this data, Mike is able to see that the average operation cost for the moon shoes is almost twice the cost of the pogo stick. Using this insight, Tommy’s Toys decides to cease production of moon shoes, thus lowering their average cost of manufacturing operations.
Use case: compare time periods
The Production Analysis report can also be used to compare data for two different time periods. This is accomplished using the options in the Comparison section of the Search… bar.
Example
Furniture company Fanny’s Furnishings wants to compare their production costs for the first and second quarters of 2024, to see which products they spent the most money producing in each quarter.
To compare the two time periods, shop floor supervisor Adam opens the Manufacturing app, and navigates to the Production Analysis page. He begins by selecting the (pie chart) graph type option at the top of the page.
Important
The Comparison feature is meant to be used with the (pie chart) graph type, or the (pivot) view.
A Comparison option can still be selected with the other view types enabled, but doing so does not change the way data is displayed on the report.
Next, Adam selects the Total Cost option from the Measures drop-down menu. This option displays the total amount spent producing each product.
In the Search… bar drop-down menu, he leaves the 2024 filter enabled in the End Date section, and enables the Q2 filter as well. With both of these time periods selected, the pie chart shows data for the second quarter of 2024.
Finally, Adam selects the End Date: Previous Period option in the Comparison section of the Search… bar. Doing so causes the pie chart to be split into an inner circle, and an outer ring.
The outer ring shows data for the selected time period, quarter two of 2024. The inner circle shows data for the previous time period, quarter one of 2024.
Note
If End Date: Previous Year is selected instead of End Date: Previous Period, the inner circle shows data for the selected time period, one year previous.
In the case of this example, it would show data for quarter two of 2023.
Using this report, Adam can see that the products with the highest total cost for quarter two are the bicycle and tricycle. On the other hand, in quarter one, the roller skates had the highest total cost.
On this page
Get Help
Contact Support Ask the Odoo Community
![]()
EN
Odoo 18
Purchase
Odoo Purchase helps keep track of purchase agreements, quotations, and purchase orders. Learn how to monitor purchase tender, automate replenishment, and follow up on your orders.
See also
Get Help
Contact Support Ask the Odoo Community
![]()
- User Docs
- Database management
- Developer
- Contributing
EN
Odoo 18
Import vendor pricelist
Set vendor prices to auto-populate requests for quotations (RFQs) or purchase orders (POs) with the unit price, once the product is added, which reduces errors and saves time.
In Odoo, vendor pricelists can be added individually on the product form, or imported in bulk, via an XLSX or CSV file.
Important
Please review this import guide before uploading vendor pricelists.
On product form
To manually add the vendor price on the product form, go to the Purchase app ‣ Products ‣ Products, and click the desired product.
Note
Product forms are accessible from multiple apps, such as Sales, Inventory, and Manufacturing.
In the Purchase tab of the product form, input the vendor and their price, to have this information auto-populate on a request for quotation each time the product is listed.
See also
Vendor pricelist on product form
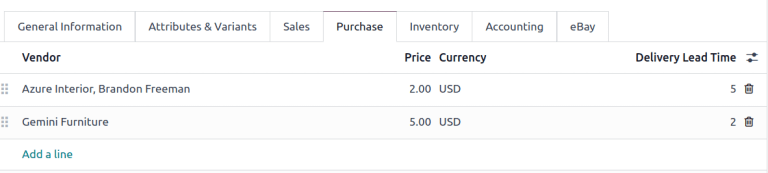
Import vendor pricelist
To import vendor pricelists, ensure the XLSX or CSV file is accurately completed. The best way to obtain a correctly formatted template, including product names, references, and vendor details, is to first export a pricelist from the database.
Modify the exported file, as needed, then import it back into the Odoo database.
Export pricelist
To export a pricelist, go to Purchase app ‣ Configuration ‣ Vendor Pricelists.
On the page, tick the checkbox(es) for the desired vendor pricelists.
Then, click the Actions button that appears, and choose Export from the drop-down menu.

In the resulting pop-up window, fields listed under the Fields to export section are included in the exported file. To add more fields, find the desired field in the Available fields section, and click the (plus) icon to the right of the field.
Note
To update to existing records, tick the I want to update data (import-compatible export) checkbox, and refer to the section on the External ID field.
For details on commonly-used fields for importing vendor pricelists, see the Common fields section.
Select the desired Export Format: XLSX or CSV.
To save the selected fields as a template, click the Template field, and select New template from the drop-down menu. Type the name of the new template, and click the (save) icon. After that, the template is a selectable option when clicking the Template field.
Finally, click Export.
Note
With developer mode turned on, the column names of the exported file display the field name with the technical name in parenthesis.
Example
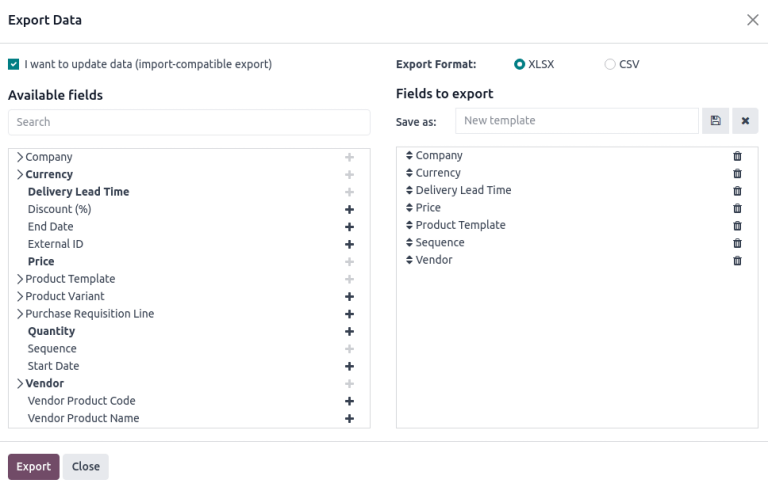
Export vendor pricelist in XLSX format. It includes Product Template and other fields in the Fields to export section.
External ID
External ID is a unique identifier used to update existing vendor pricelists. Without it, imported records create new entries, instead of updating existing ones. Including this field in the XLSX or CSV, indicates the line replaces an existing vendor pricelist in the Odoo database.
Example
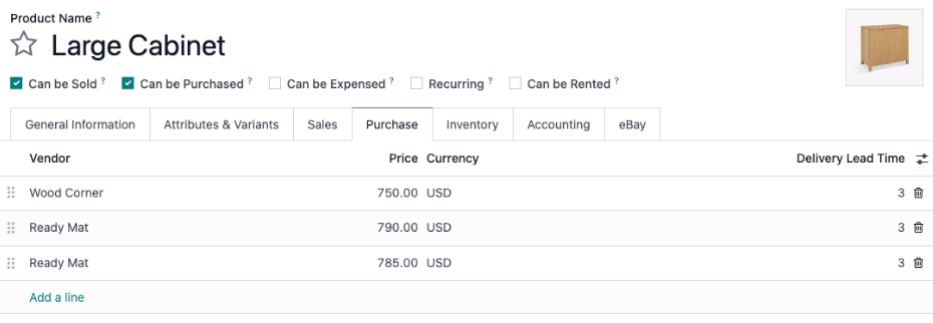
Ready Mat appears twice because the external ID was omitted during the price update from $790 to $780.
To look-up the External ID for a vendor pricelist, tick the I want to update data (import-compatible export) checkbox at the top of the Export Data pop-up window.
Note
Selecting External ID from the Available fields section with the I want to update data (import-compatible export) checkbox ticked results in an export file with two columns containing the external ID.
Common fields
Below is a list of commonly-used fields when importing vendor pricelists:
Field name definitionsField name | Used for | Field in Odoo database | Technical name of field |
|---|---|---|---|
Vendor | The only required field for creating a vendor pricelist record. This field specifies the vendor associated with the product. | Vendor field in the vendor pricelist of the product form. | partner_id |
Product Template | The Odoo product the vendor pricelist entry is related to. | Product field in the vendor pricelist. | product_tmpl_id |
Quantity | The minimum quantity required to receive the product at the specified price. | Quantity field in the vendor pricelist. (If not visible, enable it by clicking the (adjust) icon, and tick the Quantity checkbox) | min_qty |
Unit Price | The purchase price for the product from the vendor. | Price field in the vendor pricelist. | price |
Delivery Lead Time | Number of days before receiving the product after confirming a purchase order. | Delivery Lead Time field on the vendor pricelist. | delay |
Sequence | Defines the order of vendors in the pricelist when multiple vendors are available. For example, if Azure Interior is listed first and Wood Corner second, their sequences would be 1 and 2. | N/A | sequence |
Company | Name of company the product belongs to. | Company field in the vendor pricelist. | company_id |
Unique ID of a record used to update existing vendor pricelists. | N/A | id |
Import records
With a template downloaded, fill out the XLSX or CSV file with the necessary information. After inputting everything, import the file back into the Odoo database, by going to Purchase app ‣ Configuration ‣ Vendor Pricelists.
On the page, click the (gear) icon in the top-left corner. In the drop-down menu that appears, click Import records.
Then, click Upload File in the upper-left corner, and after selecting the XLSX or CSV file, confirm the correct fields, and click Import.
See also

Formatting import file
To understand how to format import files for vendor pricelists, consider the following example.
- Storage Box (Reference: E-COM08) is sold by Wood Corner for $10.
- Large Desk (Reference: E-COM09) has no records in the vendor pricelist.
An import file is created to do the following:
- Update the price for Wood Corner from $10 to $13.
- Add pricelist for Storage Box: the vendor, Ready Mat intends to sell the product for $14.
- Add pricelist for Large Desk: vendor is Wood Corner, price is $1299.
- Add pricelist for Large Desk: vendor is Azure Interior, price is $1399.
id | company_id | delay | price | product_tmpl_id | sequence | partner_id |
|---|---|---|---|---|---|---|
product.product_supplierinfo_3 | My Company (San Francisco) | 3 | 13.00 | [E-COM08] Storage Box | 4 | Wood Corner |
My Company (San Francisco) | 3 | 14.00 | [E-COM08] Storage Box | 5 | Ready Mat | |
My Company (San Francisco) | 2 | 1299.00 | [E-COM09] Large Desk | 6 | Wood Corner | |
My Company (San Francisco) | 4 | 1399.00 | [E-COM09] Large Desk | 7 | Azure Interior |
Note
The technical field name was used to create this information.
Note
Download the sample files for reference:
On this page
Get Help
Contact Support Ask the Odoo Community
![]()
- User Docs
- Database management
- Developer
- Contributing
EN
Odoo 18
Configure reordering rules
For certain products, it is necessary to ensure that there is always a minimum amount available on hand at any given time. Maintaining a minimum stock level ensures that businesses can meet customer demand without delays, and keep operations running smoothly. It also helps buffer against supply chain disruptions and unexpected spikes in demand. Inefficiencies may arise from inaccurate demand forecasting, supply chain delays, and warehouse mismanagement, all of which can lead to increased operational costs and wasted resources.
Keep highly demanded products in-stock at all times using reordering rules, that trigger a RFQ (Request for Quotation) each time the forecasted stock quantities fall below the minimum. RFQs generated from reordering rules have the vendor, price, quantity needed to reorder, which makes things faster and more convenient.
Important
The Inventory app must be installed to use reordering rules, as it keeps track of stock quantity.
Configure products for reordering
Products must be configured in a specific way before a reordering rule can be added to them.
Starting from the Inventory, Manufacturing, Purchase, or Sales app, navigate to Products ‣ Products and then click New to make a new product. Alternatively, find a product that already exists in the database and click into it’s product form.
Next, on the product form, enable reordering by ticking the Purchase checkbox underneath the Product name field. Then, under the General Information tab, set the Product Type to Goods. Finally, tick the checkbox labeled Track Inventory, and select an option from the drop-down.
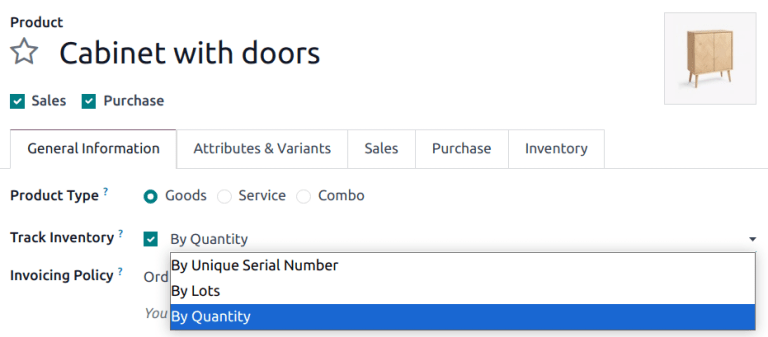
Add a reordering rule to a product
After properly configuring a product, a reordering rule can be added to it by selecting the now visible Reordering Rules smart button at the top of that product’s form, then clicking Create on the Reordering Rules dashboard.
Tip
If the Reordering Rules smart button is not visible, click More.
Once created, the reordering rule can be configured to generate purchase orders automatically by defining the following fields:
- Location specifies where the ordered quantities should be stored once they are received and entered into stock.
- Min Quantity sets the lower threshold for the reordering rule while Max Quantity sets the upper threshold. If the stock on hand falls below the minimum quantity, a new purchase order is then created to replenish it up to the maximum quantity.
Example
If Min Quantity is set to 5 and Max Quantity is set to 25 and the stock on hand falls to four, a purchase order is then created for 21 units of the product.
- Multiple Quantity can be configured so that products are only ordered in batches of a certain quantity. Depending on the number entered, this can result in the creation of a purchase order that would put the resulting stock on hand above what is specified in the Max Quantity field.
Example
If Max Quantity is set to 100 but Multiple Quantity is set to order the product in batches of 200, a purchase order is then created for 200 units of the product.
- Unit specifies the unit of measurement by which the quantity is to be ordered. For discrete products, this should be set to Units. However, it can also be set to units of measurement like Volume or Weight for non-discrete products like water or bricks.

See also
Manually trigger reordering rules using the scheduler
Reordering rules are automatically triggered by the scheduler, which runs once a day by default. To trigger reordering rules manually, turn on developer mode, navigate to Inventory app ‣ Operations ‣ Procurement: Run Scheduler. On the pop-up window, confirm the manual action by clicking Run Scheduler.
Note
Manually triggering reordering rules will also trigger any other scheduled actions.
Manage reordering rules
To manage the reordering rules for a single product, navigate to that product page’s form and select the Reordering Rules smart button at the top of the form.
To manage all reordering rules for every product, go to Inventory app ‣ Operations ‣ Replenishment. From this dashboard, typical bulk actions in Odoo can be performed such as exporting data or archiving rules that are no longer needed. As well, the Filters, Group By or triple-dotted menu on the form are available to search for and/or organize the reordering rules as desired.
On this page
Get Help
Contact Support Ask the Odoo Community
![]()
- User Docs
- Database management
- Developer
- Contributing
EN
Odoo 18
Temporary reordering rules
Some businesses require certain products to always have a minimum quantity of stock on-hand at any given time. To avoid stock falling below a certain threshold, companies can create reordering rules in Odoo to automate purchase orders for specific products.
Reordering rules keep the forecasted stock levels above a certain threshold, without exceeding a specified upper limit, or maximum amount. When a product with a reordering rule falls below a specified quantity, Odoo generates an order using the specified route (e.g. Buy or Manufacture) to replenish the stock.
In certain cases, businesses might opt for temporary reordering rules when they do not want specific products to be replenished automatically.
In Odoo, a “temporary” reordering rule is created in the replenishment dashboard when a product:
- is configured with a Buy route
- has no reordering rule configured
- has 0 quantity in stock
- is included in a sales order (SO).
This rule is deleted upon confirmation of the purchase order (PO) generated for the product.
See also
Configuration
To configure a product that triggers temporary reordering rules when its stock reaches 0, begin by going to Inventory app ‣ Products ‣ Products, and click New.
Note
The same configurations can also be made on an existing product, by going to Inventory app ‣ Products ‣ Products, and selecting an existing product.
On the product form, enter the product name, and ensure the Can be Sold and Can be Purchased options are enabled, located beneath the Product Name field.
Then, set the Product Type to Storable Product, under the General Information tab.
Next, click the Purchase tab, and under Vendor, click Add a line to select a vendor from the drop-down menu. Then, set a purchase price under Price.
Important
A vendor must be set for temporary reordering rules to work. While a PO can still be created automatically, attempting to replenish the product from the Replenishment dashboard in the Inventory app triggers a warning to add a vendor on the product form.
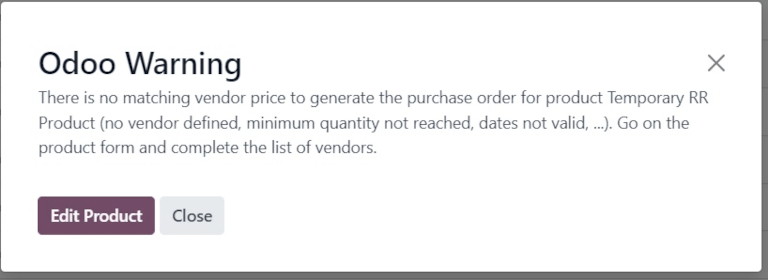
Before creating a SO for the product, ensure the On Hand smart button on the product form reads 0.00 Units. Then, ensure that the Reordering Rules smart button reads 0, indicating there are no rules applied to this product.

Trigger temporary reordering rule
To trigger a temporary reordering rule, create a new sales order for a product by navigating to Sales app ‣ New.
Then, add a customer in the Customer field, and click Add a product under the Product column in the Order Lines tab. Next, select the desired product from the drop-down menu. Lastly, Confirm the SO.
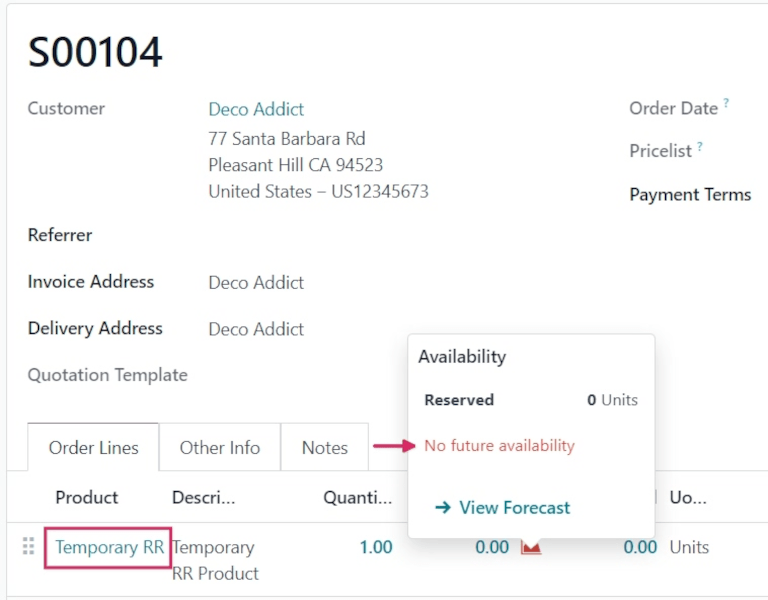
Check replenishment report
To see the temporary reordering rule created for the out-of-stock product included in the sales order, navigate to Inventory app ‣ Operations ‣ Replenishment. Doing so opens the Replenishment dashboard.
On this dashboard, locate the product for which the temporary reordering rule was created. On its product line, its On Hand quantity, negative Forecast quantity, Buy Route, and To Order quantity to replenish can be seen.
Additionally, two replenishment options are located to the far-right of the row: Order Once and Automate.

To use the one-time, temporary reordering rule, click Order Once. This action triggers a confirmation pop-up window in the top-right corner, reading The following replenishment order has been generated, along with a new purchase order number.
Tip
Once the purchase order has been generated after clicking Order Once, refresh the page. The temporary reordering rule for the product no longer appears in the Replenishment dashboard.
Complete purchase order
To view the purchase order created from the Replenishment dashboard, navigate to the Purchase app, and select the generated PO from the Requests for Quotation overview.
From here, click Confirm Order, then click Receive Products. Finally, click Validate to complete the purchase order.
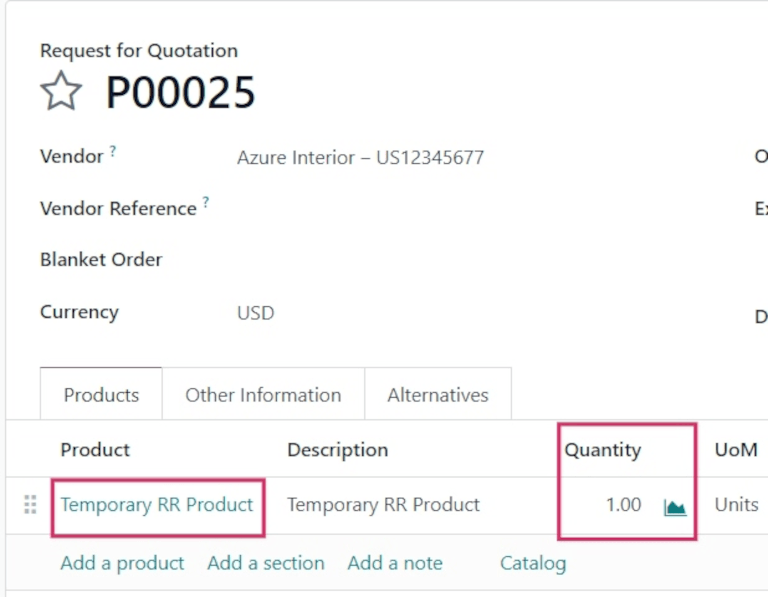
Now, the original sales order can be delivered and invoiced.
Note
Once the SO is delivered and invoiced, ensure there are no reordering rules on the product form.
Go to Inventory app ‣ Products ‣ Products, select the product, and confirm that the Reordering Rules smart button displays 0.
On this page
Get Help
Contact Support Ask the Odoo Community
![]()
- User Docs
- Database management
- Developer
- Contributing
EN
Odoo 18
Requests for quotation
Odoo’s requests for quotation (RFQs) feature in the Purchase app standardizes ordering products from multiple vendors with varying prices and delivery times.
RFQs are documents companies send to vendors requesting product pricing. In Odoo, once the vendor approves the RFQ, the purchase order (PO) is confirmed to align on lead times and pricing.
Configuration
Product
To auto-populate product information and prices on an RFQ, configure products by going to Purchase app ‣ Products ‣ Products. Select an existing product, or create a new one by selecting New. Doing so opens the product form, where various sales and purchasing data can be configured.
To configure purchasable products, tick the Can be purchased checkbox, under the product name. Then, go to the Inventory tab, and enable the Buy route.
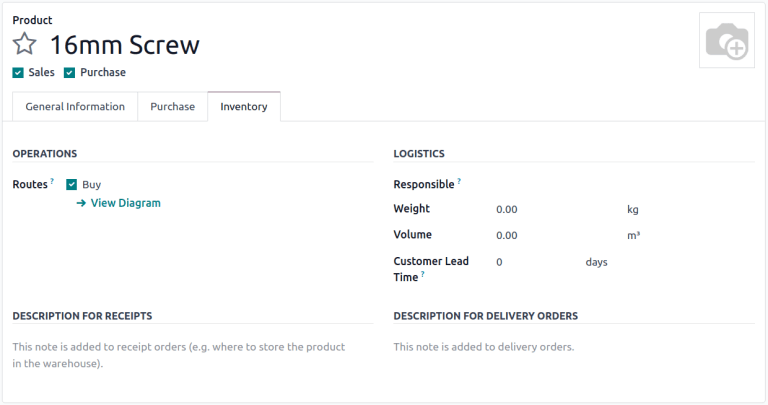
Vendor pricelist
In the Purchase tab of the product form, input the vendor and their price, to have this information auto-populate on an RFQ each time the product is listed.
See also
Default columns include Quantity, Price, and Delivery Lead Time, but other columns like, Product Variant or Discounts, can also be enabled.
To enable or disable columns, click the (additional options) icon on the right side of the header row to reveal a drop-down menu of additional columns that can be added (or removed) from the Purchase tab.
Note
Alternatively, prices and delivery lead times for existing products can be added in bulk by going to Purchase app ‣ Configuration ‣ Vendor Pricelists. Click New in the top-left corner. In the Vendor section of the pricelist form that appears, add the product information as it pertains to the vendor.
Order products
With products and prices configured, follow these steps to create and send RFQs to make purchases for the company.
RFQ dashboard
To get started, navigate to Purchase app ‣ Orders ‣ Requests for Quotation.
The Requests for Quotation dashboard displays an overview of the company’s RFQs, POs, and their status. The top of the screen breaks down all RFQs in the company, as well as individual ones (where the user is the buyer) with a summary of their status.
The top-right corner also provides a quick report of the company’s recent purchases by total value, lead times, and number of RFQs sent.
Additionally, the dashboard includes buttons for:
- To Send: orders in the RFQ stage that have not been sent to the vendor.
- Waiting: RFQs that have been sent by email, and are waiting on vendor confirmation.
- Late: RFQs or POs where the Order Deadline has passed.
In addition to various view options, the Requests for Quotation dashboard provides Filters and Group By options, accessible via the search bar drop-down menu.
See also
Search, filter, and group records
Create new RFQ
To create a new RFQ, click the New button on the top-left corner of the Requests for Quotation dashboard to reveal a new PO form.
Start by assigning a Vendor.
The Vendor Reference field points to the sales and delivery order numbers sent by the vendor. This comes in handy once products are received, and the PO needs to be matched to the delivery order.
The Blanket Order field refers to long-term purchase agreements on recurring orders with set pricing. To view and configure blanket orders, head to Purchase app ‣ Orders ‣ Purchase agreements.
The Currency can be changed, if purchasing products from a vendor in another country.
Next, configure an Order Deadline, which is the date by which the vendor must confirm their agreement to supply the products.
Note
After the Order Deadline is exceeded, the RFQ is marked as late, but the products can still be ordered.
Expected Arrival is automatically calculated based on the Order Deadline and vendor lead time. Tick the checkbox for Ask confirmation to ask for signage at delivery.
With the Storage Locations feature activated, the Deliver to field appears, with options for the order shipment.
Select the receiving warehouse address here, or select Dropship to indicate that this order is to be shipped directly to the end customer. When Dropship is selected, the Dropship address field is enabled. Contact names auto-populate here from the Contacts app.
Products tab
In the Products tab, add the products to be ordered. Click Add a product, and type in the product name, or select the item from the drop-down menu.
To create a new product and add it, type the new product name in the Product column, select Create [product name] from the resulting drop-down menu, and manually add the unit price. Or, select Create and edit… to be taken to the product form for that new item.
Catalog can also be selected to navigate to a product menu from the chosen vendor. From here, products can be added to the cart.
Note
To make adjustments to products and prices, access the product form by clicking the (right arrow) icon that becomes available upon hovering over the Product name.
Send RFQ
Clicking Send by Email reveals a Compose Email pop-up window, with a Purchase: Request for Quotation template loaded, ready to send to the vendor’s email address (configured in the Contacts app).
After crafting the desired message, click Send. Once sent, the RFQ moves to the RFQ Sent stage.
Clicking Print RFQ downloads a PDF of the RFQ.
Confirm order
Clicking Confirm Order directly transforms the RFQ into an active PO.
Tip
Odoo tracks communications on each order through the chatter of the PO form. This shows the emails sent between the user and the contact, as well as any internal notes and activities. Messages, notes, and activities can also be logged on the chatter.
Once an RFQ is confirmed, it creates a PO.
On the new PO, the Order Deadline field changes to Confirmation Date, which displays the date and time the user confirmed the order.
Depending on the user’s chosen configuration in the Purchase app settings, a vendor bill is created once products have been ordered or received. For more information, refer to the documentation on managing vendor bills.
Note
After an order is placed, clicking Receive Products records the reception of new products into the database.
Note
With the Inventory app installed, confirming a PO automatically creates a receipt document, with the product information and expected arrival dates automatically populated.
See also
On this page
Get Help
Contact Support Ask the Odoo Community
![]()
- User Docs
- Database management
- Developer
- Contributing
EN
Odoo 18
Blanket orders
Blanket orders are long-term purchase agreements between a company and a vendor to deliver products on a recurring basis with predetermined pricing.
Blanket orders are helpful when products are consistently purchased from the same vendor, but in different quantities, and at different times.
By simplifying the ordering process, blanket orders not only save time, they also save money, since they can be advantageous when negotiating bulk pricing with vendors.
Create a new blanket order
To create blanket orders, enable the Purchase Agreements feature from the Purchase app settings. Navigate to Purchase app ‣ Configuration ‣ Settings, and under the Orders section, click the checkbox for Purchase Agreements. Then click Save to implement the changes.
Note
In addition to creating blanket orders, the Purchase Agreements setting also allows users to create alternative requests for quotation (RfQs).
![]()
To create a blanket order, go to Purchase app ‣ Orders ‣ Blanket Orders, and click New. This opens a new blanket order form.
Configure the following fields in the new blanket order form to establish predetermined rules for the recurring long-term agreement:
- Purchase Representative: the user assigned to this specific blanket order. By default, this is the user who created the agreement; the user can be changed directly from the drop-down menu next to this field.
- Agreement Type: the type of purchase agreement this blanket order is classified as. In Odoo, blanket orders are the only official purchase agreement.
- Vendor: the supplier to whom this agreement is tied, either once or on a recurring basis. The vendor can be selected directly from the drop-down menu next to this field.
- Currency: the agreed-upon currency to be used for this exchange. If multiple currencies have been activated in the database, the currency can be changed from the drop-down menu next to this field.
- Agreement Deadline: the date that this purchase agreement will be set to expire on. If this blanket order should not expire, leave this field blank.
- Ordering Date: the date that this blanket order should be placed on if a new quotation is created directly from the blanket order form. If a new quotation is created, this value automatically populates the Order Deadline field on the RfQ.
- Delivery Date: the expected delivery date that the products included in an RfQ are expected, if created directly from a blanket order form. If a new quotation is created, this value automatically populates the Expected Arrival field on the RfQ.
- Source Document: the source purchase order (PO) that this blanket order is tied to. If this blanket order should not be tied to any existing PO, leave this field blank.
- Company: the company assigned to this specific blanket order. By default, this is the company that the user creating the blanket order is listed under. If the database is not a multi-company database, this field cannot be changed, and defaults to the only company listed in the database.
![]()
Once all relevant fields have been filled out, click Add a line to add products under the Product column. Then, in the Quantity column, change the quantity of each product, and set a price in the Unit Price column.
Important
When adding products to a new blanket order, the pre-existing prices of products are not automatically added to the product lines. Instead, the prices must be manually assigned, by changing the value in the Unit Price column to an agreed-upon price with the listed vendor. Otherwise, the price will remain 0.
To view and change the default purchase agreement settings for blanket orders directly from the blanket order form, click the ➡️ (right arrow) icon that becomes visible when hovering over the Agreement Type field, where Blanket Order is listed. This navigates to the blanket order settings.
![]()
From here, the settings for blanket orders can be edited. Under the Agreement Type section, the name of the Agreement Type can be changed, and the Agreement Selection Type can be changed, as well. There are two options that can be activated for the type of selection:
- Select only one RfQ (exclusive): when a purchase order is confirmed, the remaining purchase orders are cancelled.
- Select multiple RfQ (non-exclusive): when a purchase order is confirmed, remaining purchase orders are not cancelled. Instead, multiple purchase orders are allowed.
Under the Data For New Quotations section, the Lines and Quantities fields can be edited. Doing so sets how new quotations should be populated when using this purchase agreement.
![]()
There are two options that can be activated for Lines:
- Use lines of agreement: when creating a new quotation, the product lines pre-populate with the same products listed on the blanket order, if said blanket order is chosen for the new quotation.
- Do not create RfQ lines automatically: when creating a new quotation, and selecting an existing blanket order, the settings carry over to the new quotation, but the product lines do not populate.
And, there are two options that can be activated for Quantities:
- Use quantities of agreement: when creating a new quotation, the product quantities listed on the blanket order pre-populate on the product lines, if said blanket order is chosen for the new quotation.
- Set quantities manually: when creating a new quotation, and selecting an existing blanket order, the product lines pre-populate, but all quantities are set to 0. The quantities must be manually set by the user.
Once any desired changes have been made, click New (via the breadcrumbs, at the top of the page) to navigate back to the blanket order form. Then, click Confirm to save this new purchase agreement.
Once confirmed, the blanket order’s stage (in the upper-right corner) changes from Draft to Ongoing, meaning this agreement can be selected and used when creating new RfQs.
Tip
After creating and confirming a blanket order, products, quantities, and prices can still be edited, added, and removed from the purchase agreement.
Create a new RfQ from the blanket order
After confirming a blanket order, new quotations can be created directly from the blanket order form. RfQs using this form are pre-populated with information based on the rules set in the form. Additionally, new quotations are automatically linked to this blanket order form, via the RFQs/Orders smart button at the top-right of the form.
To create a new quotation from the blanket order form, click the New Quotation button. This opens a new RfQ, that is pre-populated with the correct information, depending on the settings configured on the blanket order form.
From the new RfQ form, click Send by Email to compose and send an email to the listed vendor. Click Print RFQ to generate a printable PDF of the quotation; or, once ready, click Confirm Order to confirm the PO.
![]()
Once the PO has been confirmed, click back to the blanket order form (via the breadcrumbs, at the top of the page). From the blanket order form, there is now one RfQ listed in the RFQs/Orders smart button at the top-right of the form. Click the RFQs/Orders smart button to see the PO that was just created.
![]()
Replenishment
Once a blanket order is confirmed, a new vendor line is added under the Purchase tab of the products included in the order.
This makes blanket orders useful with automated replenishment, because information about the Vendor, Price, and the Agreement are referenced on the vendor line. This information dictates when, where, and at what price the product should be replenished.
![]()
See also
On this page
Get Help
Contact Support Ask the Odoo Community
![]()
- User Docs
- Database management
- Developer
- Contributing
EN
Odoo 18
Call for tenders
Sometimes, companies might want to invite vendors to submit offers for similar goods or services all at once. This helps companies select the cheapest, fastest vendors for their specific business needs.
In Odoo, this can be done by creating alternative requests for quotation (RfQs) for different vendors. Once a response is received from each vendor, the product lines from each RfQ can be compared, and a decision can be made for which products to purchase from which vendors.
Note
Sometimes referred to as a call for tender, this process is primarily used by organizations in the public sector, who are legally bound to use it when making a purchase. However, private companies can also use alternative RfQs to spend money efficiently.
Configuration
To create alternative RfQs, the Purchase Agreements feature must be enabled in the Purchase app settings. To enable the feature, navigate to Purchase app ‣ Configuration ‣ Settings. Under the Orders section, click the checkbox for Purchase Agreements.
Then, click Save to apply the change.
Create an RfQ
To create a new RfQ, follow the instructions in the Requests for quotation documentation.
See also
Odoo Tutorial: Purchase Basics and Your First Request for Quotation
Create alternative RfQs
Once a PO is created and sent to a vendor, alternative RfQs can be created for additional vendors to compare prices, delivery times, and other factors, to help make a decision for the order.
To create alternative RfQs from the original, click the Alternatives tab. Then, click Create Alternative. When clicked, a Create alternative pop-up window appears.
From this window, select an alternative vendor from the drop-down menu next to the Vendor field, to whom the alternative quotation is assigned.
Next to this, there is a Copy Products checkbox that is selected by default. When selected, the product quantities of the original RfQ are copied over to the alternative. For this first alternative quotation, leave the checkbox checked. Once finished, click Create Alternative. This opens a new RfQ form.
Since the Create Alternative checkbox was left checked, the new form is already pre-populated with the same products, quantities, and other details as the previous, original RfQ.
Note
When the Copy Products checkbox is selected while creating an alternative quotation, additional products do not need to be added, unless desired.
However, if a chosen vendor is listed in the Vendor column under a specific product form included in the order, the values set on the product form carry over to the RfQ, and must be changed manually, if necessary.
Once ready, create a second alternative quotation by clicking the Alternatives tab, followed by Create Alternative.
This opens the Create alternative pop-up window. Once again, choose a different vendor from the drop-down menu next to Vendor. For this particular RfQ, however, uncheck the Copy Products checkbox. Doing so removes all products on the new alternative RfQ, leaving it blank. The specific products which should be ordered from this particular vendor can be added in as needed.
Once ready, click Create Alternative.
Tip
If an alternative quotation should be removed from the Alternatives tab, they can be individually removed by clicking on the X (remove) icon at the end of their row.
This creates a third, new RfQ. But, since the product quantities of the original RfQ were not copied over, the product lines are empty, and new products can be added as needed by clicking Add a product, and selecting the desired products from the drop-down menu.
Once the desired number of specific products are added, click Send by Email.
![]()
This opens a Compose Email pop-up window, wherein the message to the vendor can be customized, and attachments can be added, if necessary. Once ready, click Send.
From this newest form, click the Alternatives tab. Under this tab, all three RfQs can be seen in the Reference column. Additionally, the vendors are listed under the Vendor column, and the order Total (and Status) of the orders are in the rows, as well.
The date in the Expected Arrival column is calculated for each vendor, based on any pre-configured lead times in the vendor and product forms.
Link new RfQ to existing quotations
Even if a quotation is not created directly from the Alternatives tab of another RfQ, it can still be linked to existing RfQs.
To do that, begin by creating a new RfQ. Navigate to Purchase app ‣ New. Fill out the RfQ, according to the previous instructions.
Then, once ready, click the Alternatives tab. Since this new RfQ was created separately, there are no other orders linked yet.
However, to link this RfQ with existing alternatives, click Link to Existing RfQ on the first line in the Vendor column.

This opens an Add: Alternative POs pop-up window. Select the desired previously-created RfQs, and click Select. All of these orders are now copied to this RfQ, and can be found under the Alternatives tab.
Tip
If a large number of POs are being processed, and the previous POs can’t be located, click the (chevron) icon to the right of the search bar, at the top of the pop-up window.
Then, under the Group By section, click Vendor. Vendors are displayed in their own nested drop-down lists, and each vendor’s list can be expanded to view open POs for that vendor.
Compare product lines
Alternative RfQs can be compared side-by-side, in order to determine which vendors offer the best deals on the products included in the orders.
To compare alternative RfQs, navigate to the Purchase app, and select one of the previously-created RfQs.
Then, click the Alternatives tab to see all linked RfQs. Next, under the Create Alternative option, click Compare Product Lines. This navigates to the Compare Order Lines page.
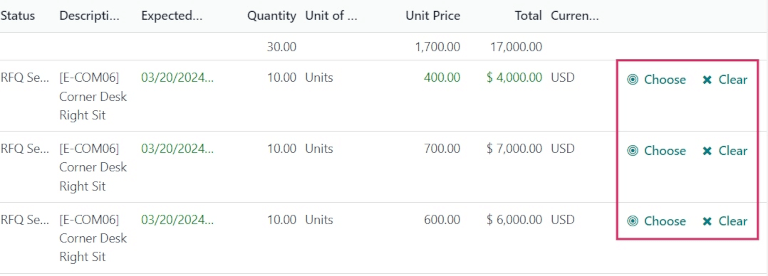
The Compare Order Lines page, by default, groups by Product. Each product included in any of the RfQs is displayed in its own nested drop-down list, and features all of the PO numbers in the Reference column.
Note
To remove product lines from the Compare Order Lines page, click Clear at the far-right end of that product line’s row.
Doing so removes this specific product as a selectable option from the page, and changes the Total price of that product on the page to 0.
Additionally, on the RfQ form, in which that product was included, its ordered quantity is also changed to 0.
Once the best offers have been identified, individual products can be selected by clicking the Choose button at the end of each corresponding row.
Once all desired products have been chosen, click Requests for Quotation (in the breadcrumbs, at the top of the page) to navigate back to an overview of all RfQs.
Cancel (or keep) alternatives
Once the desired products have been chosen from the Compare Order Lines page, the remaining RfQs, from which no products were chosen, can be cancelled.
The cost in the Total column for each product that wasn’t chosen is automatically set to 0, indicated at the far-right of each corresponding row.
Although they haven’t been cancelled yet, this indicates that each of those orders can be cancelled without having an effect on the other live orders, once those orders have been confirmed.
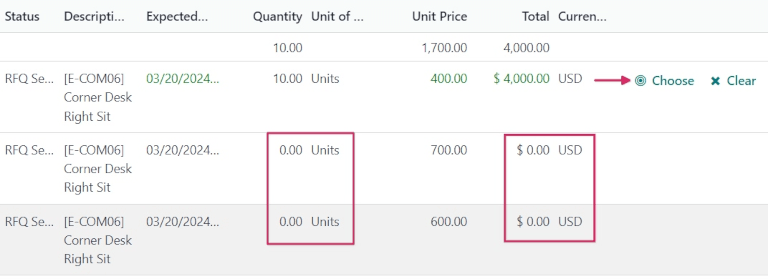
To confirm an RfQ for which products were selected, click into an RfQ, and click Confirm Order.
This causes a What about the alternative Requests for Quotations? pop-up window to appear.
To view a detailed form of one of the RfQs listed, click the line item for that quotation. This opens an Open: Alternative POs pop-up window, from which all details of that particular RfQ can be viewed.
Once ready, click Close to close the pop-up window.
In the What about the alternative Requests for Quotations? pop-up window, two options are presented: Cancel Alternatives and Keep Alternatives.
If this PO should not be confirmed, click Discard.
Selecting Cancel Alternatives automatically cancels the alternative RfQs. Selecting Keep Alternatives keeps the alternative RfQs open, so they can still be accessed, if any additional product quantities need to be ordered later.
Once all products are ordered, select Cancel Alternatives from whichever PO is open at that time.
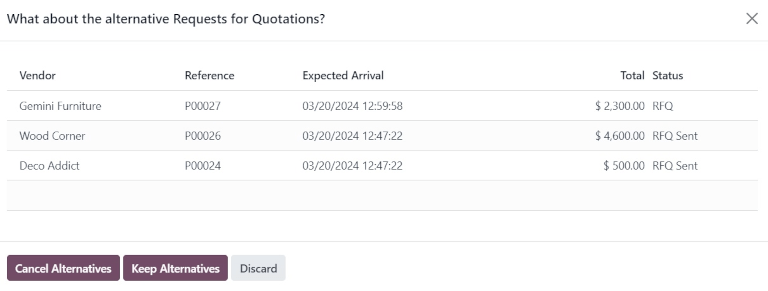
Finally, using the breadcrumbs at the top of the page, click Requests for Quotation to navigate back to an overview of all RfQs.
The cancelled orders can be seen, greyed out and listed with a Cancelled status, under the Status column at the far-right of their respective rows.
Now that all product quantities have been ordered, the purchase process can be completed, and the products can be received into the warehouse.
See also
On this page
Get Help
Contact Support Ask the Odoo Community
![]()
- User Docs
- Database management
- Developer
- Contributing
EN
Odoo 18
Purchase templates
Purchase templates are an agreement type that allow for the repeated creation of requests for quotations (RFQs) for recurring purchases. Products can then be added and quantities can be changed, as needed. Purchase templates can be used for multiple vendors, saving time and simplifying the RFQ process.
Purchase templates differ from blanket orders in that a blanket order is a large order split into several deliveries, therefore all RFQs must be for the same vendor. Purchase templates can be replicated for multiple vendors, and can copy over quantities, which is useful when placing frequent orders.
Configuration
First, navigate to Purchase app ‣ Configuration ‣ Settings. Under the Orders section, tick the Purchase Agreements checkbox. Click Save to save the changes.

Create a new template
Navigate Purchase app ‣ Orders ‣ Purchase Agreements and click New.
Select a Vendor from the drop-down list.
Tip
To make this template available to use with multiple vendors, leave the Vendor field blank.
In the Agreement Type field, select Purchase Template from the drop-down.
Confirm the information in the remaining fields is correct, or update as needed.
On the Products tab, click Add a line, and select the desired product. Update the Quantity, and set the Unit Price.
Important
When adding products to a new blanket order, the pre-existing prices of products are not automatically added to the product lines. Instead, the prices must be manually assigned, by changing the value in the Unit Price column to an agreed-upon price with the listed vendor. Otherwise, the price will remain 0.
After adding all necessary products, click Confirm.
Create a new RFQ from a purchase template
After confirming a purchase template, new quotations can be created directly from the purchase template form. RFQs using this form are pre-populated with information based on the rules set in the form. Additionally, new quotations are automatically linked to this purchase template form, via the RFQs/Orders smart button at the top of the form.
To create a new quotation, click New Quotation. This opens a new RFQ, that is pre-populated with the correct information, depending on the settings configured on the purchase template form.
If there was no vendor identified on the purchase template, choose a Vendor from the drop-down list. Products can be added to the RFQ by clicking Add a product in the Products tab. To remove a product, click the (trash) icon at the far-right of the product line.
From the new RFQ form, click Send by Email to compose and send an email to the listed vendor. Click Print RFQ to generate a printable PDF of the quotation; or, once ready, click Confirm Order to confirm the purchase order.
After confirming the order, return to the purchase template via the breadcrumbs. The RFQs/Orders smart button has been updated to list the confirmed order.

On this page
Get Help
Contact Support Ask the Odoo Community
![]()
- User Docs
- Database management
- Developer
- Contributing
EN
Odoo 18
Bill control policies
In Odoo’s Purchase app, the bill control policy determines the quantities billed by vendors on every purchase order (PO), for either ordered or received quantities.
The policy selected in the Purchase app settings acts as the default value, and is applied to any new product created.
Configuration
To configure the bill control policy, navigate to Purchase app ‣ Configuration ‣ Settings, and scroll down to the Invoicing section. Under Bill Control, select either Ordered quantities or Received quantities. Then, click Save.
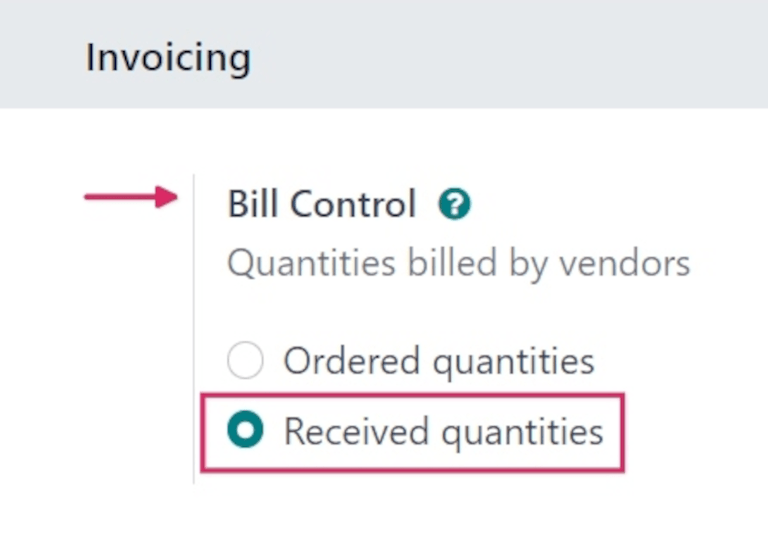
- Ordered quantities: creates a vendor bill as soon as a PO is confirmed. The products and quantities in the PO are used to generate a draft bill.
- Received quantities: a bill is created only after part of the total order has been received. The products and quantities received are used to generate a draft bill. An error message appears if creation of a vendor bill is attempted without receiving anything.
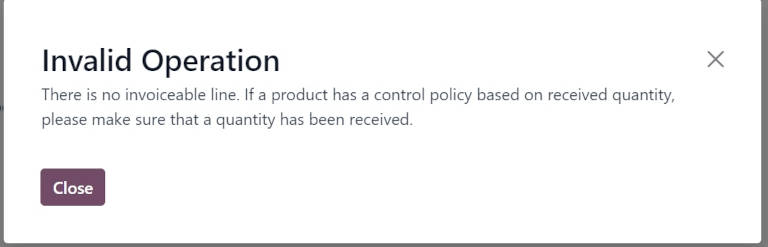
Note
If a specific product should use a different control policy than selected in the Purchase app settings, the Bill Control policy for that product can be changed from its product form.
To do that, navigate to Purchase app ‣ Products ‣ Products, and select a product. From the product form, click the Purchase tab. Under the Vendor Bills section, modify the selection in the Control Policy field.
3-way matching
The 3-way matching feature ensures vendor bills are only paid once some (or all) of the products included in the PO have been received.
To activate 3-way matching, navigate to Purchase app ‣ Configuration ‣ Settings, and scroll down to the Invoicing section. Then, tick the checkbox for 3-way matching to enable the feature, and click Save.
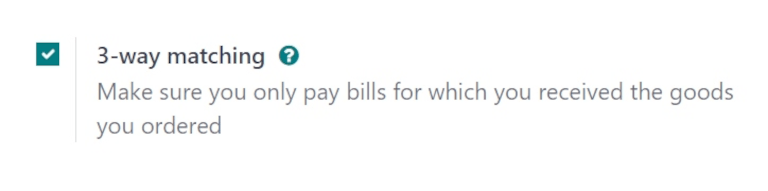
Important
The 3-way matching feature only works with the Bill Control policy set to Received quantities.
Pay vendor bills with 3-way matching
When 3-way matching is enabled, vendor bills display a Should Be Paid field under the Other Info tab. When a new vendor bill is created, the field is set to Yes, since a bill cannot be created until at least some of the products included in a PO have been received.
To create a vendor bill from a PO, navigate to Purchase app ‣ Orders ‣ Purchase Orders. From the Purchase Orders page, select the desired PO from the list. Then, click Create Bill. Doing so opens a new draft Vendor Bill form, in the Draft stage. Click the Other Info tab, and locate the Should Be Paid field.
Important
The PO selected from the list must not be billed yet, or an Invalid Operation pop-up window appears. This occurs for POs with a Received quantities policy, and a Fully Billed Billing Status.
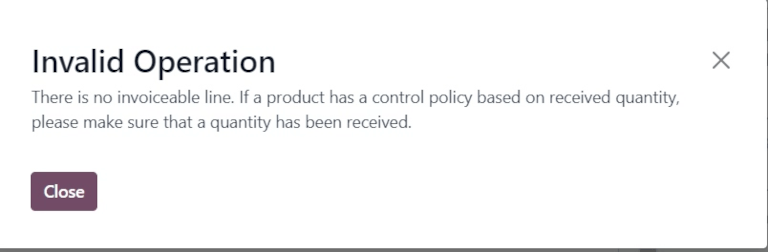
Click the drop-down menu next to Should Be Paid to view the available options: Yes, No, and Exception.
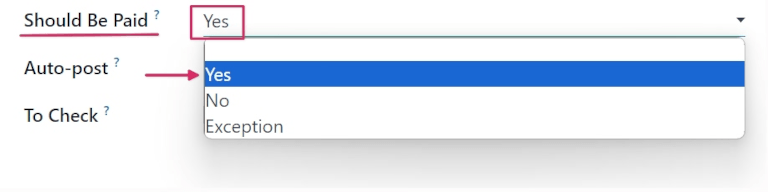
Note
If the total quantity of products from a PO has not been received, Odoo only includes the products that have been received in the draft vendor bill.
Draft vendor bills can be edited to increase the billed quantity, change the price of the products in the bill, and add additional products to the bill.
If the draft bill’s information is changed, the Should Be Paid field status is set to Exception. This means that Odoo notices the discrepancy, but does not block the changes or display an error message, since there might be a valid reason for making changes to the draft bill.
To process the vendor bill, select a date in the Bill Date field, and click Confirm, followed by Register Payment.
This opens a Register Payment pop-up window. From this window, accounting information is pre-populated based on the database’s accounting settings. Click Create Payment to process the vendor bill.
Once payment has been registered for a vendor bill, and the bill displays the green Paid banner, the Should Be Paid field status is set to No.
Tip
The Should Be Paid status on bills is automatically set by Odoo. However, the status can be manually changed by clicking the field’s drop-down menu inside the Other Info tab.
View a purchase order’s billing status
Once a PO is confirmed, its Billing Status can be viewed under the Other Information tab on the PO form.
To view the Billing Status of a PO, navigate to Purchase app ‣ Orders ‣ Purchase Orders, and select a PO to view.
Click the Other Information tab, and locate the Billing Status field.
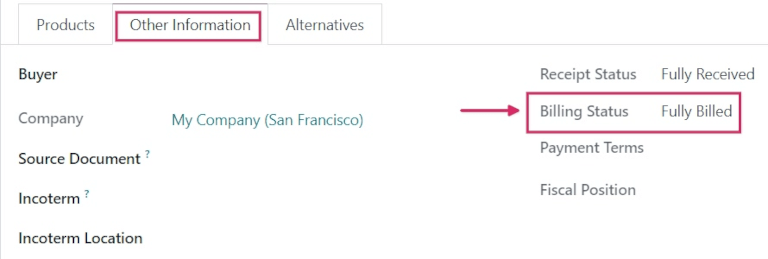
The table below details the different values the Billing Status field could read, and when they are displayed, depending on the Bill Control policy used.
Billing Status | On received quantities | On ordered quantities |
|---|---|---|
Nothing to Bill | PO confirmed; no products received | Not applicable |
Waiting Bills | All/some products received; bill not created | PO confirmed |
Fully Billed | All/some products received; draft bill created | Draft bill created |
See also
On this page
Get Help
Contact Support Ask the Odoo Community
![]()
- User Docs
- Database management
- Developer
- Contributing
EN
Odoo 18
Manage vendor bills
A vendor bill is an invoice received for products and/or services purchased by a company from a vendor. Vendor bills record payables as they arrive from vendors, and can include amounts owed for the goods and/or services purchased, sales taxes, freight and delivery charges, and more.
In Odoo, a vendor bill can be created at different points in the purchasing process, depending on the bill control policy chosen in the Purchase app’s settings.
Bill control policies
To configure the default bill control policy, navigate to Purchase app ‣ Configuration ‣ Settings, and scroll to the Invoicing section.
The Bill Control feature lists two policy options: Ordered quantities and Received quantities.
The policy selected acts as the default for any new product created. Each policy acts as follows:
- Ordered quantities: creates a vendor bill as soon as a purchase order is confirmed. The products and quantities in the purchase order are used to generate a draft bill.
- Received quantities: a bill is only created after all (or part) of the total order has been received. The products and quantities received are used to generate a draft bill.
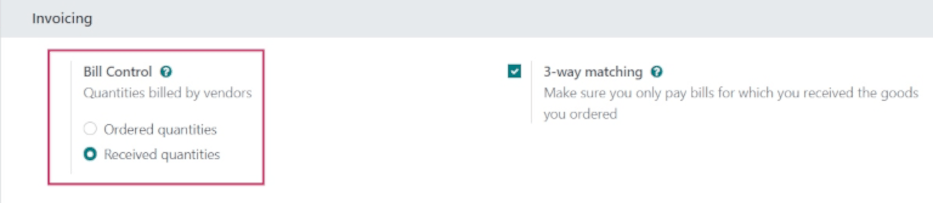
Once a policy is selected, click Save to save the changes.
Tip
If a product needs a different control policy than the one set in the Purchase app settings, that product’s control policy can be overridden by going to the Purchase tab on a product form, and selecting the desired policy in the Control Policy field.
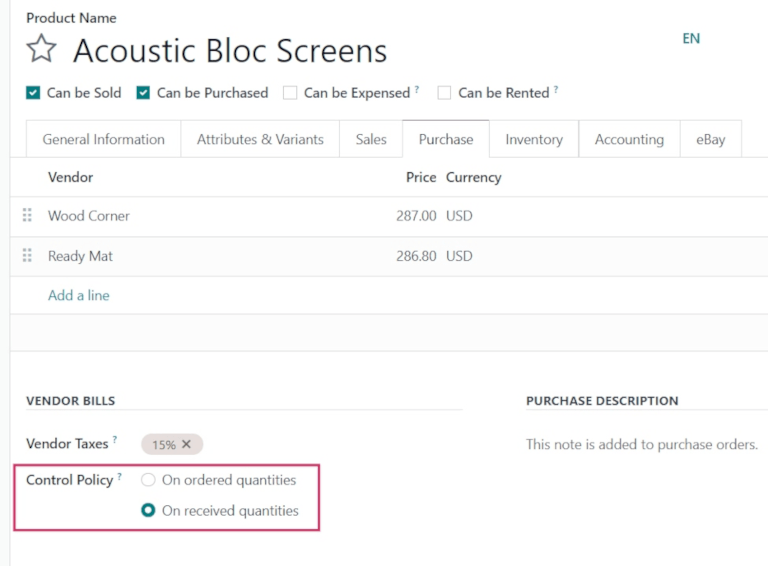
3-way matching
The 3-way matching policy ensures vendor bills are only paid once all (or some) products in a purchase order (PO) have been received.
To activate 3-way matching, navigate to Purchase app ‣ Configuration ‣ Settings, and scroll to the Invoicing section.
Tick the checkbox next to 3-way matching, and click Save.
Important
The 3-way matching feature is only intended to work with the Bill Control policy set to Received quantities.
Create and manage vendor bills on receipts
When products are received into a company’s warehouse, receipts are created. Once the company processes the received quantities, they can choose to create a vendor bill directly from the warehouse receipt form.
Depending on the bill control policy chosen in the settings, vendor bill creation is completed at different steps of the procurement process.
Ordered quantities
To create and manage vendor bills for receipts with the Bill Control policy set to Ordered Quantities, first navigate to the Purchase app, and click New from the Requests for Quotation dashboard.
Doing so opens a new Request for Quotation (RfQ) form. On the blank RfQ form, add a Vendor, and click Add a line under the Product tab to add products to the order.
On the product line, select a product from the drop-down menu in the Product field, and enter the quantity to order in the Quantity field.
Once ready, click Confirm Order to confirm the RfQ into a PO.
Then, click Create Bill to create a vendor bill. This opens a Vendor Bill form in the Draft state. From here, add a billing date in the Bill Date field.
Once ready, confirm the bill by clicking Confirm on the Vendor Bill page.
Tip
Since the bill control policy is set to Ordered quantities, the draft bill can be confirmed as soon as it is created, before any products have been received.
Once a payment has been received, click Register Payment at the top of the bill to record it.
Doing so causes a Register Payment pop-up window to appear, wherein a payment Journal can be chosen, and a Payment Method selected.
Additionally, the bill Amount, Payment Date, and Memo (Reference Number) can be edited from this pop-up window, if necessary.
Once ready, click Create Payment to finish creating the Vendor Bill. Doing so displays a green Paid banner on the RfQ form.
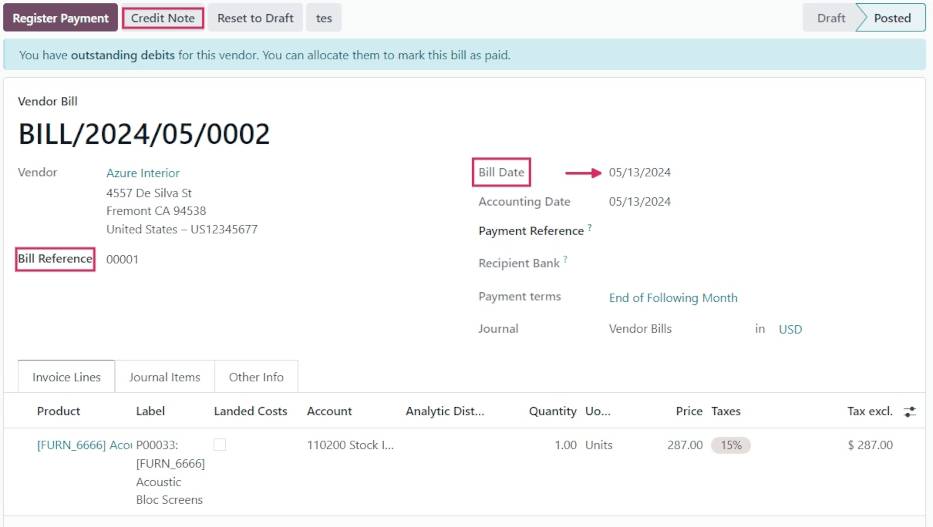
Received quantities
To create and manage vendor bills for receipts with the bill control policy set to Received quantities, first navigate to the Purchase app, and click New.
Doing so opens a new RfQ form. On the blank RfQ form, add a Vendor, and click Add a line under the Product tab to add products to the order.
On the product line, select a product from the drop-down menu in the Product field, and enter the quantity to order in the Quantity field.
Once ready, click Confirm Order to confirm the RfQ into a PO.
Important
When using the Received quantities control policy, clicking Create Bill before any products are received causes an Invalid Operation pop-up window to appear.
Odoo requires at least partial quantities of the items included in the PO to be received in order to create a vendor bill.
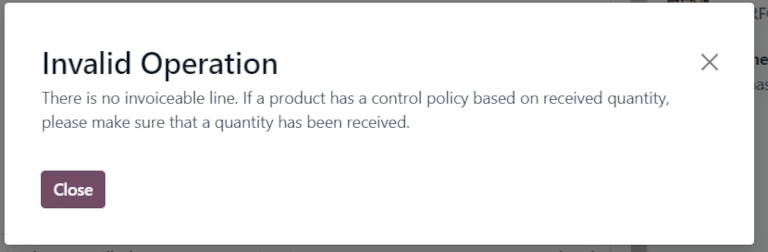
On the PO, click the Receipt smart button to view the warehouse receipt form.
From here, click Validate to register the Done (received) quantities.
Then, navigate back to the PO, via the breadcrumb, and click Create Bill.
This opens a Vendor Bill form in the Draft state. From here, add a billing date in the Bill Date field. Once ready, confirm the bill by clicking Confirm at the top of the draft.
Once a payment has been received, click Register Payment at the top of the bill to record it.
Doing so causes a Register Payment pop-up window to appear, wherein a payment Journal can be chosen, and a Payment Method selected.
Additionally, the bill Amount, Payment Date, and Memo (Reference Number) can be edited from this pop-up window, if necessary.
Once ready, click Create Payment to finish creating the Vendor Bill. Doing so displays a green Paid banner on the RfQ form.
Manage vendor bills in Accounting
Vendor bills can also be created directly from the Accounting app, without having to create a purchase order first.
Navigate to Accounting app ‣ Vendors ‣ Bills, and click New. Doing so reveals a blank Vendor Bill form.
Add a vendor in the Vendor field. Then, in the Invoice Lines tab, click Add a line to add products.
Select a product from the drop-down menu in the Product field, and enter the quantity to order in the Quantity field.
Select a Bill Date, and configure any other necessary information. Finally, click Confirm to confirm the bill.
Once confirmed, click the Journal Items tab to view the Account journals. These journals are populated based on the configuration on the corresponding Vendor and Product forms.
If necessary, click Credit Note to add a credit note to the bill. Additionally, a Bill Reference number can be added.
Once ready, click Register Payment, followed by Create Payment, to complete the Vendor Bill.
Tip
To link a draft bill to an existing purchase order, click the drop-down menu next to Auto-Complete before clicking Confirm, and select a PO from the menu.
The bill auto-populates with the information from the chosen PO.
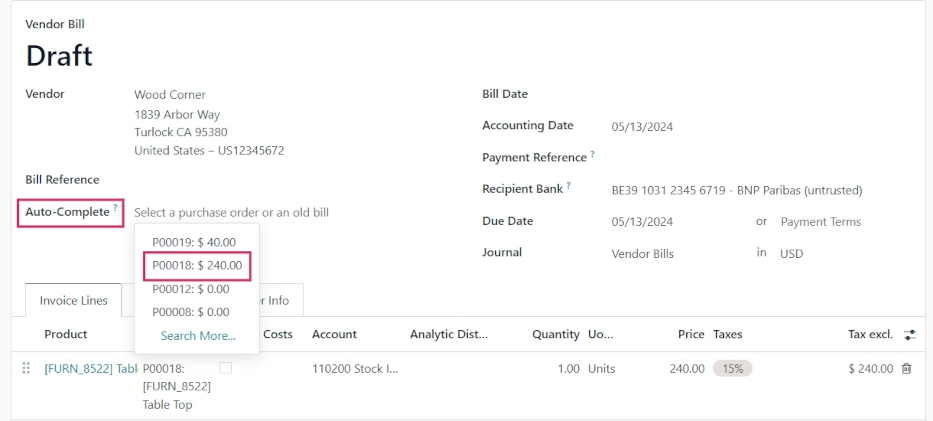
Batch billing
Vendor bills can be processed and managed in batches in the Accounting app.
Navigate to Accounting app ‣ Vendors ‣ Bills. Then, click the checkbox in the top-left corner, beside the Number column, under the New button.
This selects all existing vendor bills with a Status of Posted or Draft.
Click the Print button to print the selected invoices or bills.
Click Register Payment to create and process payments for multiple vendor bills at once.
Note
Only payments with their Status listed as Posted can be billed in batches. Payments in the Draft stage must be posted before they can be included in a batch billing.
Clicking Register Payment opens a Register Payment pop-up window. From the pop-up window, select the Journal the bills should post to, choose a Payment Date, and select a Payment Method.
There is also the option to Group Payments together from this pop-up window, as well. If this checkbox is ticked, only one payment is created, instead of one per bill. This option only appears if the Batch Payments feature is enabled in the settings of the Accounting app.
Once ready, click the Create Payment button. This creates a list of journal entries on a separate page. The journal entries on this list are all tied to their corresponding vendor bills.
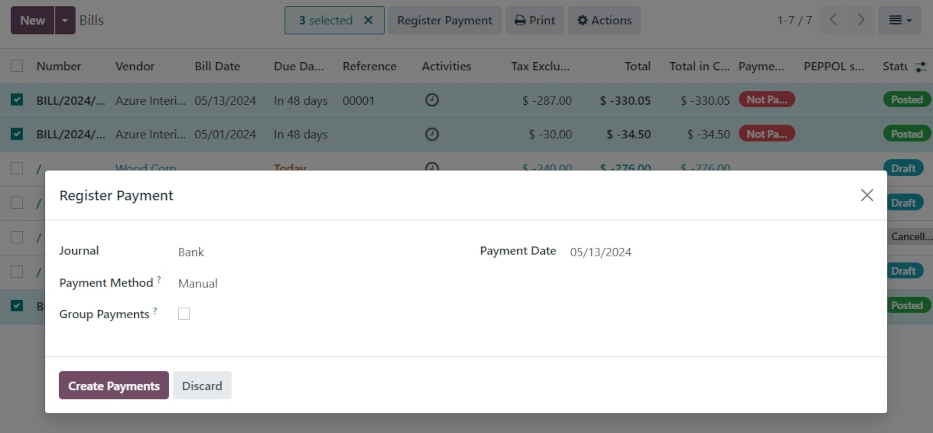
See also
On this page
Get Help
Contact Support Ask the Odoo Community
![]()
- User Docs
- Database management
- Developer
- Contributing
EN
Odoo 18
Purchase Analysis report
The Purchase Analysis report provides statistics about products purchased using Odoo’s Purchase app. This data is useful for gaining a deeper understanding of key metrics related to purchase orders (POs), including the quantity of products ordered and received, the amount of time it takes to receive purchased products, and more.
To open the Purchase Analysis report, navigate to Purchase app ‣ Reporting ‣ Purchase.
Important
The Purchase Analysis report is one of many reports available across the Odoo app suite. This documentation only covers the measures specific to the Purchase Analysis report, along with a few use case examples.
For a full overview of the basic features available in most Odoo reports, see the documentation on reporting essentials.
Measures
Measures refer to the various datasets that can be displayed on the Purchase Analysis report, with each dataset representing a key statistic about POs or products. To choose a measure, click the Measures button, and select one of the options from the drop-down menu:
- # of Lines: The number of PO order lines, across all POs.
- Average Cost: The average cost of POs.
- Days to Confirm: The number of days it takes to confirm a PO.
- Days to Receive: The number of days it takes to receive the products in a PO.
- Gross Weight: The total weight of purchased products.
- Qty Billed: The quantity of a product (or products) for which the vendor has already been billed.
- Qty Ordered: The quantity of a product (or products) ordered.
- Qty Received: The quantity of an ordered product (or products) received.
- Qty to be Billed: The quantity of an ordered product (or products) for which the vendor has yet to be billed.
- Total: The total amount spent, including tax.
- Untaxed Total: The total amount spent, excluding tax. This measure is selected by default.
- Volume: The total volume of ordered products, for products which are measured by volume.
- Count: The total count of POs.
Tip
Only one measure can be selected at a time when one of the (graph view) options is enabled. However, multiple measures, and varying group-by criteria (on the x and y axes), can be selected when using the (pivot table).
Use case: determine days to receive products from each vendor
One possible use case for the Purchase Analysis report is determining how long each vendor takes to deliver purchased items. This allows companies to make better informed decisions about which vendors they want to purchase from.
Example
A local bike shop, Bike Haus, sells high-quality unicycles, bicycles, tricycles, and all the accessories needed to ride and maintain them. They purchase their inventory from a few different vendors, and then sell those products on to customers through their storefront.
Recently, Bike Haus has decided to have their purchasing manager, David, look into how long it has taken each of their vendors to deliver the items they’ve purchased during the current year, 2024.
David starts by navigating to Purchase app ‣ Reporting ‣ Purchase, and selecting the (bar chart) graph type at the top of the report.
Next, he clicks the (toggle) button on the right of the search bar to open its drop-down menu. In the Confirmation Date filter section, he makes sure that only the 2024 filter is enabled. Then, he selects the Vendor option in the Group By section, before clicking away from the drop-down menu to close it.
Finally, David clicks on the Measures drop-down menu, and selects the Days to Receive option.
With all of these options enabled, the Purchase Analysis report shows a bar chart, with one bar for each vendor, representing the average number of days it takes to receive products purchased from the vendor.
Using this data, David can see that it takes Bike Friends over 4.5 days, on average, to deliver purchased products. This is more than four times the amount of time it takes any other vendor.
Based on these findings, David makes the decision to reduce the quantity of products purchased from Bike Friends.
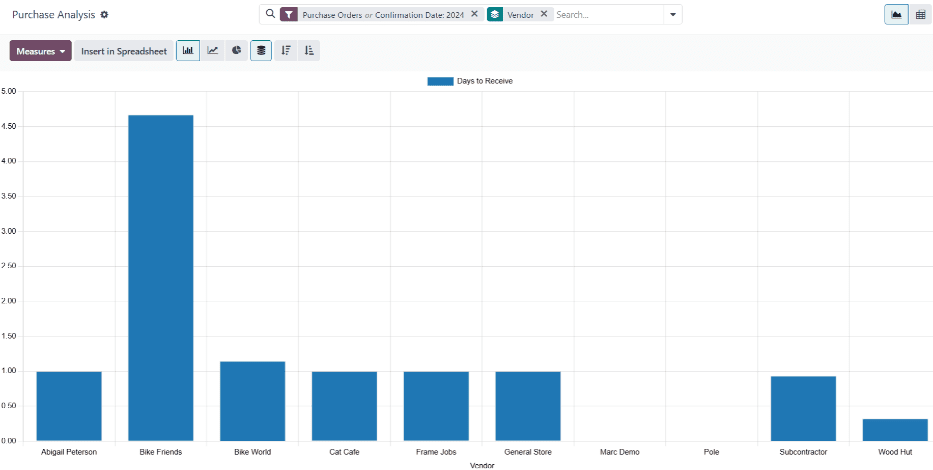
Use case: compare vendor POs for two time periods
Another use for the Purchase Analysis report is to compare key statistics about POs for two different time periods, for a specific vendor. By doing so, it is easy to understand how purchases from the vendor have increased or decreased.
Example
Following the previous example, it has been one month since Bike Haus decided to reduce the quantity of products purchased from Bike Friends, one of their retailers. Bike Haus’ purchasing manager, David, wants to understand the impact this decision has had on the amount of money they have spent on Bike Friends products.
David starts by navigating to Purchase app ‣ Reporting ‣ Purchase. Then, he selects the (pivot table) option at the top of the screen.
In the search bar, he types Bike Friends, and clicks Enter, so the report only shows data for purchases from Bike Friends.
Then, David clicks the (toggle) button on the right of the search bar to open its drop-down menu. In the Confirmation Date field, he leaves the June and 2024 filters enabled. He also selects Confirmation Date: Previous Period in the Comparison section, before clicking away from the drop-down menu to close it.
Next, David clicks on the Measures drop-down menu. He leaves the Total and Untaxed Total datasets enabled, and disables the Order and Count datasets.
Finally, David clicks the Total button above the rows on the pivot table, and selects the Product option.
With all of these options configured, the Purchase Analysis report shows a pivot table comparing purchase data for the current month, June, with the previous month, May.
The pivot table is broken down into two main columns: one for the untaxed total spent, and one for the taxed total spent. These columns are further broken down into three smaller columns: the amount spent in May, the amount spent in June, and the variation between the two months, represented as a percentage.
On the left side of the pivot table, one row is shown for each product purchased from Bike Friends during June. Using this report, David is able to see that Bike Haus has spent much less money on products purchased from Bike Friends, compared to the previous month.
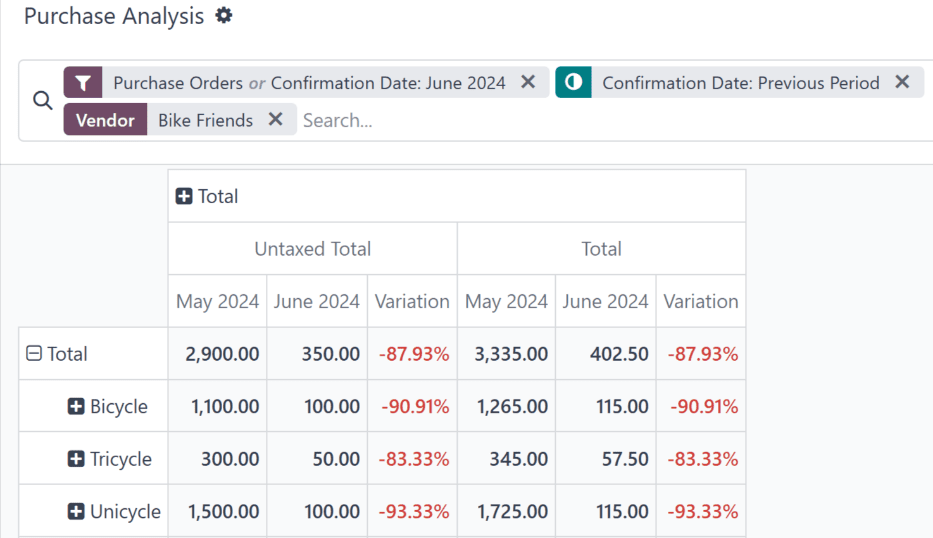
On this page
Get Help
Contact Support Ask the Odoo Community
![]()
- User Docs
- Database management
- Developer
- Contributing
EN
Odoo 18
Vendor costs report
With the Purchase application, users can track the fluctuation of vendor costs over time. This allows users to identify the most expensive vendors, and track seasonal changes.
Create vendor costs reports
To create a vendor costs report, first navigate to Purchase app ‣ Reporting ‣ Purchase to open the Purchase Analysis dashboard. By default, the dashboard displays a line chart overview of the Untaxed Total of POs (Purchase Orders) with a Confirmation Date for the current month, or of RFQs (Requests for Quotation) with a status of Draft, Sent, or *Cancelled.
Add filters and groups
On the top-right, click the (pivot) icon to switch to pivot view.
Remove any default filters from the Search… bar. Then, click the (down) icon to open the drop-down menu that contains the Filters, Group By, and Favorites columns.
Note
Unless otherwise specified, the report displays data from both RfQs and POs. This can be changed by selecting either Requests for Quotation or Purchase Orders under the Filters column.
Under the Filters column, select a date range to use for comparison. The report can be filtered by either Order Date or Confirmation Date. Choose one from the list, and click the (down) icon to specify the date range, either by month, quarter, or year.
Next, under the Group by column, select Vendor. Then, select Product, which is also located in the Group By column.
Note
Selecting Product is not required for this report. However, it is recommended, as it provides additional insight into the performance of individual vendors. Additional selections can be made under the Group by heading as well, including Product Category, Status, and Purchase Representative.
To ensure the report is generated correctly, make sure that Vendor is the first selection made under the Group By column.
Next, make a selection under the Comparison heading. These options are only available after the date range is selected under the Filters column, and vary based on that range. Previous Period adds a comparison to the previous period, such as the last month or quarter. Previous Year compares the same time period from the previous year.
Note
While multiple time-based filters can be added at once, only one comparison can be selected at a time.

Add measures
After selecting the Filters, Group by, and Comparison settings, click out of the drop-down menu.
By default, the report displays with the following measures: Order, Total, Untaxed Total, and Count. Click Measures at the top-left to open the drop-down list of available measures. Click Average Cost to add it to the report. Select any additional measures to add to the report, or click on any of the already selected measures to remove them, if desired.
Tip
It is recommended to run the report with at least Average Cost, Total, or Untaxed Total selected from the Measures list. Additional measures, such as Days to Receive, can be added to provide additional insights.
View results
After all of the filters and measures have been selected, the report generates in the pivot view. Click Insert in Spreadsheet to add the pivot view into an editable spreadsheet format within the Documents app.
Important
The Insert in Spreadsheet option is only available if the Documents Spreadsheet module is installed.

Note
The vendor costs report is also available in graph view. Click the (area chart) icon to change to graph view. Click the corresponding icon at the top of the report to switch to a (bar chart), (line chart), or (pie chart).
See also
To save this report as a favorite, see Favorites.
On this page
Get Help
Contact Support Ask the Odoo Community
![]()
- User Docs
- Database management
- Developer
- Contributing
EN
Odoo 18
Procurement expenses report
With the Purchase application, users can monitor procurement expenses over time. This report helps companies track and analyze spending, identify cost-saving opportunities, and ensure efficient budget management.
Create procurement expenses report
To create a procurement expenses report, first navigate to Purchase app ‣ Reporting ‣ Purchase to open the Purchase Analysis dashboard.
By default, the dashboard displays a line chart overview of the Untaxed Total of Purchase Orders (POs) with a Confirmation Date for the current month, or of Requests for Quotation (RFQs) with a status of Draft, Sent, or Cancelled.
Add filters and groups
On the top-right, click the (pivot) icon to switch to pivot view.
Tip
While the procurement expenses report can also be viewed as a (bar chart), (line chart), or (pie chart), the pivot view provides the most detailed view of the data, and is the recommended starting point.
Remove any default filters from the Search… bar. Then, click the (down) icon to open the drop-down menu that contains the Filters, Group By, and Favorites columns.
Note
Unless otherwise specified, the report displays data from both RfQs and POs. This can be changed by selecting either Requests for Quotation or Purchase Orders under the Filters column.
Under the Filters column, select a time frame to use for comparison. The report can be filtered by either Order Date or Confirmation Date. Choose one from the list, and click the (down) icon to specify the date range, either by month, quarter, or year.
Next, under the Group by column, select Vendor. Then, select Product Category, which is also located in the Group By column.
Note
The selections under the Group By heading can be altered, depending on the needs of the individual company. For example, selecting Product, instead of Product Category, provides a more in depth look at the performance of specific items, in place of an entire category.
Next, make a selection under the Comparison heading that appears. These options are only available after the date range is selected under the Filters column, and vary based on that range. Previous Period adds a comparison to the previous period, such as the last month or quarter. Previous Year compares the same time period from the previous year.
Note
While multiple time-based filters can be added at once, only one comparison can be selected at a time.
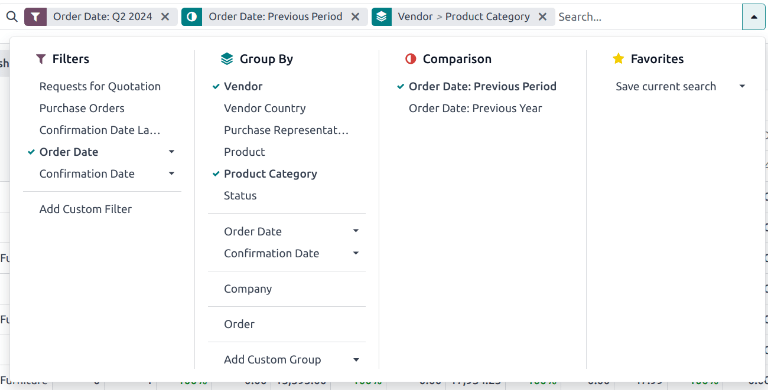
The filter for Q2, comparison for Previous Period, and group-by for Vendor and Product Category were selected.
Add measures
After selecting the Filters, Group by, and Comparison settings, click out of the drop-down menu.
By default, the report displays data with the following measures: Order, Total, Untaxed Total, and Count. Click Measures at the top-left to open the drop-down list of available measures.
Click the following specific measures to include additional columns for the procurement expenses report:
- Total and Untaxed Total: can include one or both measures. These are included for overall spending analysis.
- Average Cost: included to evaluate cost efficiency.
- Days to Confirm and Days to Receive: used to assess supplier performance.
- Qty Ordered and Qty Received: used to understand order efficiency.
- Qty Billed and Qty to be Billed: used to track order accuracy.
Tip
Additional measures can be included in the report, if desired, to provide additional insights. For example, Gross Weight and Volume may be included for further logistics and management analysis.
After selecting all necessary measures, click out of the drop-down menu.
View results
After all of the filters and measures have been selected, the report generates in the selected view.
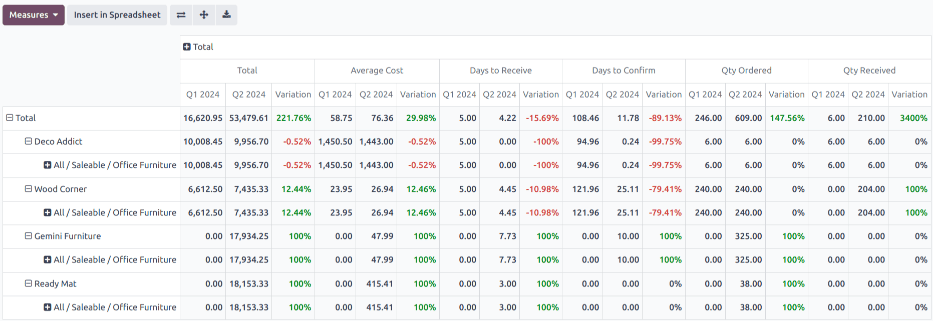
Click Insert in Spreadsheet to add the pivot view into an editable spreadsheet format within the Documents app.
Important
The Insert in Spreadsheet option is only available if the Documents Spreadsheet module is installed.
Note
The procurement expenses report is also available in graph view. Click the (area chart) icon to change to graph view. Click the corresponding icon at the top of the report to switch to a (bar chart), (line chart), or (pie chart).
See also
To save this report as a favorite, see Favorites.
On this page
Get Help
Contact Support Ask the Odoo Community
![]()
EN
Odoo 18
Barcode
Odoo Barcode allows users to assign barcodes to individual products and product categories, and track inventory movements using those barcodes. By connecting a barcode scanner, certain inventory processes can be triggered by scanning barcodes.
See also
Get Help
Contact Support Ask the Odoo Community
![]()
- User Docs
- Database management
- Developer
- Contributing
EN
Odoo 18
Barcode device troubleshooting
Odoo Barcode supports three main types of barcode scanners: USB scanners, bluetooth scanners, and mobile computer scanners. While configuring each type of scanner, common issues may arise, in which the scanners do not work as intended, and Odoo returns errors to the device.
Read the sections below to identify general and unique device issues, related to specific, popular types of scanners.
General issues
Refer to the following sections below for common issues involving popular barcode scanner devices.
For issues related to specific devices, refer to the Android scanners section for mobile computer scanners, or to the Screenless scanners section for USB and bluetooth scanners.
Barcode cannot be read
One common issue encountered when using barcode scanners is an error resulting from barcodes that cannot be read.
This can occur due to any of the following reasons:
- The barcode is damaged.
- The device cannot read the required barcode type (some scanners can only read 2D barcodes).
- The barcode being scanned is on a screen. Some scanners don’t support this, and the barcodes must be printed out to be scanned. This is most common with 1D barcodes.
- The device has no battery, or is broken. To rule this out, follow the troubleshooting instructions in the following sections.
Odoo returns barcode error
All types of barcode scanners have their own device “language”, which affects how they output barcode data to Odoo’s Barcode app. Sometimes, this can cause Odoo Barcode to return a barcode error after scanning. This could be due to any of the following reasons:
- The computer is configured with a different keyboard layout than the barcode scanner. To rule this out, ensure that the device is configured with the same keyboard layout.
For example, if the computer is configured to use an FR-BE keyboard, configure the scanner to send FR-BE keystrokes. The same logic applies if using a tablet instead of a computer.
For more information on configuring keystrokes, refer to the Barcode scanner setup documentation. - For mobile computer scanners (such as Zebra devices, for example), the scanner might interpret the barcode differently than intended. To rule this out, scan a test barcode to see how the scanner interprets the barcode.
Android scanners
The most recent barcode scanner models using Android and Google Chrome should work with Odoo. However, due to the variety of models and configurations, it is recommended to first test a scanner’s compatibility with Odoo.
The Zebra product line is recommended; specifically, the Zebra TC21 (WiFi-only), and Zebra TC26 (WiFi/cellular).
See also
Odoo Inventory & Barcode compatible hardware
Barcode app does not give feedback
By default, Android barcode scanners pre-process the barcode, then send a full text. Since Odoo Barcode does not read this type of output, settings for each type of scanner must be configured correctly.
Odoo Barcode expects that the scanner works like an analogue keyboard, and so, only detects key events. Refer to the following sections for configuration settings for the most popular devices.
Zebra TC21/TC26
When using Zebra scanners, ensure the following keystroke configurations are set to prevent errors.
Begin on the Zebra scanner’s home screen, and select the DataWedge app (the app is represented by a (light blue barcode) icon).
On the DataWedge Profiles page, select the profile option to access the Zebra scanner’s settings.
Once the profile is selected, scroll down to the Keyboard Output option, and ensure the Enable/disable keystroke output option is Enabled.
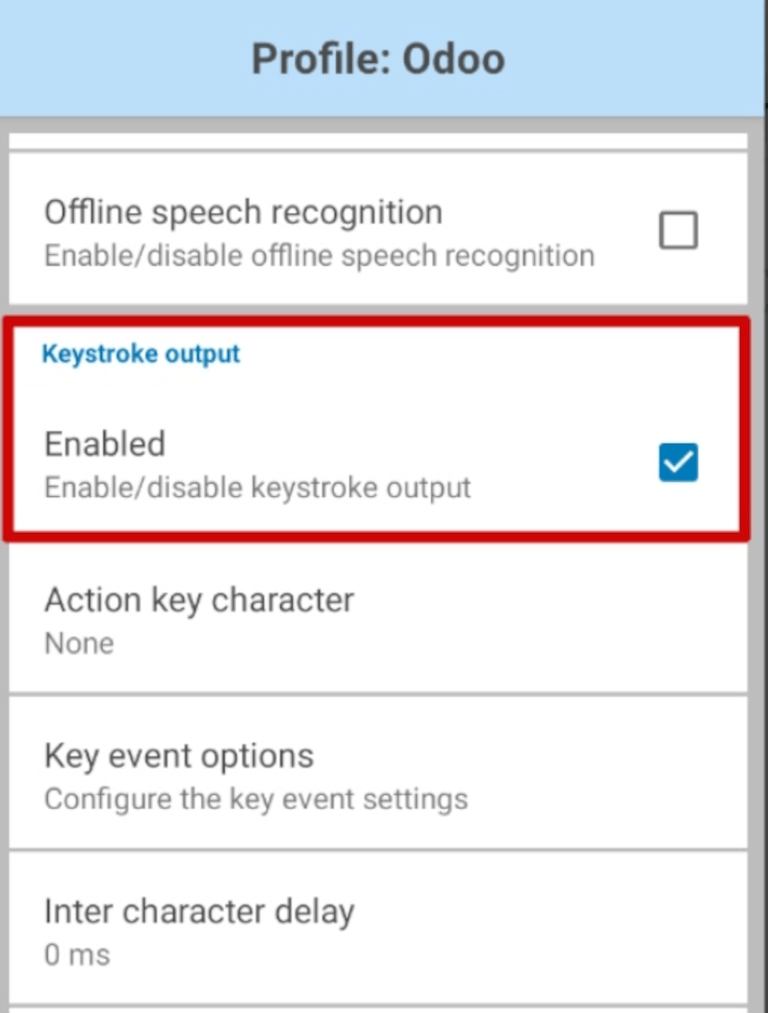
Once that option is enabled, go back to the Profile options page, and go to the Keystroke output section. Then, open the Key event options submenu. Under Characters, ensure the Send Characters as Events option is checked.
Important
The Send Characters as Events option must be checked on the Zebra scanner, or Odoo cannot recognize the barcodes that are scanned.
Once the above steps have been taken, perform a test scan to ensure the Zebra scanner is working as intended.
MUNBYN Android devices
When using MUNBYN Android scanners, ensure the following configurations are set to prevent errors.
From the device’s home screen, click AppSettings. On the resulting page, locate the Process mode section, and select Keyboard input.
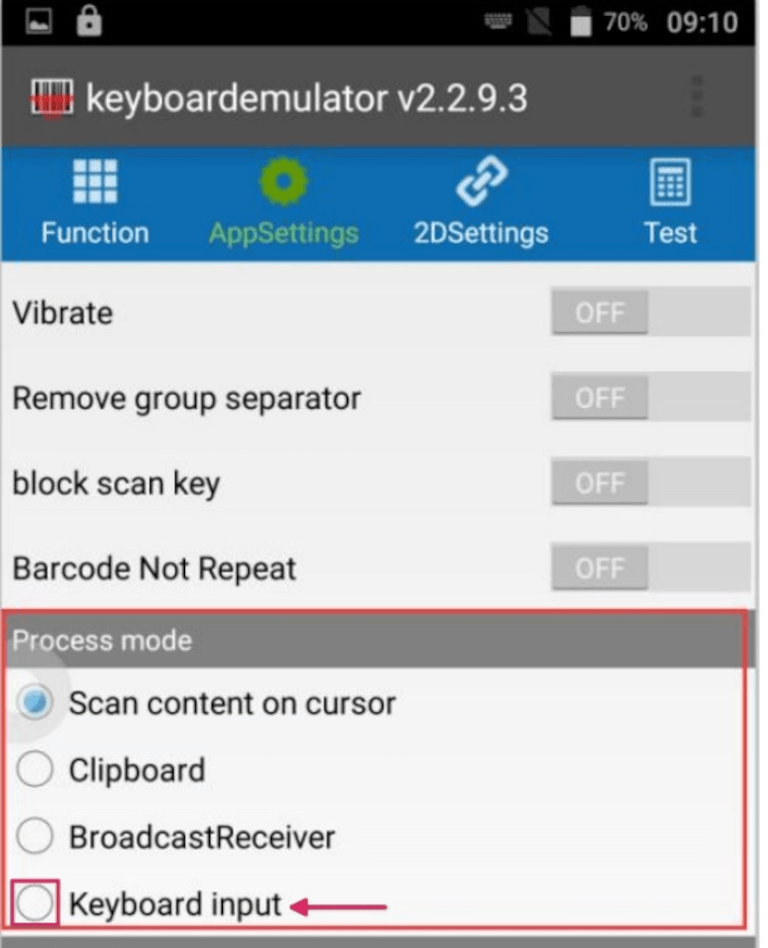
Tip
The selected Process mode controls how data is processed after barcode data has been read out.
Keyboard input enters read-out data at the position of the cursor, the same as input data on an analogue keyboard would.
Once the above steps have been taken, perform a test scan to ensure the MUNBYN Android scanner is working as intended.
Why is there no data output in the app after a successful scan?
When scanning a barcode, the scanner might beep, indicating a successful scan, but there is no data output in the app.
To fix this issue, adjust the output method to keyboard analogue in the Scanner app on the device.
From the device’s home screen, click Scanner App ‣ Settings. From the Settings page, click Output Mode. The resulting pop-up window presents the different output options available to users. Select Keyboard Mode, then click OK.

Go back to the app that needs to be scanned, and click on the input dialog box first before scanning. Finally, perform a test scan to ensure the MUNBYN Android scanner is working as intended.
Datalogic Android devices
When using Datalogic Android scanners, ensure the following configurations are set to prevent errors.
To view and configure all settings for the scanner, use the Settings app on the Datalogic Android device. From the applications menu, select Settings ‣ System ‣ Scanner Settings.
From the resulting list of settings, select Wedge. From this menu, under the Keyboard wedge section, ensure that the Enable keyboard wedge feature is activated.
Then, also under the Keyboard wedge section, locate the Keyboard wedge input mode option. By default, the input mode is set to Text injection.
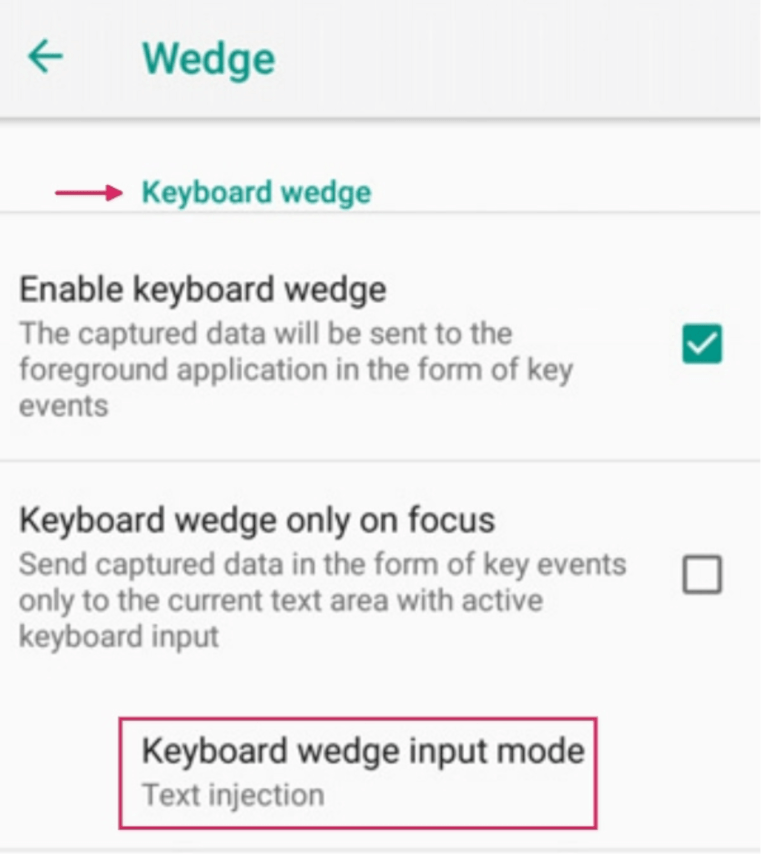
Click Keyboard wedge input mode, and change the setting to Key pressure. This ensures that scanned barcodes are translated into keyboard strokes, instead of being injected into the text area.
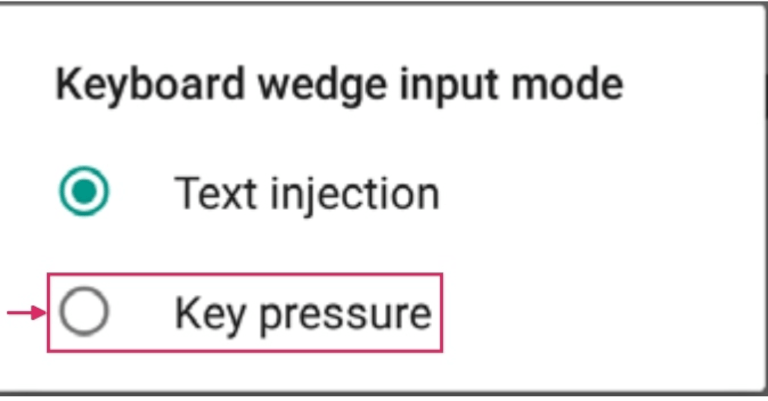
Once all those steps have been taken, perform a test scan to ensure the Datalogic Android scanner is working as intended.
Screenless scanners
Screenless scanners are barcode scanning devices that have no screens. These include USB scanners and bluetooth scanners.
Important
Odoo supports most USB and Bluetooth barcode scanners, as they all emulate a keyboard. However, to verify that a scanner is compatible with a specific keyboard layout (or can be configured to do so), refer to Odoo’s Inventory & Barcode compatible hardware documentation.
NETUM devices
By default, the NETUM barcode scanner’s user manual only shows the French keyboard configuration. To use the Belgian keyboard, scan the code below:
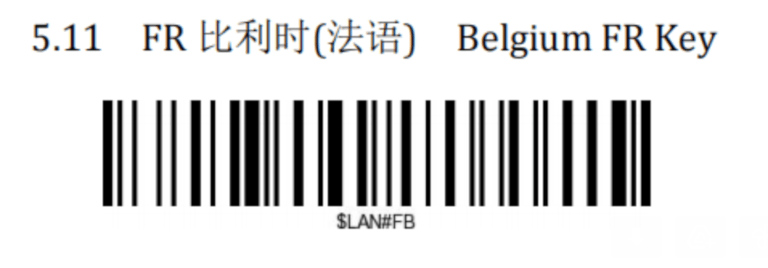
Once that code has been scanned, ensure the NETUM scanner has the correct keyboard configuration, and is working as intended.
See also
On this page
Get Help
Contact Support Ask the Odoo Community
![]()
- User Docs
- Database management
- Developer
- Contributing
EN
Odoo 18
Barcode scanner setup
Follow this guide to choose and set up a barcode scanner compatible with Odoo’s Inventory and Barcode apps.

Scanner types
Before setting up a barcode scanner, it is important to determine which type of scanner best meets the needs of the business. There are three main types of scanners that can be used with Odoo, each with their own benefits and use cases:
- USB scanners are connected to a computer, and are suitable for businesses that scan products at a fixed location, like at the checkout line in a grocery store.
- Bluetooth scanners pair with a smartphone or tablet, making them both a cost-effective and portable barcode scanner option. In this scenario, Odoo is installed on the smartphone, allowing warehouse operators to handle operations, and check stock, directly through their mobile devices.
- Mobile computer scanners are mobile devices with a built-in barcode scanner.
Important
If using a USB scanner, ensure the scanner is compatible with the keyboard layout of the computer.
If using a mobile computer scanner, ensure the device can run the Odoo mobile app properly. Recent models that use Android OS with the Google Chrome browser, or Windows OS with Microsoft Edge, should work. However, testing is crucial due to the variety of available models and configurations.
See also
Odoo Inventory & Barcode • Compatible Hardware
Configuration
When setting up the barcode scanner, make sure the following configurations are correct so the scanner can properly interpret barcodes with Odoo.
Keyboard layout
When using a USB barcode scanner, match its keyboard layout with the operating system’s layout for proper interpretation of characters. Generally, the scanning mode should be set to accept a USB keyboard (HID), with the language set based on the keyboard that is in use.
To configure the keyboard layout for a Zebra scanner, scan the keyboard wedge barcode for the desired language in the scanner’s user manual.
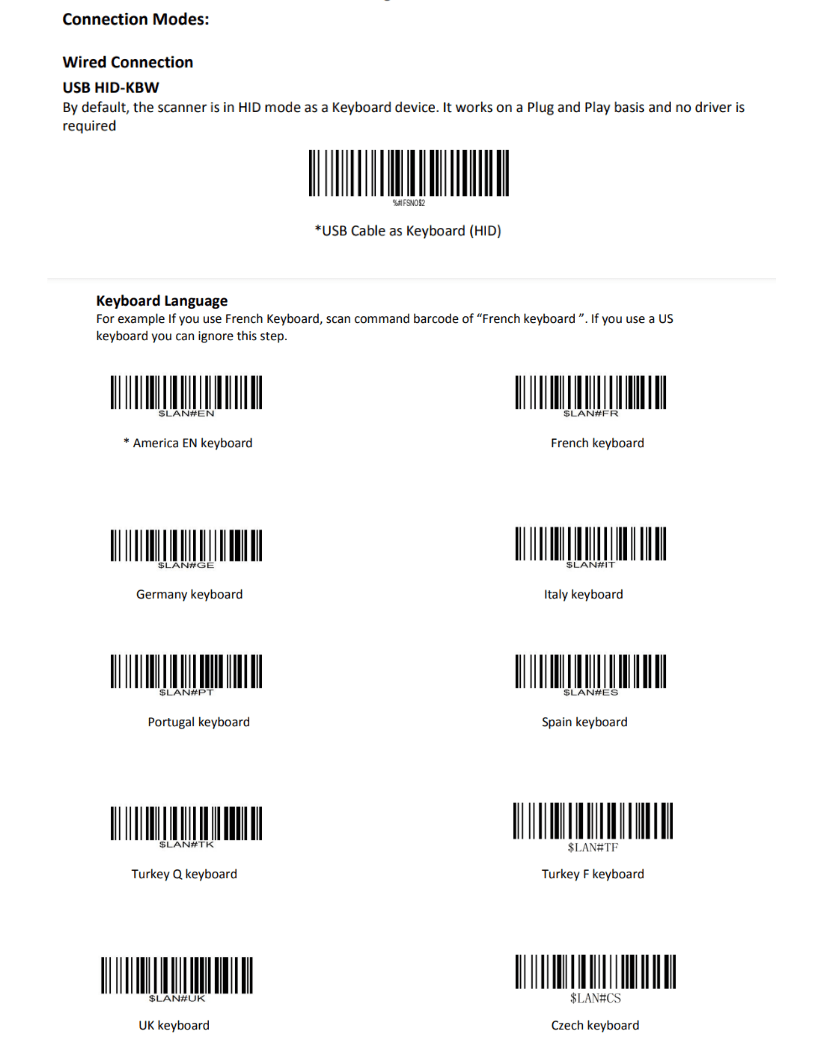
Examples of keyboard language settings in the Zebra scanner user manual.
Automatic carriage return
Odoo has a default 100-millisecond delay between scans to prevent accidental double scanning. To synchronize with the barcode scanner, set it to include a carriage return (character like the “Enter” key on a keyboard) after each scan. Odoo interprets the carriage return as the end of the barcode input; so Odoo accepts the scan, and waits for the next one.
Typically, on the scanner, a carriage return is included by default. Ensure it is set by scanning a specific barcode in the user manual, like CR suffix ON or Apply Enter for suffix.
Zebra scanner
When using Zebra scanners, ensure the following keystroke configurations are set to prevent errors.
Begin on the Zebra scanner’s home screen, and select the DataWedge app (the app is represented by a (light blue barcode) icon).
On the DataWedge Profiles page, select the profile option to access the Zebra scanner’s settings.
Warning
It is not suggested to use the “DWDemo” profile, as it does not work properly in every circumstance.
Instead, it is recommended to create a new, personal profile. Once a new profile is created, add the Odoo Mobile app and Google Chrome app in the Associated Apps on the scanner’s home screen.
Once the profile is selected, scroll down to the Keyboard Output option, and ensure the Enable/disable keystroke output option is Enabled.

Once that option is enabled, go back to the Profile options page, and go to the Keystroke output section. Then, open the Key event options submenu. Under Characters, ensure the Send Characters as Events option is checked.
Important
The Send Characters as Events option must be checked on the Zebra scanner, or Odoo cannot recognize the barcodes that are scanned.
Once all those steps have been taken, perform a test scan to ensure the Zebra scanner is working properly, as intended.
Honeywell mobile computer scanner
When using Honeywell scanners, follow the instructions below to ensure barcodes can be scanned in Odoo.
Begin on the Honeywell scanner’s home screen, and select Settings, represented by a ⚙️ (gear) icon. Then, click Honeywell Settings, followed by Scanning.
From here, click Internal Scanner, followed by Default Profile. From the resulting list of options, select Data Processing Settings.
The Data Processing Settings specify how barcode data is processed by the computer. Locate the Wedge Method setting. By default, this is set to Standard.
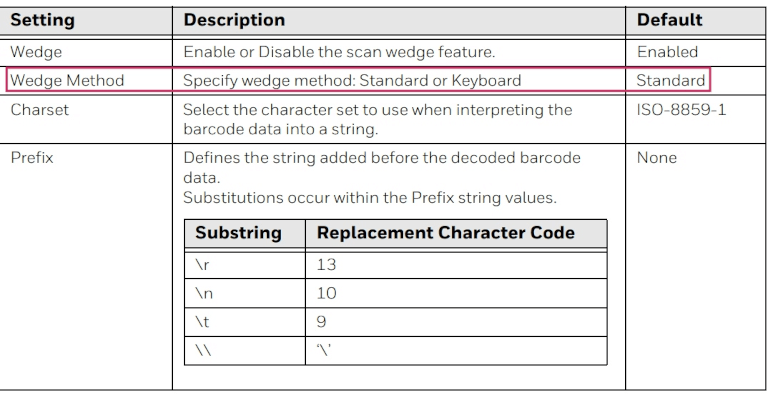
Change the Wedge Method setting to Keyboard.
After completing the steps, conduct a test scan to verify the Honeywell scanner is working as intended.
Cipherlab mobile computer scanner
When using Cipherlab scanners, follow the instructions below to ensure barcodes can be scanned in Odoo.
Begin on the Cipherlab scanner’s home screen, and navigate to the App Drawer (All Applications). Then, click the ReaderConfig app, represented by an orange ⚙️ (gear) icon over a blue (barcode) icon.
Next, select the Default Profile, or create a new profile, if needed.
Under the General Settings, click Data Output, followed by Keyboard Emulation.
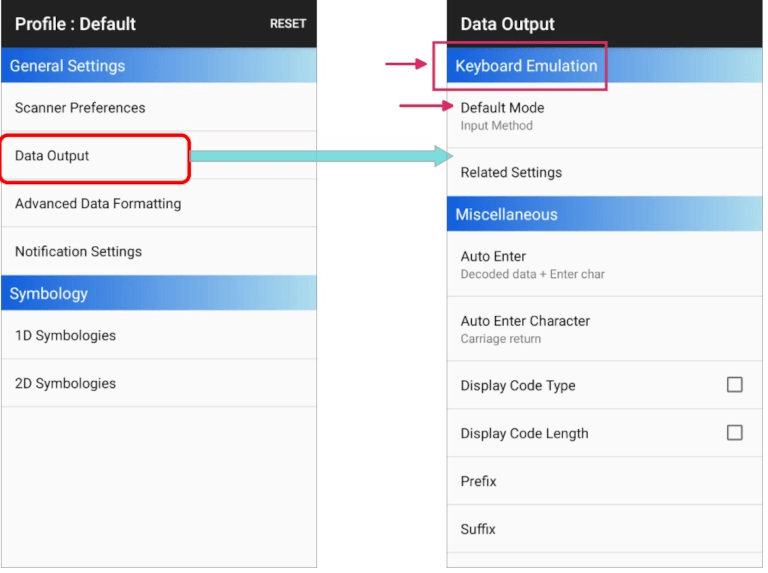
By default, the Input Method, under Keyboard Emulation, is set to Default Mode. Change this setting to KeyEvent.
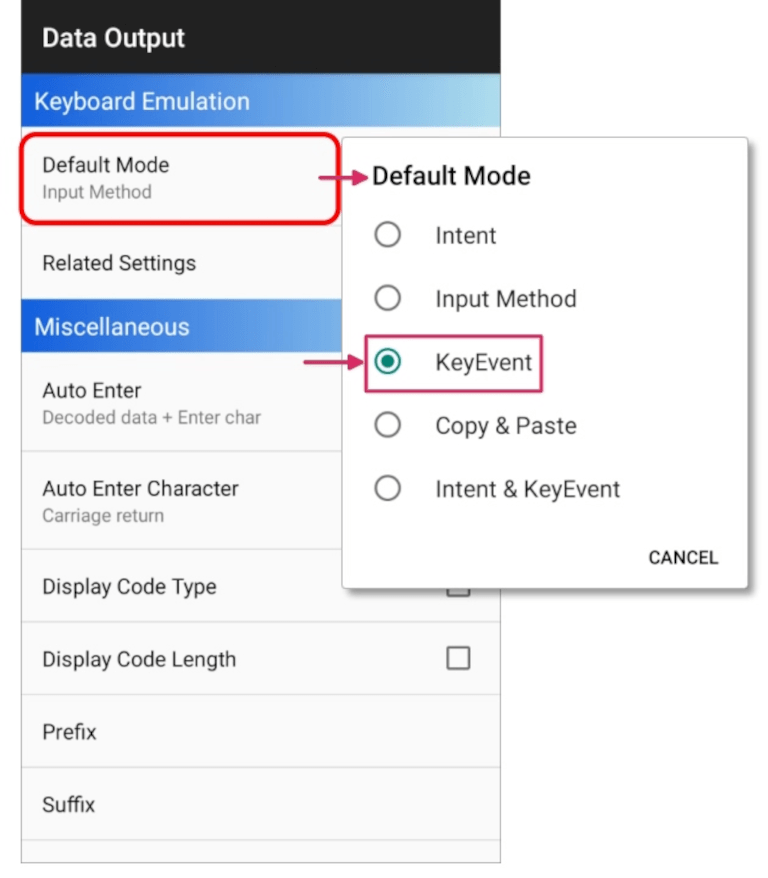
After completing the steps, conduct a test scan to verify the Cipherlab scanner is working as intended.
See also
On this page
Get Help
Contact Support Ask the Odoo Community
![]()
- User Docs
- Database management
- Developer
- Contributing
EN
Odoo 18
Activate the Barcodes in Odoo
The barcode scanning features can save you a lot of time usually lost switching between the keyboard, the mouse and the scanner. Properly attributing barcodes to products, pickings locations, etc. allows you to work more efficiently by controlling the software almost exclusively with the barcode scanner.
Configuration
To use this feature, you first need to activate the Barcode functionality via Inventory ‣ Settings ‣ Barcode Scanner. Once you have ticked the feature, you can hit save.
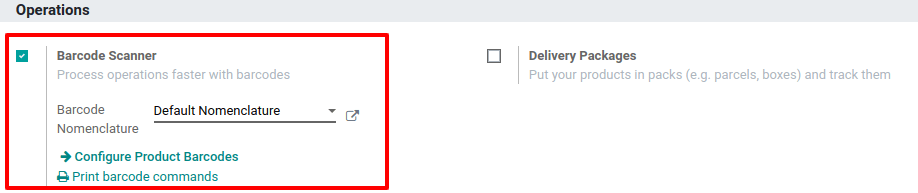
Set Product Barcodes
You can easily assign barcodes to your different products via the Inventory app. To do so, go to Settings ‣ Configure Products Barcodes.
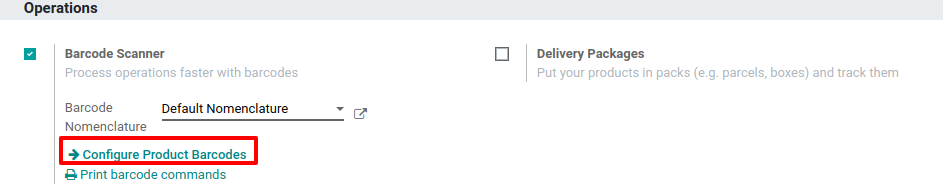
Then, you have the possibility to assign barcodes to your products directly at creation on the product form.

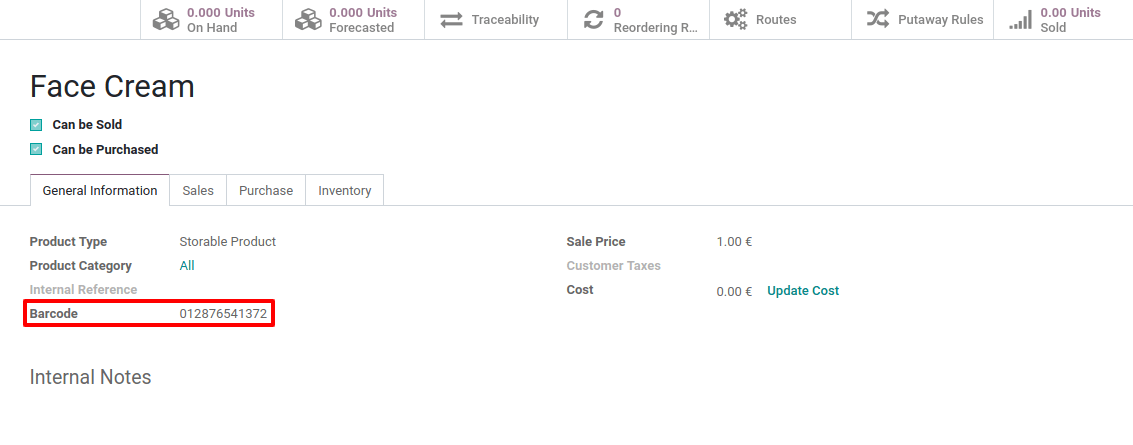
Note
Be careful to add barcodes directly on the product variants and not on the template product. Otherwise, you won’t be able to differentiate them.
Set Locations Barcodes
If you manage multiple locations, you will find useful to attribute a barcode to each location and stick it on the location. You can configure the locations barcodes in Inventory ‣ Configuration ‣ Locations.


Note
You can easily print the barcode you allocate to the locations via the Print menu.
Barcode Formats
Most retail products use EAN-13 barcodes, also known as GTIN (Global Trade Identification Numbers). GTIN are used by companies to uniquely identify their products and services. While GTIN and UPC are often used synonymously, GTIN refers to the number a barcode represents, while UPC refers to the barcode itself. More information about GTIN can be found on the GS1 website.
In order to create GTIN for items, a company must have a GS1 Company Prefix. This prefix is the number that will appear at the beginning of each GTIN, and will identify the company as the owner of the barcode any the products it appears on. To learn more about GS1 Company Prefixes, or purchase a license for a prefix, visit the GS1 Company Prefix page.
Odoo users are able to use GTIN barcodes to identify their products. However, since Odoo supports any numeric string as a barcode, it is also possible to define a custom barcode for internal use.
Barcode Lookup
Barcode Lookup allows you to scan (or enter) products’ barcodes (UPC, EAN, or ISBN) to automatically create them in your Odoo database, complete with product names, descriptions, images, categories, etc.
To use Barcode Lookup to scan and create products in Barcode, go to Inventory ‣ Configuration ‣ Settings, scroll down to the Barcode section, and enable Stock Barcode Database.
Note
If your database is hosted on Odoo.sh or on-premise, you must also configure an API key. If your database is hosted on Odoo Online, you can use Barcode Lookup without further configuration.
On this page
Get Help
Contact Support Ask the Odoo Community
![]()
- User Docs
- Database management
- Developer
- Contributing
EN
Odoo 18
Adjust inventory with barcodes
An inventory adjustment, or inventory audit, is the process of verifying the physical stock of products against the quantities recorded in the database. Regular audits ensure accurate inventory records, prevent stock discrepancies, and maintain efficient operations. In a warehouse setting, managers typically assign inventory counts to employees, who then walk to designated locations, scan product barcodes, and adjust quantities as needed.
Inventory adjustments can be completed through the Barcode application using a compatible scanner, or the Odoo mobile app.
Note
For a list of Odoo-compatible barcode mobile scanners, and other hardware for the Inventory and Barcode apps, refer to the Odoo Inventory • Hardware page.
See also
Tip
Odoo’s Barcode application provides demo data with barcodes to explore the features of the app. These can be used for testing purposes, and can be printed from the home screen of the app.
To access this demo data, navigate to the Barcode app and click demo data sheet or barcodes in the banner above the scanner.
Assigning inventory counts
Before performing an inventory count, managers can assign counting tasks to employees. This can be done through Inventory app ‣ Operations ‣ Physical Inventory by selecting specific locations and products for counting, and assigning a User to them. Once assigned, users will see pending counts when they open the Barcode app.
To view a requested inventory count, navigate to the Barcode app dashboard. If a count has been requested, the number of products to be counted is listed on the Inventory count button.

Configuration
Before an inventory adjustment can be performed with the Barcode app, the app has to be installed, and configured. Navigate to Inventory app ‣ Configuration ‣ Settings, and scroll to the Barcode section. Tick the checkbox next to Barcode Scanner, and click Save to save any changes. If necessary, click Confirm on the pop-up.
Danger
Enabling the Barcode feature requires installing the Barcode application. Installing a new application on a One-App-Free database triggers a fifteen-day trial. At the end of the trial, if a paid subscription has not been added to the database, it will no longer be accessible.
After saving, a new drop-down menu appears under the Barcode Scanner option, labeled Barcode Nomenclature, where either Default Nomenclature or Default GS1 Nomenclature can be selected. Each nomenclature option determines how scanners interpret barcodes in Odoo.
To count products using barcodes, ensure that barcodes for products and storage locations are set up within Odoo first. Refer to this section for detailed instructions: Set Product Barcodes.
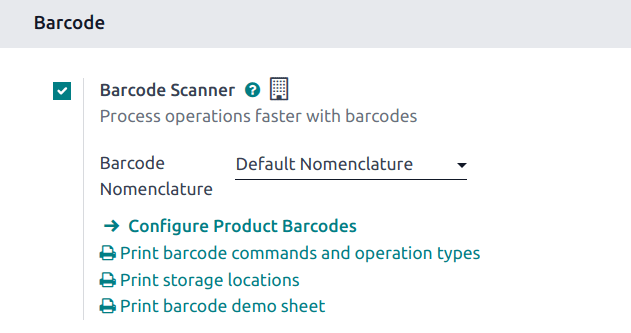
Performing an inventory count
To perform an inventory adjustment, first navigate to the Barcode app. If assigned counts exist, tap Inventory Count to view pending tasks.
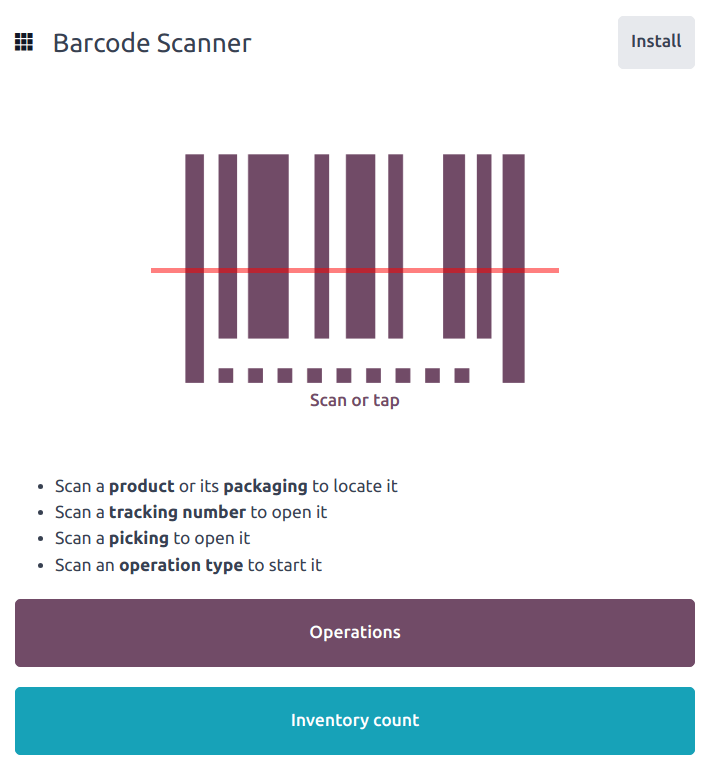
Walk to the designated storage location, then scan the location barcode.
Tip
If the warehouse multi-location feature is not enabled in the database, a source location does not need to be scanned. Instead, scan the product barcode to start the inventory adjustment.
Doing so highlights the location and displays all of the products stored there. Scan the barcode of each product to adjust its count.
Note
If no counts have been assigned to a user, and the Count Entire Locations feature is not enabled, no products may appear after the location barcode is scanned.
Manually adjust quantities if necessary by tapping the (edit) icon. Doing so opens a separate window with a keypad. Edit the number in the Quantity line to change the quantity. Additionally, the +1 and -1 buttons can be clicked to add or subtract quantity of the product, and the number keys can be used to add quantity, as well.
Example
In the below inventory adjustment, the source location WH/Stock/Shelf 1 was scanned, assigning the location. Then, the barcode for the product [FURN_7888] Desk Stand with Screen was scanned three times, increasing the units in the adjustment. Additional products can be added to this adjustment by scanning the barcodes for those specific products.

Count entire locations
The Count Entire Locations feature assigns a user to count all the products within a location once they scan the barcode for that location. This allows for easier cycle counts by assigning an entire location to a user by assigning a single product count. During cycle counts, users can ensure accurate inventory numbers, see if products that should be in a location are missing, or discover products incorrectly stored within a location.
To enable this feature, navigate to Inventory app ‣ Configuration ‣ Settings, and scroll to the Barcode section. Tick the Count Entire Locations checkbox, then click Save.
Important
This setting is only visible if the Storage Locations checkbox is ticked.
To perform an inventory count of an entire location, navigate to Barcode app ‣ Inventory Count. Scan the desired location barcode. The app then displays all assigned products in that location. Proceed with the count as normal.
Show quantity to count
When conducting an inventory count, the expected quantity of products is displayed by default, to provide the user with a baseline to use when performing the count. However, as this can result in users relying on this count instead of performing a new count, this quantity can be hidden.
Navigate to Inventory app ‣ Configuration ‣ Settings. In the Barcode section, clear the Show Quantity to Count checkbox, then click Save.

Manually add products to an inventory count
When barcodes for location or products are not available, Odoo Barcode can still be used to perform inventory counts.
To do this, navigate to the Barcode app ‣ Inventory Count.
To manually add products to this adjustment, click the white Add Product button at the bottom of the screen.
This navigates to a new, blank page where the desired product, quantity, and source location must be chosen.

First, click the Product line, and choose the product whose stock count should be adjusted. Then, manually enter the quantity of that product, either by changing the 1 in the Quantity line, or by clicking the +1 and -1 buttons to add or subtract quantity of the product. The number pad can be used to add quantity, as well.
Below the number pad is the location line, which should read WH/Stock by default. Click this line to reveal a drop-down menu of locations to choose from, and choose the source location for this inventory adjustment.
Click Confirm to confirm the changes.
Finalizing an inventory count
After counting all of the products, review the entries to ensure all the counted quantities are accurately entered. To complete the inventory adjustment, click Apply.
Tip
The Validate barcode can be scanned in place of clicking the Apply button.
Odoo then navigates back to the Barcode Scanning screen. A small green banner appears in the top-right corner, confirming the inventory count has been updated.
On this page
Get Help
Contact Support Ask the Odoo Community
![]()
- User Docs
- Database management
- Developer
- Contributing
EN
Odoo 18
Process receipts and deliveries with barcodes
The Barcode app can be used to process receipts, deliveries, and other types of operations in real time using a barcode scanner or the Odoo mobile app.
This makes it possible to process operations on the warehouse floor when they happen, instead of having to wait to validate transfers from a computer. Processing operations this way can help to properly attribute barcodes to the appropriate products, pickings, locations, and more.
Enable Barcode app
To use the Barcode app to process transfers, it must be installed by enabling the feature from the settings of the Inventory app.
To do so, go to the Inventory app ‣ Configuration ‣ Settings. Then, scroll down to the Barcode section, and click the checkbox next to the Barcode Scanner feature.
Once the checkbox is ticked, click Save at the top of the page to save changes.
Once the page has refreshed, new options will be displayed under the Barcode Scanner feature: Barcode Nomenclature (with a corresponding drop-down menu), where either Default Nomenclature or Default GS1 Nomenclature can be selected.
There is also a Configure Product Barcodes internal link arrow, and a set of Print buttons for printing barcode commands and a barcode demo sheet.

For more on setting up and configuring the Barcode app, refer to the Set up your barcode scanner and Activate the Barcodes in Odoo documentation pages.
Scan barcodes for receipts
To process warehouse receipts for incoming products, there first needs to be a purchase order (PO) created, and a receipt operation to process.
To create a PO, navigate to the Purchase app ‣ Create to create a new request for quotation (RFQ).
From the blank RFQ form, click the drop-down menu next to the Vendor field to add a vendor. Then, on the Product line under the Products tab, click Add a product, and select the desired product(s) to add to the quotation.
Once ready, click Save at the top of the form, then click Confirm Order to confirm the RFQ to a PO.
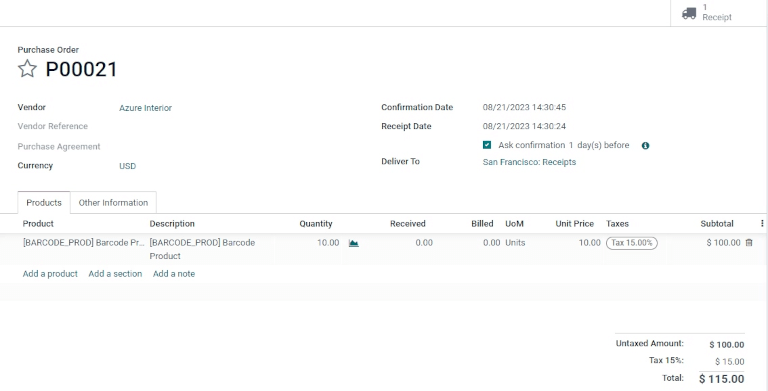
To process and scan barcodes for warehouse receipts, navigate to the Barcode app.
Once inside the Barcode app, a Barcode Scanning screen displaying different options is presented. To process receipts, click on the Operations button at the bottom of the screen. This navigates to an Operations overview page.
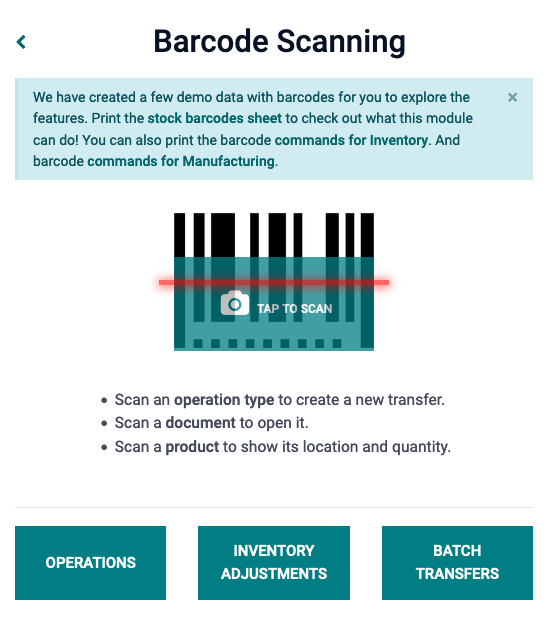
From this page, locate the Receipts card, and click the # To Process button to view all outstanding receipts. Then, select the desired receipt operation to process. This navigates to the barcode transfer screen.
Note
If only using a barcode scanner or the Odoo mobile app, the barcodes for each transfer of a corresponding operation type can be scanned to be processed easily. Once scanned, the products that are part of an existing transfer can be scanned, and new products can be added to the transfer, as well. Once all products have been scanned, validate the transfer to proceed with the stock moves.
From this screen, an overview of all receipts to process within that transfer (WH/IN/000XX) is shown. At the bottom of the screen, there are options to Add Product or Validate, depending on if products need to be added to the operation, or if the whole operation should be validated at once.
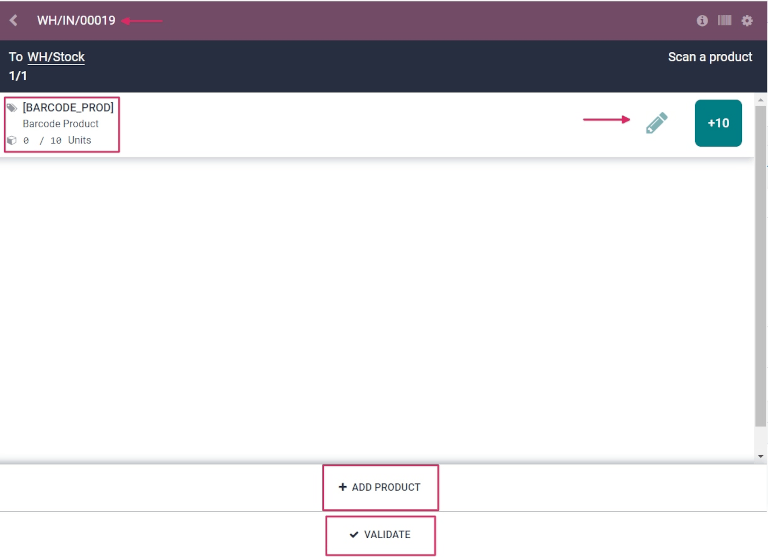
To process and scan each product individually, choose a specific product line. The +# button (in this case, +10) can be clicked to indicate receipt of that product, or the pencil icon can be clicked to open a new screen to edit that product line.
From this screen, the product that’s being received is listed. Under the product name, the Quantity line can be edited. Either change the 0 in the line to the desired quantity, or click the /# Units button (in this case, /10 Units) to automatically fill the quantity ordered from the PO.
Example
In the reception operation WH/IN/00019, 10 Units of the Barcode Product is expected to be received. [BARCODE_PROD] is the Internal Reference set on the product form. Scan the barcode of the Barcode Product to receive one unit. Afterwards, click the pencil icon to manually enter the received quantities.
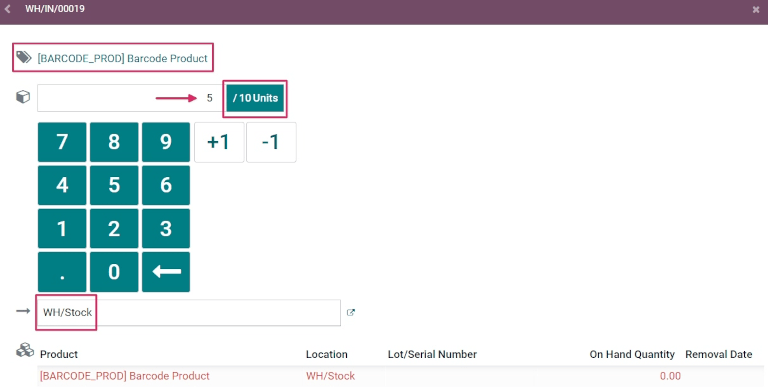
Additionally, the +1 and -1 buttons can be clicked to add or subtract quantity of the product, and the number keys can be used to add quantity, as well.
Below the number keys is the location line, which reads WH/Stock by default, unless another location is listed on the product itself. Click this line to reveal a drop-down menu of additional locations to choose from.
Once ready, click Confirm to confirm the changes made to the product line.
Then, from the overview page with all receipts to process within that transfer (WH/IN/000XX), click the +# button on the product line for the products being received, and click Validate. The receipt has now been processed, and the Barcode app can be closed out.
![]()
Scan barcodes for delivery orders
To process warehouse deliveries for outgoing products, there first needs to be a sales order (SO) created, and a delivery operation to process.
To create a SO, navigate to the Sales app ‣ Create to create a new quotation.
From the blank quotation form, click the drop-down menu next to the Customer field to add a customer. Then, on the Product line under the Order Lines tab, click Add a product, and select the desired product(s) to add to the quotation.
Once ready, click Save at the top of the form, and click Confirm Order to confirm the quotation to a SO.
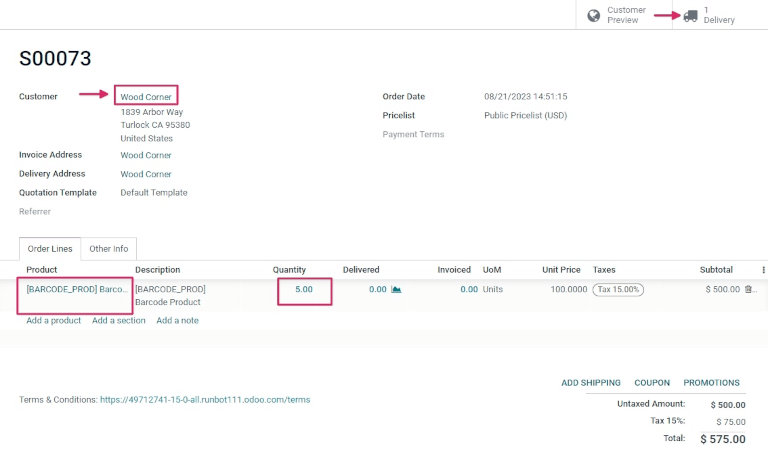
To process and scan barcodes for warehouse deliveries, navigate to the Barcode app.
Once inside the Barcode app, a Barcode Scanning screen displaying different options is presented. To process deliveries, click on the Operations button at the bottom of the screen. This navigates to an Operations overview page.
From this page, locate the Delivery Orders card, and click the # To Process button to view all outstanding deliveries. Then, select the desired delivery order to process. This navigates to the barcode transfer screen.
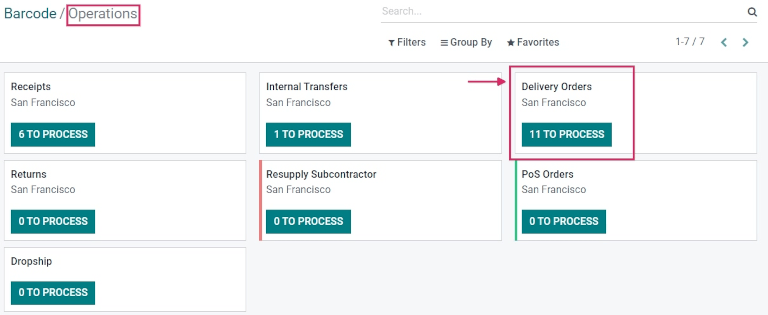
From this screen, an overview of all deliveries to process within that transfer (WH/OUT/000XX) is shown. At the bottom of the screen, there are options to Add Product or Validate, depending on if products need to be added to the operation, or if the whole operation should be validated at once.
To process and scan each product individually, choose a specific product line. The +1 button can be clicked to indicate delivery of that product, or the pencil icon can be clicked to open a new screen to edit that product line.
From this screen, the product that’s being delivered is listed. Under the product name, the Quantity line can be edited. Either change the 0 in the line to the desired quantity, or click the /# Units button (in this case, /10 Units) to automatically fill the quantity ordered from the SO.
Additionally, the +1 and -1 buttons can be clicked to add or subtract quantity of the product, and the number keys can be used to add quantity, as well.
Below the number keys is the location line, which reads WH/Stock by default, unless another location is listed on the product itself.
This is the location that the product is being pulled from for delivery. Click this line to reveal a drop-down menu of additional locations to choose from (if this product is stored in multiple locations in the warehouse).
Tip
For warehouses that have multiple different storage locations, putaway rules, and removal strategies, additional steps can be added for various operation types, while using the Barcode app.
Once ready, click Confirm to confirm the changes made to the product line.
Then, from the overview page with all receipts to process within that transfer (WH/OUT/000XX), click the +# button on the product line for the products being received, and click Validate. The delivery has now been processed, and the Barcode app can be closed out.
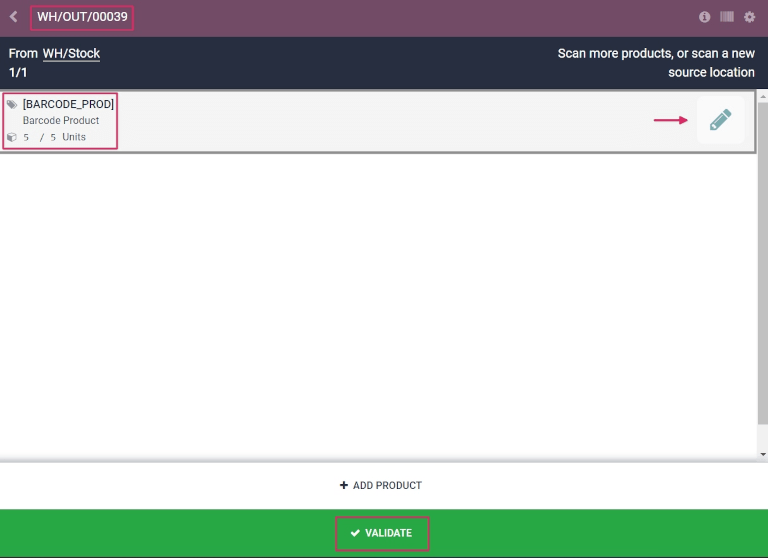
On this page
Get Help
Contact Support Ask the Odoo Community
![]()
- User Docs
- Database management
- Developer
- Contributing
EN
Odoo 18
Process batch transfers
The Odoo Barcode app can be used to process Batch, Wave, and Cluster transfers that are created in the Inventory app.
See also
This document covers the steps to process transfers in the Barcode app. Instructions on creating transfers can be found below:
Process the batch
First, navigate to Barcode app ‣ Operations and select an operation type (like delivery orders) grouped into batches. From here, select the card for the appropriate batch transfer, and click the BATCH smart button.
![]()
On the batch transfer screen, the products in the picking are grouped by location, and each line is color-coded to associate products in the same picking together.
Then, follow the prompt to Scan the source location barcode for the storage location of the first product. Scan the barcode for the product and package to process the transfer. To record multiple quantities, click the (edit) icon, and enter the required quantities for the picking.
Repeat this for all products, and click the Validate button to mark the transfer as Done.
Note
After creating a batch transfer and assigning a package to a picking, Odoo suggests the specified package by displaying the name in italics under the product name, ensuring pickers place products into the correct boxes.
Products from the same order are labeled with the same color on the left. Completed pickings are highlighted in green.
Example
In a batch transfer for 2 Cabinet with Doors, 3 Acoustic Bloc Screens, and 4 Four Person Desks, the 3/3 and 4/4 Units indicate that the last two product pickings are complete.
1/2 units of the Cabinet with Doors has already been picked, and after scanning the product barcode for the second cabinet, Odoo prompts the user to Scan a serial number to record the unique serial number for product tracking.

Get Help
Contact Support Ask the Odoo Community
![]()
- User Docs
- Database management
- Developer
- Contributing
EN
Odoo 18
Create and process transfers with barcodes
The Barcode app can be used to process internal transfers for all types of products, including transfers for products tracked using lots or serial numbers. Transfers can be created from scratch in real time using an Odoo-compatible barcode scanner or the Odoo mobile app.
For a list of Odoo-compatible barcode mobile scanners, and other hardware for the Inventory app, refer to the Odoo Inventory • Hardware page.
Enable Barcode app
To use the Barcode app to process transfers, it must be installed by enabling the feature from the settings of the Inventory app.
To do so, go to the Inventory app ‣ Configuration ‣ Settings. Then, scroll down to the Barcode section, and click the checkbox next to the Barcode Scanner feature.
Once the checkbox is ticked, click Save at the top of the page to save changes.
When the page has refreshed, new options are displayed under the Barcode Scanner feature: Barcode Nomenclature (with a corresponding drop-down menu), where either Default Nomenclature or Default GS1 Nomenclature can be selected. The nomenclature selected changes how scanners interpret barcodes in Odoo.
There is also a Configure Product Barcodes internal link arrow, and a set of Print buttons for printing barcode commands and a barcode demo sheet.
![]()
For more on setting up and configuring the Barcode app, refer to the Set up your barcode scanner and Activate the Barcodes in Odoo documentation pages.
Scan barcodes for internal transfers
To create and process internal transfers for products in a warehouse, the Storage Locations and Multi-Step Routes features must be enabled.
To do so, go to the Inventory app ‣ Configuration ‣ Settings. Then, scroll down to the Warehouse section, and click the checkboxes next to Storage Locations and Multi-Step Routes.
Then, click Save at the top of the page to save changes.
Create an internal transfer
To process existing internal transfers, there first needs to be an internal transfer created, and an operation to process.
To create an internal transfer, navigate to the Inventory app. From the Inventory Overview dashboard, locate the Internal Transfers card, and click on the 0 To Process button.
Then, click Create in the top left of the resulting page. This navigates to a new Internal Transfer form.
On this blank form, the Operation Type is automatically listed as Internal Transfers. Under that field, the Source Location and Destination Location are set as WH/Stock by default, but can be changed to whichever locations the products are being moved from, and moved to.
![]()
Once the desired locations have been selected, products can be added to the transfer. On the Product line under the Products tab, click Add a product, and select the desired product(s) to add to the transfer.
Once ready, click Save at the top of the form to save the new internal transfer. Once saved, click the Detailed Operations icon (four lines, at the far right of the Product line) to open the Detailed Operations pop-up window.
![]()
From the pop-up, click Add a line.
Then, in the To column, change the location from WH/Stock to a different location, where the products should be moved.
Next, in the Done column, change the quantity to the desired quantity to transfer. Once ready, click Confirm to close out the pop-up window.
Scan barcodes for internal transfer
To process and scan barcodes for internal transfers, navigate to the Barcode app.
Once inside the Barcode app, a Barcode Scanning screen displaying different options is presented.
To process internal transfers, click on the Operations button at the bottom of the screen. This navigates to an Operations overview page.
![]()
From this page, locate the Internal Transfers card, and click the # To Process button to view all outstanding internal transfers. Then, select the desired operation to process. This navigates to the barcode transfer screen.
Note
When using the Barcode app without the Inventory app (only if using a barcode scanner or the Odoo mobile app), the barcodes for each transfer of a corresponding operation type can be scanned to be processed easily.
Once scanned, the products that are part of an existing transfer can be scanned, and new products can be added to the transfer, as well. Once all products have been scanned, validate the transfer to proceed with the stock moves.
From this screen, an overview of all products to process within that specific internal transfer (WH/INT/000XX) is shown. At the bottom of the screen, there are options to Add Product or Validate, depending on if products need to be added to the operation, or if the whole operation should be validated at once.
![]()
Then, scan the barcode of the product to process the internal transfer.
Or, to process and scan each product individually, choose a specific product line. The + 1 button can be clicked to add additional quantity of that product to the transfer, or the pencil icon can be clicked to open a new screen to edit that product line.
In the product’s pop-up window, the product and the units to process is displayed with a number pad. Under the product name, the Quantity line can be edited. Change the number in the line to the quantity listed to be transferred on the internal transfer form.
Example
In the internal transfer operation WH/INT/000XX, 50 Units of the Transfer Product is moved from WH/Stock to WH/Stock/Shelf 1. [TRANSFER_PROD] is the Internal Reference set on the product form. Scan the barcode of the Transfer Product to receive one unit. Afterwards, click the pencil icon to manually enter the transferred quantities.
![]()
Additionally, the +1 and -1 buttons can be clicked to add or subtract quantity of the product, and the number keys can be used to add quantity, as well.
Below the number keys are the two location lines, which read whichever locations were previously specified on the internal transfer form, in this case WH/Stock and WH/Stock/Shelf 1. Click these lines to reveal a drop-down menu of additional locations to choose from.
Once ready, click Confirm to confirm the changes made to the product line.
Then, from the overview page with all products to process within that transfer (WH/INT/000XX), click Validate. The receipt has now been processed, and the Barcode app can be closed out.
Tip
The Barcode app can also be used to scan products in internal transfers containing unique lot numbers and serial numbers.
From the barcode transfer screen, scan the barcode of a lot or serial number, and Odoo automatically increases the quantity of the product to the quantity recorded in the database. If the same lot or serial number is shared between different products, scan the product barcode first, then the barcode of the lot/serial number.
See also
Connect to the Barcode Lookup database to quickly create new products by scanning their barcodes during internal transfers.
Create a transfer from scratch
In addition to processing and scanning barcodes for existing, previously-created internal transfers, the Barcode app can also be used to create transfers from scratch, simply by scanning a printed operation type barcode.
Did you know?
Odoo’s Barcode application provides demo data with barcodes to explore the features of the app. These can be used for testing purposes, and can be printed from the home screen of the app. To access this demo data, navigate to the Barcode app and click stock barcodes sheet (bolded and highlighted in blue) in the information pop-up above the scanner.
![]()
To do this, first navigate to the Barcode app. Once inside the Barcode app, a Barcode Scanning screen displaying different options is presented.
From this screen, when using a USB or bluetooth barcode scanner, directly scan the product barcode.
When using a smartphone as the barcode scanner, click the Tap to Scan button (next to the camera icon, at the center of the screen). This opens a Barcode Scanner pop-up screen that enables the camera of the device being used.
Face the camera toward the printed operation type barcode to scan it. Doing so processes the barcode, and navigates to a barcode transfer screen.
From this screen, an overview of all products to process within that specific internal transfer (WH/INT/000XX) is shown. Since this is a new transfer created from scratch, however, there should not be any products listed on the page.
To add products, scan the product barcode. If the barcode is not available, manually enter the product into the system by clicking the Add Product button at the bottom of the screen, and add the products and product quantities that should be transferred.
Once ready, click Confirm to confirm the changes made to the product line.
![]()
Then, from the overview page with all products to process within that transfer (WH/INT/000XX), click Validate. The internal transfer has now been processed, and the Barcode app can be closed out.
On this page
Get Help
Contact Support Ask the Odoo Community
![]()
- User Docs
- Database management
- Developer
- Contributing
EN
Odoo 18
Default barcode nomenclature
Barcode nomenclatures define how barcodes are recognized and categorized. When a barcode is scanned, it is associated to the first rule with a matching pattern. The pattern syntax is described in Odoo’s nomenclature list using a regular expression, and a barcode is successfully read by Odoo if its prefix and/or length matches the one defined in the barcode’s rule.
For instance, at a Point of Sale station, product weight barcodes in the European Article Number (EAN) format, which begin with 21 and have five digits specifying the weight, are used to weigh products and generate a barcode depicting the weight and price. The 21 and five-digit weight is the barcode pattern used to identify the barcode and can be customized to ensure Odoo correctly interprets all barcodes for the business.
Note
Barcodes are also commonly used with Odoo’s Inventory and Barcode apps.
Odoo Barcode supports EAN, Universal Product Code (UPC), and GS1 formats. This document exclusively focuses on default rules and patterns in Odoo, which use UPC and EAN encoding.
Important
To use UPC and EAN barcodes for uniquely identifying products across the entire supply chain, they must be purchased from GS1.
In Odoo, custom barcode patterns can be defined to recognize barcodes specific to the company. Barcodes do not need to be purchased if used only within the company, such as in the example where the barcode is written in the EAN format.
Configuration
To use default nomenclature, navigate to Inventory app ‣ Configuration ‣ Settings. Under the Barcode section, tick the Barcode Scanner checkbox. Doing so installs the Barcode app in the database.
Next, in the Barcode Nomenclature field, ensure Default Nomenclature is selected. Then, click Save.
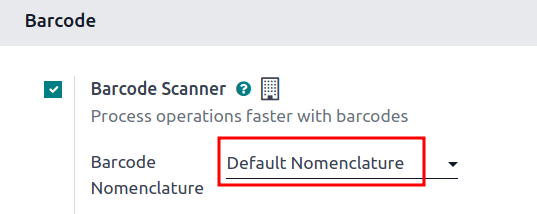
With the Barcode module installed, and the Default Nomenclature selected, the barcode actions using UPC and EAN, detailed in the default nomenclature list, are available for use. And, by default, Odoo automatically handles UPC/EAN conversion.
Example: product weight barcode
To better understand how barcode nomenclature is used to identify products in Odoo, this example where product weight barcodes in EAN format are used to allow a Point of Sale business to automatically print barcodes, and calculate the price using the weight of the item.
To set up barcodes for weighted products, the following rule is used:
Rule Name | Barcode Pattern | Field in Odoo |
|---|---|---|
Weighted Barcodes 3 Decimals | (21)….{NNDDD} | Barcode field on product form |
Example
To better understand the barcode pattern for weighted products, consider the barcode, 2112345000008:
- 21: code that identifies this a barcode for weighted products.
- 12345: five digits (denoted by ..... in the table above) that identify the product.
- 00000: five digits (denoted by {NNDDD} in the table) representing the weight of the product. On the product form, the five weight values must be 00000. The first two digits are whole number values, and the last three digits are decimal values. For example, “13.5 grams” in the {NNDDD} format is 13500.
- 8: check digit for 211234500000.
Together, these components make up a 13-character EAN - 13 barcode.
To configure the product barcode for Pasta Bolognese, the EAN barcode for weighted products, 2112345000008, is entered in the Barcode field on the product form (accessible by going to Inventory app ‣ Products ‣ Products, and selecting the desired product). In addition, the Unit of Measure is set to kg.
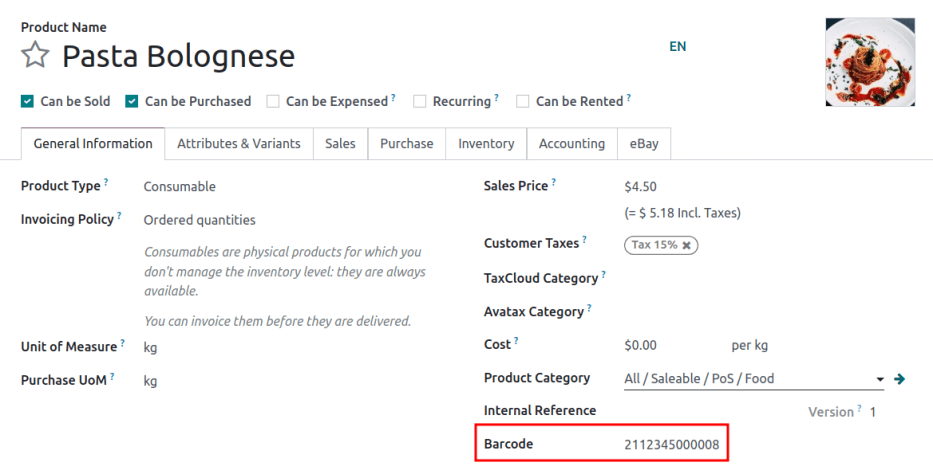
Next, a customer’s bowl of pasta is weighed to be 1.5 kilograms. This generates a new barcode for the pasta, according to the weight: 211234501500, which has a check digit of 2. The new barcode is 2112345015002.
Ensure the products scan properly, by navigating to the Barcode app ‣ Operations. Next, click any operation type, such as Receipts. Then, click the New button to create a draft stock move. Scan the product weight barcode, such as 2112345015002, and if the intended product appears, the barcode setup is correct.
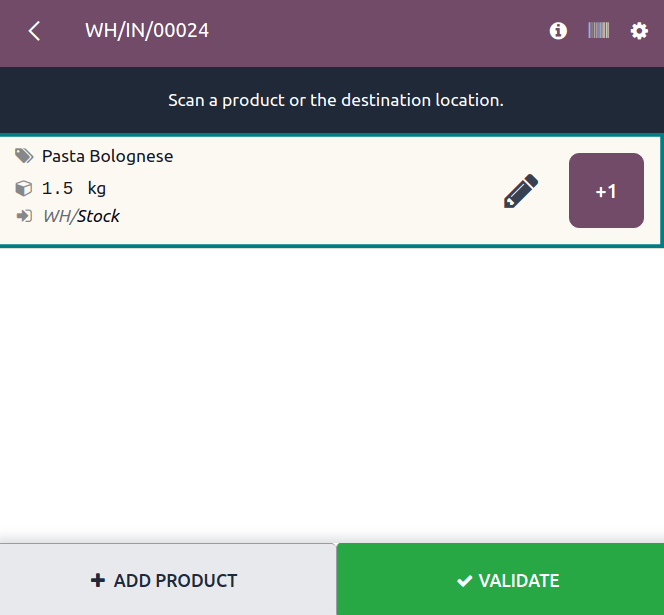
Create rules
Important
Adding new rules is necessary for UPC and EAN formats that are not in Odoo’s default list, since barcodes cannot be read successfully if there are unknown fields.
While new rules can be created, Odoo fields do not auto-populate with information from these rules. Custom development is required for this functionality.
To create a rule, first enable developer mode. Then, navigate to Inventory app ‣ Configuration ‣ Barcode Nomenclatures, and select Default Nomenclature.
On this page, configure the following optional fields:
- UPC/EAN Conversion: determines if a UPC/EAN barcode should be automatically converted when matching a rule with another encoding. Options include Always (the default option), Never, EAN-13 to UPC-A, and UPC-A to EAN-13.
- Is GS1 Nomenclature: ensure this checkbox is not ticked, as the Default Nomenclature uses UPC and EAN encoding, not GS1 encoding.
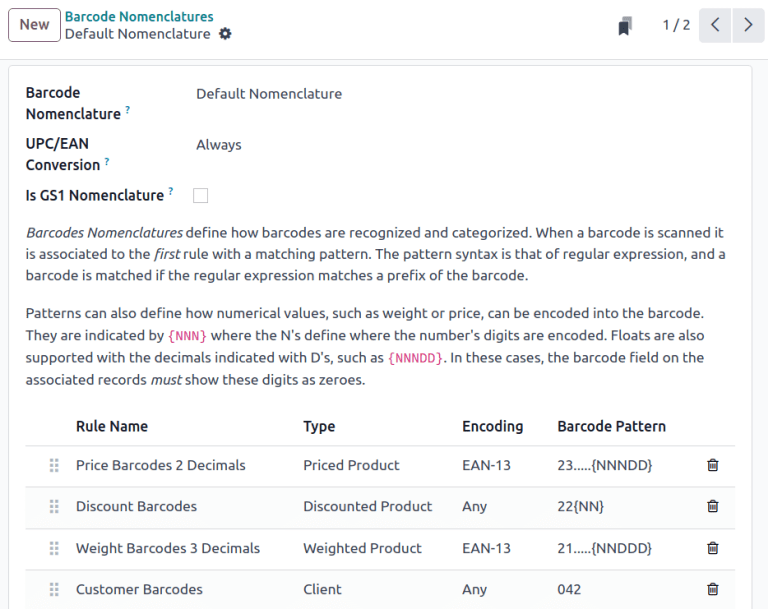
On the Default Nomenclature page, click Add a line at the bottom of the table, which opens a Create Rules pop-up window to create a new rule.
The Rule Name field is used internally to identify what the barcode represents.
The Sequence field represents the priority of the rule; meaning the smaller the value, the higher the rule appears on the table.
The barcode Type field represents different classifications of information that can be understood by the system (e.g., Package, Lot, Location, Coupon, etc.).
The Encoding field specifies which encoding the barcode uses. This rule only applies if the barcode uses this specific encoding. The available Encoding options are: EAN-13, EAN-8, UPC-A, and GS1-28.
The Barcode Pattern field represents how the sequence of letters or numbers is recognized by the system to contain information about the product. Sometimes, when a certain amount of digits are required, the number of . is shown. N represents whole number digits, and D represent decimal digits.
Example
1... represents any 4-digit number that starts with 1. NNDD represents a two digit number with two decimal points. For example, 14.25 is 1425.
After filling in the information, click the Save & New button to save the rule, and instantly start creating another rule. Or, click Save & Close to save the rule, and return to the table of rules.
Default nomenclature list
The table below contains Odoo’s list of Default Nomenclature rules. Barcode patterns are written in regular expressions.
Rule Name | Type | Encoding | Barcode Pattern |
|---|---|---|---|
Price Barcodes 2 Decimals | Priced Product | EAN-13 | 23…..{NNNDD} |
Discount Barcodes | Discounted Product | Any | 22{NN} |
Weight Barcodes 3 Decimals | Weighted Product | EAN-13 | 21…..{NNDDD} |
Customer Barcodes | Client | Any | 042 |
Coupon & Gift Card Barcodes | Coupon | Any | 043|044 |
Cashier Barcodes | Cashier | Any | 041 |
Location barcodes | Location | Any | 414 |
Package barcodes | Package | Any | PACK |
Lot barcodes | Lot | Any | 10 |
Magnetic Credit Card | Credit Card | Any | %.* |
Product Barcodes | Unit Product | Any | .* |
Note
When the Barcode Pattern contains .*, it means it can contain any number or type of characters.
See also
On this page
Get Help
Contact Support Ask the Odoo Community
![]()
- User Docs
- Database management
- Developer
- Contributing
EN
Odoo 18
GS1 barcode nomenclature
GS1 nomenclature consolidates various product and supply chain data into a single barcode. Odoo takes in unique Global Trade Item Numbers (GTIN), purchased by businesses, to enable global shipping, sales, and eCommerce product listing.
Configure GS1 nomenclature to scan barcodes of sealed boxes and identify essential product information, such as GTIN, lot number, quantity information, and more.
Important
GTINs are unique product identification that must be purchased from GS1 to use GS1 barcodes.
See also
Set up barcode nomenclature
To use GS1 nomenclature, navigate to the Inventory app ‣ Configuration ‣ Settings. Then under the Barcode section, check the Barcode Scanner box. Next, select Barcode Nomenclature ‣ Default GS1 Nomenclature from the default barcode nomenclature options.
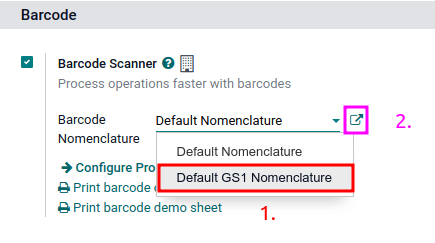
The list of GS1 rules and barcode patterns Odoo supports by default is accessible by clicking the ➡️ (arrow) icon to the right of the Barcode Nomenclature selection.
In the Open: Nomenclature pop-up table, view and edit the GS1 Rule Names available in Odoo. The table contains all the information that can be condensed with a GS1 barcode, along with the corresponding Barcode Pattern.
Tip
After setting GS1 as the barcode nomenclature, the Barcode Nomenclatures settings can also be accessed by a hidden menu that’s discoverable after enabling developer mode. Once enabled, navigate to the Inventory app ‣ Configuration ‣ Barcode Nomenclatures menu and finally, select Default GS1 Nomenclature.
Use GS1 barcodes in Odoo
For product identification using GS1 barcodes in Odoo, businesses obtain a unique GTIN as an internationally distinct product identifier purchased from GS1. This GTIN is combined with specific product details following GS1’s designated barcode pattern. The barcode pattern’s arrangement of numbers and letters must adhere to GS1 conventions for accurate interpretation by global systems along the supply chain.
Every barcode starts with a 2-4 digit application identifier (A.I.). This required prefix universally indicates what kind of information the barcode contains. Odoo follows GS1 rules for identifying information, as detailed in the default GS1 rules list. Including the relevant A.I. from the list enables Odoo to correctly interpret GS1 barcodes. While most barcode patterns have a fixed length requirement, certain ones, such as lots and serial numbers, have flexible length.
Tip
For flexible-length barcode patterns not placed at the end of the GS1 barcode, use the FNC1 separator (\x1D) to end the barcode.
Example: The barcode pattern for lot numbers is 20 characters long. Instead of creating a 20-character lot number barcode, like LOT00000000000000001, use the FNC1 separator to make it shorter: LOT001x1D.
Refer to the GS1 nomenclature list to see a comprehensive list of all barcode patterns and rules to follow. Otherwise, refer to this GS1 usage doc for specific examples of combining GTIN to product information and configuring the workflow.
See also
Create rules
GS1 rules are a specific format of information contained in the barcode, beginning with an A.I. and containing a defined length of characters. Scanning GS1 barcodes from the default GS1 list auto-fills corresponding data in the Odoo database.
Adding GS1 barcode rules in Odoo ensures accurate interpretation of unique, non-standard GS1 formats.
To do so, begin by turning on developer mode and navigating to the Barcode Nomenclatures list in Inventory app ‣ Configuration ‣ Barcode Nomenclatures. Then, select the Default GS1 Nomenclature list item.
On the Default GS1 Nomenclature page, select Add a line at the bottom of the table, which opens a window to create a new rule. The Rule Name field is used internally to identify what the barcode represents. The barcode Types are different classifications of information that can be understood by the system (e.g. product, quantity, best before date, package, coupon). The Sequence represents the priority of the rule; this means the smaller the value, the higher the rule appears on the table. Odoo follows the sequential order of this table and will use the first rule it matches based on the sequence. The Barcode Pattern is how the sequence of letters or numbers is recognized by the system to contain information about the product.
After filling in the information, click the Save & New button to make another rule or click Save & Close to save and return to the table of rules.
Barcode troubleshooting
Since GS1 barcodes are challenging to work with, here are some checks to try when the barcodes are not working as expected:
- Ensure that the Barcode Nomenclature setting is set as Default GS1 Nomenclature. Jump to the nomenclature setup section for more details.
- Ensure that the fields scanned in the barcode are enabled in Odoo. For example, to scan a barcode containing lots and serial numbers, make sure the Lots & Serial Numbers feature is enabled in Odoo’s settings and on the product.
- Omit punctuation such as parentheses () or brackets [] between the A.I. and the barcode sequence. These are typically used in examples for ease of reading and should not be included in the final barcode. For more details on building GS1 barcodes, go to this section.
- When a single barcode contains multiple encoded fields, Odoo requires all rules to be listed in the barcode nomenclature for Odoo to read the barcode. This section details how to add new rules in the barcode nomenclature.
- Test barcodes containing multiple encoded fields, piece by piece, to figure out which field is causing the issue.
Example
When testing a barcode containing the GTIN, lot number, and quantity, start by scanning the GTIN alone. Then, test the GTIN with the lot number, and finally, try scanning the whole barcode. - After diagnosing the encoded field is unknown, add new rules to Odoo’s default list to recognize GS1 barcodes with unique specifications.
Important
While the new field will be read, the information won’t link to an existing field in Odoo without developer customizations. However, adding new rules is necessary to ensure the rest of the fields in the barcode are interpreted correctly.
GS1 nomenclature list
The table below contains Odoo’s default list of GS1 rules. Barcode patterns are written in regular expressions. Only the first three rules require a check digit as the final character.
Rule Name | Type | Barcode Pattern | GS1 Content Type | Odoo field |
|---|---|---|---|---|
Serial Shipping Container Code | Package | (00)(\d{18}) | Numeric identifier | Package name |
Global Trade Item Number (GTIN) | Unit Product | (01)(\d{14}) | Numeric identifier | Barcode field on product form |
GTIN of contained trade items | Unit Product | (02)(\d{14}) | Numeric identifier | Packaging |
Ship to / Deliver to global location | Destination location | (410)(\d{13}) | Numeric identifier | Destination location |
Ship / Deliver for forward | Destination location | (413)(\d{13}) | Numeric identifier | Source location |
I.D. of a physical location | Location | (414)(\d{13}) | Numeric identifier | Location |
Batch or lot number | Lot | (10) ([!”%-/0-9:-?A-Z_a-z]{0,20}) | Alpha-numeric name | Lot |
Serial number | Lot | (21) ([!”%-/0-9:-?A-Z_a-z]{0,20}) | Alpha-numeric name | Serial number |
Packaging date (YYMMDD) | Packaging Date | (13)(\d{6}) | Date | Pack date |
Best before date (YYMMDD) | Best before Date | (15)(\d{6}) | Date | Best before date |
Expiration date (YYMMDD) | Expiration Date | (17)(\d{6}) | Date | Expiry date |
Variable count of items | Quantity | (30)(\d{0,8}) | Measure | UoM: Units |
Count of trade items | Quantity | (37)(\d{0,8}) | Measure | Qty in units for containers (AI 02) |
Net weight: kilograms (kg) | Quantity | (310[0-5])(\d{6}) | Measure | Qty in kg |
Length in meters (m) | Quantity | (311[0-5])(\d{6}) | Measure | Qty in m |
Net volume: liters (L) | Quantity | (315[0-5])(\d{6}) | Measure | Qty in L |
Net volume: cubic meters (m3) | Quantity | (316[0-5])(\d{6}) | Measure | Qty in m3 |
Length in inches (in) | Quantity | (321[0-5])(\d{6}) | Measure | Qty in inches |
Net weight/volume: ounces (oz) | Quantity | (357[0-5])(\d{6}) | Measure | Qty in oz |
Net volume: cubic feet (ft3) | Quantity | (365[0-5])(\d{6}) | Measure | Qty in ft3 |
Packaging type | Packaging Type | (91) ([!”%-/0-9:-?A-Z_a-z]{0,90}) | Alpha-numeric name | Package type |
On this page
Get Help
Contact Support Ask the Odoo Community
![]()
- User Docs
- Database management
- Developer
- Contributing
EN
Odoo 18
GS1 barcode usage
GS1 barcodes provide a standardized format that barcode scanners can interpret. They encode information in a specific structure recognized globally, allowing scanners to understand and process supply chain data consistently.
Odoo Barcode interprets and prints GS1 barcodes, automating product identification and tracking in warehouse operations such as receiving, picking, and shipping.
The following sections contain examples of how Odoo uses GS1 barcodes provided by the business to identify common warehouse items and automate certain warehouse workflows.
Important
Odoo does not create GS1 barcodes. Businesses must purchase a unique Global Trade Item Number (GTIN) from GS1. Then, they can combine their existing GS1 barcodes with product and supply chain information (also provided by GS1) to create barcodes in Odoo.
See also
Configure barcodes for product, quantity, and lots
To build a GS1 barcode that contains information about a product, its quantities, and the lot number, the following barcode patterns and Application Identifiers (A.I.) are used:
Name | Rule Name | A.I. | Barcode Pattern | Field in Odoo |
|---|---|---|---|---|
Product | Global Trade Item Number (GTIN) | 01 | (01)(\d{14}) | Barcode field on product form |
Quantity | Variable count of items | 30 | (30)(\d{0,8}) | Units field on transfer form |
Lot Number | Batch or lot number | 10 | (10)([!”%-/0-9:-?A-Z_a-z]{0,20}) | Lot on Detailed Operations pop-up |
Configuration
First, enable product tracking using lots by navigating to Inventory app ‣ Configuration ‣ Settings, and checking the box for Lots & Serial Numbers under the Traceability heading.
Then, set up the product barcode by navigating to the intended product form in Inventory app ‣ Products ‣ Products and selecting the product. On the product form, click Edit. Then, in the General Information tab, fill in the Barcode field with the unique 14-digit Global Trade Item Number (GTIN), which is a universally recognized identifying number that is provided by GS1.
Important
On the product form, omit the A.I. 01 for GTIN product barcode pattern, as it is only used to encode multiple barcodes into a single barcode that contains detailed information about the package contents.
Example
To record the GS1 barcode for the product, Fuji Apple, enter the 14-digit GTIN 20611628936004 in the Barcode field on the product form.
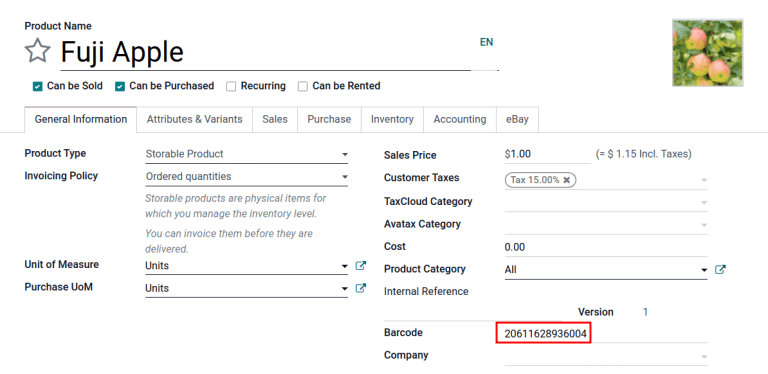
Tip
To view a list of all products and their corresponding barcodes in the Odoo database, navigate to Inventory app ‣ Configuration ‣ Settings. Under the Barcode heading, click on the Configure Product Barcodes button under the Barcode Scanner section. Enter the 14-digit GTIN into the Barcode column, then click Save.
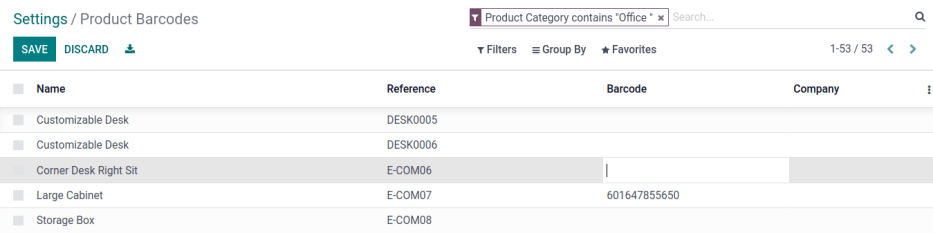
After activating tracking by lots and serial numbers from the settings page, specify that this feature is to be applied on each product by navigating to the Inventory tab on the product form. Under Tracking, choose the By Lots radio button.
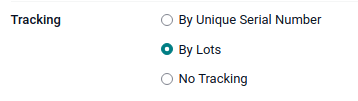
Scan barcode on receipt
To ensure accurate lot interpretation in Odoo on product barcodes scanned during a receipt operation, navigate to the Barcode app to manage the receipt picking process.
From the Barcode Scanning dashboard, click the Operations button, then the Receipts button to view the list of vendor receipts to process. Receipts generated from POs are listed, but new receipt operations can also be created directly through the Barcode app using the Create button.
On the list of receipts, click on the warehouse operation (WH/IN) and scan product barcodes and lot numbers with a barcode scanner. The scanned product then appears on the list. Use the ✏️ (pencil) button to open a window and manually enter quantities for specific lot numbers.
Example
After placing a PO for fifty apples, navigate to the associated receipt in the Barcode app.
Scan the barcode containing the GTIN, quantity, and lot number. For testing with a barcode scanner, below is an example barcode for the fifty Fuji apples in Lot 2.
50 Fuji apples in Lot0002 | |
|---|---|
2D Matrix |  |
A.I. (product) | 01 |
GS1 Barcode (product) | 20611628936004 |
A.I. (quantity) | 30 |
GS1 Barcode (quantity) | 00000050 |
A.I. (lot) | 10 |
GS1 Barcode (lot #) | LOT0002 |
Full GS1 barcode | 0120611628936004 3000000050 10LOT0002 |
If the configuration is correct, 50/50 Units processed will be displayed and the Validate button turns green. Click the Validate button to complete the reception.
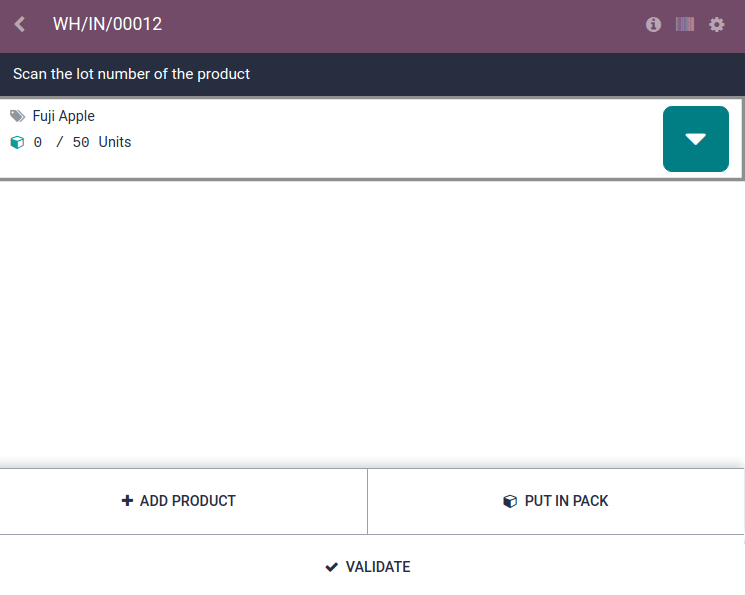
Configure barcode for product and non-unit quantity
To build a GS1 barcode that contains products measured in a non-unit quantity, like kilograms, for example, the following barcode patterns are used:
Name | Rule Name | A.I. | Barcode Pattern | Field in Odoo |
|---|---|---|---|---|
Product | Global Trade Item Number (GTIN) | 01 | (01)(\d{14}) | Barcode field on product form |
Quantity in kilograms | Variable count of items | 310[0-5] | (310[0-5])(\d{6}) | Units field on transfer form |
Scan barcode on receipt
To confirm that quantities are correctly interpreted in Odoo, place an order in the Purchase app using the appropriate unit of measure (UoM) for the quantity of products to be purchased.
See also
Simplify vendor unit conversions with UoMs
After the order is placed, navigate to the Barcode app to receive the vendor shipment.
Example
On the receipt in the Barcode app, receive an order for 52.1 kg of peaches by scanning the barcode containing the GTIN and quantity of peaches in kilograms.
52.1 kg of Peaches | |
|---|---|
2D Matrix |  |
A.I. (product) | 01 |
GS1 Barcode (product) | 00614141000012 |
A.I. (kg, 1 decimal point) | 3101 |
GS1 Barcode (quantity) | 000521 |
Full GS1 barcode | 0100614141000012 3101000521 |
If the configuration is correct, 52.1 / 52.1 kg will be displayed and the Validate button turns green. Finally, press Validate to complete the validation.
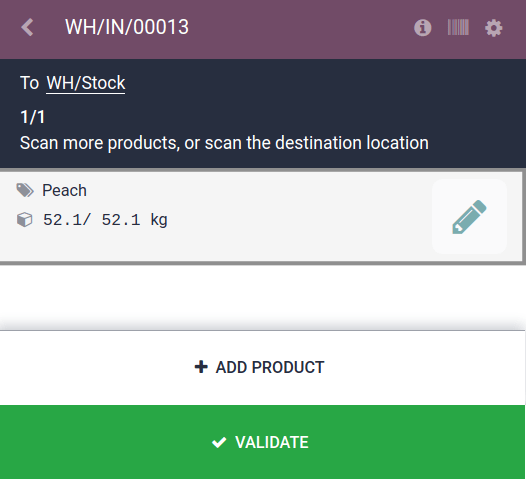
Verify product moves
For additional verification, the quantities of received products are also recorded on the Product Moves report, accessible by navigating to Inventory app ‣ Reporting ‣ Product Moves.
The items on the Product Moves report are grouped by product by default. To confirm the received quantities, click on a product line to open its collapsible drop-down menu, which displays a list of stock move lines for the product. The latest stock move matches the warehouse reception reference number (e.g. WH/IN/00013) and quantity processed in the barcode scan, demonstrating that the records processed in the Barcode app were properly stored in Inventory.

On this page
Get Help
Contact Support Ask the Odoo Community
![]()
EN
Odoo 18
Quality
Odoo Quality helps ensure product quality throughout manufacturing processes and inventory movements. Conduct quality checks, automate quality inspection frequency, and create quality alerts when issues arise.
See also
Get Help
Contact Support Ask the Odoo Community
![]()
- User Docs
- Database management
- Developer
- Contributing
EN
Odoo 18
Quality control points
In Odoo, quality control points (QCPs), are used to automatically create quality checks at predetermined intervals. QCPs can be configured to create quality checks for specific operations (manufacturing, delivery, etc.), as well as specific products within those operations.
Using QCPs allows quality teams to ensure products are being regularly inspected for defects and other issues.
Configure quality control points
To create a new QCP, navigate to Quality ‣ Quality Control ‣ Control Points, and then click New.
Begin filling out the new QCP by entering a unique Title that makes the QCP easily identifiable.
In the Products field, select one or more products the QCP should apply to. If the QCP should apply to an entire product category, select it in the Product Categories field.
In the Operations field, select the operation(s) that should trigger the QCP. For example, selecting the Manufacturing option in the Operations field causes a quality check to be created for new manufacturing orders (MOs).
Note
When creating a new QCP, at least one operation must be listed in the Operations field. However, the Products and Product Categories fields can be left blank. If they are left blank, the QCP generates quality checks for every instance of the specified operation(s).
If the Manufacturing operation is selected in the Operations field, a new field appears below it, titled Work Order Operation. From this field, select a specific work order to generate quality checks for that operation, rather than the manufacturing operation, in general.
Example
A QCP could be configured to create quality checks for the Assembly work order of the Coffee Table product. Then, if a new MO is confirmed for a Coffee Table, the QCP creates a quality check specifically for the Assembly operation.
The Control Per field is set to one of three options that determine when a new quality check is created:
- Operation: One check is requested for the specified operation, as a whole.
- Product: One check is requested for each unique product included in the specified operation. For example, a delivery operation for one table and four chairs would generate two checks, since two unique products are included in the operation.
- Quantity: A check is requested for a certain percentage of items within the specified operation. This percentage is set by enabling the Partial Transfer Test checkbox, and then entering a numerical value in the Percentage field that appears below. If the checkbox is not enabled, one quality check is created for the full quantity.
The Control Frequency field is set to one of three options that determine how often a new quality check is created:
- All: A quality check is requested every time the conditions of the QCP are met.
- Randomly: A quality check is randomly requested for a certain percentage of operations, which can be specified in the Every #% of Operations field that appears below.
- Periodically: A quality check is requested once every set period of time, which is specified by entering a numerical value in the field below, and choosing either Days, Weeks, or Months as the desired time interval.
In the Type field, specify the type of quality check that should be performed. The method for processing quality checks created by the QCP depends upon the type of quality check selected:
- Instructions checks provide specific instructions for how to complete the quality check.
- Take a Picture checks require a picture of the product be uploaded for later review by the assigned quality team.
- Register Production checks prompt manufacturing employees to confirm the quantity of the product that was produced during the manufacturing operation.
- Pass - Fail checks specify a criterion that products must meet for the check to pass.
- Measure checks prompt employees to record a measurement of the product that must be within a tolerance of a norm value for the check to pass.
- Worksheet checks require the employee processing the check to fill out an interactive worksheet.
- Spreadsheet checks require the employee processing the check to fill out an interactive spreadsheet.
Important
An Instructions check is the same as a step on a work order for an MO.
When a step is added to a work order, Odoo stores it in the Quality app as a QCP. It is possible to manually create a QCP with the Instructions check type, and even assign it to an operation other than manufacturing, like receipts.
However, when creating a control point specifically for quality control purposes, using a different check type is probably more effective.
Note
When creating a QCP with the Worksheet or Spreadsheet check types, it is necessary to specify a Quality Worksheet Template or Quality Spreadsheet Template in the Template field that appears below the Type field.
The selected template is duplicated for each quality check created by the QCP, and must be filled out to complete the quality check.
To create a new template, navigate to Quality app ‣ Configuration ‣ Quality Worksheet/Spreadsheet Templates, and click New.
In the Team field, specify the quality team that is responsible for managing the QCP, and the quality checks it creates. If a specific quality team member is responsible for the QCP, select them in the Responsible field.
The Step Document field has two options that specify the location of an instructional document detailing how to complete the quality checks created by the QCP.
Select Specific Page of Operation Worksheet if the document is included with the instructional worksheet for the work order, then enter the page number in the Worksheet Page field that appears below.
Select Custom if the document should be included in the Instructions tab at the bottom of the QCP.
In the Instructions tab at the bottom of the form, enter instructions for how to complete the quality checks created by the QCP.
If the Custom option was selected in the Step Document field above, a document can be attached in this tab. To do so, either select the Upload your file button to open the device’s file manager, and then select a file, or add a link to a Google Slides document in the Google Slide Link field.
In the Message If Failure tab, include instructions for what to do if the quality check fails. For example, instruct the employee processing the quality check to create a quality alert.
The Notes tab is used to provide additional information about the QCP, like the reason it was created. The information entered in this tab is not shown to employees processing the quality checks created by the QCP.
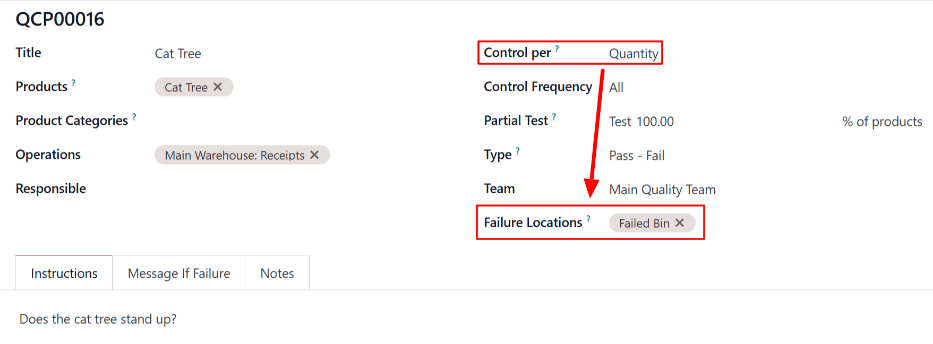
Get Help
Contact Support Ask the Odoo Community
![]()
- User Docs
- Database management
- Developer
- Contributing
EN
Odoo 18
Quality alerts
In the Odoo Quality app, quality alerts are used to notify quality teams of product defects or other issues. Quality alerts can be created from a manufacturing or inventory order, from a work order in the Shop Floor module, or directly within the Quality app.
Create quality alerts
There are multiple ways to create a new quality alert:
- From the Quality app itself, by to Quality ‣ Quality Control ‣ Quality Alerts, and then click New to open a quality alert form.
- Navigate to Manufacturing ‣ Operations ‣ Manufacturing Orders, and then select an MO. Click the Quality Alert button at the top of the MO to open a quality alert form in a new page.
Important
This method can only be used if a quality check has been requested for the MO. The Quality Alert button will not appear otherwise. - Open the Inventory app, click the # To Process button on an inventory order type card (Receipts, Delivery Orders, etc.), and then select an order. Click the Quality Alert button at the top of the order to open a quality alert form in a new page.
Important
This method can only be used if a quality check has been requested for the inventory order. The Quality Alert button will not appear otherwise. If the button does not appear, a quality alert can also be created by clicking the ⚙️ (gear) icon at the top of the page and selecting the Quality Alert option from the resulting menu. - Open the Shop Floor module, and then select a work center from the navigation bar at the top of the page. Then, click the ⋮ (three vertical dots) button at the bottom-right of a work order card to open the What do you want to do? menu. Select the Create a Quality Alert option from this menu to open a quality alert in a pop-up window.
Note
Depending on how a new quality alert form is opened, certain fields on the form may already be filled in. For example, if a quality alert is created from a work order card in the Shop Floor module, the Product and Work Center are pre-filled.
Quality alerts form
After opening a new quality alert form, begin by giving it a short Title that summarizes the issue with the product.
Then, if the quality alert is referencing:
- A specific product or product variant, select it from the Product or Product Variant drop-down menus.
- A specific work center, select it from the Work Center drop-down menu.
- A specific picking order, select it from the Picking drop-down menu.
Next in the Team field, select the quality team that is responsible for managing the quality alert. If a specific employee should be responsible for the quality alert, select them from the Responsible drop-down menu.
In the Tags field, select any tags relevant to the quality alert from the drop-down menu.
Use the Root Cause field to select the cause of the quality issue, if known.
Lastly, choose a Priority level by selecting a ⭐ (star) number between one and three. Quality alerts with higher priorities appear at the top of the Quality Alerts Kanban board in the Quality app.
At the bottom of the quality alert form are four tabs which aid in adding supplemental information or actions to be taken for the quality alert. They can be filled out as follows:
- In the Description tab, enter a description of the quality issue.
- Use the Corrective Actions tab to detail the steps that should be taken to fix the issue.
- Use the Preventive Actions tab to detail what should be done to prevent the issue from occurring in the future.
- In the Miscellaneous tab, select the Vendor of the product. If using an Odoo database which manages multiple companies, select the relevant company in the Company field. Finally, specify when the alert was assigned to a quality team in the Date Assigned field.
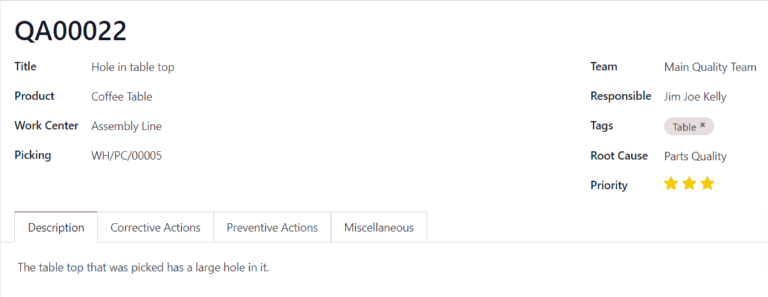
Manage quality alerts
To view all existing quality alerts, navigate to Quality ‣ Quality Control ‣ Quality Alerts. By default, alerts are displayed in a Kanban board view, which organizes them into different stages based on where they are in the review process.
To move an alert to a different stage, simply drag and drop it on the desired stage. Alternatively, select a quality alert to open it, and then click the desired stage above the top-right corner of the quality alert form.
To create a new alert within a specific stage, click the + (plus) button to the right of the stage name. In the new alert card that appears below the stage title, enter the Title of the alert, and then click Add. To configure the rest of the alert, select the alert card to open its form.
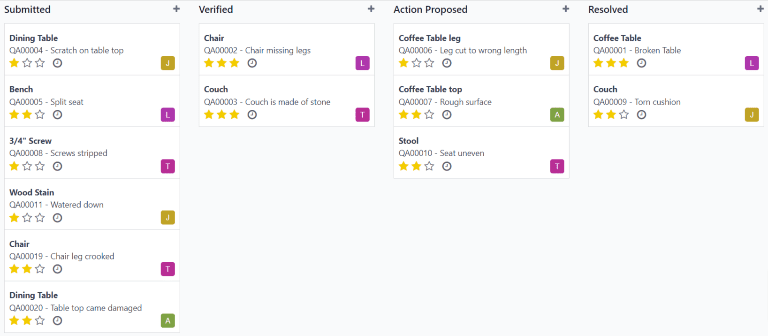
On this page
Get Help
Contact Support Ask the Odoo Community
![]()
- User Docs
- Database management
- Developer
- Contributing
EN
Odoo 18
Quality checks
Quality checks are manual inspections conducted by employees, and are used to ensure the quality of products. In Odoo, a quality check can be conducted for a single product, or multiple products within the same inventory operation or manufacturing order.
Using a Quality Control Point (QCP), it is possible to create quality checks automatically at regular intervals. When quality checks are created by a QCP, they appear on a manufacturing or inventory order, where the employee processing the order will be prompted to complete them. For a full explanation of how to create and configure a QCP, see the documentation on quality control points.
While quality checks are most commonly created automatically by a QCP, it is also possible to manually create a single quality check. Creating a check manually is useful when an employee wants to schedule a quality check that will only occur once, or register a quality check that they conduct unprompted.
Manual quality check
To manually create a single quality check, navigate to Quality ‣ Quality Control ‣ Quality Checks, and click New. On the quality check form, begin by selecting an option from the Control per drop-down menu:
- Operation requests a check for an entire operation (ex. delivery order) and all products within it.
- Product requests a check for every unit of a product that is part of an operation (ex. every unit of a product within a delivery order).
- Quantity requests a check for every quantity of a product that is part of an operation (ex. one check for five units of a product within a delivery order). Selecting Quantity also causes a Lot/Serial drop-down field to appear, from which can be selected a specific lot or serial number that the quality check should be conducted for.
Next, select an inventory operation from the Picking drop-down menu or a manufacturing order from the Production Order drop-down menu. This is necessary because Odoo needs to know for which operation the quality check is being conducted.
If the quality check should be assigned to a specific QCP, select it from the Control Point drop-down menu. This is useful if the quality check is being created manually, but should still be recognized as belonging to a specific QCP.
Select a quality check type from the Type drop-down field:
- Instructions provides specific instructions for how to conduct the quality check.
- Take a Picture requires a picture to be attached to the check before the check can be completed.
- Pass - Fail is used when the product being checked must meet a certain criteria to pass the check.
- Selecting Measure causes a Measure input field to appear, in which a measurement must be entered before the check can be completed.
- Selecting Worksheet causes a Quality Template drop-down field to appear. Use it to select a quality worksheet that must be filled out to complete the check.
In the Team field, select the quality team that is responsible for the quality check. In the Company field, select the company that owns the product being inspected.
On the Notes tab at the bottom of the form, enter any relevant instructions in the Instructions text entry box (ex. ‘Attach a picture of the product’). In the Notes text entry box, enter any relevant information about the quality check (who created it, why it was created, etc.).
Finally, if the check is being processed immediately, click the Pass button at the top left of the screen if the check passes, or the Fail button if the check fails.
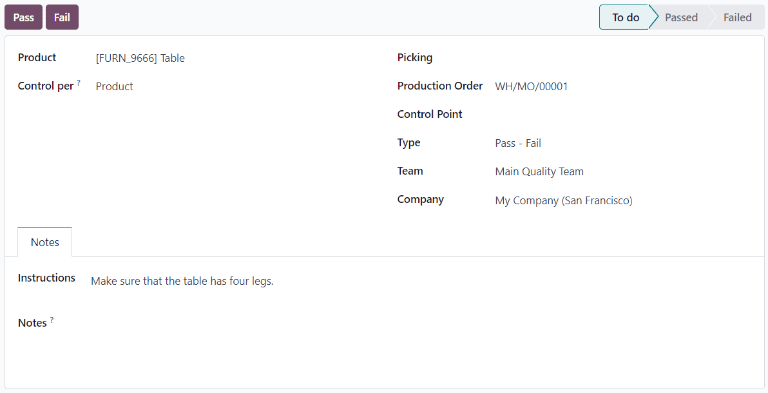
Process quality check
Quality checks can be processed directly on the quality check’s page, or from a manufacturing or inventory order for which a check is required. Alternatively, if a quality check is created for a specific work order operation, the check is processed in the Shop Floor module.
Note
It is not possible to manually create a single quality check that is assigned to a specific work order operation. Quality checks for work order operations can only be created by a QCP. See the documentation on Quality Control Points for information about how to configure a QCP that will create quality checks for a specific work order operation.
Quality check page
To process a quality check from the check’s page, begin by navigating to Quality ‣ Quality Control ‣ Quality Checks, then select the check to process. Follow the instructions for how to complete the check, listed in the Instructions field of the Notes tab at the bottom of the page.
If the quality check passes, click the Pass button at the top of the page. If the check fails, click the Fail button, instead.
Quality check on order
To process a quality check on an order, select a manufacturing or inventory order (receipt, delivery, return, etc.), for which a check is required. Manufacturing orders can be selected by navigating to Manufacturing ‣ Operations ‣ Manufacturing Orders, and clicking on an order. Inventory orders can be selected by navigating to Inventory, clicking the # To Process button on an operation card, and selecting an order.
On the selected inventory or manufacturing order, a purple Quality Checks button appears at the top of the order. Click the button to open the Quality Check pop-up window, which shows all of the quality checks required for that order.
Follow the instructions that appear on the Quality Check pop-up window. If a Pass - Fail check is being processed, complete the check by clicking Pass or Fail at the bottom of the pop-up window. For all other quality check types, a Validate button appears instead. Click it to complete the check.
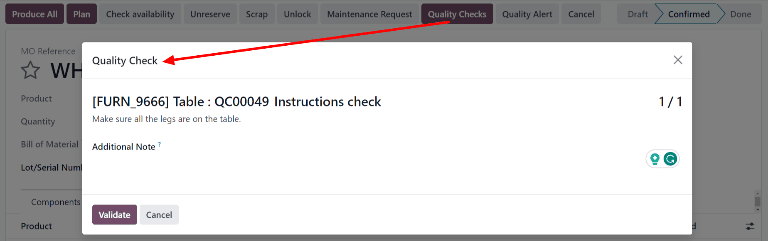
Quality check on work order
To process a quality check for a work order, begin by navigating to Manufacturing ‣ Operations ‣ Manufacturing Orders. Select an MO that includes a work order for which a quality check is required.
On the MO, select the Work Orders tab, and then click the Open Work Order (external link icon) button on the line of the work order to be processed. On the resulting Work Orders pop-up window, click the Open Shop Floor button to open the Shop Floor module.
See also
For a full guide to the Shop Floor module, see the Shop Floor overview documentation.
When accessed from a specific work order, the Shop Floor module opens to the page for the work center where the order is configured to be processed, and isolates the work order’s card so that no other cards are shown.
Process the work order’s steps until the quality check step is reached. Click on the step to open a pop-up window that details how the check should be completed. After following the instructions, click Validate to complete the check. Alternatively, if a Pass - Fail check is being processed, click either the Pass or Fail button.
It is also possible to complete a quality check by clicking the checkbox on the right side of the step. Doing so automatically marks the check as Passed.
Note
The specific steps for processing a quality check depend upon the type of check being conducted. For information about processing each type of quality check, see the associated documentation:
- Instructions quality check
- Pass - Fail quality check
- Measure quality check
- Take a Picture quality check
On this page
Get Help
Contact Support Ask the Odoo Community
![]()
- User Docs
- Database management
- Developer
- Contributing
EN
Odoo 18
Failure locations
In Odoo, quality control points (QCPs) are used to create quality checks, which prompt employees to confirm the quality of products, when they are included in certain operations. By setting one or more failure locations on a QCP, products that fail the quality checks it creates can be sent to one of the specified locations.
Important
The Failure Location feature was added in version 17.0 of Odoo, and does not appear in any previous version. To upgrade an Odoo database to a more recent version, see the documentation on database upgrades.
Configuration
To use failure locations, the Storage Locations setting must be enabled in the settings of the Inventory app. This setting allows for the creation of sub-locations within a warehouse, including failure locations.
To enable the Storage Locations setting, navigate to Inventory app ‣ Configuration ‣ Settings, and tick the checkbox next to Storage Locations, under the Warehouses heading. Then, click Save.

Important
Failure locations are most effective when used for products configured as storable products. This is because inventory counts are only tracked for storable products, versus consumable products, for which exact counts are not tracked.
Quality checks can still be created for consumable products, and those products can be sent to a failure location if they fail a check. However, Odoo does not track the exact quantity of a consumable product stored at a failure location.
To configure a product as storable, navigate to Inventory app ‣ Products ‣ Products, and select a product. In the Product Type field on the General Information tab, make sure that Storable Product is selected from the drop-down menu.
Add failure location to QCP
To add a failure location to a QCP, navigate to Quality app ‣ Quality Control ‣ Control Points. Select an existing QCP from the list, or create a new one by clicking New.
Note
The following instructions only detail the configuration settings necessary for adding a failure location to a QCP. For a full overview of QCP and all of the options available when configuring them, see the documentation on quality control points.
In the Control Per field on the QCP form, select the Quantity option. Doing so causes a Failure Locations field to appear on the form. This field is only available when the Quantity option is selected.
In the Failure Locations field, select one or more locations from the drop-down menu. To create a new location, type the desired location name into the field, and then select Create “[name]” from the drop-down menu.
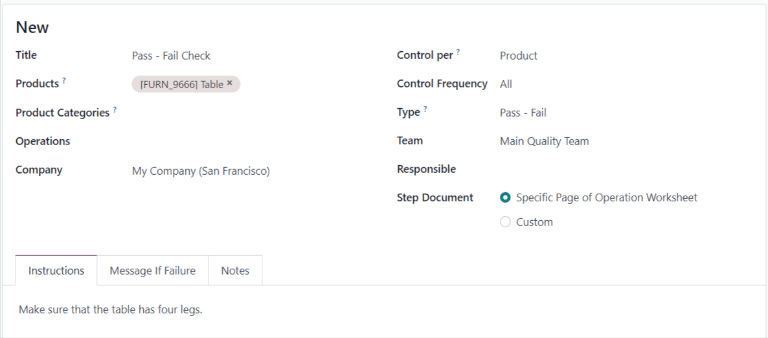
Send products to failure location
Once a QCP has been configured with one or more failure locations, products that fail a check created by the QCP can be routed to one of the locations.
To do so, open an order that requires a quality check created by a QCP configured with a failure location. For example, navigate to Inventory app ‣ Operations ‣ Receipts, and select a receipt.
At the top of the selected order, click the Quality Checks button to open a pop-up window, from which the quality check can be processed. At the bottom of the pop-up window, click the Fail button to fail the quality check, which opens a second pop-up window, titled Quality Check Failed for [Product].
In the Quantity Failed field, enter the quantity of the product that failed to pass the quality check. In the Failure Location field, select a location to which the failed quantity should be sent. Then, click Confirm at the bottom of the pop-up window to close it.
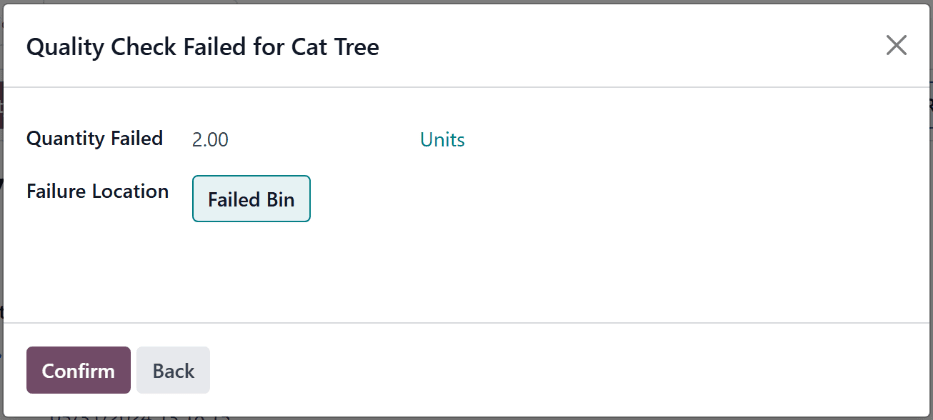
Finally, on the order, click the Validate button at the top of the page. Doing so confirms the products that failed the quality check were sent to the failure location, while products that passed it were sent to their normal storage locations.
View failure location inventory
To view the product quantities stored in a failure location, navigate to Inventory app ‣ Configuration ‣ Locations. Select a failure location from the list. Then, click the Current Stock smart button on the location’s page.
A failure location’s page lists all of the products stored within the location, along with the quantity of each.
On this page
Get Help
Contact Support Ask the Odoo Community
![]()
- User Docs
- Database management
- Developer
- Contributing
EN
Odoo 18
Instructions quality check
In Odoo Quality, an Instructions check is one of the quality check types that can be selected when creating a new quality check or quality control point (QCP). Instructions checks consist of a text entry field that allows the creator to provide instructions for how to complete the check.
For a full overview of how to configure a quality check or a QCP, see the documentation on quality checks and quality control points.
Process an Instructions quality check
There are multiple ways that Instructions quality checks can be processed. If a quality check is assigned to a specific manufacturing, inventory, or work order, the check can be processed on the order itself. Alternatively, a check can be processed from the check’s page.
Process from the quality check’s page
To process an Instructions quality check from the check’s page, begin by navigating to Quality ‣ Quality Control ‣ Quality Checks, and select a quality check. Follow the Instructions for how to complete the check.
If the product passes the check, click the Pass button above the quality check form. If the product does not pass the check, click the Fail button, instead.
Process quality check on an order
To process an Instructions quality check on an order, select a manufacturing order or inventory order (receipt, delivery, return, etc.) for which a check is required. Manufacturing orders can be selected by navigating to Manufacturing ‣ Operations ‣ Manufacturing Orders, and clicking on an order. Inventory orders can be selected by navigating to Inventory, clicking the # To Process button on an operation card, and selecting an order.
On the selected manufacturing or inventory order, a purple Quality Checks button appears above the order. Click the button to open the Quality Check pop-up window, from which any quality checks created for the order can be processed.

To complete an Instructions quality check, follow the instructions detailed in the Quality Check pop-up window. Finally, click Validate to confirm that the check has been completed.
If an issue or defect is found during the quality check, a quality alert may need to be created to notify a quality team. To do so, click the Quality Alert button that appears at the top of the manufacturing or inventory order after the check is validated.
Clicking Quality Alert opens a quality alert form on a new page. For a complete guide on how to fill out quality alert forms, view the documentation on quality alerts.
Process work order quality check
When configuring a QCP that is triggered by a manufacturing order, a specific work order can also be specified in the Work Order Operation field on the QCP form. If a work order is specified, an Instructions quality check is created for that specific work order, rather than the MO as a whole.
Quality checks configured for work orders must be completed from the Shop Floor module. To do so, begin by navigating to Manufacturing ‣ Operations ‣ Manufacturing Orders. Select an MO that includes a work order for which an Instructions quality check is required.
On the MO, select the Work Orders tab, and click the Open Work Order (square with arrow coming out of it) button on the line of the work order to be processed. On the resulting Work Orders pop-up window, click the Open Shop Floor button to open the Shop Floor module.
When accessed from a specific work order, the Shop Floor module opens to the page for the work center where the order is configured to be processed, and isolates the work order’s card so that no other cards are shown.
Begin processing the work order’s steps until the Instructions quality check step is reached. Click on the step to open a pop-up window that details how to complete the quality check. Once completed, click the Next button to complete the check, and move on to the next step.
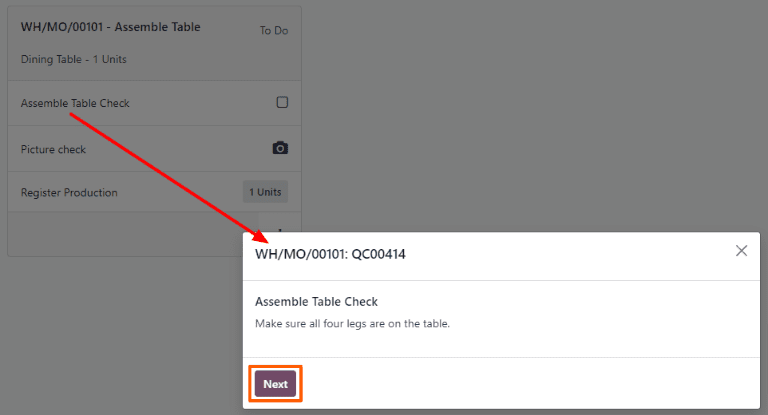
Alternatively, an Instructions quality check can be completed by clicking the checkbox that appears on the right side of the step’s line on the work order card. When using this method, the quality check automatically passes, without a pop-up window appearing.
Note
For a full guide to the Shop Floor module, see the Shop Floor overview documentation.
On this page
Get Help
Contact Support Ask the Odoo Community
![]()
- User Docs
- Database management
- Developer
- Contributing
EN
Odoo 18
Pass - Fail quality check
In Odoo Quality, a Pass - Fail check is one of the quality check types that can be selected when creating a new quality check or quality control point (QCP). Pass - Fail checks consist of a text field that allows the creator to specify a certain criteria that a product must meet to pass the check.
Create a Pass - Fail quality check
There are two distinct ways that Pass - Fail quality checks can be created. A single check can be manually created. Alternatively, a QCP can be configured that automatically creates checks at a predetermined interval.
This documentation only details the configuration options that are unique to Pass - Fail quality checks and QCP. For a full overview of all the configuration options available when creating a single check or a QCP, see the documentation on quality checks and quality control points.
Quality check
To create a single Pass - Fail quality check, navigate to Quality ‣ Quality Control ‣ Quality Checks, and click New. Fill out the new quality check form as follows:
- In the Type drop-down field, select the Pass - Fail quality check type.
- In the Team drop-down field, select the quality team responsible for managing the check.
- In the Instructions text field of the Notes tab, enter instructions for how to complete the quality check and the criteria that must be met for the check to pass.
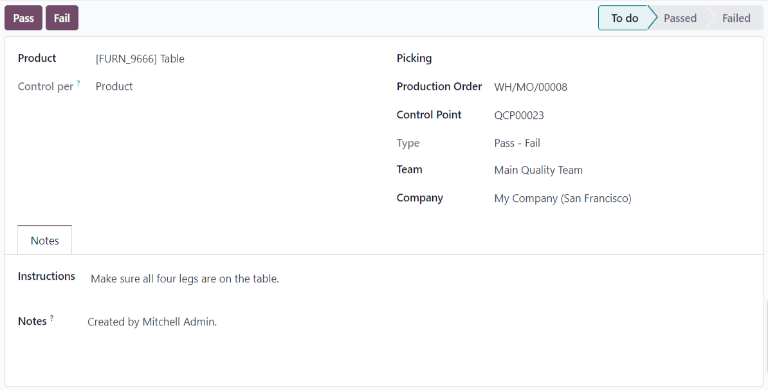
Quality Control Point (QCP)
To create a QCP that generates Pass - Fail quality checks automatically, begin by navigating to Quality ‣ Quality Control ‣ Control Points, and click New. Fill out the new QCP form as follows:
- In the Type drop-down field, select the Pass - Fail quality check type.
- In the Team drop-down field, select the quality team responsible for managing the checks created by the QCP.
- In the Instructions text field, enter instructions for how to complete the quality check and the criteria that must be met for the check to pass.
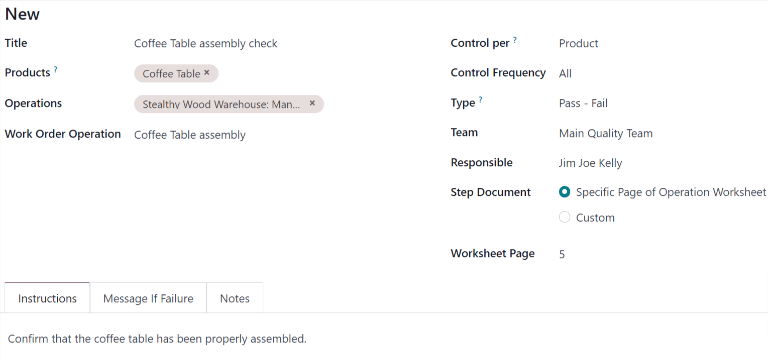
Process a Pass - Fail quality check
Once created, there are multiple ways that Measure quality checks can be processed. If a quality check is assigned to a specific inventory, manufacturing, or work order, the check can be processed on the order itself. Alternatively, a check can be processed from the check’s page.
From the check’s page
To process a Measure quality check from the check’s page, begin by navigating to Quality ‣ Quality Control ‣ Quality Checks, and select a quality check. Follow the Instructions for how to complete the check.
If the criteria for the check is met, click the Pass button at the top-left corner of the page. If the criteria is not met, click the Fail button.
On an order
To process a Pass - Fail quality check on an order, select a manufacturing order or inventory order (receipt, delivery, return, etc.), for which a check is required. Manufacturing orders can be selected by navigating to Manufacturing ‣ Operations ‣ Manufacturing Orders, and clicking on an order. Inventory orders can be selected by navigating to Inventory, clicking the # To Process button on an operation card, and selecting an order.
On the selected manufacturing or inventory order, a purple Quality Checks button appears at the top of the order. Click the button to open the Quality Check pop-up window, which shows all of the quality checks required for that order.
To process a Pass - Fail quality check, follow the instructions shown on the Quality Check pop-up window. If the criteria for the check is met, click the Pass button at the bottom of the window. If the criteria is not met, click the Fail button.
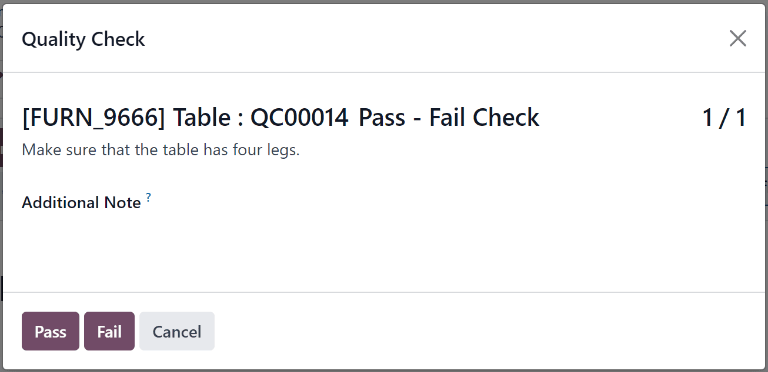
If a quality alert must be created, click the Quality Alert button that appears at the top of the manufacturing or inventory order after the check fails. Clicking Quality Alert opens a quality alert form on a new page.
See also
For a complete guide on how to fill out quality alert forms, view the documentation on quality alerts.
On a work order
When configuring a QCP that is triggered during manufacturing, a specific work order can also be specified in the Work Order Operation field on the QCP form. If a work order is specified, a Pass - Fail quality check is created for that specific work order, rather than the manufacturing order as a whole.
Pass - Fail quality checks configured for work orders must be completed from the Shop Floor module. To do so, begin by navigating to Manufacturing ‣ Operations ‣ Manufacturing Orders. Select an MO that includes a work order for which a Pass - Fail quality check is required.
On the MO, select the Work Orders tab, and then click the Open Work Order (external link icon) button on the line of the work order to be processed. On the resulting Work Orders pop-up window, click the Open Shop Floor button to open the Shop Floor module.
When accessed from a specific work order, the Shop Floor module opens to the page for the work center where the order is configured to be processed, and isolates the work order’s card so that no other cards are shown.
Begin processing the work order’s steps until the Pass - Fail quality check step is reached. Click on the step to open a pop-up window that details the criteria for whether the check passes or fails. Click the Pass button at the bottom of the pop-up window if the check passes, or the Fail button if it fails.
If the Pass button is clicked, the pop-up window moves to the next step for the work order. If the Fail button is clicked, a Quality Check Failed pop-up window appears, detailing what should be done next.
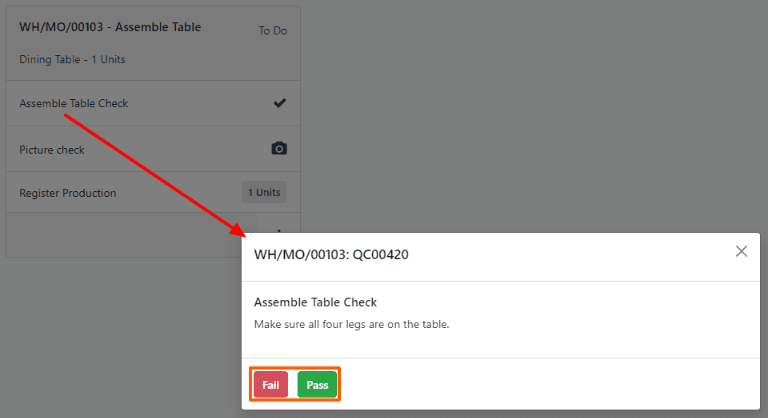
Tip
Alternatively, instead of clicking on the step to open the pop-up window, a Pass - Fail quality check can be completed by clicking the checkbox that appears on the right side of the step’s line on the work order card. When using this method, the quality check passes automatically, without a pop-up window appearing.
On this page
Get Help
Contact Support Ask the Odoo Community
![]()
- User Docs
- Database management
- Developer
- Contributing
EN
Odoo 18
Measure quality check
In Odoo Quality, a Measure check is one of the quality check types that can be selected when creating a new quality check or quality control point (QCP). Measure checks prompt users to measure a certain aspect of a product and record the measurement in Odoo. For the quality check to pass, the recorded measurement must be within a certain tolerance of a norm value.
Create a Measure quality check
There are two distinct ways that Measure quality checks can be created. A single check can be manually created. Alternatively, a QCP can be configured that automatically creates checks at a predetermined interval.
This documentation only details the configuration options that are unique to Measure quality checks and QCPs. For a full overview of all the configuration options available when creating a single check or a QCP, see the documentation on quality checks and quality control points.
Quality check
To create a single Measure quality check, navigate to Quality ‣ Quality Control ‣ Quality Checks, and click New. Fill out the new quality check form as follows:
- In the Type drop-down field, select the Measure quality check type.
- In the Team drop-down field, select the quality team responsible for managing the check.
- In the Instructions text field of the Notes tab, enter instructions for how the picture should be taken.
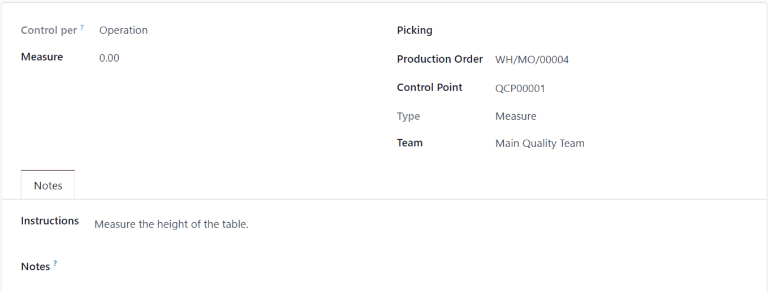
Quality control point (QCP)
To create a QCP that generates Measure quality checks automatically, navigate to Quality ‣ Quality Control ‣ Control Points, and click New. Fill out the new QCP form as follows:
- In the Type drop-down field, select the Measure quality check type. Doing so causes two new fields to appear: Norm and Tolerance.
- Use the first text-entry field of the Norm field to record the ideal measurement that the product should conform to. Use the second text-entry field to specify the unit of measurement that should be used.
- The Tolerance field features two sub-fields: from and to. Use the from field to specify the minimum acceptable measurement, and the to field to specify the maximum acceptable measurement.
- In the Team drop-down field, select the quality team responsible for managing the checks created by the QCP.
- In the Instructions text field, enter instructions for how the measurement should be taken.
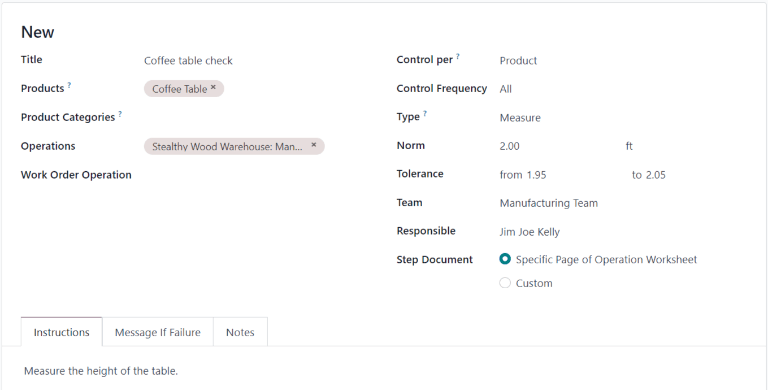
Process a Measure quality check
Once created, there are multiple ways that Measure quality checks can be processed. If a quality check is assigned to a specific inventory, manufacturing, or work order, the check can be processed on the order itself. Alternatively, a check can be processed from the check’s page.
From the check’s page
To process a Measure quality check from the check’s page, begin by navigating to Quality ‣ Quality Control ‣ Quality Checks, and select a quality check. Follow the Instructions for how to take the measurement.
After taking the measurement, record the value in the Measure field on the quality check form. To manually pass or fail the check, click Pass or Fail at the top-left corner of the check.
Alternatively, if the quality check is assigned to a QCP for which norm and tolerance values have been specified, click Measure at the top-left corner of the check instead. Doing so automatically marks the check as Passed if the recorded value is within the specified tolerance, or Failed if the value is outside of it.
On an order
To process a Measure quality check on an order, select a manufacturing order or inventory order (receipt, delivery, return, etc.), for which a check is required. Manufacturing orders can be selected by navigating to Manufacturing ‣ Operations ‣ Manufacturing Orders, and clicking on an order. Inventory orders can be selected by navigating to Inventory, clicking the # To Process button on an operation card, and selecting an order.
On the selected manufacturing or inventory order, a purple Quality Checks button appears at the top of the page. Click the button to open the Quality Check pop-up window, which shows all of the quality checks required for that order.
To process a Measure quality check, measure the product as instructed, then enter the value in the Measure field on the pop-up window. Finally, click Validate to register the recorded value.
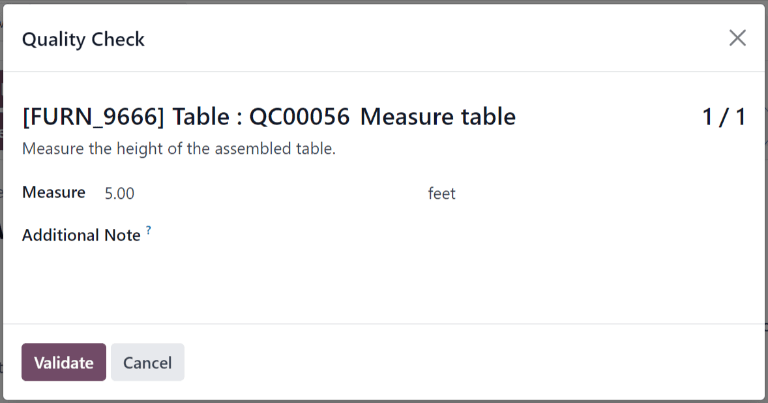
If the value entered is within the range specified in the Tolerance section of the QCP, the quality check passes and the pop-up window closes. The rest of the manufacturing or inventory order can then be processed as usual.
However, if the value entered is outside of the specified range, a new pop-up window appears, titled Quality Check Failed. The body of the pop-up shows a warning message that states, You measured # units and it should be between # units and # units., as well as the instructions entered in the Message If Failure tab of the QCP. At the bottom of the pop-up, two buttons appear: Correct Measure and Confirm Measure.

If the measurement was not entered correctly and should be changed, select Correct Measure. Doing so re-opens the Quality Check pop-up window. Enter the corrected measurement in the Measure field, and then click Validate to complete the check.
If the measurement was entered correctly, click Confirm Measure instead, and the quality check fails. Follow any instructions that were listed on the Quality Check Failed pop-up window.
If a quality alert must be created, click the Quality Alert button that appears at the top of the manufacturing or inventory order after the check fails. Clicking Quality Alert opens a quality alert form on a new page.
See also
For a complete guide on how to fill out the quality alert form, view the documentation on quality alerts.
On a work order
When configuring a QCP that is triggered during manufacturing, a specific work order can also be specified in the Work Order Operation field on the QCP form. If a work order is specified, a Measure quality check is created for that specific work order, rather than the manufacturing order as a whole.
Measure quality checks configured for work orders must be completed from the Shop Floor module. To do so, begin by navigating to Manufacturing ‣ Operations ‣ Manufacturing Orders. Select an MO that includes a work order for which a Measure quality check is required.
On the MO, select the Work Orders tab, and click the Open Work Order (external link icon) button on the line of the work order to be processed. On the resulting Work Orders pop-up window, click the Open Shop Floor button to open the Shop Floor module.
When accessed from a specific work order, the Shop Floor module opens to the page for the work center where the order is configured to be processed, and isolates the work order’s card, so no other cards are shown.
Process the work order’s steps until the Measure quality check step is reached. Click on the step to open a pop-up window that includes instructions for how the measurement should be taken. After taking the measurement, enter it in the Measure field of the pop-up window, and then click Validate.
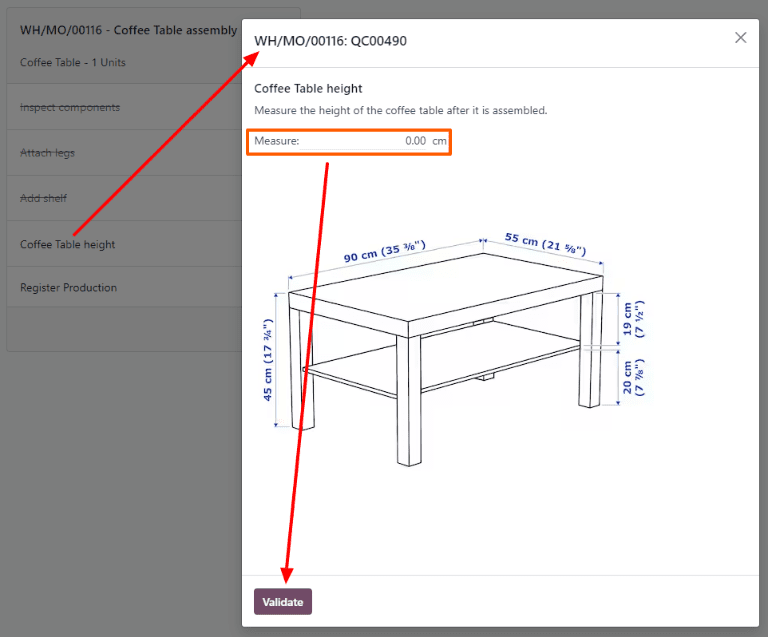
If the measurement entered is within the range specified in the Tolerance section of the QCP, the quality check passes, and the pop-up window moves on to the next step of the work order. However, if the measurement entered is outside of the specified range, a new pop-up window appears, titled Quality Check Failed.
The body of the Quality Check Failed pop-up window shows a message that states, You measured # units and it should be between # units and # units, as well as the instructions entered in the Message If Failure tab of the QCP. At the bottom of the pop-up window, two buttons appear: Correct Measure and Confirm Measure.

If the measurement was not entered correctly, and should be changed, select Correct Measure. Doing so opens a new pop-up window, titled Quality Check. Enter the corrected measure in the Measure field, and then click Validate to complete the check and close the pop-up window.
If the measurement was entered correctly, click Confirm Measure instead, and the quality check fails. Follow any instructions that were listed on the Quality Check Failed pop-up window.
If a quality alert must be created, exit the pop-up window by clicking the X (close) button in the top-right corner.
Then, click the ⋮ (three vertical dots) button on the bottom-right corner of the work order card to open the What do you want to do? pop-up window.
On the What do you want to do? pop-up window, select the Create a Quality Alert button. Doing so opens a blank quality alert form in a new Quality Alerts pop-up window.
See also
For a complete guide on how to fill out quality alert forms, view the documentation on quality alerts.
On this page
Get Help
Contact Support Ask the Odoo Community
![]()
- User Docs
- Database management
- Developer
- Contributing
EN
Odoo 18
Take a Picture quality check
In Odoo Quality, a Take a Picture check is one of the quality check types that can be selected when creating a new quality check or quality control point (QCP). Take a Picture checks require a picture to be attached to the check, which can then be reviewed by a quality team.
Create a Take a Picture quality check
There are two distinct ways that Take a Picture quality checks can be created. A single check can be manually created. Alternatively, a QCP can be configured that automatically creates checks at a predetermined interval.
This documentation only details the configuration options that are unique to Take a Picture quality checks and QCP. For a full overview of all the configuration options available when creating a single check or a QCP, see the documentation on quality checks and quality control points.
Quality check
To create a single Take a Picture quality check, navigate to Quality ‣ Quality Control ‣ Quality Checks, and click New. Fill out the new quality check form as follows:
- In the Type drop-down field, select the Take a Picture quality check type.
- In the Team drop-down field, select the quality team responsible for managing the check.
- In the Instructions text field of the Notes tab, enter instructions for how the picture should be taken.
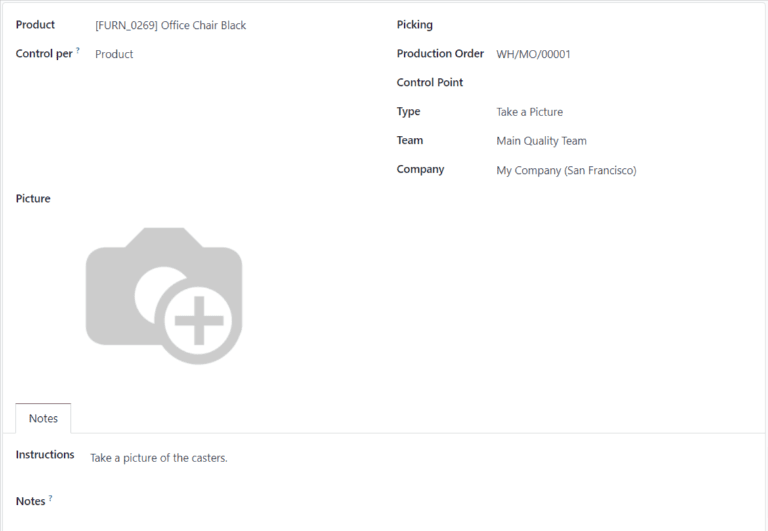
Quality control point
To create a QCP that generates Take a Picture quality checks automatically, navigate to Quality ‣ Quality Control ‣ Control Points, and click New. Fill out the new QCP form as follows:
- In the Type drop-down field, select the Take a Picture quality check type.
- If the Maintenance app is installed, a Device field appears after selecting the Take a Picture check type. Use this field to specify a device that should be used to take quality check pictures. For information about managing devices in the Maintenance app, see the documentation on adding new equipment.
- In the Team drop-down field, select the quality team responsible for managing the checks created by the QCP.
- In the Instructions text field, enter instructions for how the picture should be taken.
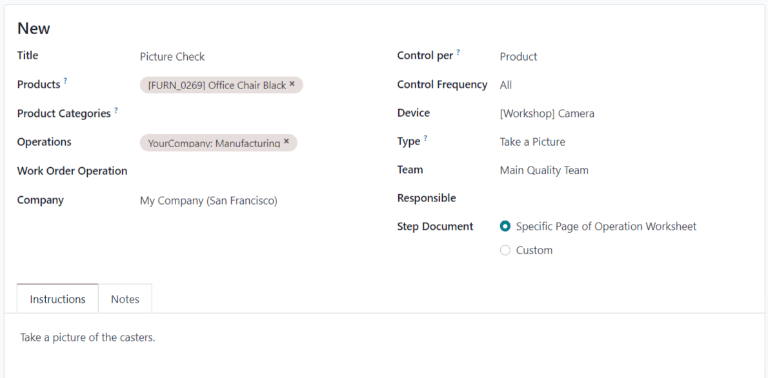
Process a Take a Picture quality check
Once created, there are multiple ways that Take a Picture quality checks can be processed. If a quality check is assigned to a specific inventory, manufacturing, or work order, the check can be processed on the order itself. Alternatively, a check can be processed from the check’s page.
From the check’s page
To process a Take a Picture quality check from the check’s page, begin by navigating to Quality ‣ Quality Control ‣ Quality Checks, and then select a quality check. Follow the Instructions for how to take the picture.
After taking the picture, make sure it is stored on the device being used to process the quality check (computer, tablet, etc.). Then, click the ✏️ (pencil) button in the Picture section to open the device’s file manager. In the file manager, navigate to the picture, select it, and click Open to attach it.
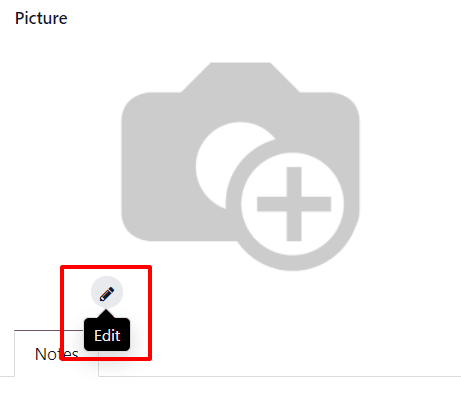
On an order
To process a Take a Picture quality check on an order, select a manufacturing order or inventory order (receipt, delivery, return, etc.), for which a check is required. Manufacturing orders can be selected by navigating to Manufacturing ‣ Operations ‣ Manufacturing Orders, and clicking on an order. Inventory orders can be selected by navigating to Inventory, clicking the # To Process button on an operation card, and selecting an order.
On the selected manufacturing or inventory order, a purple Quality Checks button appears at the top of the page. Click the button to open the Quality Check pop-up window, which shows all of the quality checks required for that order.
Follow the instructions detailing how to take the picture, which are shown on the Quality Check pop-up window. After taking the picture, make sure it is stored on the device being used to process the quality check (computer, tablet, etc.).
Then, click the Take a Picture button in the Picture section to open the device’s file manager. In the file manager, navigate to the picture, select it, and click Open to attach it. Finally, click Validate on the Quality Check pop-up window to complete the quality check.
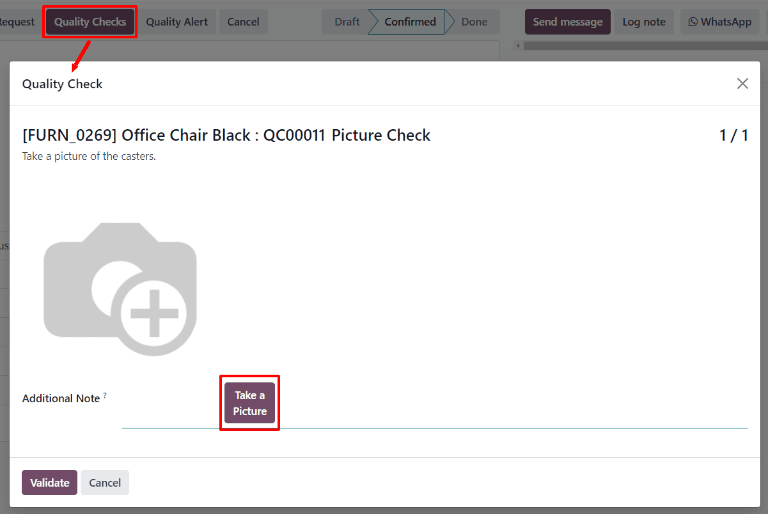
If a quality alert must be created, click the Quality Alert button that appears at the top of the manufacturing or inventory order after the check is validated. Clicking Quality Alert opens a quality alert form on a new page. For a complete guide on how to fill out quality alert forms, view the documentation on quality alerts.
On a work order
When configuring a QCP that is triggered during manufacturing, a specific work order can also be specified in the Work Order Operation field on the QCP form. If a work order is specified, a Take a Picture quality check is created for that specific work order, rather than the manufacturing order as a whole.
Take a Picture quality checks configured for work orders must be completed from the Shop Floor module. To do so, begin by navigating to Manufacturing ‣ Operations ‣ Manufacturing Orders. Then, select an MO that includes a work order for which a Take a Picture quality check is required.
On the MO, select the Work Orders tab, and then click the Open Work Order (external link icon) button on the line of the work order to be processed. On the resulting Work Orders pop-up window, click the Open Shop Floor button to open the Shop Floor module.
When accessed from a specific work order, the Shop Floor module opens to the page for the work center where the order is configured to be processed, and isolates the work order’s card, so no other cards are shown.
Process the work order’s steps until the Take a Picture quality check step is reached. Click on the step to open a pop-up window that includes instructions for how the picture should be taken. After taking the picture, make sure it is stored on the device being used to process the quality check (computer, tablet, etc.).
Then, click the Take a Picture button on the pop-up window to open the device’s file manager. In the file manager, navigate to the picture, select it, and click Open to attach it.
Finally, click Validate at the bottom of the pop-up window to complete the quality check. The pop-up window then moves on to the next step of the work order.
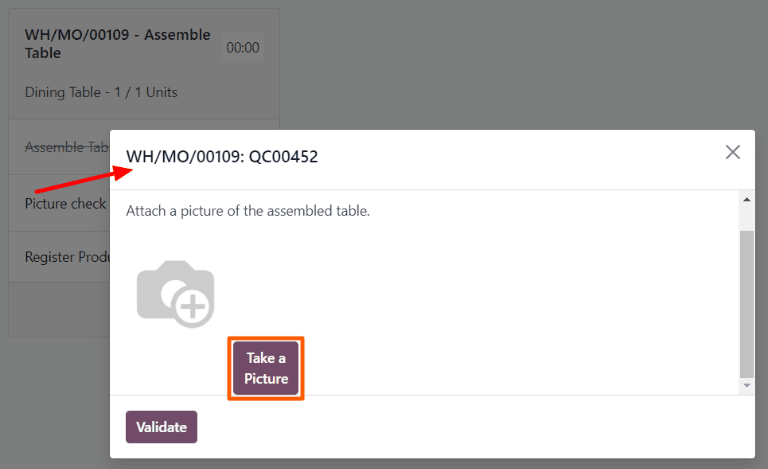
If a quality alert must be created, exit the pop-up window by clicking the X (close) button in the top-right corner.
Then, click the ⋮ (three vertical dots) button on the bottom-right corner of the work order card to open the What do you want to do? pop-up window.
On the What do you want to do? pop-up window, select the Create a Quality Alert button. Doing so opens a blank quality alert form in a new Quality Alerts pop-up window.
See also
For a complete guide on how to fill out quality alert forms, view the documentation on quality alerts.
Review picture attached to quality check
After a picture has been attached to a check, it can then be reviewed by quality team members or other users. To do so, navigate to Quality ‣ Quality Control ‣ Quality Checks, and select a quality check to review.
The attached picture appears in the Picture section of the quality check form. After reviewing the picture, click the Pass button if the check passes, or the Fail button if the check fails.
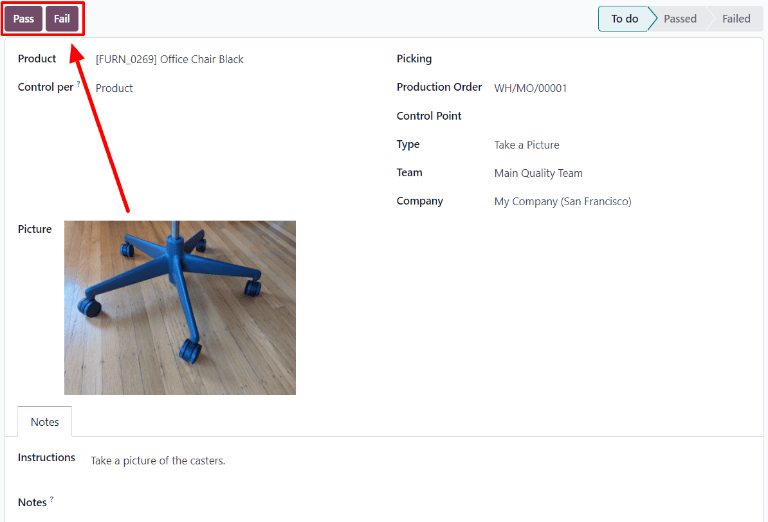
On this page
Get Help
Contact Support Ask the Odoo Community
![]()
EN
Odoo 18
Add new equipment
In Odoo, equipment refers to any item that is used in everyday operations, including the manufacturing of products. This can mean a piece of machinery on a production line, a tool that is used in different locations, or a computer in an office space. Equipment registered in Odoo can be owned by the company that uses the Odoo database, or by a third party, such as a vendor in the case of equipment rentals.
Using Odoo Maintenance, it is possible to track individual pieces of equipment, along with information about their maintenance requirements. To add a new piece of equipment, navigate to the Maintenance module, select Equipments ‣ Machines & Tools ‣ Create, and configure the equipment as follows:
- Equipment Name: the product name of the piece of equipment
- Equipment Category: the category that the equipment belongs to; for example, computers, machinery, tools, etc.; new categories can be created by navigating to Configuration ‣ Equipment Categories and clicking Create
- Company: the company that owns the equipment; again, this can be the company that uses the Odoo database, or a third-party company
- Used By: specify if the equipment is used by a specific employee, department, or both; select Other to specify both an employee and a department
- Maintenance Team: the team responsible for servicing the equipment; new teams can be created by navigating to Configuration ‣ Maintenance Teams and selecting Create; the members of each team can also be assigned from this page
- Technician: the person responsible for servicing the equipment; this can be used to assign a specific individual in the event that no maintenance team is assigned or when a specific member of the assigned team should always be responsible for the equipment; any person added to Odoo as a user can be assigned as a technician
- Used in location: the location where the equipment is used; this is a simple text field that can be used to specify locations that are not work centers, like an office, for example
- Work Center: if the equipment is used at a work center, specify it here; equipment can also be assigned to a work center by navigating to Maintenance ‣ Equipments ‣ Work Centers, selecting a work center or creating a new one using the Create button, and clicking the Equipment tab on the work center form
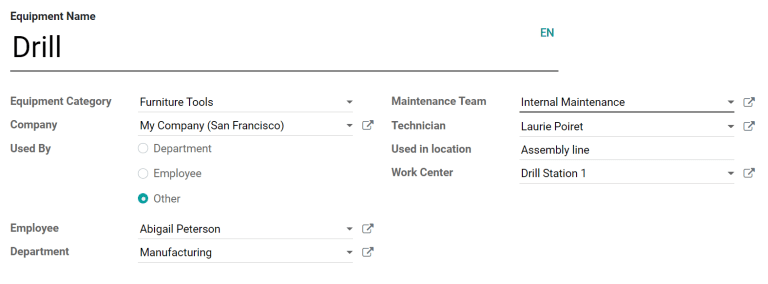
Include additional product information
The Product Information tab at the bottom of the page can be used to provide further details about the piece of equipment:
- Vendor: the vendor that the equipment was purchased from
- Vendor Reference: the reference code assigned to the vendor
- Model: the specific model of the piece of equipment
- Serial Number: the unique serial number of the equipment
- Effective Date: the date that the equipment became available for use; this is used to calculate the MTBF
- Cost: the amount the equipment was purchased for
- Warranty Expiration Date: the date on which the equipment’s warranty will expire

Add maintenance details
The Maintenance tab at the bottom of the page provides information about the failure frequency of the piece of equipment:
- Expected Mean Time Between Failure: the average number of days the equipment is expected to operate between failures. This number can be configured manually.
- Mean Time Between Failure: the average number of days the equipment operates between failures. This number is calculated automatically based on previous failures, and cannot be configured manually.
- Estimated Next Failure: the estimated date the equipment may experience its next failure. This date is calculated automatically based on the data in the Mean Time Between Failure and Latest Failure fields, and cannot be configured manually.
- Latest Failure: the most recent date on which the equipment failed. This date is based on the creation date of the equipment’s most recent maintenance request, and cannot be configured manually.
- Mean Time To Repair: the average number of days needed to repair the equipment. This number is calculated automatically based on the duration of previous maintenance requests, and cannot be configured manually.
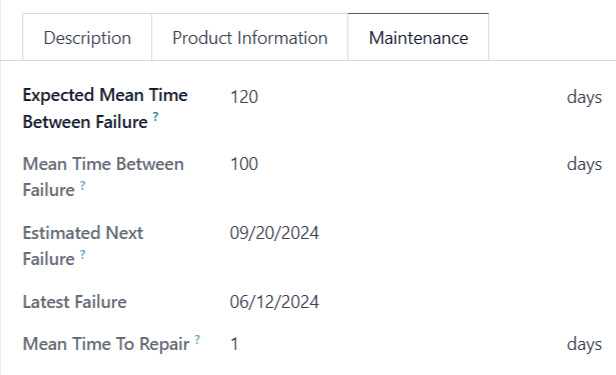
Tip
To see any open maintenance requests for a piece of equipment, go to the page for the equipment, and click the Maintenance smart button at the top of the page.
On this page
Get Help
Contact Support Ask the Odoo Community
![]()
EN
Odoo 18
Maintenance calendar
Avoiding equipment breakdowns, and blocks in warehouse work centers, requires constant equipment maintenance. Timely corrective maintenance for machines and tools that break unexpectedly, as well as preventive maintenance to ensure that such issues are avoided, are key to keeping warehouse operations running smoothly.
In Odoo Maintenance, users can access the Maintenance Calendar to create, schedule, and edit both corrective and preventive maintenance requests, to stay on top of equipment and work centers.
Create maintenance request
Maintenance requests can be created directly from the Maintenance Calendar. To access the calendar, navigate to Maintenance app ‣ Maintenance ‣ Maintenance Calendar.
To create a new request, click anywhere on the calendar. Doing so opens a New Event pop-up window. In the Name: field, assign a title to the new request.
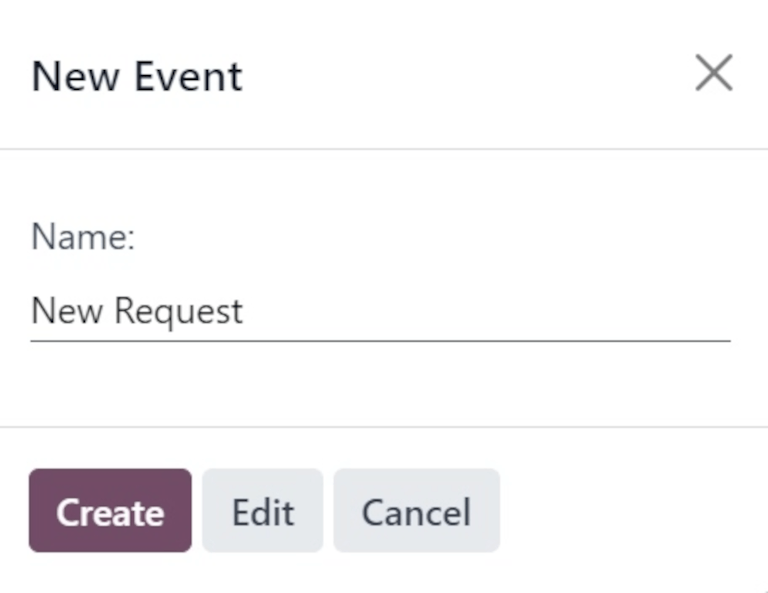
Clicking Create on the pop-up window saves the new request with no additional details. If the request’s creation should be cancelled, click Cancel.
To add more details and schedule the request for a specific date and time, click Edit.
Clicking Edit opens a blank maintenance request form, where various details about the request can be filled out.
Edit maintenance request
In the Request field, assign a title to the new request. In the Created By field, from the drop-down menu, select which user the request was created by. By default, this field populates with the user actually creating the request.
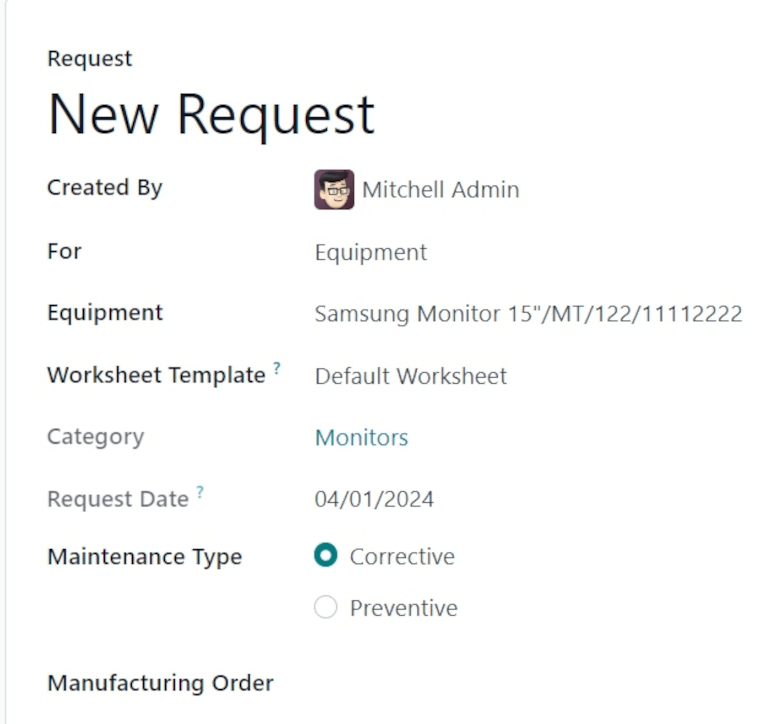
In the For field, from the drop-down menu, select if this request is being created for a piece of Equipment, or a Work Center.
Note
If Work Center is selected in the For field’s drop-down menu, two additional fields appear on the form: Work Center and Block Workcenter.
In the Work Center field, select which work center in the warehouse this maintenance request applies to.
If the Block Workcenter option’s checkbox is ticked, it is not possible to plan work orders, or other maintenance requests, in this work center during the time that this request is being performed.
If Equipment is selected in the For field, which it is by default, select which machine or tool requires maintenance from the Equipment field. Once a specific piece of equipment is selected, a greyed-out Category field appears, listing the Equipment Category to which the equipment belongs.
In the Worksheet Template field, if necessary, click the drop-down menu to select a worksheet template. These templates are custom templates that can be filled out by the employee performing the maintenance.
Under the Category field, the Request Date field displays the date requested for the maintenance to happen.
The Maintenance Type field provides two selectable radio button options: Corrective and Preventive.
Corrective maintenance is for requests that arise for immediate needs, such as broken equipment, while Preventive maintenance is for planned requests, to avoid breakdowns in the future.
If this request is tied to a specific MO, select that MO from the Manufacturing Order field.
From the drop-down menu for the Team field, select the desired maintenance team who will perform the maintenance. In the Responsible field, select the technician responsible for the request.
In the Scheduled Date field, click the date to open a calendar popover. From this popover, select the planned date of the maintenance, and click Apply to save the date.
In the Duration field, enter the the amount of hours (in a 00:00 format) that the maintenance is planned to take.
In the Priority field, choose a priority between one and three ⭐⭐⭐ (stars). This indicates the importance of the maintenance request.
If working in a multi-company environment, from the drop-down menu in the Company field, select the company to which this maintenance request belongs.
At the bottom of the form, there are two tabs: Notes and Instructions.
In the Notes tab, type out any internal notes for the team or technician assigned to the request, if necessary.
In the Instructions tab, if necessary, select one of the three radio button options to provide maintenance instructions to the assigned team or technician. The available methods for providing instructions are via PDF, Google Slide, or Text.
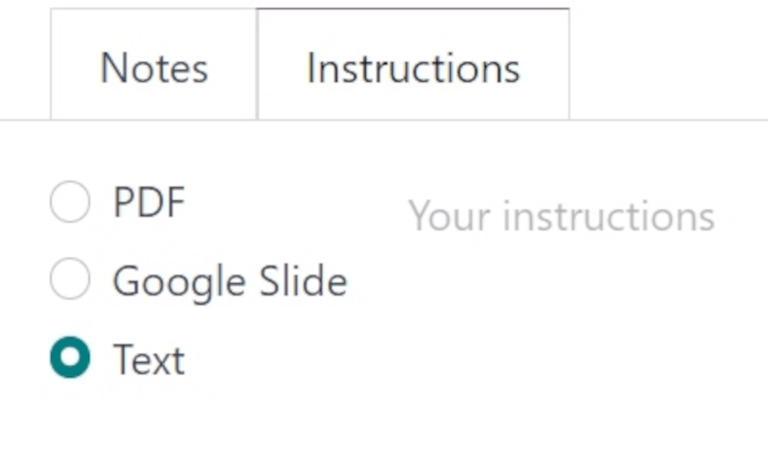
Calendar elements
The Maintenance Calendar provides various views, search functions, and filters to help keep track of the progress of ongoing and planned maintenance requests.
The following sections describe elements found across various views of the calendar.
Filters and Favorites
To access the maintenance calendar, navigate to Maintenance app ‣ Maintenance ‣ Maintenance Calendar.
To add and remove filters for sorting data on the Maintenance Calendar, click the 🔻 (triangle pointed down) icon, to the right of the search bar at the top of the page.
The left-hand side of the resulting drop-down menu lists all the different Filters users can select. By default, To Do and Active are selected, so all open requests are displayed.
Tip
To add a custom filter to the Maintenance Calendar, click Add Custom Filter, under the Filters section of the drop-down menu. This opens an Add Custom Filter pop-up window.
From this pop-up window, configure the properties of the new rule for the filter. Once ready, click Add.
The right-hand side of the drop-down menu lists the Favorites, or any searches that have been saved as a favorite to be revisited at a later date.
To save a new Favorite search, select the desired Filters. Then, click Save current search. In the field directly below Save current search, assign a name to the search.
Under the assigned name, there are two options, to save the current search either as the Default filter, or as a Shared filter.
Selecting Default filter sets this filter as the default when opening this calendar view.
Selecting the Shared filter makes this filter available to other users.
Once ready, click Save. When clicked, the new Favorite filter appears in the Favorites column, and a ⭐ (gold star) icon appears with the filter’s name in the search bar.
Views
The Maintenance Calendar is available in six different views: Calendar (default), Kanban, List, Pivot, Graph, and Activity.
![]()
Calendar view
Calendar is the default view displayed when the Maintenance Calendar is opened. There are a number of options in this view type for sorting and grouping information about maintenance requests.
In the top-left corner of the page, there is a drop-down menu set to Week, by default. Clicking that drop-down menu reveals the different periods of time, in which the calendar can be viewed: Day, Month, and Year. There is also an option to Show weekends, selected by default. If unselected, weekends are not shown on the calendar.
To the left of this menu, there is a ⬅️ (left arrow) icon and a ➡️ (right arrow) icon. Clicking these arrows moves the calendar backward or forward in time, respectively.
To the right of the drop-down menu set to Week, by default, is a Today button. Clicking this button resets the calendar to view today’s date, no matter which point in time is being viewed before clicking it.
At the far-right side of the page is a sidebar column, containing a minimized calendar set to today’s date, and a Technician list, displaying all the Technicians with requests currently open. Click the (panel) icon at the top of this sidebar to open or close the sidebar.
Note
The Technician list only displays if technicians are assigned to open requests, and individual technicians are only listed, if they are listed as Responsible on at least one maintenance request form.
Kanban view
With the Kanban view, all open maintenance requests are displayed in Kanban-style columns, in their respective stages of the maintenance process.
Each maintenance request appears on its own task card, and each task card can be dragged-and-dropped to a different stage of the Kanban pipeline.
Each column has a name (i.e. In Progress). Hovering at the top of a column reveals a ⚙️ (gear) icon. Clicking the ⚙️ (gear) icon reveals a list of options for that column: Fold, Edit, Automations, and Delete.
Clicking Fold folds the column to hide its contents.
Clicking Edit opens an Edit: (stage name) pop-up window, with the corresponding stage name, wherein the column’s details can be edited. The following are the column options that can be edited:
- Name: the name of the stage in the Kanban pipeline.
- Folded in Maintenance Pipe: when checked, this stage’s column is folded by default in the Kanban view type.
- Request Confirmed: when this box is not ticked, and the maintenance request type is set to Work Center, no leave is created for the respective work center when a maintenance request is created. If the box is ticked, the work center is automatically blocked for the listed duration, either at the specified date, or as soon as possible, if the work center is unavailable.
- Sequence: the order in the maintenance process, in which this stage appears.
- Request Done: if ticked, this box indicates this stage is the final step of the maintenance process. Requests moved to this stage are closed.
Once ready, click Save & Close. If no changes have been made, click Discard, or click the X icon to close the pop-up window.
List view
With the List view selected, all open maintenance requests are displayed in a list, with information about each request listed in its respective row.
The columns of information displayed in this view type are the following:
- Subjects: the name assigned to the maintenance request.
- Employee: the employee who originally created the maintenance request.
- Technician: the technician responsible for the maintenance request.
- Category: the category the equipment being repaired belongs to.
- Stage: the stage of the maintenance process the request is currently in.
- Company: if in a multi-company environment, the company in the database the request is assigned to.
Pivot view
With the Pivot view selected, maintenance requests are displayed in a pivot table, and can be customized to show different data metrics.
To add more data to the pivot table, click the Measures button to reveal a drop-down menu. By default, Count is selected. Additional options to add to the table are Additional Leaves to Plan Ahead, Duration, and Repeat Every.
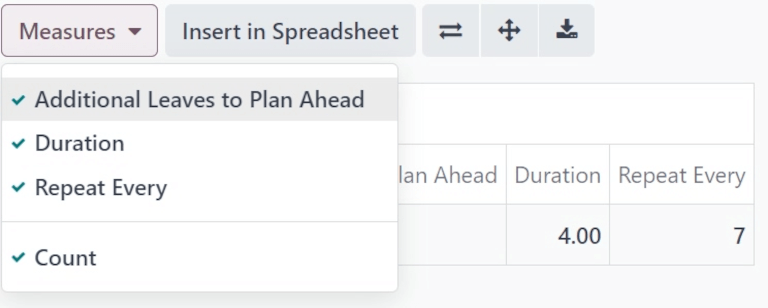
To the right of the Measures button is the Insert in Spreadsheet button. Clicking this button opens a pop-up window titled Select a spreadsheet to insert your pivot..
There are two tabs in this pop-up window: Spreadsheets and Dashboards. Click into one of these tabs, and select a spreadsheet or dashboard in the database to add this pivot table to. Once ready, click Confirm. If this table shouldn’t be added to a spreadsheet or dashboard, click Cancel, or click the X icon to close the pop-up window.
To the right of the Insert in Spreadsheet button are three buttons:
- Flip axis: the x and y axis of the pivot data table flip.
- Expand all: all the available rows and columns of the pivot data table expand fully.
- Download xlsx: the pivot data table is downloaded as an .xlsx file.
Graph view
With the graph view selected, the following options appear between the search bar and visual representation of the data. These graph-specific options are located to the right of the Measures and Insert in Spreadsheet buttons.
![]()
There are three different types of graphs available to users to view the data:
- Bar Chart: the data is displayed in a bar chart.
- Line Chart: the data is displayed in a line chart.
- Pie Chart: the data is displayed in a pie chart.
When viewing the data as a Bar Chart graph, the data can be formatted in the following ways:
- Stacked: the data is stacked on the graph.
- Descending: the data is displayed in descending order.
- Ascending: the data is displayed in ascending order.
When viewing the data as a Line Chart graph, the data can be formatted in the following ways:
- Stacked: the data is stacked on the graph.
- Cumulative: the data is increasingly accumulated.
- Descending: the data is displayed in descending order.
- Ascending: the data is displayed in ascending order.
When viewing the data as a Pie Chart graph, all relevant data is displayed by default, and no additional formatting options are available.
Activity view
With the Activity view selected, all open maintenance requests are listed in their own row, with the ability to schedule activities related to those requests.
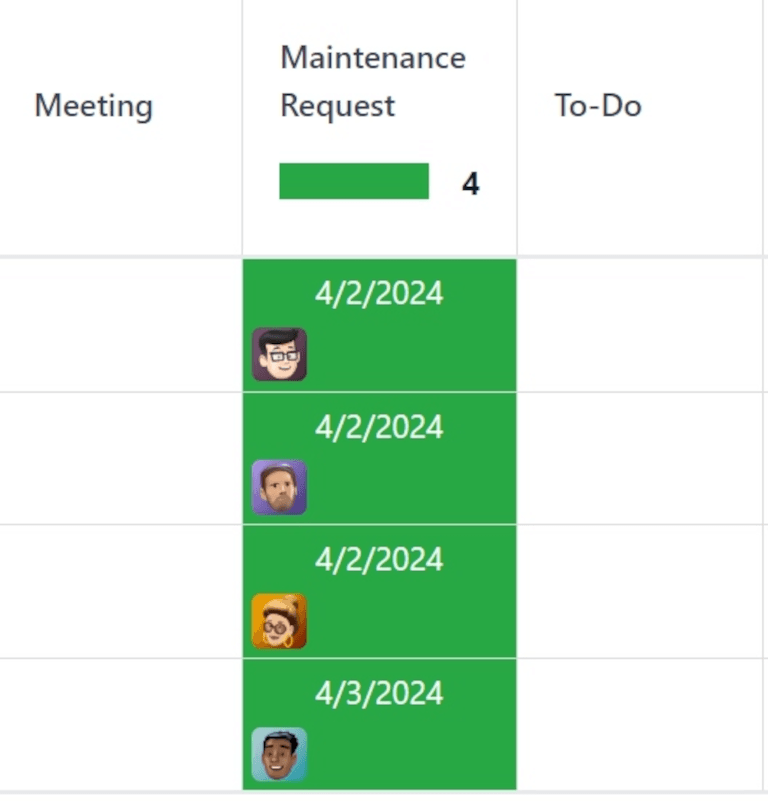
Maintenance requests are listed in the Maintenance Request column as activities. Clicking a request opens a Maintenance Request popover that indicates the status of the request, and the responsible technician. To schedule an activity directly from the popover, click ➕ Schedule an activity. This opens a Schedule Activity pop-up window.
From the pop-up window, choose the Activity Type, provide a Summary, schedule a Due Date, and choose the responsible user in the Assigned to field.
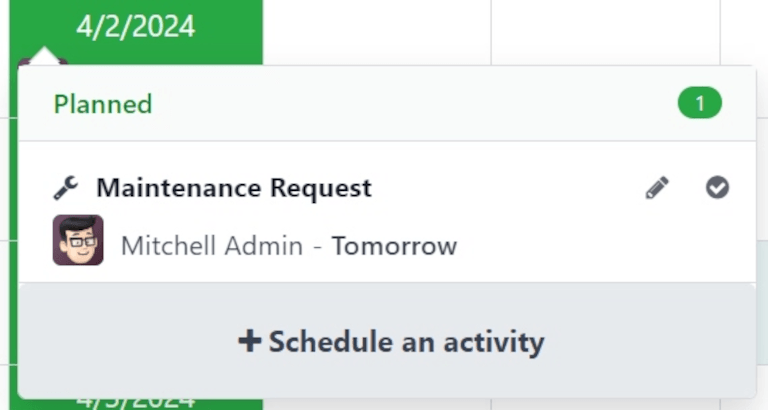
Type any additional notes for the new activity in the blank space under the greyed-out Log a note… field. When clicked, this changes to Type “/” for commands.
Once ready, click Schedule to schedule the activity. Alternatively, click Schedule & Mark as Done to close the activity, click Done & Schedule Next to close the activity and open a new one, or click Cancel to cancel the activity.
With the Activity view selected, each activity type available when scheduling an activity is listed as its own column. These columns are Email, Call, Meeting, Maintenance Request, To-Do, Upload Document, Request Signature, and Grant Approval.
To schedule an activity with that specific activity type, click into any blank box on the corresponding row for the desired maintenance request, and click the ➕ (plus) icon. This opens an Odoo pop-up window, wherein the activity can be scheduled.
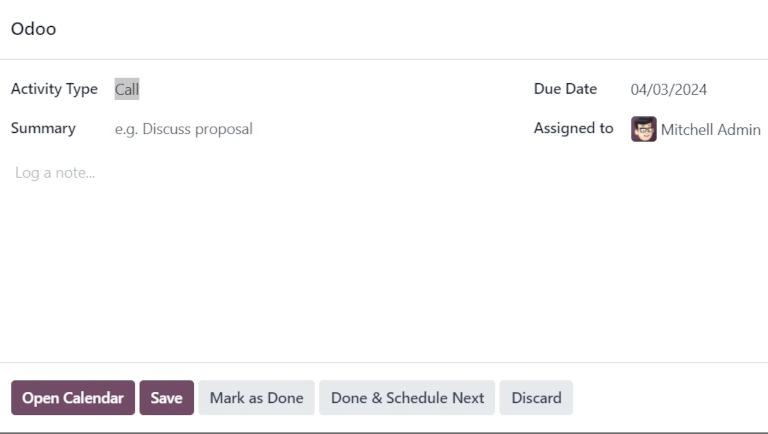
See also
On this page
Get Help
Contact Support Ask the Odoo Community
![]()
EN
Odoo 18
Maintenance requests
In order to keep equipment and work centers functioning properly, it is often necessary to perform maintenance on them. This can include preventive maintenance, intended to prevent equipment from breaking down, or corrective maintenance, which is used to fix equipment that is broken or otherwise unusable.
In Odoo Maintenance, users can create maintenance requests to schedule and track the progress of equipment and work center maintenance.
Create maintenance request
To create a new maintenance request, navigate to Maintenance app ‣ Maintenance ‣ Maintenance Requests, and click New.
Begin filling out the form by entering a descriptive title in the Request field (e.g., Drill not working).
The Created By field auto-populates with the user creating the request, but a different user can be selected by clicking on the drop-down menu.
In the For drop-down menu, select Equipment if the maintenance request is being created for a piece of equipment, or Work Center if it is being created for a work center.
Depending on the option selected in the For field, the next field is titled either Equipment or Work Center. Using the drop-down menu for either field, select a piece of equipment or a work center.
If the Custom Maintenance Worksheets setting is enabled in the Maintenance app’s settings, a Worksheet Template field appears below the Equipment or Work Center field. If necessary, use this field to select a worksheet to be filled out by the employee performing the maintenance.
The next field is titled Request Date, and is set by default to the date on which the maintenance request is created. This date cannot be changed by the user.
In the Maintenance Type field, select the Corrective option if the request is intended to fix an existing issue, or the Preventive option if the request is intended to prevent issues from occurring in the future.
If the request is being created to address an issue that arose during a specific manufacturing order (MO), select it in the Manufacturing Order field.
If an MO was selected in the Manufacturing Order field, a Work Order field appears below it. If the issue arose during a specific work order, specify it in this field.
In the Team field, select the maintenance team that is responsible for managing the request. If a specific team member is responsible, select them in the Responsible field.
The Scheduled Date field is used to specify the date on which maintenance should take place, and the time it should begin. Choose a date by clicking on the field to open a calendar in a pop-up window, and then select a day on the calendar. Enter an hour and minute in the two fields below the calendar, and click Apply to save the date and time.
The Duration field is used to specify the time it takes to complete the maintenance request. Use the text-entry field to enter the time in a 00:00 format.
If Work Center was selected in the For field, a Block Workcenter checkbox appears below the Duration field. Enable the checkbox to prevent work orders or other maintenance from being scheduled at the specified work center while the maintenance request is being processed.
The Priority field is used to communicate the importance (or urgency) of the maintenance request. Assign the request a priority between zero and three ⭐⭐⭐ (stars), by clicking on the desired star number. Requests assigned a higher priority appear above those with a lower priority, on the Kanban board used to track the progression of maintenance requests.
In the Notes tab at the bottom of the form, enter any relevant details about the maintenance request (why the maintenance issue arose, when it occurred, etc.).
The Instructions tab is used to include instructions for how maintenance should be performed. Select one of the three options, and then include the instructions as detailed below:
- PDF: click the Upload your file button to open the device’s file manager, and then select a file to upload.
- Google Slide: enter a Google Slide link in the text-entry field that appears after the option is selected.
- Text: enter the instructions in the text-entry field that appears after the option is selected.
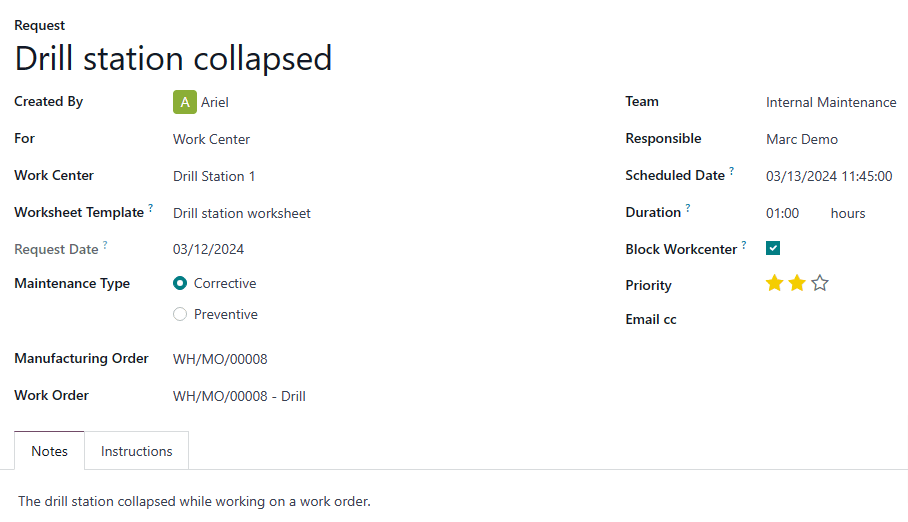
Process maintenance request
Once a maintenance request has been created, it appears in the New Request stage of the Maintenance Requests page, which can be accessed by navigating to Maintenance app ‣ Maintenance ‣ Maintenance Requests.
Maintenance requests can be moved to different stages by dragging and dropping them. They can also be moved by clicking on a request to open it in a new page, and then selecting the desired stage from the stage indicator bar, located above the top-right corner of the request’s form.
Successful maintenance requests should be moved to the Repaired stage, indicating that the specified piece of equipment or work center is repaired.
Failed maintenance requests should be moved to the Scrap stage, indicating the specified piece of equipment, or work center, could not be repaired, and must instead be scrapped.
On this page
Get Help
Contact Support Ask the Odoo Community
![]()
EN
Odoo 18
Maintenance setup
Odoo Maintenance helps companies schedule corrective and preventive maintenance on equipment used in their warehouse. This helps companies avoid equipment breakdowns, blocks in warehouse work centers, and emergency repair costs.
Maintenance teams
When creating maintenance requests, a maintenance team can be assigned to the request as the team responsible for handling the request.
To view existing maintenance teams, navigate to Maintenance app ‣ Configuration ‣ Maintenance Teams.
From the resulting Teams page, a list of all existing teams (if any) is displayed, with the Team Name, Team Members, and Company listed in the columns, by default.
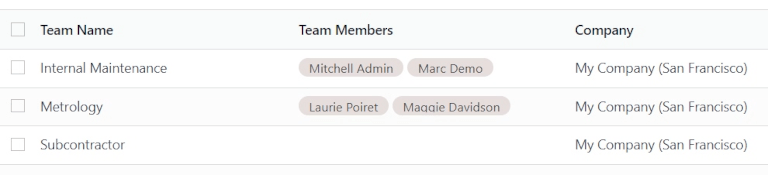
To add a new team, click New. This adds a blank line at the bottom of the list of teams. In the blank field that appears below the Team Name column, assign a name to the new maintenance team.
In the Team Members column, click the field to reveal a drop-down menu with existing users in the database. Choose which users should be members of the new maintenance team.
Click Search More… to open a Search: Team Members pop-up window to search for users not shown on the initial drop-down menu.
In the Company column, if in a multi-company environment, click the drop-down menu to select the company in the database to which this new maintenance team belongs.
Once ready, click Save to save changes.
Tip
The team members assigned to maintenance teams are also referred to as Technicians, when viewing the Maintenance Calendar.
Navigate to Maintenance app ‣ Maintenance ‣ Maintenance Calendar, and click on an existing maintenance request. From the resulting popover, locate the Technician field. The name listed in the field is the team member, and is the user responsible for that particular request.
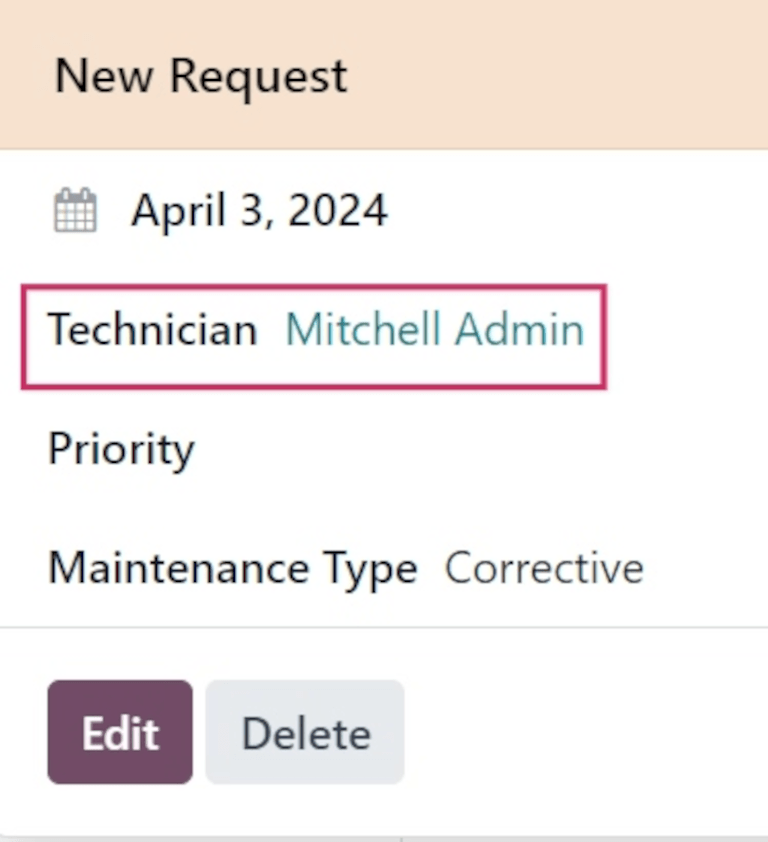
At the far-right side of the page is a sidebar column, containing a minimized calendar set to today’s date, and a Technician list, displaying all the technicians (or team members) with requests currently open.
Equipment
In Odoo Maintenance, equipment refers to machines and tools used internally in warehouse work centers. Equipment can include technology such as computers or tablets, power tools, machines used for manufacturing, and more.
Equipment categories
Each piece of equipment belongs to an equipment category. Before adding new equipment, make sure that a fitting equipment category is created.
To create a new equipment category, navigate to Maintenance app ‣ Configuration ‣ Equipment Categories, and click New. Doing so opens a blank equipment category form.
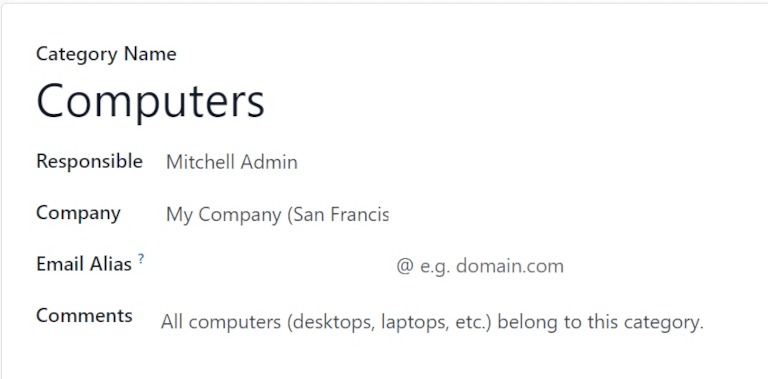
On the blank form, assign a name in the Category Name field.
In the Responsible field, assign a user to be responsible for the equipment in this category, if necessary. By default, the user who creates the category is selected as Responsible, by default.
If in a multi-company environment, click the drop-down menu in the Company field, and select the company in the database to whom the equipment in this category belongs.
In the Email Alias field, assign an email alias to this category, if necessary.
In the Comments field, type any comments or notes for internal users to reference in relation to this category, if necessary.
Note
Once a new equipment category is created, all equipment belonging to that category, as well as any past or currently open maintenance requests, are available from the equipment category form.
Navigate to Maintenance app ‣ Configuration ‣ Equipment Categories, and select a category to view. Locate the Equipment and Maintenance smart buttons at the top of the form.

Click the Equipment smart button to view all equipment belonging to this category. Click the Maintenance smart button to view any past, or currently open, maintenance requests.
Machines & tools
To add new equipment, navigate to Maintenance app ‣ Equipment ‣ Machines & Tools, and click New. This opens a blank equipment form.
In the Name field, assign a name for the new equipment. In the Equipment Category field, click the drop-down menu and select which category this new equipment should belong to.
If in a multi-company environment, click the drop-down menu in the Company field, and select the company in the database to whom the new equipment belongs.
In the Used By field, select from one of three radio button options: Department, Employee, or Other.
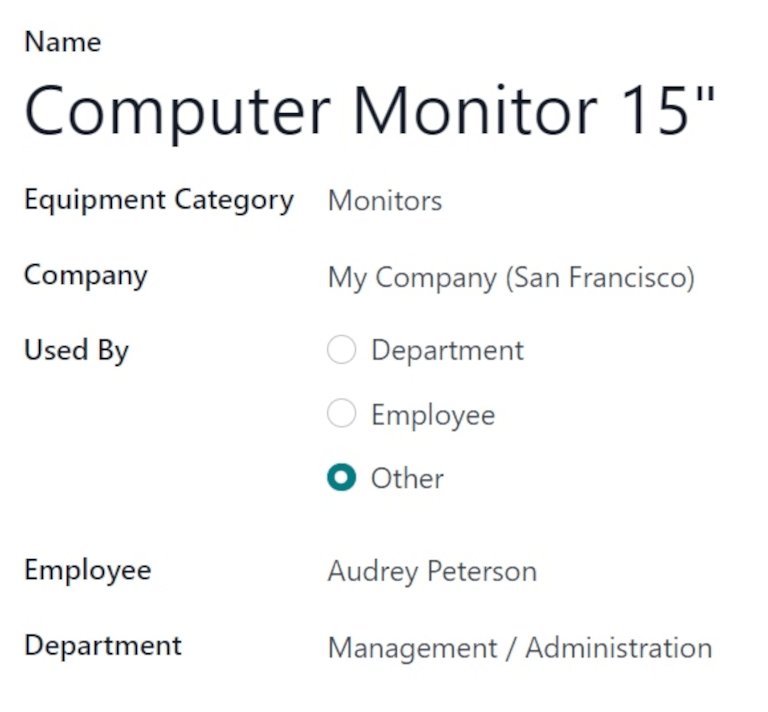
If Department is selected, a Department field appears below the Used By field. Click the drop-down menu and select the department that uses this equipment.
If Employee is selected, an Employee field appears below the Used By field. Click the drop-down menu, and select the employee who uses this equipment.
If the Other option is selected, both the Department and Employee fields appear below the Used By field. Click the drop-down menus for the respective fields, and choose which department and employee uses this equipment.
In the Maintenance Team field, select the team responsible for this equipment. In the Technician field, select the team member/user responsible for this equipment.
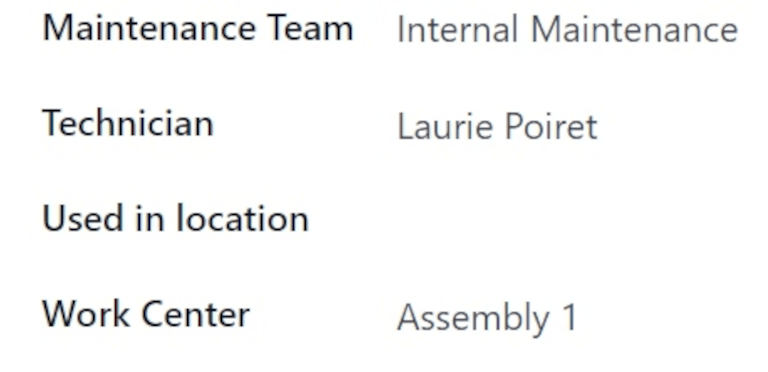
In the Used in location field, enter the location wherein this equipment will be used, if not in an internal work center (e.g. in an office).
In the Work Center field, click the drop-down menu, and select which work center this equipment will be used in.
In the blank space under the Description tab at the bottom of the form, add any relevant information describing the equipment for users to reference.
Product Information tab
To add any relevant information while creating a new piece of equipment, from the equipment form, click the Product Information tab.
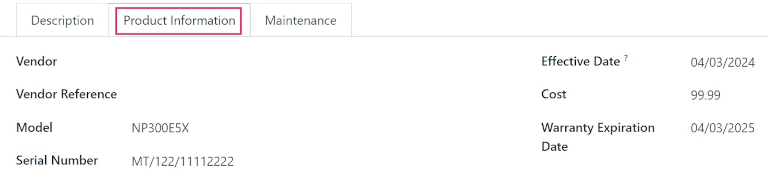
In the Vendor field, add the vendor from which the equipment was purchased. In the Vendor Reference field, add the product reference number obtained from the vendor, if applicable.
In the Model field, specify which model this equipment is, if applicable. If the equipment is serialized, add a serial number in the Serial Number field.
In the Effective Date field, click the date to reveal a calendar popover, and select a date. This date indicates when this equipment was first put in use, and will be used to compute the Mean Time Between Failure (MTBF) in the equipment’s Maintenance tab.
In the Cost field, specify how much the equipment cost to acquire, if applicable.
If the equipment is covered under a warranty, specify the Warranty Expiration Date by selecting a date from the calendar popover in that field.
Maintenance tab
Various maintenance metrics are available for each piece of equipment, and are automatically computed, based on corrective maintenance, and planned preventive maintenance.
To view the maintenance metrics for a specific piece of equipment, from the equipment form, click the Maintenance tab.
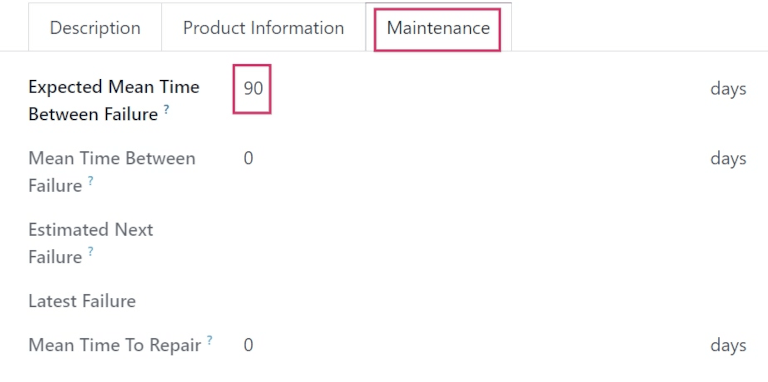
Doing so reveals the following fields:
- Expected Mean Time Between Failure: the amount of time (in days) before the next failure is expected. This is the only field not greyed-out, and the only field users can edit.
- Mean Time Between Failure: the amount of time (in days) between reported failures. This value is computed based on completed corrective maintenances.
- Estimated Next Failure: the date on which the next failure is expected. This date is computed as the Latest Failure Date + MTBF.
- Latest Failure: The date of the latest failure. The value in this field updates once a failure is reported for this equipment.
- Mean Time To Repair: the amount of time (in days) it takes to repair this equipment upon failure. This value updates once a maintenance request is completed for this equipment.
Work centers
To view the work centers where equipment is being used, and how the equipment is being used in them, navigate to Maintenance app ‣ Equipment ‣ Work Centers, and click into a work center.
From the resulting work center form, click the Equipment tab to view all machines and tools being used in that specific work center.
Each piece of equipment is listed with certain relevant information: the Equipment Name, the responsible Technician, the Equipment Category it belongs to, and a few important maintenance metrics: its MTBF, MTTR, and Est. Next Failure date.
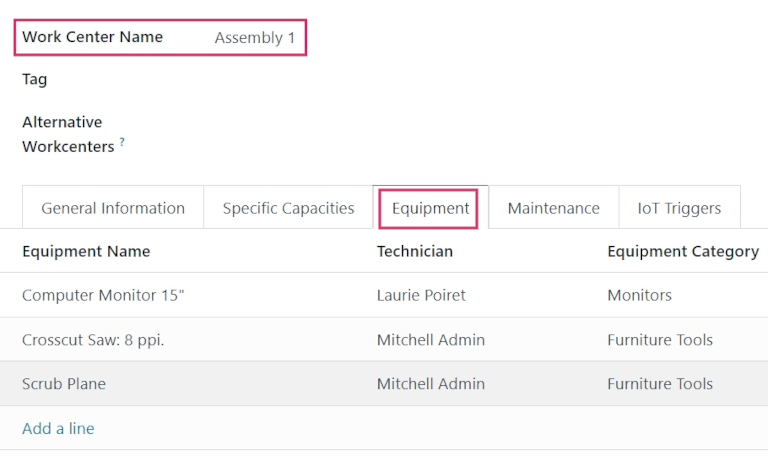
Tip
To add new equipment to a work center directly from the work center form, click Add a line under the Equipment tab. This opens an Add: Maintenance Equipment pop-up window.
From the pop-up window, select the equipment that should be added to the work center, and click Select.
See also
On this page
Get Help
Contact Support Ask the Odoo Community
![]()
EN
Odoo 18
Engineering change orders
Utilize engineering change orders (ECOs) to track, implement, and revert change versions made to products, and bills of materials.
Engineering change orders can be created:
- directly in the ECO type.
- by an operator in the tablet view of an operation.
- automatically from feedback submitted to the ECO type’s email alias.
Create ECO
To create a new ECO, begin by navigating to the PLM app. Then, select the ECO type card that will be used to track the progress of the change. On the Engineering Change Orders page, click the New button in the top-left corner.
Note
Learn how to create new ECO types to categorize and organize change orders. Doing so ensures employees only view the ECOs related to their responsibilities, whether it involves new product introductions, targeted product line updates, or regulatory compliance fulfillment.
On the ECO form, fill in the following fields accordingly:
- Description is a brief summary of the improvement.
- Type: specifies the ECO type project for organizing the ECOs.
- Apply on determines if the ECO changes the Bill of Materials or the Product Only.
- Product indicates the product being improved.
- Bill of Materials specifies the changed BoM. It auto-populates if the product in Product field has an existing BoM. If multiple BoMs exist, select the intended radio options from the drop-down menu.
- Company field is used in multi-company databases. Specify if the change applies to products in a specific company, or leave blank if the change applies to all companies.
- Responsible represents the assignee in charge of this ECO. (Optional)
- Effective specifies when the ECO becomes live. Choosing As soon as possible means the ECO applies to the production BoM as soon as an authorized user applies the changes.
On the other hand, choosing At Date, and setting a specific date, leaves a date that makes it easier to track the version history of the BoM, and the specific date BoMs, used for production. - Tags are assigned to ECOs for prioritization and organization. Create a new tag by typing the name in the field and selecting Create from the drop-down menu. (Optional)
After filling out the ECO form, click the Start Revision button to begin implementing the changes.
By pressing Start Revision, three actions occur:
- The Documents smart button appears, storing relevant files of the BoM.
- A copy of the production BoM is stored in the newly-appeared Revision smart button of the ECO. The next available version number (e.g., V2, V3, …) is also assigned to keep track of all BoM versions.
- The stages of the ECO Type are displayed in the top-right corner of the ECO.
Note
The Revision smart button is available only when the Bill of Materials radio button is selected in the Apply on field, and the Start Revision button has been pressed.
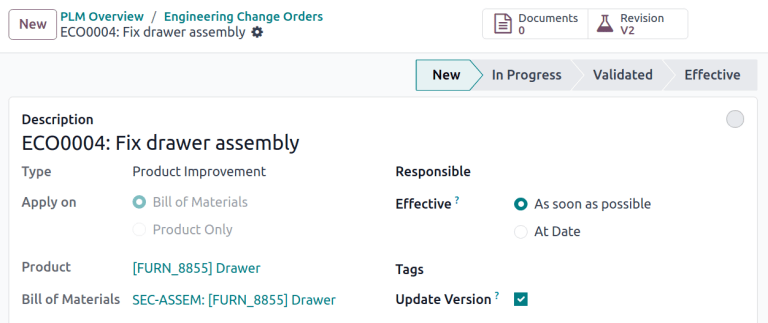
Change components
To modify the components in a BoM, click the Revision smart button on an ECO to access the new version of the BoM. Odoo distinguishes the non-production version of the BoM from the current version, by flagging the test BoM with a large Archived tag.
Example
After clicking the Start Revision button for an ECO for the product, [D_0045 Stool], make changes to the product’s BoM by clicking the Revision smart button. Doing so opens the archived BoM, marked with a large red Archived flag.
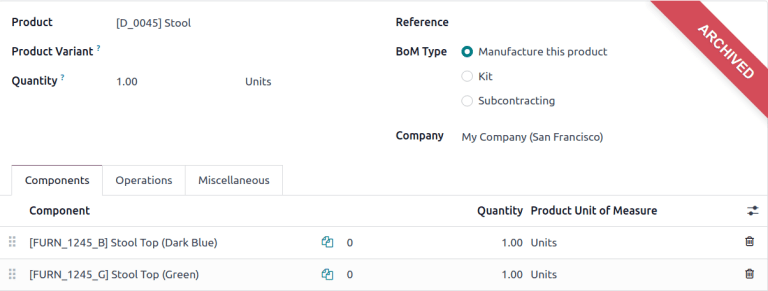
On the new BoM, in the Components tab, proceed to modify the components list, by changing the Quantity of existing components, adding new components using the Add a line button, and removing components with the 🗑️ (trash) icon.
Example
In version two of the BoM for a keyboard, the component quantities are reduced, and an additional component, Stabilizers, is added.
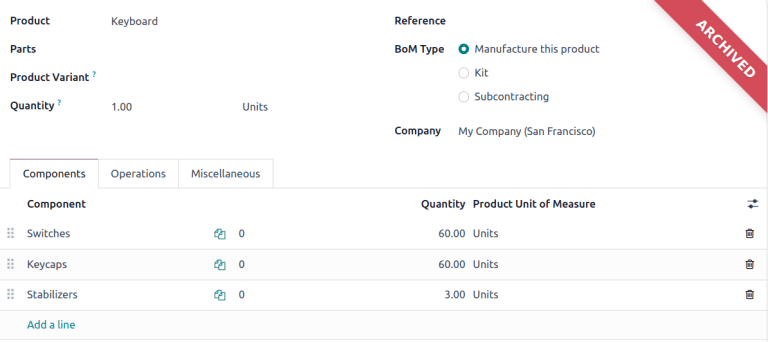
Compare changes
Once the changes are complete, navigate back to the ECO, by clicking ECO00X in the breadcrumbs located in the top-left corner. On the ECO form, a new BoM Changes tab displays the differences between the current BoM and the new version.
Blue text indicates new components added to the revised BoM that are not in the production BoM. Black text represents updates shared by both BoMs, while red text indicates components removed in the revised BoM.
Changes and tests are encapsulated in the revised BoM, and do not affect the BoM currently used in production. That is, until the changes are applied.
Example
View the summary of the differences between the current and revised keyboard BoMs in the BoM Changes tab of the ECO.
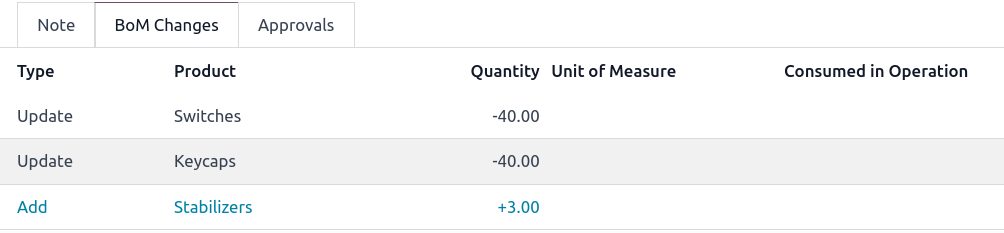
Change operations
To modify the operations in a BoM, click the Revision smart button on an ECO to access the archived, new version of the BoM.
In the new BoM version, switch to the Operations tab to view and edit BoM operations. To make changes, select each operation, which opens the corresponding Open: Operations pop-up window.
Note
The Operations tab is not available by default. To enable it, navigate to Manufacturing app ‣ Configuration ‣ Settings, and check the Work Orders box.
Make changes to any of the fields in the Open: Operations pop-up window, then click Save once completed.
Create new operations by clicking the Add a line button, and remove new operations by clicking the Archive Operation button.
Compare changes
Once the changes are complete, navigate back to the ECO, by clicking ECO00X in the breadcrumbs located in the top-left corner.
On the ECO form, a new Operation Changes tab displays the differences between the current production BoM and the new version.
Blue text indicates new operations added to the revised BoM that do not yet exist in the production BoM. Black text represents updates shared by both BoMs, while red text indicates operations removed in the revised BoM.
Modifications to the BoM in an ECO will not affect the BoM used in production. That is, until the changes are applied.
In the Operation Changes tab, each row of details, beneath the columns in the table, reflect the following information:
- Operation: Name of the operation that was modified.
- Step: specifies the quality control point, visible when the operation includes detailed instructions.
Note
To check for instructions, click the operation line item in the Operations tab of a BoM. Then, in the Open: Operations pop-up window, look for the Instructions smart button displayed at the top.
Example
The Assembly Operation includes 10 detailed Instructions to complete it.

- Step Type details the type of quality control for further instructions in the operation.
- Type corresponds with the colored text to specify how the revised BoM differs from the production BoM. Operation change types can be Add, Remove, or Update.
- Work Center specifies the work center at which the operation is performed.
- Manual Duration Change refers to the change in the Default Duration field in the Open: Operations pop-up window, which specifies the expected time for completing the operation.
Example
The Operation Changes tab compares the production BoM with the revised BoM in the ECO.
In the revised BoM, a new Assembly Operation at the Work Center Assembly Line 1 is added. In addition, the expected duration of the operation is 20.00 minutes, as specified by the Manual Duration Change.
To supplement the Assembly operation, two quality control point instructions are added:
- The first is the Step QCP00039, a Step Type to Register Production of components.
- The second Step is QCP00034, an Instructions Step Type that provides additional assembly details.
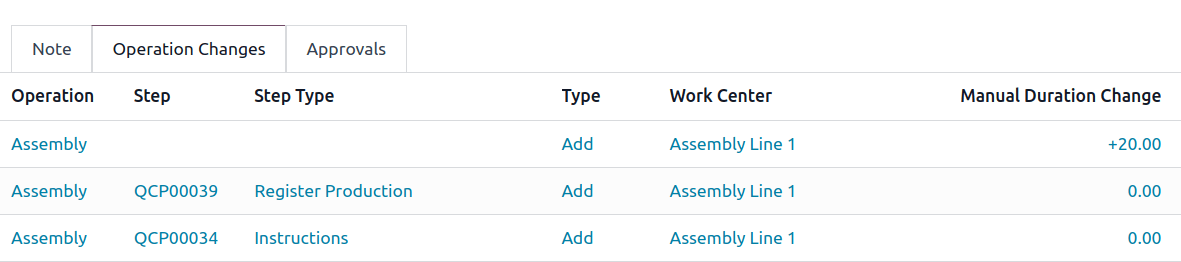
Apply changes
After verifying the changes, move the ECO to a verification stage, which are stages that require approval before the revised changes can be applied to the production BoM.
Once the approvers accept the changes, the Apply Changes button becomes available. Click this button, and the ECO is automatically moved to a closing stage. The changes are applied, which archives the original production BoM, and the revised BoM becomes the new production BoM.
Verify changes
To ensure the changes are live, from the ECO where the Apply Changes button was just pressed, return to the revised BoM by clicking the Revision smart button.
On the revised BoM, the large red Archived flag is removed.
To further verify the changes, check the production BoM by going to Manufacturing app ‣ Products ‣ Products and select the product.
Then, on the product form, click the Bill of Materials smart button, and select the BoM from the list. In the Miscellaneous tab of the BoM, the Version field is updated to match the version number shown on the Revision smart button of the latest ECO.
Example
After applying the changes of the ECO for the keyboard, view the version of the current keyboard BoM in the Miscellaneous tab. Here, the Version number has been updated to 2, matching the V2 that appears in the Revision smart button of the ECO.
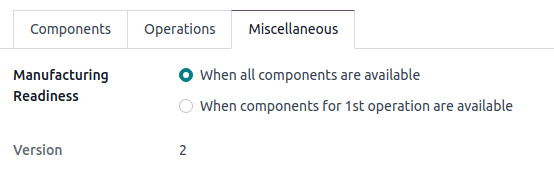
Create ECO from tablet view
Operators can directly suggest clearer operation instructions, while performing manufacturing orders (MOs) in the Manufacturing app.
To create ECOs in this manner, begin by navigating to Manufacturing app ‣ Operations ‣ Manufacturing Orders. Then, select the desired MO and switch to the Work Orders tab. Then, click the 📱 (mobile phone) icon for the desired work order to open the tablet view of the operation.
Important
The 📱 (mobile phone) icon is only available for MOs with a Confirmed or In Progress status.
![]()
Next, add an instructional step, by clicking the ☰ (three horizontal lines) icon in the tablet view of an operation. Doing so opens the Menu of action items for a MO. Then, click the Add a step button.

Clicking the button reveals an Add a step pop-up window, where the proposed changes are submitted.
In the Title field, enter a short step description. Next, in the Instruction text field, type the instructions of the step in greater detail. Optionally, add an image to the Document field. Once completed, finish by clicking the Propose Change button.
Example
To propose an additional check for broken components, enter the details in the Add a Step pop-up window. Doing so creates an instructional quality control point that will be reviewed in the following section.

Based on the inputs from the Add a Step pop-up window, an ECO is created with the following information:
- Description is the name of the operation, followed by the MO number for reference.
- The ECO Type is automatically assigned to BOM Changes.
- Product and Bill of Materials fields are automatically populated, based on the BoM used in the MO.
- Responsible is the operator who submitted the feedback.
View ECO
To review the proposed changes, navigate to the PLM app ‣ Overview. In the BOM Updates ECO type card, the X Engineering Changes button represents the amount of operational changes created from the tablet view.
Click on the X Engineering Changes button to open the kanban view of the ECO type. To view the suggestion, select an ECO in the New stage.
On the ECO, view a summary of the proposed changes in the Operation Changes tab. Click the Revision smart button to navigate to the revised BoM and look into the proposed changes in greater detail.
Example
An operator suggested another check for broken components by adding a step from the tablet view, while performing the Assemble switches operation for the MO WH/MO/00010 for the product, Keyboard.
Then, this created ECO can be viewed by navigating to the BOM Changes ECO type found in PLM app ‣ Overview. By default, ECOs created from tablet view are set to spawn in the New stage.
The Responsible field is assigned to the operator who made the suggestion, allowing the employee revising the BoM to seek further clarification from the person who proposed the changes.
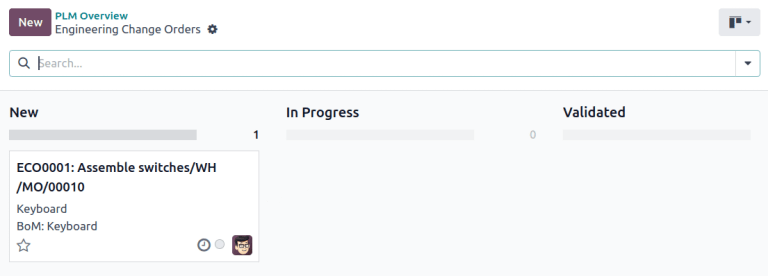
On the revised BoM, switch to the Operations tab, and select the ☰ (three horizontal lines) icon. Doing so opens a list of Steps to perform the operation, with the newest instruction titled New Step Suggestion:, followed by the user-entered title. Click the line item to view the suggested changes.
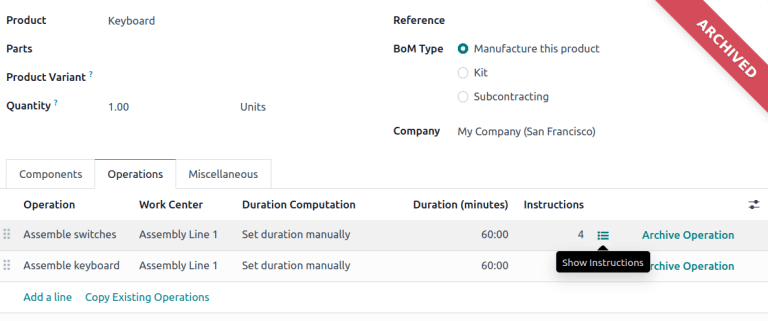
On the quality control point form, ensure the following form fields are accurately filled out to give detailed instructions for operators:
- Title: rename to give a concise description of the new instruction.
- Control per: using the drop-down menu, determine whether this instruction applies broadly for the Product, specifically for this Operation only, or a particular Quantity of the product.
- Type: categorizes the control point type. From the drop-down menu, select Instructions to detail an instruction for the worker. To receive input from the workers, select the Take a Picture, Register Consumed Materials, Print Label, or other quality check options.
See also
Configure quality control points
Once the quality control point is configured, return to the Steps list using the breadcrumbs. Finally, drag the last quality control line item to its intended order of instructions.
Example
Drag and reorder the Check for broken switches instruction, by clicking and dragging its “6 dots” icon to move it from the bottom to the second position.

On this page
Get Help
Contact Support Ask the Odoo Community
![]()
EN
Odoo 18
ECO type
An ECO type is assigned to engineering change orders (ECOs) to organize and track changes to products and bills of materials (BoMs). Each ECO type separates ECOs into a project in Gantt view, ensuring collaborators and stakeholders only view and assist with relevant BoM improvements.
For example, an electronic chip manufacturer might use ‘New Product Introduction’, ‘Product Improvement’, ‘Component Change’, and ‘Firmware Update’ ECO types. Then, designers and engineers can focus on ECOs in the ‘New Product Introduction’ and ‘Product Improvement’ projects, avoiding unrelated supplier change or firmware update ECOs.
Create ECO type
To access and manage ECO types, navigate to PLM app ‣ Configuration ‣ ECO Types.
Create a new ECO type by clicking New. On the new ECO Types form, fill in the following information:
- Name: the name of the ECO type, which will organize all of the ECOs of this type in a project.
- Email Alias: if this optional field is filled, emails submitted to this email address automatically generate ECOs in the left-most stage of this ECO type.
Example
The Formulation change ECO type is used to organize and track related ECOs in a single project. Configuring the Email Alias field generates ECOs in the Formulation change project sent to the email address, pawlish-change@pawlished-glam.odoo.com.

Edit ECO type
Modify existing ECO type names and email aliases by navigating to the PLM app ‣ Configuration ‣ ECO Types page. There, click on the desired ECO type from the list.
On the form for each ECO type, proceed to edit the Name and Email Alias fields.
Stages
Within an ECO type project, stages are like milestones and are used to identify the progress of the ECO before the changes are ready to be applied. (e.g. ‘Feedback’, ‘In Progress’, ‘Approved’, ‘Complete’)
Additionally, required approvers can be added to each stage, ensuring that changes to the production BoM cannot proceed until the approver reviews and approves the ECO. Doing so prevents errors on the production BoM by enforcing at least one review of suggested changes before they’re applied on a production BoM.
For best practice, there should be at least one verification stage, which is a stage with a required approver, and one closing stage, which stores ECOs that have been either cancelled or approved for use as the next production BoM.
Create stage
To add a stage, go to the PLM app and select the intended project for an ECO type from the PLM Overview dashboard.
Then, on the Engineering Change Orders project pipeline for the ECO type, click the + Stage button. Doing so reveals a text box to fill in the name of the stage. After filling it in, click the Add button to finish adding the stage.
Example
A new Assigned stage separates assigned ECOs from the unassigned ones in the New stage. Adding another stage helps the product manager track unassigned tasks.

Verification stage
Click an ECO type from PLM app ‣ Overview to open a kanban view of ECOs of this type.
To configure a verification stage, hover over the intended stage, and select the ⚙️ (gear) icon. Then, click Edit to open a pop-up window.
Configure the verification stage in the edit stage pop-up window, by checking the box for Allow to apply changes.
Then, add an approver in the Approvers section, by clicking Add a line, and specifying the Role of the reviewer, their User, and Approval Type.
Make sure at least one approver is configured with the Approval Type: Is required to approve.
The approver listed is automatically notified when ECOs are dropped in the stage specified in the pop-up window. Once finished, click Save & Close.
Example
In the ECO type New Product Introduction, the verification stage Validated is configured by clicking the ⚙️ (gear) icon, and selecting Edit. Doing so opens the Edit: Validated pop-up window.
By adding the Engineering manager as an approver, only ECOs approved by this user can proceed to the next stage, and have the changes applied on the production BoM.
Additionally, check the Allow to apply changes option to ensure proper behavior.

Closing stage
Configure a closing stage by opening the Edit: [stage] pop-up window. To do so, hover over the intended stage and click the ⚙️ (gear) icon that appears in the top-right corner. Then, click Edit from the drop-down menu.
On the Edit: [stage] pop-up window, select the check boxes for Folded in kanban view, Allow to apply changes and Final Stage.
Example
The closing stage, Effective is configured by checking the Folded in kanban view, Allow to apply changes, and Final Stage options

On this page
Get Help
Contact Support Ask the Odoo Community
![]()
EN
Odoo 18
Version control
Use Odoo’s Product Lifecycle Management (PLM) to manage previous versions of bills of materials (BoMs). Store former assembly instructions, component details, and past product design files while keeping the past details out of the production BoM.
Easily revert to previous BoM versions, when needed. Additionally, use PLM to trace which BoM version was active on specific dates for recalls or customer complaints.
Every BoM version is stored in an engineering change order (ECO) for organized testing and improvements without disrupting normal manufacturing operations.
See also
Current BoM version
To see the current version of the BoM used in production, go to PLM app ‣ Master Data ‣ Bill of Materials, and select the desired BoM from the list. Then, switch to the Miscellaneous tab, where the currently live Version of the BoM is displayed.
Note
BoMs can also be accessed from Manufacturing app ‣ Products ‣ Bill of Materials.
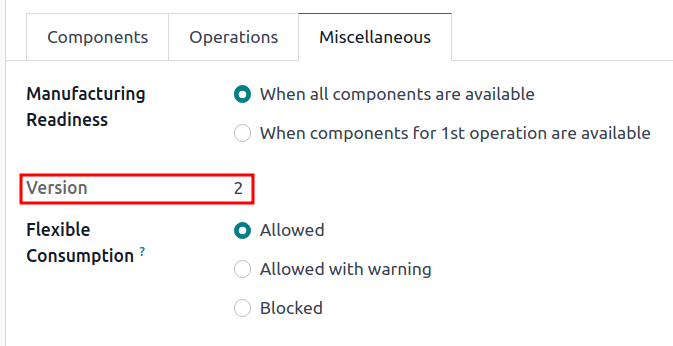
Version history
To manage all former, current, and future versions of a BoM, begin by navigating to Manufacturing app ‣ Products ‣ Bills of Materials and click the desired BoM.
From the BoM page, click the ECO smart button, and switch to list view by selecting the ≣ (four horizontal lines) icon on the top right corner.
Note
The ECO smart button is visible on the BoM only if the PLM app is installed.
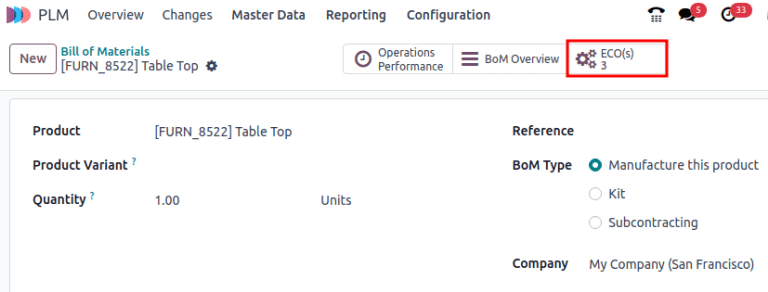
In the list of ECOs for the product, navigate to the search bar at the top, and click the ▼ (down arrow) icon on the right to access a drop-down menu of Filters.
Next, filter by Done ECOs to view: the revision history of the BoM, the Responsible user who applied the change, and the Effective Date of the BoM.
Click each ECO to view the past components, operations, and design files associated with the BoM.
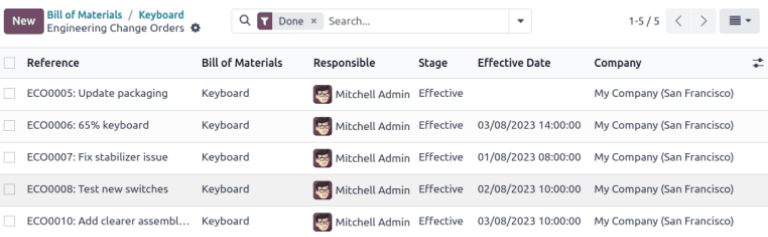
Note
If the Effective Date field is empty, the Effective date of the ECO is automatically set to As soon as possible and no dates are recorded in the revision history of the BoM.

Tip
A workaround for checking when the BoM went live is by navigating to the chatter, and hovering over the time the ECO was moved to the closing stage.
Design files
Attach computer-aided design (CAD) files, PDFs, images, or other design material to the BoM itself.
To do so, navigate to PLM app ‣ Master Data ‣ Bill of Materials, and select the desired BoM. On the BoM, navigate to the chatter, and click the 📎 (paperclip) icon.
The files associated with the BoM are displayed in the Files section. To add more design files, select the Attach files button.
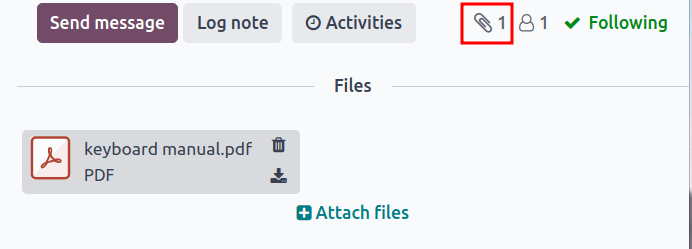
Manage design files in an ECO
Add, modify, and remove files in an ECO. Once the ECO is approved and applied, the new files are automatically linked to the production BoM. Archived files are removed from the BoM, but are still accessible in the ECO.
To manage the design files in the ECO, begin by navigating to PLM app ‣ Changes and choose the desired ECO. Next, open the Attachments page by clicking the Documents smart button.
Hover over each attachment to reveal the ︙ (three vertical dots) icon. From there, choose whether to Edit, Remove, or Download the file. Any changes made to these files are contained within the ECO, and will only apply to the production BoM once the changes are applied.
Example
In the Create 60% keyboard ECO, the design files are from the original 100% keyboard BoM. To replace the keyboard PDF, begin by selecting the Documents smart button.
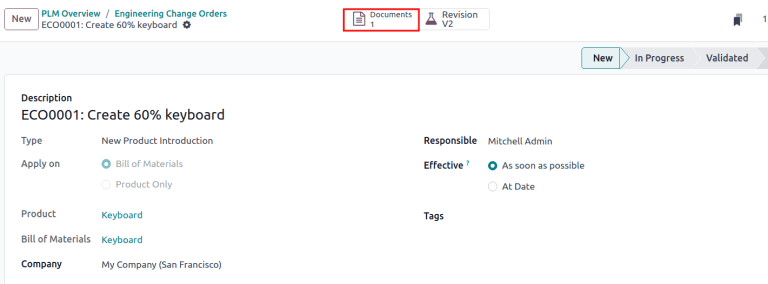
On the Attachments page, hover over the 100% keyboard manual.pdf design file, and click the ︙ (three vertical dots) icon. Then, click the Remove option to archive the file.
Next, on the same Attachments page, click the Upload button to upload the new design file, named 60% keyboard manual.
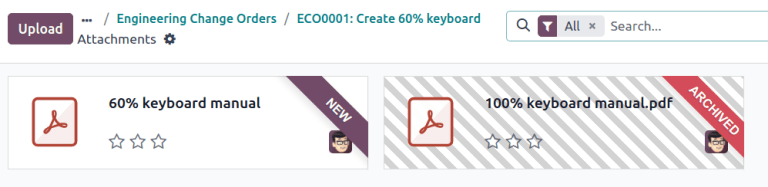
Note
Archived files are not permanently deleted — they can still be accessed in the previous ECO, or as an archived file in the latest ECO, where the archival occurred.
Apply rebase
Odoo simplifies merge conflict resolution for concurrent ECOs on the same product.
Conflicts can occur when the production BoM is updated while other ECOs are modifying the previous version. Differences between the new and previous production BoMs are displayed in the Previous Eco Bom Changes tab, visible only in this scenario.
To resolve conflicts and retain ECO changes, click the Apply Rebase button.
Example
Two ECOs, ECO0011 and ECO0012, are created when the current BoM version is 5. In ECO0011, a new component, Space stabilizer, is added, and the changes are applied. This means the current BoM version has become 6.

This means ECO0012 is modifying an outdated BoM. As shown in the Previous Eco Bom Changes tab, the BoM is missing the Space stabilizer.
To ensure the changes applied by ECO0011 are kept when the changes occur in ECO0012, click the Apply Rebase button to apply the previous ECO changes, without affecting the changes already made to ECO0012.
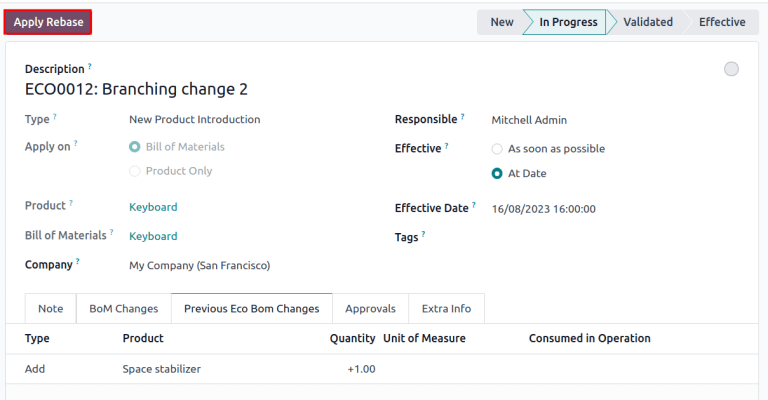
On this page
Get Help
Contact Support Ask the Odoo Community
![]()
EN
Odoo 18
Approvals
Notify stakeholders and managers automatically by assigning approvers to stages of engineering change orders (ECOs) under review. Changes can only be applied after the assigned approver accepts them. Approvals ensure reviews by team members, which prevents mistakes and premature actions.
See also
Add approver
To add an approver, first go to the PLM app, and click on the project card of an ECO type to open the Gantt view of the ECOs.
On the Engineering Change Orders page, hover over the intended stage, and select the ⚙️ (gear) icon. Then, click Edit to open a pop-up window.
Note
Approvers can be added to any stage, but it’s strongly recommended to assign them to the verification stage, which comes before the closing stage, where ECOs are applied, and the BoM version is updated.
See the documentation about stage types for more information.
In the Edit stage pop-up window, click the Add a line button, located under Approvals. Then, type in the approver’s position (or title) under Role (e.g. Engineering Manager, Quality Team, etc.), and select the relevant User from the drop-down menu.
Next, set the Approval Type to Is required to approve, Approves, but the approval is optional, or Comments only.
Example
Assign the CTO, “Mitchell Admin,” as a required approver for ECOs in the Validated stage in the New Product Introduction ECO type.
Approvals from the quality and marketing teams are not required to apply changes to the ECO because their Approval Type is set to Approves, but the approval is optional and Comments only, respectively.
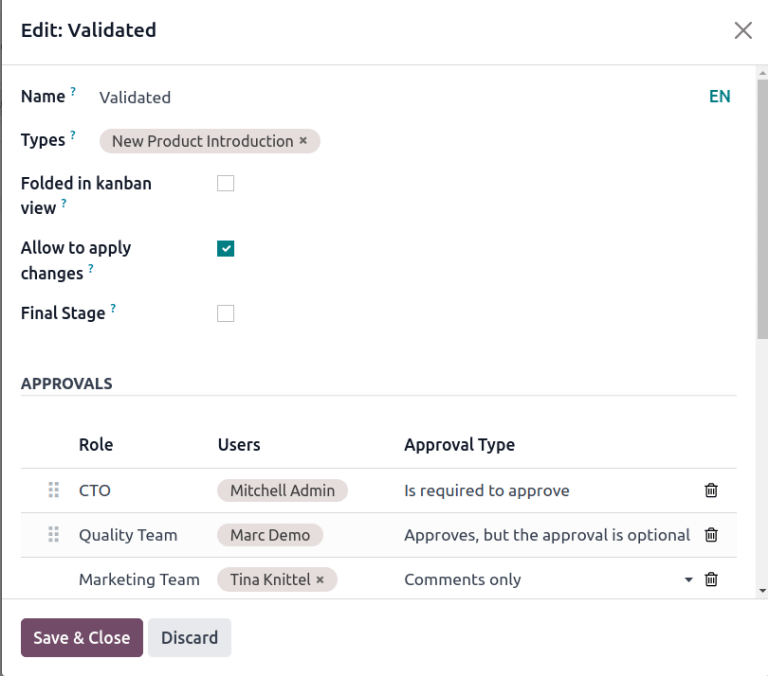
Manage approvals
Approvers can easily track their to-do approvals by navigating to the PLM app, and looking at the card for an ECO type, which shows the count of open tasks assigned to them.
Here’s what each button on an ECO project card does:
- The # Engineering Changes button displays a count of in-progress ECOs of this ECO type. Clicking the button opens the Gantt view of the Engineering Change Orders page.
- My Validations displays a count of ECOs the approver must accept or reject. Clicking on this button displays ECOs pending approval or rejected (marked with the red Blocked state).
- The All Validations button shows the count of ECOs awaiting approval or rejected by any approver. Clicking it reveals these pending ECOs.
- To Apply displays a count of ECOs to which the user needs to apply changes. Clicking on the button displays all the ECOs to approve, and apply changes to, in the verification stage.
ECOs marked with the green Done stage have already been approved, and the user just needs to click on the ECO to enter the form view, and click the Apply Changes button.
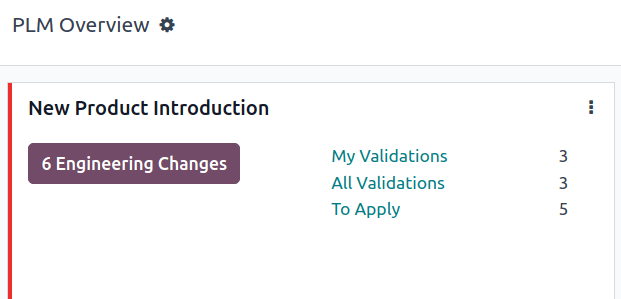
Approve ECOs
Navigate to an ECO in a verification stage, while logged in as the assigned approver, to see the Approve, Reject, and Apply Changes buttons.
To approve the ECO, and apply the changes onto the production BoM, click Approve, and then Apply Changes.
Note that the Apply Changes button will not work unless the Approve button was clicked first. Additionally, the chatter logs the history of the clicked buttons.
Warning
When the Approval Type is not set to Is required to approve, approval from the associated user is not needed before applying changes with the Apply Changes button. Thus, the Apply Changes button will work without requiring the Approve button to be clicked first.
Automated activities
When an ECO is moved to a verification stage, a planned activity is automatically created for assigned approvers to review the ECO. Approvers receive a notification in their activities inbox, accessible through the 🕘 (clock) icon at the top of the page.
In the to-do task list, the Engineering Change Order (ECO) notification displays the number of activities marked Late, Today, and Future. Clicking on each of these buttons shows a filtered Gantt view of the respective ECOs.
Example
Scheduled activities are shown as a number on the 🕘 (clock) icon, with 5 ECOs pending approval Today. Currently, there are 0 Late or Future ECOs.

By clicking a pending ECO, a planned activity for ECO Approval is recorded in the chatter. Click on the i (Info) icon to view additional information, including the approval’s Created date, the approver Assigned to it, and the due date.

Follow-up activities
When ECOs are rejected, tasks need to be assigned to project members for required modifications before ECO approval. To create tasks with deadlines, navigate to the rejected ECO form, and go to the chatter.
Select the Mark Done button in the Planned Activities section of the chatter to close the activity, and open a pop-up window for creating tasks.

In the Mark Done window, click Done & Schedule Next to open a new Schedule an Activity window. Next, set the Assigned to team member and the Due Date for completing the changes. Provide task details in the Summary field and the text box. Click the Schedule button to close the window.
After closing the window, on the ECO form, move the ECO back one stage. Doing so ensures that when the team member completes the changes, and returns the ECO to the verification stage, a new ECO Approval task is created for the approver.
Example
The approver creates an activity for the Responsible of the ECO, Laurie Poiret, that details the changes required for the approver to Accept the ECO. Clicking the Schedule button creates a planned activity for Laurie due on 08/15/2023.

On this page
Get Help
Contact Support Ask the Odoo Community
![]()
EN
Odoo 18
Process repair orders
Sometimes, products delivered to customers can break or be damaged in transit, and need to be returned for a refund, delivery of a replacement product, or repairs.
In Odoo, repairs for products returned by customers can be tracked in the Repairs app. Once repaired, products can be redelivered to the customer.
The return and repair process for damaged products typically follows the below steps:
- Process return order for damaged product
- Create repair order for returned product
- Return repaired product to customer
Return order
Returns can be processed in Odoo via reverse transfers, created directly from a sales order (SO) once products have been delivered to a customer.
To create a return, navigate to the Sales app, and click into an SO from which a product should be returned. Then, from the SO form, click the Delivery smart button. Doing so opens the delivery order (DO) form.
From this form, click Return. This opens a Reverse Transfer pop-up window.
![]()
This pop-up lists the Product included in the order, the Quantity delivered to the customer, and the Unit of Measure the product was in.
Click the value in the Quantity field to change the quantity of the product to be returned, if necessary.
Click the 🗑️ (trash) icon at the far-right of the product line to remove it from the return, if necessary.
Once ready, click Return to confirm the return. This creates a new receipt for the returned products.
Once the product has been returned to the warehouse, receipt of the return can be registered in the database by clicking Validate from the reverse transfer form.
Tip
Once a reverse transfer for a return is validated, the value in the Delivered column on the original SO updates to reflect the difference between the original Quantity ordered, and the Quantity returned by the customer.
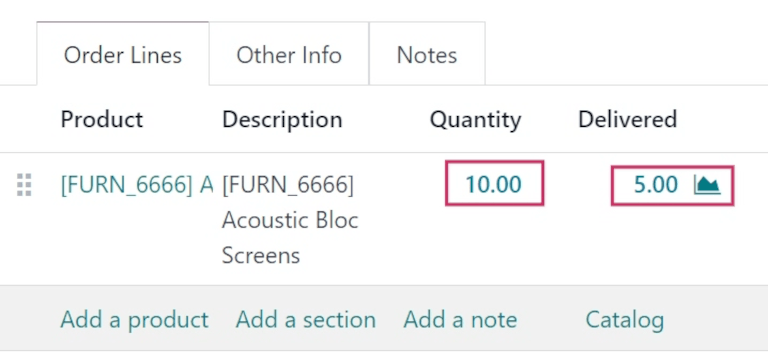
Create repair order
Once products have been returned, their repairs can be tracked by creating a repair order (RO).
To create a new RO, navigate to Repairs app, and click New. This opens a blank RO form.
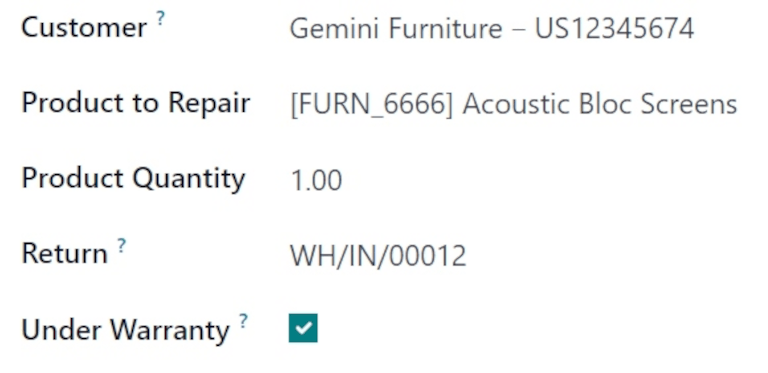
On this form, begin by selecting a Customer. The customer selected should be for whom the order will be invoiced and delivered.
In the Product to Repair field, click the drop-down menu to select the product that needs repair. If necessary, click Search More… to open a Search: Product to Repair pop-up window, and browse all products in the database.
Once a Product to Repair is selected, a new Product Quantity field appears below it. In that field, enter the quantity (in a 0.00 format) of the product that requires repair.
To the right of that value, click the drop-down list to select the unit of measure (UoM) for the product.
In the Return field, click the drop-down menu and select the return order from which the product to be repaired comes from.
Tick the Under Warranty checkbox, if the product being repaired is covered by a warranty. If ticked, the Customer is not charged for all the parts used in the repair order.
In the Scheduled Date field, click the date to reveal a calendar popover window. From this calendar, select a date for the repair, and click Apply.
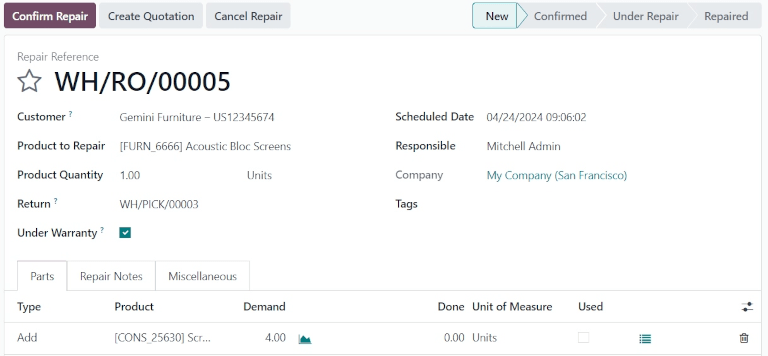
In the Responsible field, click the drop-down menu and select the user who should be responsible for the repair.
In the Company field, if in a multi-company environment, select which company this RO belongs to.
In the Tags field, click the drop-down menu and select which tags should be applied to this RO.
Parts tab
Add, remove, or recycle parts in the Parts tab. To do so, click Add a line at the bottom of the form.
In the Type column, click the box to reveal three options to choose from: Add (selected by default), Remove, and Recycle.
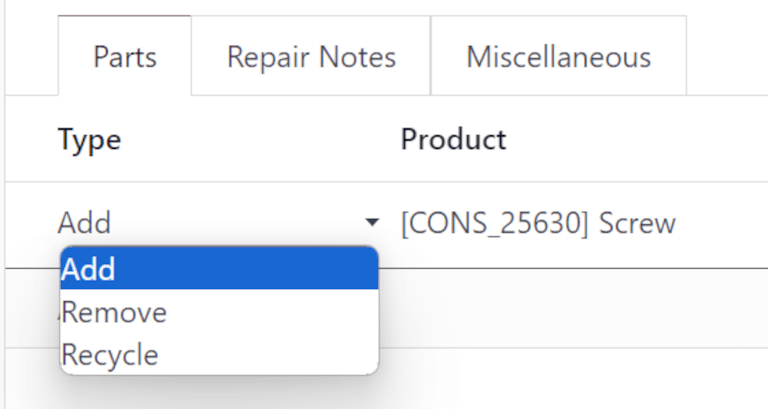
Choosing Add adds this part to the RO. Adding parts lists components for use in the repair. If the components are used, the user completing the repair can record they were used. If they were not used, the user can indicate that, too, and the components can be saved for another use.
Choosing Remove removes this part from the RO. Removing parts lists components that should be removed from the product being repaired during the repair process. If the parts are removed, the user completing the repair can indicate they were removed.
Choosing Recycle recycles this part from the RO, designating it for later use or to be repurposed for another use in the warehouse.
In the Product column, select which product (part) should be added, removed, or recycled. In the Demand column, change the quantity, if necessary, to indicate what quantity of this part should be used in the repair process.
In the Done column, change the value (in a 0.00 format) once the part has been successfully added, removed, or recycled.
In the Unit of Measure column, select the UoM for the part.
Finally, in the Used column, tick the checkbox once the part has been used in the repair process.
To add additional columns to the line, click the (optional columns drop-down) icon, at the far-right of the header row. Select the desired options to add to the line.
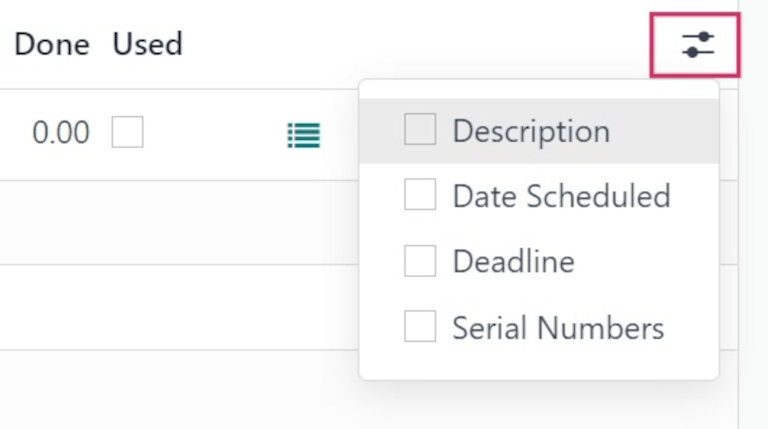
Repair Notes and Miscellaneous tabs
Click the Repair Notes tab to add internal notes about this specific RO, and anything the user performing the repair might need to know.
Click the blank text field to begin writing notes.
Click the Miscellaneous tab to see the Operation Type for this repair. By default, this is set to YourCompany: Repairs, indicating this is a repair type operation.
Once all desired configurations have been made on the RO form, click Confirm Repair. This moves the RO to the Confirmed stage, and reserves the necessary components needed for the repair.
A new Forecasted column appears on the product lines under the Parts tab, displaying the availability of all components needed for the repair.
Once ready, click Start Repair. This moves the RO to the Under Repair stage (in the upper-right corner). If the RO should be cancelled, click Cancel Repair.
Once all products have been successfully repaired, the RO is completed. To register this in the database, click End Repair.
Note
If all parts added to the RO were not used, clicking End Repair causes an Uncomplete Move(s) pop-up window to appear.
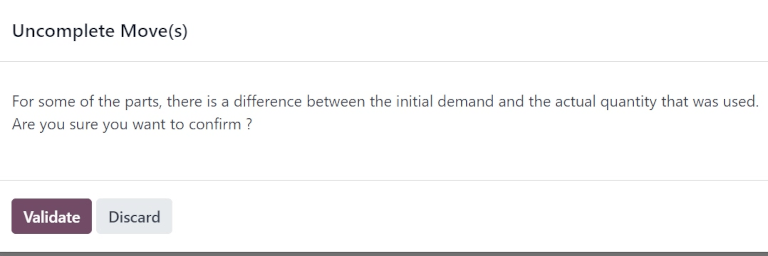
The pop-up window informs the user that there is a difference between the initial demand and the actual quantity used for the order.
If the Used quantity should be changed, click Discard or close the pop-up window. If the order should be confirmed, click Validate.
This moves the RO to the Repaired stage. A Product Moves smart button also appears above the form.
Click the Product Moves smart button to view the product’s moves history during and after the repair process.
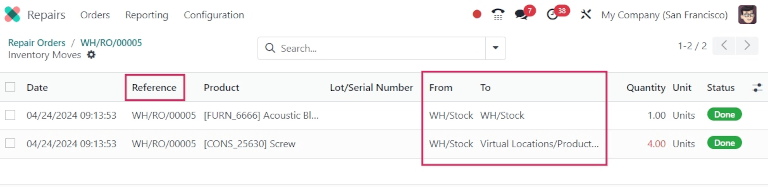
Return product to customer
Product is under warranty
Once the product has been successfully repaired, it can be returned to the customer.
Product is not under warranty
If the product is not under warranty, or should the customer bear the repair costs, click Create Quotation. This opens a new SO form, pre-populated with the parts used in the RO, with the total cost of the repair calculated.
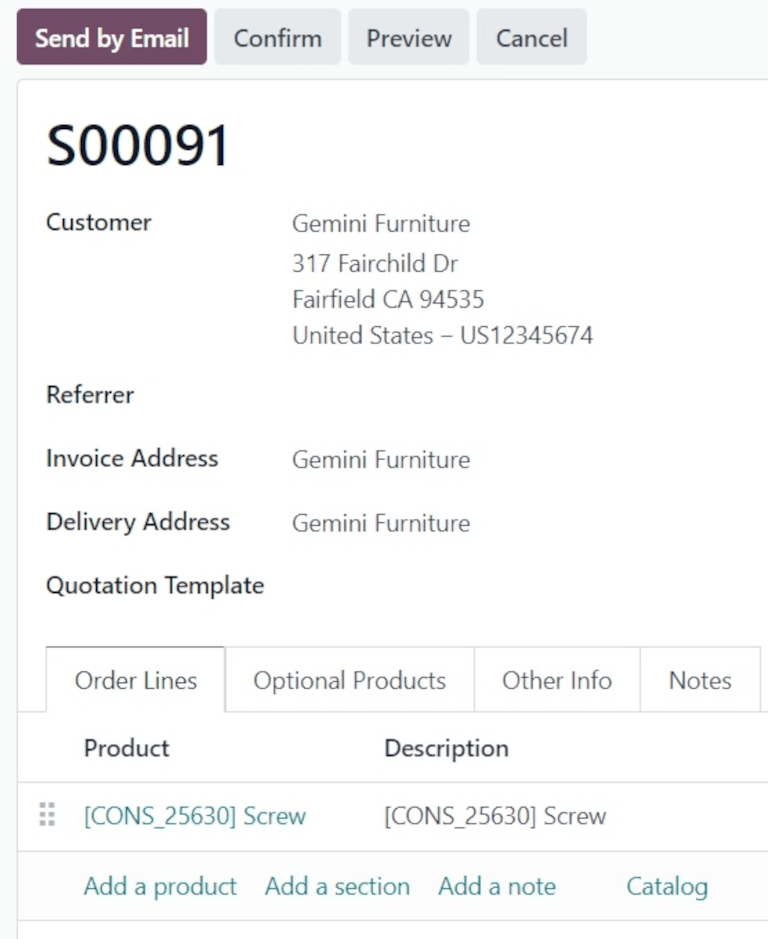
If this SO should be sent to the customer, click Confirm, and proceed to invoice the customer for the repair.
Tip
If the customer should be charged for a repair service, a service type product can be created and added to the SO for a repaired product.
To return the product to the customer, navigate to the Sales app, and select the original SO from which the initial return was processed. Then, click the Delivery smart button.
From the resulting list of operations, click the reverse transfer, indicated by the Source Document, which should read Return of WH/OUT/XXXXX.
This opens the return form. At the top of this form, a Repair Orders smart button now appears, linking this return to the completed RO.
Click Return at the top of the form. This opens a Reverse Transfer pop-up window.
![]()
This pop-up lists the Product included in the order, the Quantity delivered to the customer, and the Unit of Measure the product was in.
Click the value in the Quantity field to change the quantity of the product to be returned, if necessary.
Click the 🗑️ (trash) icon at the far-right of the product line to remove it from the return, if necessary.
Once ready, click Return to confirm the return. This creates a new delivery for the returned products.
When the delivery has been processed and the product has been returned to the customer, click Validate to validate the delivery.
See also
On this page
Get Help
Contact Support Ask the Odoo Community
![]()
EN
Odoo 18
Attendances
Odoo’s Attendances application functions as a time clock. Employees are able to check in and out of work using a dedicated device in kiosk mode, while users are also able to check in and out of work directly from the database. Managers can quickly see who is available at any given time, create reports to see everyone’s hours, and gain insights on which employees are working overtime, or checking out of work earlier than expected.
Access rights
It is important to understand how the different access rights affect what options and features users can access in the Attendances application.
Every user in the database is able to check in and out directly from the database, without needing access to the Attendances application. Additionally, all users can access their own attendance records from their employee form in the Employees app.
Access to both the Attendances application, and the various features within the application is determined by access rights.
To see what access rights a user has, navigate to the Settings app ‣ Users & Companies: Users, and click on an individual user. The Access Rights tab is visible by default. Scroll down to the Human Resources section to see the setting. For the Attendances field, the options are either to leave the field blank or select Administrator.
If the Administrator option is selected, the user has full access to the entire Attendances application, with no restrictions. They can view all employee attendance records, enter Kiosk mMode from the application, access all reporting metrics, and make modifications to the settings. If left blank, the user does not have access to the Attendances application.
Approvers
The only other scenario where different information may be accessible in the Attendances application is for approvers. If a user does not have administrative rights for the Attendances application, but they are set as an employee’s approver for the Attendances application, that user is able to view the attendance records for that specific employee, as well as make modifications to that employee’s attendance records, if necessary. This applies to all employees for whom the user is listed as the Attendances application approver. Approvers are typically managers, though this is not required.
To see who the attendance approver is for an employee, navigate to the Employees application and click on the specific employee. Click on the Work Information tab, scroll to the Approvers section, and check the Attendance field. The person selected is able to view that employees’ attendance records, both on the Attendances application dashboard as well as in the attendance reports, and make modifications to their records.
Configuration
Few configurations are needed in the Attendances application. Determining how employees check in and out, defining how the kiosks function, and determining how extra hours are computed are all set in the Configuration menu. Navigate to the Attendances application ‣ Configuration to access the configuration menu.
Modes
- Attendances from Backend: activate this selection to allow users to check in and out directly from the Odoo database. If this is not activated, users must use a kiosk to check in and out of work.
Extra hours
This section specifies how extra time is calculated, including when extra time is counted and what time is not logged.
- Count of Extra Hours: enable this box to allow employees to log extra hours beyond their set working hours (sometimes referred to as overtime). Activating this selection displays the following settings as well. If this is not activated, no other configurations appear.
- Start From: the current date is automatically entered in this field. If desired, click on this field and use the calendar selector to modify the start date on which extra hours are logged.
- Tolerance Time In Favor Of Company: enter the amount of time, in minutes, that is not counted towards an employee’s overtime. When an employee checks out, and the extra time logged is below the specified minutes, the extra time is not counted as overtime for the employee.
- Tolerance Time In Favor Of Employee: enter the amount of time, in minutes, that an employee is given, that does not adversely affect their attendance if they log less time than their working hours. When an employee checks out, and the total time logged for the day is less than their specified working hours and less than this specified grace period, they are not penalized for their reduced hours.
Example
A company sets both of the Tolerance fields to 15 minutes, and the working hours for the entire company are set from 9:00 AM to 5:00 PM.
If an employee checks in at 9:00 AM, and checks out at 5:14 PM, the extra 14 minutes are not counted towards their overtime.
If an employee checks in at 9:05 AM, and checks out at 4:55 PM, even though they logged a total of 10 minutes less than their full working hours, they are not penalized for this discrepancy. - Display Extra Hours: activate this box to display the extra hours logged by an employee when they check out with a kiosk, or when a user checks out in the database.
Note
Employees are still able to log overtime hours even if the Count of Extra Hours option is not activated. The difference is that when Count of Extra Hours is activated, the extra hours can be deducted from an approved time off request.
Overview
When entering the Attendances application, the Overview dashboard is presented, containing all the check in and check out information for the signed in user. If the user has specific access rights and/or are approvers for specific employees, then those additional employee’s check in and check out information is also visible on the Overview dashboard.
Views
To change the view from the default Gantt chart to a list view, click the List icon in the top right of the dashboard, beneath the user’s photo. To switch back to the Gantt chart, click the Gantt button, located next to the List button.
The default view presents the current day’s information. To present the information for the Week, Month, or Year, click on the Day button to reveal a drop-down, displaying those other options. Select the desired view, and the dashboard updates, presenting the selected information. To change the Day, Week, Month, or Year presented, click the ← (left arrow) or → (right arrow) buttons on either side of the drop-down menu. To jump back to a view containing the current day, click the Today button. This refreshes the dashboard, presenting information containing the current day’s information.
In the Day view, the column for the current hour is highlighted in yellow. If the Week or Month view is selected, the column for the current day is highlighted. If the Year view is selected, the current month is highlighted.
Any entries that have errors appear in red, indicating they need to be resolved by a user with the proper access rights and/or are approvers for the employee(s) with the errors.
Filters and groups
To filter the results in the overview dashboard, or to present different groups of information, click the 🔻 (triangle drop down) button in the right side of the Search bar above the dashboard, and select one of the available Filters or Group By options. There are several pre-configured filters and groups to choose from, as well as an option to create custom ones.
Filters
The default filters that can be selected are:
- My Attendances: this filter only presents the user’s attendance data.
- My Team: this filter presents the attendance data for the user’s team.
- At Work: this filter displays the attendance data for everyone currently checked in.
- Errors: this filter displays any entries with errors that need to be resolved.
- Check In: this filter has a drop-down to further select a specific time period. Select the desired time period from the options presented, a specific month, quarter, or year.
- Last 7 days: this filter presents the attendance data for the last seven days.
- Add Custom Filter: create a custom filter using the pop-up that appears when this is selected.
Groups
The default groups that can be selected are:
- Check In: this grouping presents a drop-down menu containing the following time period options: Year, Quarter, Month, Week, and Day. Selected the time period to display all the check-in information, grouped by the selected time period.
- Employee: this group presents the attendance data organized by employee.
- Check Out: this grouping presents a drop-down menu containing the following time period options: Year, Quarter, Month, Week, and Day. Selected the time period to display all the check-out information, grouped by the selected time period.
- Add Custom Group: this option displays a drop-down menu with a variety of options to group the attendance data by, including City, Country, Mode, and IP Address.
Attendance log details
Odoo captures various time and location details when a user checks in and out. The specific details provided are determined by the method the user checked in and out.
To view the specific check in and/or check out details for an employee, click on an individual entry in the overview dashboard.
A detailed attendance log for the user appears in a pop-up window. To close the detailed attendance log, click the Save & Close button in the bottom-left corner of the form.
The detailed attendance log contains the following information:
Main details
- Employee: the name of the employee.
- Check In: the date and time the employee checked in.
- Check Out: the date and time the employee checked out. This only appears if the employee has checked out.
- Worked Hours: the total amount of time the employee logged for the day, in an hour and minute format (HH:MM). This value calculates all the checks in and check outs for the day, if the employee checked in and out multiple times.
- Extra Hours: any extra hours the employee logged that is beyond their expected working hours.
Check in/check out details
The following information appears for both the Check In and Check Out sections.
- Mode: the method with which the attendance information was gathered. Systray is displayed if the employee logged in and out directly from the database, Manual is displayed if the employee logged in and out using an attendance kiosk.
- IP Address: the IP address for the computer the employee used to log in or out.
- Browser: the web browser the employee used to log in or out.
- Localization: the city and country associated with the computer’s IP address.
- GPS Coordinates: the specific coordinates when the user logged in or out. To view the specific coordinates on a map, click the → View on Maps button beneath the GPS Coordinates. This opens a map in a new browser tab, with the specific location pointed out.
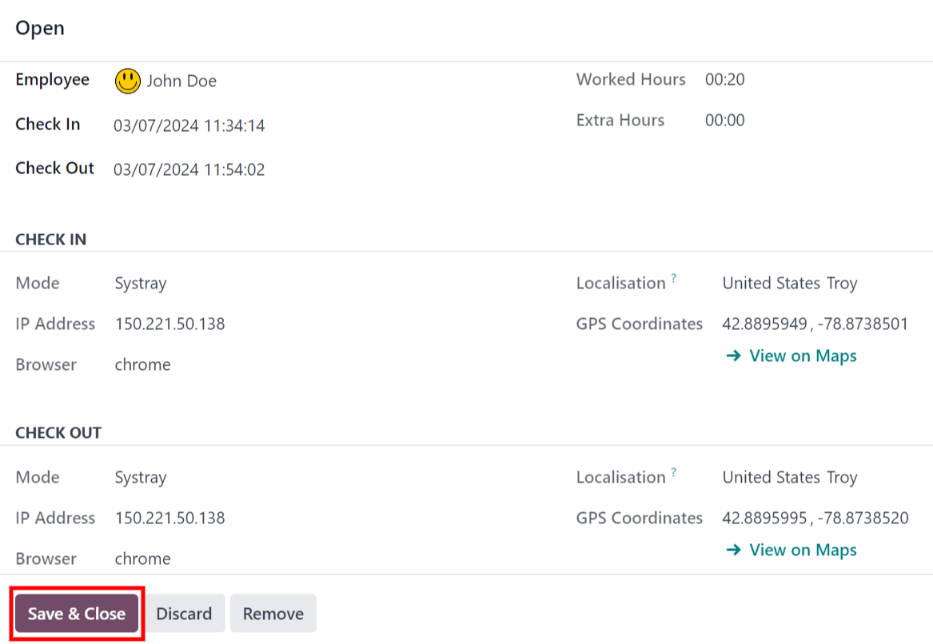
Errors
Entries that contain an error appear on the overview dashboard in red. In the Gantt view, the entry appears with a red background. If in the List view, the entry text appears in red.
An error typically occurs when an employee has checked in but has not checked out within the last 24 hours, or when an employee has a check in and check out period spanning over 16 hours.
To fix the error, the attendance entry must be modified or deleted. Click on the entry to reveal a pop-up containing the details for that particular entry. To modify the Check In and/or Check Out information, click on the Check In or Check Out field and a calendar selector appears. Click on the desired date, then use the time selector beneath the calendar to select the specific time for the entry. When the information is correct, click Apply.

When all the information on the pop-up is correct, click Save & Close. When the entry no longer has an error, the entry appears in gray instead of red.
To delete an entry, click Remove on the pop-up instead of making modifications to the entry.
Reporting
To view attendance reports, click Reporting in the top menu. The default report displays each employee’s attendance information for the past 3 months, in a Line Chart.
The default view is a Graph. To view the data in a pivot table, click the Pivot Table button on the top right of the report. To switch back to the graph view, click the Graph button, located next to the Pivot Table button.
To present different information, adjust the filters and groups in the same way as in the Overview dashboard.
The data can be presented in either a Bar Chart, Line Chart, Pie Chart, Stacked chart, or in Descending or Ascending order. To change the view to any of these charts, click the corresponding button above the displayed chart.
To change the Measures, click the Measures button and select the desired measure from the drop-down menu.
The report can also be inserted into a spreadsheet. Click the Insert in Spreadsheet button and a pop-up appears. Select the desired spreadsheet, and click Confirm.
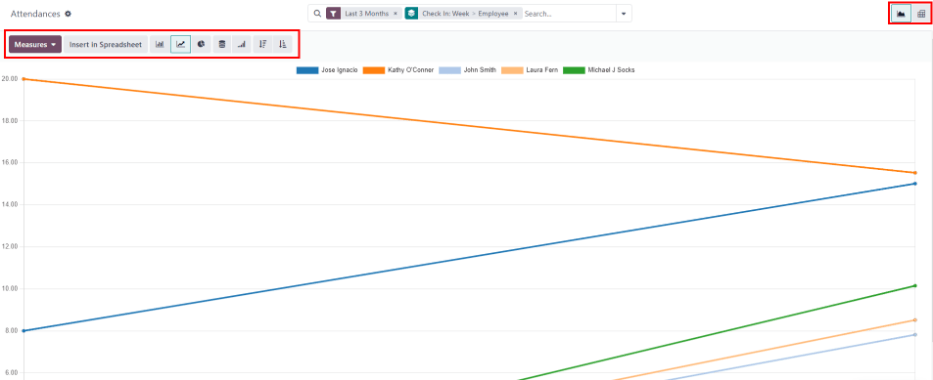
See also
On this page
Get Help
Contact Support Ask the Odoo Community
![]()
EN
Odoo 18
Check in and out
Odoo’s Attendances application allows users, who are logged into the database, to check in and out, without needing to go into the Attendances application, or use a kiosk. For smaller companies, where every employee is also a user, this feature may be useful.
A user can check in and/or out on the main database Odoo dashboard, or while inside any application. To do so, in the upper-right corner of the top main header menu, which is always visible regardless of what application the user is in, a 🔴 (red circle) or 🟢 (green circle) is visible. Click on the colored circle to reveal the attendance widget, enabling the user to check in and/or out.

Check in
If the attendance widget circle is red, this indicates the user is not currently checked in. Click the 🔴 (red circle), and the attendance widget appears, displaying a green Check in button.
When the user checks in from the database, the Attendances app logs the location details for the user, including the IP Address and GPS coordinates.
Important
For the Attendances app to log the location details, the user must allow their computer to access their location information.
If the user has not already checked in and out during the current work day, this button is the only visible item in the widget. If the user has previously checked in and out, a Total today field appears above the button, and the total amount of time that has been logged for the day appears in that field, in an HH:MM (hours:minutes) format.
Click the Check in button to check in. The 🔴 (red circle) in the top menu changes to green, and the widget changes appearance, as well. The widget updates to reflect that the user has checked in, by changing the green Check in button to a yellow Check out button.
Click anywhere on the screen to close the attendance widget.
Check out
If the user is checking out for the first time, Since HH:MM (AM/PM) appears at the top of the widget, with the time the user checked in populating the time field. Beneath that line, the hours and minutes that have elapsed since checking in are displayed in a HH:MM format. As time passes, this value is updated to reflect the hours and minutes that have passed since the user checked in.
If the user has previously checked in and out, additional fields are presented. A Before HH:MM (AM/PM) field appears, in addition to the Since HH:MM (AM/PM) field. The times displayed in both of these fields match, and are populated with the most recent check in time. Beneath the Before HH:MM (AM/PM) field, the previously logged time is displayed, in an HH:MM (hours:minutes) format.
In addition, beneath both of these fields, a Total today field appears. This field is the sum of both the Before HH:MM (AM/PM) and Since HH:MM (AM/PM) fields, and is the total time that is logged for the user, if they were to log out at that moment.
As time passes, both the Since HH:MM (AM/PM) and Total today fields are updated live. To check out, click the yellow Check out button. The attendance widget updates again, displaying the Total today field with the logged time, while the yellow Check out button changes to a green Check in button.
When the user checks out from the database, the Attendances app logs the location details for the user. This information is only logged if the user allows their computer to access this information.
Tip
There is no limit to the amount of times a user can check in and check out. Users are able to check in and out without any time elapsing (a value of 00:00). Each time an employee logs in and out, the information is stored and appears on the main Attendances dashboard, including check ins and check outs with no time value.
On this page
Get Help
Contact Support Ask the Odoo Community
![]()
EN
Odoo 18
Kiosks
Odoo’s Attendances app allows employees to check in and out of work directly from the database, or from a kiosk.
A kiosk is a dedicated device (a PC, tablet, or mobile phone) for employees to use when they check in and out.
Kiosks are needed for employees who do not have access to the database.
Only employees with access to the database can check in and out from the Attendances app, and they are referred to as users.
Important
If employees check in and out using a badge or an RFID, then an accessible device in Kiosk Mode must be available in order to use these two methods.
Configuration
There are only a few configurations needed to use kiosks in the Attendances application. Navigate to Attendances app ‣ Configuration to access the Settings page to configure the Kiosk Mode section and the Kiosk Settings section.
Once all desired settings have been configured, click the Save button on the Settings page, to activate and enable them.
Kiosk Mode section
Using the drop-down menu, select how an employee checks in when using a kiosk. Options are Barcode/RFID, Barcode/RFID and Manual Selection, or Manual Selection.
Note
The Barcode application does not need to be installed to use one of the Barcode/RFID settings.
Kiosk Settings section
The various settings in the Kiosk Settings section determine how employees check in and out with kiosks.
- Barcode Source: this setting only appears if one of the two Barcode/RFID selections were configured for the Kiosk Mode setting.
If available, select how barcodes are scanned at the kiosk, via one of the drop-down menu options. Barcodes can be scanned with a dedicated Scanner, or with a device’s camera (Front Camera or Back Camera). - Employee PIN Identification: tick this checkbox if employees should use a unique PIN to check in. PINs are configured on each individual employee record. Refer to the new employee documentation documentation for more information on setting up PINs.
- Display Time: determine how many seconds a check-in/check-out confirmation message remains on the kiosk screen before returning to the main check in screen.
- Attendance Kiosk Url: Odoo generates a unique web address (URL) to use a device as a kiosk, without having to sign in to the Odoo database. When setting up a kiosk device, navigate to this unique web address in a web browser to present the Attendances app kiosk.
Important
These kiosk URLs are not secured with any type of access code. Anyone who has the URL can access the Attendances app kiosk. If the URL is compromised for any reason, such as in the event of a security breach, click Generate a new Kiosk Mode URL, located beneath the link, to generate a new URL, and update the kiosk, accordingly.
Kiosk mode
Entering Kiosk Mode is only available for users with specific access rights.
Kiosk Mode can be activated in two different ways:
- Navigate to the Attendances app, and click Kiosk Mode in the top menu. The device then signs out of Odoo and enters Kiosk Mode.
- Navigate to the Attendances app ‣ Configuration. In the Kiosk Settings section, use the link in the Attendance Kiosk Url field to open Kiosk Mode on any device.

As a security measure, once a device is in Kiosk Mode, it is not possible to go back into the database without signing back in.
Note
At any time, a new kiosk URL can be generated, if needed. Click the Generate a new Kiosk Mode URL
To exit Kiosk Mode, just close the tab in the web browser or return to the main log-in screen of Odoo.
Check in and out with a kiosk
Badge
To check in or out using a badge, tap the Tap to scan image in the center of the kiosk.
![]()
Then, scan the barcode on the badge using the method configured in the Kiosk Settings section of the configuration menu.
Once the barcode is scanned, the employee is checked in or out, and a confirmation message appears with all the information.
RFID
To check in or out using an RFID key fob, simply scan the fob with an RFID reader.
Once scanned, the employee is either checked in or checked out, and a confirmation message appears with all the information.
Manually
Users who do not have a scannable badge, or an RFID fob, can manually check in and out at a kiosk.
Tap the Identify Manually button on the kiosk, and a screen appears with all the employees that can be checked in or out. The Employees application dashboard has the same display.
Tap on a person to check them in or out, and a confirmation message appears.
There are two ways to quickly find a specific person:
- Search…: tap on the Search… field, and enter the desired person’s name. As the name is typed in, the matching results are displayed on the screen.
- Department: tap on any desired selection in the Department section, located on the left-side of the screen, to only view employees from that specific department. The number at the end of each listed Department represents how many employees that department has.
PIN
If the Employee PIN Identification checkbox was ticked in the Kiosk Settings section of the configuration menu, the employee is prompted to enter a PIN when manually checking in or out.
After the employee is selected, a number pad appears with a message. When checking in, (Employee) Welcome! Please enter your PIN to check in appears above the numbers. When checking out, (Employee) Want to check out? Please enter your PIN to check out appears above the numbers.
Tap in the PIN using the number pad, then tap OK when done. The employee is then checked in or out, and a confirmation message appears.
Confirmation message
When an employee checks in or out, a confirmation message appears, with all the check in or check out information. When checking in, a welcome message appears, as well as the date and time of check in.
An Hours Previously Today: HH:MM field also appears, displaying any time that has already been logged for that employee for the day. If no time has been logged, the value displayed is: 00:00. Beneath the message is an OK button.
To exit the screen before the preset time in the kiosk, tap the OK button.
When checking out, the screen displays a goodbye message, with the date and time of check out, and the total hours logged for the day. Beneath the message is a Goodbye button. To exit the screen before the preset time, tap the Goodbye button.
On this page
Get Help
Contact Support Ask the Odoo Community
![]()
EN
Odoo 18
Hardware
Employees who are not database users, and therefore, do not have access to the Attendances app, must sign in and out of work using a kiosk. The following are the physical requirements for setting up a kiosk.
Kiosk devices
A kiosk is a self-service station, where employees can check in and out of work with either a badge or an RFID key fob. Typically, these devices are dedicated as kiosks only, but any device with an internet browser is able to be set up as a kiosk.
A kiosk is used by navigating to the webpage specified in the configuration section of the Attendances app.
Kiosks are set up using one of the following types of devices:
- Laptop or Desktop computer
- Tablet
- Mobile phone (Android or iOS)
Tip
Touchscreens are easy to use, and tablets and mobile phones take up less space. That’s why most consider using a smaller device with a touchscreen as a kiosk.
It is recommended to place kiosks on a secure stand, or mount them securely on a wall.
Badges
Badges are a way for employees to quickly sign in and out from a kiosk, as badges are scanned by the kiosk’s camera to quickly identify the employee.
To generate a badge, first navigate to the Employees app. Next, click on the desired employee card to open the employee’s form, then click the HR Settings tab.
Under the ATTENDANCE/POINT OF SALE/MANUFACTURING section, there is a Badge ID field. If this field is blank, click Generate at the end of the Badge ID line, and the field is automatically populated with a new badge ID number. Then, click Print Badge at the end of the badge ID number to create a PDF file of the badge.
If a badge ID number is already present on the employee form, there is no Generate button, only a Print Badge button.
The employee’s badge contains the employee’s photo, name, job position, company logo, and a barcode that can be scanned at a kiosk to check in and out.
Badges can be printed for employees using any thermal or inkjet printer.
![]()
Note
Badges are not required, as employees can manually identify themselves on the kiosk.
Barcode scanners
When using badges to check in and out, the barcode must be scanned to identify the employee. This can be done with the kiosk’s camera, if one is available on the device.
If a camera is not available on the kiosk device, an external barcode scanner must be used to scan badges.
Kiosks work with most USB barcode scanners. Bluetooth barcode scanners are also supported for devices without USB ports, or if a wireless connection is desired.
Follow the manufacturer’s instructions on the barcode scanner to properly connect the barcode scanner to the kiosk device.
Tip
If the barcode scanner is connected directly to a computer, it must be configured to use the computer’s keyboard layout.
Note
An IoT box is not required to use a barcode scanner.
RFID key fob readers
Instead of using a badge, employees can scan a personal RFID key fob with an RFID reader to check in and out of work.
It is required to purchase both RFID key fobs and an RFID reader to use this method to check in and out. Follow the manufacturer’s directions to install the RFID reader, and set up the RFID key fob.
Tip
A recommended RFID reader is the Neuftech USB RFID Reader.
Note
An IoT box is not required to use RFID key fobs.
On this page
Get Help
Contact Support Ask the Odoo Community
![]()
EN
Odoo 18
New employees
When a new employee is hired, the first step is to create a new employee record. This record is a centralized place where all important information about the employee is stored, including general information, job history and skills, various work information, personal details, documents, and more.
To begin, open the Employees app, then click the New button in the upper-left corner. Doing so reveals a blank employee form.
Proceed to fill out the required information, along with any additional details.
Note
The current company phone number and name are populated in the Work Phone and Company fields. If the Appraisals application is installed, the Next Appraisal Date field is populated with a date six months from the current date.
General information
The employee form automatically saves as data is entered. However, the form can be saved manually at any time by clicking the Save manually option, represented by a (cloud with an upwards arrow) icon.
Required fields
- Employee’s Name: enter the employee’s name.
- Company: from the drop-down menu in this field, select the company the new employee was hired by, or create a new company by typing the name in the field, and clicking Create or Create and edit… from the mini drop-down menu that appears.
Optional fields
- Photo: in the top-right image box of the employee form, click on the ✏️ (pencil) edit icon to select a photo to upload.
- Job Position: enter the employee’s job title under their name, or select it from the Job Position field drop-down menu below to have this top field auto-populate. The Job Position field under the employee name can be modified, and does not need to match the selection made in the Job Position drop-down menu in the field below.
Example
While it is recommended to have the job positions match, the typed-in description in this top field can contain more specific information than the selected drop-down Job Position, if desired.
For instance, if someone is hired for a sales representative position configured as Sales Representative in the Recruitment app, that can be selected in the drop-down Job Position field.
In the typed-in Job Position field beneath the Employee’s Name field, the position could be more specific, such as Sales Representative - Subscriptions if the employee is focused solely on subscription sales.
- Tags: select a tag from the drop-down menu to add relevant tags to the employee. Any tag can be created in this field by typing it in. Once created, the new tag is available for all employee records. There is no limit to the amount of tags that can be added.
- Work Contact Information: enter the employee’s Work Mobile, Work Phone, Work Email, and/or Company name, if not already auto-populated.
- Department: select the employee’s department from the drop-down menu.
- Job Position: select the employee’s job position from the drop-down menu. Once a selection is made, the Job Position field beneath the Employee’s Name field automatically updates to reflect the currently selected job position. These positions are from the Recruitment application, and reflect the currently configured job positions.
- Manager: select the employee’s manager from the drop-down menu.
- Coach: select the employee’s coach from the drop-down menu.
- Next Appraisal Date: this field is only visible if the Appraisals application is installed. The date automatically populates with a date that is computed according to the settings configured in the Appraisals application. This date can be modified using the calendar selector.
Note
After a Manager is selected, if the Coach field is blank, the selected manager automatically populates the Coach field.
Tip
To make edits to the selected Department, Manager, Coach, or Company, click the Internal Link arrow next to the respective selection. The Internal Link arrow opens the selected form, allowing for modifications. Click Save after any edits are made.
Additional information tabs
Resumé tab
Resumé
Next, enter the employee’s work history in the Resumé tab. Each resumé line must be entered individually. When creating an entry for the first time, click Create a new entry, and the Create Resumé lines form appears. After an entry is added, the Create a new entry button is replaced with an Add button. Enter the following information for each entry.
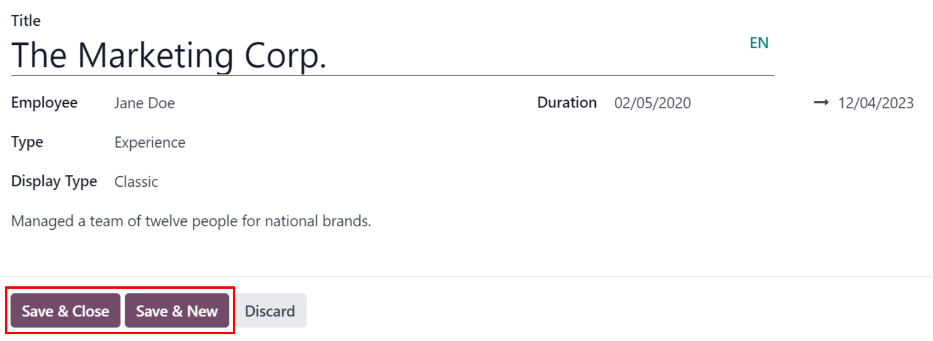
- Title: type in the title of the previous work experience.
- Employee: select the employee from the drop-down menu.
- Type: from the drop-down menu, select either Experience, Education, Side Projects, Internal Certification, Completed Internal Training, or type in a new entry, then click Create “(Type)”.
- Display Type: from the drop-down menu, choose Classic for typical work experience, Certification for experience gained through a certification, or Course for non-certified classes.
- Duration: enter the start and end dates for the work experience. To select a date, click the first empty field to reveal a calendar pop-up window. Proceed to use the < (left arrow) and > (right arrow) icons to scroll to the desired month, then click on the day to select it. Repeat this process to locate and select the end date. When the desired dates have been selected, click ✔️ Apply.
- Description: enter any relevant details in this field.
Once all the information is entered, click the Save & Close button if there is only one entry to add, or click the Save & New button to save the current entry and create another resumé line.
Note
After the new employee form is saved, the current position and company is automatically added to the Resumé tab, with the end date listed as current.
Skills
An employee’s skills can be entered in the Resumé tab in the same manner that a resumé line is created.
In order to add a skill to an employee record, the skill types must be configured first. If no skill types are configured, a Create new Skills button appears in the Skills section of the Resumé tab. Configure the skill types before adding any skills to the employee record.
If the skill types are configured, a Pick a skill from the list button appears instead. Click the Pick a skill from the list button, and select the following information for each skill.
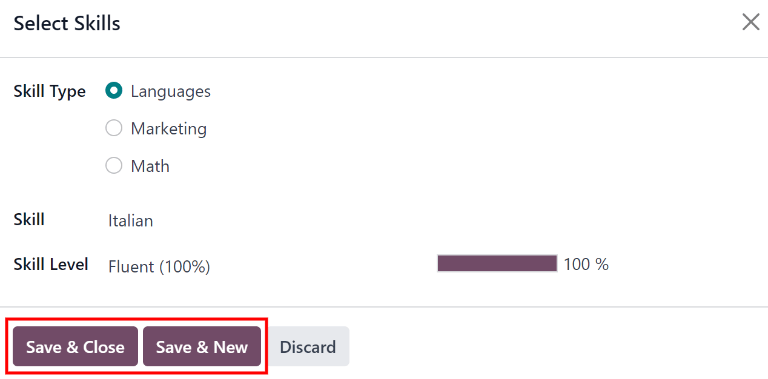
- Skill Type: select a skill type by clicking the radio button next to the skill type.
- Skill: after selecting a Skill Type, the corresponding skills associated with that selected Skill Type appear in a drop-down menu. For example, selecting Language as the Skill Type presents a variety of languages to select from under the Skills field. Select the appropriate pre-configured skill, or type in a new skill, then click Create “(new skill)”.
- Skill Level: pre-defined skill levels associated with the selected Skill Type appear in a drop-down menu. First, select a Skill Level, then the progress bar automatically displays the pre-defined progress for that specific skill level. Skill levels and progress can be modified in the Skill Level pop-up form, which is accessed via the Internal Link arrow next to Skill Level field.
Click the Save & Close button if there is only one skill to add, or click the Save & New button to save the current entry and immediately add another skill.
To delete any line from the Resumé tab, click the 🗑️ (trash can) icon to delete the entry. Add a new line by clicking the Add button next to the corresponding section.
Important
Only users with Officer: Manage all employees or Administrator rights for the Employees app can add or edit skills.
Skill types
In order to add a skill to an employee’s form, the Skill Types must be configured. Go to Employees app ‣ Configuration ‣ Employee: Skill Types to view the currently configured skill types and create new skill types.
Note
The default skill of Languages is pre-configured as a skill type, but there are no specific language skills listed within that skill type. The Languages skill type must be fully configured before it can be used.
Click New and a new Skill Type form appears. Fill out all the details for the new skill type. Repeat this for all the needed skill types.
- Skill Type: enter the name of the skill type. This acts as the parent category for more specific skills and should be generic.
- Skills: click Add a line, and enter the Name for the new skill, then repeat for all other needed skills.
- Levels: click Add a line, and enter the Name of the level. Next, click into the Progress field, and enter a percentage (0-100) for that level. Repeat for all additional levels, as needed.
- Default Level: click the toggle on the level line to set that level as the default. Typically, the lowest level is set as the default, but any level can be chosen. The toggle turns green, indicating it is the default level for the skill. Only one level can be set as the default.
Example
To add a math skill set, enter Math in the Name field. Next, in the Skills field, enter Algebra, Calculus, and Trigonometry. Last, in the Levels field enter Beginner, Intermediate, and Expert, with the Progress listed as 25, 50, and 100, respectively. Last, click Set Default on the Beginner line to set this as the default skill level.
The Skill Type form automatically saves as data is entered.
Tip
Once the form is completely filled out, click the Save manually button, represented by a cloud with an upwards arrow icon at the top of the screen, and the Levels rearrange in descending order, with the highest level at the top, and the lowest at the bottom, regardless of the default level and the order they were entered.
Work information tab
The Work Information tab is where the employee’s specific job related information is found. Their working schedule, various roles, who approves their specific requests (time off, timesheets, and expenses), their remote work schedule, and specific work location details are listed here.
Click on the Work Information tab to access this section, and enter the following information for the new employee:
- Location: select the Work Address from the drop-down menu. To modify the address, hover over the first line (if there are multiple lines) of the address to reveal an Internal Link arrow. Click the Internal Link arrow to open up the company form, and make any edits.
Use the breadcrumb links to navigate back to the new employee form when done.
If a new work address is needed, add the address by typing it in the field, then click Create (new address) to add the address, or Create and edit… to add the new address and edit the address form. - Approvers: to see this section, the user must have either Administrator or Officer: Manage all employees rights set for the Employees application. Using the drop-down menus, select the users responsible for approving an Expense, a Time Off request, Timesheet entries, and Attendance records for the employee.
Hover over any of the selections to reveal the Internal Link arrow.
Click the Internal Link arrow to open a form with the approver’s Name, Email Address, Company, Phone, Mobile, and Default Warehouse fields. These can be modified, if needed.
Use the breadcrumb links to navigate back to the new employee form when done.
Important
The users that appear in the drop-down menu for the Approvers section must have Administrator rights set for the corresponding human resources role.
To check who has these rights, go to Settings app ‣ Users ‣ → Manage Users. Then, click on an employee, and check the Human Resources section of the Access Rights tab.- In order for the user to appear as an approver for Expenses, they must have either Team Approver, All Approver, or Administrator set for the Expenses role.
- In order for the user to appear as an approver for Time Off, they must have either Officer:Manage all Requests or Administrator set for the Time Off role.
- In order for the user to appear as an approver for Timesheets, they must have either Manager, Officer:Manage all contracts, or Administrator set for the Payroll role.
- Remote Work: use the drop-down menu to select the default location the employee works from each day of the week. The default options are Home, Office, or Other.
A new location can be typed into the field, then click either Create (new location) to add the location, or Create and edit… to add the new location and edit the form.
After edits are done, click Save & Close, and the new location is added, and populates the field.
Leave the field blank (Unspecified) for non-working days like Saturday and Sunday.
Note
It is also possible to add or modify work locations by navigating to Employees app ‣ Configuration ‣ Employee: Work Locations. To modify a location, click on an existing location, then make any changes on the form.
Click New to create a new location, then enter the following information on the form. All fields are required.- Work Location: enter the name for the location. This can be as general or as specific, as needed, such as Home or Building 1, Second Floor, respectfully.
- Work Address: using the drop-down menu, select the address for the location.
- Cover Image: click on the icon to select it for the Cover Image. Options are a house icon, an office building icon, and a GPS location marker icon.
- Company: using the drop-down menu, select the company the location applies to. The current company populates this field, by default.

- Schedule: select the Working Hours and Timezone for the employee. The Internal Link arrow opens a detailed view of the specific daily working hours. Working hours can be modified or deleted here.
Note
Working Hours are related to a company’s working schedules, and an Employee cannot have working hours that are outside of a company’s working schedule.
Each individual working schedule is company-specific. So, for multi-company databases, each company needs to have its own working schedules set.
If an employee’s working hours are not configured as a working schedule for the company, new working schedules can be added, or existing working schedules can be modified.
Working hours can be modified in the Payroll application, where they are referred to as Working Schedules.
For more information on how to create or modify Working Schedules in the Payroll application, refer to the Payroll documentation. - Planning: select a role from the drop-down menu for both the Roles and the Default Role fields. If the Default Role is selected as a role, it is automatically added to the list of Roles.
Important
The users that appear in the drop-down menu for the Approvers section must have Administrator rights set for the corresponding human resources role.
To check who has these rights, go to Settings app ‣ Users ‣ → Manage Users. Click on an employee, and check the Human Resources section of the Access Rights tab.
- In order for the user to appear as an approver for Expenses, they must have either Team Approver, All Approver, or Administrator set for the Expenses role.
- In order for the user to appear as an approver for Time Off, they must have either Officer or Administrator set for the Time Off role.
- In order for the user to appear as an approver for Timesheets, they must have either Manager, Officer, or Administrator set for the Payroll role.
Note
Working Hours are related to a company’s working times, and an employee cannot have working hours that are outside of a company’s working times.
Each individual working time is company-specific. So, for multi-company databases, each company must have its own working hours set.
If an employee’s working hours are not configured as a working time for the company, new working times can be added, or existing working times can be modified.
To add or modify a working time, go to the Payroll app ‣ Configuration ‣ Working Schedules. Then, either add a new working time by clicking New, or edit an existing one by selecting a Working Time from the list to modify it.
Refer to the Working schedules section of the payroll documentation for specific details on creating and editing working schedules.
After the new working time is created, or an existing one is modified, the Working Hours can be set on the employee form. In the Schedule section of the Work Information tab, select the employee’s working hours using the drop-down menu.
Private information tab
No information in the Private Information tab is required to create an employee, however, some information in this section may be critical for the company’s payroll department. In order to properly process payslips and ensure all deductions are accounted for, the employee’s personal information should be entered.
Here, the employee’s Private Contact, Family Status, Emergency contact, Education, Work Permit, and Citizenship information is entered. Fields are entered either using a drop-down menu, ticking a checkbox, or typing in the information.
- Private Contact: enter the Private Address, Email, and Phone for the employee. Then, enter the employee’s Bank Account Number using the drop-down menu.
If the bank is not already configured (the typical situation when creating a new employee), enter the bank account number, and click Create and edit... A Create Bank Account Number form loads. Fill in the necessary information, then click Save & Close.
Next, select the employee’s preferred Language from the drop-down menu. Then enter the Home-Work Distance in the field. This field is only necessary if the employee is receiving any type of commuter benefits.
Lastly, enter the employee’s license plate information in the Private Car Plate field. - Family Status: select the current Marital Status using the drop-down menu, either Single, Married, Legal Cohabitant, Widower, or Divorced. If the employee has any dependent children, enter the Number of Dependent Children in the field.
- Emergency: type in the Contact Name and Contact Phone number of the employee’s emergency contact in the respective fields.
- Education: select the highest level of education completed by the employee from the Certificate Level drop-down menu. Default options include Graduate, Bachelor, Master, Doctor, or Other.
Type in the Field of Study, and the name of the School in the respective fields. - Work Permit: if the employee has a work permit, enter the information in this section. Type in the Visa No (visa number), and/or Work Permit No (work permit number) in the corresponding fields.
Using the calendar selector, select the Visa Expiration Date, and/or the Work Permit Expiration Date, to enter the expiration date(s).
If available, upload a digital copy of the Work Permit document. Click Upload your file, navigate to the work permit file in the file explorer, and click Open. - Citizenship: this section contains all the information relevant to the citizenship of the employee. Some fields use a drop-down menu, as the Nationality (Country), Gender, and Country of Birth fields do.
The Date of Birth uses a calendar selector to select the date. First, click on the name of the month, then the year, to access the year ranges. Use the < (left) and > (right) arrow icons, navigate to the correct year range, and click on the year. Next, click on the month. Last, click on the day to select the date.
Type in the information for the Identification No (identification number), Passport No (passport number), and Place of Birth fields.
Lastly, if the employee is not a resident of the country they are working in, activate the checkbox next to the Non-resident field.
Note
Depending on the localization setting, other fields may be present. For example, for the United States, a SSN No (Social Security Number) field is present.
HR settings tab
This tab provides various fields for different information, depending on the country the company is located. Different fields are configured for different locations, however some sections appear regardless.
- Status: select an Employee Type and, if applicable, a Related User, with the drop-down menus. The Employee Type options include Employee, Student, Trainee, Contractor, or Freelancer.
Important
Employees do not also need to be users. Employees do not count towards the Odoo subscription billing, while Users do count towards billing. If the new employee should also be a user, the user must be created.
After the employee is created, click the ⚙️ (gear) icon, then click Create User. A Create User form appears.
Type in the Name and Email Address. Next, select the Company from the drop-down menu.
Then, enter the Phone and Mobile numbers in the respective fields.
If a photo is available, click the Edit icon (which appears as a ✏️ (pencil) icon) in the lower-left corner of the image box, which is located in the top-right corner of the form.
A file explorer pops up. Navigate to the file, then click Open to select it. Finally, click Save after all the information is entered, and the employee record is automatically updated with the newly-created user populating the Related User field.
Users can also be created manually. For more information on how to manually add a user, refer to the Users document. - Attendance/Point of Sale/Manufacturing: the employee’s PIN Code and Badge ID can be entered here, if the employee needs/has one. Click Generate next to the Badge ID to create a badge ID.
The PIN Code is used to sign in and out of the Attendance app kiosk, and a POS system. - Payroll: if applicable, enter the Registration Number of the Employee in this section.
Depending on the localization setting, the other items that appear in this field vary based on location. In addition, other sections may appear in this tab based on location. It is recommended to check with the payroll and/or accounting departments to ensure this section, as well as any other sections relating to payroll that may appear, are filled in correctly. - Application Settings: enter the employee’s Billing Time Target for the billing rate leader board in the Timesheets application. Next, enter the Hourly Cost in a XX.XX format. This is factored in when the employee is working at a work center.
If applicable, enter the Fleet Mobility Card number.
Note
Manufacturing costs are added to the costs for producing a product, if the value of the manufactured product is not a fixed amount. This cost does not affect the Payroll application.
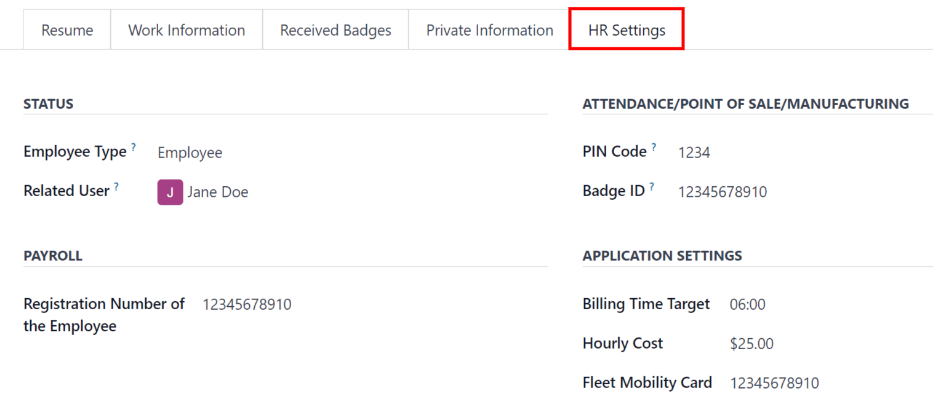
Documents
All employee-related documents are stored in the Documents app. The number of associated documents is displayed in the Documents smart button above the employee record. Click on the smart button to access all documents.
Refer to documentation on the Documents app for more information.
On this page
Get Help
Contact Support Ask the Odoo Community
![]()
EN
Odoo 18
Departments
All employees in the Employees app fall under specific departments within a company.
Create new departments
To make a new department, navigate to Employees app ‣ Departments, then click New in the top-left to reveal a blank department form. Fill out the following information on the department form:
- Department Name: enter a name for the department.
- Manager: using the drop-down menu, select the department manager.
- Parent Department: if the new department is housed within another department (has a parent department), select the parent department using the drop-down menu.
- Custom Appraisal Templates: if employees in this department require a specific appraisal form that is different from the default appraisal form, tick the checkbox. If this option is activated, an Appraisal Templates tab appears below the form. This field only appears if the Appraisals app is installed.
- Company: using the drop-down menu, select the company the department is part of.
- Appraisal Survey: using the drop-down menu, select the default survey to use for the department when requesting feedback from employees. This field only appears if the Appraisals app is installed, and the 360 Feedback option is enabled in the settings.
- Color: select a color for the department. Click the default white color box to display all the color options. Click on a color to select it.
- Appraisal Templates tab: this tab only appears if the Custom Appraisal Templates options is activated on the form. Make any desired edits to the appraisal form. The appraisal form is used for appraisals for all employees within this department.
After the form is completed, click the (cloud upload) icon to manually save the changes. When saved, a Department Organization chart appears in the top-right of the department card.
Note
The form auto-saves while data is entered, however the Department Organization chart does not appear until the form is manually saved. If the form is not saved, the Department Organization chart is visible upon opening the department card from the Departments dashboard.
See also
Refer to the Appraisals documentation for more information.
Departments dashboard
To view the currently configured departments, navigate to Employees app ‣ Departments. All departments appear in a Kanban view, by default, and are listed in alphabetical order.
Kanban view
Each department has its own Kanban card on the main Departments (Kanban) dashboard view, that can display the following information:
- Department name: the name of the department.
- Company: the company the department is part of.
- Employees: the number of employees within the department.
- Appraisals: the number of appraisals scheduled for employees in the department.
- Time Off Requests: the number of unapproved time off requests for employees in the department awaiting approval . This only appears if there are requests to approve.
- Allocation Requests: the number of unapproved allocation requests for employees in the department awaiting approval. This only appears if there are requests to approve.
- New Applicants: the number of new applicants for a position in this department. This only appears if there are new applicants.
- Expense Reports: the number of employees in the department with open expense reports to approve. This only appears if there are any expense reports waiting for approval.
- Absence: the number of absences for the current day.
- Color bar: the selected color for the department appears as a vertical bar on the left side of the department card.
Note
Click on an alert in a department card, such as Time Off Requests, to reveal a list view of the requests to approve. This list includes all open requests to approve, not just from the specific department.
The default view for the Departments dashboard is a Kanban view. It is possible to view the departments in two other forms: a list view and a hierarchy view.
List view
To view the departments in a list view, click the (list) icon in the top-right corner. The departments appear in a list view, which displays the Department Name, Company, Manager, Employees, Parent Department, and Color for each department.
The departments are sorted alphabetically by Department Name, by default.
Tip
When in list view, departments can be managed in batch by selecting one or multiple record’s checkbox, then select the Actions button to reveal a drop-down menu of actions.
Hierarchy view
To view the departments in a hierarchy view, click the (hierarchy) icon in the top-right corner. The departments appear in an organizational chart format, with the highest-level department at the top (typically Management), and all other departments beneath it. All child departments of the first-level child departments are folded.
Each department card displays the Department Name, the Manager (and their profile image), the Number of Employees in the department, and the ability to expand the department (Unfold) if there are child departments beneath it.
Click the Unfold button on a department card to expand it. Once expanded, the Unfold button changes to a Fold button. To collapse the department, click the Fold button. Only one department per row can be unfolded at a time.
Click anywhere on a department card to open the department form. Click the (#) Employees smart button to view a list of all the employees in that department, including all employees in the child departments beneath it, organized by individual department.
Example
In the hierarchy view, if the (2) Employees button on the Management card is clicked (the highest-level department card), all employees appear in a list view, grouped by department. This is because all departments are children of the Management department.
If the (3) Employees button in the Sales department card is clicked, the employees from the Sales department, as well as its two child departments (East Coast Territory and West Coat Territory), appear in the list.
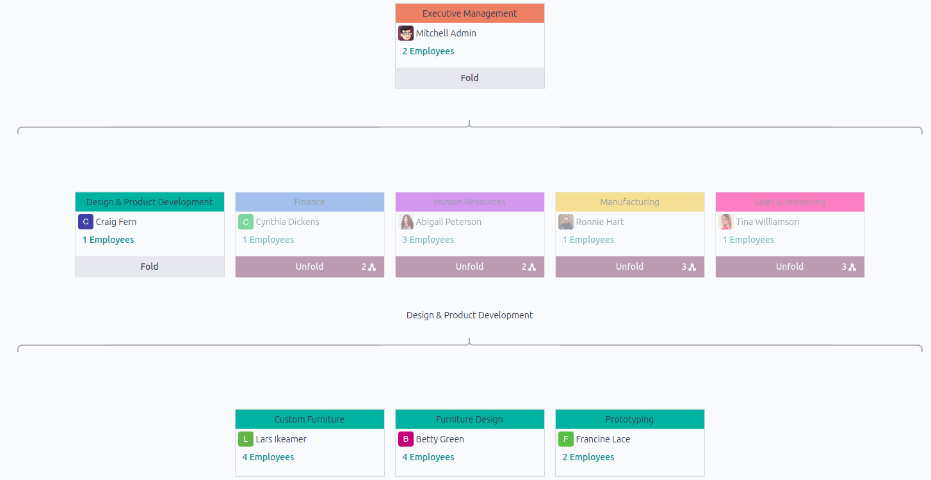

On this page
Get Help
Contact Support Ask the Odoo Community
![]()
EN
Odoo 18
Certifications
When jobs require specific knowledge, it is necessary to track employee certifications to ensure the necessary knowledge and certifications are in place.
Certifications include classes, tests, professional seminars, and more. There are no restrictions in terms of what type of certification records can be added in Odoo.
Important
To access the Employee Certifications report, the Surveys app must be installed.
View certifications
To view a full list of all employee certifications, navigate to Employees app ‣ Reporting ‣ Certifications.
All certifications appear in a list view, grouped by employee. Each certification entry displays the following:
- Employee: the employee’s name, along with their avatar image.
- Name: the title of the certification.
- Validity Start: when the employee received the certification.
- Validity End: when the certification expires.
- Certification: the corresponding course in the Surveys app that was completed by the employee, if applicable.
The entries are also color-coded. Current certifications that are still valid appear in black, expired certifications appear in red, and certifications that are going to expire within the next 90 days appear in orange.
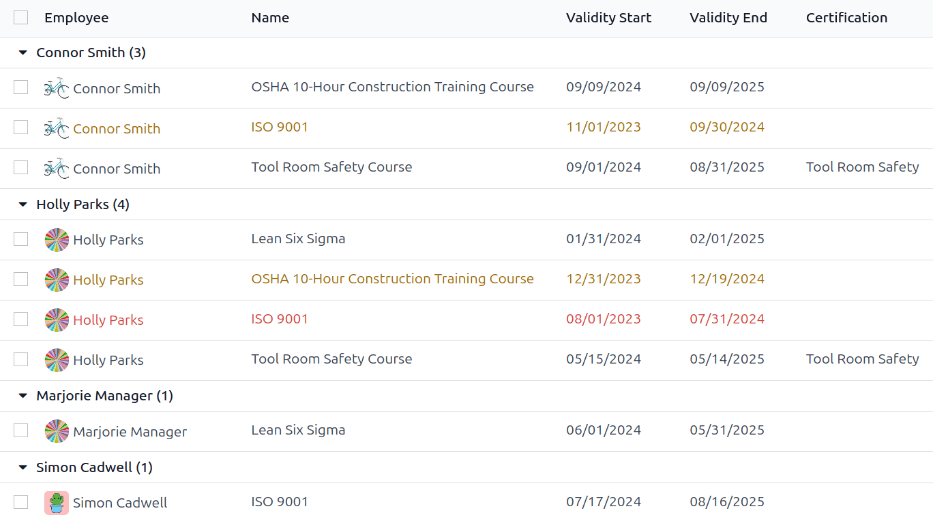
Important
Only certification records with the Display Type set to Certification on their certification form appear on the Employee Certifications report. All other certifications appear in the resume section of the employee form.
View certifications by expiration status
When managing a large number of employees with a variety of certifications, it can be difficult to determine which employees need to keep necessary certifications current in the default list view. In this scenario, it is beneficial to view the certifications by expiration status.
To do so, navigate to Employees app ‣ Reporting ‣ Certifications. Next, click the (down arrow) in the search bar, then click Add Custom Group, revealing a drop-down menu. Click Expiration Status, then click away from the drop-down menu to close it.
After doing so, all the certifications are organized by status, starting with Expired certifications, then certifications that are Expiring soon (within the next 90 days), and lastly, certifications that are still Valid.
This view provides an easy way to see which employees have certifications that are going to expire soon, to determine which employees need to take action to keep their certifications current.
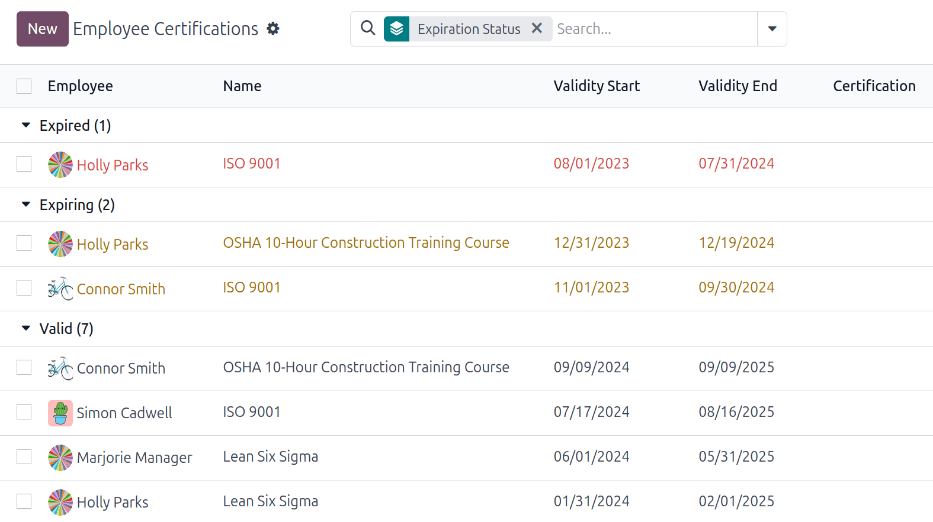
Log a certification
To log a certification for an employee, navigate to Employees app ‣ Reporting ‣ Certifications. Click New, and a blank certification form loads. Enter the following information on the form:
- Title: Enter a short description for the certification in this field.
- Employee: Using the drop-down menu, select the employee who received the certification.
- Type: Using the drop-down menu, select the type of certification received. This field determines where on the employee’s resume the certification appears. To create a new Type, enter the type in the field, then click Create “type”.
The default options are:- Experience: Select this option to have the certification appear in the Experience section of the Resume tab on the employee form.
- Education: Select this option to have the certification appear in the Education section of the Resume tab on the employee form.
- Internal Certification: Select this option to have the certification appear in the Internal Certification section of the Resume tab on the employee form.
- Completed Internal Training: Select this option to have the certification appear in Completed Internal Training section of the Resume tab on the employee form.
- Display Type: Select the visibility of the certification in this field. The default options are:
- Classic: Select this option to have the certification appear in the Resume section of the employee form, and not appear on the Employee Certifications report.
- Course: Select this option to have the certification appear in the Resume section of the employee form, and not appear on the Employee Certifications report. Once this option is selected, a Course field appears beneath the Display Type field. Using the drop-down menu, select the course the employee took. The course is created in the Surveys app.
- Certification: Select this option to have the certification appear in the Resume section of the employee form, and appear on the Employee Certifications report. Once this is selected, a Certification field appears beneath the Display Type field. Using the drop-down menu, select the certification the employee took.
- Description: Enter a description for the certification in this field.
- Duration: Click into the first field, and a calendar pop-over window appears. Click on the start and end dates for the certification validity period. When the correct dates are selected, click Apply, and both fields are populated.

On this page
Get Help
Contact Support Ask the Odoo Community
![]()
EN
Odoo 18
Equipment
Many employees are given various items to use while they work, such as laptops, phones, and printers. Most companies track their equipment, to see who is using what, as well as having a record of important information regarding the equipment, such as serial numbers, warranty information, and maintenance history.
Note
To track employee equipment, the Maintenance app must be installed.
Individual employee equipment
Employee equipment is tracked on the employee record. To view all equipment currently assigned to an employee, navigate to the Employees app, and click on the desired employee record.
At the top of the record, an Equipment Count smart button appears, with a number indicating how many, if any, items are currently assigned to that employee.
Click the Equipment Count smart button, and all equipment currently assigned to the employee appears in individual Kanban cards.
Each Kanban card displays the name and brand of the equipment on the first line, the serial number, and the employee’s name. Any current maintenance requests appear at the bottom of the card in a red box.

All employee equipment
To view all equipment for all employees, start on the equipment record of an individual employee.
Note
It does not matter what employee is selected, as this is just to get to the Equipment list.
In the Kanban view of the employee’s equipment, clear the default Assigned Employee filter in the search bar. This presents all equipment in the database, including those assigned to individual employees and whole departments.
Click into the search bard, and select Employee in the Group By column. The equipment is now organized in a Kanban view, organized by employee.
In the Kanban view displaying all employee equipment records, equipment can be quickly reassigned. Click and drag an equipment card to the desired employee to change ownership of the equipment.

Add equipment to an employee record
To add equipment to an employee’s record, open the Employees app, click on the desired employee record, then click the Equipment Count smart button at the top.
All equipment currently assigned to the employee appears in individual Kanban cards. To add a new equipment record, click the New button in the upper-left corner, and a blank Equipment form loads.
Fill out the equipment form for the employee’s equipment.
Tip
Instead of filling out a new Equipment form for the same item, a form can be duplicated, then updated.
On the Equipment form, click the (Actions) icon in the upper-left corner, then select Duplicate.
An identical form appears, with all the information filled out, except for the Serial Number.
Enter the Serial Number on the form, and make any other necessary changes, such as the assigned Employee.

On this page
Get Help
Contact Support Ask the Odoo Community
![]()
EN
Odoo 18
Offboarding
When an employee leaves the company, it is important to ensure their employee record is updated to reflect their departure, log the reason why, close any open activities associated with the employee, and provide them with any important documents.
Archive an employee
In Odoo, when an employee leaves the company they must be archived. To archive an employee, first navigate to the Employees app. From here, locate the employee who is leaving the company, and click on their employee card.
The employee form loads, displaying all their information. Click the (gear) icon in the top-left corner, and a drop-down menu appears. Click Archive, and an Employee Termination pop-up window appears.
Fill out the following fields on the form:
- Departure Reason: Select a reason the employee is leaving from the drop-down menu. The default options are:
- Fired: Select this option when an employee is being let go, and the company has given notice.
- Resigned: Select this option when the employee no longer wishes to be employed, and the employee has given notice.
- Retired: Select this option when the employee is retiring.
- Became Freelance: Select this option when the employee is no longer working for the company, but is becoming a freelance worker instead.
- Contract End Date: Using the calendar selector, select the last day the employee is working for the company.
- Detailed Reason: Enter a short description for the employee’s departure in this field.
- Close Activities: Tick the checkbox next to each type of activity to close or delete any open activities associated with it. It is recommended to tick all checkboxes that are applicable. The available options are:
- Appraisals: cancels all appraisals scheduled after the contract end date.
- Contract: applies an end date for the current contract.
- Company Car: removes the employee as the driver for their current company car, and assigns the next driver, if applicable.
- Time Off: cancels any time off requests after the contract end date.
- Allocations: removes the employee from any accrual plans they are on.
- HR Info: Tick the checkbox next to Send Access Link to send a download link to the employee’s personal email address, containing all their personal HR files.
- Private Email: This field appears if the HR Info checkbox is ticked. Enter the private email address for the employee.
When the form is complete, click Apply. The employee record is archived, an email with a download link to their personal documents is sent to the employee’s private email address (if selected), and a red Archived banner appears in the top-right corner of the employee form. The chatter logs the Departure Date and Departure Reason, and if an access link was emailed.

Note
While attempting to send the HR documents access link, an Invalid Operation pop-up window may appear, displaying the following error message:
Employee’s related user and private email must be set to use “Send Access Link” function: (Employee Name)
If this error appears, click Close to close the pop-up window, then tick the Send Access Link checkbox to deselect it on the Employee Termination pop-up window.
Click Apply to archive the employee and close the selected activities on the Employee Termination pop-up window, returning to the employee form.
Once the employee form, ensure the following fields are populated:
- Private Information tab: Ensure an email address is entered in the Email field.
- HR Settings tab: Ensure a Related User is selected in the corresponding field.
After the necessary information is entered, resend the HR documents access link
Send HR documents access link
If the access link was not sent when first archiving the employee on the Employee Termination form, it can be sent after the employee is archived at any point.
After an employee is archived, they are no longer visible on the main Employees app dashboard. To view the archived employees, navigate to the Employees app dashboard, and click the (down arrow) in the search bar to reveal a drop-down menu. Select Archived, towards the bottom of the Filters column, then click away from the drop-down window to close it.
Now, only archived employees appear on the dashboard. Click on the desired employee to open their employee form. On this form, click the (gear) icon in the top-left corner, then click Send HR Documents Access Link from the resulting drop-down menu. The chatter logs that the link was sent.
On this page
Get Help
Contact Support Ask the Odoo Community
![]()
EN
Odoo 18
Employee retention report
It is possible to determine the retention rate for a company by modifying an existing report.
First, navigate to Employees app ‣ Reporting ‣ Contracts to open the Employee Analysis report. This report shows the number of all employees for the Last 365 Days, in a default Line Chart.
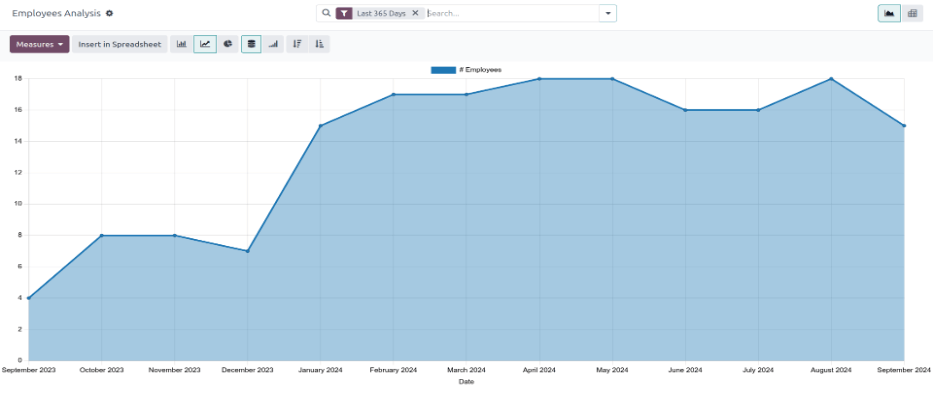
Next, click the Measures button in the upper-left corner, revealing a drop-down menu. Click # Departure Employee in the list, then click away from the drop-down menu to close it. Now, the report shows all the employees who were archived for the Last 365 Days.
To view this information in an easier format, click the (Pivot) icon in the upper-right corner, and the data is presented in a pivot table.
The various employees, organized by department, populate the rows. The columns display the following totals: the monthly Wage, the Fuel Card budget, total Annual Employee Budget (also referred to as the annual salary), the number of New Employees, as well as the number of Departure Employees (employees who left).
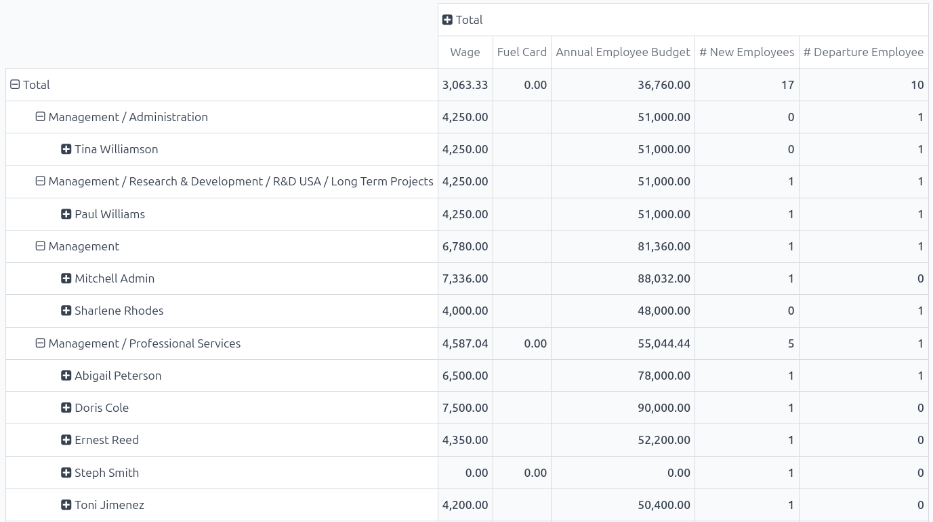
Employee retention rate comparison report
It is possible to compare data only for employees who left, compared to the total current employees, between two separate time periods. This is commonly referred to as the employee retention rate.
To view these metrics, first open the Employee Analysis report by navigating to Employees app ‣ Reporting ‣ Contracts. Click the (Pivot) icon in the upper-right corner to view the information in a pivot table.
Next, click the Measures button in the upper-left corner, revealing a drop-down menu. Click # New Employees, Annual Employee Budget, Fuel Card, and Wage in the list, to deselect these metrics and hide them in the table. Then, click Count at the bottom of the list to enable that metric.
Click away from the drop-down menu to close it. Now, the report shows all the employees who left the company (# Departure Employee), as well as the total number of employees (Count), for the Last 365 Days.
To compare the data for the current year with the previous year, click the (down arrow) in the search bar, revealing multiple filter and grouping options. Click Last 365 Days in the Filters column, to turn off that filter. Then, click Date, and click the current year (in this example, 2024) from the resulting drop-down menu.
Once a selection is made beneath Date in the Filters column, a Comparison column appears. Click Date: Previous Year in the new column, then click off of the drop-down menu to close it.
Note
In Odoo, in order to access the Comparison column, a specific time other than Last 365 Days must be selected. If not, the Comparison column is not visible.
Now, the pivot table displays the total number of employees who left the company (# Departure Employee), as well as the total number of employees (Count) in the columns. These are further divided by the two different years, and also displays the Variation between the two.
The rows display the departments, and lists each individual employee for each department, in the rows.
For a more concise view of this report, click Total above the top row of the departments and employees, to collapse the rows. Now, the table presents the total number of employees who left the company for both years, compared to the total number of employees for both years, including the difference, in a percentage.
Example
In this example, 3 employees out of 83 left in 2023, and 8 employees out of 202 left in 2024. There was a 166.67% increase in the employees who left in 2024 as compared to 2023. Additionally, there was a 143.37% increase in the total number of employees in 2024 as compared to 2023.
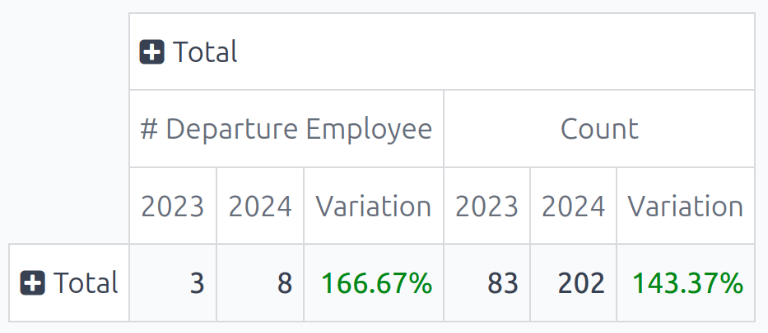
To view more detailed rates for each department, click Total in the single row, revealing a drop-down menu, and click Department. Click away from the drop-down to close it, and now the pivot table displays the total number of employees who left (# Departure Employee), the total number of employees (Count), and the Variation (in a percentage) for both 2023 and 2024, organized by department.
Example
In this example, it can be determined that the Management department had the best retention rate in 2024 as compared to 2023, with a Variation rate of -100%. Additionally, it can be determined that the Management / Research & Development department had the most turnover, with a Variation of 300%.
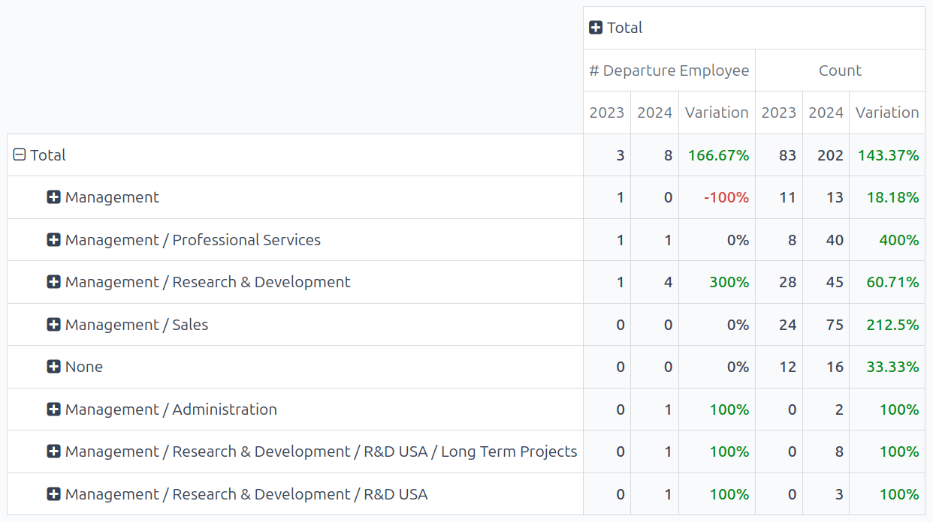
Get Help
Contact Support Ask the Odoo Community
![]()
EN
Odoo 18
Appraisals
In Odoo, the Appraisals application can be used to evaluate employee performance on a recurring basis. Managers can evaluate the performance of their employees, and also allow employees to do a self-assessment of their own. Appraisals are customizable, and can be set for any kind of schedule desired.
Appraisals give employees valuable feedback, including actionable goals to work toward, and measurable skills to improve upon. Additionally, appraisals may form the basis for raises, promotions, and other benefits.
Regular appraisals are good for both the employees and the company, since they can accurately measure performance based on company goals, and show employees where they need to improve.
Configuration
The Configuration menu in the Appraisals application is where the settings can be configured, feedback templates can be edited, frequencies can be set, evaluation scales can be managed, data for 360 feedback can be stored, and goal tags can be viewed/created.
Settings
To access the Settings menu, navigate to Appraisals application ‣ Configuration ‣ Settings.
Feedback templates
Feedback templates are form outlines used during an employee appraisal. Any edits made to a template are, ultimately, reflected in the appraisals sent to employees.
There are two default templates pre-configured in Odoo Appraisals: one for employee feedback, and one for manager feedback. Each contains several sections, along with questions, and brief explanations for how to respond to the questions.
The Employee Feedback Template has the following sections: My work, My future, and My feelings.
The Manager Feedback Template has the following sections: Feedback, Evaluation, and Improvements.
Any desired changes to the default feedback templates can be made by making changes directly in each template.
Appraisals
The Appraisals section of the settings menu determines the frequency that appraisals are performed, and if it is possible to request additional feedback.
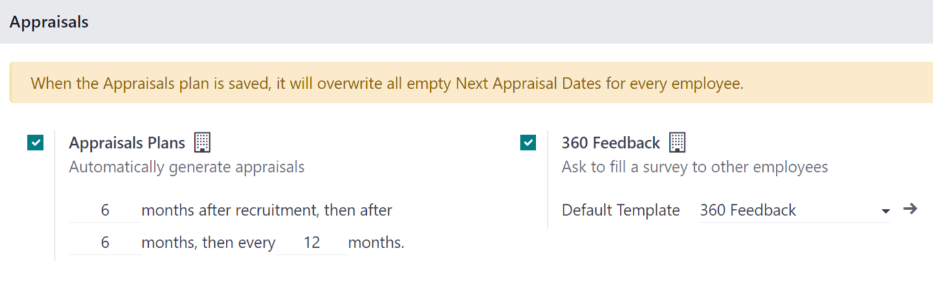
Appraisals plans
By default, appraisals are pre-configured to be automatically created six months after an employee is hired, with a second appraisal exactly six months after that.
Once those two initial appraisals have been completed in the employee’s first year, following appraisals are only created once a year (every twelve months).
To modify this schedule, change the number of months in the blank fields under the Appraisals Plans section.
Important
If the Appraisals Plans section is modified, all empty Next Appraisal Dates are modified for all employees.
360 feedback
The 360 Feedback option can be enabled to allow managers to request feedback from other employees using a different survey form, at any time, independent of the appraisal schedule.
Typically, managers ask for feedback from other people who work with an employee they manage. This includes the employee’s various managers, peers, and direct reports.
To view the 360 Feedback survey, click the → Internal link icon at the end of the Default Template field. The 360 Feedback survey loads, and any desired changes to the survey can be made.
For more information on how to edit a survey, refer to the Create surveys document.
Important
The 360 Feedback form is a pre-configured survey within the Surveys application. In order to use the 360 Feedback option, including the ability to edit the survey, the Surveys application must be installed.
Evaluation scale
On each employee appraisal form, final rating options appear by default. To view and edit these options, navigate to Appraisals application ‣ Configuration ‣ Evaluation Scale. This presents the ratings in a list view.
The pre-configured ratings are Needs Improvement, Meets Expectations, Exceeds Expectations, and Strongly Exceeds Expectations. To add another rating, click the New button.
When the New button is clicked on the Evaluation Scale page, a blank line appears at the bottom of the list. Enter the name of the rating in the field.
To rearrange the order of the ratings, click the (six small gray boxes) icon to the left of a rating, and drag the rating to the desired position on the list.
360 feedback
The 360 Feedback section displays information for all the surveys currently configured in the Appraisals application. To view the surveys, and their statistics, navigate to Appraisals application ‣ Configuration ‣ 360 Feedback.
Each appraisal (or survey) is presented in its own line on the 360 Feedback page, along with various information related to that particular appraisal.
Each appraisal includes the following information:
- Survey Name: the name of the specific survey.
- Responsible: the employee responsible for the survey, including the month and year they were given that designation.
- Questions: the number of questions in that particular survey.
- Average Duration: the average time a user spends completing the survey.
- Registered: the number of people who have been sent the survey.
- Completed: the number of people who have completed the survey.
Each appraisal also has two buttons at the end of each line: a Test button and a See Results button.
To see what an appraisal looks like for the end user (i.e. an employee), click the Test button, and the appraisal loads in a new browser tab. The entire appraisal loads, and can be clicked through without having to enter any answers.
To exit, close the tab. Or, click This is a Test Survey. → Edit Survey at the top of the page to be taken to the detail form for that particular survey.
To view the results from everyone who completed an appraisal, click the See Results button. This presents all the answers for the survey in a new tab. Each question provides information on how many people responded to a question, and how many people skipped it. All answers for each question are visible.
To exit, close the tab. Or, click → Edit Survey at the top of the page to be taken to the detail form for that particular survey.
In addition to viewing the responses from past appraisals and surveys, new surveys can also be created from the 360 Feedback page. Simply click the New button in the top-left of the page to create a new survey.
For more information on how to create a survey, refer to the Create surveys document.
Note
In previous versions of Odoo, this section was referred to as Surveys.
See also
On this page
Get Help
Contact Support Ask the Odoo Community
![]()
EN
Odoo 18
New appraisals
To create a new appraisal for an employee, first navigate to the main Appraisals dashboard by opening the Appraisals app. The Appraisals dashboard is the default view.
Appraisals dashboard
All appraisals are displayed on the dashboard in a default Kanban view, with a list of groupings on the left side of the dashboard, including COMPANY, DEPARTMENT, and STATUS.
Click any grouping option to view appraisals for only the chosen selection.
Note
Only groupings with multiple selections appear in the list. For example, if a database only has one company, the COMPANY grouping does not appear, since there is no other company to select.
Each appraisal card displays the following information:
- Name: the employee’s name.
- Department: the department the employee is associated with.
- Company: the company the employee works for. This only appears in a multi-company database.
- Date: the date the appraisal was requested, or is scheduled for in the future.
- Activities: any activities that are scheduled for the appraisal, such as Meetings or Phone Calls.
- Manager: the employee’s manager, indicated by the profile icon in the bottom-right corner of an appraisal card.
- Status banner: the status of the appraisal. A banner appears if an appraisal is marked as either Canceled or Done. If no banner is present, that means the appraisal has not happened, or has not been scheduled yet.
To view the details of any appraisal, click on the card to open the appraisal form.
Create an appraisal
To create a new appraisal, click the New button in the upper-left corner of the Appraisals dashboard. Doing so reveals a blank appraisal form. After entering a name in the first blank field, proceed to enter the following information on the form:
- Manager: select the employee’s manager from the drop-down menu. The manager is responsible for completing the Manager’s Feedback section of the appraisal. This field auto-populates after the employee is selected, if they have a manager set on their employee profile.
- Appraisal Date: the current date is automatically entered in this field. This field is automatically updated once the appraisal is completed or cancelled, with the corresponding date of completion or cancellation.
- Department: select the employee’s department from the drop-down menu. This field auto-populates after the employee is selected, if they have a department set on their employee profile.
- Company: select the employee’s company from the drop-down menu. This field auto-populates after the employee is selected, if they have a company set on their employee profile.
Note
The only required fields for the appraisal form are the employee’s name, the Manager, and the Company.
Once the form is complete, click the Confirm button to confirm the appraisal request.
Once confirmed, the employee receives an email stating that an appraisal was requested, and is then prompted to schedule an appraisal date.
The status changes to Confirmed, and the Employee’s Feedback section of the Appraisal tab is grayed out. The information in that section only appears after the self-assessment is published by the employee. The Final Rating field also appears once the appraisal request is confirmed.
If there are any existing appraisals for the employee, an Appraisal smart button appears at the top of the page, listing the total number of appraisals there are for the employee.
Ask for feedback
As part of the appraisal process, the manager can request feedback on an employee from anyone in the company. Feedback is usually requested from co-workers and other people who interact with, or work with, the employee. This is to get a more well-rounded view of the employee, and aid in the manager’s overall assessment.
To request feedback, the appraisal must be confirmed. Once confirmed, an Ask Feedback button appears at the top of the form.
When the Ask Feedback button is clicked, an Ask Feedback email pop-up form appears, using the Appraisal: Ask Feedback email template, which sends the 360 Feedback survey.
Enter the employees being asked to complete the survey in the Recipients field. Multiple employees may be selected.
The email template has dynamic placeholders to personalize the message. Add any additional text to the email, if desired.
If required, an Answer Deadline can be added, as well.
If any attachments are needed, click the Attachments button, and a file explorer window appears. Navigate to the file(s), select them, then click Open.
When the email is ready to send, click Send.

Appraisal form
Once an appraisal is confirmed, the next steps require the employee to fill out the self-assessment, after which the manager completes their assessment.
Employee’s feedback
To complete their portion of feedback, employees should navigate to the main Appraisals application dashboard, where the only entries visible are appraisals for the employee, themselves, and/or anyone they manage and have to provide manager feedback for.
Click on the appraisal to open the appraisal form. Enter responses in the Employee’s Feedback section, under the Appraisal tab.
When completed, click the Not Visible to Manager toggle (the default setting once an appraisal is confirmed). When clicked, the toggle changes to Visible to Manager.
Manager’s feedback
After the employee has completed the Employee’s Feedback section, under the Appraisal tab, it is time for the manager to fill out the Manager’s Feedback section.
The manager enters their responses in the fields in the same manner as the employee.
When the feedback section is completed, click the Not Visible to Employee toggle (the default setting once an appraisal is confirmed). When clicked, the toggle changes to Visible to Employee.
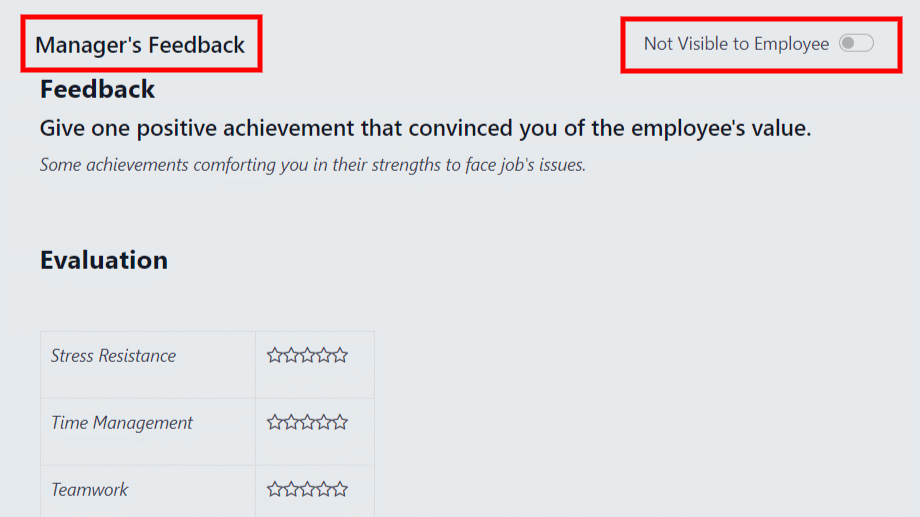
Skills tab
Part of an appraisal is evaluating an employee’s skills, and tracking their progress over time. The Skills tab of the appraisal form auto-populates with the skills from the employee form, once an appraisal is confirmed.
Each skill is grouped with like skills, and the Skill Level, Progress, and Justification are displayed for each skill.
Update any skills, or add any new skills to the Skills tab.
If a skill level has increased, a reason for the improved rating can be entered into the Justification field, such as took a fluency language test or received Javascript certification.
See also
Refer to the Create a new employee document for detailed instructions on adding or updating a skill.
After an appraisal is completed, and the skills have been updated, the next time an appraisal is confirmed, the updated skills populate the Skills tab.
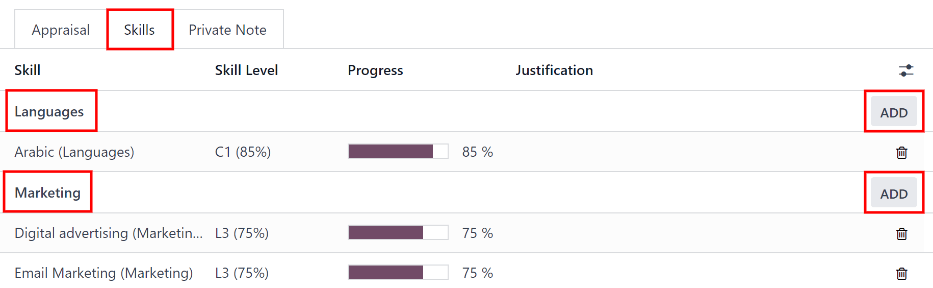
Note
The Skills tab can be modified after the employee and their manager have met and discussed the employee’s appraisal.
This is a common situation as the manager may not have all the necessary information to properly assess and update the employee’s skills before meeting.
Private Note tab
If managers want to leave notes that are only visible to other managers, they can be entered in the Private Note tab. This can be done before or after meeting with the employee to discuss the appraisal.
The employee being evaluated does not have access to this tab, and the tab does not appear on their appraisal.
Schedule a meeting
Once both portions of an appraisal are completed (the employee and manager feedback sections), it is time for the employee and manager to meet and discuss the appraisal.
A meeting can be scheduled in one of two ways: either from the Appraisals application dashboard, or from an individual appraisal card.
To schedule an appraisal from the dashboard of the Appraisals application, first navigate to Appraisals app ‣ Appraisals.
Click the (clock) icon, beneath the appraisal date on the desired appraisal card, and a pop-up window appears. Then, click Schedule an activity to create an activity from a Schedule Activity pop-up form that appears.
Select Meeting for the Activity Type from the drop-down menu. Doing so causes the form to change, so only the Activity Type and Summary fields appear.
Enter a brief description in the Summary field of the Schedule Activity pop-up form, such as Annual Appraisal for (Employee).
Next, click the Open Calendar button. From the calendar page that appears, navigate to, and double-click on, the desired date and time for the meeting.
Doing so opens a New Event pop-up form. From this pop-up form, make any desired modifications, such as designating a Start time, or modifying the default Title to the meeting.
Add the appraisee in the Attendees section, and include anyone else who should also be in the meeting, if necessary.
To make the meeting a video call, instead of an in-person meeting, click Odoo meeting, and a Videocall URL link appears in the field.
Once all the desired changes are complete, click Save & Close.
The meeting now appears on the calendar, and the invited parties are informed, via email.
The other way to schedule a meeting is from the individual appraisal form. To do this, navigate to the Appraisal app dashboard, then click on an appraisal card.
Next, click on the Meeting smart button, and the calendar loads. Follow the same directions above to create the meeting.
For more detailed information on how to schedule activities, refer to the activities documentation.
Note
If no meetings are scheduled, the Meeting smart button reads No Meeting.
Complete an appraisal
After the appraisal is complete, and both the manager and employee have met to discuss the appraisal, the appraisal can be marked as Done. When completed, click the Mark as Done button on the appraisal form, located in the top-left corner.
Once the appraisal is marked as Done, the Mark as Done button disappears, and a Reopen button appears.
Tip
Modifications are not possible once the appraisal is marked as done.
To make any changes to an appraisal that is marked as Done, click the Reopen button.
Then, click the Confirm button that appears, and make any modifications needed. Once all modifications are complete, click the Mark as Done button again.
See also
On this page
Get Help
Contact Support Ask the Odoo Community
![]()
EN
Odoo 18
Goals
The Odoo Appraisals application allows managers to set goals for their employees. That way, employees know what to work toward before their next review.
To view all goals, navigate to Appraisals app ‣ Goals. This presents all the goals for every employee, in a default Kanban view.
Each goal card contains the following information:
- Goal: the name of the goal.
- Employee: the employee the goal is assigned to.
- (clock) icon: displays the corresponding activity icon for the record. If no activities are scheduled, the default icon is the (clock). If any activities have been scheduled, the icon represents the activity scheduled soonest.
- Deadline: the due date for the goal.
- Progress: the percentage of competency set for the goal. The options are 0%, 25%, 50%, 75%, or 100%.
- Employee Icon: the profile icon of the employee the goal is assigned to.
If a goal is completed, a Done banner appears in the top-right corner of the goal card.
Note
Every individual goal requires its own record for each employee. If multiple employees have the same goal, a goal card for each employee appears on the list.
For example, if Bob and Sara have the same goal of Typing, two cards appear in the Kanban view: one Typing goal for Bob, and another Typing goal for Sara.
New goal
To create a new goal, navigate to Appraisals app ‣ Goals, and click New top-left corner to open a blank goal form.
Input the Goal, Employee, Progress, and Deadline, information on the goal card, as discussed in the goal card section of this document.
The information requested is all the same information that appears on the goal card in the Kanban view, with the addition of a Tags field and a Description tab.
Tip
The Appraisals application does not have any pre-configured tags, so all tags need to be added. To add a tag, enter the name of the tag on the line, then click Create “(tag)”. Repeat this for all tags that need to be added.
The current user populates the Employee field, by default, and the Manager field populates with the manager set on the employee profile.
Make any necessary changes to the form, and add any notes that might be useful to clarify the goal in the Description tab.

Completed goals
When a goal has been met, it is important to update the record. A goal can be marked as Done in one of two ways: from the main Goals dashboard, or from the individual goal card.
To mark a goal as Done from the main Goals dashboard, click on the (vertical ellipsis) icon in the top-right of a goal card.
Note
The (vertical ellipsis) icon only appears when the mouse hovers over the top-right corner of a goal card.
Then, click Mark as Done from the resulting drop-down menu. A green Done banner appears in the top-right corner of the goal card.
To mark a goal as Done from the goal card itself, click on a goal card to open that goal’s form. Then, click the Mark as Done button in the top-left of the form. When clicked, a green Done banner appears in the top-right corner of the goal form.
On this page
Get Help
Contact Support Ask the Odoo Community
![]()
EN
Odoo 18
Appraisal analysis
The Appraisals app has the ability to report on all the appraisals in the system, including past, present, and future appraisals, and their respective statuses. This report helps managers track scheduled appraisals, and identify any overdue or unconfirmed ones.
To access the Appraisal Analysis report, navigate to Appraisals app ‣ Reporting ‣ Appraisal Analysis.
On the Appraisal Analysis page, a report loads, displaying all the appraisals in the database. Each entry is highlighted in a different color to represent their status:
Color | Status | Meaning |
|---|---|---|
Yellow | Done | The appraisal was completed. |
Orange | Appraisal Sent | The appraisal was confirmed, but not completed. |
Red | Cancelled | The appraisal was cancelled. |
Gray | To Start | The appraisal was scheduled, but not confirmed. |
Note
Appraisals are scheduled automatically (appear in gray), according to their respective Appraisals plans.
The report displays the current year, in a default Gantt view, grouped by department, with the current month highlighted.
To change the period of time that is presented, adjust the date settings in the top-left corner of the report by clicking the default Year to reveal a drop-down menu of options. The options to display are Day, Week, Month, and Year. Use the adjacent arrows to move forward or backward in time.
At any point, click the Today button to have the Gantt view include today’s date in the view.
To view the details of any appraisal, click on any appraisal. A pop-over window appears, displaying the due date for the appraisal. To view more details, click the View button, and further details appear in a pop-up window.
The report can have other filters and groupings set in the search bar at the top.
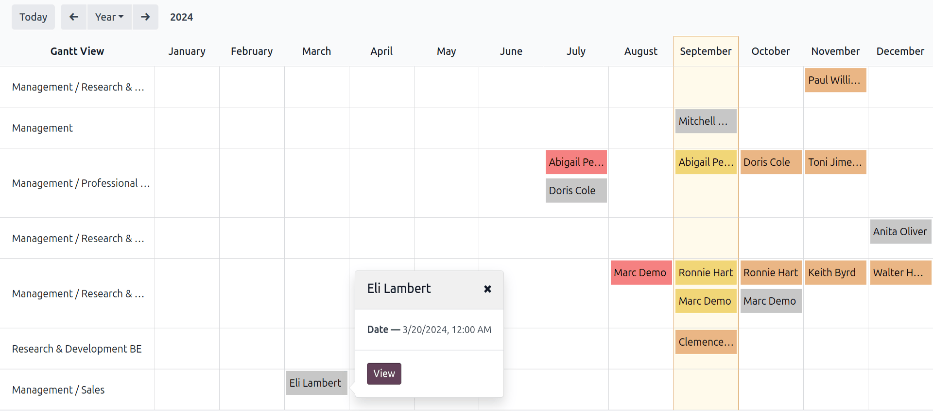
Group by status
When a company has a large number of employees, the default Appraisal Analysis report may display too much information to view easily. In this scenario, viewing the data by status can be beneficial.
First, remove the default Department grouping from the search bar. Next, click the (down arrow) icon in the far-right of the search bar. Click Status in the Group By column. Click away from the drop-down menu to close it.
All the appraisals are now organized by status, in the following order: Cancelled, Done, To Start, and Appraisal Sent.
This view makes it easy to see which appraisals need to be completed, and when, as well as which appraisals still need to be confirmed.
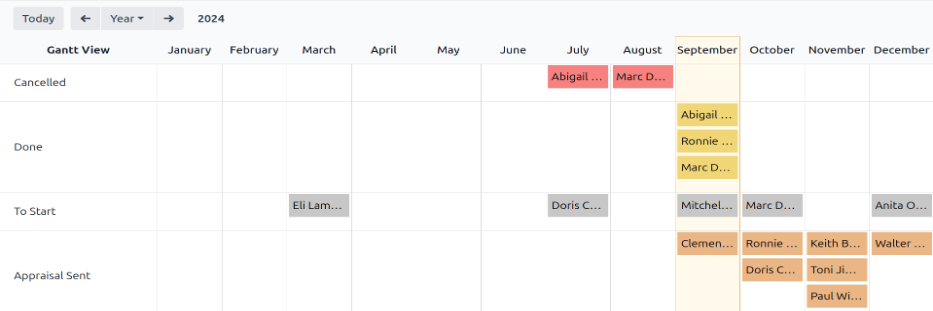
Use case: view only the user’s appraisals
When viewing the Appraisal Analysis report, it can save time to only view the appraisals the signed-in user is responsible for, and hide the rest.
To only view this data, click the (down arrow) icon in the far-right of the search bar, revealing a drop-down menu.
Note
It is not necessary to remove the default Department grouping. If it remains active, the results are grouped by department. If it is removed, the results appear in a list, alphabetically.
Click Add Custom Filter at the bottom of the Filters column, and a Add Custom Filter pop-up window appears.
Click into the first field, and a pop-over appears with a variety of options. Click the (right arrow) icon after the word Employee, then scroll down and click on Manager. Next, set the middle field to = (equal). Last, click the third field and select the desired user from the list. When all the fields are set, click Add.

Now, the only appraisals that appear are the appraisals that the selected user is responsible for, instead of viewing all the appraisals.
This report can also be grouped by status.
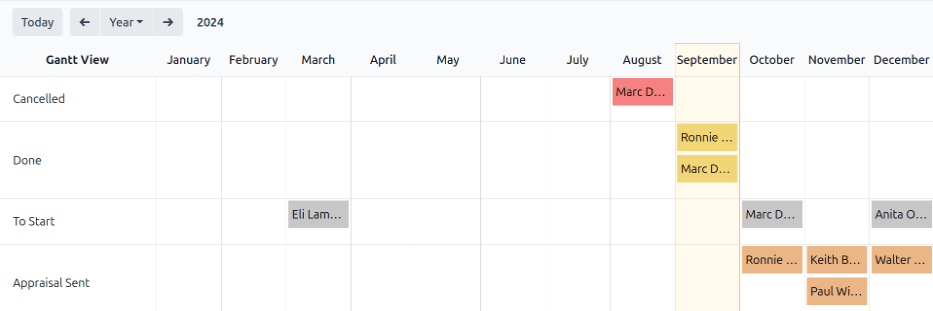
See also
On this page
Get Help
Contact Support Ask the Odoo Community
![]()
EN
Odoo 18
Skills evolution
In Odoo’s Appraisals app, it is possible to view employee’s skills as they progress over time in the Skills Evolution report, also known as the Appraisal Skills Report.
Managers can use this to see who is achieving their various skill goals set on their appraisals, who is meeting their skill deadlines, who has the highest performance in terms of skill development, and more.
The Skills Evolution report also provides the ability to search for employees with specific skills at certain levels, which can be helpful for scenarios where specific skills are required.
Skills evolution report
To access this Skills Evolution report, navigate to Appraisals app ‣ Reporting ‣ Skills Evolution.
Doing so reveals the Appraisal Skills Report page, which displays a report of all skills, grouped by employee, in alphabetical order, by default.
Note
Skill levels are only updated after an appraisal is marked as done. Any skill level changes from ongoing appraisals that have not been finalized are not included in this report.
All the Employee lines are expanded, with all the various skill types nested below. Each individual skill type is collapsed, by default. To view the individual skills contained within a skill type, click anywhere on the skill type line to expand the data.
Each skill has the following information listed:
- Employee: the name of the employee.
- Skill Type: the category the skill falls under.
- Skill: the specific, individual skill.
- Previous Skill Level: the level the employee had previously achieved for the skill.
- Previous Skill Progress: the previous percentage of competency achieved for the skill (based on the Skill Level).
- Current Skill Level: the current level the employee has achieved for the skill.
- Current Skill Progress: the current percentage of competency achieved for the skill.
- Justification: any notes entered on the skill, explaining the progress.
The color of the skill text indicates any changes from the previous appraisal. Skill levels that have increased since the last appraisal appear in green, as an Improvement. Skill levels that have not changed appear in black, as No Change. Skills that have regressed appear in red, as Regression.
This report can be modified to find specific information by adjusting the filters and groupings set in the search bar at the top.
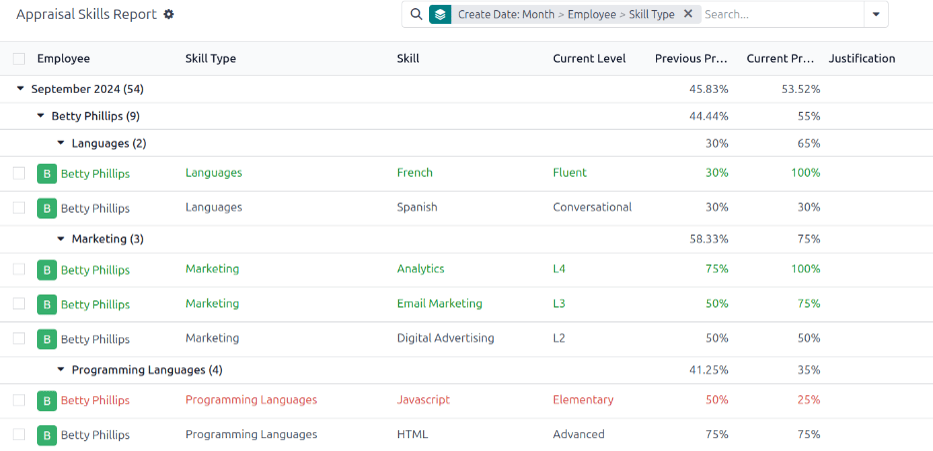
Use case: Identify employees with specific skills
Since the Appraisal Skills Report organizes all skills by employee, it can be difficult to find employees with a specific skill at a specific level. To find these employees, a custom filter must be used.
In this example, the report is modified to show employees with an expert level of Javascript knowledge. To view only those employees, first remove all active filters in the search bar.
Next, click the (down arrow) icon in the search bar, then click Add Custom Filter beneath the Filters column to load an Add Custom Filter pop-up window.
Using the drop-down menu in the first field, select Skill. Then, keep the second field as-is, and select Javascript from the third drop-down menu in the third field.
Next, click New Rule, and another line appears. In this second line, select Current Skill Level for the first drop-down field, leave the second field as-is, then select Expert for the third drop-down field.
After the New Rule button is clicked, the word “any” in the sentence Match any of the following rules:, changes from plain text into a drop-down menu. Click the (down arrow) icon after the word any, and select all.
Finally, click the Add button.
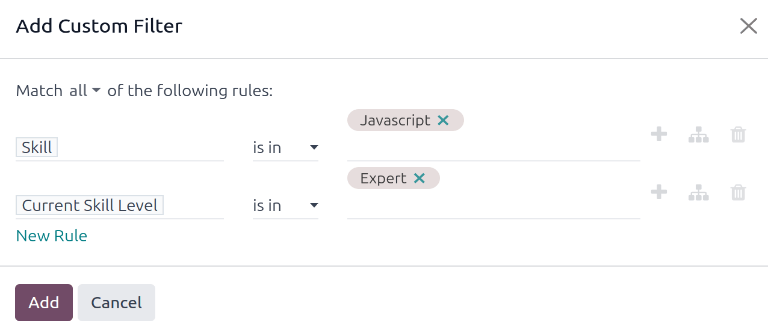
Now, only employees that have an Expert level for the skill Javascript appear. In this example, only Marc Demo meets these criteria.

Use case: Assess highest improvement
Another way to modify the Appraisal Skills Report is to identify the employee who has the highest amount of improved skills over a specific period of time.
To view this information, first remove the default filter in the search bar. Next, click the (down arrow) icon in the search bar, then click Improvement beneath the Filters column. Enabling this filter only presents skills that have improved.
It is possible to view the skills that have improved over a period of time, such as a specific quarter, or month. With the search bar drop-down menu still expanded, click Add Custom Filter at the bottom of the Filters column, and an Add Custom Filter pop-up window appears.
Select Create Date for the first drop-down field, then select is between for the second drop-down field. Once is between is selected, a second field appears after the last field. Using the calendar selector, select the date range to apply the filter to. Once all the fields are properly formatted, click Add.
The custom filter presents only the skills that have improved during the specified time period, organized by employee.
Example
To determine the employee with the most amount of improved skills for the third quarter, remove the default filter in the search bar of the Appraisal Skills Report. Next, activate the Improvement filter, then click Add Custom Filter at the bottom of the Filters column.
In the resulting Add Custom Filter pop-up window, select Create Date for the first drop-down field, then select is between for the second drop-down field. Two date fields appear after is between is selected.
Using the calendar selector, set the first date to 07/01/2024 and the second date to 09/30/2024, then click Add.
These filters present only the skills that have improved during the third quarter (between July 1st and September 30th, 2024), organized by employee.
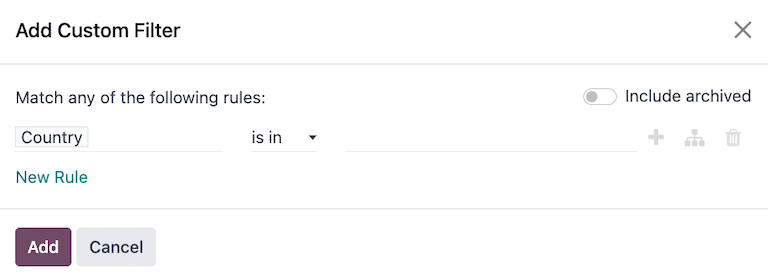
To view the number of employees and skills in further detail, click the (Pivot) icon in the top-right corner to view the data in a pivot table. This presents a pivot table with the employees populating the rows, and the only visible column represents the total number of improved skills.
To expand more rows or columns to view which skill types had the most overall improvement, click Total above the Count column, then click Skill Type from the resulting drop-down menu. This organizes the total improved skills by their respective skill type.
Example
In this example, it is determined that Charles Reginald had the largest improvement in the third quarter, with six improved skills. Additionally, they also had the most skill improvements for both Languages (three) and Programming Languages (two).
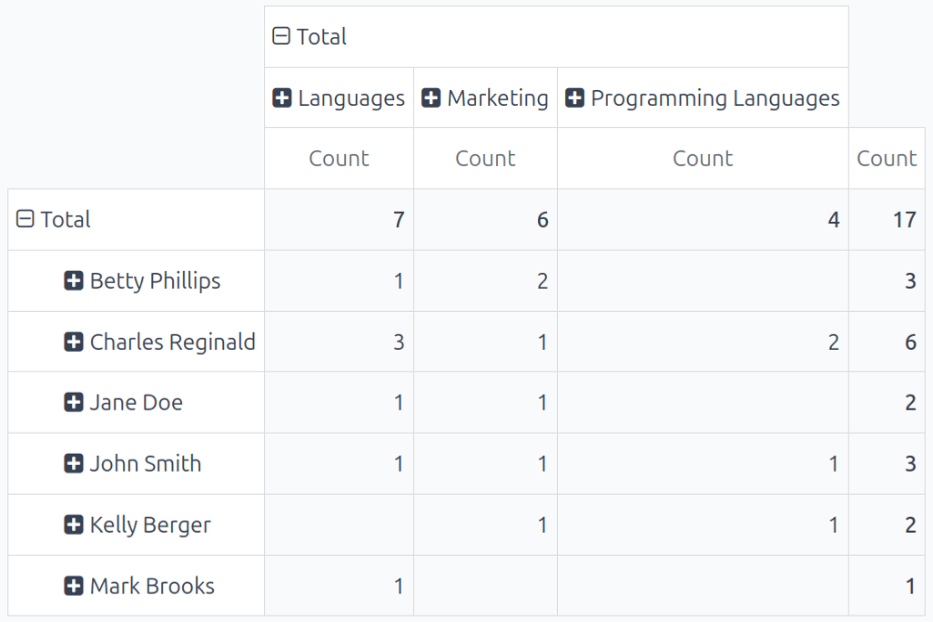
See also
On this page
Get Help
Contact Support Ask the Odoo Community
![]()
EN
Odoo 18
Frontdesk
The Odoo Frontdesk application provides a way for visitors to check in to a building or location, and alert the person they are meeting about their arrival. Additionally, they can request a pre-configured beverage to be brought to them, while they wait.
This application is ideal for businesses that do not have someone working at a reception desk, locations without a designated waiting area available to guests and visitors.
Configuration
The first item to configure with the Frontdesk application is the station, followed by any drink selections that might optionally be offered.
Stations
In Odoo’s Frontdesk application, a Station can be thought of as any location where someone can sign in and wait for an employee. This is typically some form of waiting room, such as a lobby. Each station has a kiosk where visitors check in.
When setting up the Frontdesk application, a minimum of one station must be configured, but there is no limit to how many stations can be created and configured.
To create a station, navigate to Frontdesk app ‣ Configuration ‣ Stations, and click New. When clicked, a blank frontdesk form appears.
Enter the following information on the form:
- Frontdesk Name: enter a name for the specific frontdesk location. This should be short and easily identifiable, such as Reception Desk or Main Lobby. This field is required in order to create a station.
- Responsibles: select the person (or persons) who are alerted when a visitor checks in using this specific frontdesk. Multiple selections can be entered. This field is required in order to create a station.
- Kiosk URL: this field auto-populates once the frontdesk form is saved, with at least the Frontdesk Name and Responsibles fields filled. To save manually, click the (cloud with upward arrow) icon, located at the top of the form.
Once saved, a URL is generated in the Kiosk URL field. This URL is one way the frontdesk kiosk is accessed.
To access the kiosk, click the Copy button at the end of the URL, and navigate to that URL in a web browser. This URL opens that specific station’s frontdesk sign-in page.
Tip
To add an image/photo to a frontdesk form, hover over the (camera with a ‘+’ sign) icon in the top-right of the form to reveal a ✏️ (pencil) icon.
Click on the ✏️ (pencil) icon to open a file explorer, navigate to the desired image/photo file, then click Open to select it.
The image selected for the station photo appears as the background image for the station kiosk.
Options tab
- Host Selection: if the visitor is attending a meeting, this option allows the visitor to select the meeting host from a presented list, and notify that individual. When enabled, additional fields appear, as detailed below.
- Authenticate Guest: if additional information is required when a guest checks in, enable this option, and select which of the following are required:
- Email: select whether the guest’s email address is Required, Optional, or if the information is not requested at all (None).
- Phone: select whether the guest’s phone number is Required, Optional, or if the information is not requested at all (None).
- Organization: select whether the guest’s organization is Required, Optional, or if the information is not requested at all (None).
- Theme: select the color mode of the kiosk. Choose either Light or Dark. The Light selection displays a pale gray background on the kiosk, whereas the Dark selection displays a dark gray and black background.
- Self Check-In: enable this option to present a check-in QR code on the kiosk. The QR code allows guests to check in using their mobile device, instead of using the kiosk. This option is recommended for a busy kiosk with multiple guests checking in at any time.
- Offer Drinks: enable this option to offer guests a drink upon check in. If this option is enabled, it is necessary to configure the drinks being offered, via the Configure Drinks link that appears when the option is enabled. Once all drink options are configured, select each drink to be offered using the drop-down menu.
Note
The following options are only visible in the Options tab if the Host Selection option is enabled.
- Notify by email: enable this option to have an email sent to the person the guest is visiting upon check in. When enabled, an Email Template field appears beneath, with the default Frontdesk Email Template selected.
To change the default email template, click the drop-down menu in the Email Template field, then select another email template.
To modify the currently selected template, click the Internal link (arrow) icon at the end of the line, and make any edits to the template. - Notify by SMS: enable this option to have an SMS (text) message sent to the person the guest is visiting upon check in. When enabled, an SMS Template field appears beneath, with the default Frontdesk SMS Template selected.
To change the default SMS template, click the drop-down menu in the SMS Template field, and select another SMS template.
To modify the currently selected template, click the Internal link (arrow) icon at the end of the line, and make any desired edits to the content of the template. The SMS message may have a maximum of 242 characters, which fits in 4 SMS (UNICODE) messages. - Notify by Discuss: this option is enabled by default when the Host Selection option is enabled. This option opens a Discuss application message window with the person the guest is visiting upon check in.
When enabled, a default message appears for the person the guest is visiting. The Discuss application must be installed in order for this option to work.
Note
Discuss is installed by default when creating an Odoo database, and does not count towards billing. As long as the Discuss application is not intentionally uninstalled, the Notify by Discuss option works.
Example
The default message format for the Notify by Discuss option is: (Frontdesk Station) Check-In: (Guest Name) (Guest Phone Number) (Organization) to meet (Name of employee).
An example of how that might appear in a Discuss message is: Main Lobby Check-In: John Doe (123-555-1234) (Odoo, Inc.) to meet Marc Demo.
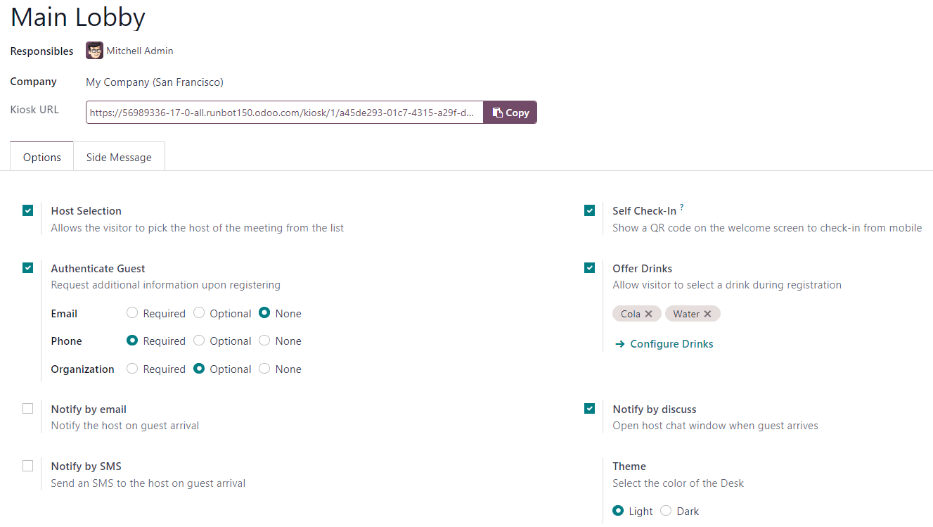
Side Message tab
Enter any desired text to appear on the station kiosk after a guest has checked in, such as a welcome greeting or any necessary instructions. The text appears on the confirmation page, on the right side of the screen after a guest has completed the check-in process.
Drinks
After a station is created, the next step is to configure the drinks to offer visitors, if desired. This step is not necessary or required for the Frontdesk application to work, and only needs to be configured if drinks are offered to guests.
To add a drink option, navigate to Frontdesk app ‣ Configuration ‣ Drinks, and click New. Doing so reveals a blank drink form to configure.
Enter the following information on the drink form:
- Drink Name: type the name of the drink option in this field. This field is required.
- People to Notify: use the drop-down menu in this field to select who is notified when the drink is selected. Multiple people can be entered in this field. This field is required.
- Sequence: enter a numerical value in this field to indicate where in the list of drink options this specific option appears. The lower the number, the higher on the list the drink appears. For example, entering the number one would place that drink at the top of the list, and appear first in the sequence.
Tip
To add an image/photo to a drink form, hover over the (camera with a ‘+’ sign) icon in the top-right of the form to reveal a ✏️ (pencil) icon.
Click on the ✏️ (pencil) icon to open a file explorer, navigate to the desired image/photo file, then click Open to select it.
The image selected now appears in the picture field, and is set as the image for the drink.
Station dashboard
Tip
To add an image/photo to a drink form, hover over the (camera with a ‘+’ sign) icon in the top-right of the form to reveal a ✏️ (pencil) icon.
Click on the ✏️ (pencil) icon to open a file explorer, navigate to the desired image/photo file, then click Open to select it.
The image selected now appears in the picture field, and is set as the image for the drink.
Kiosk setup
Set up each kiosk for use after configuring the various stations. It is recommended to use a dedicated device for each frontdesk kiosk, such as a tablet.
Navigate to the kiosk in one of two ways:
- Navigate to the main Frontdesk application dashboard, and click the Open Desk button on the desired station card. The kiosk loads in a new browser tab.
- Navigate to Frontdesk app ‣ Configuration ‣ Stations, and click on the desired station. Then, click the Copy button at the end of the Kiosk URL line, and paste the URL into a new browser tab or window.
Important
It is recommended to log out of the database, and close the tab, after navigating to the kiosk. That way, there is no possibility of a visitor accessing the database when checking-in.
Reporting
The Frontdesk application has two reports available: Visitors and Drinks.
To access either of these reports, navigate to Frontdesk app ‣ Reporting to reveal a drop-down menu containing the options: Visitors and Drinks.
The Visitors report displays the number of visitors by month, for the current year. The Drinks report shows how many total requests were made for each drink.
As with all reports in Odoo, the filters and groups can be modified to show other metrics, as well.
See also
On this page
Get Help
Contact Support Ask the Odoo Community
![]()
EN
Odoo 18
Visitors
In the Odoo Frontdesk application, a visitor is defined as any non-employee (e.g., repair person, job candidate, etc.). These visitors can be logged upon arrival and departure for security purposes. This ensures an accurate list of people on the premises.
Visitor list
To access a complete list of checked-in visitors, navigate to Frontdesk app ‣ Visitors.
Note
By default, the Planned or Checked-In and Today filters appear in the Search… bar.
All visitors are presented in a list view, with the following details that were entered upon check in:
- Name: the guest’s name.
- Visitor Company: the company the guest represents.
- Phone: the guest’s phone number.
- Drinks*: the drink the guest requested.
- Host: who the guest is waiting to see.
- CheckIn: the date and time the guest checked in.
- Checkout*: the date and time the guest checked out. In the default view, only guests with a Checked-In or Planned status are visible. Guests with check-out times are only visible if the Today filter is not active.
- Duration: the amount of time the guest has been checked in for.
- Station: the location of where the guest checked in.
- Status: the status of the guest. The options are Checked-In, Planned, Checked-Out, or Cancelled.
- Email*: the guest’s email address.
* These fields are not visible in the default Visitor list. These must be enabled using the (settings adjust) icon in the top-right of the list.
To the far-right of the titled columns on the Visitors page, there is an untitled column, where a guest’s status can be updated.
When a guest leaves, click the available Check out button to update the guest’s record, and log the date and time they left.
If a scheduled guest arrives, and they did not check in using the Frontdesk kiosk, they can be checked in here, by clicking the available Check in button to log the date and time they arrived.
Beside the untitled status column, a Drink Served button appears, but only if that particular visitor requested a drink.
When their drink has been served, click the Drink Served button to indicate the drink has been delivered to the guest. Once clicked, that button disappears.

If any column is not visible, or if a visible column is preferred to be hidden, click the (additional options) icon, located at the end of the column name list. Doing so, reveals a reveals a drop-down menu of column options to enable or disable. A (check) icon indicates the column is visible.
Planned visitors
Enter expected guest information in advance by creating a planned guest in the Frontdesk app.
To create a planned guest, navigate to Frontdesk app ‣ Visitors, and click New. Then, enter the same information as any other visitor on the guest form that appears. The only required fields are the visitor’s Name and the Station at which they are expected to arrive.
Important
If a guest is planned in advance, they must be checked in from the list on the Visitors page in the Frontdesk application (Frontdesk app ‣ Visitors). If a planned guest checks in using a kiosk, they will be checked in separately, and their planned visitor entry remains listed as Planned.
The Planned status of a planned guest only changes to Checked-In when they are checked in inside the application’s Visitors list.
If a guest does check in using a kiosk, ensure all records are current, and the list of guests that are currently on-site is correct. Be sure to check in and/or check out the correct entries, so the visitors list correctly reflects who is currently on the premises.
Ensure planned guests are informed that they should not check in using the kiosk if they are listed as a planned guest in advance.
Visitor flow
Visitor check in
When a visitor arrives at a facility, they approach a Frontdesk kiosk, and click Check in. The information requested from the visitor is what was configured for that specific Frontdesk station. If any information is required, the field displays a red asterisk (*). The visitor must enter the required information in order to check in.
Once all the information is entered, the visitor taps the Check In button.
Note
At any point in the check-in process, if ten seconds pass with no selection, the kiosk returns to the main welcome screen.
Drinks
If drinks were configured for the station, after tapping Check In, a registration confirmation screen loads, along with the question: Do you want something to drink?
The visitor can tap either Yes, please, or No, thank you.
If they select Yes, please, a drink selection screen appears, and the pre-configured options are listed. The visitor then taps the desired selection, or, if they do not want anything, they can tap the Nothing, thanks button at the bottom of the screen.
If a drink selection was made, a Thank you for registering! Your drink is on the way. message appears.
Notifications
Once the visitor has checked in, the person they are visiting, and any other users who were configured to be notified when check-ins occur at the kiosk, are notified. The notification is either by email, SMS message, a Discuss chat, or any combination of those three options.
If the visitor requested a drink, the user(s) configured as the People to Notify on the drink form, are notified, via the Discuss application. The message that appears is: (Visitor Name) just checked-in. They requested (Drink Name).
Once the drink has been delivered to the guest, the person who delivered the drink is responsible for marking the drink as delivered.
To mark a drink as delivered, navigate to Frontdesk app ‣ Stations, and choose the desired station card displaying (#) Drinks to serve.
This opens a list of all the visitors checked in at that station, and are waiting for a drink. Click the Drink Served button at the end of the line for the visitor who was served. Once they are marked as having their drink served, the visitor disappears from the list.
Check out
Once the visitor has completed their business, and has left the premises, it is important to check them out for accurate record keeping.
To check visitors out properly, navigate to Frontdesk app ‣ Stations, and choose the desired station card displaying (#) Drinks to serve. Doing so opens a list of all the visitors who are currently checked-in at that station.
Click the Check out button near the end of the line for the visitor who left. Once they are marked as checked-out, the visitor disappears from the list.
Important
Visitors do not check themselves out when they leave. It is important for Frontdesk users to check out visitors for accurate record keeping.
Always have an accurate list of who is on the premises at any given time. This is important for security purposes, and in the case of an emergency.
On this page
Get Help
Contact Support Ask the Odoo Community
![]()
EN
Odoo 18
Fleet
This document outlines the configurations and settings for the Fleet application, for both settings and manufacturers.
Settings
To access the settings menu, go to Fleet app ‣ Configuration ‣ Settings. Only two settings need configuration: End Date Contract Alert and New Vehicle Request.
End Date Contract Alert
The End Date Contract Alert field how many days before the end of a vehicle contract an alert should be sent. The responsible people receive an email informing them a vehicle contract is about to expire in the number of days defined in this field.
Note
To determine who the responsible person is for a contract, open an individual contract. The person listed as Responsible under the Contract Information section of the contract is the person who will receive the alert.
To access all contracts, navigate to Fleet app ‣ Fleet ‣ Contracts and all contracts appear in the list. Click on a Contract to view it.
An individual contract can also be found by navigating to Fleet app ‣ Fleet ‣ Fleet and clicking on an individual vehicle. On the vehicle form, click the Contracts smart button at the top of the page. The contract(s) associated with this vehicle only appears in the list. Click on an individual contract to open it. The Responsible person is listed on the contract.
New Vehicle Request
The New Vehicle Request field sets a limit on how many new vehicles are requested based on fleet availability. An employee filling out the salary configurator form (after being offered a position), will not be able to request a new car if the number of existing cars is greater than the number specified in the New Vehicle Request field. Enter the specific number limit for existing available cars in this field.
Example
If the New Vehicle Request limit is set to 20 vehicles, and there are 25 vehicles available, an employee would not be able to request a new vehicle. If there are only 10 cars available, then the employee would be able to request a new vehicle.
Manufacturers
Odoo Fleet comes pre-configured with sixty-six commonly used car and bicycle manufacturers in the database, along with their logos. To view the pre-loaded manufacturers, go to Fleet app ‣ Configuration ‣ Manufacturers.
The manufacturers appear in an alphabetical list. Each manufacturer’s card lists how many specific models are configured for each particular manufacturer. Odoo comes with forty-six preconfigured models from four major auto manufacturers, and one major bicycle manufacturer: Audi, BMW, Mercedes, Opel (cars), and Eddy Merckx (bicycle).

Add a manufacturer
To add a new manufacturer to the database, click Create. A manufacturer form will load. Only two pieces of information are needed, the Name of the manufacturer, and the logo. Type the name of the manufacturer in the name field, and select an image to upload for the logo. When the information is entered, click Save.
See also
On this page
Get Help
Contact Support Ask the Odoo Community
![]()
EN
Odoo 18
Vehicle models
When adding a vehicle to the fleet, specify the vehicle model to maintain updated records, which keeps track of specific details, like maintenance schedules and parts compatibility.
Odoo comes with preconfigured car models from four major auto manufacturers: Audi, BMW, Mercedes, and Opel.
If a new vehicle model joins the fleet, and it is not one of the preconfigured models from these manufacturers, the model (and/or manufacturer) must be added to the database.
Preconfigured models
The following models are preconfigured in Odoo, and do not need to be added to the database:
AUDI | BMW | Mercedes | Opel |
|---|---|---|---|
A1 | Serie 1 | Class A | Agilia |
A3 | Serie 3 | Class B | Ampera |
A4 | Serie 5 | Class C | Antara |
A5 | Serie 6 | Class CL | Astra |
A6 | Serie 7 | Class CLS | AstraGTC |
A7 | Serie Hybrid | Class E | Combo Tour |
A8 | Serie M | Class GL | Corsa |
Q3 | Serie X | Class GLK | Insignia |
Q5 | Serie Z4 | Class M | Meriva |
Q7 | Class R | Mokka | |
TT | Class S | Zafira | |
Class SLK | Zafira Tourer | ||
Class SLS |
Add a new model
To add a new vehicle model, navigate to Fleet app ‣ Configuration ‣ Models: Models. Click New, and in a new vehicle model form, enter the following information on the form.
Note
Be advised, some fields are specific to Belgian based companies, so not all fields or sections may be visible depending on the location of the company.
- Model name: enter the model name in the field.
- Manufacturer: select the manufacturer from the drop-down menu. If the manufacturer is not configured, type in the manufacturer, and click Create or Create and edit...
Note
When the manufacturer is selected, if it is one of the default manufacturers in Odoo, the logo for the manufacturer automatically loads in the image box in the top-right corner. - Vehicle Type: select one of two preconfigured vehicle types, either Car or Bike, from the drop-down menu. The vehicle types are hardcoded in Odoo, and are integrated with the Payroll application, since vehicles can be part of an employee’s benefits. Adding additional vehicle types is not possible as it affects payroll.
- Category: select a category for the vehicle from the drop-down menu. To create a new category, type in the category and then click Create (new category).
Information tab
In the Information tab, specify details about the car model, such as the car size, passenger capacity, cost settings (applicable to the Belgium localization only), and engine information.
Model section
- Seats Number: enter how many passengers the vehicle can accommodate.
- Doors Number: enter the number of doors the vehicle has.
- Color: enter the color of the vehicle.
- Model Year: enter the year the vehicle was manufactured.
- Trailer Hitch: tick this checkbox if the vehicle has a trailer hitch installed.
Salary section
Note
The Salary section only appears for Belgian-based companies, and only if the company has their localization setting set to Belgium. The cost values are all monthly, with the exception of the Catalog Value (VAT Incl.).
- Can be requested: tick this checkbox if employees can request this model vehicle, if a vehicle is part of their employee contract.
- Catalog Value (VAT Incl.): enter the MSRP for the vehicle at the time of purchase or lease.
- C02 fee: represents the carbon dioxide emission fee paid to the Belgian government. This value is automatically calculated, based on Belgian laws and regulations, and cannot be modified. The value is based on the figure entered in the CO2 Emissions field (in the Engine section of the Information tab) on the vehicle form.
Important
Modifying the CO2 Emissions field adjusts the value in the CO2 fee field.
- Cost (Depreciated): enter the monthly vehicle cost, which appears in the salary configurator for future employees. This value impacts the gross and net salary of the employee assigned to the vehicle. This figure is depreciated over time, according to local tax laws. The Cost (Depreciated) does not depreciate automatically on the vehicle model, it only depreciates based on the contract linked to a specific vehicle.
- Total Cost (Depreciated): this value is the combination of the Cost (Depreciated) and the C02 fee fields. It also depreciated over time.
Engine
- Fuel Type: select the type of fuel the vehicle uses from the drop-down menu. The options are Diesel, Gasoline, Hybrid Diesel, Hybrid Gasoline, Plug-in Hybrid Diesel, Plug-in Hybrid Gasoline, CNG, LPG, Hydrogen, or Electric.
- CO2 Emissions: enter the average carbon dioxide emissions the vehicle produces in grams per kilometer (g/km). This information is provided by the car manufacturer.
- CO2 Standard: enter the standard amount of carbon dioxide in grams per kilometer (g/km) for a similar-sized vehicle.
- Transmission: select Manual or Automatic transmission from the drop-down menu.
- Power: if the vehicle is electric or hybrid, enter the power the vehicle uses in kilowatts (kW).
- Horsepower: enter the vehicle’s horsepower in this field.
- Horsepower Taxation: enter the amount that is taxed, based on the size of the vehicle’s engine. This is determined by local taxes and regulations, and varies depending on the location. It is recommended to check with the accounting department to ensure this value is correct.
- Tax Deduction: this field auto-populates, according to the engine specifications, and cannot be modified. The percentage is based on the localization settings and local tax laws.
Vendors tab
Specify the vendors a vehicle can be purchased from in this tab. With proper setup, requests for quotations for vehicles can be easily created through Odoo’s Purchase app.
To add a vendor, click Add, which opens an Add: Vendors pop-up window, with a list of all the vendors currently in the database. Add a vendor by ticking the checkbox next to the vendor name, then click Select. There is no limit to the number of vendors that can be added to this list.
If a vendor is not in the database, add a vendor by clicking New in the bottom-left of the Add: Vendors pop-up window. In the Create Vendors form that appears, enter the necessary information, then click Save & Close to add the vendor, or click Save & New to add the current vendor and create another new vendor.
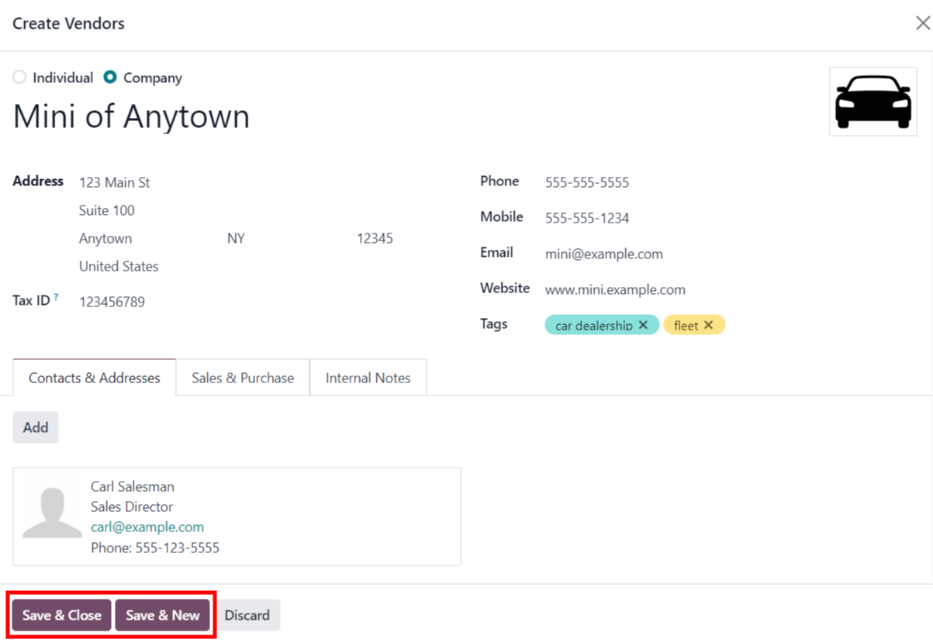
Model category
To best organize a fleet, it is recommended to have vehicle models housed under a specific category, to easily see what kinds of vehicles are in the fleet. Model categories are set on the vehicle model form.
Odoo does not come with any models preconfigured; all models must be added.
To view any models currently set up in the database, navigate to Fleet app ‣ Configuration ‣ Models: Categories. All models are displayed in a list view.
Add a new model category
To add a new category, click the New button in the top-left corner of the Categories page. A new entry line appears at the bottom of the list. Type in the new category, then either click Save, or click anywhere on the screen, to save the entry.
To reorganize how the categories appear in the list, click on the (draggable) icon to the left of any desired category name, and drag the line to the desired position.
The order of the list does not affect the database in any way. However, it may be preferable to view the vehicle categories in a specific order, for example, by size, or the numbers of passengers the vehicle can carry.
Note
When used with the Inventory app, the Max Weight and Max Volume fields track a vehicle’s capacity. This helps manage in-house deliveries by showing how much space and weight remain for loading products.
On this page
Get Help
Contact Support Ask the Odoo Community
![]()
EN
Odoo 18
New vehicles
Odoo’s Fleet app manages all vehicles, and the accompanying documentation that comes with vehicle maintenance, and drivers records.
Upon opening the Fleet application, all vehicles are organized within the Vehicles dashboard, which is the default dashboard for the Fleet application. Each vehicle is displayed in its corresponding Kanban stage, based on its status. The default stages are New Request, To Order, Registered, and Downgraded.
To add a new vehicle to the fleet from the Vehicles page, click the New button in the top-left corner, and a blank vehicle form loads. Then, proceed to enter the vehicle information on the vehicle form.
The form auto-saves as data is entered. However, the form can be saved manually at any time by clicking the save manually option, represented by a (cloud upload) icon, located in the top-left corner of the page.
Vehicle form fields
- Model: select the vehicle’s model from the drop-down menu. Once a model is selected, additional fields may appear on the form.
If the model is not listed, type in the model name, and click either Create “model”, or Create and edit… to create a new model and edit the model details. - License Plate: enter the vehicle’s license plate number in this field.
- Tags: select any tags from the drop-down menu, or type in a new tag. There is no limit on the amount of tags that can be selected.
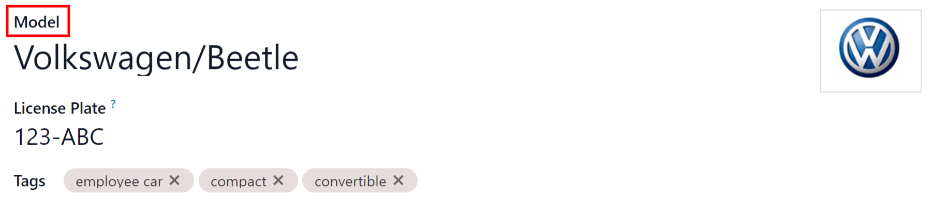
Note
The Model is the only required field on the new vehicle form. When a model is selected, other fields appear on the vehicle form, and relevant information auto-populates the fields that apply to the model. If some of the fields do not appear, this may indicate there is no model selected.
Driver section
This section of the vehicle form relates to the person who is currently driving the car, as well as any plans for a change in the driver in the future, and when.
- Driver: select the driver from the drop-down menu, or type in a new driver and click either Create “driver” or Create and edit… to create a new driver, and edit the driver details.
Important
A driver does not have to be an employee. When creating a new driver, the driver is added to the Fleet application, not the Employees application.
If the Contacts application is installed, the driver information is also stored in the Contacts application. - Mobility Card: if the selected driver has a mobility card listed on their employee card in the Employees application, the mobility card number appears in this field. If there is no mobility card listed, and one should be added, edit the employee record in the Employees application.
- Future Driver: if the next driver for the vehicle is known, select the next driver from the drop-down menu. Or, type in the next driver and click either Create “future driver” or Create and edit… to create a new future driver, and edit the driver details.
- Plan To Change Car: if the current driver set for this vehicle plans to change their vehicle - either because they are waiting on a new vehicle that is being ordered, or this is a temporary vehicle assignment, and they know which vehicle they are driving next - check this box. Do not check this box if the current driver does not plan to change their vehicle.
- Assignment Date: using the drop-down calendar, select when the vehicle is available for another driver. Select the date by navigating to the correct month and year using the ⬅️ (left arrow) and ➡️ (right arrow) icons. Then, click on the specific day. If this field is left blank, that indicates the vehicle is currently available, and can be reassigned to another driver. If it is populated, the vehicle is not available for another driver until the selected date.
- Company: select the company from the drop-down menu. This field only appears in a multi-company database.
Create a new driver
If a driver is not already in the system, the new driver should first be configured and added to the database. A new driver can be added either from the Driver or Future Driver fields on the vehicle form.
First, type in the name of the new driver in either the Driver or Future Driver field, then click Create and edit…. A Create Driver or Create Future Driver form appears, depending on which field initiated the form.
Both the Create Driver and Create Future Driver forms are identical.
Note
Depending on the installed applications, different tabs or fields may be visible on the Create Driver and Create Future Driver forms.
General information
Fill out the following information on the top-half of the form:
- Individual or Company: choose if the driver being added is an individual driver or a company. Click the radio button to make a selection.
When a selection is made, some fields may disappear from the form. If any of the fields below are not visible, that is because Company was selected instead of Individual. - Name: enter the name of the driver or company in this field.
- Company Name…: using the drop-down menu, select the company the driver is associated with.
If the Company radio button is selected at the top of the form, this field does not appear. - Contact: enter the contact information in this section.
If desired, the Contact field can be changed to a different type of contact. Click on Contact to reveal a drop-down menu. The available options to select are Contact, Invoice Address, Delivery Address, Follow-up Address, or Other Address.
If desired, select one of these other options for the Contact field, and enter the corresponding information.
If the Company radio button is selected at the top of the form, this field is labeled Address and cannot be modified. - Tax ID: enter the driver or company’s tax ID in this field.
- Job Position: enter the driver’s job position in this field. If the Company radio button is selected at the top of the form, this field does not appear.
- Phone: enter the driver or company’s phone number in this field.
- Mobile: enter the driver or company’s mobile number in this field.
- Email: enter the driver or company’s email address in this field.
- Website: enter the driver or company’s website address in this field.
- Title: using the drop-down menu, select the driver’s title in this field. The default options are Doctor, Madam, Miss, Mister, and Professor.
If the Company radio button is selected at the top of the form, this field does not appear. - Tags: using the drop-down menu, select any tags that apply to the driver or company.
To add a new tag, type in the tag, then click Create “tag”.
There is no limit to the number of tags that can be selected.
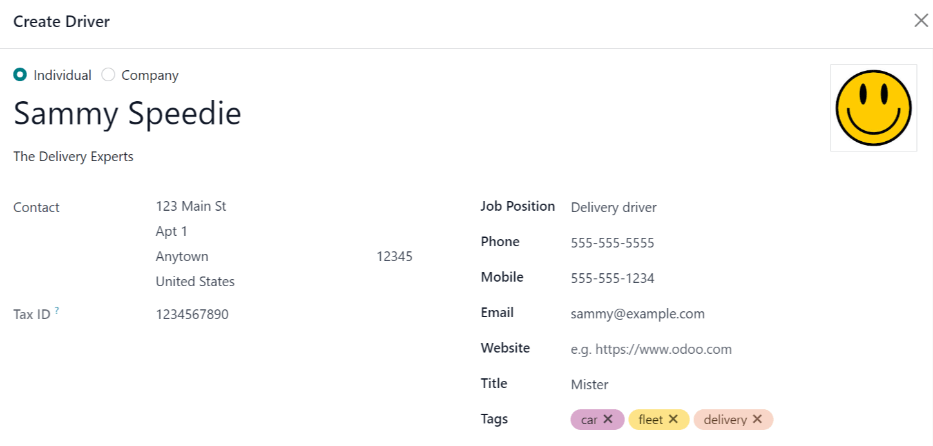
Contacts & Addresses tab
After completing the top-half of the Create Driver or Create Future Driver form, add any other contacts and addresses associated with the driver or company in this tab.
To add a new contact, click the Add button, and a Create Contact pop-up window appears.
Before entering the necessary information on the form, select the type of contact being added from a series radio button options located at the top of the form. Those options are:
- Contact: select this option to add general contact details for employees of the associated company.
- Invoice Address: select this option to add a preferred address for all invoices. When added to the form, this address is selected by default when sending an invoice to the associated company.
- Delivery Address: select this option to add a preferred address for all deliveries. When added to the form, this address is selected by default when delivering an order to the associated company.
- Follow-up Address: select this option to add a preferred address for all follow-up correspondence. When added to the form, this address is selected by default when sending reminders about overdue invoices.
- Other Address: select this option to add any other necessary addresses for the company or driver.
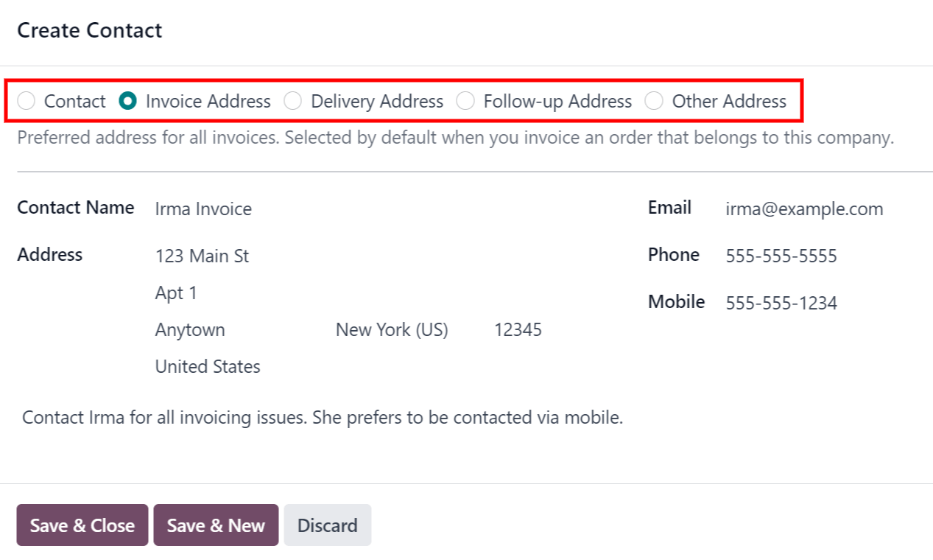
Depending on the Contact Type, some optional fields may not be visible. The available fields are identical to the fields in the general information section of the new driver form.
Add any notes to the Internal notes… section of the form.
After entering all of the information, click either Save & Close to add the one new contact, or Save & New to add the current address record and create another address record.
As contacts are added to this tab, each contact appears in a separate box, with an icon indicating what type of contact is listed.
Example
An Invoice Address displays a 💲 (dollar sign) icon inside that specific address box, whereas a Delivery Address displays a 🚚 (truck) icon inside.

Sales & Purchase tab
Enter the following sales and purchasing information, in the Sales & Purchase tab of the Create Driver or Create Future Driver pop-up form for the various sections below.
Depending on the other installed applications, additional fields and sections may appear. The following are all default fields for the Fleet application only.
Sales section
- Salesperson: using the drop-down menu, select the user who is the main point of contact for sales with this driver’s company.
This person must be an internal user of the company, meaning they can log into the database as a user.
Misc
- Company ID: if the company has an ID number, other than its tax ID, enter it in this field.
- Reference: enter any text to give more information regarding the contact person. This is an internal note to provide any additional information.
Example
A company has several people with the same name, John Smith. The Reference field could state John Smith at X205 - purchaser to provide additional details.
Internal Notes tab
Add any notes that pertain to the driver, or any other necessary information, in this tab.
Vehicle section
This section of the vehicle form relates to the physical details of the vehicle.
If a preexisting vehicle in the database was selected for the Model field in the top portion of the form, some fields may auto-populate, and additional fields may also appear.
Fill in the following fields on the form:
- Category: using the drop-down menu, select the vehicle category from the available options. To create a new category, type in the new category name, then click Create “category”.
- Order Date: using the drop-down calendar, select the date the vehicle was ordered.
- Registration Date: using the drop-down calendar, select the date the vehicle was registered.
- Cancellation Date: using the drop-down calendar, select the date the vehicle lease expires, or when the vehicle is no longer available.
- Chassis Number: enter the chassis number in the field. This is known in some countries as the VIN number.
- Last Odometer: enter the last known odometer reading in the number field. Using the drop-down menu next to the number field, select whether the odometer reading is in kilometers (km) or miles (mi).
- Fleet Manager: select the fleet manager from the drop-down menu, or type in a new fleet manager, and click either Create or Create and Edit.
- Location: type in the specific location where the vehicle is typically located in this field. The entry should clearly explain where the vehicle can be found, such as Main Garage or Building 2 Parking Lot.
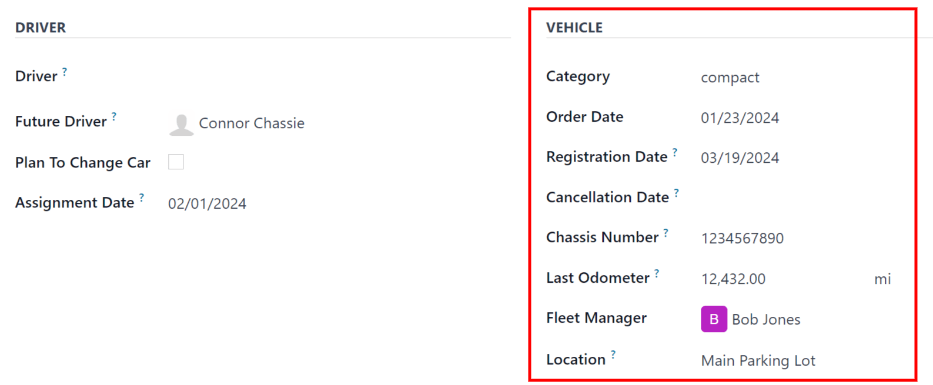
Tax Info tab
Depending on the localization setting for the database, and what additional applications are installed, other fields may be present on the form.
The sections below are default and appear for all vehicles, regardless of other installed applications or localization settings.
Fiscality
- Horsepower Taxation: enter the amount that is taxed based on the size of the vehicle’s engine. This is determined by local taxes and regulations, and varies depending on the location. It is recommended to check with the accounting department to ensure this value is correct.
Contract
- First Contract Date: select the start date for the vehicle’s first contract using the drop-down calendar. Typically this is the day the vehicle is purchased or leased.
- Catalog Value (VAT Incl.): enter the MSRP (Manufacturer’s Suggested Retail Price) for the vehicle at the time of purchase or lease.
- Purchase Value: enter the purchase price or the value of the lease for the vehicle.
- Residual Value: enter the current value of the vehicle.
Note
The values listed above affect the accounting department. It is recommended to check with the accounting department for more information and/or assistance with these values.
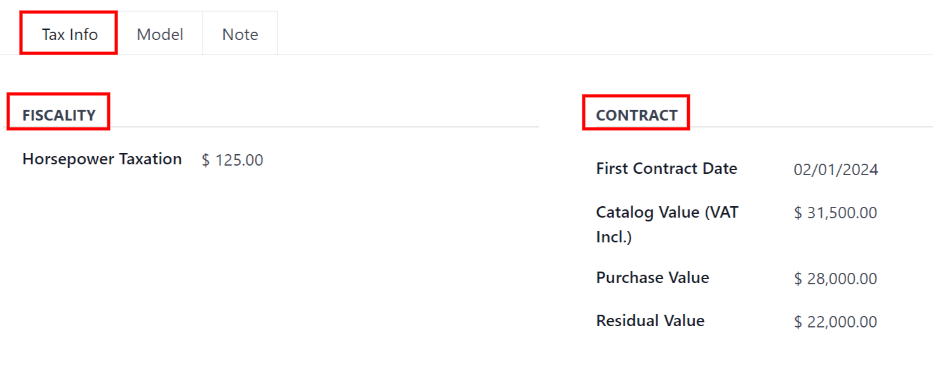
Model tab
If the model for the new vehicle is already configured in the database, the Model tab will be populated with the corresponding information. If the model is not already in the database and the Model tab needs to be configured, configure the new vehicle model.
Check the information in the Model tab to ensure it is accurate. For example, the color of the vehicle, or if a trailer hitch is installed, are examples of common information that may need updating.
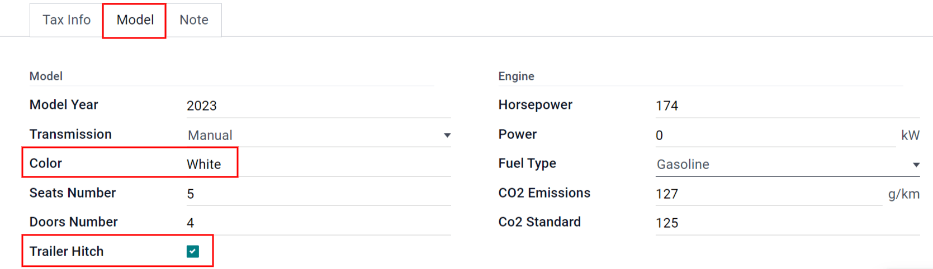
Note tab
Enter any notes for the vehicle in this section.
On this page
Get Help
Contact Support Ask the Odoo Community
![]()
EN
Odoo 18
Services
To properly maintain a fleet of vehicles, regular maintenance as well as periodic repairs are needed. Scheduling repairs and managing services for an entire fleet is necessary to ensure all vehicles are in good working order when they are needed.
Create service records
To log a service for a vehicle, go to the main Services dashboard by navigating to Fleet app ‣ Fleet ‣ Services. Open a new service form by clicking the New button in the top-left corner.
Fill out the information on the form. The only two fields that are required to be populated are Service Type and Vehicle.
The service form automatically saves as data is entered. However, the form can be saved manually at any time by clicking the Save manually option, represented by a (cloud upload) icon.
The fields on the form are:
- Description: enter a brief description of the service.
- Service Type: select the type of service performed using the drop-down menu. Or, enter a new type of service, and click either Create “service type” or Create and edit… to add the service type and configure it.
Important
Service Types are not pre-configured in Odoo. When logging a service for the first time, the type of service needs to be created before it can be selected. - Date: using the calendar popover window, select the date the service was provided, or is scheduled to be performed. Navigate to the desired month using the < > (arrow) icons, then click on the date to select it.
- Cost: enter the cost of the service.
- Vendor: select the vendor who performed the service using the drop-down menu. If the vendor has not already been entered in the system, type in the vendor name, and click either Create to add them, or Create and edit… to add and configure the vendor.
- Vehicle: select the vehicle that was serviced from the drop-down menu. When the vehicle is selected, the Driver field is populated, and the unit of measure for the Odometer Value field appears.
- Driver: the current driver listed for the selected vehicle is populated when the Vehicle is selected. If the driver needs to be changed, another driver can be selected from the drop-down menu.
- Odometer Value: enter the odometer reading when the service was done. The units of measure are either in kilometers (km) or miles (mi), depending on how the selected vehicle was configured.
When the Vehicle is selected, the unit of measure for this field is populated. This comes from the vehicle form.
Tip
To change from kilometers to miles, or vice versa, click the Internal Link button to the right of the vehicle selected in the Vehicle field.
Change the unit of measure, then navigate back to the service form, via the breadcrumb links. The unit of measure is then updated in the Odometer Value field. - Notes: enter any notes for the repair at the bottom of the service form.
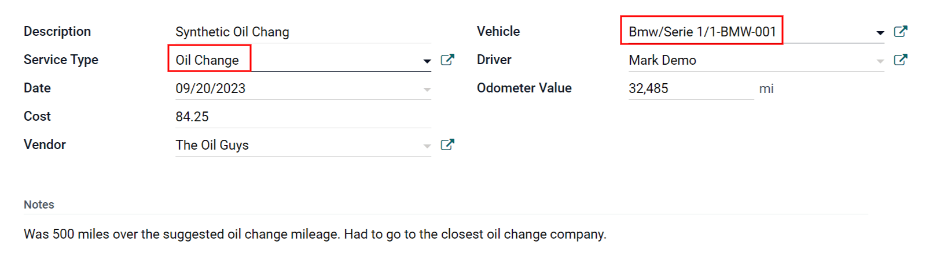
Create service type
Service types must be created from a service form. There is no other way to access the list of service types.
On the service form, type in the name of the new Service Type in the corresponding field. Then, click Create and edit…, and a Create Service Type pop-up form appears.
The service type entered on the service form automatically populates the Name field, which can be modified, if desired.
Then, select the Category for the new service type from the drop-down menu in that field. The two default options to choose from are Contract or Service. Additional categories cannot be created.
If the service applies to only contracts or services, select the corresponding Category. If the service applies to both contracts and services, leave this field blank.
When done, click Save & Close.
Create vendor
When a service is done for the first time, typically, the vendor is not in the database yet. It is best practice to add the full details for a vendor in the database, so that any necessary information can be easily retrieved.
On the service form, type in the name of the new Vendor in the corresponding field. Then, click Create and edit…, and a Create Vendor form appears.
The vendor name entered on the service form populates the Name field, by default. This field can be modified, if desired.
Note
Different tabs or fields may be visible on the Create Vendor form, depending on what other applications are installed.
General information
Fill out the following information in the top-half of the form:
- Individual or Company: select whether the new vendor being added is an individual or a company, by clicking the corresponding radio button.
When a selection is made, some fields may disappear from the form. If any of the fields below are not visible, that is because Company was selected, instead of Individual. - Name: enter a name for the individual or company in this field.
- Company Name: using the drop-down menu, select the company that the vendor is associated with, if any.
If the Company radio button at the top of the form is selected, this field does not appear. - Contact: enter the contact information in this section.
If desired, the Contact field can be changed to a different type of contact. Click on Contact to reveal a drop-down menu. The available options to select are Contact, Invoice Address, Delivery Address, Follow-up Address, or Other Address.
If desired, select one of these other options for the Contact field, and enter the corresponding information.
If Company is selected for the Individual or Company field, this field is labeled Address, and cannot be modified. - Tax ID: enter the vendor’s tax ID in this field.
- Job Position: enter the vendor’s job position in this field. If the Company radio button at the top of the form is selected, this field does not appear.
- Phone: enter the vendor’s phone number in this field.
- Mobile: enter the vendor’s mobile number in this field.
- Email: enter the vendor’s email address in this field.
- Website: enter the vendor’s website address in this field.
- Title: using the drop-down menu, select the vendor’s title in this field. The default options are Doctor, Madam, Miss, Mister, and Professor.
If the Company radio button at the top of the form is selected, this field does not appear. - Tags: using the drop-down menu, select any tags that apply to the vendor.
To add a new tag, type in the tag, then click Create “tag”.
There is no limit to the number of tags that can be selected. - Image: a photo of either the main contact person, or the company logo, can be added to the form. Hover over the 📷 (camera) box, in the top-right of the form, to reveal a ✏️ (pencil) icon, and click it. A file explorer window appears. Navigate to the desired file, then click Open to select it.
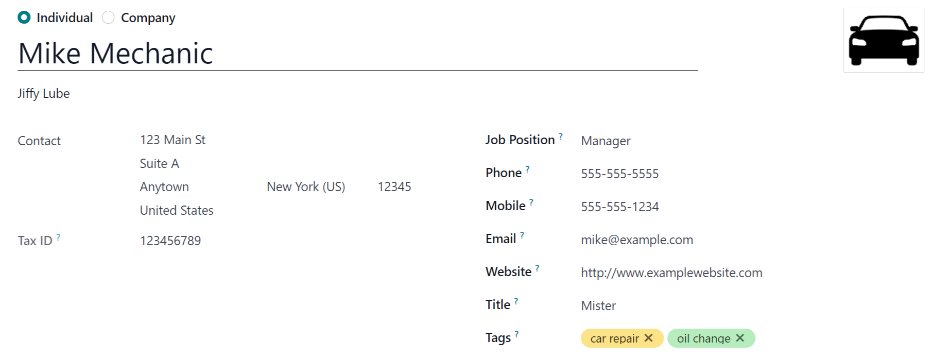
Contacts & Addresses tab
After the top-half of the Create Vendor form is filled out, add any other contacts and addresses associated with the vendor in this tab.
Click the Add button to add a new contact, and a Create Contact pop-up window appears.
Select one of the appropriate contact type options from the radio buttons, located at the top of the pop-up window. Those options are as follows:
- Contact: select this option to add general contact details for employees of the associated vendor.
- Invoice Address: select this option to add a preferred address for all invoices. When added to the form, this address is selected by default when sending an invoice to the associated vendor.
- Delivery Address: select this option to add a preferred address for all deliveries. When added to the form, this address is selected by default when delivering an order to the associated vendor.
- Follow-up Address: select this option to add a preferred address for all follow-up correspondence. When added to the form, this address is selected by default when sending reminders about overdue invoices.
- Other Address: select this option to add any other necessary addresses for the vendor.
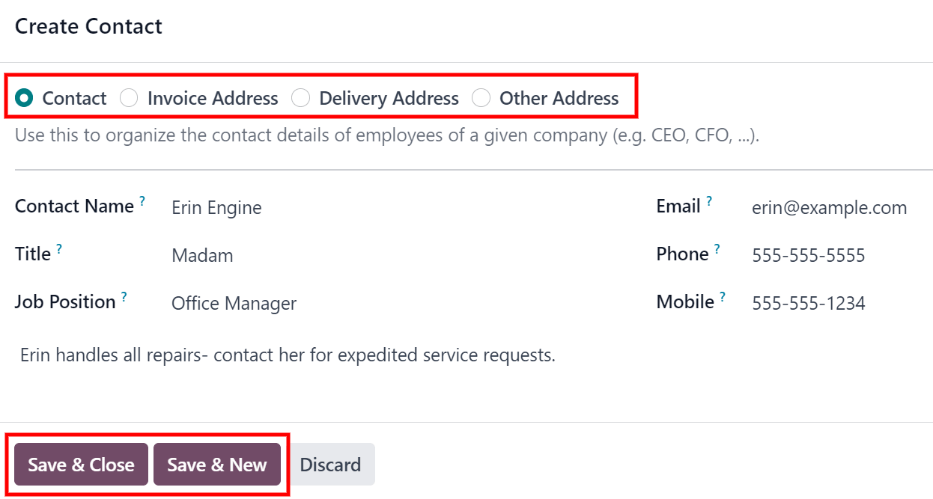
Note
If an option other than Contact is selected for the contact type, an Address section appears on the form. Enter the address details in the Address section.
Add any notes to the Internal notes… section of the form.
After all of the information is added, click either Save & Close to add the one new contact, or Save & New to add the current address record and create another address record.
As contacts are added to this tab, each contact appears in a separate box, with an icon indicating what type of contact is listed.
Example
A Delivery Address displays a ⛟ (truck) icon inside that specific address box, whereas an Invoice Address displays a 💵 (dollar bill) icon inside.

Sales & Purchase tab
Enter the following sales and purchasing information for the various sections below. Depending on the other installed applications, additional fields and sections may appear. The following are all default fields for the Fleet application only.
Sales
- Salesperson: using the drop-down menu, select a user as the main point of contact for sales with this vendor.
This person must be an internal user of the company, meaning they can log into the database as a user.
Misc
- Company ID: if the company has an ID number other than its tax ID, enter it in this field.
- Reference: enter any text to give more information regarding the contact. This is an internal note to provide any additional information.
Example
A company has several people with the same name, Mary Jones. The Reference field could state Mary Jones at X108 - returns to provide additional details.
Internal Notes tab
Add any notes that pertain to the vendor, or any other necessary information, in this tab.
List of services
To view all services logged in the database, including old and new requests, navigate to Fleet app ‣ Fleet ‣ Services. All services appear in a list view, including all the details for each service.
The service records are grouped by service type. The number of repairs for each service type appears in parentheses after the name of the service type.
Each service listed displays the following information:
- Date: the date that the service, or repair, was performed (or requested to be performed).
- Description: a short description of the specific type of service, or repair, performed to clarify the specific service.
- Service Type: the type of service, or repair, performed. This is selected from a list of services that must be configured.
- Vehicle: the specific vehicle the service was performed on.
- Driver: the current driver for the vehicle.
- Vendor: the specific vendor who performed the service, or repair.
- Notes: any information associated with the service, or repair, that is documented to add clarification.
- Cost: the total cost of the service, or repair.
- Stage: the status of the service, or repair. Options are New, Running, Done, or Cancelled.
At the bottom of the Cost column, the total cost of all services and repairs are listed.
View services
It is recommended to view the list of services in one of several pre-configured ways to better view the information presented. In the top-right corner of the list, there are several icons that when clicked, sort the data in different ways.
List view
The default view of the service records is a list view. This presents all the services, first grouped alphabetically by type of service, then grouped by status.
The information can be re-sorted by any column. At the top of each column, hover over the column name, and an arrow appears in the far-right of that column. Click the arrow to sort the data by that specific column.
The default sorting is in descending alphabetical order (A to Z), represented by a ⌄ (down arrow) icon. Click the ⌄ (down arrow) icon to reverse the alphabetical order (Z to A). The ⌄ (down arrow) icon changes to an ^ (up arrow) icon.
The two exceptions to this sorting are the default Date column and the Cost column. The Date column sorts the information in chronological order (January to December), instead of alphabetical order. The Cost column sorts the information by repair price, from lowest to highest.
Add a service
To add a service record from the list view, click the New button, and a service form loads. Enter all the information on the service form.
The form automatically saves as data is entered.
Kanban view
To view services by their stage, click the Kanban button, which is the second icon in the top-right corner, and appears as two different length bars beneath a line.
All services are organized by service type, and appear in the corresponding Kanban column.
The number of repairs for each type of service appears in the far-right of each Kanban column header.
The collective status of the scheduled activities for each service type appears in the color-coded bar beneath each Kanban column title. Repairs with activities scheduled in the future appear green, activities due today appear yellow, overdue activities appear red, and repairs with no activities scheduled appear gray.
Each Kanban card displays a color-coded activity-related icon, such as a 🕘 (clock) icon or 📞 (phone) icon, for example. These icons indicate both the type of scheduled activity and the status. The status of the activity corresponds to the colors in the status bar. Click on an activity icon to view the details of that specific activity.
The length of the color bar is proportionate to the number of corresponding activities with that specific status in that particular stage. Hover over a color section to reveal the number of service records in that specific grouping.
To view only the records with a specific status, click the desired color bar section. The background color for the column changes to a pale hue of the same color (either green, yellow, red, or gray), and the color bar appears striped instead of solid. Only repairs and services with the selected status appear in the column.
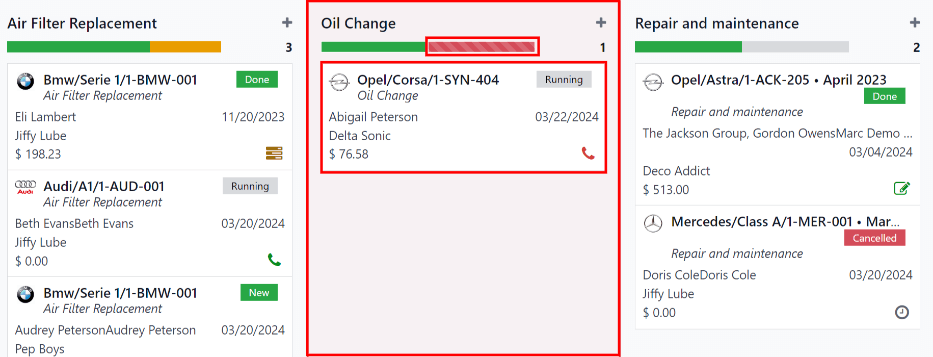
Schedule activities
To schedule an activity for a repair or service from the Kanban view, click the activity icon in the lower-right corner of the service record, and click + Schedule an activity. A Schedule Activity pop-up window appears.
Note
Depending on what kind of activity, if any, is scheduled, the activity icon may appear differently. For example, a 📞 (phone) appears if a phone call is scheduled, or an ✉️ (envelope) appears if an email is scheduled.
Enter the following information on the form:
- Activity Type: using the drop-down menu, select the activity being scheduled. The default options are Email, Call, Meeting, To-Do, and Upload Document.
- Summary: enter a short description of the activity, such as Schedule oil change.
- Due Date: using the calendar popover, select the date the activity must be completed. Using the < (left) and > (right) arrow icons, navigate to the desired month, then click on the date to select it.
- Assigned to: using the drop-down menu, select the user responsible for the activity.
- Notes: add any notes or details in the blank area in the bottom-half of the form.
When the Schedule Activity is completed, click Schedule to schedule the activity, or click Done & Schedule Next to schedule the current activity and schedule another activity for the same repair.
See also
For more detailed information regarding activities, refer to the main activities document.
Add a service
A new repair can be added from this view. Click the ➕ (plus icon) in the top-right corner of the Kanban column, and a new block appears at the top of the column, beneath the Kanban title.
Enter a Title for the service or repair, then click Add. A Create service form appears in a pop-up window. Enter all the information on the service form, then click Save & Close to add the record. The new record now appears in the Kanban column.
Graph view
Another way to view the data is in a graph. To change to the graph view, click the Graph icon, which is the third icon in the top-right, and appears as a small graph.
The default graph view displays the service information in a stacked bar chart, grouped by Service Type. The X-axis represents the Service Type and the Y-axis represents the Cost.
Each column visually represents the total cost for all repairs and services for that specific Service Type. Hover over any bar to reveal a popover window that displays the total Cost for the service and repairs the bar represents.
The graph can change to either a Line Chart or a Pie Chart by clicking the corresponding button above the graph. Additionally, the graph can display the data in either Stacked, Descending, or Ascending order, by clicking the corresponding buttons.

Pivot view
Another way to view the service data is in a spreadsheet pivot table. Click the Pivot icon, which is the fourth icon in the top-right, and appears as a small spreadsheet.
The default way the data is presented shows the total cost of each type of service. The horizontal rows represent the various types of service, with a different service type in its own line. The vertical columns represent the total costs for each specific type of service, further divided by the type of service.
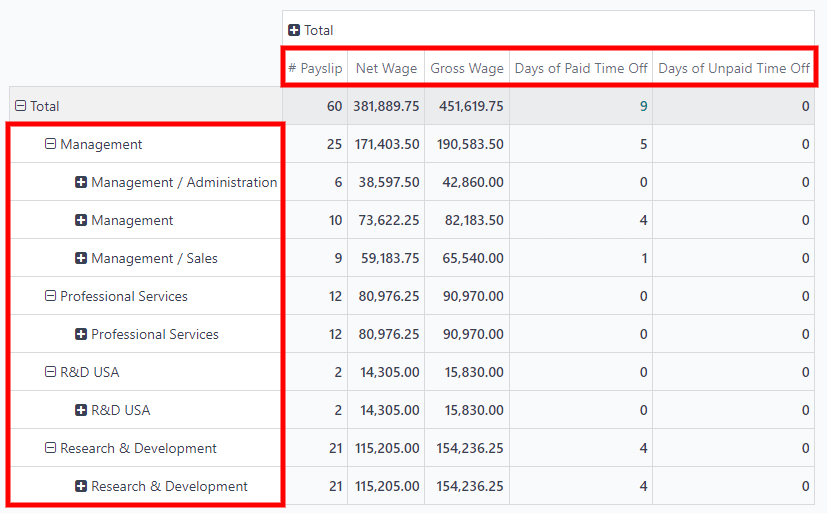
The table can either be inserted in a spreadsheet or downloaded, if desired.
To add the pivot table to a spreadsheet in Odoo, first, the appearance of the pivot table must change. The default pivot table view does not allow it to be inserted into a spreadsheet (the Insert in Spreadsheet button is grayed out).
First, click the ➖ (minus) icon to the left of Total at the top of the pivot table. This collapses the service types, leaving only a single Cost column visible.
Then, click the Insert in Spreadsheet button, which is no longer grayed out, and a Select a spreadsheet to insert your pivot pop-up window appears. Two tabs are visible in this pop-up window, a Spreadsheets tab and a Dashboards tab.
Click the desired tab to indicate where the spreadsheet should be placed, either in a Spreadsheet or on a Dashboard. After clicking the desired option, click Confirm. The spreadsheet then loads on the screen.
Note
Spreadsheets are stored in Odoo’s Documents application, while dashboards are stored in Odoo’s Dashboards application.
Click Services in the top-left corner to navigate back to the previous pivot table view.
To download the table in an xlsx format, click the download xlsx icon, represented by a ⬇️ (down arrow above a line) icon.
See also
For more detailed information regarding reporting, refer to the main reporting document.
Activity view
To view the scheduled activities for services or repairs, click the 🕗 (clock) activity icon in the top-right corner of the screen. This presents all activities, organized by vehicle and activity type.
The vertical columns are organized by activity type, and the horizontal lines are organized by vehicle.
The entries are color-coded according to the status of each activity. Green activities are scheduled in the future, yellow activities are due today, and red activities are overdue.
The user responsible for the activity appears in a photo in the lower-left corner of each activity entry.
The due date of each activity is written in the top-center of each activity entry.
A color-coded bar at the top of each activity column indicates the status of the activities within that column.
The number of activities for each activity type is written on the right side of the color-coded bar beneath the column name.
Schedule an activity
To add a service record from the activity view, click + Schedule an activity in the bottom-left corner of the list, and a Search: Services pop-up window loads. Click the service that the activity is being scheduled for, and a Schedule Activity form loads.
Enter all the information on the activity form.
When the form is complete, click the Schedule button. Then, both pop-up windows close, and the activity now appears on the activity view.
On this page
Get Help
Contact Support Ask the Odoo Community
![]()
EN
Odoo 18
Accidents
When managing a fleet, accidents are inevitable. Tracking accidents is crucial for understanding vehicle maintenance costs and identifying safe drivers.
Odoo’s Fleet app offers multiple ways to track accidents. Below are step-by-step instructions for only one method to monitor accidents and repair costs.
Structure
For this example, to track accidents, two service types are created: Accident - Driver's Fault and Accident - No Fault.
This tracks various repairs associated with accidents, organized by who was at fault.
When an accident occurs, a service record is created. The specific repairs needed for the accident are logged in the Description of the service record, and the details about the accident are logged in the Notes section.
With this organizational structure, it is possible to view all accidents organized by fault, car, driver, or cost.
Note
To manage accidents, the creation of service records is required.
Refer to the Services documentation for detailed instructions on creating service records in Odoo’s Fleet app.
Log accidents and repairs
To log an accident, and initiate the repair process, the first step is to create a service record detailing the specific repairs needed.
Note
Some accidents require multiple repairs with several different vendors. For these scenarios, a separate service record is needed for each vendor performing repairs. To keep records organized, it is recommended to keep the Notes field identical, as well as attaching the same important documentation, such as a police report.
Navigate to Fleet app ‣ Fleet ‣ Services to view the main Services dashboard. Click New in the top-left corner, and a blank service form loads.
Enter the following information on the form:
- Description: enter the description of repairs needed to fully repair the vehicle, such as Bodywork, Windshield Replacement, or Replacement Bumper, Tires, and Windows.
- Service Type: for this example, select either Accident - Driver's Fault or Accident - No Fault, depending on the situation.
When entering either of these two Service Types for the first time, type in the new service type, then click Create (new service type). A Create Service Type pop-up window appears, with the new service type populating the Name field. In the Category field, select Service from the drop-down menu, then click the Save & Close button.
Once an accident service type has been added to the database, it is available to select from the drop-down menu in the Service Type field. - Date: using the calendar popover window, select the date the accident occurred. Navigate to the desired month using the (arrow) icons, then click the date to select it.
- Cost: leave this field blank, as the repair cost is not yet known.
- Vendor: select the vendor performing the repairs using the drop-down menu. If the vendor has not already been entered in the system, type in the vendor name, and click either Create to add them, or Create and edit… to add and configure the vendor.
- Vehicle: select the vehicle that was in the accident from the drop-down menu. When the vehicle is selected, the Driver field is populated, and the unit of measure for the Odometer Value field appears.
- Driver: the current driver listed for the selected vehicle populates this field when the Vehicle is selected. If a different driver was operating the vehicle when the accident occurred, select the correct driver from the drop-down menu.
- Odometer Value: enter the odometer reading when the accident occurred. The units of measure are either in kilometers (km) or miles (mi), depending on how the selected vehicle was configured.
- NOTES: enter the specific details of the accident at the bottom of the service form, such as Hit a deer or Rear-ended at an intersection while stopped.
Odoo provides the ability to attach any important paperwork, such as repair estimates and police reports, to the service record. To do so, click the (paperclip) icon, located in the chatter of the form, and a file explorer pop-up window appears. Navigate to the desired record, and click Open to upload the file.
Note
Once a file is added to a service record, a Files section appears in the chatter. To attach more records, click Attach files to add more documents.
Service stages
In Odoo’s Fleet app, there are four default service stages:
NewRunningCompletedCancelled
The default stage when a service record is created. The service has been requested, but repairs have not begun. The Cost field for this stage remains zero.
During the repair process, change the service status to reflect the vehicle’s current state in one of two ways: on the individual service record, or in the Kanban service view.
Service record
Open the main Services dashboard, by navigating to Fleet app ‣ Fleet ‣ Services. Next, click on the individual service record to open the detailed service form. Click the desired stage in the top-right corner, above the service form, to change the status.
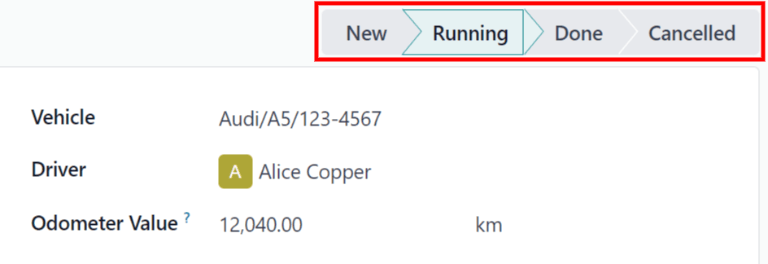
Kanban view
Open the main Services dashboard, by navigating to Fleet app ‣ Fleet ‣ Services. First, click the Kanban icon in the top-right of the screen, which organizes all repairs by vehicle.
Next, remove the default Service Type filter in the search bar. Upon doing so, all services appear in a Kanban view, organized by their respective Status.
Drag-and-drop the service record to the desired stage.
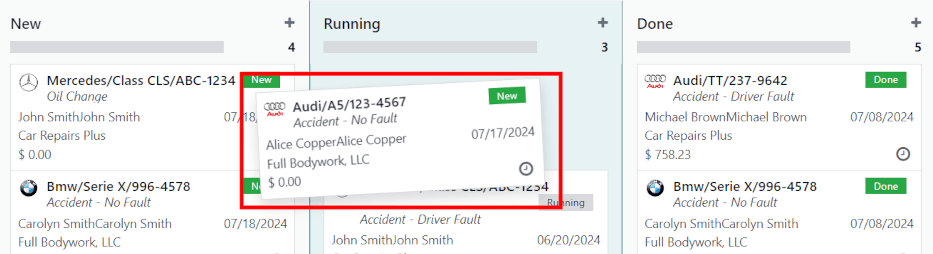
Accident reporting
One of the main reasons to track accidents using the method outlined in this document is the ability to view the total accident cost, determine the safest drivers, and calculate the actual total cost for specific vehicles.
The main Services dashboard displays all the various accident information, while the Reporting dashboard displays the total cost for specific vehicles.
Services dashboard
Navigate to Fleet app ‣ Fleet ‣ Services to view the Services dashboard. All service records are displayed in a (List) view, grouped alphabetically, by Service Type.
The two service types created for accident tracking appear in the list: Accident - Driver Fault and Accident - No Fault.
Each grouping displays the number of records within each type, and lists the individual records beneath each grouping title.
Example
In this example, there are six accidents where the driver was at fault, and four accidents that were not the driver’s fault. This dashboard also displays the estimated total Cost for all the accidents in each group.
An estimated $19,164.81 dollars are for driver-caused accident repairs, and an estimated $2,548.21 dollars are for no-fault accidents.
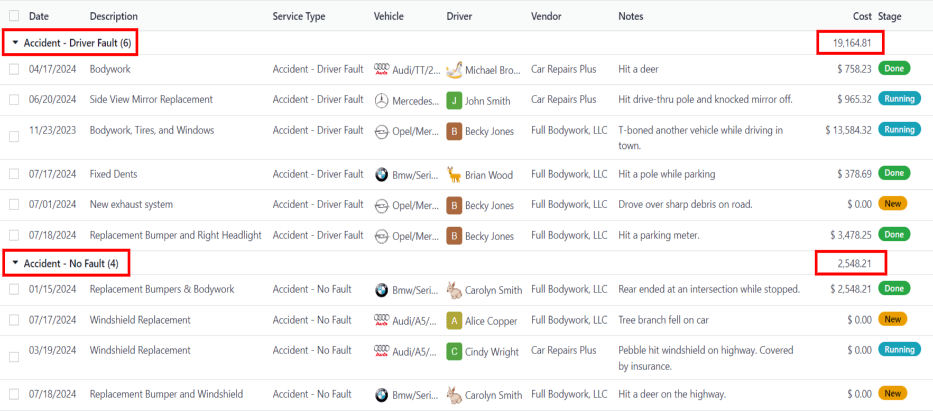
Note
The total Cost calculates all costs on the repair form, including estimated costs, as well as final repair costs. This number may not be accurate, if there are any repairs in the Running stage, and the final bill has not yet been calculated.
Reporting dashboard
Navigate to Fleet app ‣ Reporting ‣ Costs to view the Cost Analysis report. This report displays a (Bar Chart) of all Contract and Service costs for the current year, organized by month (Date : (year)), by default. The Sum, represented by a gray dotted line, is the combined total of both the Contract and Service costs.
To view the total cost by vehicle, click the (down arrow) icon at the right of the search bar, revealing a drop-down menu. Click Vehicle in the Group By column, and the data is organized by vehicle.
This displays the true cost for each vehicle, including both the contract cost (such as the monthly vehicle lease cost) and all service costs, including all accidents. Hover over a column to reveal a data popover window, which displays the vehicle name and the total cost. This allows for a more complete view of the vehicle cost.
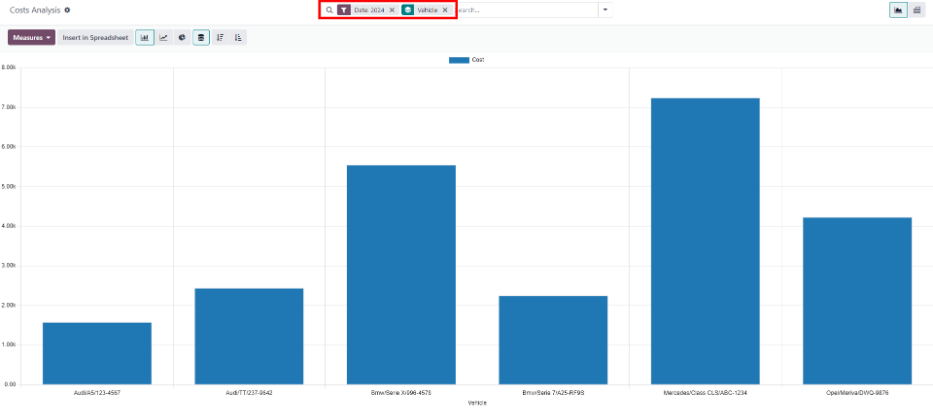
To view the individual cost details for both contract costs and repairs, click the (Pivot) icon in the top-right corner of the Cost Analysis dashboard. This displays each vehicle on a separate line, and displays the Contract cost and Service cost, as well as the Total cost.
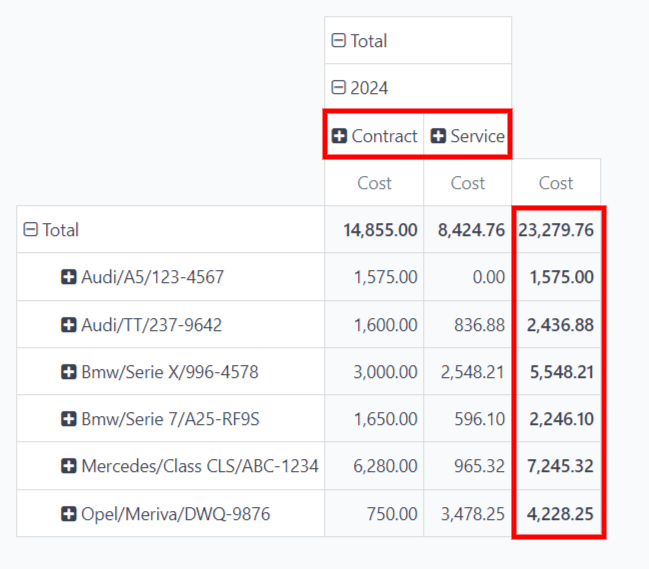
Note
The (Pivot) view organizes the data by vehicle, by default, therefore grouping the data by Vehicle is not required. If this filer is already activated, it does not affect the presented data.
Manage accident repairs
For companies with multiple employees, who manage a large fleet of vehicles, displaying only service records in the New and Running stages can be time-saving, if there are a large number of records in the Services dashboard.
Navigate to Fleet app ‣ Fleet ‣ Services, where all service requests are organized by Service Type. Next, click the (down arrow) icon at the right of the search bar, revealing a drop-down menu. Click Add Custom Filter in the Filters column, and a Add Custom Filter pop-up window appears.
Three drop-down fields need to be configured on the pop-up window.
In the first field, scroll down, and select Stage.
Leave the second field set to =.
Select Running from the drop-down menu in the last field.
Next, click the (plus) icon to the right of the last field, and an identical rule appears beneath the current rule.
Then, change Running to New in the third field of the second rule, leaving the other fields as-is.
Click the Add button at the bottom to add the new custom filter.
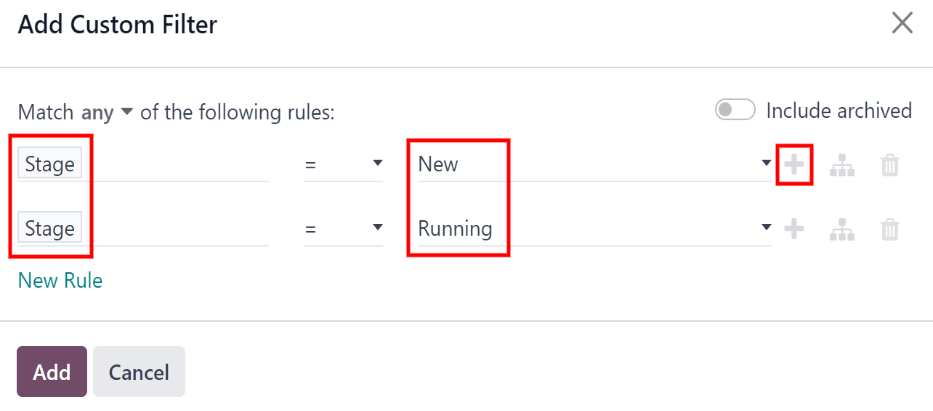
This slight modification only presents services in the New and Running stages. This is a helpful report for a company managing a high number of repairs at any given time.
To have this report appear as the default report when opening the Services dashboard, click the (down arrow) icon at the far-right of the search bar. Next, click Save current search, beneath the Favorites column, which reveals another drop-down column beneath it. Tick the checkbox beside Default Filter, then click Save. Then, this customized Services dashboard appears, by default, anytime the Services dashboard is accessed.
On this page
Get Help
Contact Support Ask the Odoo Community
![]()
- User Docs
- Database management
- Developer
- Contributing
EN
Odoo 18
Payroll
Odoo Payroll is used to process work entries and create payslips for employees. Payroll works in conjunction with other Odoo apps, such as Employees, Time Off, Attendances, and Planning.
The Payroll app helps ensure there are no issues or conflicts when validating work entries. It also handles country-specific localizations to ensure payslips follow local rules and taxes, and allows for salary assignments.
Settings
Configure the Payroll app by navigating to Payroll app ‣ Configuration ‣ Settings. The various settings for accounting, localizations, time off, alerts, and payslips are specified here.
Accounting
The accounting section of the configuration menu relates to three options:
- Payroll Entries: enable this option to post payroll slips in accounting.
- Payroll SEPA: enable this option to create SEPA payments.
- Batch Account Move Lines: enable this option to have a single account move line created from all the accounting entries from the same period. This disables the generation of single payments.
Localizations
Localizations are country-specific settings pre-configured in Odoo at the creation of the database, which account for all taxes, fees, and allowances for that particular country.
The Localization section of the Payroll app Settings page may include specific settings that need to be set for the specific country. This selection also provides a detailed view of all benefits provided to employees.
The settings and options shown in this section varies, depending on the localization enabled for the database.
Warning
It is not recommended to alter the localization settings, unless specifically required.
Note
Odoo can handle a multi-company configuration. This is generally done when there is a main company or office location, such as a headquarters, and there are other offices/branches around the country or globe, that fall under that main company or headquarters. In Odoo, each company, including the headquarters, would be set up as their own company/branch using the multi-company method.
Each individual company can have a different localization setting, since locations can vary anywhere in the world, where rules and laws differ.
For more information on companies, refer to the Companies documentation, which covers how to set up companies.
Time off
- Deferred Time Off: if time off is taken after payslips are validated, the time off needs to be applied to the following pay period. Select the person that will be notified for these specific time off situations using the drop-down menu in the Responsible field.
Example
An employee is paid on the 15th of the month and the last day of the month. Payslips are typically processed a day before.
If an employee’s payslip is approved and processed on the 30th, but that same employee takes an unexpected sick day on the 31st, the time off needs to be logged.
Since the employee is already paid for a regular work day on the 31st, to keep the time off balances correct, the sick day is moved/applied to the 1st of the next month (the next pay period).
Payroll
- Contract Expiration Notice Period: enter the number of Days before a contract expires, and Odoo notifies the responsible person about the upcoming expiration at that time.
- Work Permit Expiration Notice Period: enter the number of Days before a work permit expires, and Odoo notifies the responsible person about the upcoming expiration at that time.
- Payslip PDF Display: enable this option to show the payslip’s PDF when the state is validated.
Contracts
In order for an employee to be paid, they must have an active contract for a specific type of employment. Creating and viewing contract templates, and creating and viewing employment types, is possible from this section of the configuration header menu.
Templates
Contract templates are used when sending an offer to a candidate. The contract template forms the basis of an offer, and can be modified for specific candidates or employees, when necessary. If a contract template is created or modified in the Payroll application, the changes are also reflected in the Recruitment application.
Important
To access contract templates, the Salary Configurator (hr_contract_salary) module must be installed.
To view all the current contract templates in the database, navigate to Payroll app ‣ Configuration ‣ Contracts: Templates.
On the Contract Templates page, all current contract templates appear in a list view. To view the details of a contract template, click anywhere on the line to open the contract form. The contract template can be modified from this form. Proceed to make any desired changes to the contract.
To create a new contract template, click the New button. Then, enter the following information on the blank contract template form that appears:
- Contract Reference: enter a brief description for the template. This should be clear and easily understood, as this name appears in the Recruitment application, as well.
- Working Schedule: select the desired working schedule the contract applies to from the drop-down menu. If a new working schedule is needed, create a new working schedule.
- Work Entry Source: select how the work entries are generated. Choices are either:
- Working Schedule: work entries are generated based on the selected working schedule.
- Attendances: work entries are generated based on the employee’s attendance, as they are logged in the Attendances application. Refer to the Attendances documentation for information on checking in and out.
- Planning: work entries are generated based on the employee’s planning in the Planning application.
- Salary Structure Type: select the salary structure type from the drop-down menu.
- Department: select the department the contract template applies to from the drop-down menu. If blank, the template applies to all departments.
- Job Position: select the job position the contract template applies to from the drop-down menu. If blank, the template applies to all job positions.
- Wage on Payroll: enter the monthly wage in the field.
- Contract Type: select the type of contract from the drop-down menu. This list is the same as the Employment Types.
- HR Responsible: select the employee responsible for validating contracts, using this template, from the drop-down menu.
- New Contract Document Template: select a default document that a new employee has to sign to accept an offer.
- Contract Update Document Template: select a default document that a current employee has to sign to update their contract.
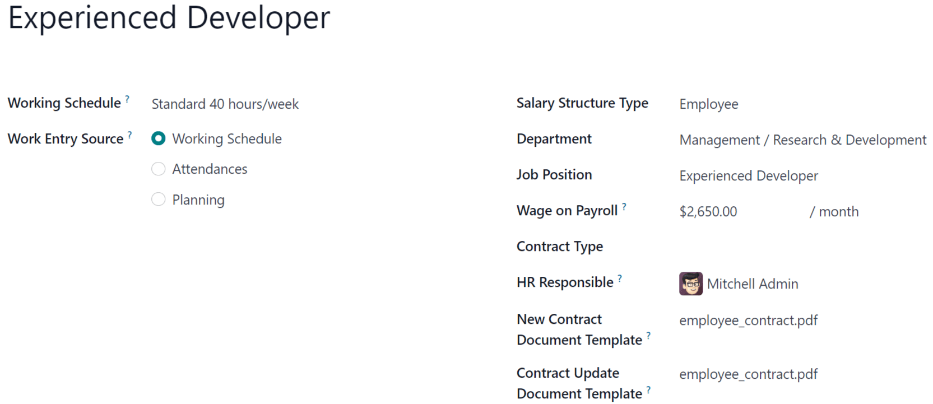
Salary information tab
- Wage Type: select either Fixed Wage or Hourly Wage from the drop-down menu.
- Schedule Pay: using the drop-down menu, select how often the employee is paid. Options include Annually, Semi-annually, Quarterly, Bi-monthly, Monthly, Semi-monthly, Bi-weekly, Weekly, or Daily.
- Wage: enter the gross wage. The time period presented in this field is based on what is selected for the Scheduled Pay field. It is recommended to populate the Yearly Cost (Real) field first, since that entry updates this field automatically.
- Yearly Cost (Real): enter the total yearly cost the employee costs the employer. When this value is entered, the Monthly Cost (Real) is automatically updated.
- Monthly Cost (Real): this field is not editable. The value is automatically populated after the Yearly Cost (Real) is entered.
Important
The Schedule Pay, Wage, and Yearly Cost (Real) fields are all linked. If any of these fields are updated, the other two fields automatically update to reflect the change. It is best practice to check these three fields if any modifications have been made, to ensure they are accurate.
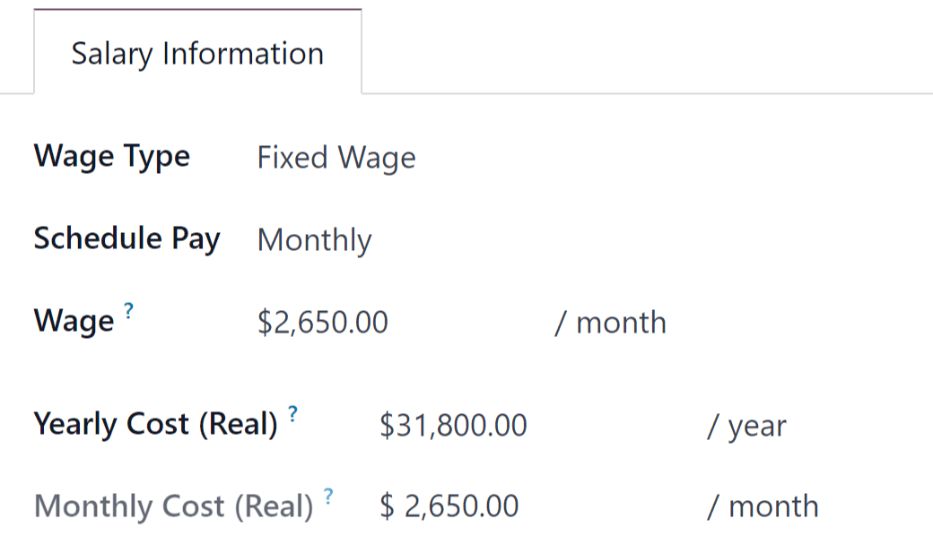
Pre-tax benefits and post-tax deductions
Depending on the localization settings set for the company, the entries presented in this section either vary, or may not appear at all.
For example, some entries may pertain to retirement accounts, health insurance benefits, and commuter benefits.
Enter the monetary amounts or percentages to specify how much of the employee’s salary goes to the various benefits and/or deductions.
Employment types
To view all the pre-configured employment types, navigate to Payroll application ‣ Configuration ‣ Contracts: Employment Types.
The employment types are presented in a list view on the Employment Types page.
The default employment types are Permanent, Temporary, Seasonal, Interim, Full-Time, Part-Time, and Permanent.
To make a new employment type, click the New button in the upper-left corner, and a blank line appears at the bottom of the Employment Types page.
On this new blank line, enter the name of the employment type in the Name column. If the employment type is country-specific, select the country using the drop-down menu in the Country column. If a country is selected, then the employment type is only applicable for that specific country.
To rearrange the order of the employment types, click the six small gray boxes icon to the left of the employment type Name, and drag the line to the desired position on the list.
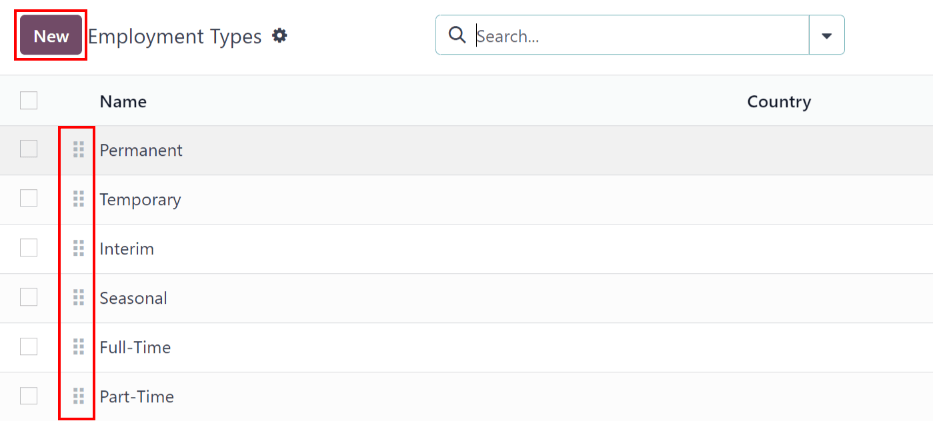
Work entries
A work entry is an individual record on an employee’s timesheet. Work entries can be configured to account for all types of work and time off, such as Attendance, Sick Time Off, Training, or Public Holiday.
See also
Work entry types
When creating a work entry in the Payroll application, or when an employee enters new time off types in Time Off application, a Work Entry Type needs to be selected. The list of Work Entry Types is automatically created based on localization settings set in the database.
To view the current work entry types available, go to Payroll app ‣ Configuration ‣ Work Entries ‣ Work Entry Types.
Each work entry type has a code to aid in the creation of payslips, and to ensure all taxes and fees are correctly entered.
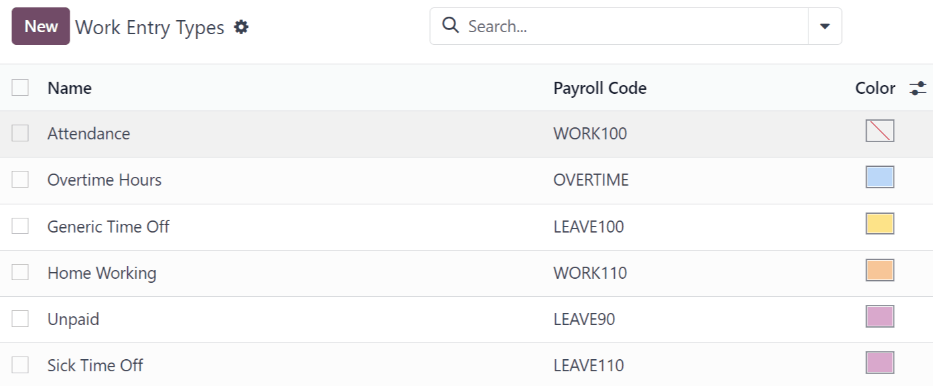
New work entry type
To create a new Work Entry Type, click the New button, and enter the information for the following sections on the form.
General information section
- Work Entry Type Name: the name should be short and descriptive, such as Sick Time or Public Holiday.
- Payroll Code: this code appears with the work entry type on timesheets and payslips. Since the code is used in conjunction with the Accounting application, it is advised to check with the accounting department for a code to use.
- External Code: this code is used for exporting data to a third-party payroll service. Check with the third-party being used to determine the External Code to enter for the new work entry type.
- Color: select a color for the particular work entry type.
Display in payslip section
- Rounding: the rounding method selected determines how quantities on timesheet entries are displayed on the payslip.
- No Rounding: entry is not modified.
- Half Day: entry is rounded to the closest half day amount.
- Day: entry is rounded to the closest full day amount.
Example
If the working time is set to an 8-hour work day (40-hour work week), and an employee enters a time of 5.5 hours on a work entry, and Rounding is set to No Rounding, the entry remains 5.5 hours. If Rounding is set to Half Day, the entry is changed to 4 hours. If it is set to Day, it is changed to 8 hours.
Unpaid section
- Unpaid in Structures Types: if the work entry is for work that is not paid, specify which pay structure the unpaid work entry applies to from the drop-down menu. Some situations where work is logged on a payslip, but no compensation given would be for unpaid internships, unpaid training, or volunteer work.
Valid for advantages section
- Meal Voucher: if the work entry should count towards a meal voucher, check the box.
- Representation Fees: if the work entry should count towards representation fees, check the box.
- Private Car Reimbursement: if the work entry should count towards a private car reimbursement, check the box.
Time off options section
- Time Off: check this box if the work entry type can be selected for a time off request, or entry, in the Time Off application.
If Time Off is checked, a Time Off Type field appears. This field has a drop-down menu to select the specific types of time off, such as Paid Time Off, Sick Time Off, or Extra Hours, for example.
A new type of time off can be entered in the field, if the listed types of time off in the drop-down menu do not display the type of time off needed.
Reporting section
- Unforeseen Absence: if the work entry should be visible on the unforeseen absences report, check this box.
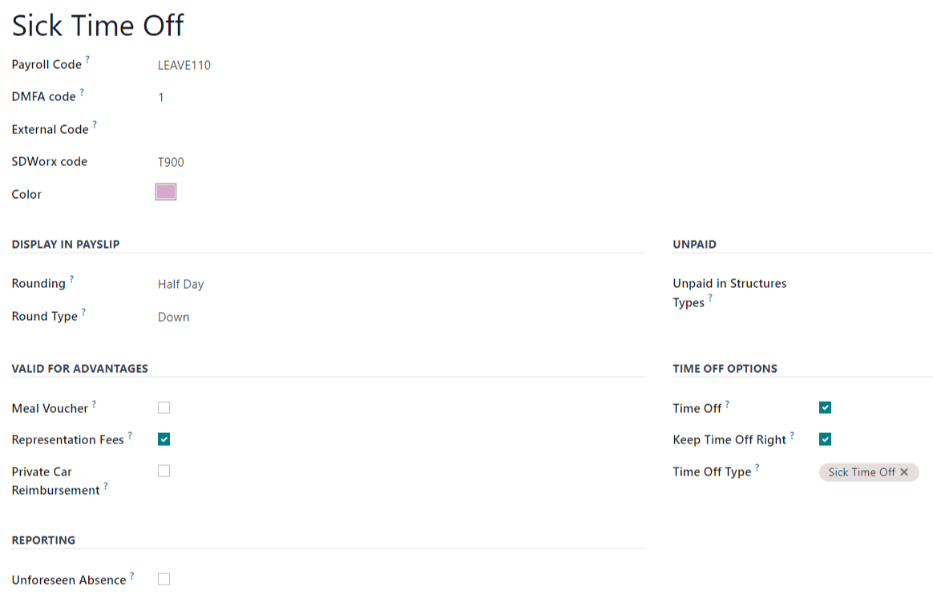
Working schedules
To view the currently configured working schedules, go to Payroll app ‣ Configuration ‣ Work Entries ‣ Working Schedules. The working schedules that are available for an employee’s contracts are found in this list.
Working schedules are company-specific. Each company must identify each type of working schedule they use. If the database is created for only one company, the company column is not available.
Example
An Odoo database containing multiple companies that use a standard 40-hour work week needs to have a separate working schedule entry for each company that uses the 40-hour standard work week.
A database with five companies that all use a standard 40-hour work week needs to have five separate 40-hour working schedules configured.
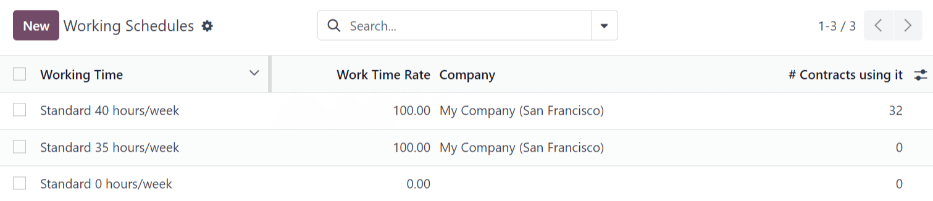
New working schedule
To create a new working schedule, click the New button, and enter the information on the form.
The fields are auto-populated for a regular 40-hour work week but can be modified. First, change the name of the working time by modifying the text in the Name field. Next, make any adjustments to the days and times that apply to the new working time.
In the Working Hours tab, modify the Day of Week, Day Period, and Work Entry Type selections by clicking on the drop-down menus in each column and making the desired selection. The Work From and Work To columns are modified by typing in the time.
Note
The Work From and Work To times must be in a 24-hour format. For example, 2:00 PM would be entered as 14:00.
If the working time should be in a two-week configuration, click the Switch to 2 weeks calendar button in the top-left. This creates entries for an Even week and an Odd week.
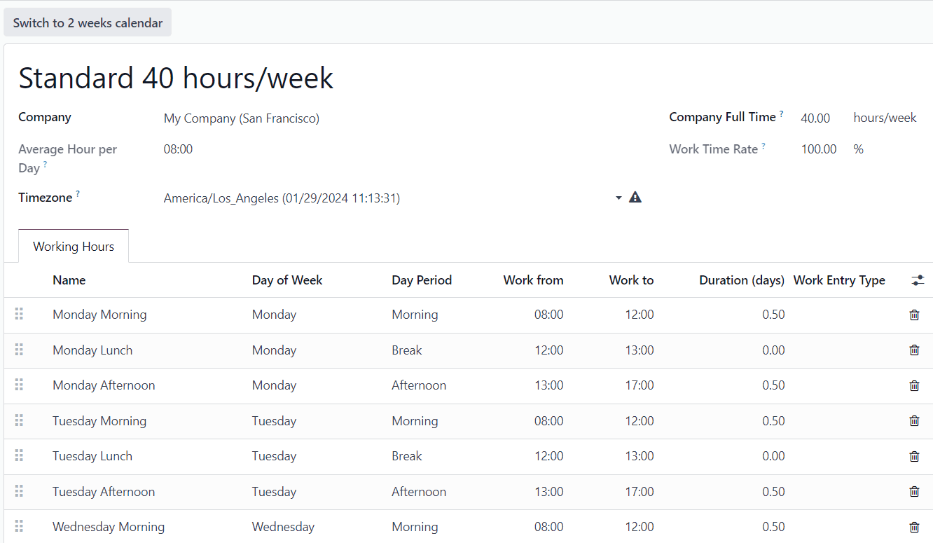
Salary
Structure types
In Odoo, structure types are used to identify group of people referring to the same payroll rules. A structure type contains specific options and a subset of structures that will be used according the situation.
In Odoo, an employee’s payslip is based on structures and structure types, which both affect how an employee enters timesheets. Each structure type is an individual set of rules for processing a timesheet entry, which consists of different structures nested within it. Structure types define how often an employee gets paid, the working hours, and if wages are based on a salary (fixed) or how many hours the employee worked (varied).
For example, a structure type could be Employee, and that structure type could have two different structures in it: a Regular Pay structure which includes all the separate rules for processing regular pay, as well as a structure for an End of Year Bonus which includes the rules only for the end of year bonus. Both the Regular Pay structure and End of Year Bonus structure are structures within the Employee structure type.
The different Structure Types can be seen by navigating to Payroll app ‣ Configuration ‣ Salary: Structure Types.
Two default structure types are configured in Odoo: Employee and Worker.
Typically, Employee is used for salaried employees, which is why the wage type is Monthly Fixed Wage, and Worker is typically used for employees paid by the hour, so the wage type is Hourly Wage.

New structure type
To make a new structure type, click the New button, and a blank structure type form appears.
Proceed to enter information in the fields. Most fields are pre-populated, but all the fields can be modified.
- Structure Type: enter the name for the new structure type, such as Employee or Worker.
- Country: select the country that the new structure type applies to from the drop-down menu.
- Wage Type: select what type of wage the new structure type uses, either Fixed Wage or Hourly Wage.
If the type is to be used for salaried employees, who receive the same wage every pay period, select Fixed Wage.
If the type is to be used for employees, who receive wages based on how many hours they worked during a pay period, select Hourly Wage. - Default Scheduled Pay: select the typical pay schedule for the new structure type from the drop-down menu. Options are Monthly, Quarterly, Semi-annually, Annually, Weekly, Bi-weekly, Bi-monthly. This indicates how often this specific type of structure is paid out.
- Default Working Hours: select the default working hours for the new structure type from the drop-down menu. All available working hours for the currently selected company appear in the drop-down menu. The default working hours that are pre-configured in Odoo is the Standard 40 hours/week option. If the needed working hours do not appear in the list, a new set of default working hours can be created.
- Regular Pay Structure: type in the name for the regular pay structure. It will be used as the default option when generating payslips.
- Default Work Entry Type: For employees whose contracts is referred under this structure type, the main work entry type used for all period of work is defined here. It will commonly be set as Attendance, Overtime Hours, Generic Time Off, Compensatory Time Off, Home Working, Unpaid, Sick Time Off, Paid Time Off, Out Of Contract, Extra Hours, and Long Term Time Off.
To view all the options for the Default Work Entry Type, click the Search More.. button at the bottom of the drop-down list.
Depending on the localization settings, this list may contain more options in addition to the default options.
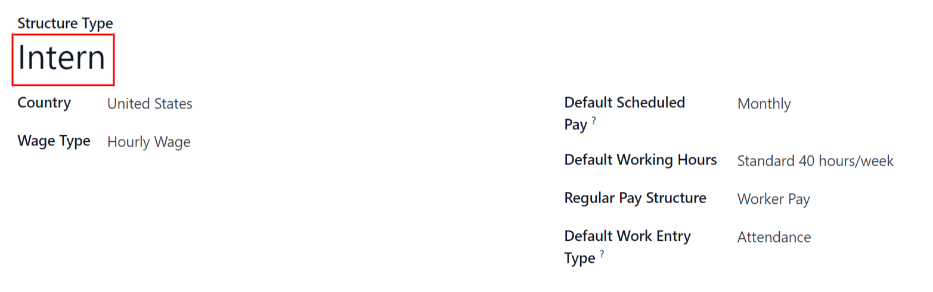
New default working hours
To make new default working hours, type the name for the new working hours in the Default Working Hours field on the new structure type form. Click Create and edit. A default working hours form pops up. The default working hours form has two sections, a general information section and a tab listing out all the individual working hours by day and time. When the form is completed, click Save & Close.
- Name: type in the name for the new default working hours. This should be descriptive and clear to understand, such as Standard 20 Hours/Week.
- Company: select the company that can use these new default working hours from the drop-down menu. Blank field means it’s available for all companies.
- Average Hour Per Day: the average hours per day field is auto-populated, based on the working hours configured in the Working Hours tab. This entry affects resource planning, since the average daily hours affect what resources can be used, and in what quantity, per work day.
- Timezone: select the time zone to be used for the new default working hours from the drop-down menu.
- Company Full Time: enter the number of hours per week an employee would need to work to be considered a full-time employee. Typically, this is approximately 40 hours, and this number affects what types of benefits an employee can receive, based on their employment status (full-time vs part-time).
- Work Time Rate: this percentage is auto-generated based on the entry for the Company Full Time and the working hours configured in the Working Hours tab. This number should be between 0.00% and 100%, so if the percentage is above 100%, it is an indication that the working times and/or Company Full Time hours need adjustment.
- Working Hours Tab: this tab is where each day’s specific working hours are listed. When a new default working hour form is created, the Working Hours tab is pre-populated with a default 40-hour week, with each day divided into three timed sections.
Every day has morning (8:00-12:00), lunch (12:00-13:00), and evening (13:00-17:00) hours configured, using a 24 hour time format.
To adjust any of these hours, click on the specific field to adjust, and make the adjustment using the drop-down menus, or in the specific case of the times, type in the desired time.
Keep in mind, working hours are company-specific, and cannot be shared between companies. Each company needs to have their own working hours set.
Note
If the working hours are not consistent each week, and the hours are on a bi-weekly schedule instead, click the Switch to 2 week calendar button at the top of the new default working hours form. This changes the Working Hours tab to display two weeks of working times that can be adjusted.
Structures
Salary structures are the different situations an employee could be paid within a specific structure, and are specifically defined by various rules.
The amount of structures a company needs for each structure type depends on how many different ways employees are paid, and how their pay is calculated. For example, a common structure that could be useful to add may be a Bonus.
To view all the various structures for each structure type, go to Payroll app ‣ Configuration ‣ Salary ‣ Structures.
Each structure type lists the various structures associated with it. Each structure contains a set of rules that define it.
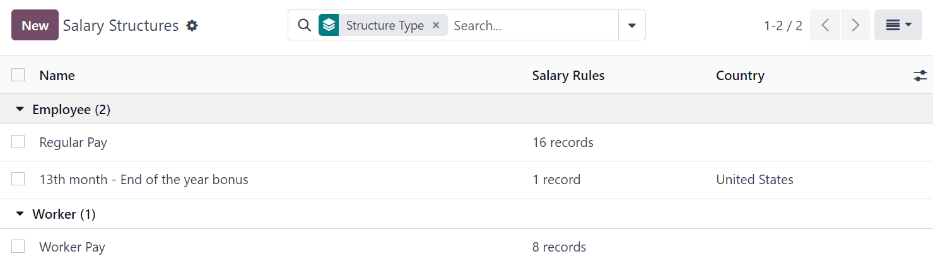
Click on a structure to view its Salary Rules. These rules define how the payslip will be computed for the employee.
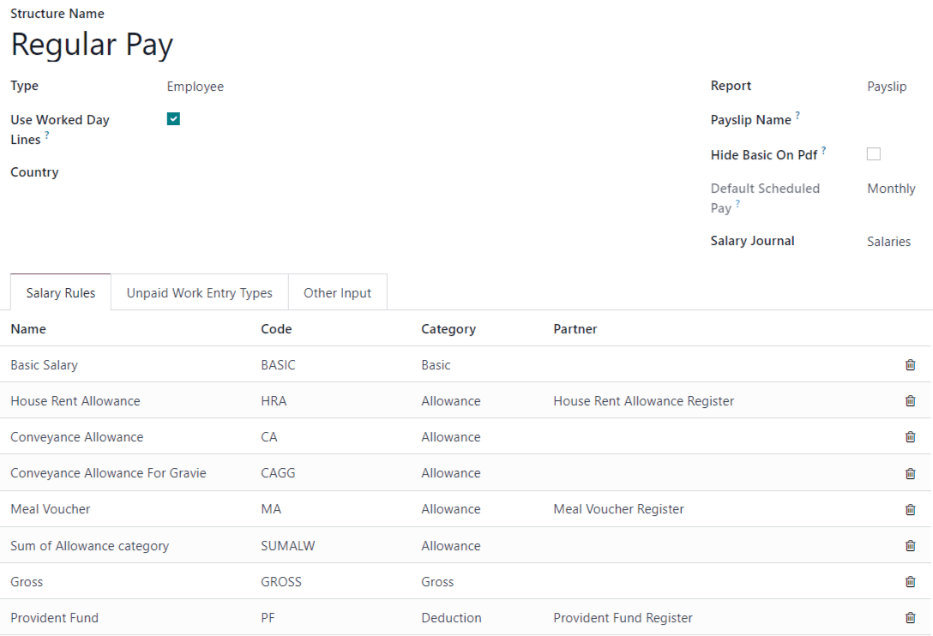
Rules
Each structure has a set of salary rules used to compute the various amounts considered in the pay. These rules are configured by the localization and affect the computation of the salaries. Modification or creation of rules should only be done when necessary.
To view all the rules, go to Payroll app ‣ Configuration ‣ Salary ‣ Rules. Click on a structure (such as Regular Pay) to view all the rules.
To make a new rule, click New. A new rule form appears. Enter the following information in the fields.
Top section
- Rule Name: enter a name for the rule. This field is required.
- Category: select a category the rule applies to from the drop-down menu, or enter a new one. This field is required.
- Code: enter a code to be used for this new rule. This field is required.
- Sequence: enter a number indicating when this rule is calculated in the sequence of all other rules.
- Salary Structure: select a salary structure the rule applies to from the drop-down menu, or enter a new one. This field is required.
- Active: enable this toggle, so the rule is available for use. Disable the toggle to continue to show it on the payslip, but skip the computation.
- Appears on payslip: tick the checkbox to have the rule appear on employee printed payslip.
- View on Employer Cost Dashboard: tick the checkbox to have the rule appear on the Employer Cost report, located on the Payroll app dashboard.
- View on Payroll Reporting: tick the checkbox to have the rule appear on payroll reports.
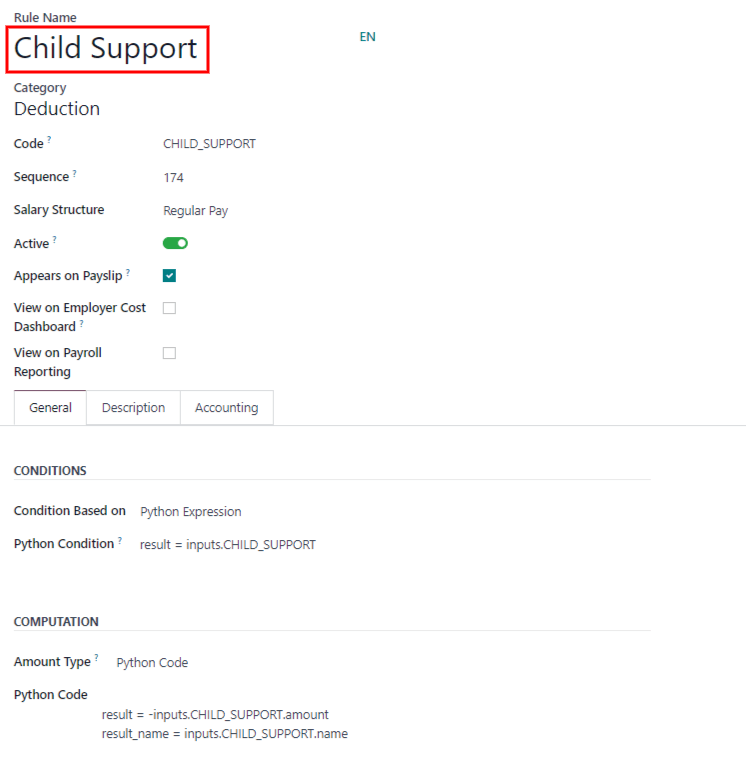
General tab
Conditions
- Condition Based on: select from the drop-down menu whether the rule is Always True (always applies), a Range (applies to a specific range, which is entered beneath the selection), or a Python Expression (the code is entered beneath the selection). This field is required.
Computation
- Amount Type: select from the drop-down menu whether the amount is a Fixed Amount, a Percentage (%), or a Python Code. Depending on what is selected, the fixed amount, percentage, or Python code needs to be entered next. This field is required.
Company contribution
- Partner: if another company financially contributes to this rule, select the company from the drop-down menu.
Description tab
Provide any additional information in this tab to help clarify the rule. This tab only appears in the rule form.
Accounting tab
- Debit Account: select the debit account from the drop-down menu the rule affects.
- Credit Account: select the credit account from the drop-down menu the rule affects.
- Not computed in net accountability: If checked, the amount of the rule will be show independantly from the Net Salary, to allow a better reporting in Accounting.
Other input types
When creating payslips, it is sometimes necessary to add other entries for specific circumstances, like expenses, reimbursements, or deductions. These other inputs can be configured by navigating to Payroll app ‣ Configuration ‣ Salary ‣ Other Input Types.
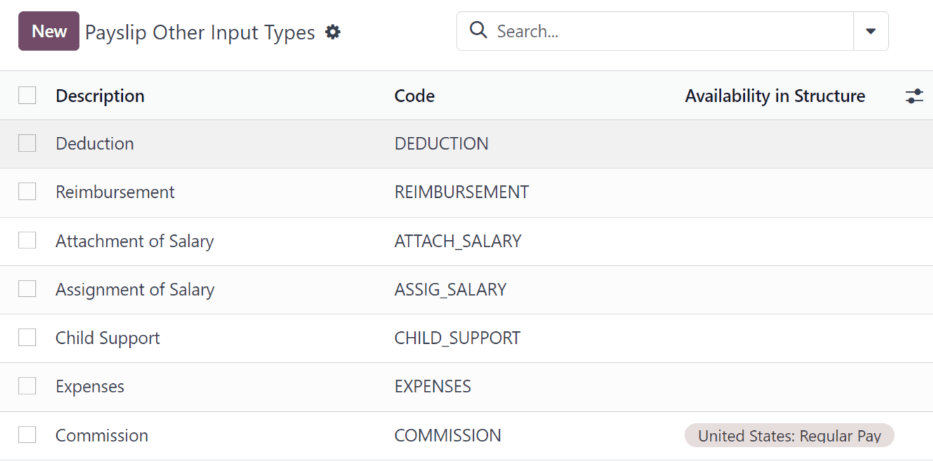
To create a new input type, click the New button. Enter the Description, the Code, and which structure it applies to in the Availability in Structure field.
Important
The Code is used in the salary rules to compute payslips. If the Availability in Structure field is left blank, it indicates that the new input type is available for all payslips and is not exclusive to a specific structure.

Salary package configurator
The various options under the Salary Package Configurator section of the Payroll app ‣ Configuration ‣ Salary Package Configurator menu all affect an employee’s potential salary.
Depending on what information an employee enters (such as deductions, dependents, etc.), their salary is adjusted accordingly. When an applicant applies for a job on the company website, the sections under Salary Package Configurator directly affect what the applicant sees, and what is populated, as the applicant enters information.
Benefits
When offering potential employees a position, there can be certain benefits set in Odoo, in addition to the salary, to make an offer more appealing (such as extra time off, the use of a company car, reimbursement for a phone or internet, etc.).
To view the benefits, go to Payroll app ‣ Configuration ‣ Salary Package Configurator: Benefits. Benefits are grouped by Structure type, and the benefit listed for a particular structure type is only available for that specific structure.
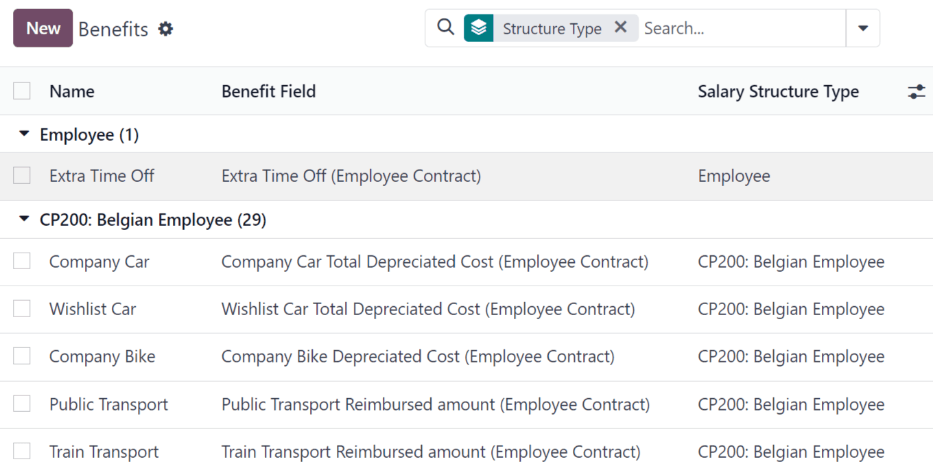
Example
A company has two structure types, one labeled Employee, and another labeled Intern. The Employee structure type contains the benefit of using a company car, while the Intern structure type has a meal voucher benefit available.
A person hired under the Employee structure type can use the company car benefit, but cannot have meal vouchers. A person hired under the Intern structure type would have meal voucher benefits available to them, not the use of a company car.
To make a new benefit, click the New button, and enter the information in the fields on the blank benefits form.
The various fields for creating a benefit are as follows:
General information section
- Contract Related Field: select from the drop-down menu a field from the contract. The choosen value from the employee will be recorded to that field.
- Benefits: enter the name for the benefit. This field is required.
- Benefit Type: select from the drop-down menu what type of benefit it is. Select from Monthly Benefit in Kind, Monthly Benefit in Net, Monthly Benefit in Cash, Yearly Benefits in Cash, or Non Financial Benefits. This field is required.
- Cost Field: select from the drop-down menu a field from the contract. The field will define the cost of the benefit and by extention the impact on the salary, Wage, Wage with Holidays, and Work time rate. Depending on the localization settings, additional options are available.
- Related Type: select from the drop-down menu what type of benefit it is. Select from Monthly Benefit in Kind, Monthly Benefit in Net, Monthly Benefit in Cash, Yearly Benefits in Cash, or Non Financial Benefits. This field is required.
- Impacts Net Salary: tick the checkbox if the benefit should impact the employee’s net salary.
- Requested Documents: select any document that is required to be submitted for this benefit, from the drop-down menu.
- Mandatory Benefits: using the drop-down menu, select the benefit that is required in order for this specific benefit to be offered to the employee.
For example, a benefit for car insurance would populate Company Car in this field. This would allow the car insurance benefit to only be displayed if the employee has selected/enabled the benefit of a company car. - Salary Structure Type: select from the drop-down menu which salary structure type this benefit applies to. This field is required.
- Unit of Measure: select the metric that the benefit is granted, using the drop-down menu. The options are Days, Percent, or Currency.
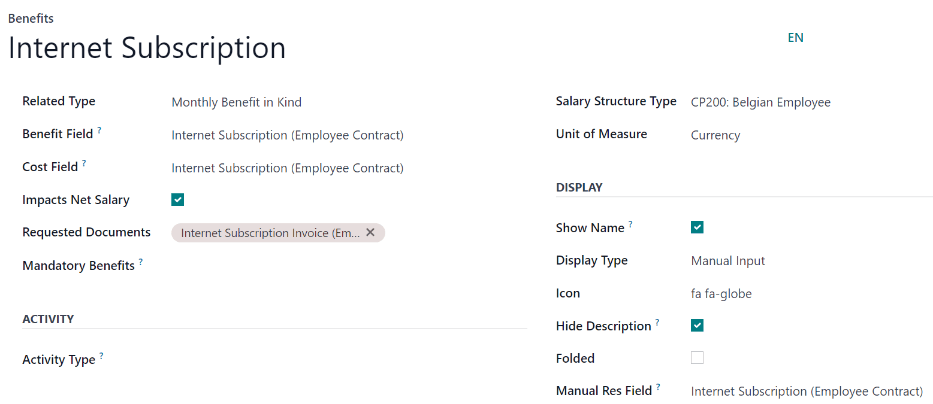
Display section
- Show Name: tick the checkbox to have the benefit name appear in the salary package configurator.
- Display Type: select from the drop-down menu how this benefit is displayed. The options are Always Selected, Dropdown, Dropdown Group, Slider, Radio Buttons, Manual Input, or Text. This field is required.
Depending on the selection made, additional configurations need to be made. For example, if Radio Buttons is selected, the individual radio buttons must be entered. - Icon: an icon from the Font Awesome 4 library can be visible for this benefit. Enter the text code for the icon in this field. For example, to display a suitcase icon, the code fa fa-suitcase is entered on this line.
- Hide Description: tick the checkbox to hide the benefit description if the benefit is not selected by the employee.
- Folded: if the benefit should be folded, or hidden, because it is dependant on another benefit selection, tick the checkbox. The following fields appear when this is active:
- Fold Label: enter a name for the folded section of the benefit.
- Fold Res Field: select the contract field this benefit is tied to using the drop-down menu. If this field is selected on the contract, then this benefit becomes visible.
Activity section
- Activity Type: from the drop-down menu, select the activity type that is automatically created when this benefit is selected by the employee.
- Activity Creation: select when the activity is created, either when the Employee signs his contract, or when the Contract is countersigned. Click the radio button next to the desired selection.
- Activity Creation Type: select the parameters for when the activity is created, either When the benefit is set or When the benefit is modified. Click the radio button next to the desired selection.
- Assigned to: select the user the activity is automatically assigned to, using the drop-down menu.
Sign section
- Template to Sign: if the employee is required to sign a document when selecting this benefit, select the document template from the drop-down menu.
For example, a benefit regarding the use of a company car may require the employee to sign a document acknowledging the company’s car policies.
Description tab
Provide any additional information in this tab to help clarify the benefit.
Personal info
Every employee in Odoo has an employee card which is created when a candidate becomes an employee. This card includes all of their personal information, resume, work information, and documents.
The personal information is gathered from the salary package configurator section that a candidate fills out after being offered a position. This personal information is then transferred to the employee card when they are hired.
To view an employee’s card, go to the main Employees app dashboard, and click on the employee’s card.
Note
An employee card can be thought of as an employee personal file.
The Personal Info section lists all of the fields that are available to enter on the employee’s card. To access this section, go to Payroll app ‣ Configuration ‣ Salary Package Configurator: Personal Info.
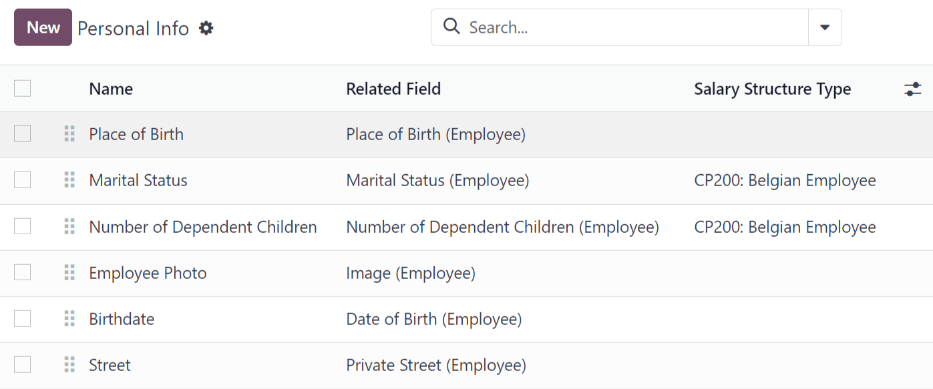
To edit a personal info entry, select an entry from the list on the Personal Info page, and modify the personal info on the form that appears.
To create a new personal info entry, click the New button.
The required fields, aside from entering the Information name, are Related Model, Related Field, and Category.
Select a Related Model from the drop-down menu. Employee populates the field by default, but the Bank Account option is also available if the information is related to a bank account, instead.
Select a Related Field from the drop-down menu that best describes what kind of personal information this entry is, and where it is stored in the backend. Then, select a Category from the drop-down menu that the personal information should be under, such as Address or Personal Documents.
The two most important fields on the personal info form are Is Required and Display Type.
Checking the Is Required box makes the field mandatory on the employee’s card. The Display Type drop-down menu allows for the information to be entered in a variety of ways, like a Text box, to a customizable Radio button, a Checkbox, a Document, and more.
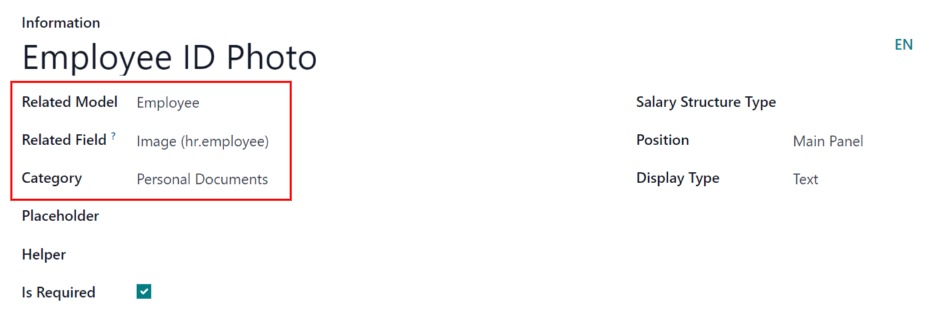
Resumé
The resumé section, housed within the salary package configurator section of the settings menu, is how salary information rules are configured when offering a position to potential employees.
When an offer is sent to a prospective employee, the values for the offer are computed from these settings, and appear on the offer page.
To configure this section, navigate to Payroll app ‣ Configuration ‣ Salary Package Configurator: Resumé.
By default, there are three Salary Structure Types pre-configured in Odoo: Worker, Employee, and None.
Each Salary Structure Type has several rules configured. These affect how an offer is calculated using that particular Salary Structure Type.
To create a new rule, click the New button, and a blank Contract Salary Resumé form loads.
Enter the following information on the form:
- Information: type in a name for this field.
- Category: select the category this value is housed under, using the drop-down menu. The default options are Monthly Salary, Monthly Benefits, Yearly Benefits, and Total.
New categories can be made if needed.
Click the New button, then enter the name for the new category in the Name field. Next, select the Periodicity from the drop-down menu, either Monthly or Yearly. Last, enter a number for the sequence. This corresponds to where this rule appears in the Salary Structure Type rule list.
Finally, click Save & Close. - Impacts Monthly Total: tick the checkbox if this value is added in the monthly total calculation.
- Unit of Measure: select what kind of value this rule is, either Currency, Days, or Percent.
Currency is for a set monetary value, Days is for compensation in the form of time off, and Percent is for a monetary value awarded that is based upon another metric, such as commissions. - Salary Structure Type: select which Salary Structure Type this rule is nested under, from the drop-down menu.
- Value Type: select how the value is computed, using the drop-down menu. The default options are Fixed Value, Contract Value, Payslip Value, Sum of Benefits Values, and Monthly Total.
- Code: select the code this rule applies to from the drop-down menu.
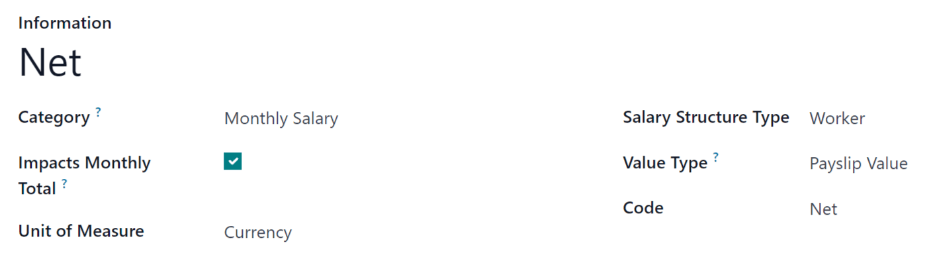
Jobs
Since the Payroll application is responsible for paying employees for specific job positions, the complete list of job positions can be found in both the Payroll and Recruitment applications.
Job positions
The job positions listed in the Payroll application are identical to the job positions listed in the Recruitment application. If a new job position is added in the Recruitment application, it is also visible in the Payroll application, and vice versa.
To view the job positions, navigate to Payroll app ‣ Configuration ‣ Jobs: Job Positions.
A list of all the job positions appear, along with the corresponding department, on the Job Position page.
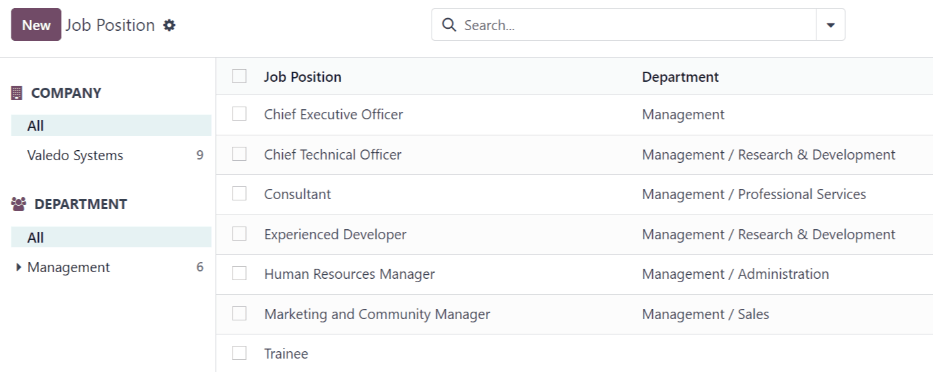
To create a new job description, click the New button and a job form appears.
Enter the information on the form for the new position. The information is identical as to the information entered when creating a new job position in the Recruitment application.
Refer to the Job positions documentation for more details on how to fill out this form.
See also
- Contracts
- Work entries
- Salary attachments
- Payslips
- Reporting
- Work entry analysis
- Salary attachment report
- Payroll localizations
On this page
Get Help
Contact Support Ask the Odoo Community
![]()
- User Docs
- Database management
- Developer
- Contributing
EN
Odoo 18
Contracts
Every employee in Odoo is required to have a running contract in order to be paid. A contract outlines the terms of an employee’s position, their compensation, working hours, and any other details about their position.
Important
Contract documents (PDFs) are uploaded and organized using the Documents application, and are signed using the Sign application. Ensure these applications are installed to send and sign contracts. Please refer to the Documents and Sign documentation.
To view the employee contracts, go to the Payroll app ‣ Contracts ‣ Contracts from the top menu. All employee contracts, and their current contract status, are displayed in a list view, by default. The list view displays running contracts, contracts that require action, expired contracts, and cancelled contracts.
Note
The list of contracts in the Payroll application matches the list of contracts in the Employees application.
In order for an employee to be paid, an active contract is required. If a new contract is needed, click the Create button on the Contracts dashboard. A contract form appears where the information can be entered.
New contract form
General information section
- Contact Reference: type in the name or title for the contract, such as John Smith Contract. This field is required.
- Employee: using the drop-down menu, select the employee that the contract applies to.
- Contract Start Date: the date the contract starts. To choose a date, click the drop-down menu, navigate to the correct month and year with the < > (arrow) icons, then click on the desired date. This field is required.
- Contract End Date: if the contract has a specific end date, click the drop-down menu, navigate to the correct month and year with the < > (arrow) icons, then click on the desired date.
- Working Schedule: select one of the working schedules from the drop-down menu. This field is required.
Tip
The Working Schedule drop-down menu displays all the working schedules for the selected company. To modify or add to this list, go to Payroll app ‣ Configuration ‣ Working Schedules. Click New, and create a new working schedule, or click on an existing working schedule and make edits. - Work Entry Source: select how the work entries are generated. This field is required. Click the radio button next to the desired selection. The options are:
- Working Schedule: work entries are generated based on the selected Working Schedule.
- Attendances: work entries are generated based on the employee’s check-in records in the Attendances application. (This requires the Attendances application).
- Planning: work entries are generated based on the planned schedule for the employee from the Planning application. (This requires the Planning application).
- Salary Structure Type: select one of the salary structure types from the drop-down menu. The default salary structure types are Employee or Worker. A new salary structure type can be created, if needed.
- Department: select the department the contract applies to from the drop-down menu.
- Job Position: select the specific job position the contract applies to from the drop-down menu.
Note
If the selected Job Position has a contract template linked to it with a specific Salary Structure Type, the Salary Structure Type changes to the one associated with that Job Position. - Wage on Payroll: enter the employee’s monthly wage.
- Contract Type: choose either Permanent, Temporary, Seasonal, Full-Time, or Part-Time from the drop-down menu.
Tip
The Working Schedule drop-down menu displays all the working times for the selected Company. To modify or add to this list, go to Payroll app ‣ Configuration ‣ Working Times, and either Create a new working time, or click on an existing working time, then edit it by clicking Edit.
- Yearly Cost (Real): this field automatically updates after the Schedule Pay and Wage fields are entered. This amount is the total yearly cost for the employer. This field can be modified. However, if this is modified, the Wage field updates, accordingly. Ensure both the Wage and Yearly Cost (Real) are correct if this field is modified.
- Monthly Cost (Real): this field automatically updates after the Schedule Pay and Wage fields are entered. This amount is the total monthly cost for the employer. This field cannot be modified, and is calculated based on the Yearly Cost (Real).

Contract Details tab
The Contract Details tab allows for the addition and editing of a contract, along with specifying which template to use when a new contract is created. These fields must be populated in order to create a new contract.
Important
To access the various contract template fields in the Contract Details tab, the Salary Configurator (hr_contract_salary) module must be installed.
When the Salary Configurator module is installed, the Salary Configurator - Holidays and Salary Configurator - Payroll modules install, as well.
Once the modules are installed, the database reverts to the main dashboard.
- Contract Template: select a pre-existing contract template from the drop-down menu. Contract templates are typically created through the configuration menu, and stored in the Documents application.
Sign section
- HR Responsible: select the person who is responsible for validating the contract from the drop-down menu. This field is required.
- New Contract Document Template: select a contract from the drop-down menu to be modified for this new employee contract. These documents are stored in the Sign application.
- Contract Update Document Template: select a contract from the drop-down menu, if the employee has an existing contract that requires updating. These documents are stored in the Sign application.
Important
The HR Responsible, New Contract Document Template, and Contract Update Document Template fields are only visible if the Sign application is installed, along with the hr_contract_salary and hr_contract_salary_payroll modules. The Sign application is where the contract templates are stored. This application is required for an employee to sign any contract.
Accounting section
- Analytic Account: select the account the contract affects from the drop-down menu. It is recommended to check with the accounting department to ensure the correct account is selected.
Part Time section
- Part Time: tick this box if the employee is working part-time. When active, additional fields appear:
- % (Percentage): enter the percent of time the employee works as compared to a full-time employee.
- Standard Calendar: select the working hours that a typical full-time worker uses from the drop-down menu.
- Part Time Work Entry Type: select the work entry type that generates the balance of a full-time working schedule.
Example
If a full-time employee works 40 hours a week, and the employee works 20, enter 50 in the % (Percentage) field (50% of 40 hours = 20 hours). The employee generates twenty (20) hours of work entries under the work entry type part-time, and another twenty (20) hours of work entries under the work entry type generic time off, for a total of forty (40) hours worth of work entries.
Notes section
- Notes: a text field where any notes for the employee contract are entered for future reference.
Modify a contract template
Click the (external Link) icon at the end of either the New Contract Document Template or Contract Update Document Template to open the corresponding contract template, and proceed to make any desired changes.
Click the Upload your file button next to the corresponding document, navigate to the file, then click Open to select the document and add it to the tab.
Modifying document templates
Contracts templates can be modified at any point when changes are needed.
- Tags: select any tags associated with the contract.
- Signed Document Workspace: this is where the signatures are stored. Choose a pre-configured workspace, or create a new one. To create a new Signed Document Workspace, type in the name of the workspace, then click either Create to add the new workspace, or Create and Edit to add the workspace and modify the workspace details.
- Signed Document Tags: select or create any tags that are only associated with the signed contract, as opposed to the original unsigned contract.
- Redirect Link: enter a redirect link for the employee to access the contract. A redirect link takes the user from one URL to another. In this case, it takes them to the newly-updated contract specifically written for them.
- Who can Sign: select either All Users or On Invitation.
- All Users: any user in the organization can sign the contract.
- On Invitation: only users selected in this field can sign the contract.
- Invited Users: select the person (or people) that can sign the document.
- Document: the attached document can be replaced by clicking the (pencil) icon. A pop-up window appears, so another document can be selected for upload. The file must be a PDF. To remove the document, click the (trash can) icon.
Once the edits are complete, click the Save button. All the information for the selected contract template populates the fields in the Salary Information tab. Any additional tabs, such as Personal Documents, appears if applicable.
Personal documents
This tab only appears after an Employee is selected, and houses any documents that are linked to the employee on their employee record. Documents cannot be added to this tab, this tab only shows documents that are already uploaded and associated with the employee.
The available documents in this tab can be downloaded. Click the (download) icon next to the document to download it.
Send the contract
Click on the following button to send the contract to the employee:

- Generate Offer: Clicking this opens a pop-up window that contains the basic information from the contract, as well as a link for the contract when using the salary configurator. Click Send to send an email to the employee, so they can sign the contract.
At the bottom of the pop-up form is a Link Expiration Date. This is the timeframe that the contract offer is valid for. By default, this field is pre-populated with 30 days, but it can be modified.
Note
In order to send a contract using the Generate Simulation Link, there must be a signature field in the contract PDF being sent to the employee, so they can sign it.
- Signature Request: clicking this reveals a pop-up window, where an email can be typed to the employee. Select the document (such as a contract, NDA, or Homeworking Policy) from the drop-down menu, and fill out the email section. Click Send when the email is ready to be sent.
Note
To send a contract using the Generate Simulation Link, there must be a signature field in the contract PDF being sent to the employee, so they can sign it.
Salary attachments
Any automatic deductions or allocations for an employee, such as child support payments and wage garnishments, are referred to as a salary attachment. This section is where all of these deductions or allocations are set.
To add a new deduction, first navigate to Payroll app ‣ Contracts ‣ Salary Attachments. Next, click Create, and a new salary attachment form loads.
Fill out the following fields on the form:
- Employee: using the drop-down menu, select the employee the salary attachment applies to.
- Description: enter a short description for the salary attachment, such as Child Support or 529 Contribution.
- Type: using the drop-down menu, select the type of salary attachment being created.
- Start Date: the date the salary attachment starts. Choose a date by clicking on the drop-down menu, navigating to the correct month and year by using the (arrow) icons, then clicking on the desired date. This field is required.
- Estimated End Date: this field automatically populates after both the Monthly Amount and Total Amount fields are populated. This field is not modifiable.
- Document: attach any documents relevant to the salary attachment. Click the Upload Your File button, navigate to the desired document in the file explorer, then click Open to select the document, and attach it to the form. To change the attached document, click the (pencil) icon, and select a different document. To remove a document, click the (trash can) icon.
- Monthly Amount: enter the amount to be taken out of the employee’s paycheck every month for this specific salary attachment.
- Total Amount: enter the total amount that the employee pays for the salary attachment to be completed.
On this page
Get Help
Contact Support Ask the Odoo Community
![]()
- User Docs
- Database management
- Developer
- Contributing
EN
Odoo 18
Work entries
Work entries are created automatically in the Payroll app, based on the employee’s salary structure type, and from the Planning, Attendances, and Time Off applications.
The Work Entries dashboard of the Payroll application provides a visual overview of the individual work entries for every employee.
To open the dashboard, navigate to Payroll app ‣ Work Entries ‣ Work Entries.
On the Work Entry dashboard, work entries appear in alphabetical order, based on the first name of the employees. The entire month is displayed, with the current day highlighted in pale yellow.
If any entries have conflicts that need to be resolved, the dashboard defaults to filter only the Conflicting entries.
To remove the filter from the Search… bar to view all work entries, click the ✖️ (remove) icon on the Conflicting filter in the Search… bar, and all work entries appear in the list.
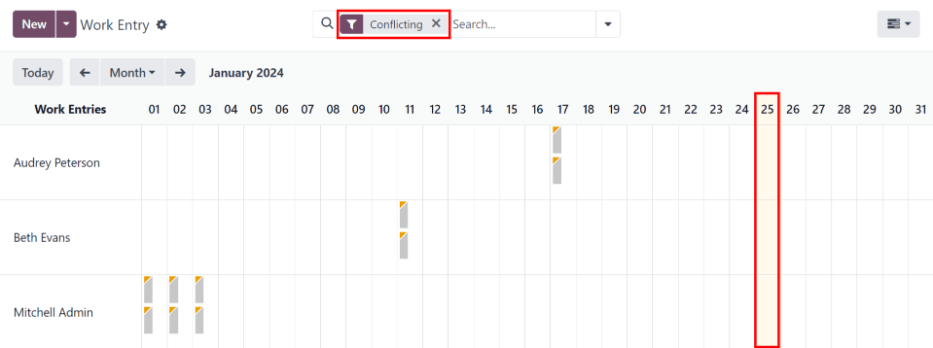
To change the view, so only the entries for a single day, week, or month are shown, click on Month. A drop-down menu appears with the options of Day, Week, or Month. Click on one of the options to only display data for that specific selection.
Use the ⬅️ (left arrow) and ➡️ (right arrow) icons on the left and right side of the Month button to adjust the displayed dates. The arrows adjust the date based on the type of time selected.
For example, if Month is selected, the arrows move one month with each click of the arrow. If Week or Day is selected, the time moves by either a week or a day for each click of the arrow, respectively.
At any point, to return to a view containing the current day, click the Today button.
Add a new work entry
If a work entry is missing and needs to be added, such as sick time, or if an employee forgot to clock in and out for a shift, click New on the Work Entry dashboard, to create a new work entry.
A Create work entry pop-up form appears.
Enter the following information on the form:
- Description: enter a short description for the work entry, such as Sick Time. If this field is left blank, it automatically populates once an employee is selected. The default entry is Attendance: (Employee).
- Employee: select the employee the work entry is for, using the drop-down menu.
- Work Entry Type: select the work entry type using the drop-down menu.
- From and To: enter the start (From) and end (To) dates and times for the work entry.
First, click on either the From or To line to reveal a calendar pop-up window. Select the date by navigating to the correct month and year, using the < (left arrow) and > (right arrow) icons, then click on the specific day.
Next, select the time, by clicking on either the hour or minute fields at the bottom of the calendar, and select the desired time for both the hour and minutes.
When the date and time are correct for the entry, click the Apply button. - Duration: displays the hours based on the To and From entries. Modifying this field modifies the To field (the From field does not change).
Once the desired information is entered, click Save & Close to save the entry, and close the pop-up form.
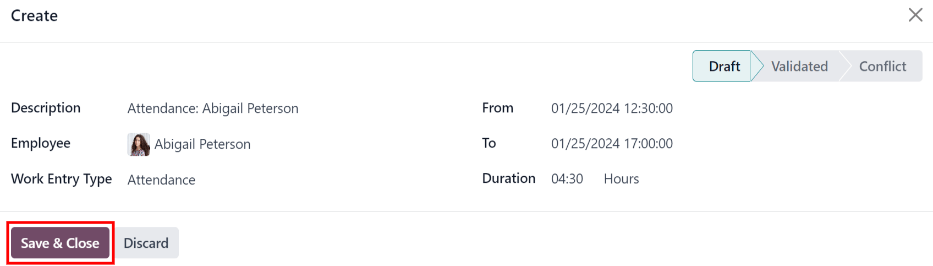
Conflicts
A conflict appears for any request that has not been approved, such as sick time or vacation, or if there are any errors on the work entry, such as required fields being left blank. Conflicts are required to be resolved before payslips can be generated.
Any work entry that has a conflict to be resolved is indicated on the main Work Entry dashboard, which can be accessed by navigating to Payroll app ‣ Work Entries ‣ Work Entries. Only conflicts needing resolution are shown by default.
Conflicts are indicated with an orange triangle in the top-left corner of each individual work entry. Click on an individual work entry to see the date and time for the specific work entry, then click Edit to view the conflict details in a pop-up window.
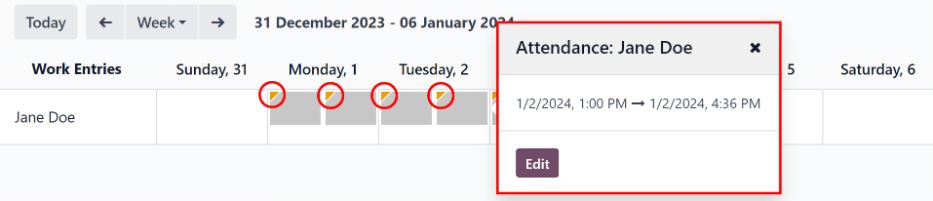
The conflict is briefly explained in an orange text box in the Open pop-up window that appears.
The Description, Employee, and Work Entry Type are listed on the left side of the pop-up window. The From and To date and time range, as well as the total time (in hours) in the Duration field, appears on the right side.
If the conflict is due to a time off request that has not been approved yet, a Time Off field appears on the left side, with the type of time off requested in the description.
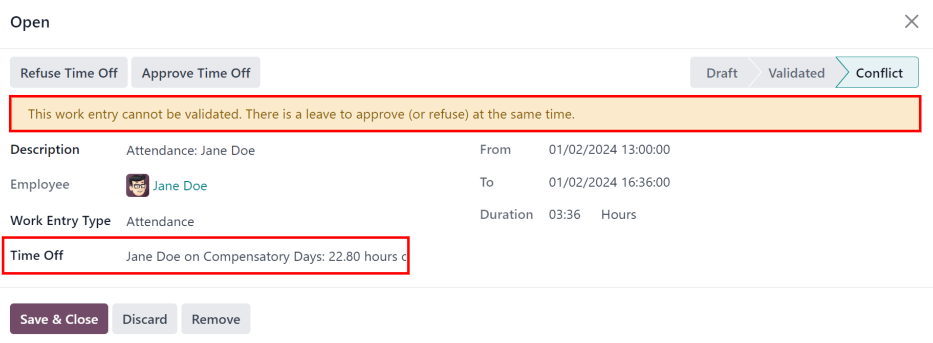
Time off conflicts
The most common work entry conflicts are for time off requests that have been submitted, but not yet approved, which results in duplicate work entries for that employee (one for time off and another for regular work).
If there is a conflict because a time off request is in the system for the same time that a regular work entry already exists, the time off request is entered in the Time Off field.
The time off conflict can be resolved either on the work entry pop-up window, or on a detailed time off request pop-up window.
Resolve on work entry
To resolve the time off conflict on this work entry pop-up window, click the Approve Time Off button to approve the time off request, and resolve the work entry conflict.
The Approve Time Off and Refuse Time Off buttons disappear. Click the Save & Close button to close the pop-up window. The conflict disappears from the Work Entry dashboard, since the conflict is resolved.
Resolve on time off request
To resolve the time off conflict on the detailed time off request pop-up window, click the Internal Link button at the end of the Time Off entry line, and the time off request details appear in a new pop-up window. The request can be modified, if needed.
Click the Approve button to approve the request, then click the Save & Close button to save the changes, and go back to the work entry conflict pop-up window.
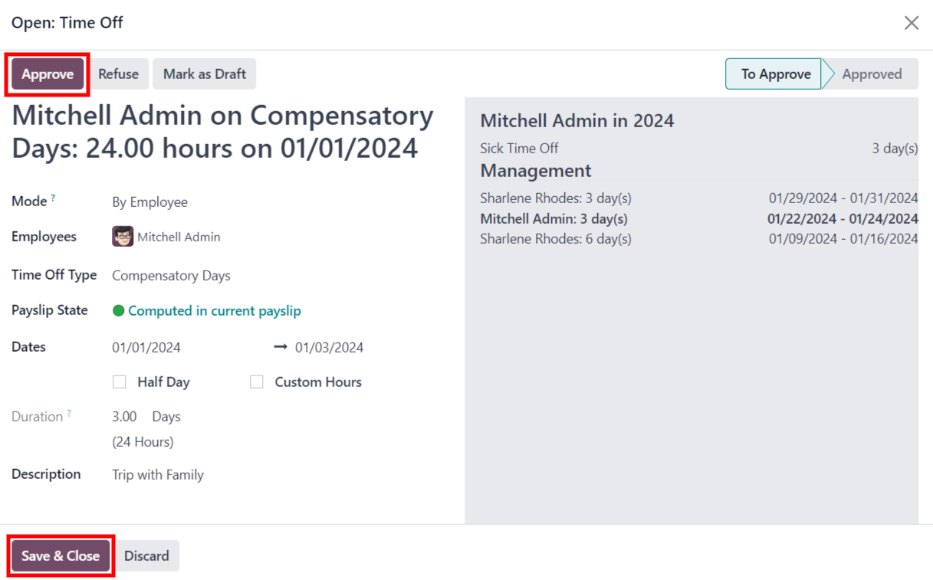
Now, the Approve Time Off button is hidden, only the Refuse Time Off button is visible.
If the approval was a mistake, the request can be refused here, by clicking the Refuse Time Off button.
Since the time off was approved in the time off window, click the X in the top-right corner to close the window. The conflict disappears from the Work Entry dashboard, since it has been resolved.
Regenerate work entries
When regenerating work entries, any manual changes, such as resolved conflicts, are overwritten, and work entries are regenerated (or recreated) from the applications that created them.
This method for correcting a large amount of conflicts is recommended to keep all records correct. While conflicts can be resolved individually, if the conflicts are caused from another application, it is best practice to ensure the records in the other applications are also correct. That is why it is recommended to resolve these conflicts in the applications that created the conflict.
Another reason this method is recommended is because, when work entries are regenerated, the conflicts reappear, if the issue in the related application is not resolved.
First, ensure the issues are resolved in the specific applications that caused the work entry conflicts.
Next, click the Regenerate Work Entries button at the top of the Work Entries dashboard, and a Work Entry Regeneration pop-up window appears.
Select the Employees to regenerate work entries for from the drop-down menu, and adjust the From and To fields, so the correct date range is displayed.
Click the Regenerate Work Entries button, and the work entries are recreated. Once finished, the pop-up window closes.
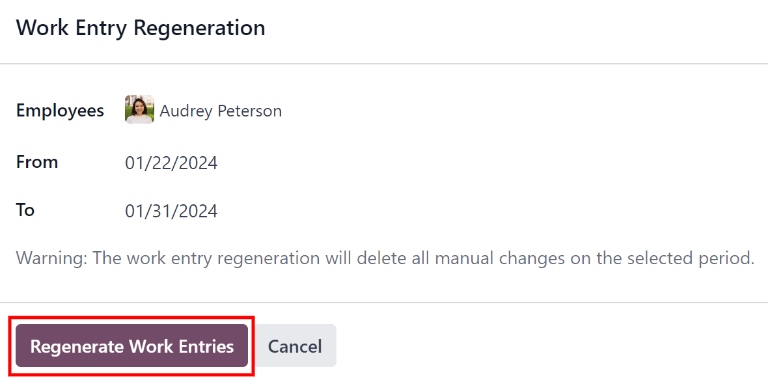
Example
An employee has incorrect work entries generated from the Planning app because they were incorrectly assigned to two work stations simultaneously. This should be fixed in the Planning app, instead of the Payroll app.
To correct this issue, modify the employee’s schedule in the Planning app, so they are correctly assigned to only one work station. Then, in the Payroll app, regenerate work entries for that employee, for that specific time period.
The Payroll app then pulls the new, corrected data form the Planning app, and recreates the correct work entries for that employee. All conflicts for that employee are now resolved.
Generating payslips
To generate payslips, navigate to the time period the payslips should be generated for. Ensure the Conflicting filter is removed. When the desired pay period is displayed, click the Generate Payslips button.
Tip
If the Generate Payslips button is not active (appears pale purple, instead of dark purple), that indicates there are conflicts, or the date selected includes dates in the future. Resolve all conflicts before generating payslips.
When the Generate Payslips button is clicked, a batch entry appears on a separate page for the time period selected.
The batch name populates the Batch Name field in a default From (date) to (date) format.
The date range to which the payslips apply appears in the Period field, and the company appears in the Company field. It is not possible to make changes to this form.
Click the Create Draft Entry button to create the payslips for the batch.
Click the Payslips smart button at the top of the page to view all the payslips for the batch.
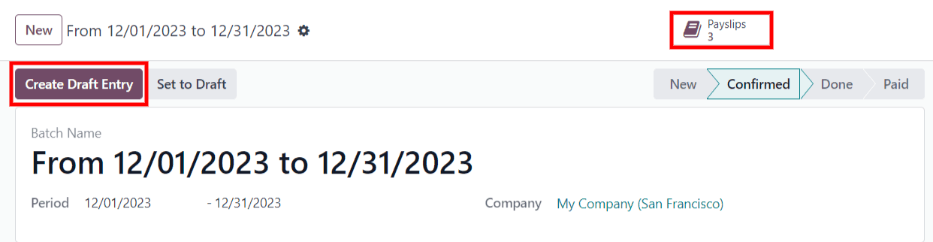
Printing payslips
To print payslips, first view the individual payslips by clicking the Payslips smart button on the batch form.
Next, select the payslips to print from the Payslips list. Click the box next to each payslip to print, or click the box to the left of the Reference column title, to select all the payslips in the list at once.
Click the Print button, and a PDF file is created with all the specified payslips.

Note
The Print button does not appear until at least one payslip is selected in the list.
Time off to report
If a time off request is submitted for a time period that was already processed on a payslip, the time off request appears in the Time Off page in the Payroll app, which is accessible by navigating to Payroll app ‣ Work Entries ‣ Time Off to Report.
On the Time Off page, the request appears with a status of To defer to next payslip. This is because the employee was already paid for that day, and it was logged as time spent at work, as a typical work day.
In order to keep the employee’s time off balances correct, the time off request must be applied to the following pay period. This not only ensures time off request balances are current, it also eliminates the need to redo work entries, cancel paychecks, and reissue paychecks.
The most common scenario when this situation occurs, is when payslips are processed a day or two before the pay period ends, and an employee is unexpectedly sick on one of the last days of the pay period. The employee puts in a time off request for a day that was already processed on a payslip as a regular work day. Instead of cancelling the payslip, modifying the work entries, and reissuing the paycheck, Odoo allows for those time off requests to be applied to the following pay period, instead.
To view all the time off requests that need to be deferred to the next payslip, navigate to Payroll app ‣ Work Entries ‣ Time Off to Report. The default filter for this report is To Defer.
All time off requests that need to be applied to the following pay period appear with a Payslip State of To defer to next payslip.

Defer multiple time off entries
To select the work entries to defer, click the box to the left of the work entry line. To select all work entries in the list, click the box to the left of the Employees column title, at the top of the list.
Once any work entry is selected, two buttons appear at the top of the report: a (#) Selected button, and an Actions button. The (#) Selected button indicates how many entries are currently selected.
When all the desired work entries are selected, click the Actions button, and a menu appears with several choices. Click Defer to Next Month in the list, and all selected entries are deferred to the following month.
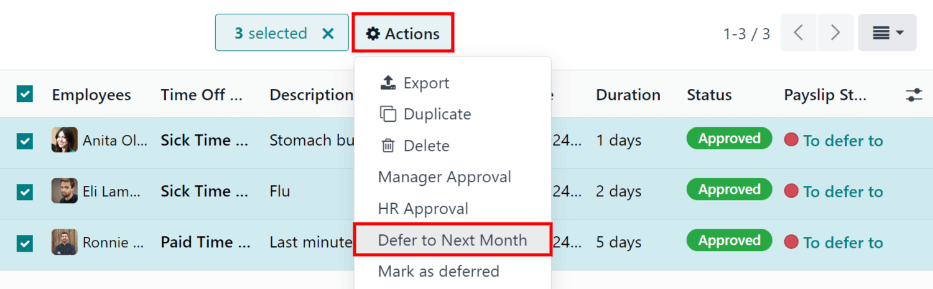
Defer individual time off entries
Time off requests appearing on the Time Off to Report list can be deferred individually.
Click on an individual time off request, and the details for that request load.
The specific details for the time off request appear on the left-hand side, and all of the employee’s submitted time off requests appear on the right-hand side (including the request in the details on the left-hand side).
To defer the time off request to the next payslip, click the Report to Next Month button at the top. Once processed, the Report to Next Month button disappears, and the Payslip State changes from To defer to next payslip to Computed in Current Payslip.
To go back to the Time Off to Report list, click on Time Off in the breadcrumb menu.
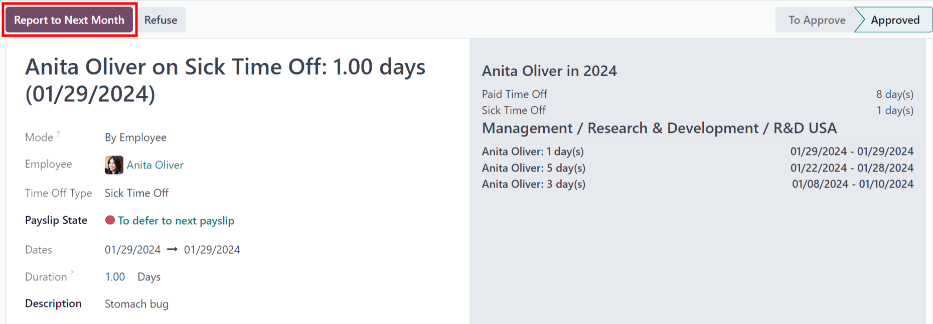
See also
On this page
Get Help
Contact Support Ask the Odoo Community
![]()
- User Docs
- Database management
- Developer
- Contributing
EN
Odoo 18
Salary attachments
Salary attachments are portions of earnings taken directly out of a payslip for a specific purpose, whether voluntary or required.
When the deduction is voluntary, they are typically considered deductions. When the deduction is court-ordered, or involuntary, it is sometimes referred to as a wage garnishment. In Odoo, these are all universally called, salary attachments.
Note that salary attachments could also be used to give recurring amount of money to employees. Like bonus divided in multiple parts.
Salary attachment types
To view the currently configured salary attachment types, navigate to Payroll app ‣ Configuration ‣ Salary Attachment Types. The default salary attachment types are: Attachment of Salary, Assignment of Salary, and Child Support.
Each salary attachment type displays the Name of the attachment type, the Code used when calculating payslips, a checkbox to indicate if there is No End Date, and whether it is Country specific (or universal).

Create new salary attachment types
Danger
Upon installation of the Payroll application, the pre-configured default salary attachment types are linked to a variety of rules that are linked to various salary structures, as well as the installed localization package.
It is not recommended to alter or modify any of the preconfigured salary attachment types, especially if they have been previously used on payslips in the database. Doing so may affect various salary rules, and can prevent the creation of payslips.
A new salary attachment type can be created, but this should only be done when absolutely necessary. A salary attachment type needs to be linked to a salary rule in order to be considered in the salary computation.
To make a new type of salary attachment, click the New button, and a blank Salary Attachment Types form loads. Enter the Name for the new salary attachment type in the corresponding field. Next, enter the Code used in the salary rules to compute payslips. Last, tick the No End Date checkbox if this salary attachment never expires.
If in a multi-company database, with locations in multiple countries, a Country field also appears on the Salary Attachment Types form. Select the country the attachment applies to, or leave blank if it is universal.
Create a salary attachment
All salary attachments must be configured separately for each employee, for each type of salary attachment. To view the currently configured salary attachments, navigate to Payroll app ‣ Contracts ‣ Salary Attachments.
All salary attachments appear in a default list view, and displays the name of the Employees, Description, the salary attachment Type, the Monthly Amount, Start Date, and current Status.
To create a new salary attachment, click the New button in the top-left corner, and a blank Salary Attachment form loads. Enter the following information on the form:
- Employees: Using the drop-down menu, select the desired employees. Multiple employees can be listed in this field.
- Description: Enter a short description of the salary attachment.
- Type: Using the drop-down menu, select the specific salary attachment type.
- Start Date: Using the calendar selector, select the date the salary attachment goes into effect.
- Estimated End Date: This field is not modifiable, and only appears after the Monthly Amount field is populated. This field is the estimated date when the salary attachment will be completed. Today’s date populates the field by default. Then, when the Total Amount field is populated, this date is updated.
- Document: If any documentation is needed, such as a court order, click the Upload your file button, and a file explorer window loads. Select the desired document to attach it to the record. Only one document can be attached to a salary attachment.
- Monthly Amount: Enter the amount taken out of each paycheck every month in this field.
- Total Amount: This field only appears if the salary attachment type has no end date (the No End Date option is not ticked.)

Since the salary attachment form auto saves as the fields are populated, after making a salary attachment for an individual employee, there is no further action required.
If creating salary attachments for multiple employees on a single salary attachment form, after the form is filled out, click the Create Individual Attachments button. This creates separate salary attachments for each of the employees listed in the Employees field.
After the separate salary attachments have been created, the screen returns to the Salary Attachment dashboard, but with a Description filter, populated with the description filled in on the salary attachment form. All the salary attachments have a status of Running, since they are currently active. Clear the filter in the search box to view the default Salary Attachment dashboard in its entirety.
Manage salary attachments
Salary attachments can have one of three statuses: Running, Completed, or Cancelled. To view the current status of all salary attachments, navigate to Payroll app ‣ Contracts ‣ Salary Attachments.
All salary attachments appear in the order they were configured. To view the salary attachments by a particular metric, such as the Status, or Type, click on the column title to sort by that specific column.
Completed salary attachments
When a salary attachment is created, it has a status of Running. Once the salary attachment is finished (the Total Amount entered on the salary attachment form has been paid in full), the status automatically changes to Completed, and the employee no longer has the money taken out of future paychecks.
If a salary attachment has been fulfilled, but has not automatically changed to Completed, the record can be manually updated. To change the status, open the Salary Attachment dashboard by navigating to Payroll app ‣ Contracts ‣ Salary Attachments.
Click on the record to update, and the detailed Salary Attachment form loads. On the individual Salary Attachment record, click the Mark as Completed button in the upper-left corner, and the status changes to Completed.
Example
The following is an example of when a payroll manager may need to manually change a salary attachment from Active to Completed.
Rose Smith has a salary attachment for a lawsuit settlement, where she is required to pay $3,000.00. A salary attachment is created that takes $250.00 a month out of Rose’s paycheck, to go towards this settlement payment.
After six months, Rose has paid $1,500.00 from her salary. She received a tax refund, and uses the money to pay off the remainder of the lawsuit settlement. After sending the relevant documentation to the payroll manager, showing the settlement has been paid in full, the payroll manager manually changes the status of her salary attachment to Completed.
Cancel salary attachments
Any salary attachment can be cancelled at any time. To cancel a salary attachment, click on the individual attachment record from the main Salary Attachment dashboard to open the record. From the Salary Attachment record, click the Cancel button to cancel the salary attachment, and stop having the designated money taken out of future paychecks.
See also
On this page
Get Help
Contact Support Ask the Odoo Community
![]()
- User Docs
- Database management
- Developer
- Contributing
EN
Odoo 18
Payslips
Payslips are generated by payroll officers through the Payroll application.
The Payslips drop-down header of the Payroll application consists of three sections: To Pay, All Payslips, and Batches.
These three sections provide all the tools needed to create payslips for employees, including individual payslips, a batch of payslips, or commission payslips.
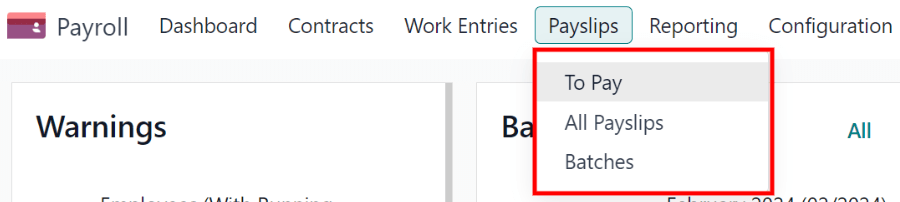
To pay
Click on Payroll app ‣ Payslips ‣ To Pay to see the payslips that need to be paid.
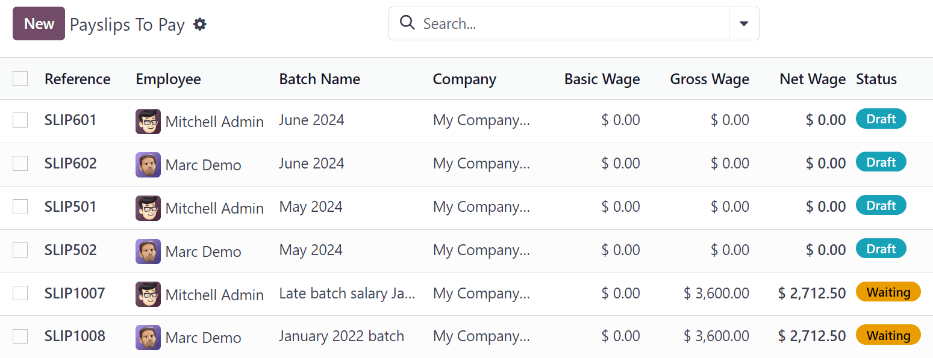
Each payslip lists the Reference number for the individual payslip, the Employee name, the Batch Name, the Company, the Basic Wage, Gross Wage, Net Wage, and the Status of the payslip.
Click on an individual payslip entry to view the details for that individual payslip.
Create a new payslip
A new payslip can be created from either the Payslips To Pay page or the Employee Payslips page.
Create a new payslip by clicking the New button in the top-left corner.
A blank payslip form is loaded, where the necessary payslip information can be entered.
Payslip form
On the blank payslip form, several fields are required. Most of the required fields auto-populate after an employee is selected.
Fill out the following information on the payslip form:
- Employee: type in the name of an employee, or select the desired employee from the drop-down list in this field. This field is required.
Note
It is recommended to only create payslips for employees that are already in the database. If there is no current employee record (and therefore no employee contract) it is recommended to create the new employee in the Employees application before creating payslips for that employee. Refer to the new employee documentation for instructions on how to add an employee. - Period: the first day to the last day of the current month auto-populates the Period fields by default. The dates can be changed, if desired.
To change the start date, click on the first date in the Period field to reveal a pop-up calendar. On this calendar, use the < (less-than) and > (greater-than) icons to select the desired month. Then, click on the desired day to select that specific date.
Repeat this process to modify the end date for the payslip. These fields are required. - Contract: using the drop-down menu, select the desired contract for the employee. Only the available corresponding contracts for the selected employee appear as options. This field is required.
- Batch: using the drop-down menu in this field, select the batch of payslips this new payslip should be added to.
- Structure: using the drop-down menu, select the salary structure type. Only the corresponding structures associated with the selected contract for the employee appear as options.
If no employee and/or no contract is selected yet, all available Structures appear in the list. Once an employee and/or contract is selected, any unavailable Structures set for that employee and/or contract do not appear. This field is required.
Note
Typically, after making a selection in the Employee field, Odoo auto-populates all other required fields (besides the Period field), but only if that information is already on that employee’s form in the Employees app.
Important
If modifications to auto-populated fields are made, it is recommended to check with the accounting department to ensure every entry that affects the Accounting application is correct.
Worked days & inputs tab
- Worked Days: the entries under Worked Days (including the Type, Description, Number of Days, Number of Hours, and Amount) are automatically filled in, based on what was entered for the Period, Contract, and Structure fields of the payslip form.
- Other Inputs: additional inputs affecting the payslip can be entered in this section, such as deductions, reimbursements, and expenses.
Click Add a line to create an entry in the Other Inputs section.
Using the drop-down menu in the Type column, select a Type for the input. Next, enter a Description, if desired. Lastly, enter the amount in the Count field.

Salary computation tab
- Salary Computation: the Salary Computation tab is automatically filled in after the Compute Sheet button is clicked. Doing so displays the wages, deductions, taxes, etc. for the entry.
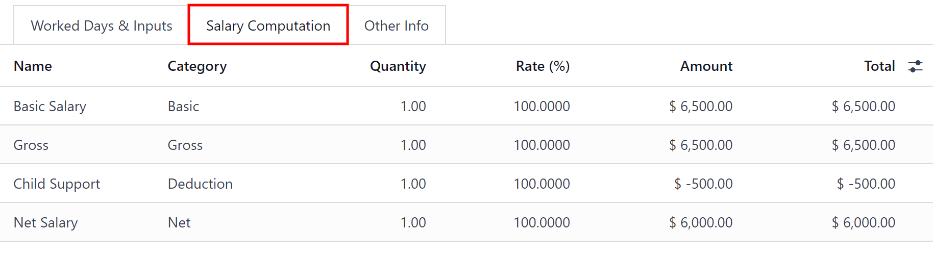
Other info tab
- Payslip Name: type in a name for the payslip in this field. The name should be short and descriptive, such as (Employee Name) April 2023. This field is required.
- Company: select the company the payslip applies to using the drop-down menu in this field. This field is required.
- Close Date: enter the date that the payment is made to the employee in this field.
Click in the field to reveal a calendar pop-up window. Using the < > (less-than/greater-than) icons, navigate to the desired month and year.
Then, click on the desired date to select it. - Date Account: enter the date on which the payslip should be posted in this field.
- Salary Journal: this field auto-populates after selecting an existing Employee. This field cannot be edited, as it is linked to the Accounting application. This field is required.
- Accounting Entry: if applicable, this field is automatically populated once the payslip is confirmed. This field cannot be modified.
- Add an Internal Note…: any note or reference message for the new entry can be typed in this field.
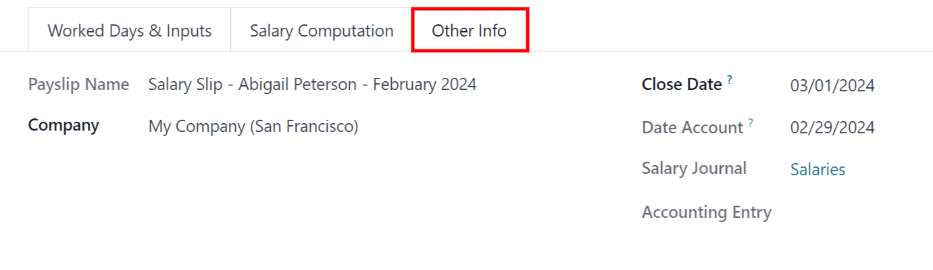
Process the new payslip
When all the necessary information on the payslip is entered, click the Compute Sheet button. Upon doing so, all the information on the payslip is saved, and the Salary Computation tab auto-populates, based on the information on the employee’s contract or attendance records.
If any modifications need to be made, first click the Cancel button, then click the Set to Draft button. Make any desired changes, then click the Compute Sheet button once again, and the changes are reflected in the Worked Days and Salary Computation tabs.
Once everything on the payslip form is correct, click the Create Draft Entry button to create the payslip.
Then, a confirmation pop-up window appears, asking Are you sure you want to proceed?. Click OK to confirm.
Note
The database may need to be refreshed for the payslip and email to appear.
To print the payslip, click the Print button. To cancel the payslip, click the Cancel button.
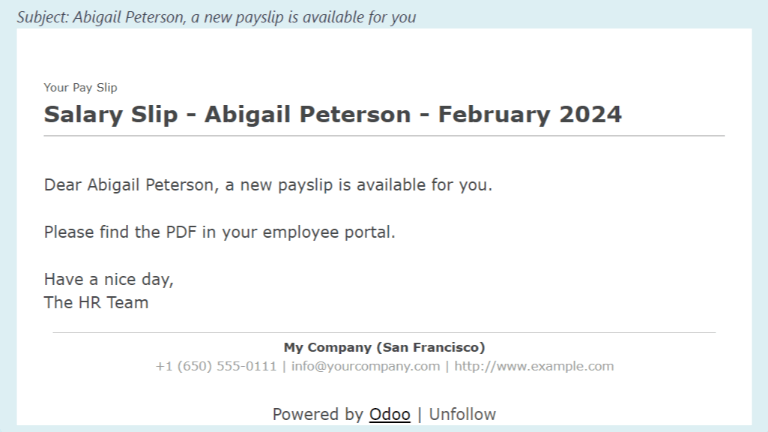
Next, the payment must be sent to the employee. To do this, click the Register Payment button. Doing so reveals a pop-up form, in which the desired Bank Journal that the payment should be made against must be selected from a drop-down menu. Then, click the Confirm button to confirm the journal, and return to the payslip.
Important
In order for a payslip to be paid, the employee must have a bank account entered in their contact information. If there is no bank information, a payslip cannot be paid, and an error appears when the Make Payment button is clicked. Banking information can be found in the Private Information tab on the employee’s card in the Employees app. Edit the employee card, and add banking information, if it is missing.
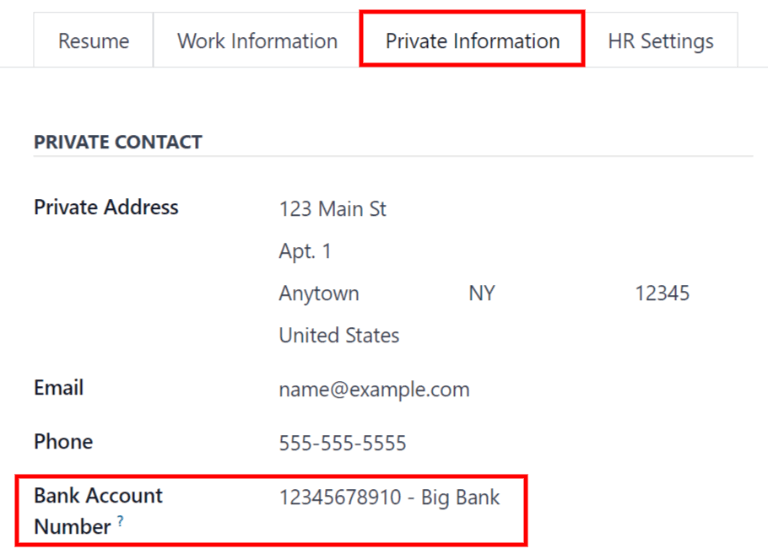
Odoo automatically checks bank account information. If there is an error with the employee’s listed bank account, an error appears in a pop-up window, stating, The employee bank account is untrusted. If this error appears, update the employee’s bank account information on their Employee Form.
If a payment needs to be cancelled or refunded, click the corresponding Cancel or Refund button, located at the top-left of the screen.
Tip
Before processing payslips, it is best practice to check the Warnings section of the Payroll app dashboard. Here, all possible issues concerning payroll appear.
To view the warnings, navigate to Payroll app ‣ Dashboard. The warnings appear in the top-left corner of the dashboard.

Warnings are grouped by type, such as Employees Without Running Contracts or Employees Without Bank account Number. Click on a warning to view all entries associated with that specific issue.
If the warnings are not resolved, at any point in the payslip processing process, an error may occur. Errors appear in a pop-up window, and provide details for the error, and how to resolve them.
All payslips
To view all payslips, regardless of status, go to Payroll app ‣ Payslips ‣ All Payslips. The Employee Payslips page loads, displaying all payslips, organized by batch, in a default nested list view.
Click on the ▶ (right arrow) next to an individual batch name to view all the payslips in that particular batch, along with all the payslip details.
The number of payslips in the batch is written in parenthesis after the batch name. The Status for each individual payslip appears on the far-right side, indicating one of the following status options:
- Draft: the payslip is created, and there is still time to make edits, since the amounts are not calculated.
- Waiting: the payslip has been calculated, and the salary details can be found in the Salary Computation tab.
- Done: the payslip is calculated and ready to be paid.
- Paid: the employee has been paid.
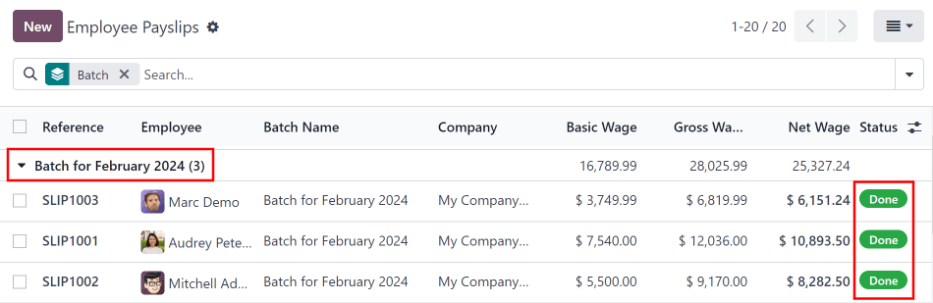
Click on an individual payslip to view the details for that payslip on a separate page. Using the breadcrumb menu, click Employee Payslips to go back to the list view of all payslips.
A new payslip can be created from the Employee Payslips page, by clicking the New button in the upper-left corner. Doing so reveals a separate blank payslip form page. On that blank payslip form page, enter all the necessary information, as described in the Create new payslips section.
To print PDF versions of payslips from the Payslips to Pay or Employee Payslips pages, first select the desired payslips by clicking on the individual checkbox to the left of each payslip to be printed. Or, click the box to the left of the Reference column title, which selects all visible payslips on the page. Then, click the Print button to print the payslips.
Payslips can also be exported to an Excel spreadsheet. To export all payslips, click on the ⚙️ (gear) icon at the end of the words Employee Payslips in the top-left corner. This reveals a drop-down menu. Click Export All to export all payslips to a spreadsheet.

To export only select payslips, first select the payslips to be exported from the list. Then, click the checkbox to the left of each individual payslip to select it. As payslips are selected, a smart button appears in the top-center of the page, indicating the number of selected payslips. Then, click the ⚙️ (gear) Actions icon in the top-center of the page, and click Export.
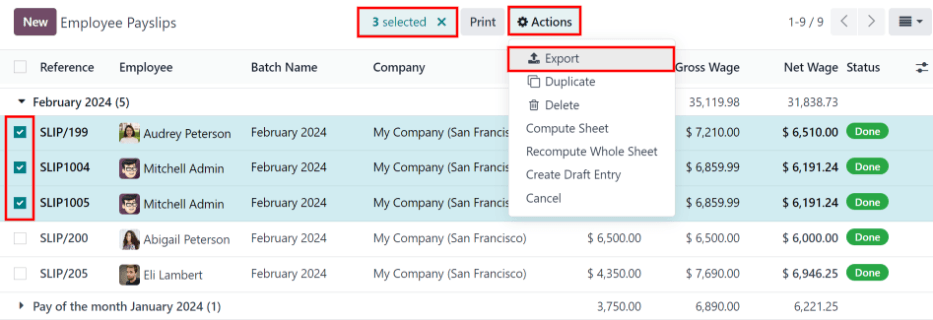
Note
Both To Pay and All Payslips display all the detailed information for each payslip.
Batches
To view payslips in batches, navigate to Payroll app ‣ Payslips ‣ Batches to display all the payslip batches that have been created. These payslip batches are displayed in a list view, by default.
Each batch displays the Name, Date From and Date To dates, its Status, the number of payslips in the batch (Payslips Count), and the Company.

Create a new batch
To create a new batch of payslips from the Payslips Batches page (Payroll app ‣ Payslips ‣ Batches), click the New button in the top-left corner. Doing so reveals a blank payslip batch form on a separate page.
On the new payslip batch form, enter the Batch Name.
Next, select the date range to which the batch applies. Click into one of the Period fields, and a calendar pop-up window appears. From this calendar pop-up window, navigate to the correct month, and click on the corresponding day for both the start and end dates of the batch.
The current company populates the Company field. If operating in a multi-company environment, it is not possible to modify the Company from the form. The batch must be created while in the database for the desired company.
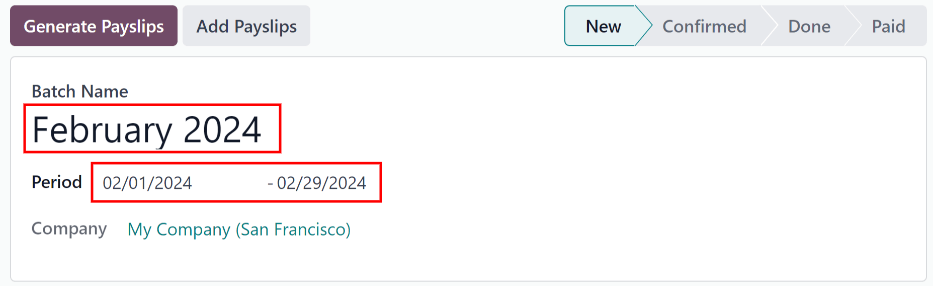
Process a batch
Click on an individual batch to view the details for that batch on a separate page. On this batch detail page, different options (buttons) appear at the top, depending on the status of the batch:
- New status: batches without any payslips added to them have a status of New. The following button options appear for these batches:

- Add Payslips: click the Add Payslips button to add payslips to the batch, and an Add Payslips pop-up window appears. Only payslips that can be added to the batch (payslips not currently part of a batch) appear on the list.
Select the desired payslips by clicking the checkbox to the left of each payslip name, then click the Select button to add them to the batch. Once payslips are selected and added to the batch, the status changes to Confirmed. - Generate Payslips: after payslips have been added to the batch, click the Generate Payslips button to process the payslips and create individual payslips in the database.
A Generate Payslips pop-up window appears. If only a specific Salary Structure and/or specific Department is desired to make payslips for, select them from the corresponding drop-down menus. If no selections are made, then all payslips listed in the pop-up window are processed as usual.
Click the Generate button to create the payslips. The Generate Payslips button changes to a Create Draft Entry button, and the status changes to Confirmed.
- Add Payslips: click the Add Payslips button to add payslips to the batch, and an Add Payslips pop-up window appears. Only payslips that can be added to the batch (payslips not currently part of a batch) appear on the list.
- Confirmed status: batches that have been created and have payslips in them, but the payslips have not been processed, have a status of Confirmed. The following two button options appear for these batches:

- Create Draft Entry: click the Create Draft Entry button to confirm the individual payslips (and the batch), and create a draft of the payslips. The batch now has a status of Done.
- Set to Draft: if at any point the batch needs to be reverted back to a status of New, click the Set to Draft button. This action does not remove any payslips that have already been added to the batch.
- Done status: batches with confirmed payslips in them have a status of Done. The following button options appear for these batches:

- Create Payment Report: click the Create Payment Report button, and a Select a bank journal pop-up window appears. Select the correct bank journal from the drop-down menu.
The batch name appears in the File name field, but this can be modified, if desired. Finally, click Confirm to process the payslips, and pay the employees. - Mark as paid: after the payments have been created via the Create Payment Report button, the payslips need to be marked as paid in the database.
Click the Mark as paid button, and the status of the batch changes to Paid. - Set to Draft: if at any point the batch needs to be reverted back to a status of New, click the Set to Draft button. This action does not remove any payslips that have already been added to the batch.
- Create Payment Report: click the Create Payment Report button, and a Select a bank journal pop-up window appears. Select the correct bank journal from the drop-down menu.
- Paid status: batches that have been completed have a status of Paid. No other button options appear for this status.

On the batch detail page, the individual payslips in the batch are accessible, via the Payslips smart button, located above the batch information, in the center. Click the Payslips smart button to view a list of all the individual payslips.
Use the breadcrumb menu to navigate back to the individual batch detail page, or back to the list of all batches.
Generate warrant payslips
Commissions are paid to employees in Odoo using warrant payslips.
Warrant payslips can be generated directly from the Payslips Batches page (Payroll app ‣ Payslips ‣ Batches).
First, select the desired batches by clicking the box to the left of each batch for which commission payslips should be created. Next, click the Generate Warrant Payslips button at the top of the page.
Doing so reveals a Generate Warrant Payslips pop-up window, in which the necessary information must be filled out.

In this pop-up window, click on the drop-down menus, located beside the Period field, to reveal calendar pop-up windows. On these calendar pop-up windows, select the desired period for which the payslips are being generated. Using the < (left) and > (right) arrow icons, navigate to the correct month, and click on the date to select it.
In the Department field, select the desired department from the drop-down menu.
When a department is selected, the employees listed for that department appear in the Employee section.
Under the Employee section, enter the Commission Amount for each employee in the far-right column. To remove an employee, click the 🗑️ (trash) icon to remove the line.
Add a new entry by clicking Add a Line, and entering the Employee and the appropriate Commission Amount.
Click the Upload your file button to add a file, if necessary. Any file type is accepted.
Once all the commissions are properly entered, click the Generate Payslips button to create the warrant payslips in a batch.
Process the batch in the same way as a typical batch to complete the payment process.
On this page
Get Help
Contact Support Ask the Odoo Community
![]()
- User Docs
- Database management
- Developer
- Contributing
EN
Odoo 18
Reporting
The Reporting section of the Payroll app offers a variety of reports to choose from, organized by location.
The Payroll report, Work Entry Analysis report, and Salary Attachment Report are default reports in the Payroll app, and are available for all companies, regardless of location.
Beneath the three default reports are all localization-based reports, organized by country, in alphabetical order. These reports contain all the various information for the offered benefits and local tax laws.
To view all the available reports for the database, including all the localization-specific ones, navigate to Payroll app ‣ Reporting to view the available reports in a drop-down menu. Click on a specific report to view it.
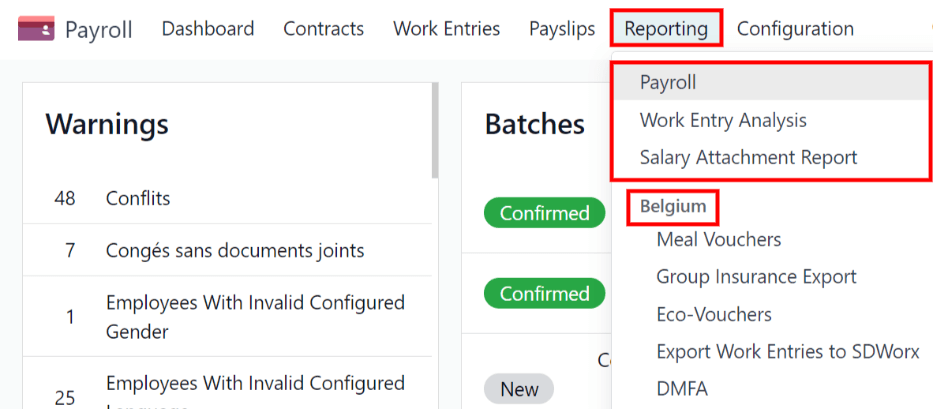
If a report is unavailable to a user, an Invalid Operation pop-up window appears, stating: You must be logged in to a (country) company to use this feature, where “(country)” is the specific country the company is configured for.
Default reports
Payroll
Click on Payroll app ‣ Reporting ‣ Payroll to display the Payroll Analysis report. This report shows all the payslips generated in the last 365 days, due to the default filter: Last 365 Days Payslip.
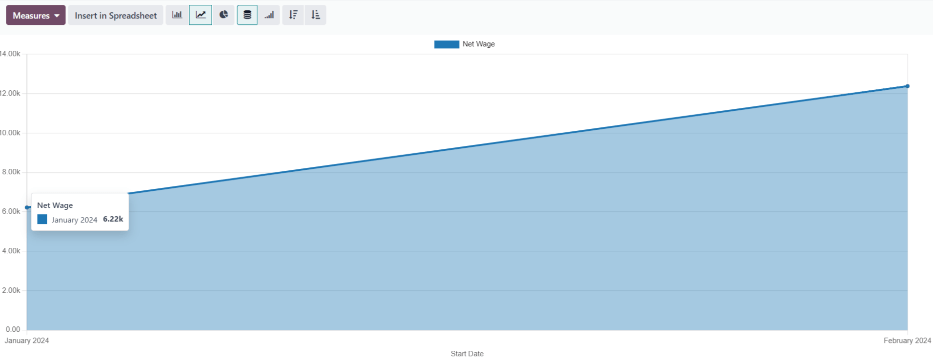
The report can display metrics for a variety of parameters. Click the Measures box to view a drop-down menu with the various metric options to display. The default options available include:
- # Payslip
- Basic Wage
- Basic Wage for Time Off
- Days of Paid Time Off
- Days of Unforeseen Absence
- Days of Unpaid Time Off
- Gross Wage
- Net Wage
- Number of Days
- Number of Hours
- Work Days
- Work Hours
- Count
Net Wage is the default metric for the Payroll report.
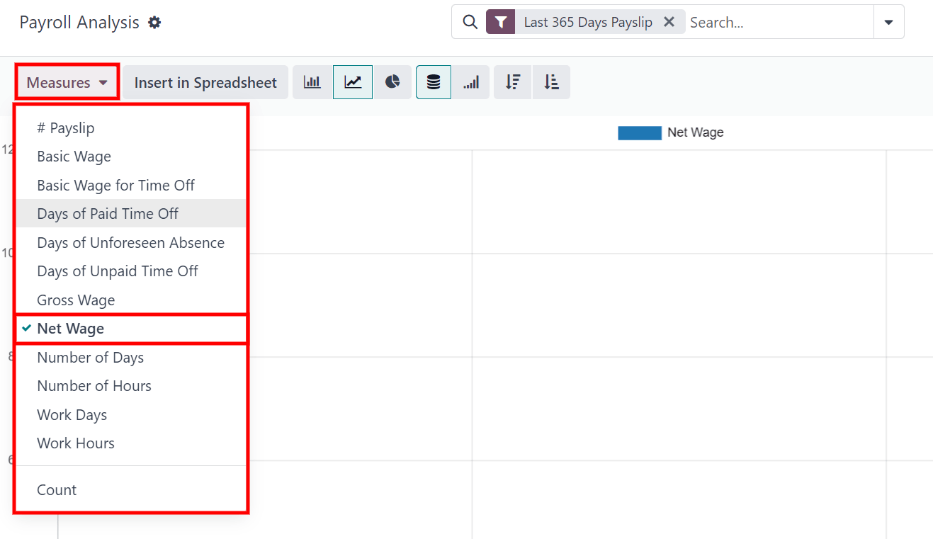
Line chart
A line chart is the default view for the Payroll report. If a different view is selected, click the Line Chart button (represented by a 📈 (chart increasing) icon) in the menu bar to change the view back to a line chart.
Several options are available for the line chart. Click the corresponding button to activate the selection, and change the way the data is presented. These icons appear at the end of the chart options. The various options are:
- Stacked: data is presented with each metric in its own line, “stacked” on top of each other. This helps visualize the distribution and variances between different categories.
- Cumulative: data is presented with each metric on an individual line, with the total amount calculated by combining all the lines. This provides a comprehensive view of the cumulative data.
- Descending: data is shown with the largest values on the left side of the chart, gradually decreasing towards the smallest values on the right side, along the x-axis. This arrangement helps emphasize trends or outliers at the extremes.
- Ascending: data is presented with the smallest values on the left side of the chart, increasing towards the largest values on the right side, along the x-axis. This arrangement can be useful for highlighting progressive growth or trends.
Note
These options can be combined to create a variety of views.

Bar chart
To display the data in a bar chart, click on the Bar Chart button (represented by a 📊 (bar chart) icon) in the menu bar.
Click the Stacked icon to view the bar chart in a stacked format (where multiple values appear in each column). Cumulative bar charts are useful for visualizing the progression over time or other categories.
An option to display the columns in Descending or Ascending order appears at the end of the options.
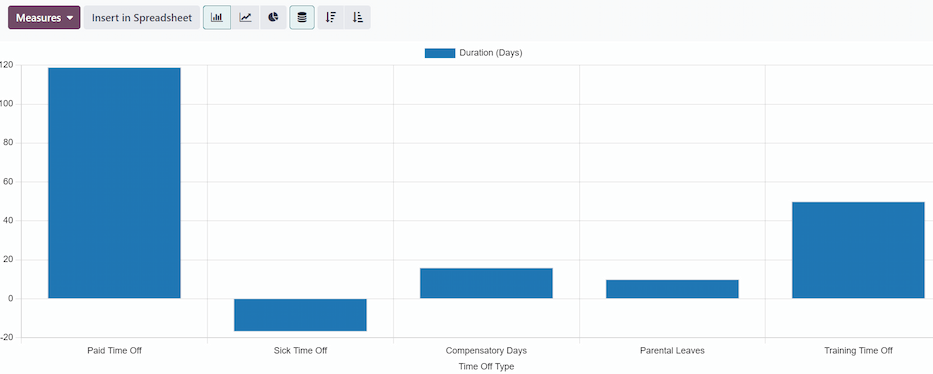
Tip
Clicking an option enables it. To turn off the option, click it again. When the option is enabled the icon appears lighter, with a turquoise outline. When it is inactive, it appears gray, with no outline.
Pie chart
To display the data in a pie chart, click on the Pie Chart button (represented by a (pie chart) icon) in the menu bar. There are no additional options available in this view.

Pivot table
To display the data in a pivot table, click on the Pivot button (represented by a (pivot) icon) located in the far-right side of the top menu bar.
The default information displayed includes the number of payslips (# Payslip), the Net Wage, the Gross Wage, the number of Days of Paid Time Off, and the number of Days of Unpaid Time Off. The information is organized by department.
To display more information on the report, click the Measures button to reveal a drop-down menu. Then, click on any other metric to display it on the pivot table.
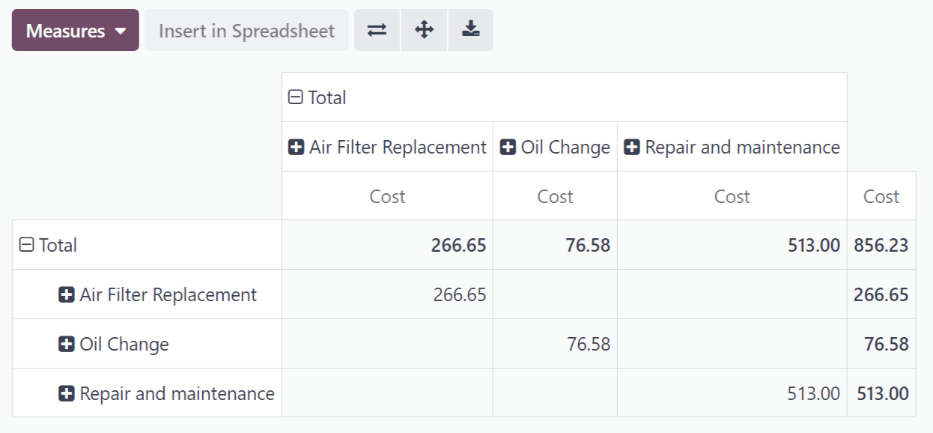
To sort the entries by a specific column, such as Net Wage, click on the column name twice. The first click selects the column, and the second click sorts the information in descending order.
To export the data in an XLSX format, click the Download xlsx button, represented by a ⬇️ (down arrow above a horizontal bar) icon, located at the far-right of the available icons. The information is then downloaded into a spreadsheet.

Any report can be inserted into a spreadsheet by clicking the Insert in Spreadsheet button. A Select a spreadsheet to insert your (type of report) pop-up window appears, asking which spreadsheet to place the information in. Select an existing spreadsheet or dashboard, or select a new Blank spreadsheet. Click the Confirm button to move to a spreadsheet view with the report added to it.
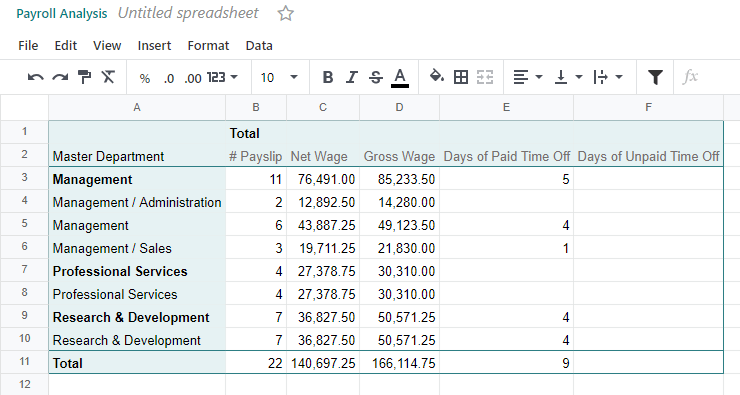
Note
If the Documents app is not installed, the Insert in Spreadsheet option places the newly-created spreadsheet in the Dashboards app.
If the Documents application is installed, the spreadsheet has the option to be stored in either the Dashboards app or Documents app.
Filters
At the top of each report, the default filters are shown inside the Search… box.
Click the ⬇️ (down arrow) icon in the search bar to display the available Filters. Filters show information that match the specific filter parameters.
Example
The Work Entries Analysis report has two default filters, the Current month:(Month) (Year) filter, and the Validated filter.
The Payroll report has only one default filter, the Last 365 Days Payslip filter.
The Salary Attachment Report has only one default filter, the Payslip End Date: (Year) filter.
All reports can include custom filters, or group information, by different metrics (employee, department, company, etc.).
Some reports have the option to compare the current report to the previous time period or year (a Comparison option).
Click on a parameter to select it and activate it. The report is immediately updated with the new parameters.
The updated report can be set as a favorite report, meaning the parameters are stored for quick access in the future. To do that, click Save the current search, under the Favorites section, located in the search bar drop-down mega menu of filter options. Doing so reveals two options and a Save button.
To set the current report as the default configuration when the report is accessed, check the box next to Default filter. If the current report should be accessible to everyone in the database, check the box next to Share.
Finally, click Save, which saves the currently configured report. Then, it appears beneath the Favorites in the search bar drop-down mega menu of filter options.
On this page
Get Help
Contact Support Ask the Odoo Community
![]()
- User Docs
- Database management
- Developer
- Contributing
EN
Odoo 18
Work entry analysis
The default Work Entries Analysis report provides an overview of the validated work entries for the current month. To view this report, navigate to Payroll app ‣ Reporting ‣ Work Entry Analysis.
The work entries appear in a pivot table, with the default filters of Current month: (Month)(Year) and Validated. The various types of Work entries populate the rows, while the Total values populate the only visible column.
To change the displayed information, click Total above the main column, revealing a drop-down menu of available metrics. Click on one of the available groupings, and the data is further organized by that selected metric. The default options are Work Entry Type, Employee, and Department. If in a multi-company database, a Company option also appears.
Work entry analysis comparison
It is possible to compare the work entries from one time period to a previous time period. To view this comparison, first navigate to Payroll app ‣ Reporting ‣ Work Entry Analysis.
Next, click the (down arrow) icon in the search bar, revealing a drop-down menu. Under the Comparison section, click on either Current Month: Previous Period or Current Month: Previous Year.
The report updates and displays the data for the current time period, data for the selected previous time period, as well as the Variation between the two, in a percentage.
Note
If no work entries for a specific work entry type are logged for the time period, it does not appear on the report. That does not mean the work entry type does not exist, or is not configured.
Additionally, if the default Current month: (Month)(Year) filter is removed from the search bar, the Comparison column does not appear; there must be a time-frame selected to view the Comparison column.
Use case: overtime report comparison
It is possible to alter the Work Entries Analysis report to show a comparison of only overtime work entries, grouped by employee, for a specific time period. To view this data, first navigate to the default Work entry analysis report by going to Payroll app ‣ Reporting ‣ Work Entry Analysis.
Next, click the (down arrow) icon in the search bar, revealing a drop-down menu. Under the Filters column, click Add Custom Filter, and a Add Custom Filter pop-up window appears.
Using the drop-down menu, select Work Entry Type for the first field, leave the middle field as-is (with is in populating the field), and select Overtime Hours for the last field. Click Add, and all other work entry types disappear, and Overtime Hours appear in the sole row.
To compare overtime from the current month to the previous month, to see which month had more overtime logged, click the (down arrow) icon again in the search bar. Under the Comparison section, click Current Month: Previous Period. Click away from the drop-down menu to close it.
Now, the report displays the Overtime Hours for the current month and the previous month, along with the Variation, in a percentage.
To view which employees received the most overtime, click Overtime Hours, revealing a drop-down menu of options. Click Employee, and all employees with overtime work entries for either the current or previous month appears.
In this example, it can be determined that Marc Demo worked the most overtime in August 2024, whereas Beth Evans worked the most overtime hours in September 2024. Additionally, Mitchell Admin had the largest variation change, with a -100% change from August 2024 to September 2024.
On this page
Get Help
Contact Support Ask the Odoo Community
![]()
- User Docs
- Database management
- Developer
- Contributing
EN
Odoo 18
Salary attachment report
Salary attachments in Odoo refer to a portion of an employee’s earnings that are designated for a specific purpose, both voluntary and involuntary. These can include contributions to a retirement plan, repayment of a loan, wage garnishments, or child support.
Voluntary salary attachments, such as repaying a loan, or contributing to a charity on a monthly basis, are considered Assignments of Salary in Odoo. Salary attachments that are required, such as a lawsuit settlement repayment, or repaying a tax lien, are considered Attachments of Salary in Odoo. Child support payments have their own category, and are simply referred to as Child Support in Odoo.
To view this report, navigate to Payroll app ‣ Reporting ‣ Salary Attachment Report. The Salary Attachment Report shows all deductions or allocations per employee, organized by payslip, in a default pivot table. The default filter is the end of the current year (Payslip End Date: (year)). The employees populate the rows, while the various deductions populate the columns, organized by type of deduction, and further grouped by individual payslip.
The default report contains all payslips for the current year, so the report typically contains a large number of columns. This could make it difficult to view all the data at once, as the report may be very wide and require scrolling to view all the data.
To view a condensed version of salary attachments, and have all the salary attachment columns visible on one page, click the Total icon at the top of the report, above the various payslips.
This presents the salary attachments for the current year, and only displays three columns, Attachment of Salary, Assignment of Salary, and Child Support.
Each entry displays the total amount paid for each specific type of salary attachment, for each employee.

The report can be downloaded as an XLSX file, or inserted into a spreadsheet using the corresponding buttons at the top.
Click the Measures button to reveal the options of what data is displayed. Assignment of salary, Attachment of salary, and Child support are all selected and visible, by default, while the Count option is not.
Click an option to either show or hide that particular metric. A (checkmark) icon indicates the data is visible.
Compare to previous year
The Salary Attachment Report can be compared to the report for the previous time period or the previous year.
To view these comparisons, click the (down arrow) icon in the search bar, then click either Payslip End Date: Previous Period or Payslip End Date: Previous Year, beneath the Comparison column.
The report updates and displays the current time period values, and the previous time period values, as well as the Variation between the two, in a percentage.

Get Help
Contact Support Ask the Odoo Community
![]()
- User Docs
- Database management
- Developer
- Contributing
EN
Odoo 18
Payroll localizations
Payroll localization refers to the process of adapting payroll systems, policies, and compliance measures to align with the specific labor laws, tax regulations, and social security requirements of a particular country or region. This ensures that employee salaries, benefits, deductions, and contributions are processed accurately and in full compliance with local legal and financial obligations. Localization also includes integrating country-specific payroll elements such as statutory benefits, holiday entitlements, termination rules, and reporting requirements, helping businesses avoid legal risks while ensuring employees receive their correct compensation.
List of countries
Payroll localization modules are available for the countries listed below.
Note
New countries are frequently added to this list and Odoo keeps expanding and improving existing localizations and the related documentation.
- Australia
- Belgium
- Bangladesh
- Egypt
- Hong Kong
- India
- Indonesia
- Jordan
- Kenya
- Lithuania
- Luxembourg
- Malaysia
- Mexico
- Morocco
- Netherlands
- Pakistan
- Poland
- Romania
- Saudi Arabia
- Slovakia
- Switzerland
- Türkiye
- United Arab Emirates
- United States
Get Help
Contact Support Ask the Odoo Community
![]()