EN
Odoo 18
User Docs
Discover our user guides and configuration tutorials per application.
- Odoo essentials
- Finance
- Sales
- Websites
- Supply Chain
- Human resources
- Marketing
- Services
- Productivity
- Studio
- General settings
Get Help
Contact Support Ask the Odoo Community
![]()
EN
Odoo 18
Activities
Activities are follow-up tasks tied to a record in an Odoo database.
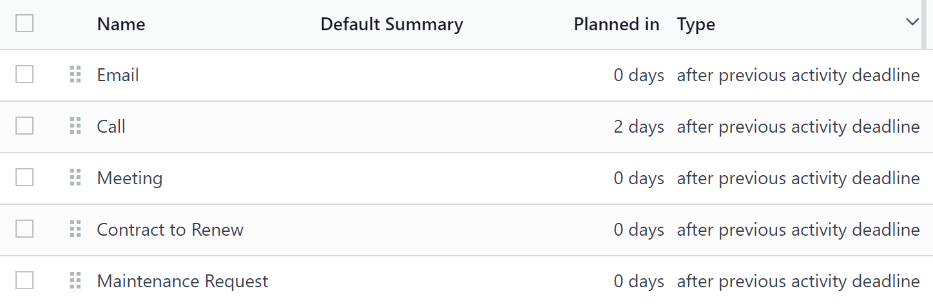
The icon used to display activities varies, depending on the activity type:
- (clock) icon: the default activities icon.
- (phone) icon: a phone call is scheduled.
- (envelope) icon: an email is scheduled.
- (check) icon: a “to-do” is scheduled.
- (people) icon: a meeting is scheduled.
- (upload) icon: a document is scheduled to be uploaded.
- (request signature) icon: a signature request is scheduled.
Schedule activities
Activities can be scheduled on any page of the database that contains a chatter thread, Kanban view, list view, or activities view of an application.
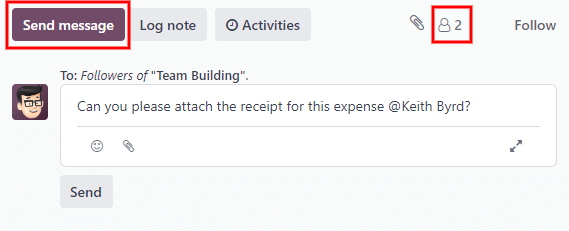
Chatter
Activities can be created from the chatter on any record.
To schedule a new activity, click the Activities button, located at the top of the chatter. In the Schedule Activity pop-up window that appears, fill out the Schedule Activity form.
Kanban view
Activities can also be created from the (Kanban) view.
To do so, click on the (clock) icon located at the bottom of an individual record.
Click + Schedule An Activity, then proceed to fill out the Schedule Activity form.
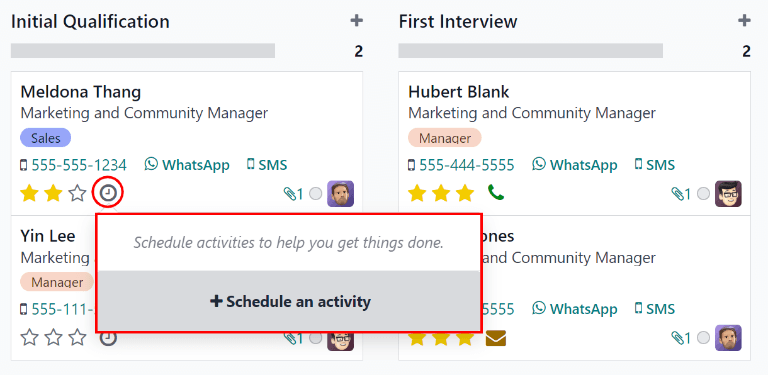
Note
If a record already has a scheduled activity, the (clock) icon is replaced by the icon that represents the existing scheduled activity. Click on the activity type’s icon to schedule another activity.
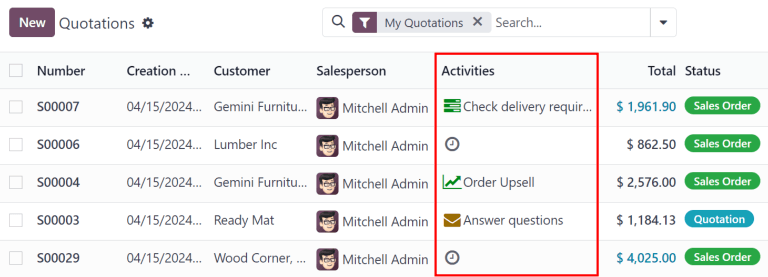
List view
Activities can also be created from a (list) view.
If the Activities column is hidden, reveal it using the (settings adjust) icon in the far-right of the top row.
Then, click on the (clock) icon for the record the activity is being added to, and click + Schedule an activity. Proceed to fill out the Schedule Activity form that appears.
Note
If a record already has a scheduled activity, the (clock) icon is replaced by the icon that represents the existing scheduled activity. Click on the activity type’s icon to schedule another activity.
Activity view
Most applications in Odoo have an Activity view available. If available, a (clock) icon is visible in the top-right corner of the main menu bar, amongst the other view option icons.
To open the activity view, click the (clock) icon.
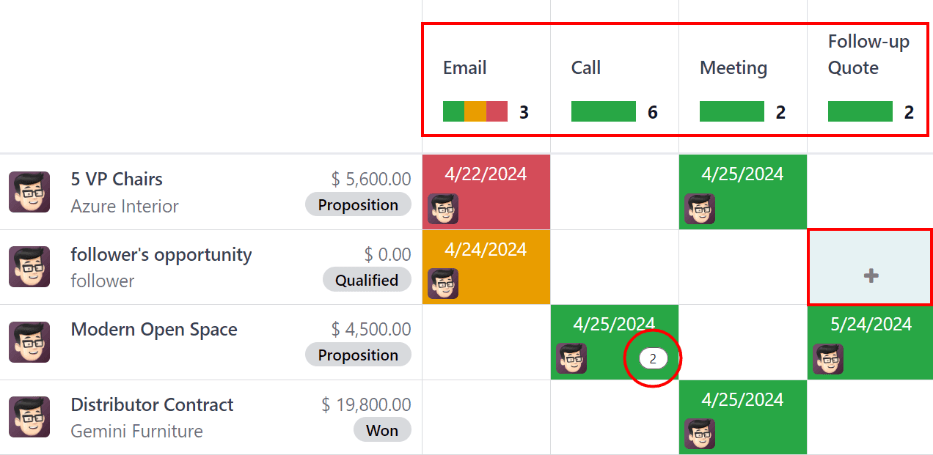
In this view, all the available activities are listed in the columns, while the horizontal entries represent all the individual records.
Activities that appear green have a due date in the future, activities that appear orange are due today, while activities appearing red are overdue.
Color bars in each column represent records for specific activity types, and display a number indicating how many activities are scheduled for that type.
If multiple activity types are scheduled for a record, a number appears in the box, indicating the total number of scheduled activities.
Note
Activity colors, and their relation to an activity’s due date, are consistent throughout Odoo, regardless of the activity type, or the view.
To schedule an activity for a record, hover over the corresponding field. Click the (plus) icon that appears, and then fill out the Schedule Activity form.
Schedule Activity form
Activities can be scheduled from many different places, such as from the chatter of a record, or from one of multiple views in an application, when available: the Kanban view, list view, or activity view.
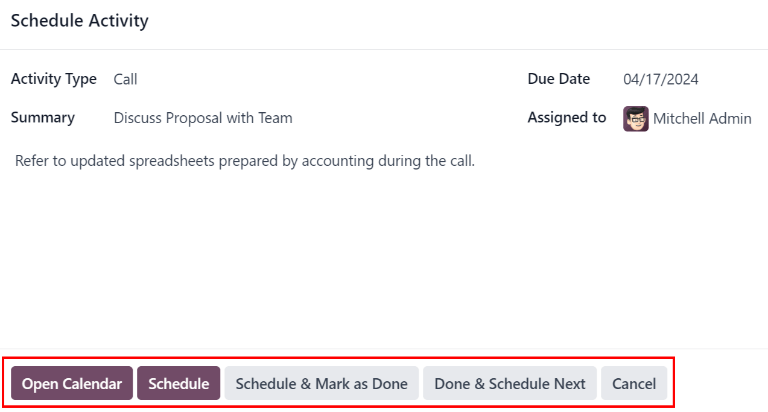
Enter the following information on the form:
- Activity Type: select the type of activity from the drop-down menu. The default options are: Email, Call, Meeting, or To-Do. Depending on what other applications are installed, additional options may be available.
- Summary: enter a short title for the activity, such as Discuss Proposal.
- Due Date: using the calendar popover, select the activity’s deadline.
- Assigned to: by default, the current user populates this field. To assign a different user to the activity, select them from the drop-down menu.
- Notes: add any additional information for the activity in this field.
When the Schedule Activity pop-up window is completed, click one of the following buttons:
- Open Calendar: opens the user’s calendar to add and schedule the activity.
Click on the desired date and time for the activity, and a New Event pop-up window appears. The summary from the Schedule Activity pop-up window populates the Title field.
Enter the information in the New Event pop-up window, then click Save & Close to schedule it. Once scheduled, the activity is added to the chatter under the Planned Activities section.
Important
The Open Calendar button only appears if the Activity Type is set to either Call or Meeting. - Schedule: schedules the activity, and adds the activity to the chatter under Planned Activities.
- Schedule & Mark as Done: adds the details of the activity to the chatter under Today. The activity is not scheduled, and is automatically marked as done.
- Done & Schedule Next: adds the details of the activity to the chatter under Today. The activity is not scheduled, is automatically marked as done, and a new Schedule Activity pop-up window appears.
- Cancel: discards any changes made on the Schedule Activity pop-up window.
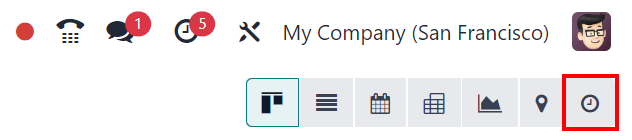
All scheduled activities
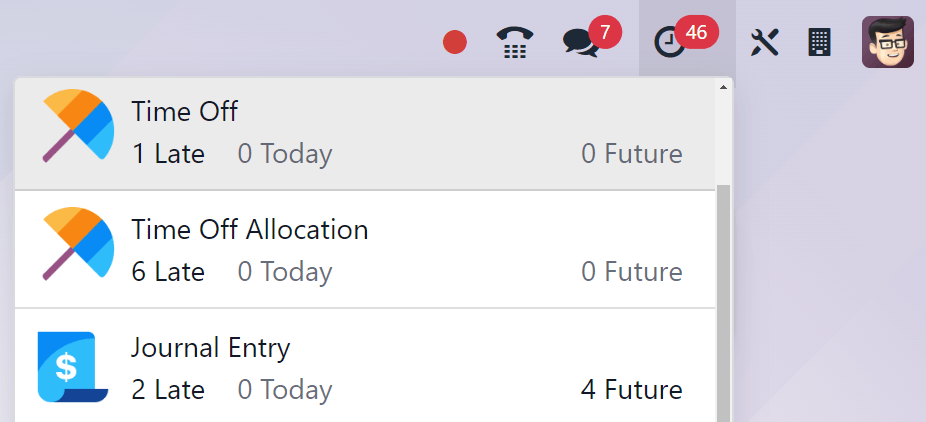
To view a consolidated list of activities, organized by application, click the (clock) icon in the header menu, located in the top-right corner.
If any activities are scheduled, the number of activities appear in a red bubble on the (clock) icon.
All activities for each application are further divided into subsections, indicating where in the application the activity is to be completed. Each sub-section lists the number of scheduled activities that are Late, due Today, and scheduled in the Future.
Example
In the Time Off application, one activity is scheduled to be done in the All Time Off requests dashboard, and six activities are scheduled to be done in the Allocations dashboard.
These requests appear in two separate lists in the all activities drop-down menu: one labeled Time Off and one labeled Time Off Allocation.
Request a document
The option to Request a Document is available at the bottom of the list of all scheduled activities, the option to Request a Document appears. Click Request a Document, and a Request a file pop-up window appears.
Enter the following information on the form:
- Document Name: enter a name for the document being requested.
- Request To: select the user the document is being requested from using the drop-down menu.
- Due Date In: enter a numerical value indicating when the document is due. Next to this field, a Days field is visible. Click Days, the default option, to reveal a drop-down menu. Select the desired time-frame option from the list. The options are Days, Weeks, or Months.
- Workspace: using the drop-down menu, select the specific Workspace the document is being uploaded to.
- Tags: select any desired tags from the drop-down menu. The available tags displayed are based on the tags configured for the selected Workspace.
- Message: enter a message to clarify the document request in this field.
When all the fields are completed, click Request to send the document request.

Activity types
To view the currently configured types of activities in the database, navigate to Settings app ‣ Discuss section ‣ Activities setting ‣ Activity Types.
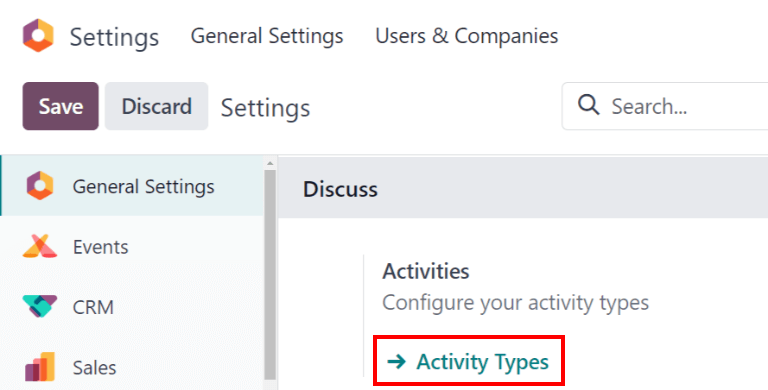
Doing so reveals the Activity Types page, where the existing activity types are found.
Tip
Individual applications have a list of Activity Types dedicated to that application. For example, to view and edit the activities available for the CRM application, go to CRM app ‣ Configuration ‣ Activity Types.
Edit activity types
To edit an existing activity type, click on the activity type, and the activity type form loads.
Make any desired changes to the activity type form. The form automatically saves, but it can be saved manually at any time by clicking the Save Manually option, represented by a (cloud upload) icon, located in the top-left corner of the page.
Create new activity types
To create a new activity type, click New from the Activity Types page, and a blank activity type form loads.
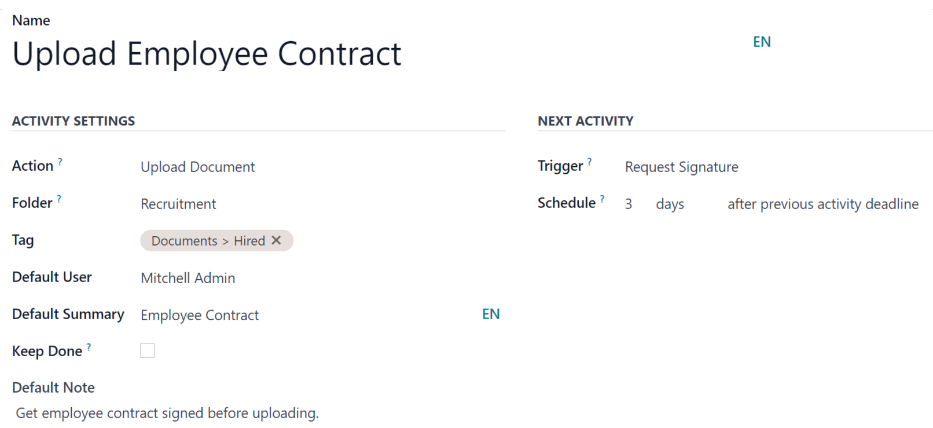
Enter a Name for the activity type at the top of the form, then enter the following information on the form.
Activity Settings section
- Action: using the drop-down menu, select an action associated with this new activity type. Some actions trigger specific behaviors after an activity is scheduled, such as:
- Upload Document: if selected, a link to upload a document is automatically added to the planned activity in the chatter.
- Call or Meeting: if selected, users have the option to open their calendar to select a date and time for the activity.
- Request Signature: if selected, a link to open a signature request pop-up window is automatically added to the planned activity in the chatter. This requires the Odoo Sign application to be installed.
Available activity types vary based on the installed applications in the database. - Folder: select a specific workspace folder to save a document to. This field only appears if Upload Document is selected for the Action.
Using the drop-down menu, select the Folder the document is saved to. - Default User: select a user from the drop-down menu to automatically assign this activity to the selected user when this activity type is scheduled. If this field is left blank, the activity is assigned to the user who creates the activity.
- Default Summary: enter a note to include whenever this activity type is created.
Note
The information in the Default User and Default Summary fields are included when an activity is created. However, they can be altered before the activity is scheduled or saved. - Keep Done: tick this checkbox to keep activities that have been marked as Done visible in the activity view.
- Default Note: enter any notes to appear with the activity.
Next Activity section
It is possible to have another activity either suggested or triggered. To do so, configure the Next Activity section.
- Chaining Type: select either Suggest Next Activity or Trigger Next Activity from the drop-down menu. Depending on the selected option, either the Suggest or Trigger field is displayed.
Note
The Chaining Type field does not appear if Upload Document is selected for the Action. - Suggest/Trigger: depending on what is selected for the Chaining Type, this field either displays Suggest or Trigger. Using the drop-down menu, select the activity to recommend or schedule as a follow-up task to the activity type.
- Schedule: configure when the next activity is suggested or triggered.
First, enter a numerical value indicating when the activity is suggested or triggered.
Next to this field, a Days field is visible. Click Days, the default option, to reveal a drop-down menu. Select the desired time-frame option from the list. The options are Days, Weeks, or Months.
Lastly, using the drop-down menu, select whether the activity is scheduled or triggered either after previous activity deadline or after completion date.
See also
On this page
Get Help
Contact Support Ask the Odoo Community
![]()
EN
Odoo 18
Reporting
You can find several reports under the Reporting menu of most apps that let you analyze and visualize the data of your records.
Selecting a view
Depending on the report, Odoo can display the data in various ways. Sometimes, a unique view fully tailored to the report is available, while several views are available for others. However, two generic views are dedicated to reporting: the graph and pivot views.
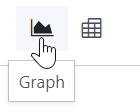
Graph view
The graph view is used to visualize your records’ data, helping you identify patterns and trends. The view is often found under the Reporting menu of apps but can be found elsewhere. Click the graph view button located at the top right to access it.
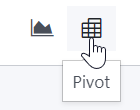
Pivot view
The pivot view is used to aggregate your records’ data and break it down for analysis. The view is often found under the Reporting menu of apps but can be found elsewhere. Click the pivot view button located at the top right to access it.
Choosing measures
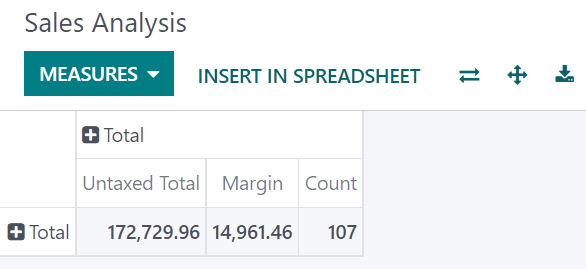
After selecting a view, you should ensure only the relevant records are filtered. Next, you should choose what is measured. By default, a measure is always selected. If you wish to edit it, click Measures and choose one or, only for pivots, multiple measures.
Note
When you select a measure, Odoo aggregates the values recorded on that field for the filtered records. Only numerical fields (integer, decimal, monetary) can be measured. In addition, the Count option is used to count the total number of filtered records.
After choosing what you want to measure, you can define how the data should be grouped depending on the dimension you want to analyze. By default, the data is often grouped by Date > Month, which is used to analyze the evolution of a measure over the months.
Tip
When you filter a single time period, the option to compare it against another one appears.
Example
Select measuresGroup measures
Among other measures, you could add the Margin and Count measures to the Sales Analysis report. By default, the Untaxed Amount measure is selected.
Using the pivot view
Grouping data is quintessential to the pivot view. It enables drilling down the data to gain deeper insights. While you can use the Group By option to quickly add a group at the level of rows, as shown in the example above, you can also click the plus button (➕) next to the Total header at the level of rows and columns, and then select one of the preconfigured groups. To remove one, click the minus button (➖).
Once you have added a group, you can add new ones on the opposite axis or the newly created subgroups.
Example
You could further divide the measures on the previous Sales Analysis report example by the Salesperson group at the level of columns and by the Order Date > Month group on the All / Saleable / Office Furniture product category.
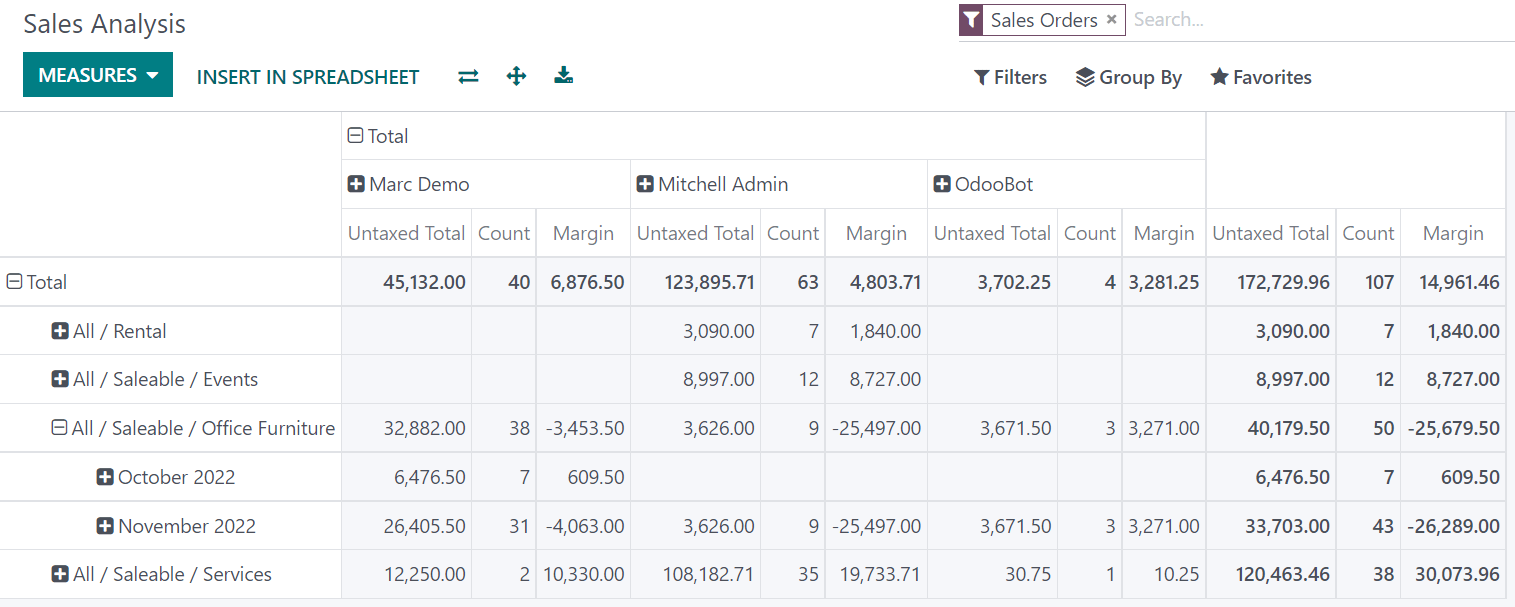
Tip
- Switch the rows and columns’ groups by clicking the flip axis button (⇄).
- Click on a measure’s label to sort the values by ascending (⏶) or descending (⏷) order.
- Download a .xlsx version of the pivot by clicking the download button (⭳).
Using the graph view
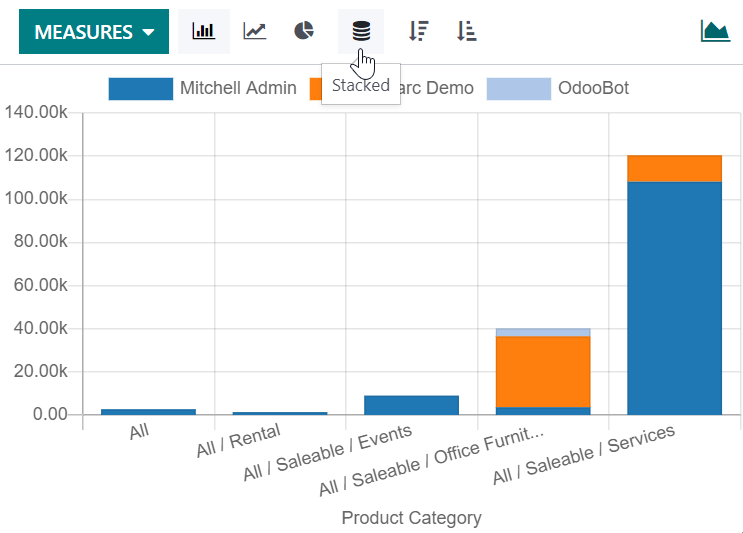
Three graphs are available: the bar, line, and pie charts.
Bar charts are used to show the distribution or a comparison of several categories. They are especially useful as they can deal with larger data sets.
Line charts are useful to show changing time series and trends over time.
Pie charts are used to show the distribution or a comparison of a small number of categories when they form a meaningful whole.
Bar chartLine chartPie chart

Tip
For bar and line charts, you can use the stacked option when you have at least two groups, which then appear on top of each other instead of next to each other.
Stacked bar chartRegular bar chartStacked line chartRegular line chart
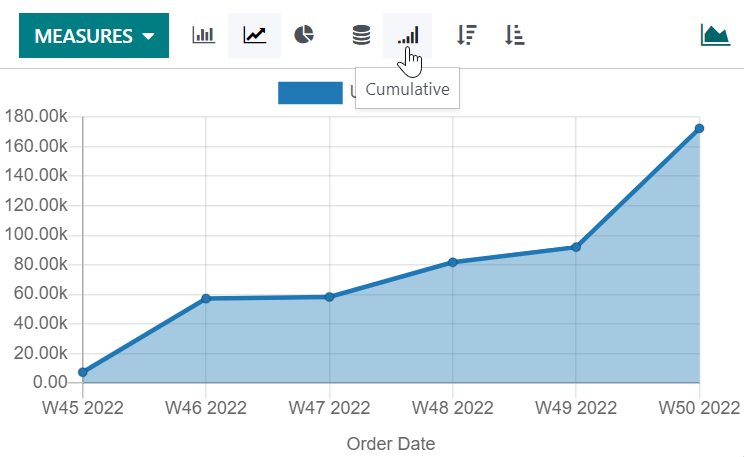
For line charts, you can use the cumulative option to sum values, which is especially useful to show the change in growth over a time period.
Cumulative line chartRegular line chart
On this page
Get Help
Contact Support Ask the Odoo Community
![]()
EN
Odoo 18
Search, filter, and group records
Odoo allows for the searching, filtering, and grouping of records in a view to display only the most relevant records. The search bar is located at the top of the view: start typing to search for values, or click the (dropdown) icon to access the Filter, Group By, and Favorites drop-down menus.
Search for values
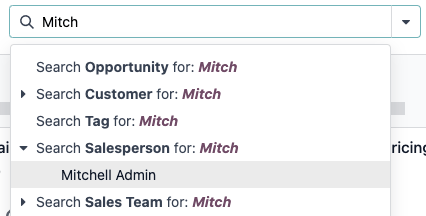
Use the search field to look for specific values, and add them as a filter. Type the value to search for (like a salesperson’s name or a product), and select the desired option from the drop-down menu to apply the search filter.
Example
Instead of adding a custom filter to select records where Mitchell Admin is the salesperson on the Sales Analysis report (Sales app ‣ Reporting ‣ Sales), search for Mitch, and click the (submenu) icon next to Search Salesperson for: Mitch, and select Mitchell Admin.
Note
Using the search field is equivalent to using the contains operator when adding a custom filter. If a partial value is entered, and the desired field is directly selected (without selecting the (submenu), all records containing the typed characters for the selected field are included.
Filters
Filters are used to select records that meet specific criteria. The default selection of records is specific to each view, but can be modified by selecting one (or several) preconfigured filters, or by adding a custom filter.
Preconfigured filters
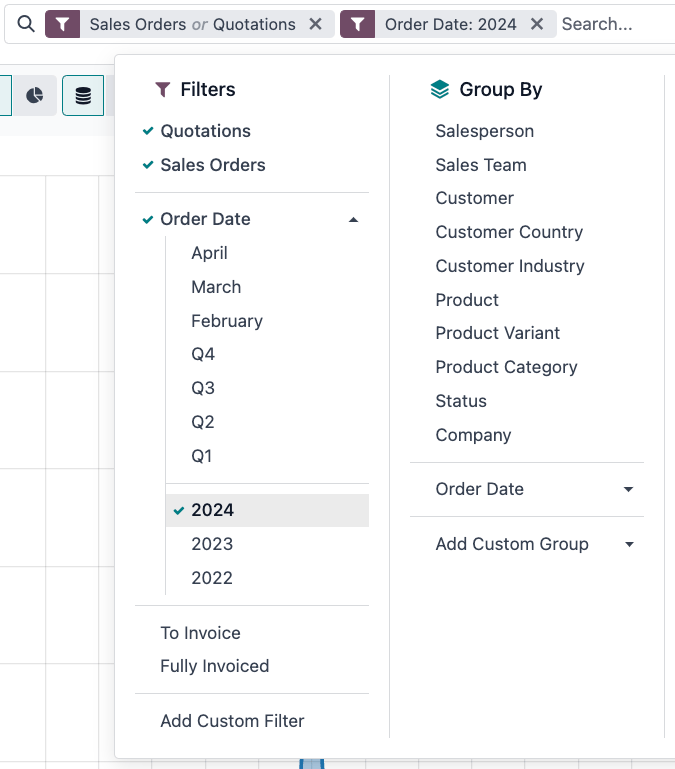
Modify the default selection of records by clicking the (dropdown) from the search bar, and selecting one (or several) preconfigured filters from the Filters drop-down menu.
Example
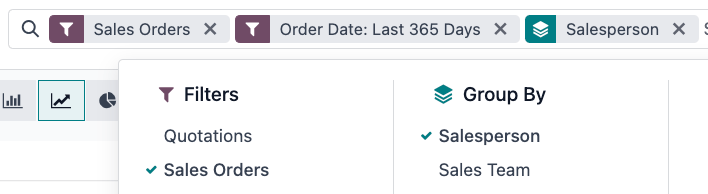
On the Sales Analysis report (Sales app ‣ Reporting ‣ Sales), only records that are at the sales order stage, with an order date within the last 365 days, are selected by default.
To also include records at the quotation stage, select Quotations from the Filters.
Furthermore, to only include sales order and quotation records from a specific year, like 2024, for example, first remove the existing Order Date: Last 365 Days filter by clicking (cancel), then select the Order Date ‣ 2024 filter.
Note
The preconfigured Filters are grouped, and each group is separated by a horizontal line. Selecting preconfigured filters from the same group allows records to match any of the applied conditions. However, selecting filters from different groups requires records to match all of the applied conditions.
Custom filters
If the preconfigured filters are not specific enough, add a custom filter. To do so, click the (dropdown) icon in the search bar, then select Filters ‣ Add Custom Filter.
The Add Custom Filter pop-up window displays the matching option, filter rule, and a toggle to Include archived records.
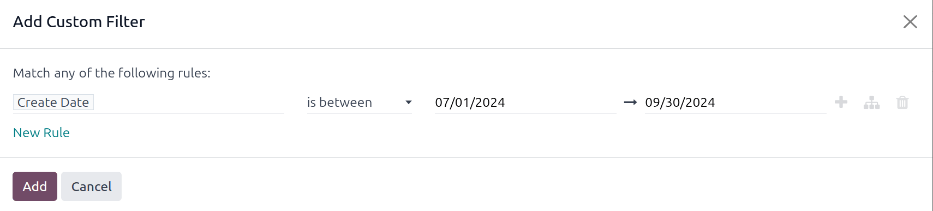
The default matching configuration is to Match any of the following rules, indicating that each filter rule is applied independently. To change the matching configuration to Match all of the following rules, at least two filter rules must be added to the custom filter.
- Match all of the following rules: All of the filter rules must be met. Think of this as an AND (&) operation.
- Match any of the following rules: Any of the filter rules can be met. Think of this as an OR (|) operation.
By default, a single filter rule is added to the custom filter. The following describes the structure of a filter rule:
- The first inline field is the field name to filter by. Some fields have refined parameters that are nested within another field. These fields have a (submenu) icon beside them, which can be selected to reveal the nested fields.
- The second inline field is the conditional operator used to compare the field name to the value. The available conditional operators are specific to the field’s data type.
- The third inline field is the variable value of the field name. The value input may appear as a drop-down menu, a text input, a number input, a date/time input, a boolean selector, or it may be blank, depending on the operator used and the field’s data type.
Three inline buttons are also available to the right of the rule’s filter criteria:
- (plus): Adds a new rule below the existing rule.
- (node): Adds a new group of rules below the existing rule, with the any and all matching options available to define how each rule within this branch is applied to the filter. If the matching option is set to the same as the parent group, the fields are moved to join the parent group.
Example
If the matching option is set to Match all of the following rules, and a new branch is added with its matching option changed from any of to all of, the newly-added branch disappears, and its group of rules are moved to the parent group. - (delete): Deletes the node. If a branch node is deleted, all children of that node are deleted, as well.
A new filter rule can be added to the custom filter by clicking the New Rule button.
Once the filter criteria are defined, click Add to add the custom filter to the view.
Example
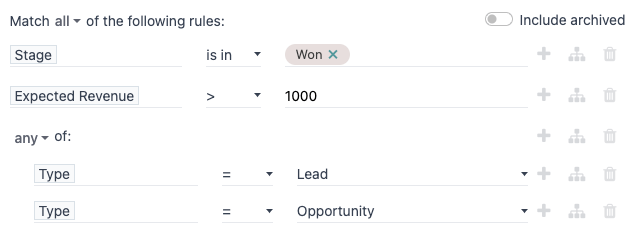
To target all leads and opportunities from the CRM app that are in the Won stage, and have an expected revenue greater than $1,000, the following should be entered:
Match all of the following rules:
- Stage is in Won
- Expected Revenue > 1,000
- any of:
- Type = Lead
- Type = Opportunity
Tip
Activate Developer mode (debug mode) to reveal each field’s technical name and data type, as well as the # Code editor text area below the filter rules, to view and edit the domain manually.
Group records
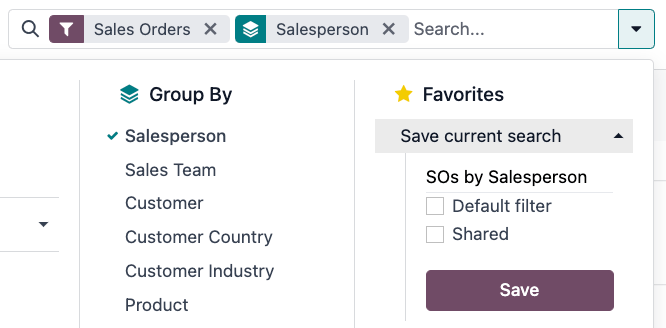
The display of records in a view can be clustered together, according to one of the preconfigured groups. To do so, click the (dropdown) icon in the search bar, then select one of the Group By options from the drop-down menu.
Example
To group the records by salesperson on the Sales Analysis report (Sales app ‣ Reporting ‣ Sales), click the Salesperson option from the Group By drop-down menu. The view changes to group the records by salesperson, without filtering out any records.
It is possible to customize groups by using a field present on the model. To do so, click Add Custom Group, and select a field from the drop-down menu.
Note
Several groups can be used at the same time. The first group that is selected is the main cluster, the next one that is added further divides the main group’s categories, and so on. Furthermore, filters and groups can be used together to refine the view even more.
Comparison
Certain reporting dashboards include a Comparison section in the drop-down menus of their search bars. This includes the Overall Equipment Effectiveness report for the Manufacturing app and the Purchase report for the Purchase app, among others.
The options in the Comparison section are used to compare data from two different time periods. Pick between the two comparison options: (Time Filter): Previous Period and (Time Filter): Previous Year.
Important
For some reports, the Comparison section only appears in the search bar drop-down
menu if one (or more) time periods have been selected in the Filters column. This is because there is nothing to compare if no time period is specified.
Additionally, some reports only allow use of the Comparison feature when the (Pie Chart) graph type or the (Pivot) view, is selected. A Comparison option can be selected even if another view is enabled, but doing so does not change the way data is displayed on the report.

To view data using one of the two comparisons, begin by selecting a time period in the Filters column of the search bar drop-down menu. Then, select either (Time Filter): Previous Period or (Time Filter): Previous Year in the Comparison section.
With one of the Comparison options enabled, the report compares the data for the selected period, with the data for the same unit of time (month, quarter, year), one period or year prior. The way the data is displayed depends on the selected view:
- The (Bar Chart) shows two bars, side-by-side, for each unit of time for the selected time period. The left bar represents the selected time period, while the right bar represents the previous time period.
- The (Line Chart) is displayed with two lines, one representing the selected time period, and the other representing the previous time period.
- The (Pie Chart) appears as a large circle with a smaller circle inside. The larger circle represents the selected time period, while the smaller circle represents the previous time period.
- The (Pivot) is displayed with each column split into two smaller columns. The right column represents the selected time period, while the left column represents the previous time period.
Example
In the Production Analysis report of the Manufacturing app, data for the second quarter of 2024 is compared to data for the second quarter of 2023. Q2 is selected in the End Date filter section of the search bar drop-down menu. In the Comparison section, End Date: Previous Year is selected.
The current year is 2024, so the larger circle shows data for the second quarter (Q2) of 2024. The smaller circle shows data for the second quarter (Q2) of 2023, which is the same time period, but one year prior.
If End Date: Previous Period is selected instead, the smaller circle shows data for the first quarter (Q1) of 2024, which is the same time period, but one period prior.
Favorites
Favorites are a way to save a specific search for future use, or as the new default filter for the view.
To save the current view as a favorite, click the (dropdown) icon in the search bar, then select the Save current search drop-down menu to display the following options:
- Filter name: Name of the favorited search.
- Default filter: Sets the favorited search as the default filter for the view.
- Shared: Makes the favorited search available to all users. Otherwise, by default, the favorited search is only available to the user who created it.
Once the options are set, click Save to save the favorited search.
Saved favorites can be accessed by clicking the (delete) icon in the search bar, then selecting the saved filter in the Favorites drop-down menu. To remove a saved favorite, click the (delete) icon next to the favorited search.
Tip
To view all favorited searches, first activate Developer mode (debug mode), and navigate to Settings app ‣ Technical ‣ User Interface: User-defined Filters. From here, all favorited searches can be viewed, edited, archived, or deleted.
On this page
Get Help
Contact Support Ask the Odoo Community
![]()
 docs
docs- Try Odoo for FREE
- EN
- Odoo 18
- Article creation and editing
- Article creation
- Knowledge articles can be created from scratch or from a preconfigured template.
- From scratch
- To create an article from scratch, click New in the top right corner or hover over the Private or Workspace category in the sidebar tree, then click the (plus) icon. Start typing text or select one of the suggested options:
- Load a Template: Select a preconfigured template and click Load Template.
- Build an Item Kanban: Create items to visualize and manage them in a Kanban view.
- Build an Item List: Create a structured list of items to centralize them in a single article.
- Build an Item Calendar: Create a calendar view to manage and track items by date.
- Generate an Article with AI: Generate content based on a prompt.
- Tip
- After writing the header, click or hover over Untitled in the top bar to automatically name the article after the header. This does not apply if the article is already titled.
- From a template
- To create an article from a template, follow these steps:
- Click Browse Templates at the bottom of the sidebar tree.
- Select a preferred template.
- Click Load Template.
- Article editing
- To edit an article, select it in the sidebar tree, then edit its content and format it using the text editor toolbar, by typing powerbox commands, and adding a cover picture with a title emoji.
- Text editor toolbar
- To edit a word, sentence, or paragraph, select or double-click it to display the text editor toolbar and apply the desired formatting options.
- Tip
- Click Comment to add a comment to the selected text.
- Commands
- Type / to open the powerbox and use a command. The following commands are exclusive to the Knowledge app:
- Cover pictures
- To add a cover picture, click the (ellipsis) icon, then Add Cover. The following options enable selecting and inserting pictures from different sources:
- Search the Unsplash database to find a suitable picture. If your database and your Unsplash account are associated, the cover picture is automatically selected based on the article’s name.
- Add URL: Copy-paste the image address.
- Upload an image: Upload the file into the image library.
- To manage the cover picture, hover the mouse over it and select the preferred option:
- Replace Cover and search from the database or library, or add a different URL.
- Reposition and adjust the picture before clicking Save Position.
- Remove Cover.
- Title emoji
- To add a title emoji to the article’s name and header:
- Click the (ellipsis) icon, then Add Icon to generate a random emoji. Click the emoji to select a different one.
- Alternatively, click the (page) icon next to the article’s name in the sidebar or the top bar and select the preferred emoji.
- Views and links from other apps
- To insert a view or a view link into an article, follow these steps:
- Go to the desired app and select the preferred view.
- Click the (cog) icon, then select Knowledge ‣ Insert view in article or Insert link in article.
- Choose the article to insert the view or link to.
- Note
- Once the view or link is inserted:
- Users without access to the view cannot see it in Knowledge, even if they can access the article containing it.
- Clicking the inserted link opens a pop-up with the view’s name next to the (copy), (edit), and (remove) icons. Click the name inside the pop-up to open the linked view.
- Edit on GitHub
- On this page
- Get Help
- Contact Support Ask the Odoo Community
Command | Use |
|---|---|
Index | Show nested articles: Display the child pages of the parent article. |
Item Kanban | Insert a Kanban view and create items. |
Item Cards | Insert a Card view and create items. |
Item List | Insert a List view and create items. |
Item Calendar | Insert a Calendar view and create items. |
EN
Odoo 18
Articles management
Managing articles effectively is key to maximizing the value of your knowledge resources, whether working on a research project, studying for an exam, or building a knowledge database for your business. Knowledge allows you to fully manage your articles, from creation to removal, through sharing and structure.
You can find most tools to manage articles by clicking the vertical ellipsis button (⋮) at the right side of the top bar. From there, you can move, lock, delete, or duplicate an article.

Creation, sharing, and removal of articles
Creation
To create articles, click the + New button on the right side of the top bar or the + button next to a category or another article.
Tip
Create private articles quickly with the Alt/Option + C keyboard shortcut.
Sharing
You can share articles with internal or external users. To do so, open the share menu by clicking Share in the top-right menu of articles.
Invite users
To share articles with specific users (internal or external, such as a partner or a customer), click Invite. This opens a pop-up window in which you can choose the Permission (i.e, access rights) and enter the Recipients’ name or email.
You can also restrict a specific user from accessing the article by selecting No access permission.

Share online
To share articles online, activate the Share to web button. Doing so generates a URL link anyone can use to view the article.
Additionally, the share menu displays the default permission for internal members along with all the users who have been granted specific permission.

Removal
To remove an article, you can either delete it or archive it.
To delete an article, open it and click the vertical ellipsis button (⋮) ‣ Delete. The article is moved to the trash for 30 days before being permanently deleted. To restore it, click Open the Trash, select the article, and click Restore.
To archive articles, click Search, select the article(s), and click Action ‣ Archive ‣ Archive. Archived articles are hidden from the search menu. To retrieve an archived article, add a custom filter to display them (Search ‣ Filters ‣ Add Custom Filter, and set Active as is No). Then, select the article(s) and go to Action ‣ Unarchive.
Structure of articles
Articles are organized into a hierarchical structure wherein the article on top is a parent article, and those underneath are called nested articles. This structure allows the grouping of related articles.
To establish this hierarchy, create new articles by clicking the + button next to the parent-to-be article, or move existing articles by either dragging and dropping them under the parent-to-be or by clicking the vertical ellipsis button (⋮), clicking Move To on the toolbox and selecting the article to use as a parent.
Categories
Additionally, articles are divided into four categories that can be found on the left sidebar. These categories give articles default access rights.
- Favorites: You can set any article you can access as a favorite. To do so, click the star-shaped icon (★) in the top-right menu of articles. Marking articles as favorites is user-specific and does not affect other users.
- Workspace: Articles displayed in that category are available to all internal users. These users have the right to read, modify or share these articles.
- Shared: Articles displayed in that category are those you shared with internal users, external users, or shared with you.
- Private: Articles displayed in that category are only available to you.

On this page
Get Help
Contact Support Ask the Odoo Community
![]()
EN
Odoo 18
Properties
Properties are fields containing data and that can be added to articles by any user with write access. These fields are shared between all the child articles and article items under the same parent.
Note
To be able to add properties, an article must be either a child article or an article item.
Add property fields
Hover above the first-level header to make the buttons appear. Click ⚙ Add Properties ‣ Field Type, select the type and add a default value if needed. To make the fields appear in kanban views, check View in Kanban as well. To validate and close the property creation window, click anywhere.
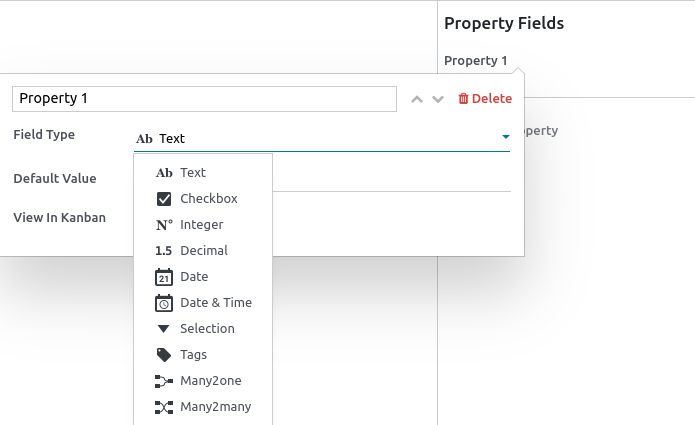
The different types assess what the field content can be:
Types | Uses |
|---|---|
Text | Allows adding any content with no restriction. |
Checkbox | Add a checkbox. |
Integer | Allows adding integer numbers. |
Decimal | Allows adding any number. |
Date | Allows selecting a date. |
Date & Time | Allows selecting a date and time. |
Some field types need to be configured:
Types | Uses |
|---|---|
Selection | Add a drop-down selection menu with restricted values that have been set at the property creation. To set it up, click Add a Value next to the Values field. Enter predetermined values and press enter to validate; you can enter as many values as needed. Click anywhere to close the property creation window. |
Tags | Allows creating and applying as many tags as needed. To set it up, enter your new_tag in the Tags field, and press enter or click Create “new_tag”. Click anywhere to close the window. Then, add the tags into the property field. To do so, click the property field and choose from the created tags; enter the tags’ name and press enter; enter a new tag’s name and create a new one on the spot. |
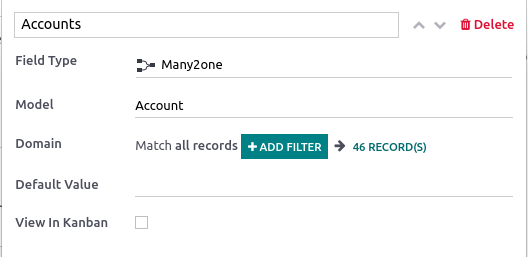
Many2one | Choose from a list of records that result from a model’s domain. You can only select one result. To set it up, click Search a Model in the Model field, select the model. Match all records by clicking ## Record(s), or filter the results by clicking + Add Filter and show the records by clicking ## Record(s). |
Many2many | Choose from a list of records that result from a model’s domain. You can select as many results as needed. To set it up, click Search a Model in the Model field, select the model. Match all records by clicking ## Record(s), or filter the results by clicking + Add Filter and show the records by clicking ## Record(s). |
Delete property fields
To remove a property, click the pencil icon next to the targeted property, then click Delete ‣ Delete.
Warning
Once a property field is deleted, you cannot retrieve it.
Hide the property panel
To hide the property sidebar panel, click the gear (⚙) button.
On this page
Get Help
Contact Support Ask the Odoo Community
![]()
EN
Odoo 18
Calendar
Odoo Calendar is a scheduling app that allows users to integrate a company’s business flow into a single management platform. By integrating with the other apps in Odoo’s ecosystem, Calendar allows users to schedule and organize meetings, schedule events, plan employee appraisals, coordinate projects, and more – all from the same platform.
Upon opening the Calendar app, users have an overview of their current meetings. The selected view option appears as a Day, Week, Month, or Year drop-down menu. Under the view options drop-down menu, users can also enable or disable Show weekends.
Tip
Depending on the selected view option, users can click the (left or right arrow) buttons to switch between days, weeks, etc., and switch back to the current day with the Today button.
Sync third-party calendars
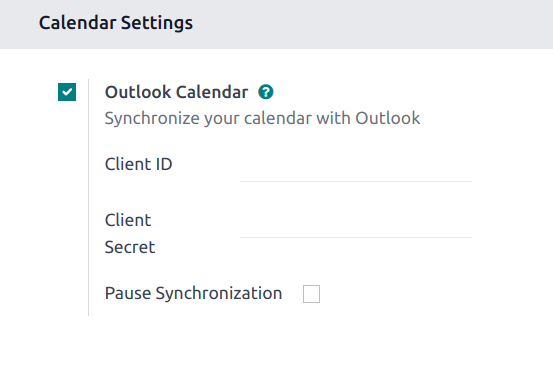
Users can sync Odoo with existing Outlook and/or Google calendars, by heading to Calendar app ‣ Configuration ‣ Settings. From here, enter Client ID and Client Secret. There is also an option to pause synchronization by ticking the checkbox, or automating synchronization by keeping it blank.
Once the desired configurations are complete, be sure to click Save before moving on.
Events created in synced calendars automatically appear across the integrated platforms.
See also
Create activities from chatter
Instantly create new meetings anywhere in Odoo through an individual record’s chatter, like in a CRM opportunity card or task in the Projects app.
From the chatter, click on the Activities button. In the Schedule Activity pop-up window, select the desired Activity Type, which populates a set of buttons, depending on the activity.
Activities that involve other schedules, like Meeting or Call for Demo, link to the Calendar app. Select one of these activities to link to the Calendar app, then hit Open Calendar to navigate back to the app. Alternatively, it is also possible to Schedule & Mark as Done to close out the activity, or select Done & Schedule Next to keep the Schedule Activity window open to create another.
See also
Plan an event
To put an event on the calendar, open the Calendar app, and click into the target date. On the New Event pop-up window that appears, start by adding the event title.
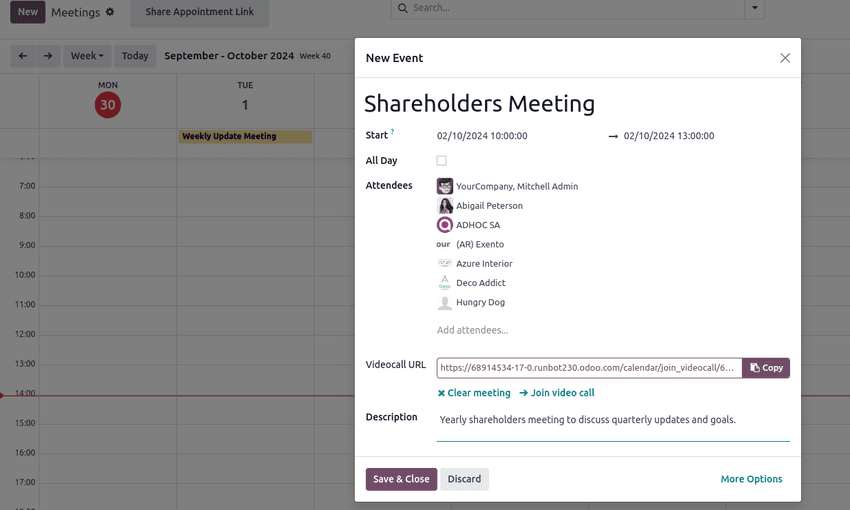
The target date auto-populates in the Start field. This can be changed by clicking into the date section, and selecting a date from the calendar. For multi-day events, select the end date in the second field, then click Apply.
Tick the All Day checkbox if there is no specific start or end time.
For events with specific start and stop times, ensure the All Day checkbox is unticked to enable time selection. With the All Day checkbox unticked, time selections appear in the Start field.
The signed-in user auto-populates as the first attendee. Additional Attendees can be added or created from here, as well.
For virtual meetings, copy and paste the URL into the space provided in the Videocall URL field. Or, click Odoo meeting to create a link.
Next, either create the event by clicking Save & Close, or select More Options to further configure the event.
Tip
Once the event is created, users can click into the virtual meeting directly from the calendar event to access more configuration options.
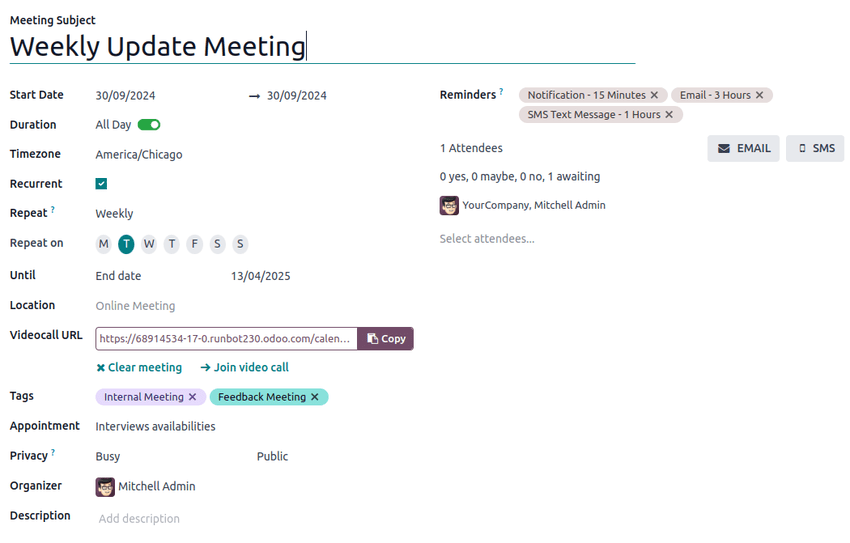
The Description field allows users to add additional information and details about the meeting.
Click More Options to navigate to the meeting form, which provides additional configurations for the event:
- Duration: Define the length of the meeting in hours, or toggle the All Day switch.
- Recurrent: Tick the checkbox to create a recurring meeting. Once selected, this opens new fields:
- Timezone: Select the timezone for which this meeting time is specified.
- Repeat: Select the recurring period of this meeting. Depending on what type of recurrence has been selected, a subsequent field appears, in which users can indicate when the meeting should recur. For example, if Monthly is selected as the Repeat option, a new field appears, in which the user decides on what Day of Month the meeting should recur.
- Until: Select the limited Number of repetitions this meeting should recur, the End date of when the recurrences should stop, or if the meetings should recur Forever.
- Tags: Add tags to the event, like Customer Meeting or Internal Meeting. These can be searched and filtered in the Calendar app when organizing multiple events.
- Appointment: Link existing or new appointments. These can be configured through the Share Availabilities button from the main Calendar dashboard.
- Privacy: Toggle between visibility options to control who can view the event.
- Organizer: This is defaulted to the current Odoo user. Select a new one from existing users, or create and edit a new user.
- Description: Add additional information or details about the meeting.
- Reminders: Select notification options to send to attendees. Choose a default notification, or configure new reminders.
Coordinate with teams’ availability
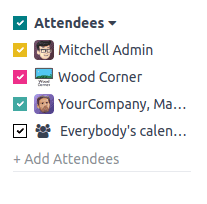
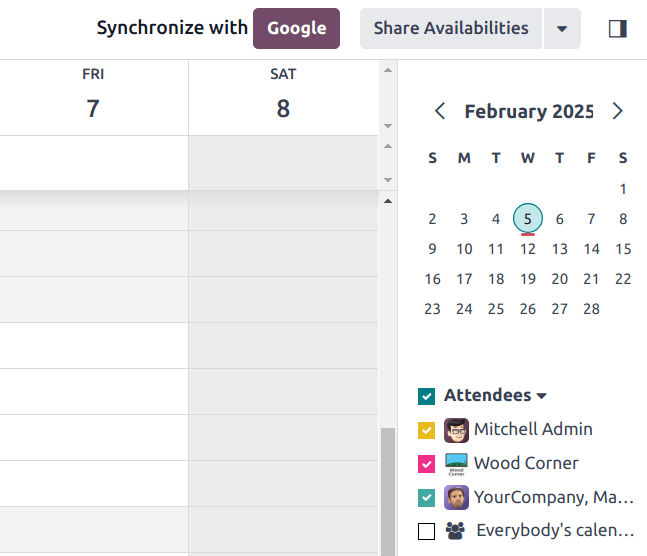
When scheduling an event for multiple users, on the Calendar app dashboard, tick the checkbox next to Attendees to view team members’ availability. Tick (or untick) the checkbox next to listed users to show (or hide) individual calendars.
Share Availabilities
On the Calendar app main dashboard, click the Share Availabilities button at the top of the page. Next, click and drag to select the available times and dates on the calendar to add them as options in the invitation.
Tip
To remove a selected time range, hover over the availability to click the (trash) icon.
Note
Within the Share Availabilities feature, selecting times is only possible on the Day calendar views.
Once availability has been selected, click the Open button to navigate to the associated appointment.

Several configuration options are available on the appointment form:
In the Scheduling field, set a minimum hour window to ensure appointments are confirmed a specified amount of time in advance. For example, set 01:00 to require attendees to confirm at least one hour before their appointment time.
In the Allow Cancelling field, set a maximum hour window before the appointment that attendees are able to cancel.
The Availability on field enables attendees to book Users or Resources, such as meeting rooms or tables. After selecting Users or Resources, type in the desired user or resource in the space below.
The Front-End Display field is used to choose No Picture or Show Pictures related to the selected user or resource on the appointment page.
If Resources has been selected in the Availability on field, users have an option to Manage Capacities.
Tick the checkbox to limit the maximum amount of people that can use the resource at the same time.
The Assignment Method field enables the order in which attendees book their time and user/resource:
- Pick User/Resource then Time
- Select Time then User/Resource
If Resources has been selected in the Availability On field, a third option is available, Select Time then auto-assign.
Optionally, configure the following tabs:
Click the Preview button to see how the appointment link looks for attendees.
Once the configurations are finished, click the Share button to generate a link to send directly, or click Publish to publish the appointment selection on the connected Odoo website.
Schedule tab
In the Schedule tab of the appointment form, time slots can be managed. The target date and time populate as the first time slots.
To add a new time slot, hit Add a line. Click into the new blank space under the From field, then select and enter the new target start date and time, respectively. Repeat under the new blank space under To to select and enter the new target end date and time.
Options tab
The Options tab provides additional configurations:
- Website: Specify which website this meeting invitation will be published on.
- Timezone: This defaults to the company’s timezone selected in the Settings app. To change the timezone, select the desired option from the drop-down menu.
- Location: Select or create new locations from the drop-down menu. If this field is left empty, the meeting is considered to be taking place online.
- Videoconference Link: Select from Odoo Discuss or Google Meet to include a video conference link in the meeting invitation, or leave it blank to prevent generating a meeting URL.
- Manual Confirmation: Only shown if Resources has been selected in the Availability On field. Tick the checkbox and enter a maximum percentage of the selected resource(s)’ total capacity to create a manual confirmation requirement to finalize the meeting.
- Up-front Payment: Tick the checkbox to require users to pay before confirming their booking. Once this is ticked, a link appears to Configure Payment Providers, which enables online payments.
- Limit to Work Hours: If Users has been selected in the Availability On field, tick the checkbox to limit meeting time slots to the selected users’ working hours.
- Create Opportunities: When this is selected, each scheduled appointment creates a new CRM opportunity.
- Reminders: Add or delete notification reminders in this field. Select the blank space for additional options.
- Confirmation Email: Tick the checkbox to automatically send a confirmation email to attendees once the meeting is confirmed. Select from the email templates or click Search More…, then New to create a custom template.
- Cancelation Email: Tick the checkbox to automatically send a cancelation email to attendees if the meeting is canceled. Select from the email templates or click Search More…, then New to create a custom template.
- CC to: Add contacts to be notified of meeting updates in this field, regardless if they attend the meeting.
- Allow Guests: Tick the checkbox to allow attendees to invite guests.
Questions tab
In the Questions tab, add questions for the attendee to answer when confirming their meeting. Click Add a line to configure a Question. Then select a Question Type, optionally add a Placeholder answer, and choose whether it is a Required Answer.
To learn how to create more comprehensive questionnaires, head to the Survey app documentation on creating and configuring data-capturing questions.
Messages tab
In the Introduction Message field of the Messages tab, add additional meeting information that appears on the invitation.
Information added to the Extra Message on Confirmation field appears once the meeting is confirmed.
On this page
Get Help
Contact Support Ask the Odoo Community
![]()
EN
Odoo 18
Outlook Calendar synchronization
Synchronizing a user’s Outlook Calendar with Odoo is useful for keeping track of tasks and appointments across all related applications.
See also
Microsoft Azure setup
To sync the Outlook Calendar with Odoo’s Calendar, a Microsoft Azure account is required. Creating an account is free for users who have never tried, or paid for, Azure. For more information, view the account options on the Azure website.
Refer to Microsoft’s documentation on how to set up a Microsoft Entra ID (formally called Microsoft Azure Active Directory (Azure AD)). This is an API console to manage and register Microsoft applications.
Existing Microsoft Entra ID users should log in at the Microsoft Azure developer portal. Next, select View under the section labeled Manage Microsoft Entra ID.
Register application
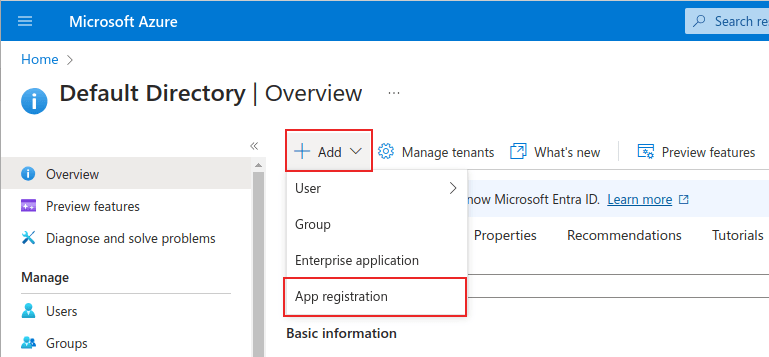
After logging in with the Microsoft Entra ID, register an application.
To create an application, click + Add in the top menu. From the resulting drop-down menu, select App Registration.
Enter a unique Name for the connected application.
Choosing the appropriate Supported account type is essential, or else the connected application will not work. Users who wish to connect their Outlook Calendar to Odoo should select the Accounts in any organizational directory (Any Microsoft Entra ID directory - Multitenant) and personal Microsoft accounts (e.g. Skype, Xbox) option for Supported account types.
When configuring the Redirect URI, choose the Web option from the first drop-down menu. Then, enter the Odoo database URI (URL) followed by /microsoft_account/authentication.
Example
Enter https://yourdbname.odoo.com/microsoft_account/authentication for the Redirect URI. Replace yourdbname.odoo.com with the URL.
Tip
Ensure the database’s URL (domain) used in the URI is the exact same domain as the one configured on the web.base.url system parameter.
Access the web.base.url by activating developer mode, and navigating to Settings app ‣ Technical header menu ‣ Parameters section ‣ System Parameters. Then, select it from the Key list on the System Parameters page.

For more information on the restrictions and limitations of URIs, check Microsoft’s Redirect URI (reply URL) restrictions and limitations page.
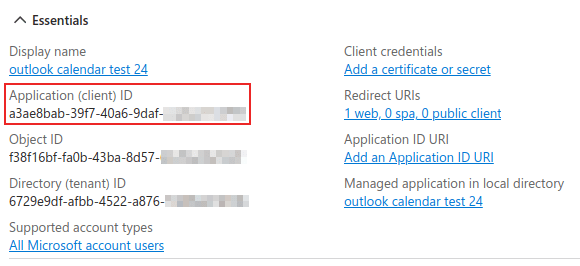
Finally, on the application registration page, click Register button to complete the application registration. The Application (client) ID is produced. Copy this value, as it is needed later, in the Configuration in Odoo.
Create client secret
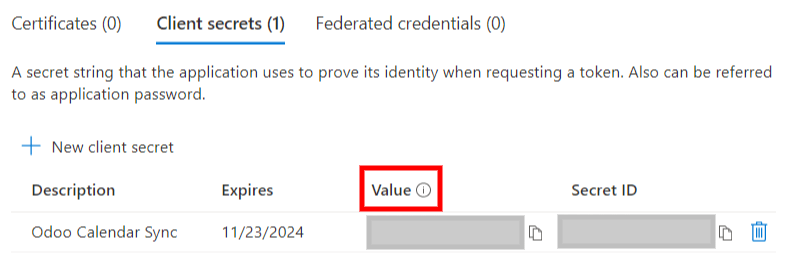
The second credential needed to complete the synchronization of the Microsoft Outlook Calendar is the Client Secret. The user must add a client secret, as this allows Odoo to authenticate itself, requiring no interaction from the user’s side. Certificates are optional.
To add a client secret, click Certificates & secrets in the left menu. Then click + New client secret to create the client secret.

Next, type a Description, and select when the client secret Expires. Available options include: 90 days (3 months), 365 days (12 months), 545 days (18 months), 730 days (24 months) or Custom. The Custom option allows the administrator to set a Start and End date.
Finally, click Add to Add a client secret.
Tip
Since resetting the synchronization can be tricky, Odoo recommends setting the maximum allowed expiration date for the client secret (24 months or custom), so there is no need to re-synchronize soon.
Copy the Value for use in the next section.
Warning
Client secret values cannot be viewed, except immediately after creation. Be sure to save the secret when created before leaving the page.
Configuration in Odoo
In the Odoo database, go to Calendar app ‣ Configuration ‣ Settings, and tick the checkbox beside the Outlook Calendar setting. Remember to click Save to implement the changes.
From the Microsoft Azure portal, under the Overview section of the application, copy the Application (Client) ID, if it has not already been copied, and paste it into the Client ID field in Odoo.

Copy the previously-acquired Value (Client Secret Value), and paste it into the Client Secret field in Odoo.
Finally, on the Odoo Settings ‣ General Settings page, click Save.
Sync with Outlook
Warning
Odoo highly recommends testing the Outlook calendar synchronization on a test database and a test email address (that is not used for any other purpose) before attempting to sync the desired Outlook Calendar with the user’s production database.
If the user has any past, present, or future events on their Odoo calendar before syncing their Outlook calendar, Outlook will treat the events pulled from Odoo’s calendar during the sync as new events, causing an email notification to be sent from Outlook to all the event attendees.
To avoid unwanted emails being sent to all past, present, and future event attendees, the user must add the events from the Odoo calendar to the Outlook calendar before the first ever sync, delete the events from Odoo, and then start the sync.
Even after synchronizing the Odoo Calendar with the Outlook calendar, Outlook will still send a notification to all event participants every time an event is edited (created, deleted, unarchived, or event date/time changed), with no exceptions. This is a limitation that cannot be fixed from Odoo’s side.
In summary, once a user synchronizes their Outlook calendar with the Odoo calendar:
- Creating an event in Odoo causes Outlook to send an invitation to all event attendees.
- Deleting an event in Odoo causes Outlook to send a cancellation to all event attendees.
- Unarchiving an event in Odoo causes Outlook to send an invitation to all event attendees.
- Archiving an event in Odoo causes Outlook to send a cancellation to all event attendees.
- Adding a contact to an event causes Outlook to send an invitation to all event attendees.
- Removing a contact from an event causes Outlook to send a cancellation to all event attendees.
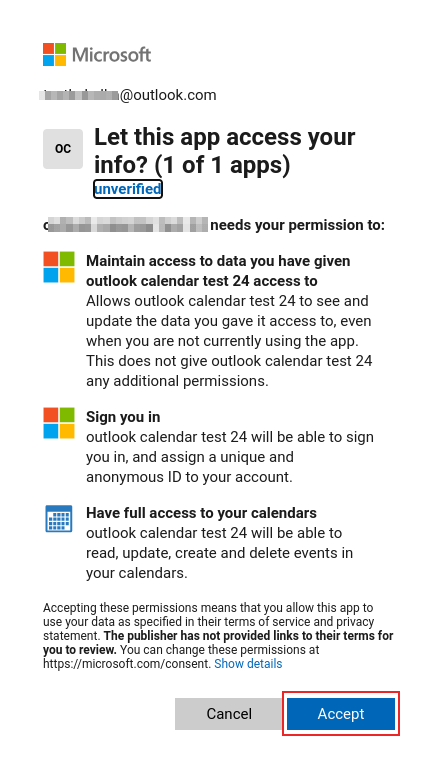
Sync Odoo Calendar and Outlook
In the Odoo database, open to the Calendar module, and click the Outlook sync button on the right-side of the page, beneath the monthly calendar.

The synchronization is a two-way process, meaning that events are reconciled in both accounts (Outlook and Odoo). The page redirects to a Microsoft login page, and the user is asked to log in to their account, if they are not already. Finally, grant the required permissions by clicking Accept.
Note
All users that want to use the synchronization simply need to sync their calendar with Outlook. The configuration of Microsoft’s Azure account is only done once, as Microsoft Entra ID tenants’ client IDs and client secrets are unique, and help the user manage a specific instance of Microsoft cloud services for internal and external users.
See also
Troubleshoot sync
There may be times when the Microsoft Outlook Calendar account does not sync correctly with Odoo. Sync issues can be seen in the database logs.
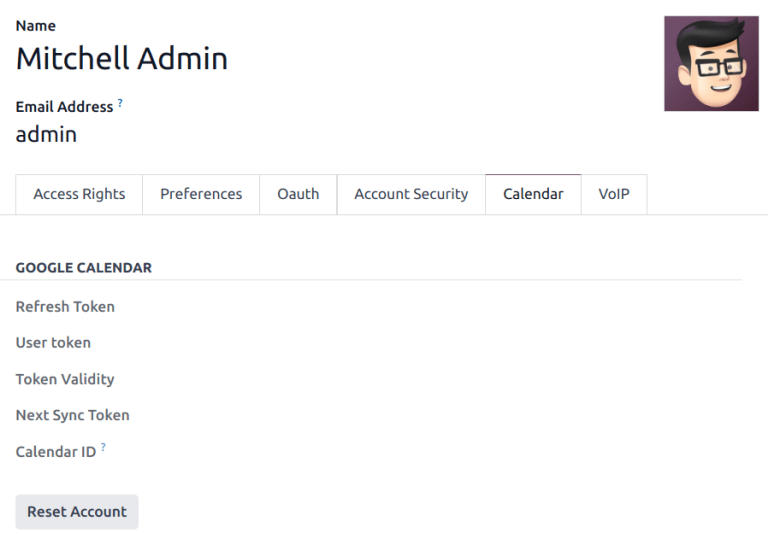
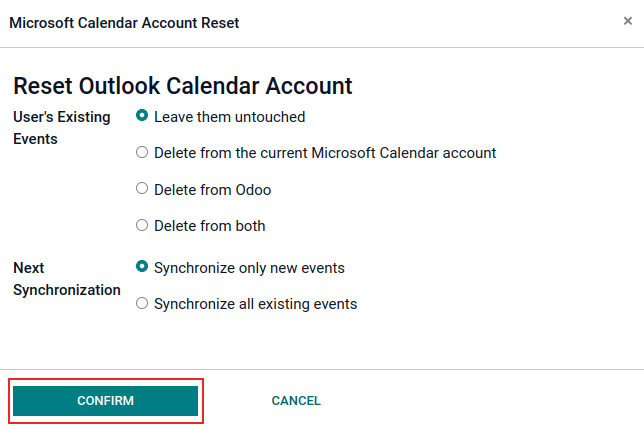
In these cases, the account needs troubleshooting. A reset can be performed using the Reset Account button, which can be accessed by navigating to Settings app ‣ Manage Users. Then, select the user to modify the calendar, and click on the Calendar tab.
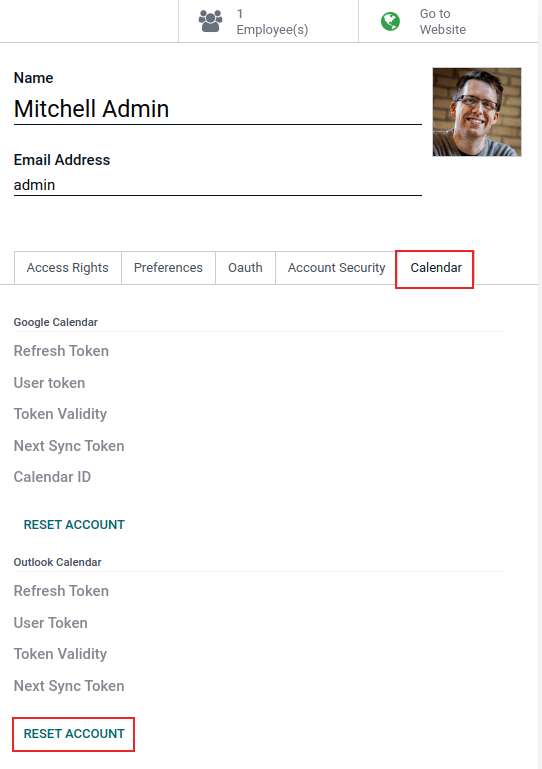
Next, click Reset Account under the correct calendar.
Reset options
The following reset options are available for troubleshooting Microsoft Outlook Calendar sync with Odoo:
User’s Existing Events:
- Leave them untouched: no changes to the events.
- Delete from the current Microsoft Calendar account: delete the events from Microsoft Outlook Calendar.
- Delete from Odoo: delete the events from the Odoo calendar.
- Delete from both: delete the events from both Microsoft Outlook Calendar and Odoo calendar.
Next Synchronization:
- Synchronize only new events: sync new events on Microsoft Outlook Calendar and/or Odoo calendar.
- Synchronize all existing events: sync all events on Microsoft Outlook Calendar and/or Odoo calendar.
Click Confirm after making the selection to modify the user’s events and the calendar synchronization.
On this page
Get Help
Contact Support Ask the Odoo Community
![]()
EN
Odoo 18
Google Calendar synchronization
Synchronize Google Calendar with Odoo to see and manage meetings from both platforms (updates go in both directions). This integration helps organize schedules, so a meeting is never missed.
See also
Setup in Google
Select (or create) a project
Create a new Google API project and enable the Google Calendar API. First, go to the Google API Console and log into the Google account.
Note
If this is the first time visiting this page, Google will prompt the user to enter a country and agree to the Terms of Service. Select a country from the drop-down list and agree to the ToS.
Next, click Select a project and select (or create) an API project to configure OAuth in, and store credentials. Click New Project.
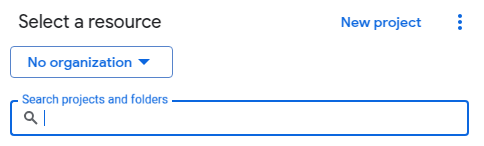
Give the API project a clear name, like Odoo Sync, so it can be identified. Then click the Create button.
Enable Google calendar API
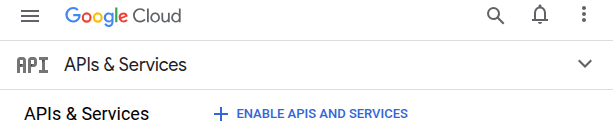
Now, click on Enabled APIs and Services in the left menu. Select Enabled APIs and Services again if the Search bar does not appear.
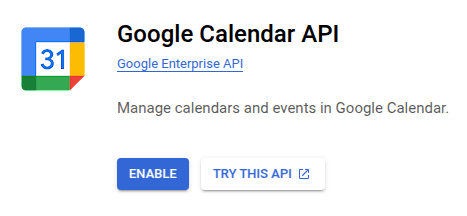
After that, search for Google Calendar API using the search bar and select Google Calendar API from the search results. Click Enable.
OAuth consent screen
Now that the API project has been created, OAuth should be configured. To do that, click on OAuth consent screen in the left menu, then click the Get started button.
Warning
Personal Gmail Accounts are only allowed to be External User Type, which means Google may require an approval, or for Scopes to be added on. However, using a Google WorkSpace account allows for Internal User Type to be used.
Note, as well, that while the API connection is in the External testing mode, then no approval is necessary from Google. User limits in this testing mode is set to 100 users.
Follow the proceeding steps, in order:
- In App Information, type Odoo in the App name field, then enter the email address for the User support email field and click the Next button.
- In Audience, select External, then click the Next button.
- In Contact Information, enter the email again, then click the Next button.
- In Finish, tick the checkbox to agree to Google API Services: User Policy. For the last step, click the Create button.
Authorized domain setup
Next, any domains set to appear on the consent screen or in an OAuth client’s configuration must be pre-registered. To do so, navigate to Branding in the left menu. In the Authorized domains section, click the Add domain button to create a field to enter an authorized domain. Enter a domain, such as odoo.com, then click the Save button at the bottom of the page.
Test users
To give users the ability to sync with personal Gmail accounts, they must be set as a test user. Setup test users by going to Audience in the left-side menu and clicking the Add users button in the Test users section. Enter any desired user emails, and click the Save button.
Create credentials
The Client ID and the Client Secret are both needed to connect Google Calendar to Odoo. This is the last step in the Google console. Begin by clicking Clients in the left menu. Then, click Create Credentials, and select OAuth client ID, Google will open a guide to create credentials.
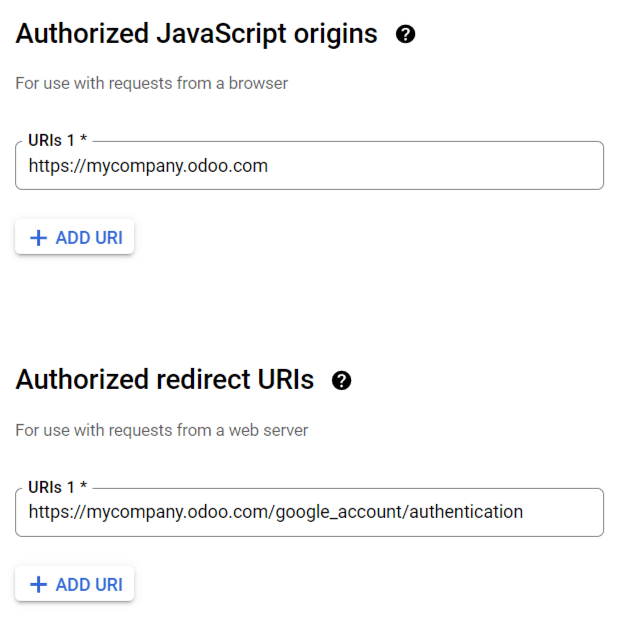
Under Create OAuth Client ID, select Website application for the Application Type field, and type My Odoo Database for the Name.
- Under the Authorized JavaScript Origins section, click + Add URI and type the company’s Odoo full URL address.
- Under the Authorized redirect URIs section, click + Add URI and type the company’s Odoo URL address followed by /google_account/authentication. Finally, click Create.
A Client ID and Client Secret will appear, save these somewhere safe.
Setup in Odoo
Once the Client ID and the Client Secret are located, open the Odoo database and go to Settings ‣ Calendar to find the Google Calendar feature. Tick the checkbox labeled Google Calendar.
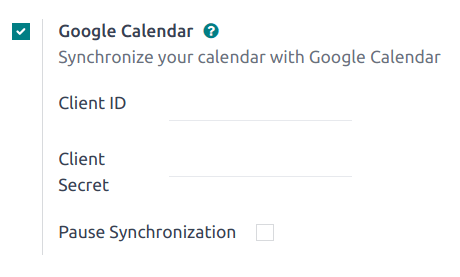
Next, copy and paste the Client ID and the Client Secret from the Google Calendar API credentials page into their respective fields below the Google Calendar checkbox. Then, click Save.
Note
Tick the Pause Synchronization checkbox to temporarily pause events from being updated. This allows for testing and troubleshooting without removing credentials or uninstalling the synchronization. To resume the sync, clear the checkbox and save.
Sync calendar in Odoo
Finally, open the Calendar app in Odoo and click on the Google sync button to sync Google Calendar with Odoo.
Note
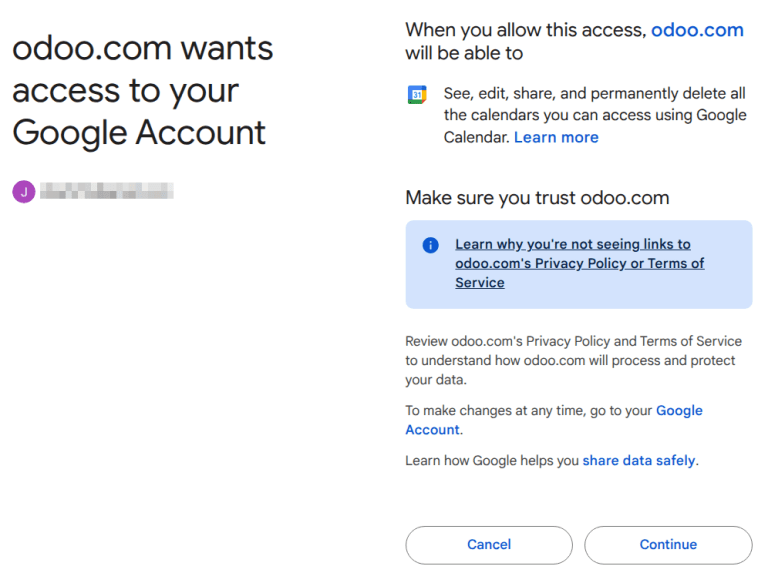
When syncing Google Calendar with Odoo for the first time, the page will redirect to the Google Account. From there, select the Email Account that should have access, then select Continue (should the app be unverified), and finally select Continue (to give permission for the transfer of data).
Now, Odoo Calendar is successfully synced with Google Calendar!
Warning
Odoo highly recommends testing the Google calendar synchronization on a test database and a test email address (that is not used for any other purpose) before attempting to sync the desired Google Calendar with the user’s production database.
Once a user synchronizes their Google calendar with the Odoo calendar:
- Creating an event in Odoo causes Google to send an invitation to all event attendees.
- Deleting an event in Odoo causes Google to send a cancellation to all event attendees.
- Adding a contact to an event causes Google to send an invitation to all event attendees.
- Removing a contact from an event causes Google to send a cancellation to all event attendees.
Events can be created in Google Calendar without sending a notification by selecting Don’t Send when prompted to send invitation emails.
Troubleshoot sync
There may be times when the Google Calendar account does not sync correctly with Odoo. Sync issues can be seen in the database logs.
In these cases, the account needs troubleshooting. A reset can be performed using the Reset Account button, which can be accessed by navigating to Settings app ‣ Manage Users. Then, select the user to modify the calendar, and click the Calendar tab.
Next, click Reset Account under the correct calendar.
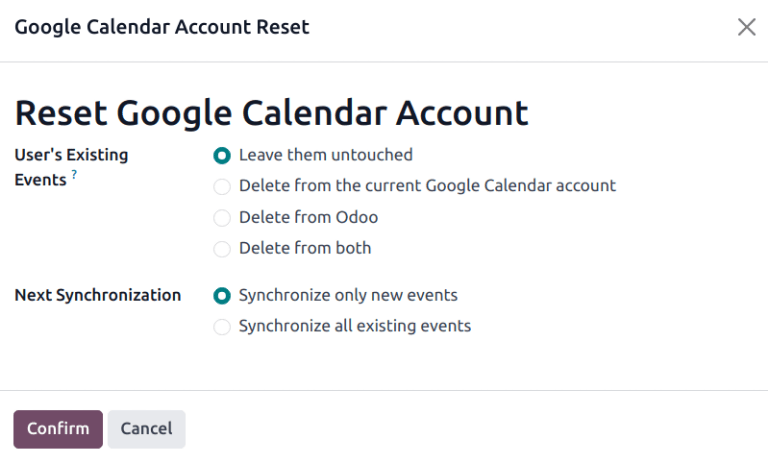
Reset options
The following reset options are available for troubleshooting Google calendar sync with Odoo:
User’s Existing Events:
- Leave them untouched: no changes to the events.
- Delete from the current Google Calendar account: delete the events from Google Calendar.
- Delete from Odoo: delete the events from the Odoo calendar.
- Delete from both: delete the events from both Google Calendar and Odoo calendar.
Next Synchronization:
- Synchronize only new events: sync new events on Google Calendar and/or Odoo calendar.
- Synchronize all existing events: sync all events on Google Calendar and/or Odoo calendar.
Click Confirm after making the selection to modify the user’s events and the calendar synchronization.
Google OAuth FAQ
At times there can be configuration errors that occur, and troubleshooting is needed to resolve the issue. Below are the most common errors that may occur when configuring the Google Calendar for use with Odoo.
Production vs. testing publishing status
Choosing Production as the Publishing Status (instead of Testing) displays the following warning message:
OAuth is limited to 100 sensitive scope logins until the OAuth consent screen is verified. This may require a verification process that can take several days.
To correct this warning, navigate to the Google API Platform. If the Publishing Status is In Production, click Back to Testing to correct the issue.
No test users added
If no test users are added to the OAuth consent screen, then an Error 403: access_denied populates.
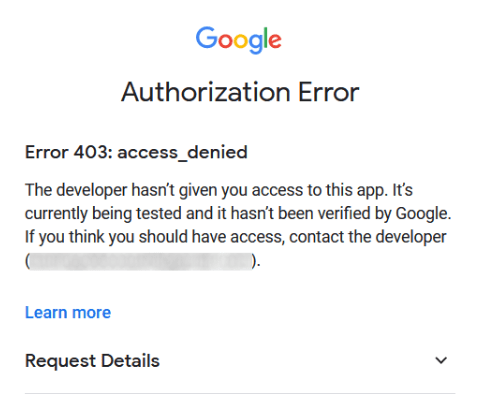
To correct this error, return to the OAuth consent screen, under APIs & Services, and add test users to the app. Add the email to be configured in Odoo.
Application Type
When creating the credentials (OAuth Client ID and Client Secret), if Desktop App is selected for the Application Type, an Authorization Error appears (Error 400:redirect_uri_mismatch).
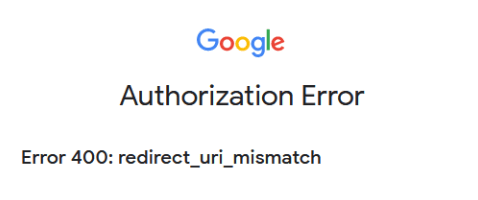
To correct this error, delete the existing credentials, and create new credentials, by selecting Web Application for the Application Type.
Then, under Authorized redirect URIs, click ADD URI, and type: https://yourdbname.odoo.com/google_account/authentication in the field, being sure to replace yourdbname in the URL with the real Odoo database name.
Tip
Ensure that the domain (used in the URI: https://yourdbname.odoo.com/google_account/authentication) is the exact same domain as configured in the web.base.url system parameter.
Access the web.base.url by activating developer mode, and navigating to Settings app ‣ Technical header menu ‣ Parameters section ‣ System Parameters.
On this page
Get Help
Contact Support Ask the Odoo Community
![]()
- User Docs
- Database management
- Developer
- Contributing
EN
Odoo 18
Discuss
Odoo Discuss is an internal communication app that allows users to connect through messages, notes, file sharing, and video calls. Discuss enables communication through a persistent chat window that works across applications, or through the dedicated Discuss dashboard.
Upon opening the Discuss app, the Discuss dashboard appears.
Inbox, starred, and history
Upon opening the Discuss app, the Discuss dashboard appears.
On the Discuss dashboard, unread messages are visible in the Inbox. Starred is where starred messages are stored. History shows chatter updates for records in the Odoo database the user has been assigned to, or tagged on.
Direct messages
Direct messages allow the user to communicate privately with one or multiple team members. To start a new direct message, click the icon, next to Direct Messages on the Discuss dashboard, and enter the name of the desired person in the Start a conversation search bar that appears.
Tip
Multiple names can be selected in the Start a conversation search bar. Once all of the names have been entered, press Enter.
Direct message actions
Hover over a direct message in the chat window to see a menu of actions to take on the message.
- (Add a Reaction): open a drop-down menu of emojis that can be used to react to the direct message.
- (Reply): reply to the direct message in a thread.
- (Mark as Todo): add the message to the Starred tab.
- (Expand): reveals more message actions, including:
- Pin
- Mark as Unread
- Edit
- Delete
Conversation actions
The icons in the top-right corner of a direct message conversation represent different actions the user can take on that conversation.
Click Notification Settings to set up notification preferences for the conversation, or click Start a Call to begin a meeting. See the Meetings section for more information about meetings.
At the top of the direct message window, click the name of the direct message to change the group name, and choose to add a description in the adjacent Add a description field.

Note
The Add a description field is only available for group messages with more than two participants.
User status
It is helpful to see what colleagues are up to, and how quickly they can respond to messages, by checking their status. The status is displayed as a circle in the bottom-right corner of a contact’s photo in the (Members List).
The color of the circle represents the user’s status:
- Green = online
- Orange = away
- White = offline
- Airplane = out of the office
Leave a direct message conversation
To leave a direct message conversations, click the (Leave this channel) icon next to the conversation name in the Direct Messages section of the sidebar.
Note
Leaving a conversation does not delete the direct messages in the conversation. The direct message conversation’s history is visible when another direct message with the same person, or group, is created.
Meetings
In Discuss, Meetings are video calls. To start a meeting from the Discuss dashboard, click Start a meeting in the top-left corner, and select who to invite to the meeting, via the Invite People drop-down window that appears. To start a meeting from a direct message, click the Start a Call icon in the top-right corner.

Once a meeting has been started, the following buttons can be used:
Icon | Use |
|---|---|
Mute | |
Unmute | |
Deafen | |
Undeafen | |
Turn camera on/off | |
Raise Hand | |
Share Screen | |
Enter Full Screen |
User-specific notification preferences
Access user-specific preferences for the Discuss app by navigating to Settings app ‣ Manage Users, select a user, then click the Preferences tab.

By default, the Notification field is set as Handle by Emails. With this setting enabled, a notification email is sent by Odoo every time a message is sent from the chatter of a record, a note is sent with an @ mention (from the chatter of a record), or a notification is sent for a record the user follows.
By choosing Handle in Odoo, the above notifications are shown in the Discuss app’s Inbox.
Chat from different applications
The Discuss application enables communication across all of Odoo’s applications. To view chats and channels, or start a new message, select the speech bubbles that are consistently present in the upper-right corner of the database header.

See also
Get Help
Contact Support Ask the Odoo Community
![]()
- User Docs
- Database management
- Developer
- Contributing
EN
Odoo 18
Use channels for team communication
Use channels in the Odoo Discuss app to organize discussions between individual teams, departments, projects, or any other group that requires regular communication. With channels, employees can communicate inside dedicated spaces within the Odoo database around specific topics, updates, and latest developments having to do with the organization.
Public and private channels
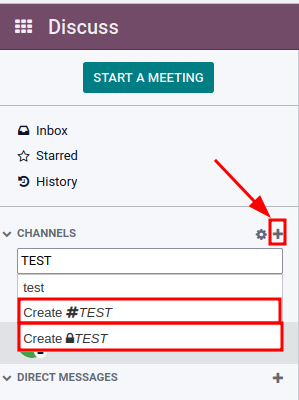
A Public channel can be seen by everyone, while a Private one is only visible to users invited to it. To create a new channel, navigate to the Discuss app, and then click on the ➕ (plus) icon next to the Channels heading in the left-side menu. After typing the name of the channel, two selectable options will appear: The first is a channel with a hashtag (#) to indicate that it is a public channel; the second option is a channel with a lock icon (🔒) next to it, to indicate that it is a private channel. Select the channel type that best fits the communication needs.
Tip
A public channel is best used when many employees need to access information (such as company announcements), whereas a private channel could be used whenever information should be limited to specific groups (such as a specific department).
Configuration options
The channel’s Group Name, Description, and Privacy settings can be modified by clicking on the channel’s settings, represented by a ⚙️ (gear) icon in the left sidebar menu, next to the channel’s name.
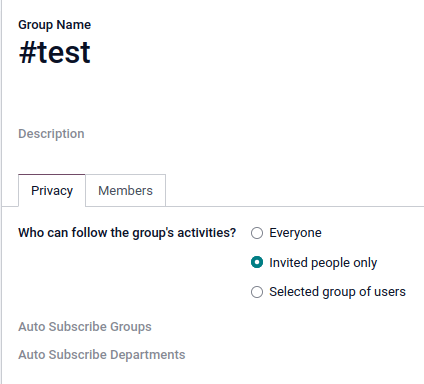
Privacy and Members tabs
Changing Who can follow the group’s activities? controls which groups can have access to the channel.
Note
Allowing Everyone to follow a private channel lets other users view and join it, as they would a public one.
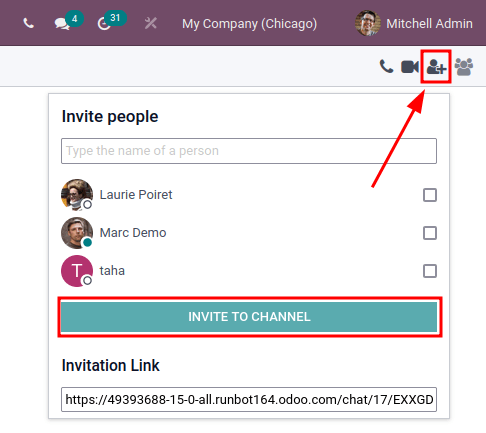
When choosing Invited people only, specify in the Members tab which members should be invited. Inviting members can also be done from the Discuss app’s main dashboard, by selecting the channel, clicking the add user icon in the top-right corner of the dashboard, and finally clicking Invite to Channel once all the users have been added.
When the Selected group of users option is selected, it reveals the ability to add an Authorized Group, along with the options to Auto Subscribe Groups and Auto Subscribe Departments.
The option to Auto Subscribe Groups automatically adds users of that particular user group as followers. In other words, while Authorized Groups limits which users can access the channel, Auto Subscribe Groups automatically adds users as members as long as they are part of a specific user group. The same is true for Auto Subscribe Departments.
Quick search bar
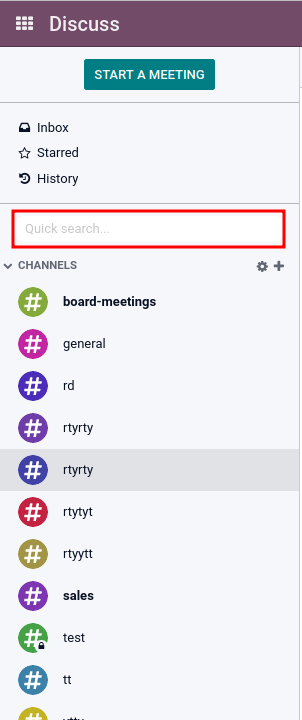
Once at least 20 channels, direct messages, or live chat conversations (if Live Chat module is installed on the database) are pinned in the sidebar, a Quick search… bar is displayed. This feature is a convenient way to filter conversations and quickly find relevant communications.
Finding channels
Click on the settings ⚙️ (gear) icon, located in the left sidebar, to the right of the CHANNELS collapsible menu item. Doing so will lead to a mosaic view containing all the public channels available. Users can join or leave channels on this screen by clicking the JOIN or LEAVE buttons that appear in the channel boxes.
There is also the ability to apply filtering criteria and save them for later use. The Search… function accepts wildcards by using the underscore character [ _ ], and specific searches can be saved by using the Favorites ‣ Save Current Search drop-down menu.
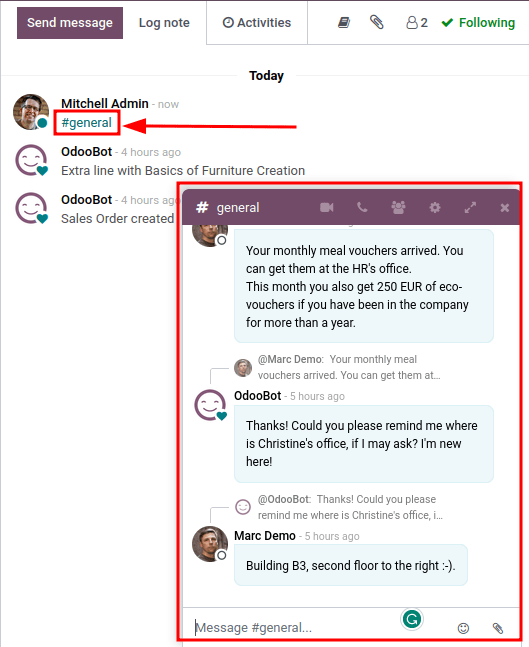
Linking channel in chatter
Channels can be linked in the chatter (log note) of a record in Odoo. To do so, simply type: # and the channel name. Click or press enter on the channel name. Upon logging the note a link to the channel will appear. After clicking on the link a chat window with the channel conversation will pop up in the lower right corner of the screen.
Users are able to contribute to this group channel (either public or member based) by typing messages in window and pressing enter.
See also
On this page
Get Help
Contact Support Ask the Odoo Community
![]()
- User Docs
- Database management
- Developer
- Contributing
EN
Odoo 18
Configure ICE servers with Twilio
Odoo Discuss uses WebRTC API and peer-to-peer connections for voice and video calls. If one of the call attendees is behind a symmetric NAT, you need to configure an ICE server to establish a connection to the call attendee. To set up an ICE server, first, create a Twilio account for video calls, and then, connect that Twilio account to Odoo.
Create a Twilio account
First, go to Twilio and click Sign up to create a new Twilio account. Next, enter your name and email address, create a password, and accept Twilio’s terms of service. Then, click Start your free trial. Verify your email address with Twilio, as per their instructions.
Next, enter your phone number into Twilio. Then, Twilio will send you an SMS text message containing a verification code. Enter the verification code into Twilio to verify your phone number.
After that, Twilio redirects to a welcome page. Use the following list to answer Twilio’s questions:
- For Which Twilio product are you here to use?, select Video.
- For What do you plan to build with Twilio?, select Other.
- For How do you want to build with Twilio?, select With no code at all.
- For What is your goal today?, select 3rd party integrations.
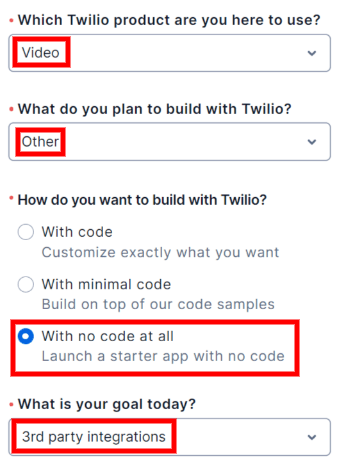
If necessary, change the billing country. Finally, click Get Started with Twilio.
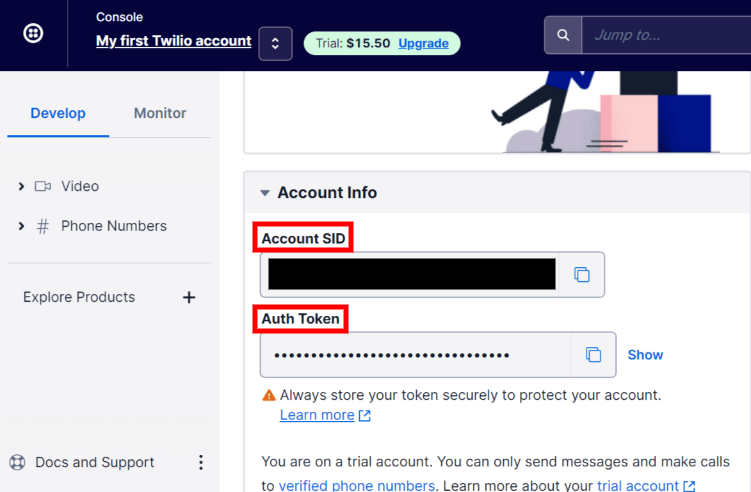
Locate the Twilio Account SID and Auth Token
To locate the Account SID and Auth Token, go to the Twilio account dashboard. Then, click Develop on the sidebar. In the Account Info section, locate the Account SID and the Auth Token. Both of these are needed to connect Twilio to Odoo.
Connect Twilio to Odoo
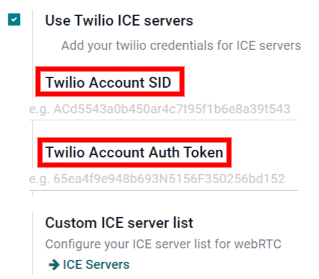
Open the Odoo database and go to Settings ‣ General Settings ‣ Discuss. Check the box next to Use Twilio ICE servers and enter the Twilio account’s Account SID and Auth Token. Finally, click Save to apply these changes.
Define a list of custom ICE servers
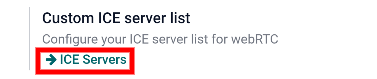
This step is not required for the Twilio configuration. However, if Twilio is not configured or is not working at any given moment, Odoo will fall back on the custom ICE servers list. The user must define the list of custom ICE servers.
In Settings ‣ General Settings ‣ Discuss, click the ICE Servers button under Custom ICE server list.
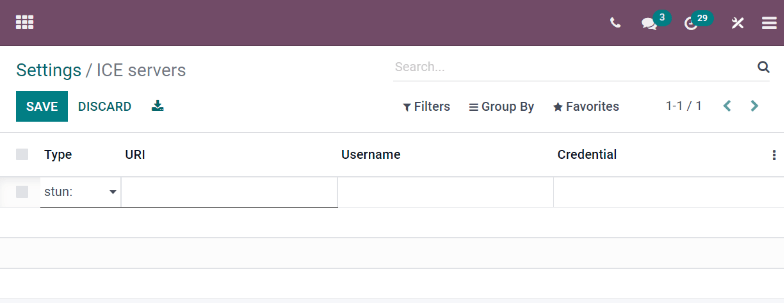
Odoo will redirect to the ICE servers page. Here you can define your own list of ICE servers.
Note
For on-premise instances of Odoo, the package python3-gevent is necessary for the Discuss module to run calls/video calls on Ubuntu (Linux) servers.
On this page
Get Help
Contact Support Ask the Odoo Community
![]()
- User Docs
- Database management
- Developer
- Contributing
EN
Odoo 18
Chatter
The Chatter feature is integrated throughout Odoo to streamline communication, maintain traceability, and provide accountability among team members. Chatter windows, known as composers, are located on almost every record within the database, and allow users to communicate with both internal users and external contacts.
Chatter composers also enable users to log notes, upload files, and schedule activities.
Chatter thread
A chatter thread can be found on most pages in the database, and serves as a record of the updates and edits made to a record. A note is logged in the chatter thread when a change is made. The note includes details of the change, and a time stamp.
Example
A user, Mitchell Admin, needs to update the email address of a contact. After they save the changes to the contact record, a note is logged in the chatter of the contact record with the following information:
- The date when the change occurred.
- The email address as it was previously listed.
- The updated email address.
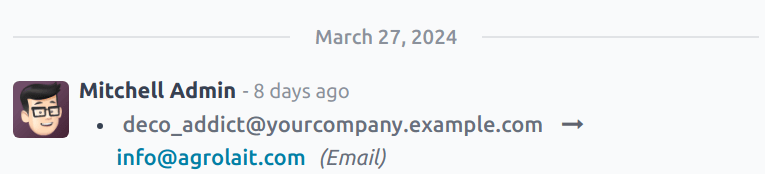
If a record was created, or edited, via an imported file, or was otherwise updated through an intervention by the system, the chatter thread creates a log note, and credits the change to OdooBot.

Add followers
A follower is a user or contact that is added to a record and is notified when the record is updated, based on specific follower subscription settings. Followers can add themselves, or can be added by another user.
Note
If a user creates, or is assigned to a record, they are automatically added as a follower.
To follow a record, navigate to any record with a chatter thread. For example, to open a Helpdesk ticket, navigate to Helpdesk app ‣ Tickets ‣ All Tickets, and select a ticket from the list to open it.
At the top-right, above the chatter composer, click Follow. Doing this changes the button to read Following. Click it again to Unfollow.
Manage followers
To add another user, or contact, as a follower, click the (user) icon. This opens a drop-down list of the current followers. Click Add Followers to open an Invite Follower pop-up window.
Select one or more contacts from the Recipients drop-down list. To notify the contacts, tick the Send Notification checkbox. Edit the message template as desired, then click Add Followers.
To remove followers, click the (user) icon to open the current followers list. Find the name of the follower to be removed, and click the (remove) icon.
Edit follower subscription
The updates a follower receives can vary based on their subscription settings. To see the type of updates a follower is subscribed to, and to edit the list, click the (user) icon. Find the appropriate follower in the list, then click the (pencil) icon. This opens the Edit Subscription pop-up window for the follower.
The list of available subscription settings varies depending on the record type. For example, a follower of a Helpdesk ticket may be informed when the ticket is rated. This option would not be available for the followers of a CRM opportunity.
Tick the checkbox for any updates the follower should receive, and clear the checkbox for any updates they should not receive. Click Apply when finished.
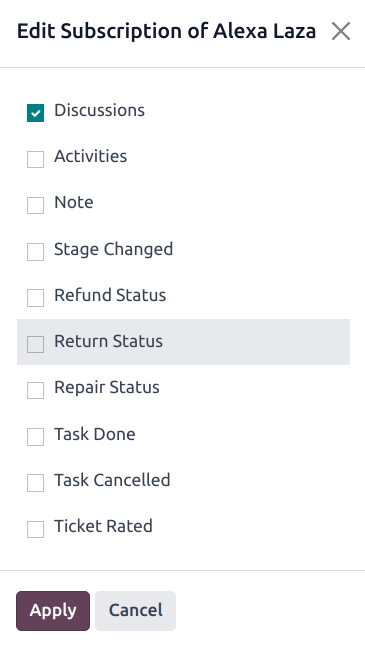
The Edit Subscription options vary depending on the record type. These are the options for a Helpdesk ticket.
Log notes
The chatter function includes the ability to log internal notes on individual records. These notes are only accessible to internal users, and are available on any records that feature a chatter thread.
To log an internal note, first navigate to a record. For example, to open a CRM opportunity, navigate to CRM app ‣ Sales ‣ My Pipeline, and click on the Kanban card of an opportunity to open it. Then, at the top-right, above the chatter composer, click Log note.
Enter the note in the chatter composer. To tag an internal user, type @, and begin typing the name of the person to tag. Then, select a name from the drop-down menu. Depending on their notification settings, the user is notified by email, or through Odoo.
Important
Outside contacts can also be tagged in an internal log note. The contact then receives an email with the contents of the note they were tagged in, including any attachments added directly to the note. If they respond to the email, their response is logged in the chatter, and they are added to the record as a follower.
Outside contacts are not able to log in to view the entire chatter thread, and are only notified of specific updates, based on their follower subscription settings, or when they are tagged directly.
Send messages
Chatter composers can send messages to outside contacts, without having to leave the database, or open a different application. This makes it easy to communicate with potential customers in the Sales and CRM applications, or vendors in the Purchase app.
To send a message, first navigate to a record. For example, to send a message from a CRM opportunity, navigate to CRM app ‣ Sales ‣ My Pipeline, and click on the Kanban card of an opportunity to open it. Then, at the top-right, above the chatter composer, click Send message.
Tip
Press Ctrl + Enter to send a message, instead of using the Send button.
If any followers have been added to the record, they are added as recipients of the message.
Warning
Followers of a record are added as recipients of a message automatically. If a follower should not receive a message, they must be removed as a follower before the message is sent, or a note is logged.
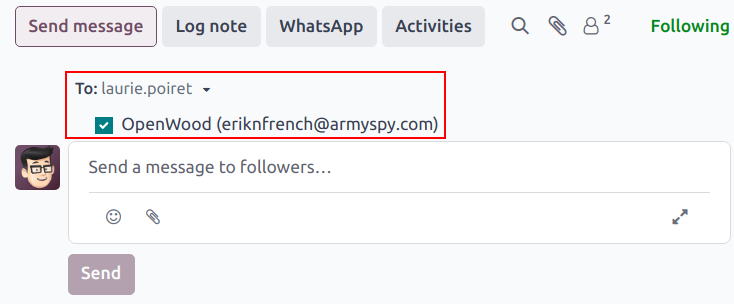
Expand full composer
The chatter composer can be expanded to a larger pop-up window, allowing for additional customizations.
To open the full composer, click the (expand) icon in the bottom-right corner of the composer window.
![]()
The expand icon in a chatter composer.
Doing this opens a Compose Email pop-up window. Confirm or edit the intended Recipients of the message, or add additional recipients. The Subject field auto-populates based on the title of the record, though it can be edited, if desired.
To use an email template for the message, select it from the drop-down menu in the Load template field.
Note
The number and type of templates available vary, based on the record the message is created from.
Click (paperclip) icon to add any files to the message, then click Send.
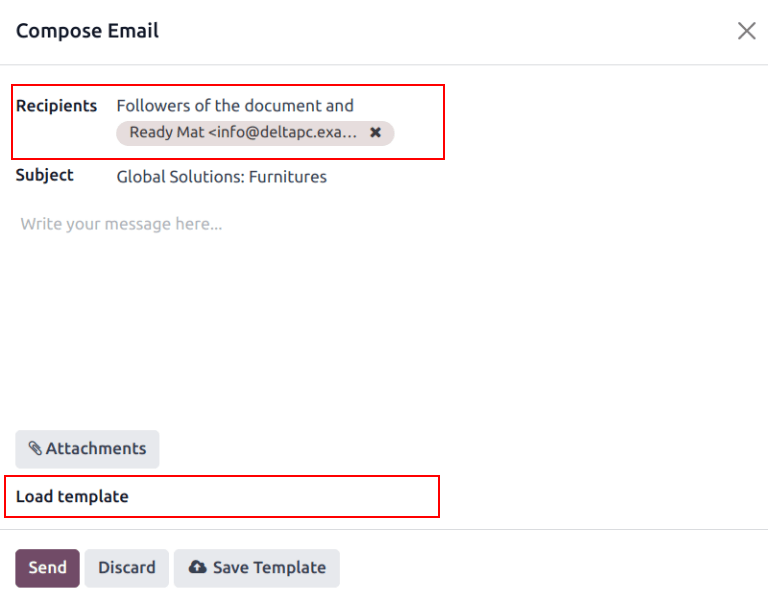
Edit sent messages
Messages can be edited after they are sent, to fix typos, correct mistakes, or add missing information.
Note
When messages are edited after they have been sent, an updated message is not sent to the recipient.
To edit a sent message, click the (ellipsis) icon menu to the right of the message. Then, select Edit. Make any necessary adjustments to the message.
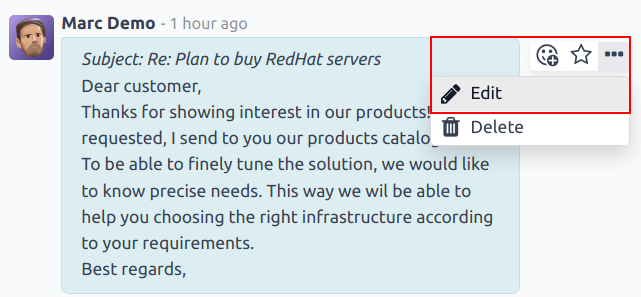
To save the changes, press Ctrl + Enter. To discard the changes, press Escape.
Important
Users with Admin-level access rights can edit any sent messages. Users without Admin rights can only edit messages they created.
Search messages
Chatter threads can become long after a while, because of all the information they contain. To make it easier to find a specific entry, users can search the text of messages and notes for specific keywords.
First, select a record with a chatter thread. For example, to search a CRM opportunity, navigate to CRM app ‣ Sales ‣ My Pipeline, and click on the Kanban card of an opportunity to open it. Then, at the top-right, above the chatter composer, click the (search) icon to open the search bar.
Enter a keyword or phrase into the search bar, then hit Enter, or click the (search) icon to the right of the search bar. Any messages or notes containing the keyword or phrase entered are listed below the search bar, with the keyword highlighted.
To be taken directly to a particular message in the chatter thread, hover over the upper-right corner of the result to reveal a Jump button. Click this button to be directed to that message’s location in the thread.
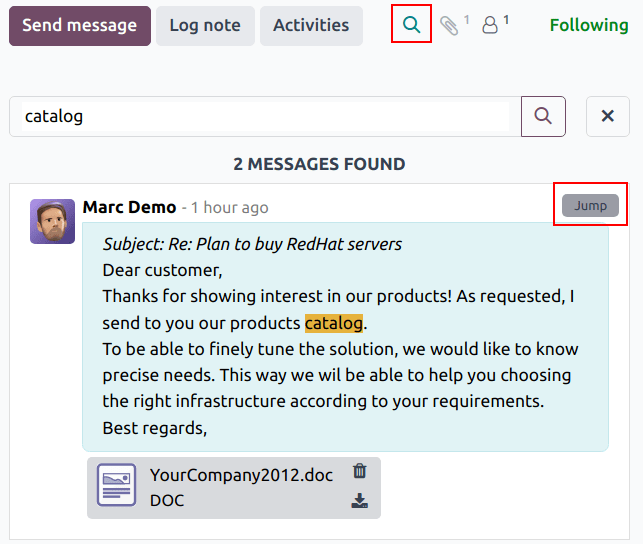
Search results in a chatter thread. Hover over the upper-right corner of a result to see the Jump option. Click it to be taken directly to that message in the chatter thread.
Schedule activities
Activities are follow-up tasks tied to a record in an Odoo database. Activities can be scheduled on any database page that contains a chatter thread, Kanban view, list view, or activities view of an application.
To schedule an activity through a chatter thread, click the Activities button, located at the top of the chatter on any record. On the Schedule Activity pop-up window that appears, select an Activity Type from the drop-down menu.
Tip
Individual applications have a list of Activity Types dedicated to that application. For example, to view and edit the activities available for the CRM application, go to CRM app ‣ Configuration ‣ Activity Types.
Enter a title for the activity in the Summary field, located in the Schedule Activity pop-up window.
Select a name from the Assigned to drop-down menu to assign the activity to a different user. Otherwise, the user creating the activity is automatically assigned.
Add any additional information in the optional Log a note… field.
Note
The Due Date field on the Schedule Activity pop-up window auto-populates based on the configuration settings for the selected Activity Type. However, this date can be changed by selecting a day on the calendar in the Due Date field.
Lastly, click one of the following buttons:
- Schedule: adds the activity to the chatter under Planned activities.
- Mark as Done: adds the details of the activity to the chatter under Today. The activity is not scheduled, it is automatically marked as completed.
- Done & Schedule Next: adds the task under Today marked as done, and opens a new activity window.
- Discard: discards any changes made on the pop-up window.
Scheduled activities are added to the chatter for the record under Planned activities, and are color-coded based on their due date.
- Red icons indicate an overdue activity.
- Yellow icons indicate an activity with a due date scheduled for the current date.
- Green icons indicate an activity with a due date scheduled in the future.
![]()
Tip
Click the (info) icon next to a planned activity to see additional details.
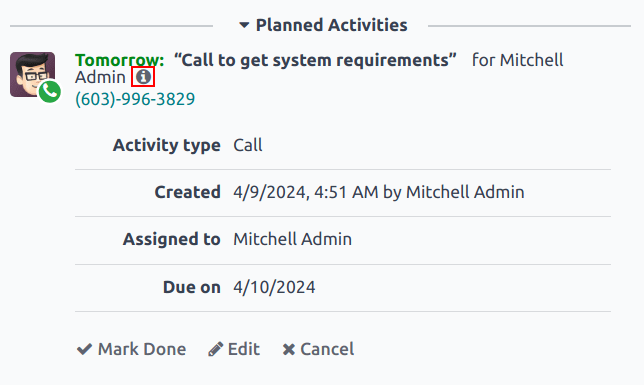
After completing an activity, click Mark Done under the activity entry in the chatter. This opens a Mark Done pop-up window, where additional notes about the activity can be entered. After adding any comments to the pop-up window, click: Done & Schedule Next, Done, or Discard.
After the activity is marked complete, an entry with the activity type, title, and any other details that were included in the pop-up window are listed in the chatter.
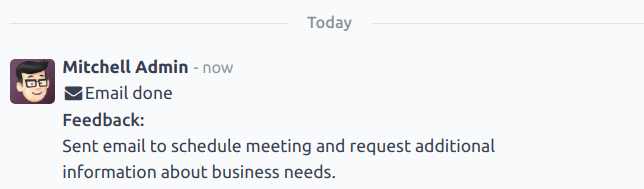
Attach files
Files can be added as attachments in the chatter, either to send with messages, or to include with a record.
Note
After a file has been added to a chatter thread, it can be downloaded by any user with access to the thread. Click the (paperclip) icon to make the files header visible, if necessary. Then, click the (download) icon the file to download it.
To attach a file, click the (paperclip) icon located at the top of the chatter composer of any record that contains a chatter thread.
This opens a file explorer pop-up window. Navigate to the desired file, select it, then click Open to add it to the record. Alternatively, files can be dragged and dropped directly onto a chatter thread.
After files have been added, they are listed in the chatter thread, under a Files heading.
Note
After at least one file has been added to a chatter record, a new button labeled Attach files appears below the Files heading. To attach any additional files, this is the button that must be used, instead of the (paperclip) icon at the top of the chatter thread.
After the Files section heading appears in the thread, clicking the (paperclip) icon no longer opens a file explorer pop-up window. Instead, clicking the (paperclip) icon toggles the Files section from visible to invisible in the chatter thread.
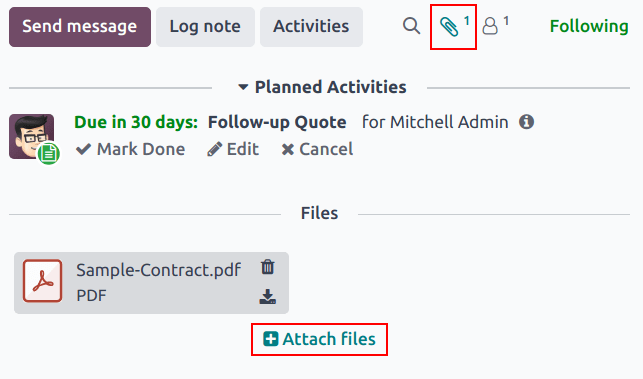
Integrations
Beyond the standard features, additional integrations can be enabled to work with the chatter feature, specifically WhatsApp and Google Translate.
Important
Before the WhatsApp and Google Translate integrations can be used with the chatter, they must be configured. Step-by-step instructions on how to set-up each of these features can be found in the documentation below:
WhatsApp is an instant messaging and voice-over-IP app that allows users to send and receive messages, as well as share content.
Warning
WhatsApp is an Odoo Enterprise-only application that does not work in the Odoo Community edition. To sign up for an Odoo Enterprise edition, click here: Odoo Free Trial.
After WhatsApp has been configured and enabled within a database, a WhatsApp button is added above the chatter composer on any applicable record. If one or more approved WhatsApp templates are found for that model, clicking this button opens a Send WhatsApp Message pop-up window.
Important
WhatsApp templates must be approved before they can be used. See WhatsApp templates for more information.

Google Translate
Google Translate can be used to translate user-generated text in the Odoo chatter.
To enable Google Translate on a database, an API key must first be created through the Google API Console.
After creating the API key, navigate to the Settings app ‣ Discuss section and paste the key in the Message Translation field. Click Save to save the changes.
Translate a chatter message
To translate a user’s text from another language, click the (ellipsis) menu to the right of the chatter. Then, select Translate. The content translates to the language set in the user’s preferences.
![]()
Important
Using the Google Translate API requires a current billing account with Google.
See also
On this page
Get Help
Contact Support Ask the Odoo Community
![]()
- User Docs
- Database management
- Developer
- Contributing
EN
Odoo 18
Canned responses
Canned responses are customizable inputs where a typed shortcut populates a longer response. A user enters a keyword shortcut, which is then automatically replaced by the expanded substitution response. Canned responses save time by allowing users to use shorthand phrases to populate longer messages. This also limits the possibility of errors when typing out longer messages because these are pre-set messages. This maintains consistency throughout customer interactions.
Canned responses consist of two main components: the shortcut and the substitution. The shortcut is the keyword or key phrase that is to be replaced. The substitution is the longer message that replaces the shortcut.

Canned responses are available to use in Live Chat conversations, the Discuss app, and the Chatter composer. This includes direct message conversations, channel conversations, and WhatsApp messages.
Creating canned responses
Canned responses are managed through the Discuss application. To create a new canned response, or manage the list of existing responses, navigate to Discuss app ‣ Configuration ‣ Canned Responses.
Then, to create a new canned response, click New at the top-left of the list. Doing so reveals a new blank line in the list.
Canned responses consist of two main components, a shortcut the user enters, and the substitution that replaces the shortcut.
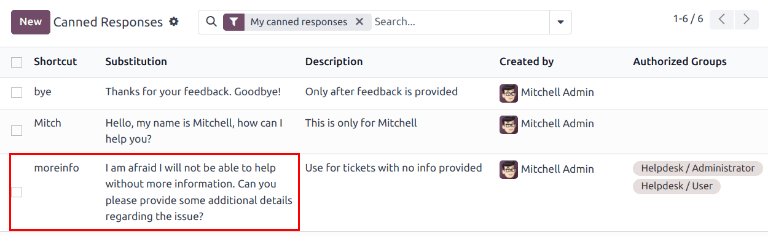
Type a shortcut command in the Shortcut field. Next, click on the Substitution field, and type the message that will replace the shortcut.
Tip
Try to connect the shortcut to the topic of the substitution. Not only does this make it easier to use the responses, it prevents the list of responses from becoming disorganized and overwhelming.
In the Description field, add any information that provides context for this response, such as guidelines for when it should or should not be used.
The Created by field automatically populates with the name of the user that creates a new response. This field cannot be edited.
To share this response with other users, select one or more groups in the Authorized Group field that should have access.
Warning
If the Authorized Group field is left blank, the response can only be used by the user that created it.
Canned responses created by the database are automatically credited as created by OdooBot. They must be assigned to an authorized group before they can be used by any users. To view the responses created by OdooBot, navigate to Discuss app ‣ Configuration ‣ Canned Responses. Click into the Search.. bar, and remove any filters.
Lastly, the Last Used field keeps track of the date and time each response was most recently used. This field cannot be edited.
Share responses
Canned responses, by default, are made available only to the user who creates them. To make a canned response available for others to use, they need to be shared.
Note
Users with Administrator access rights can view and edit canned responses created by other users through the Discuss app. However, they are only able to use them if they are included in an authorized group that has been designated on that canned responses item line, located on the Canned Responses page.
Access to shared responses is granted on the groups level.
To view the Groups a user is a member of, first enable Developer mode, then navigate to Settings app ‣ Users & Companies ‣ Users. Select a user from the list, and click to open their User Record. Then, click the Groups smart button at the top of the page.
Tip
To view a list of users in a specific group, first enable Developer mode. Next, navigate to Settings app ‣ Users & Companies ‣ Groups. Select a group from the list, then click to open the Group Record. A list of users is included on the Users tab.
After determining what groups should have access to a response, they must be added to the Authorized Groups field for each canned response.
Note
The user who created the response can use it, even if they are not a member of one of the Authorized Groups.
Use a canned response
Canned responses can be used in the Discuss app, in a Live Chat conversation, or on any record that contains a Chatter composer. This includes direct message conversations, channel conversations, and WhatsApp messages.
To use a canned response, type a colon (:) into a Chatter composer or chat window, followed by the shortcut. Then press Enter. This replaces the shortcut with the substitution, though the response can still be edited before it is sent.
Tip
Typing : in the Chatter composer, or chat window, on its own generates a drop-down list of available canned responses. A response can be selected from the list, in addition to the use of shortcuts.
To search through the list of available responses, type :, followed by the first few letters of the shortcut.

See also
On this page
Get Help
Contact Support Ask the Odoo Community
![]()
EN
Odoo 18
Data Cleaning
The Odoo Data Cleaning app maintains data integrity and consistency with the following features:
- Deduplicates: merges or removes duplicate entries to ensure data is unique.
- Recycles: identifies outdated records to either archive or delete them.
- Formats: standardizes text data by finding and replacing it according to specified needs.
Customizable rules ensure text data stays up-to-date, streamlined, consistently formatted, and aligned with company-specific formatting requirements.
Install modules
The Data Cleaning application consists of several modules. Install the following to access all available features:
Name Technical name | Description |
|---|---|
Data Recycle data_recycle | Base module to enable the recycle feature, available on Odoo Community edition. |
Data Cleaning data_cleaning | Enables field cleaning feature to format text data across multiple records, available only on Odoo Enterprise edition. |
Data Cleaning (merge) data_merge | Enables the deduplication feature to find similar (or duplicate) records, and merge them, available only on Odoo Enterprise edition. |
Additionally, several app-specific modules are available
Deduplication
The Duplicates dashboard groups similar records to be merged by matching conditions within the records set by the deduplication rules.
Navigate to this dashboard by going to Data Cleaning app ‣ Deduplication.

The RULE sidebar lists each of the active deduplication rules, and displays the total number of duplicates detected beside each rule.
By default, the All rule is selected. Records are grouped by their rule, with a Similarity rating (out of 100%), with the following columns:
- Created On: the date and time the original record was created.
- Name: the name or title of the original record.
- Field Values: the original record’s values for the fields used to detect duplicates.
- Used In: lists other models referencing the original record.
- ID: the original record’s unique ID.
- Is Master: the duplicates are merged into the master record. There can only be one master record in a grouping of similar records.
Select a specific rule in the RULE sidebar to filter the duplicate records.
Merge duplicate records
To merge records, first choose a master record within the grouping of similar records. The master record acts as the base, at which any additional information from similar records are merged into.
Optionally, no master record can be set, leaving Odoo to choose a record at random to merge into.
Next, click the Merge button at the top of the similar records grouping. Then, click Ok to confirm the merge.
Once a record is merged, a message is logged in the chatter of the master record, describing the merge. Certain records, like Project tasks, are logged in the chatter with a link to the old record as a convenient reference of the merge.
Tip
Discard groupings by clicking the DISCARD button. Upon doing so, the grouping is hidden from the list and archived.
View discarded groupings by selecting the Discarded filter from the search bar.
Deduplication rules
The Deduplication Rules set the conditions for how records are detected as duplicates.
These rules can be configured for each model in the database, and with varying levels of specificity. To get started, navigate to Data Cleaning app ‣ Configuration ‣ Deduplication.
Tip
The deduplication rules run once every day, by default, as part of a scheduled action cron (Data Merge: Find Duplicate Records). However, each rule can be ran manually anytime.
Modify a deduplication rule
Select a default rule to edit, or create a new rule by clicking on the New button.
First, choose a Model for this rule to target. Selecting a model updates the rule title to the chosen model.
Optionally, configure a Domain to specify the records eligible for this rule. The number of eligible records is shown in the # record(s) link.
Depending on the selected Model, the Duplicate Removal field appears. Choose whether to Archive or Delete merged records.
Next, select a Merge Mode:
- Manual: requires each duplicate grouping to be manually merged, also enables the Notify Users field.
- Automatic: automatically merges duplicate groupings, without notifying users, based on the records with a similarity percentage above the threshold set in the Similarity Threshold field.
Enable the Active toggle to start capturing duplicates with this rule as soon as it is saved.
Lastly, create at least one deduplication rule in the Deduplication Rules field, by clicking Add a line, under the Unique ID Field column.
- Select a field in the model from the Unique ID Field drop-down menu. This field is referenced for similar records.
- Select a matching condition in the Match If field to apply the deduplication rule, depending on the text in the Unique ID Field:
- Exact Match: the characters in the text match exactly.
- Case/Accent Insensitive Match: the characters in the text match, regardless of casing and language-specific accent differences.
Important
At least one Deduplication Rules must be set for the rule to capture duplicates.
Tip
A few more fields are available for an advanced configuration.
If on a multi-company database, the Cross-Company field is available. When enabled, duplicates across different companies are suggested.
Activate Developer mode (debug mode) to display the Suggestion Threshold field. Duplicates with a similarity below the threshold set in this field are not suggested.
With the rule’s configuration complete, either close the rule form, or run the rule manually to instantly capture duplicate records.
Manually run a deduplication rule
To manually run a specific deduplication rule at any time, navigate to Data Cleaning app ‣ Configuration ‣ Deduplication, and select the rule to run.
Then, on the rule form, select the Deduplicate button on the top-left. Upon doing so, the Duplicates smart button displays the number of duplicates captured.
Click on the Duplicates smart button to manage these records.
Recycle records
Use the recycle records feature to rid the database of old and outdated records.
The Field Recycle Records dashboard displays records that can be archived or deleted, by matching conditions within the records set by the recycle record’s rules.
Navigate to this dashboard by going to Data Cleaning app ‣ Recycle Records.
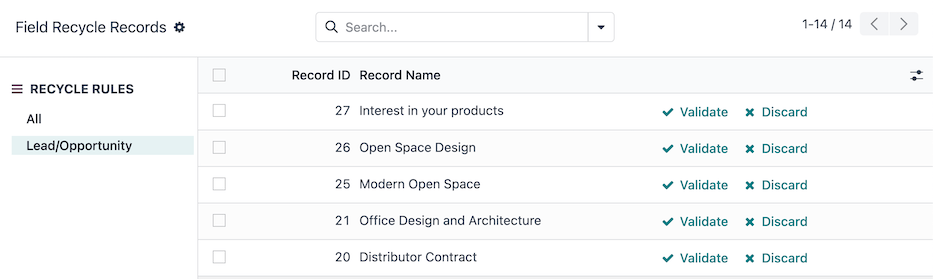
The RECYCLE RULES sidebar lists each of the active recycle record rules.
By default, the All option is selected. Records are displayed with the following columns:
- Record ID: the ID of the original record.
- Record Name: the name or title of the original record.
Select a specific rule in the RECYCLE RULES sidebar to filter the records.
To recycle records, click the Validate button on the row of the record.
Upon doing so, the record is recycled, depending on how the rule is configured, to be either archived or deleted from the database.
Tip
Discard groupings by clicking the Discard button. Upon doing so, the record is hidden from the list, and is not detected by the recycle rule again in the future.
View discarded records by selecting the Discarded filter from the search bar drop-down menu.
Recycle record rules
The Recycle Records Rules set the conditions for how records are recycled.
These rules can be configured for each model in the database, and with varying levels of specificity. To get started, navigate to Data Cleaning app ‣ Configuration ‣ Recycle Records.
Tip
Recycle rules run once a day, by default, as part of a scheduled action cron (Data Recycle: Clean Records). However, each rule can be run manually anytime.
By default, no recycle record rules exist. Click the New button to create a new rule.
On the recycle record rule form, first choose a Model for this rule to target. Selecting a model updates the rule title to the chosen model.
Optionally, configure a Filter to specify the records eligible for this rule. The number of eligible records is shown in the # record(s) link.
Next, configure the field and time range for how the rule detects the records to recycle:
- Time Field: select a field from the model to base the time (Delta).
- Delta: type the length of time, which must be a whole number (e.g. 7).
- Delta Unit: select the unit of time (Days, Weeks, Months, or Years).
Then, select a Recycle Mode:
- Manual: requires each detected record to be manually recycled, and enables the Notify Users field.
- Automatic: automatically merges recycled groupings, without notifying users.
Lastly, select a Recycle Action to either Archive or Delete records. If Delete is selected, choose whether or not to Include Archived records in the rule.
With the rule’s configuration complete, either close the rule form, or run the rule manually to instantly capture records to recycle.
Example
A recycle rule can be configured to delete archived leads and opportunities that were last updated a year ago, and with a specific lost reason, by using the following configuration:
- Model: Lead/Opportunity
- Filter:
- Active is not set
- Lost Reason is in Too expensive
- Time Field: Last Updated on (Lead/Opportunity)
- Delta: 1
- Delta Unit: Years
- Recycle Mode: Automatic
- Recycle Action: Delete
- Include Archived:
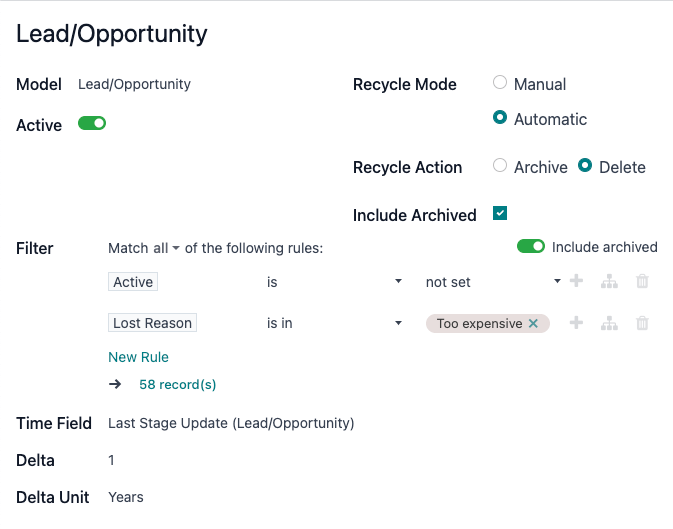
Manually run a recycle rule
To manually run a specific recycle rule at any time, navigate to Data Cleaning app ‣ Configuration ‣ Recycle Records, and select the rule to run.
Then, on the rule form, click the Run Now button on the top-left. Upon doing so, the Records smart button displays the number of records captured.
Click the Records smart button to manage these records.
Field cleaning
Use the field cleaning feature to maintain consistent formatting of names, phone numbers, IDs and other fields throughout a database.
The Field Cleaning Records dashboard displays formatting changes to data in fields of a record, to follow a convention set by the field cleaning rules.
Navigate to this dashboard by going to Data Cleaning app ‣ Field Cleaning.

The CLEANING RULES sidebar lists each of the active cleaning rules.
By default, the All rule is selected. Records are listed with the following columns:
- Record ID: the ID of the original record.
- Record Name: the name or title of the original record.
- Field: the original record’s field that contains the value to format.
- Current: the current value in the field of the original record.
- Suggested: the suggested formatted value in the field of the original record.
To clean and format records, click the Validate button on the row of the record.
Upon doing so, the record is formatted and/or cleaned.
Tip
Discard records by clicking the Discard button. Upon doing so, the record is hidden from the list and will not be detected by the field cleaning rule again in the future.
View discarded records by selecting the Discarded filter from the search bar.
Field cleaning rules
The Field Cleaning Rules set the conditions for fields to be cleaned and/or formatted.
These rules can be configured for each model in the database, and with varying levels of specificity. To get started, navigate to Data Cleaning app ‣ Configuration ‣ Field Cleaning.
Tip
The field cleaning rules run once every day, by default, as part of a scheduled action cron (Data Cleaning: Clean Records). However, each rule can be ran manually anytime.
By default, a Contact rule exists to format and clean up the Contacts app records. Select the Contact record to make edits, or select the New button to create a new rule.
On the field cleaning rule form, first choose a Model for this rule to target. Selecting a model updates the rule title to the chosen model.
Next, configure at least one rule by clicking Add a line in the Rules section.
Upon doing so, a Create Rules popover window appears with the following fields to configure:
- Select a Field To Clean from the model to assign to an action.
- Choose one of the following Action options:
- Trim Spaces reveals the Trim field to select the All Spaces or Superfluous Spaces option. Leading, trailing, and successive spaces are considered superfluous.
Example
The contact name Dr. John Doe can be formatted with the following Trim options:- All Spaces: DR.JohnDoe
- Superfluous Spaces: DR. John Doe
- Set Type Case reveals the Case field to select either First Letters to Uppercase, All Uppercase, or All Lowercase.
Example
The lead/opportunity title lumber inc, Lorraine douglas can be formatted with the following Case options:- First Letters to Uppercase: Lumber Inc, Lorraine Douglas
- All Uppercase: LUMBER INC, LORRAINE DOUGLAS
- All Lowercase: lumber inc, lorraine douglas
- Format Phone converts the phone number to an international country format.
Example- Belgium: 061928374 +32 61 92 83 74
- United States: 800 555-0101 +1 800-555-0101
- Scrap HTML converts HTML to plain text.
Example
HTML text<h1>John Doe</h1> <p>Lorem ipsum dolor sit <a href="https://example.com">amet</a>.</p>
Plain text**John Doe** Lorem ipsum dolor sit amet [1] .[1] https://example.com
- Trim Spaces reveals the Trim field to select the All Spaces or Superfluous Spaces option. Leading, trailing, and successive spaces are considered superfluous.
Then, select a Cleaning Mode:
- Manual: requires each detected field to be manually cleaned and enables the Notify Users field.
- Automatic: automatically cleans fields without notifying users.
With the rule’s configuration complete, either close the rule form, or run the rule manually to instantly capture fields to clean.
Manually run a field cleaning rule
To manually run a specific field cleaning rule at any time, navigate to Data Cleaning app ‣ Configuration ‣ Field Cleaning, and select the rule to run.
Then, on the rule form, select the Clean button on the top-left. Upon doing so, the Records smart button displays the number of records captured.
Click on the Records smart button to manage these records.
Merge action manager
The Merge Action Manager enables or disables the Merge action available in the Actions menu for models in the database.
Enable Developer mode (debug mode) and navigate to Data Cleaning app ‣ Configuration ‣ Merge Action Manager.
Models are listed with the following columns:
- Model: technical name of the model.
- Model Description: display name of the model.
- Type: whether the model is of the Base Object or Custom Object type.
- Transient Model: the model handles temporary data that does not need to be stored long-term in the database.
- Can Be Merged: enables the Merge action for the model.
To view which models are enabled by default, use the search bar to filter models that Can Be Merged.
See also
On this page
Get Help
Contact Support Ask the Odoo Community
![]()
EN
Odoo 18
WhatsApp is an instant messaging and voice-over-IP app that allows users to send messages, make calls, and share content. Businesses can use WhatsApp Business to communicate with their customers by text, send documents and provide support.
Warning
WhatsApp is an Odoo Enterprise-only application that does not work in Odoo Community edition. To sign up for Odoo Enterprise edition, click here: Odoo Free Trial.
See also
For more information on migrating from Odoo Community version to Odoo Enterprise version see this documentation: Switch from Community to Enterprise.
With the Odoo WhatsApp app, a company can connect a WhatsApp Business Account (WABA) to an Odoo database, which allows for the following:
- Receive and reply to WhatsApp messages directly from an Odoo database
- Create new templates with dynamic placeholders/variables
- Send pre-approved templates that use dynamic variables, such as:
- Quotations from the Sales app
- Receipts and invoices from the Point of Sale app
- Tickets from the Events app
See also
- Meta Business: create message templates for the WhatsApp Business account.
- Meta Business: connect a phone number to the WhatsApp Business account.
- Meta Business: change the WhatsApp Business display name.
WhatsApp is a messaging service operated by Meta, which is the parent company of Facebook. WhatsApp is commonly used as a communication tool in many countries and by many businesses. This documentation will cover the integration of a WhatsApp Business Account with Odoo. The company’s Meta account is configured in Odoo via an API connection.
The WhatsApp connector supports two flows: company initiated, and customer initiated. A company can initiate a discussion by sending a template to one or more people. Once the template is sent, the recipient can answer in order to trigger a discussion between the sender and the receiver (a Discuss chat window will pop up if the customer answers within 15 days).
If the discussion is initiated by the client (e.g. by sending to the company’s public WhatsApp number), then Odoo will open a group chat with all operators responsible for this WhatsApp channel.
Tip
It is recommended to set up multiple WhatsApp accounts for different departments. For example, the help desk team and sales teams can chat on different channels.
WhatsApp configuration in a Meta
A WhatsApp integration with Odoo uses a standard API connection, and is configured on Meta in the following steps:
- Create a Meta business account
- Create a Meta developer account
- Setup an app and WhatsApp product on Meta’s developer console
- Test the API connection.
Once connected, messages are then sent and received through Odoo’s Discuss application using the WhatsApp API.
Meta business account setup
To create a Business account with Meta (owner of Facebook) navigate to: Facebook Business Manager. Begin by clicking Create account and then enter the business name, the administrator’s name, and a work email address. Then click Next, and a pop-up window will appear prompting to confirm the email address. After confirming, click Done to close the window.
Next, follow the instructions in the email sent by Facebook to confirm the creation of the business account and to complete the setup process.
See also
Set up a Meta business account.
Important
If the business account is linked to a personal Facebook account then the administrator must toggle between the personal account to the business account for the remainder of the configuration.
To toggle to the business account navigate to the Facebook Developer Console and click on the account name in the upper right corner. Under the Business Accounts heading, click on the desired business that the WhatsApp configuration should take place in. This will be the account for which Odoo will send and receive WhatsApp messages.
Important
In order to create a Meta business account, the user must already have a personal Facebook account that has existed for a minimum of one hour prior to setting up the Facebook Business account. Trying to create the business account prior to this time will result in an error.
App creation
On the Meta for Developers dashboard, sign in with the Meta developer account. If no account is configured yet, link a Facebook account to create a Meta developer account.
Note
A Facebook developer account is different than a Facebook business account. While developer accounts are made up of personal Facebook accounts, business accounts are not as they represent a business and manage all of the business’s assets in Meta, such as apps.
See also
Set up the WhatsApp Business Platform.
Click on My Apps in the top right corner after successfully signing in to the Meta developer account. This will redirect the administrator to all the apps the developer has configured in this specific developer account. Click on Create App to begin the process of configuring a new Meta application.
App type
On the Create an app page, select Other under the section labeled, Looking for something else?, and then click Next to be directed to another page in order to select the app type. Then, click on the first option listed under the Select an app type label, titled Business. This selection allows for the creation and management of the WhatsApp API.
Now, click Next to configure the app, as desired. When the app type has been configured, the administrator will move onto the app details section.
App details
On the Details section of the Create an app process, enter Odoo in the field under the Add an app name label.
Note
The app name can be changed at a later time in the settings, if necessary.
Warning
Trademarks and branded elements may not be used in this text section. These include the Meta group of companies. Do not include the word: WhatsApp or the system will flag this in error.
Next, enter the developer email address in the field under the App contact email label.
Lastly, set the Business Account - Optional field to the Meta business account profile, using the drop-down menu. To finish, click Create app. This action will create the app and prompts the Meta Platform Terms and Developer Policies agreements.
To accept the agreements, enter the Facebook password for security purposes, and click Submit to finalize the app creation. The browser will then direct to the Meta for Developers dashboard.
Note
If the Meta business account is prohibited from advertising, claiming an app won’t be allowed. To resolve this issue navigate to https://business.facebook.com/business for assistance.
For more information, see Meta’s documentation on advertising restrictions.
Add a WhatsApp product to the app
Now that the basic structure of the app has been created, a product will need to be added to the app. Begin by accessing the Meta app dashboard by navigating to https://developers.facebook.com/apps, and clicking on the app that is being configured.
On the next page: since WhatsApp will be used, click Set up next to the box containing WhatsApp, located towards the bottom of the page.
See also
Meta’s WhatsApp developer documentation.
The page then directs to the configuration page for the WhatsApp Business Platform API. Use the drop-down menu to select the Meta business to be configured for the Select a Meta Business Account option, and then click Continue to confirm the selection.
Note
When Continue is clicked, the administrator agrees to Meta’s terms and conditions as linked on the Meta App Dashboard.
Note
Once the WhatsApp product is added to the app, Meta will provide a WhatsApp test phone number with 5 test messages.
Start using the WhatsApp API
After finishing the previous WhatsApp product wizard, and clicking Continue, the browser should have directed to the WhatsApp Quickstart page; this Quickstart page is where to begin configuring the WhatsApp API by adding a phone number and then sending an initial test message.
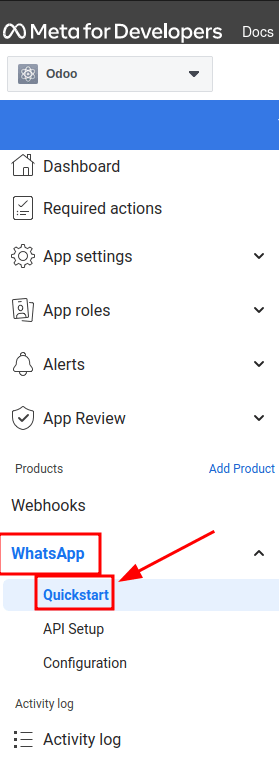
Note
If the browser isn’t on the Quickstart page for WhatsApp, navigate to https://developers.facebook.com/apps and click on the app that is being configured, (the app name is Odoo if the instructions above were followed).
Then, in the menu on the left-hand side of the page, click the v (menu toggle) icon next to the WhatsApp section heading. A small menu will open, containing the following options:
- Quickstart
- API Setup
- Configuration
Click the Quickstart option, and then click Start using the API.
API Setup
After clicking on Start using the API, the page navigates to the API Setup. Now that the test number has been created, a test message can be sent to confirm that WhatsApp is working properly. To begin, navigate to the section on the page labeled Send and receive messages and click the drop-down menu next to To, under Step 1 Select phone numbers.
Now, select the only option available: Manage phone number list. Follow the steps and add up to five numbers to send the free test messages to. After entering the appropriate country code and phone number, click on Next.
Important
Adding a phone number to send to in this step will allow for a successful test to be sent by the terminal. This is critical to ensure the WhatsApp API is working.
A verification code from WhatsApp Business is then sent to the phone number, which needs to be input on the next screen to verify ownership of the number. Enter the verification code and click Next to verify the number.
Send a test message via terminal
Next, send a test message via the terminal. Under the section labeled Step 2 Send messages with the API, click Send Message. A test message will then be sent to the phone number that was set in the previous section.
Upon successfully receiving the message to the number, move onto the next section to produce and configure webhooks.
WhatsApp configuration in Odoo
The next steps configured in this section are all within the Odoo database. A few different values for a token, phone number, and account IDs all need to be configured in Odoo; these values are necessary in order to create a Callback URL and Webhook Verify Token, which are then used to configure the webhooks (in order to receive messages back into the database).
In Odoo, navigate to WhatsApp app ‣ Configuration ‣ WhatsApp Business Accounts. Then click New to configure the WhatsApp business account in Odoo.
In another browser tab, navigate to https://developers.facebook.com ‣ My Apps ‣ WhatsApp ‣ API Configuration, and then copy the following values from the Meta developer console into the corresponding fields in Odoo:
Name | Meta Console | Odoo Interface |
|---|---|---|
Phone | Phone number ID | Phone Number ID |
Token | Temporary access token | Access Token |
App ID | App ID | App ID |
Account ID | WhatsApp Business Account ID | Account ID |
To retrieve the App Secret, navigate to the Meta developer console, https://developers.facebook.com/apps and select the app that Odoo is being configured in. Then in the left-side menu, under App settings, select Basic.
Next, click Show next to the field App secret, and enter the account password to verify ownership. Copy the App secret and then paste that copied value into the App Secret field on the Odoo WhatsApp Business Account configuration dashboard.
To complete the setup of the WhatsApp business account in Odoo, click Test Connection. A successful message in green will populate in the upper-right corner of the dashboard if the configuration is set correctly.
Configuring webhooks
To configure the webhooks for WhatsApp in Odoo, navigate to https://developers.facebook.com/apps and select the app that Odoo is being configured in. Next under the WhatsApp menu heading on the left side of the screen, click on the API Setup menu item. Finally go to the section marked Step 3: Configure webhooks to receive messages and click on Configure webhooks.
Tip
Another way to configure Webhooks is to navigate to https://developers.facebook.com/apps and select the app that Odoo is being configured in. Then select Webhooks in the left hand menu.
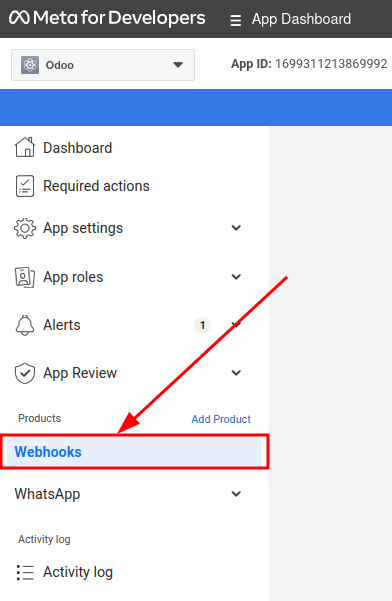
On the Webhook configuration page, click on Edit, where both the Callback URL and Webhook Verify Token values from the Odoo will be added.
Note
Both the Callback URL and Webhook Verify Token values were automatically populated after clicking on Test Connection in the previous step.
In a separate browser window, retrieve the necessary values in Odoo by navigating to WhatsApp app ‣ Configuration ‣ WhatsApp Business Accounts and select the account that is being configured. Locate the values under the section labeled Receiving Messages.
Copy and paste the Callback URL from Odoo into the Callback URL field in Meta. Similarly, copy and paste the Webhook Verify Token into the Verify Token field on the Meta developer console, as well.
Finally, click Verify and save to record the values in the Meta developer console.
Webhook fields
Now input individual webhook fields into Meta’s developer console, under the Webhook fields section. Click Manage and when the pop-up window appears, check the boxes in the Subscribe column for the following field names:
- account_update
- message_template_quality_update
- message_template_status_update
- messages
- template_category_update
After making the selections, click Done.
The finished Webhooks configuration will appear like this in the Meta developer console:
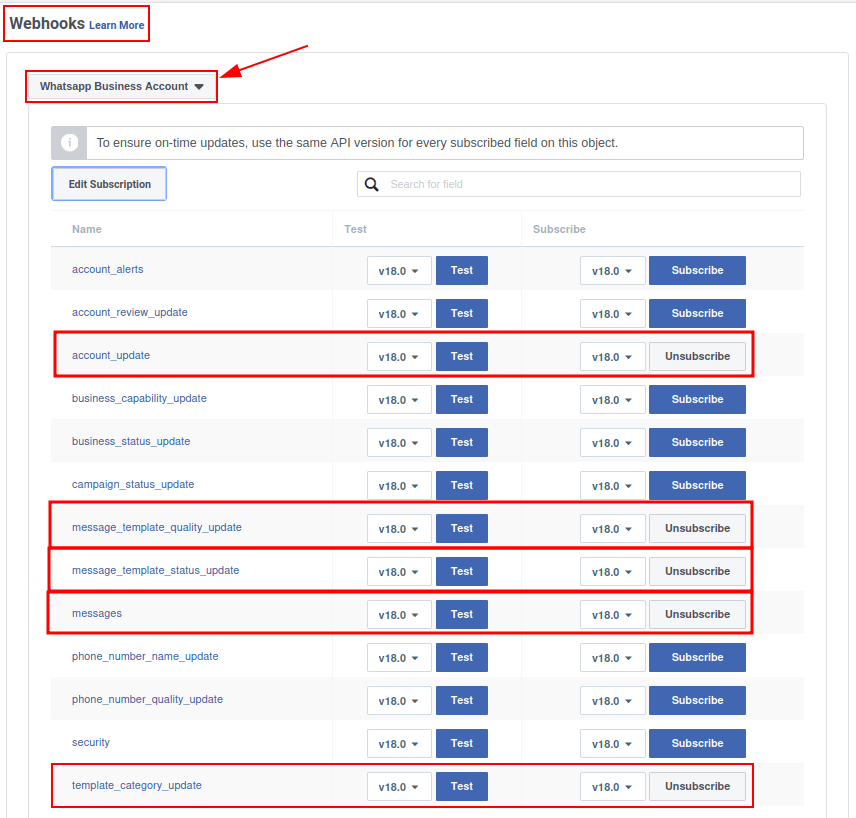
Important
The Webhook fields will only appear once the subscription is confirmed using the Callback URL and Webhook Verify Token.
See also
Meta’s WhatsApp documentation on setting webhooks.
Add phone number
To configure the phone number to use for WhatsApp in Odoo, navigate back to the Meta developer console (https://developers.facebook.com/apps) and again select the app that Odoo is being configured in. Under the WhatsApp menu heading on the left side of the screen, click on the API Setup menu item. From there, go to the section marked: Step 5: Add a phone number, and click on Add phone number.
In the fields, enter a Business name as well as a Business website or profile page.
Tip
The Business website or profile page field can be a social media page’s URL.
Complete filling out the business information by next selecting the country that the company does business in from the drop-down menu in the Country section. Add an address if desired, however, this information is optional. After adding the location, click Next to continue.
The following page contains information for the WhatsApp Business profile. Complete the following sections, accordingly:
- WhatsApp Business Profile Display Name
- Timezone
- Category
- Business description (optional)
Once these sections are complete, click Next. The page refreshes and then prompts the administrator to Add a phone number for WhatsApp in the respective field. Here, enter the phone number to configure in WhatsApp.
See also
Migrate an Existing WhatsApp Number to a Business Account.
Next, choose a verification method for the phone number. Select either Text message or Phone call, and then click Next proceed.
The phone number entered will receive either a text or a phone call by WhatsApp with a code, depending on the verification method chosen. Enter that verification code into the Verification code field and click Next to finish.
Warning
If a payment method hasn’t been added this will be necessary to proceed. Visit Meta’s documentation on how to add a payment method in Meta’s Business Manager. This is part of Meta’s fraud detection system, in order to ensure that the account/company are real a payment method is required to proceed.
See also
Meta for Developers: Add a Phone Number.
Permanent token
After configuration and testing are complete, a permanent token should be created to replace the Temporary token.
See also
Meta for Developers: System User Access Tokens.
Begin by navigating to https://business.facebook.com/ and then go to Business settings ‣ User ‣ System Users. Select an existing system user or create a new system user by clicking on Add.
Assets now must be added to the system user and then a permanent token can be generated.
Click on Add assets, and when the pop-up window appears select Apps under the Select asset type. Then, select the Odoo app and toggle the permissions to On under the Full control option. Set this new permission setting by clicking Save Changes, to which a confirmation window will appear, acknowledging the addition of the asset to the system user. Finish by clicking Done.
Next, the permanent token will be generated. Click on Generate new token, and a pop-up window will appear asking which app this token should be generated for. Select the App that this token is for. Then determine the expiration date of either 60 days or Never.
Finally, when Meta asks which permissions should the system user allow, add all of the following permissions:
- WhatsApp_business_messaging
- WhatsApp_business_management
When permissions are set, click Generate token. Copy the token value that populates on the screen that follows.
With that token value, update the Access Token field in the WhatsApp business account in Odoo by navigating to WhatsApp app ‣ Configuration ‣ WhatsApp Business Accounts.
Go live with the Meta app
Finally, to launch the app, the Meta app must be set to Live in the Meta developer console. Navigate to https://developers.facebook.com/apps and click on the app that is being configured. In the top menu, toggle the App Mode field from Development to Live.
Important
If the app status is not set to live, then the database will only be able to contact the test numbers specified in the developer console.
Warning
A privacy policy URL must be set in order for the app to be set to live. Go to the Meta developer console, https://developers.facebook.com/apps and select the app that Odoo is being configured in. Then, using the menu on the left side of the screen, go to App Settings ‣ Basic. Then, enter the privacy policy hyperlink address under the Privacy Policy URL field of the form. Click Save changes to apply the privacy policy to the app.
Once the app has gone live in the Meta developer console, a confirmation email is sent to the administrator.
WhatsApp templates
WhatsApp templates are saved messages that are used repeatedly to send messages from the database. They allow users to send quality communications, without having to compose the same text repeatedly.
Creating different templates that are tailored to specific situations lets users choose the right message for the right audience. This increases the quality of the message and the overall engagement rate with the customer.
WhatsApp templates can be created on both the Odoo and Meta consoles. The following process will overview the process for creating templates in Odoo and then afterward in Meta.
Important
WhatsApp has an approval process that must be completed before the template can be used. Meta template approval.
Creating templates in Odoo
To access and create WhatsApp templates, begin by navigating to the WhatsApp app ‣ Templates dashboard.
At the bottom of an individual template’s form, there are three tabs: Body, Buttons, and Variables; these three tabs combined create the WhatsApp template.
The text is entered into the Body tab, and dynamic content that is called out in the Body tab is specified in the Variables tab. Every piece of dynamic content (e.g., placeholders) in the message (body) is specifically called out and specified in the Variables tab.
Templates are prefabricated layouts that allow users to send professional looking messages to customers. These templates are capable of containing dynamic data that will populate in the end message using variables that are set in the template configuration. For example, messages can contain the end user’s name, call out specific products, or reference a sales order, to name a few convenient and impactful variables.
To create a WhatsApp template, go to the WhatsApp app ‣ Templates dashboard and click New. On the form, enter a Name for the template, and select a Language.
Important
In order to complete this next task, administrator access rights are needed to edit the Applies to field. See this access rights documentation for more information.
In the Account drop-down menu, select the WhatsApp business account in Odoo that this template should link to. Next, under the Applies to field select the model the server action will apply to for this template.
Tip
These models can also be accessed in developer mode. On a contact form (or similar relevant form in Odoo), navigate to the model that will be referenced, and hover over any field name. A box of backend information will reveal itself with the specific Odoo Model name in the backend. Search (using the front-end name) for this model in the Applies to drop-down menu in the WhatsApp template.
Warning
Often when changing the model or Applies to field, the Phone Field may produce an error The Phone Field should always be set to the Phone or Mobile model.
To search available fields, type in the front-end name in the Search… box. This will find a result from all of the available fields for the model (Applies to) that the template is created for.
Note
In order to find specific fields, multiple levels may need to be navigated in the search results box. Use the > (right chevron) and ⬅️ (left arrow) icons to navigate between the menu levels.
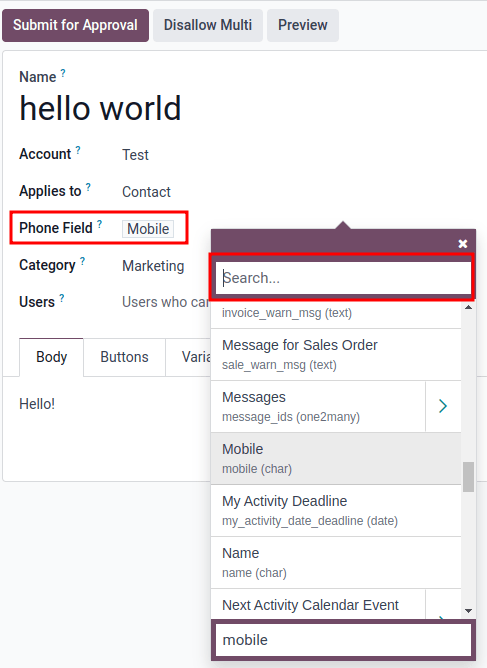
Change the Category to fit either a Marketing, Utility, or Authentication category. In most instances the first two options will be used, unless the user would like to send a password reset or something security related. Set to Marketing should there be anything promotional being sent and set to Utility should there be general transactional messages being sent (i.e., sales order, event ticket, etc).
Important
Specifying an incorrect category can cause a flag/rejected status from Meta during the approval process.
Add any Users that are allowed to use this template. In the right-side column, a Header type can be configured along with a Header message, as well.
The available Header types are as follows:
- Text
- Image
- Video
- Document
- Location (variables need to be set)
Navigate to the Body tab to configure the main message of the template.
When all the necessary changes are made to the template, click on the Submit for approval button in the upper-left corner. This will cause the status of the template to change to Pending.
The status will remain in Pending until a decision has been made by Meta, whereby a confirmation email will then be sent indicating that the template has been approved (or rejected). The templates will then need to be synced from the Odoo database.
See this section for more information on syncing templates.
Tip
There are pre-configured demo data templates available in Odoo to use or modify. These templates can be used as-is or modified to suit a specific business need.
To use these templates, navigate to WhatsApp app ‣ Templates and select a pre-configured template. Click Submit for Approval to start the approval process. An email will be sent to the administrator of the Meta account when the template has been approved.
Buttons
Buttons can be added into the message from the Buttons tab. Enter the Type (either Visit Website, Call Number, or Quick Reply), and then specify the Button Text, Call Number or Website URL (including Url Type), depending on the Type of button.
Note
Buttons can also be added on the Meta business console. See Meta’s WhatsApp template dashboard by navigating to https://business.facebook.com/wa/manage/home. Then go to Account tools ‣ Message templates.
Using placeholders and variables
Dynamic variables reference certain fields within the Odoo database to produce unique data in the WhatsApp message when using a template. Dynamic variables are encoded to display fields from within the database, referencing fields from within a model.
Example
Many companies like to customize their WhatsApp messages with a personalized piece of customer information to grab attention. This can be accomplished in Odoo by referencing a field within a model by setting a dynamic variable. For example, a customer’s name can be referenced in the email from the Customer field on the Sales Order model.
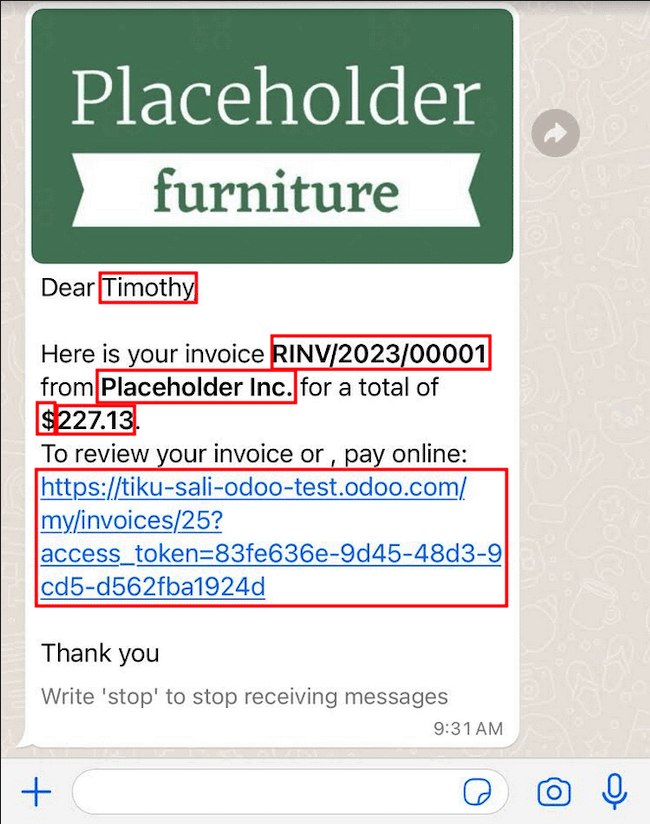
Dynamic variables can be added in to the Body by adding placeholders in the text. To add a placeholder in the message body enter the following text {{1}}. For the second placeholder enter {{2}} and increase incrementally as more placeholders are added to the text.
Example
The following is the text from payment receipt template body:
Dear {{1}},
Here is your invoice {{2}} from {{3}} for a total of {{4}}{{5}}.
To review your invoice or pay online: {{6}}
Thank you
See also
These placeholders must be configured on the Variables tab of the template before submitting for approval from Meta. To edit the dynamic variables on a template, first change the Type to Field of Model. This allows Odoo to reference a field within a model to produce unique data in the message being sent.
Next, edit the Field of the dynamic variables. The Applies to field in the template should be edited prior to ensure the correct model and field are referenced.
To search the available fields, type in the front-end name of the field in the search box. This will find a result from all of the available fields for the model (Applies to) that the template is created for. There may be multiple levels that need to be configured.
Example
The following is an example of the variables set for the above placeholders in the payment receipt noted above:
Name | Sample Value | Type | Field |
|---|---|---|---|
body - {{1}} | Azure Interior | Field of Model | Partner |
body - {{2}} | INV/2022/00001 | Field of Model | Number |
body - {{3}} | My Company | Field of Model | Company |
body - {{4}} | $ | Field of Model | Currency > Symbol |
body - {{5}} | 4000 | Field of Model | Amount |
body - {{6}} | https://.. | Portal link |
Example
For example, in the Body tab, if the following is typed, “Hello {{1}},”, then {{1}} must be set in the Variables tab. For this specific case, the message should greet the customer by name, so the {{1}} should be configured to populate the {{1}} Field with the Customer name.
Warning
Customizing WhatsApp templates is out of the scope of Odoo Support.
Meta template approval
After updating the dynamic variables on the template, the template needs to be submitted to Meta for approval again. Click Submit for Approval to start the approval process. An email will be sent to the administrator of the Meta account when the template has been approved.
Following the approval from Meta, sync the templates again in the Odoo database. See this documentation: Syncing templates.
Tip
To see the status to Meta’s WhatsApp template dashboard by navigating to https://business.facebook.com/wa/manage/home. Then go to Account tools ‣ Message templates.
Syncing templates
Templates must be synced on the Odoo database once they are approved by the Meta team. To do so, begin by navigating to WhatsApp app ‣ Configuration ‣ WhatsApp Business Accounts and select the configuration that should be synced. Under the section marked Sending messages, towards the bottom, click on Sync Templates. Meta will update the templates that are approved so that they can be utilized with various apps in the database.
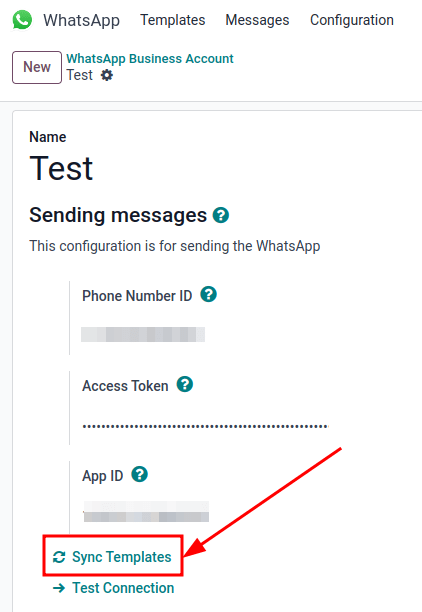
A successful message in green appears in the upper-right corner with the number of templates updated.
Tip
Templates can also be synced individually from the template itself. Navigate to the WhatsApp app ‣ Templates dashboard and select the template to sync. Then, click on the Sync Template button located in the top menu of the template’s form.
Creating templates in Meta
First, navigate to Meta’s WhatsApp template dashboard, and then go to Account tools ‣ Message templates.
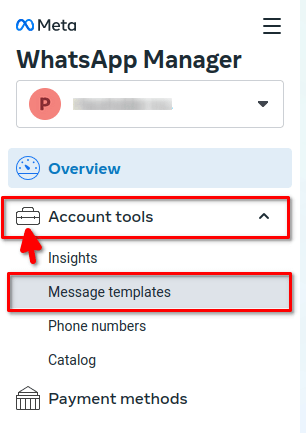
To create a WhatsApp template, click on the blue Create template button, and then select the Category. The options listed include: Marketing, Utility, and Authentication. In most instances the first two options will be used, unless the user would like to send a password reset or something security related.
Enter the Name of the template and then select the Language for the template.
Note
Multiple languages can be selected by typing the language name(s) and selecting the other languages as needed.
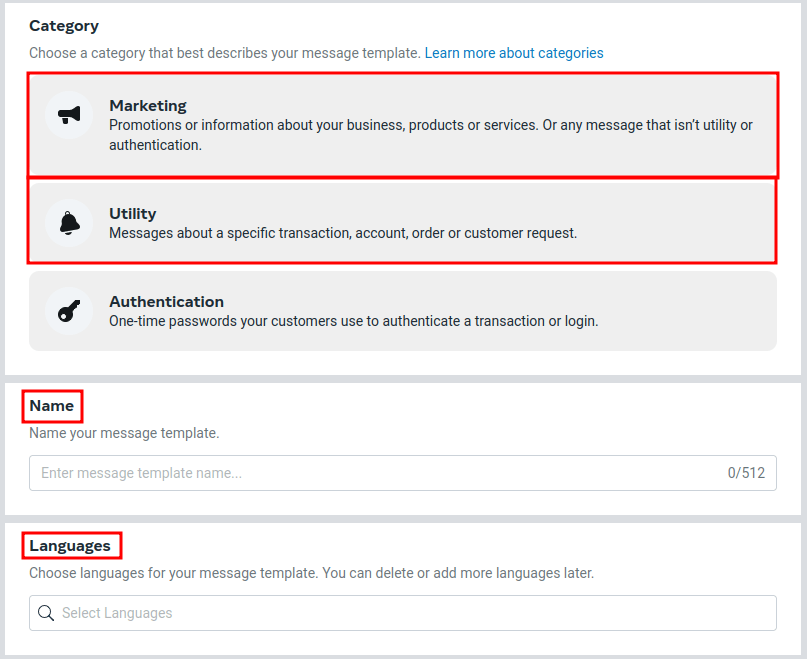
After making the appropriate selections, click on Continue in the upper-right corner. The page redirects to the Edit template page. Here the Header, Body, Footer and Buttons are configured. To the right of the template is a preview of what the template will look like in production.
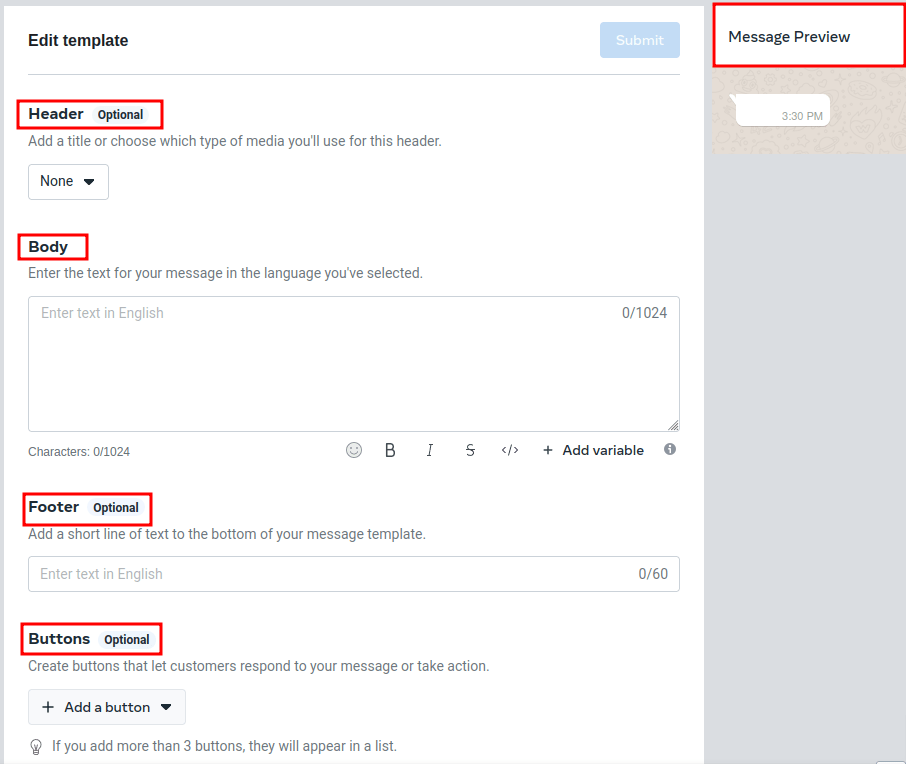
When all the necessary changes are made to the template, click on the Submit button in the upper-right corner. A confirmation window appears to confirm the language— click Confirm to approve and then another window appears stating that the template will be submitted to Meta for review and approval.
The Status of the template will remain in In review until a decision has been made by Meta. Once an email confirmation is received approving the template, the templates will need to be synced from within the Odoo database.
See also
For more information on configuring templates on the Meta developer console visit Meta’s WhatsApp template documentation.
Notifications
Notifications in WhatsApp are handled similar to a message conversation in Odoo. A pop-up window appears with the received conversation from the customer. By default, notifications are set in the WhatsApp business account configuration in Odoo.
Notification settings can be adjusted by navigating to WhatsApp app ‣ Configuration ‣ WhatsApp Business Accounts. From there, select the account and scroll down to the Control section where notifications are handled. Under the Notify users heading, type in the field which user(s) should be notified for this particular WhatsApp channel.
Note
Once a conversation is initiated between a user and a customer, notifications to all the users specified in the WhatsApp business account configuration won’t occur. Only notifications to the user(s) in the conversation will occur. Should the user not respond within 15 days, the customer’s reply after the 15 days will populate once again to all the users specified in the WhatsApp configuration.
Adding users to chat
Users can be added to a WhatsApp chat by expanding the WhatsApp pop-up window. WhatsApp conversations are located in the Discuss app. Click on the 👤+ (add user) icon next to it, and a window appears to invite users to the conversation.
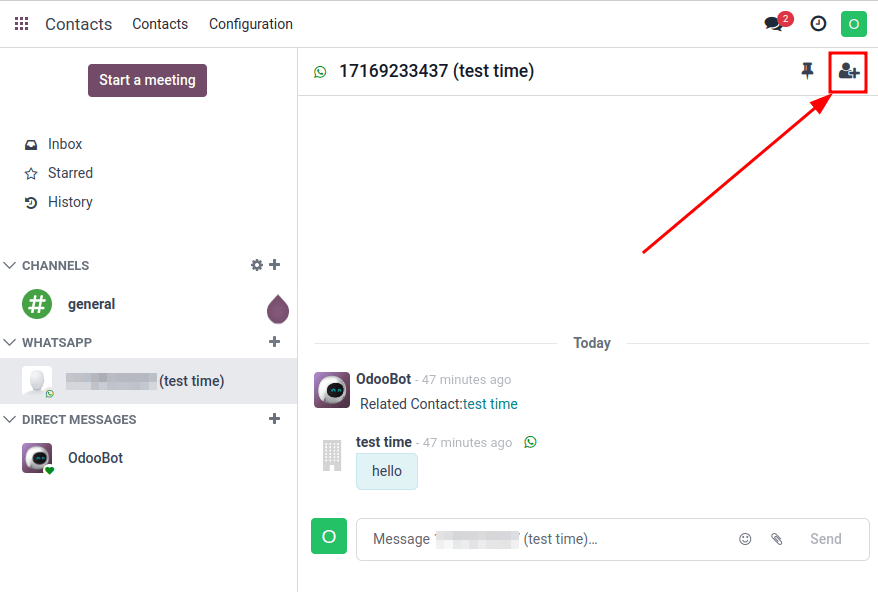
WhatsApp API FAQ
Verification
As of February 1, 2023, if the Meta app requires advanced level access to permissions, a complete business verification may need to be completed. This includes submitting office business documents to Meta. See this documentation.
See also
Meta’s WhatsApp access verification documentation.
Template errors
Editing templates can cause tracebacks and errors unless the exact process is followed above, here: (WhatsApp templates).
Duplicate validation error
When syncing the templates there may be an instance when there are multiple templates with the same name on Meta’s business manager and in Odoo. This causes a duplicate validation error. To correct this issue, rename the duplicate template name on Odoo and sync the templates once again by following the steps here: Syncing templates.

Token errors
User error
Should the temporary token not be replaced with a permanent token a user error will populate in Odoo when testing the connection after sending fails. To correct this issues see Permanent token.
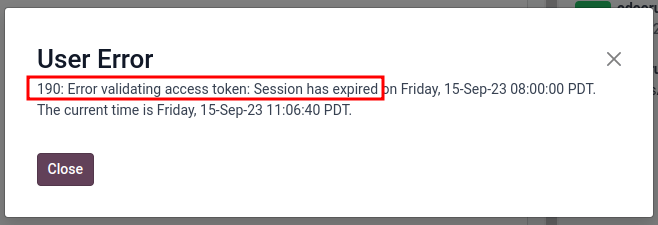
System user error 100
Should the system user be an Employee when setting up the permanent token, a user error 100 will populate.
To correct this error, create an Admin system user, following the process outlined here: Permanent token.
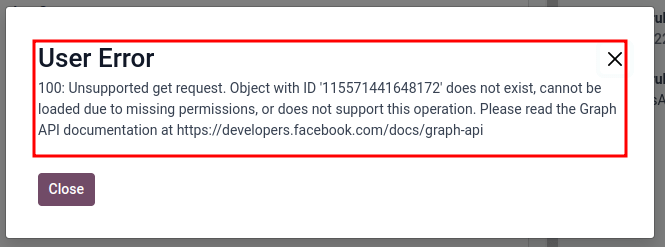
On this page
Get Help
Contact Support Ask the Odoo Community
![]()
- User Docs
- Database management
- Developer
- Contributing
EN
Odoo 18
VoIP (Voice over Internet Protocol)
VoIP in Odoo enables businesses to handle calls over the internet by integrating directly with Odoo apps like CRM, Helpdesk, and more. Calls and messages are logged within these apps, keeping records linked to customer interactions.
See also
Users can make and receive calls, track communication history, and automate call routing based on predefined rules. Features like call recording and analytics provide insights into call volume and response times, helping teams track communication efficiency.
VoIP widget
Get oriented with the features of the VoIP widget, like what actions can be taken during a call.Devices and integrations
Learn about accessing the VoIP widget from different devices (like phones) and apps (like Linphone).VoIP terms
- VoIP: Voice over Internet Protocol. Technology that is used to handle calls that are not made from a phone line.
- SIP: Session Initiation Protocol. Technology included in VoIP that specifically handles the setup, management, and termination of calls.
- Call queue: A system to route calls (usually in a support team). This allows customers to wait for help if no support agents are available.
- Dial plans: A system to define how VoIP calls are routed, based on set rules.
Configure VoIP
To use VoIP, first install the VoIP module.
Once the module is installed, a (VoIP) icon will appear at the top of the screen. This is where phone calls are made from within Odoo. When this icon is clicked, a VoIP pop-up widget appears on the screen, and is where emails can be sent, user and employee info can be edited, and activities can be managed. While this pop-up widget is open, the user can navigate through their Odoo apps.
Using VoIP also requires a service provider. The next section explains how to connect a service provider to the Odoo database.
VoIP providers
While VoIP setup is minimal in Odoo, all configuration happens in the external VoIP service provider. Two verified providers are OnSIP and Axivox. Click on the cards below to learn how to configure these service providers in the Odoo database. If these providers cannot be used, an alternate provider must meet these requirements to connect with Odoo:
- VoIP host must provide access to a SIP server via a websocket connection
- VoIP host must support WebRTC protocol
To add the credentials for the alternate provider, go to the Settings app and search for VoIP. In the Integrations section under VoIP, click Manage Providers. And then, click New and enter the requested information (like the websocket’s URL). Note that the OnSIP Domain field is where the domain created by the alternate provider goes.
If any issues with the VoIP service provider are encountered, then reach out to their support team. If any issues when setting up the VoIP service provider are encountered in Odoo, then follow the relevant troubleshooting steps.
Warning
Odoo cannot verify that every alternate provider is compatible with Odoo’s systems. However, if the above requirements are met, then no issues should be found.
Axivox configuration
Learn how to set up Axivox in Odoo. This includes adding users to Axivox, setting up call queues, and more.OnSIP configuration
Learn how to set up OnSIP in Odoo. This includes entering OnSIP credentials into Odoo and handling troubleshooting.On this page
Get Help
Contact Support Ask the Odoo Community
![]()
- User Docs
- Database management
- Developer
- Contributing
EN
Odoo 18
Use VoIP services in Odoo with OnSIP
Important
OnSIP VoIP services are only available in the United States (US). OnSIP VoIP services are widely available in the lower-48, contiguous United States. In Alaska or Hawaii, charges for service can be higher.
Additionally, a US billing address, and US credit card are required to use the service.
Before setting up an account with OnSIP, the business will need to make sure the business telephone numbers are portable to OnSIP.
OnSIP makes every attempt to work with all telephone service providers. However, certain local or regional guidelines may preclude the company’s current provider from releasing the number.
Introduction
Odoo VoIP can be set up to work together with OnSIP (Odoo Landing Page). OnSIP is a VoIP provider. An account is needed with OnSIP in order to use this service.
Before setting up an account with OnSIP, make sure the company’s home area, and the areas that will be called, are covered by OnSIP services.
After opening an OnSIP account, follow the configuration procedure below to configure it on an Odoo database.
Configuration
To configure the Odoo database to connect to OnSIP services, first navigate to the Apps application from the main Odoo dashboard. Then, remove the default Apps filter from the Search… bar, and search for OnSIP.
Next, activate the VOIP OnSIP module.
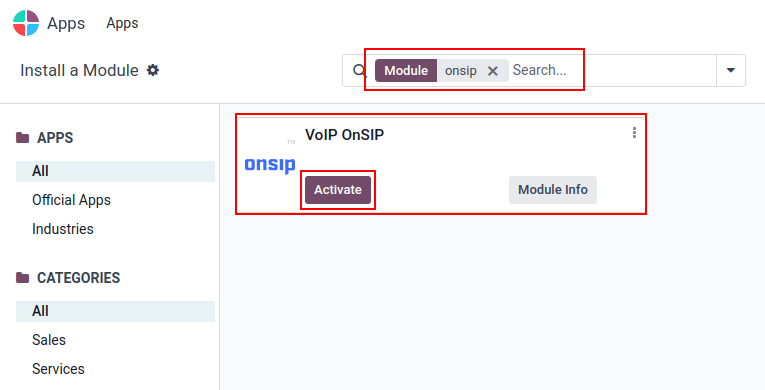
Odoo VoIP setting
After installing the VOIP OnSIP module, go to the Settings app, scroll down to the Integrations section, and locate the VoIP fields. Then, proceed to fill in those three fields with the following information:
- OnSIP Domain: the domain that was assigned when creating an account on OnSIP.
- WebSocket: wss://edge.sip.onsip.com
- VoIP Environment: Production

Tip
To access the OnSIP domain, navigate to OnSIP and log in. Then, click the Administrators link in the top-right of the page.
Next, in the left menu, click Users, and then select any user. By default, the selected user opens on the User Info tab.
Click on the Phone Settings tab to reveal OnSIP configuration credentials (first column).
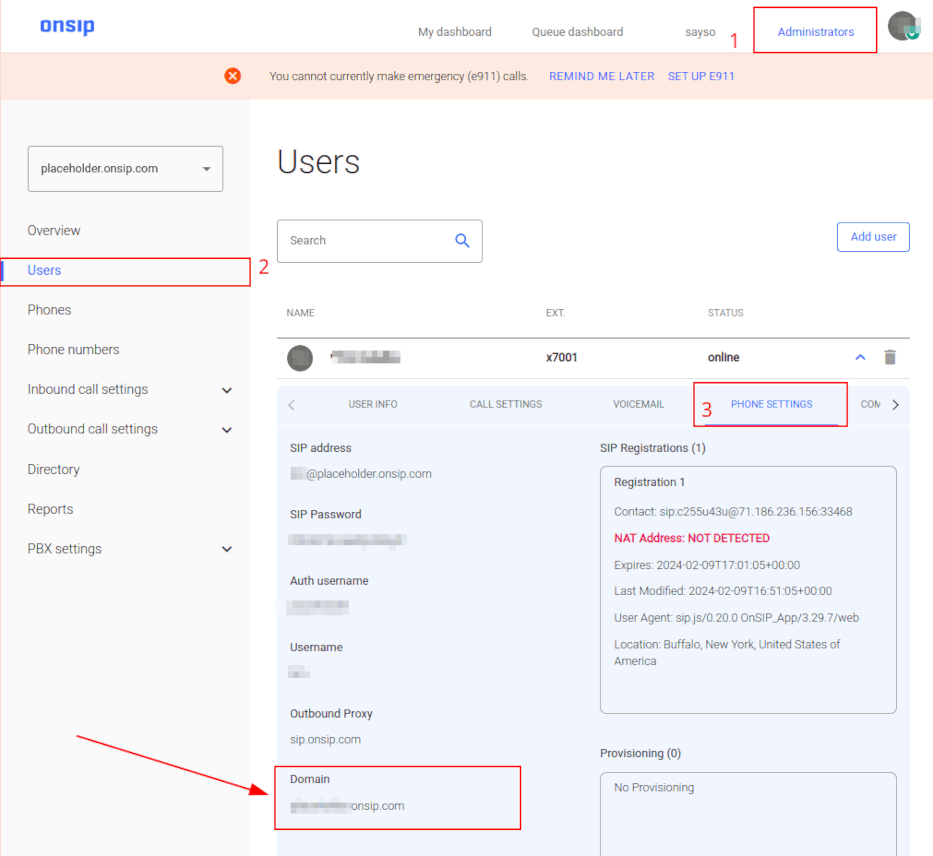
Odoo user setting
Next, the user needs to be set up in Odoo. Every user associated with an OnSIP user must also be configured in the Odoo user’s settings/preferences.
To do that, navigate to Settings app ‣ Manage Users ‣ Select the User.
On the user form, click Edit to configure the user’s OnSIP account. Then, click the Preferences tab, and scroll to the VoIP Configuration section.
In this section, fill in the fields with OnSIP credentials.
Fill in the following fields with the associated credentials listed below:
- Voip Username = OnSIP Username
- OnSIP Auth Username = OnSIP Auth Username
- VoIP Secret = OnSIP SIP Password
Tip
The OnSIP extension can be found in the User banner line above the tabs.
When these steps are complete, navigate away from the user form in Odoo to save the configurations.
Once saved, Odoo users can make phone calls by clicking the ☎️ (phone) icon in the top-right corner of Odoo.
See also
Additional setup and troubleshooting steps can be found on OnSIP’s knowledge base.
Incoming calls
The Odoo database also receives incoming calls that produce pop-up windows in Odoo. When those call pop-up windows appear, click the green 📞 (phone) icon to answer the call.
To ignore the call, click the red 📞 (phone) icon.
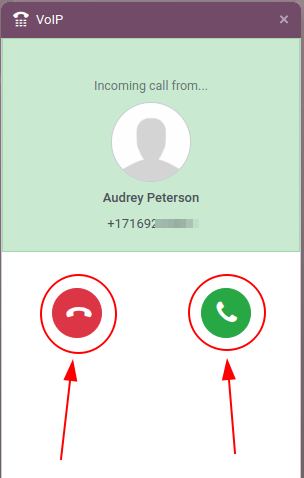
See also
Troubleshooting
Missing parameters
If a Missing Parameters message appears in the Odoo widget, make sure to refresh the Odoo browser window (or tab), and try again.

Incorrect number
If an Incorrect Number message appears in the Odoo widget, make sure to use the international format for the number. This means leading with the international country code.
A country code is a locator code that allows access to the desired country’s phone system. The country code is dialed first, prior to the target number. Each country in the world has its own specific country code.
For example, 16505555555 (where 1 is the international prefix for the United States).
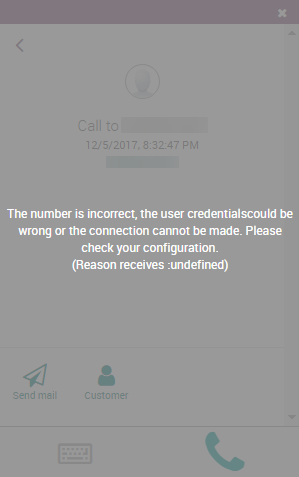
See also
For a list of comprehensive country codes, visit: https://countrycode.org.
OnSIP on mobile phone
In order to make and receive phone calls when the user is not in front of Odoo on their computer, a softphone app on a mobile phone can be used in parallel with Odoo VoIP.
This is useful for convenient, on-the-go calls, and to make sure incoming calls are heard. Any SIP softphone will work.
See also
On this page
Get Help
Contact Support Ask the Odoo Community
![]()
- User Docs
- Database management
- Developer
- Contributing
EN
Odoo 18
VoIP widget
The VoIP (Voice over Internet Protocol) widget is an add-on made available to Odoo users by installing the VoIP module. Instead of managing mobile devices for every salesperson, fumbling through call transfers for upset customers, or needing a meeting room to handle a conference call, utilize the VoIP widget to tackle any of these business needs.
Install the VoIP module
To use VoIP, it must first be installed.
Once the module is installed, a (VoIP) icon will appear at the top of the screen. This is where phone calls are made from within Odoo. When this icon is clicked, a VoIP pop-up widget appears on the screen, and is where emails can be sent, user and employee info can be edited, and activities can be managed. While this pop-up widget is open, the user can navigate through their Odoo apps.

Sign up for a VoIP service provider
While VoIP setup is minimal in Odoo, all mapping happens in the external VoIP service provider. Two verified providers are OnSIP and Axivox. If these providers cannot be used, an alternate provider must meet these requirements to connect with Odoo:
- VoIP host must provide access to a SIP server via a websocket connection
- VoIP host must support WebRTC protocol
To add the credentials for the alternate provider, go to the Settings app and search for VoIP. In the Integrations section under VoIP, click Manage Providers. And then, click New and enter the requested information (like the websocket’s URL). Note that the OnSIP Domain field is where the domain created by the alternate provider goes.
If any issues with the VoIP service provider are encountered, then reach out to their support team. If any issues when setting up the VoIP service provider are encountered in Odoo, then follow the relevant troubleshooting steps.
Warning
Odoo cannot verify that every alternate provider is compatible with Odoo’s systems. However, if the above requirements are met, then no issues should be found.
Make a phone call with VoIP
One of the primary purposes of VoIP is to make phone calls without needing a phone. Here are the three ways to make a phone call in the Odoo database:
- Click the (VoIP) icon, located in the top-right of the navigation bar. Then, enter the phone number to be called by clicking the (keyboard) icon, and then entering the phone number to be called.
- To return to the widget’s home page, click the (keyboard) icon again.
- Click the (VoIP) icon, located in the top-right of the navigation bar. Then, click the (phone) icon to redial the last called contact.
- Click the (VoIP) icon, located in the top-right of the navigation bar. Then, search for a specific contact’s name or go to the Contacts tab. Then, select the contact and click the (phone) icon.
When receiving calls in Odoo, the VoIP widget rings, and displays a notification. To close the widget, click the (close) icon in the upper-right of the widget’s screen.
Note
The VoIP number is the one provided by Axivox. It can be accessed by navigating to https://manage.axivox.com/. After logging into the portal, go to Users ‣ Outgoing number (column).
Send an email through the VoIP widget
While phone calls are handled through the VoIP widget, emails can also be sent through it. This is helpful for sending follow-up emails to the call participants, emailing a question to a coworker, or reminding a vendor to send over some components during a check-in call.
To send an email through the VoIP widget, click the (VoIP) icon, located in the top navigation bar. When this is clicked, the VoIP widget will appear in the bottom-right corner of the page. Then, search for a contact to email or find them in the Contacts tab of the VoIP widget. Next, click the (envelope) icon, and then select the email recipients, enter the email’s subject line, and write the email. When it is ready to be sent, click Send. To schedule an email to send later, click the (dropdown) icon next to Send, click Send Later, pick the scheduled time, and click Schedule.
Navigate the VoIP widget
The VoIP widget contains three tabs: Recent, Next Activities, and Contacts, which are used for managing calls and day-to-day activities in Odoo. Use the search bar to find contacts faster.

Recent tab
Under the Recent tab of the VoIP widget, the call history for the user is available. This includes incoming and outgoing calls. Any number can be clicked to begin a call.
Next activities tab
Under the Next Activities tab of the VoIP widget, a user can see any activities assigned to them, and which ones are due to be completed for the day.
Click an activity from this tab to perform any of these actions to prepare for and complete (found under the Documents heading):
- (envelope): send an email to a contact (e.g., coworkers or clients)
- (user): shows the contact information for this contact
- (documents): shows the attached record in Odoo (like sales orders)
- (Activities): schedule an activity
When viewing the activity, the user can also manage the activity’s details and status:
- (check): marks the activity as complete
- (edit): edits the activity (like its due date)
- (close): cancels the activity
To call the customer related to a scheduled activity, click the (phone) icon. Click the (keyboard) icon to dial another number.
Contacts tab
Under the Contacts tab of the VoIP widget, a user can access a contact in the Contacts app.
Any contact that has a saved phone number can be called by clicking into the contact from the VoIP widget’s Contacts tab.
A search feature is also available at the top of the widget, represented by a (search) icon. Use this tool to find a specific contact. Scheduled activities will not appear as search results.
Troubleshooting the VoIP widget
Each section below goes through common issues with the VoIP widget and how to resolve them.
Missing parameter
If a Missing Parameter error message appears in the Odoo VoIP widget, refresh the Odoo window, and try again.
Incorrect number
If an Incorrect Number error message appears in the Odoo VoIP widget, make sure to use the international format, leading with the (plus), followed by the international country code (e.g., +16506913277, where +1 is the international prefix for the United States.)
The websocket connection with the server has been lost
If a The websocket connection with the server has been lost. Please try to refresh the page. error message appears in the Odoo VoIP widget, then refresh the page close other browser tabs.
This error is caused by returning to the database after a period of inactivity, like lunch, or if there are too many browser tabs open.
Failed to start the user agent
If a Failed to start the user agent. The URL of the websocket may be wrong. Please have an administrator verify the websocket server URL in the General Settings. error message appears in the Odoo VoIP widget, then update the browser and computer.
This error is caused by the browser or computer not being up-to-date (and can also cause issues with the microphone).
Grayed-out VoIP widget
If the VoIP widget is completely grayed out and cannot be interacted with, then update the browser and computer, and delete the Google Chrome extension causing the problem.
Cannot connect to the VoIP phone number
If the user cannot connect to their VoIP phone number, then their Odoo profile is missing their Voip Secret. To add this, click the user avatar, and then click My Profile. From here, click the VoIP tab, and then enter the user’s Voip Secret. This is the user’s password to their account for their VoIP service provider.
On this page
Get Help
Contact Support Ask the Odoo Community
![]()
- User Docs
- Database management
- Developer
- Contributing
EN
Odoo 18
Devices and integrations
VoIP can be used on many different devices, such as a computer, tablet, mobile phone, and many more. This is helpful in that it reduces costs, and employees can work from anywhere in the world, so long as they have a broadband internet connection.
Odoo VoIP is SIP (Session Initiation Protocol) compatible, which means it can be used with any SIP compatible application.
This document covers the process of setting up Odoo VoIP across different devices and integrations.
Odoo is fully-integrated with all Odoo apps, allowing users to click into any app, and schedule a call as an activity in the chatter.
Example
For example, in the CRM app, a user can click into an opportunity, and click on Activities in the chatter.
Next, they can choose Call, and under Due Date, they can select a date.
Once they click Save, an activity shows up in the chatter.
Should the Due Date be for today’s date, the activity shows up in the VoIP widget.
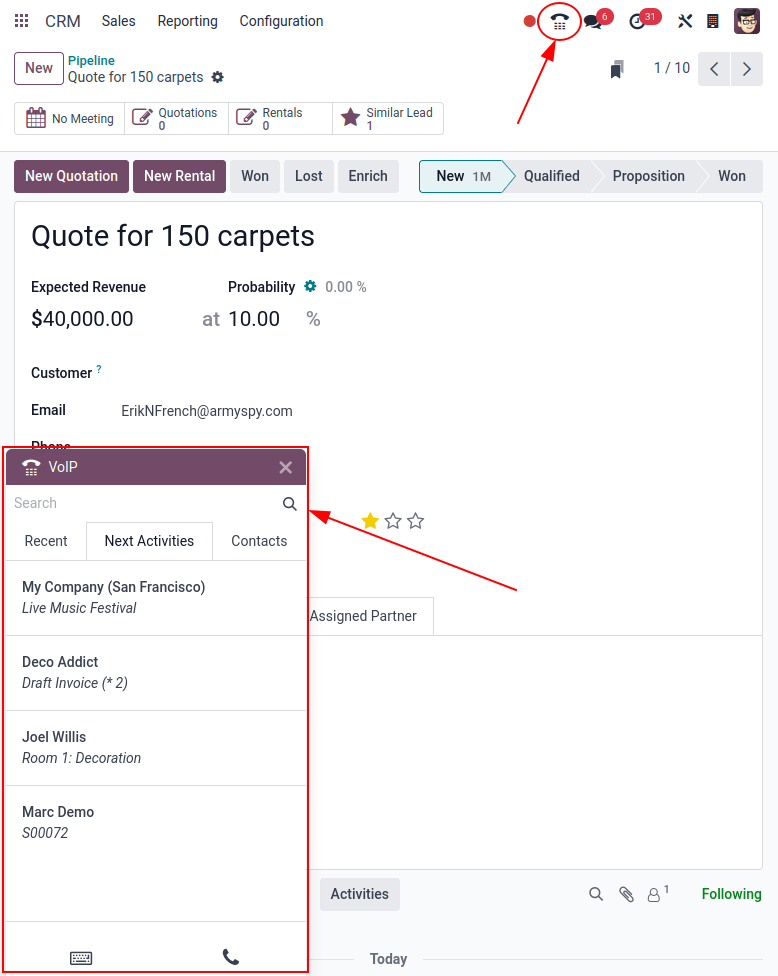
Odoo VoIP (laptop/desktop computer)
The Odoo VoIP (Voice over Internet Protocol) module and widget can be used from any browser on a laptop or desktop device. Simply click on the ☎️ (phone) icon in the upper-right corner, while in the Odoo database, and the widget appears.
See also
To see how to use the VoIP widget on a desktop/laptop computer, check out this documentation: VoIP widget.
Odoo VoIP (tablet/mobile device)
The Odoo VoIP app can be used on tablets and mobile phones, through the Odoo Android or Apple IOS applications. Additionally, a mobile web browser can be used to access the database.
Warning
Odoo Android and Apple IOS applications are no longer being maintained by Odoo on the Android and Apple portals. This means Odoo support only handles limited scopes of Odoo Android or Apple IOS support tickets.
Important
While outgoing calls can be placed using Odoo on a mobile device, be aware that Odoo is not a full VoIP application, and does not ring on incoming calls. If the user needs to be reachable on a mobile device at all times, an app, like Zoiper, should be used. Apps like that stay connected in the background at all times.
For more information, see this documentation: Zoiper Lite.
While in the mobile application on a mobile device/tablet, access the Odoo VoIP widget, by tapping on the ☎️ (phone) icon in the upper-right corner. The widget appears in the lower-left corner.
When first making a call from the tablet using the mobile application, the user is prompted to Allow the database to use the microphone. Click Allow when prompted to continue with the call using the microphone.
This step is necessary, whether using the mobile Odoo application or web browser.
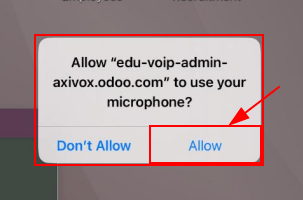
Odoo then asks how to make the call. The two options are : VOIP or Phone (should the tablet be enabled for calling). Click the box next to Remember ? should this decision be the default moving forward.
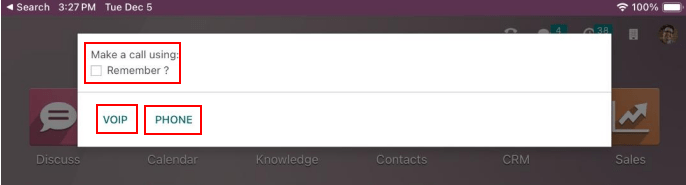
Here is the layout of what the Odoo VoIP app looks like on a mobile device:
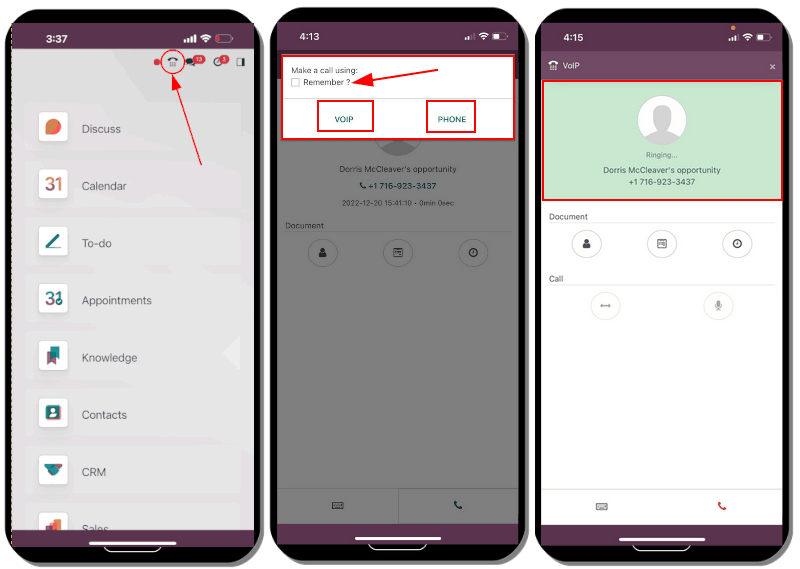
Zoiper Lite
Zoiper Lite is a free VoIP SIP dialer with voice and video.
To start using the Zoiper app, download it to the device, via the Zoiper download page.
A mobile device is the most common installation, and this document covers how to set up on the Zoiper IOS application. Screenshots and steps may differ depending on the set up conditions.
After installing the Zoiper application on the mobile phone, open the application, and tap on Settings. Navigate to Accounts, and tap on the + (plus) icon to add an account.
If the VoIP account is already set up, then click Yes. This means an account username and password has already been produced.
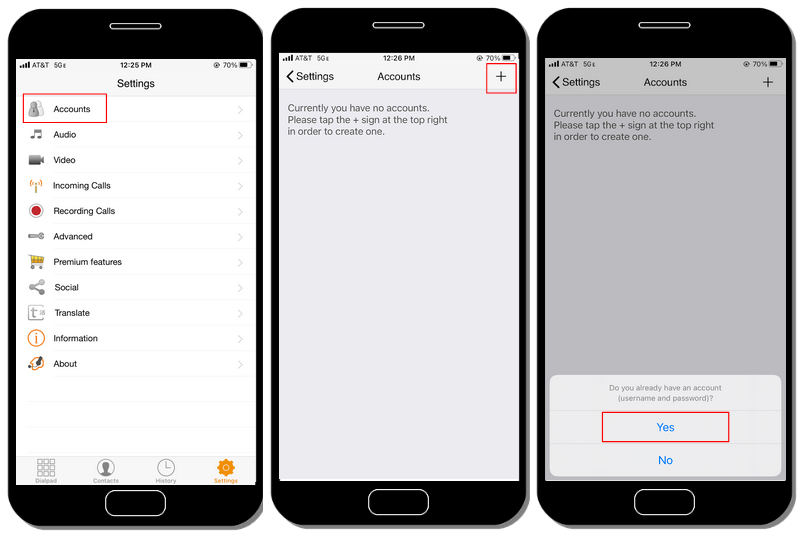
Next, tap on Select a provider. On the screen that populates, tap Country, in the upper-right corner, to narrow the providers down to a specific country. Choose the country for the provider that is being configured, then find the Provider, and select it.
Example
If the provider being configured is Axivox, then select Belgium. Then, choose Axivox as the provider.
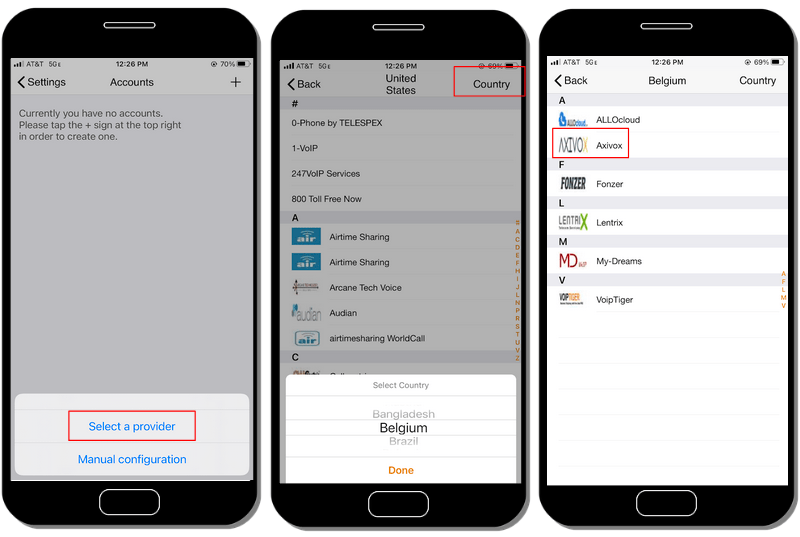
Under SIP options, enter the Account name, Domain, Username, and Password. All this information varies, based on the account.
Tip
To access this information, via the Axivox portal, navigate to Users ‣ Choose user ‣ Edit ‣ SIP Identifiers tab. The SIP username, Domain, SIP password, and Address of the proxy server are all present in this tab.
Zoiper Field | Axivox Field |
|---|---|
Account name | Can be anything |
Domain | Domain |
Username | SIP username |
Password | SIP password |
Once this account information is entered, click the green Register button at the top of the screen. Once the registration information is checked, Zoiper populates a message, stating Registration Status: OK.
At this point, Zoiper is now set up to make phone calls using the VoIP service.
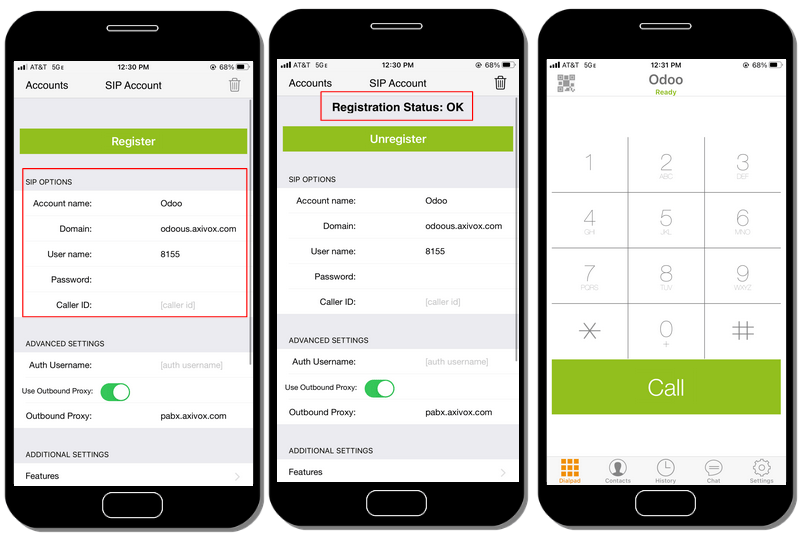
Linphone
Linphone is an open-source VoIP SIP softphone, used for voice, video, messaging (group and individual), as well as conference calls.
To start using the Linphone app, download it to the device, via the Linphone download page.
A mobile device is the most common installation, and this document covers how to set up the Linphone IOS application. Screenshots and steps may differ depending on the circumstances.
To begin configuring Linphone for use with a SIP provider, first open Linphone, and an assistant screen appears.
From this screen, select Use SIP Account. Then, on the following screen, enter the Username, Password, Domain, and Display Name. Once complete, press Login.
At this point, Linphone is ready to start making calls, once there is a green button at the top of the application screen that reads, Connected.

Tip
Linphone makes a variety of applications for mobile and desktop devices in operating systems, such as Windows, Linux, Apple, and Android. Because Linphone is an open-source project, many new updates are released on a regular basis.
See Linphone’s wiki-documentation page.
On this page
Get Help
Contact Support Ask the Odoo Community
![]()
- User Docs
- Database management
- Developer
- Contributing
EN
Odoo 18
Make, receive, transfer, and forward calls
Calling prospective clients, customers, or colleagues is an essential part of any business. A company also needs to be available when customers call, in order to build trust and make connections.
This document covers how to make, receive, transfer, and forward calls with Odoo VoIP.
Make calls
Starting on the Odoo dashboard, a call can be made by opening the phone widget in the the upper-right corner, which is represented by a ☎️ (phone) icon.
Then, a user can click on the Contacts tab, and click into any contact in the database to make a call.
Additionally, one can also use the Search bar in the VOIP pop-up window to find any desired contact.

To manually make a call, click the ⌨️ (keyboard) icon, and proceed to manually key in the desired number. Do not forget to lead with the + (plus) icon, followed by the international country code.
Example
For the United States of America, the country code and + (plus) icon, would look like this: +1. If one were to dial Belgium, the number would be prefixed by +32, and for Great Britain it would be +44.
After entering the full number, with the required + (plus) icon prefix and country code, click the green 📞 (phone) icon to start the call. When finished, click the red 📞 (phone) icon to end the call.

Receive calls
An incoming call automatically opens the VoIP widget, when a user is using the Odoo database. Should the database be open in another tab, a sound plays (the sound must be activated on the device).
Once back to the tab, the calling screen of the VoIP phone widget appears.
Click the green 📞 (phone) icon to pick up the call, or the red 📞 (phone) icon to reject the call.

Add to call queue
All the contacts and customers that need to be called can be seen in one place with the Odoo VoIP phone widget, under the Next activities tab.

To add a call to the Next activities tab, click the green 📞 (phone) icon, while in kanban view of the CRM application.
To remove them from the call queue, hover over the opportunity that has a call scheduled, and click the red 📞 (phone) icon that appears with the - (minus) icon.
When navigating back to the VoIP phone widget, only the calls that are scheduled immediately for that day appear in the queue under the Next Activities tab of the VoIP pop-up widget.

The Next Activities tab of the VoIP phone widget is integrated with the following Odoo apps: CRM, Project, and Helpdesk.
A call can be added in the chatter of records within those applications.
To manually add a call, via the chatter, click Activities (next to the 🕗 (clock) icon). Under Activity Type, select Call from the drop-down menu that appears.
Next, set a Due Date, and add a Summary.
Lastly, change the Assigned to field to the person that should make the call. Whomever is set in this last field (Assigned to) has this call show up in their Next Activities call queue in the Odoo VoIP phone widget.
Important
Only calls for the immediate day (today’s date) appear in the Next Activities tab of the VoIP phone widget for that specific user.
If specified, click Save or Open Calendar to complete the scheduling of the call.
Transfer calls
A call can be transferred from one user to another in the Odoo VoIP phone widget. However, this can only occur after speaking to the caller first. Without picking up the call in the Odoo VoIP phone widget, the only way to transfer a call is automatically though the provider console/portal.
See also
For more information on transfers, visit Forwardings tab.
To transfer a call within the Odoo VoIP phone widget, first, answer the call using the green 📞 (phone) icon.
Once the incoming call is answered, click the ↔ (left-right arrow) icon. Then, enter the extension of the user the call should be forwarded to. Finally, click Transfer to route the call to that phone number.
Tip
To find the extension for a user, consult the VoIP administrator, or, if the user has Settings access rights to Administration, navigate to Settings App ‣ Manage Users ‣ Select the user ‣ Preferences ‣ VOIP ‣ VoIP username / Extension number.
For more information on access rights, visit: Access rights.
![]()
Forward calls
To forward a call within the Odoo VoIP phone widget, first, answer the call using the green 📞 (phone) icon. Once the incoming call is answered, click the ↔ (left-right arrow) icon.
Then, enter the full phone number of the user the call should be forwarded to. Finally, click Transfer to route the call to that phone number.
See also
For more information on forwarding, visit Forwardings tab.
On this page
Get Help
Contact Support Ask the Odoo Community
![]()
EN
Odoo 18
To-do
To-do assists you in organizing and managing personal tasks.
Creating to-dos
To create a to-do, click New or the plus button (➕) next to a stage name. Add a title to your to-do, then click Add to save it or Edit to access more options.
If you choose to Edit a to-do, you have the option to add Tags, Assignees, or more information using the Odoo Editor.
Note
- Adding Assignees shares the to-do with the users selected.
- Type / in the editor box to structure and format your content. You can also add media, links, and widgets.
Tip
You can create a new to-do on the fly from anywhere in Odoo by opening the command palette tool with the keyboard shortcut ´ctrl+k´ and clicking Add a To-Do, or by clicking the clock button and then Add a To-Do.
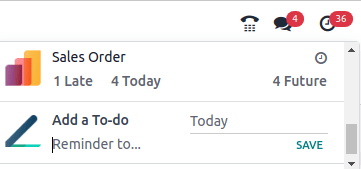
Converting to-dos into project tasks
If you use the Project app, you can convert to-dos into project tasks. To do so, open a to-do and click the gear button (⚙), then Convert to Task.
Next, select the Project, Assignees, and Tags, then click Convert to Task. The to-do is now a project task and appears in the selected project.
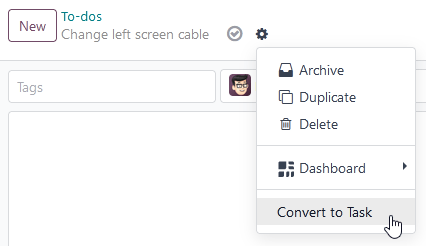
Managing the to-do pipeline
Your assigned to-dos are displayed on the app dashboard. You can drag and drop a to-do to move it from one stage to another.
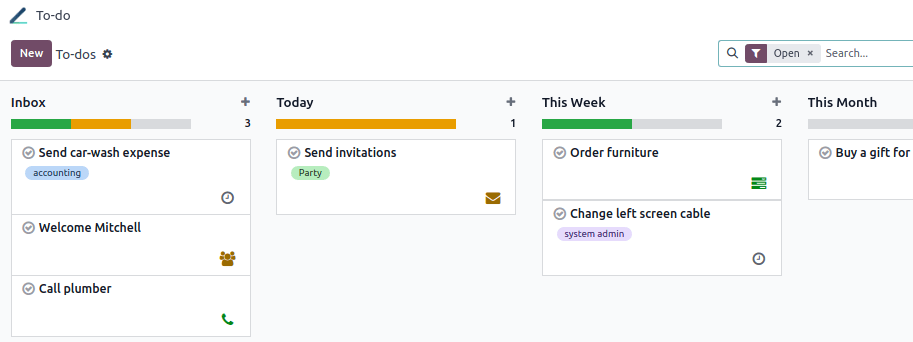
Tip
- Click the + Personal Stage button on the left of the pipeline to create a new stage.
- Click the gear button (⚙) next to a stage to Fold, Edit, or Delete it.
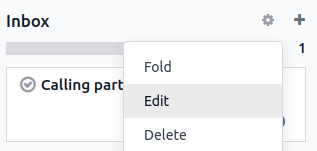
Scheduling activities
To schedule an activity on a to-do, click the clock button on the app dashboard, then the + Schedule an activity button.
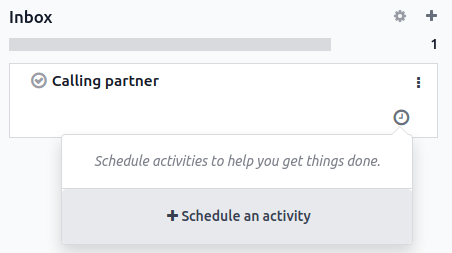
To create the activity:
- Select an Activity Type.
- Select a Due date.
- Choose who the activity should be Assigned to.
- Add a brief Summary if needed. You can add a more elaborate description in the Log a note box.
Click Schedule to complete the action.
Note
The To Do activity is not a to-do task. Selecting it does not create a to-do task.
Viewing to-dos in the Project app
If you use the Project app, your to-dos also appear as private tasks under the My Tasks view.

Note
A padlock icon is visible on your private tasks to quickly identify them among your project tasks.
On this page
Get Help
Contact Support Ask the Odoo Community
![]()
EN
Odoo 18
Studio
Studio is a toolbox used to customize Odoo without coding knowledge. For example, in any app, add or modify:
Learn how to build an app from scratch.
To access Studio, navigate to the app and model you want to modify, then click the (Toggle Studio) icon, or vice versa.
To close Studio, click Close in the upper-right corner.
See also
Get Help
Contact Support Ask the Odoo Community
![]()
EN
Odoo 18
Fields and widgets
Fields structure the models of a database. If you picture a model as a table or spreadsheet, fields are the columns where data is stored in the records (i.e., the rows). Fields also define the type of data that is stored within them. How the data is presented and formatted on the UI is defined by their widget.
From a technical point of view, there are 15 field types in Odoo. However, you can choose from 20 fields in Studio, as some field types are available more than once with a different default widget.
Tip
New Fields can only be added to the Form and List views. On other views, you can only add Existing Fields (fields already on the model).
Simple fields
Simple fields contain basic values, such as text, numbers, files, etc.
Note
Non-default widgets, when available, are presented as bullet points below.
Text (char)
The Text field is used for short text containing any character. One text line is displayed when filling out the field.
- Badge: displays the value inside a rounded shape, similar to a tag. The value cannot be edited on the UI, but a default value can be set.
- Copy to Clipboard: users can copy the value by clicking a button.
- E-mail: the value becomes a clickable mailto link.
- Image: displays an image using a URL. The value cannot be edited manually, but a default value can be set.
Note
This works differently than selecting the Image field directly, as the image is not stored in Odoo when using a Text field with the Image widget. For example, it can be useful if you want to save disk space. - Phone: the value becomes a clickable tel link.
Tip
Tick Enable SMS to add an option to send an SMS directly from Odoo next to the field. - URL: the value becomes a clickable URL.
Example
Multiline Text (text)
The Multiline Text field is used for longer text containing any type of character. Two text lines are displayed on the UI when filling out the field.
- Copy to Clipboard: users can copy the value by clicking a button.
Example
Integer (integer)
The Integer field is used for all integer numbers (positive, negative, or zero, without a decimal).
- Percentage Pie: displays the value inside a percentage circle, usually for a computed value. The value cannot be edited on the UI, but a default value can be set.
- Progress Bar: displays the value next to a percentage bar, usually for a computed value. The field cannot be edited manually, but a default value can be set.
- Handle: displays a drag handle icon to order records manually in List view.
Example
Decimal (float)
The Decimal field is used for all decimal numbers (positive, negative, or zero, with a decimal).
Note
Decimal numbers are displayed with two decimals after the decimal point on the UI, but they are stored in the database with more precision.
- Monetary: it is similar to using the Monetary field. It is recommended to use the later as it offers more functionalities.
- Percentage: displays a percent character % after the value.
- Percentage Pie: displays the value inside a percentage circle, usually for a computed value. The field cannot be edited manually, but a default value can be set.
- Progress Bar: displays the value next to a percentage bar, usually for a computed value. The field cannot be edited manually, but a default value can be set.
- Time: the value must follow the hh:mm format, with a maximum of 59 minutes.
Example

Monetary (monetary)
The Monetary field is used for all monetary values.
Note
When you first add a Monetary field, you are prompted to add a Currency field if none exists already on the model. Odoo offers to add the Currency field for you. Once it is added, add the Monetary field again.
Example
Html (html)
The Html field is used to add text that can be edited using the Odoo HTML editor.
- Multiline Text: disables the Odoo HTML editor to allow editing raw HTML.
Example
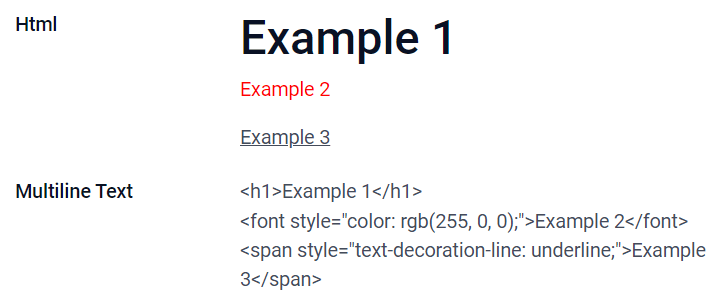
Date (date)
The Date field is used to select a date on a calendar.
- Remaining Days: the remaining number of days before the selected date is displayed (e.g., In 5 days), based on the current date.
Example
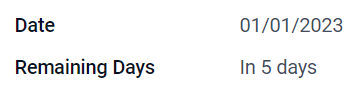
Date & Time (datetime)
The Date & Time field is used to select a date on a calendar and a time on a clock. The user’s current time is automatically used if no time is set.
- Date: used to record the time without displaying it on the UI.
- Remaining days: displays the remaining number of days before the selected date (e.g., In 5 days), based on the current date and time.
Example
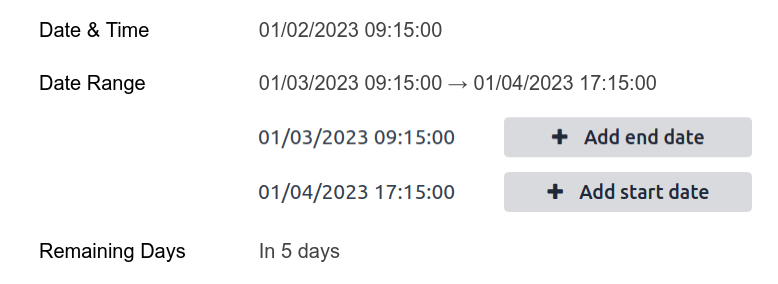
Checkbox (boolean)
The Checkbox field is used when a value should only be true or false, indicated by checking or unchecking a checkbox.
- Button: displays a radio button. The widget works without switching to the edit mode.
- Toggle: displays a toggle button. The widget works without switching to the edit mode.
Example
Selection (selection)
The Selection field is used when users should select a single value from a group of predefined values.
- Badge: displays the value inside a rounded shape, similar to a tag. The value cannot be edited on the UI, but a default value can be set.
- Badges: displays all selectable values simultaneously inside rectangular shapes, organized horizontally.
- Priority: displays star symbols instead of values, which can be used to indicate an importance or satisfaction level, for example. This has the same effect as selecting the Priority field, although, for the latter, four priority values are already predefined.
- Radio: displays all selectable values at the same time as radio buttons.
Tip
By default, radio buttons are organized vertically. Tick display horizontally to switch the way they are displayed.
Example
Priority (selection)
The Priority field is used to display a three-star rating system, which can be used to indicate importance or satisfaction level. This field type is a Selection field with the Priority widget selected by default and four priority values predefined. Consequently, the Badge, Badges, Radio, and Selection widgets have the same effects as described under Selection.
Tip
To change the number of available stars by adding or removing values, click Edit Values. Note that the first value is equal to 0 stars (i.e., when no selection is made), so having four values results in a three-star rating system, for example.
Example

File (binary)
The File field is used to upload any type of file, or sign a form (Sign widget).
- Image: users can upload an image file, which is then displayed in Form view. This has the same effect as using the Image field.
- PDF Viewer: users can upload a PDF file, which can be then browsed from the Form view.
- Sign: users can electronically sign the form. This has the same effect as selecting the Sign field.
Example
Image (binary)
The Image field is used to upload an image and display it in Form view. This field type is a File field with the Image widget selected by default. Consequently, the File, PDF Viewer, and Sign widgets have the same effects as described under File.
Tip
To change the display size of uploaded images, select Small, Medium, or Large under the Size option.
Sign (binary)
The Sign field is used to sign the form electronically. This field type is a File field with the Sign widget selected by default. Consequently, the File, Image, and PDF Viewer widgets have the same effects as described under File.
Tip
To give users the Auto option when having to draw their signature, select one of the available Auto-complete with fields (Text, Many2One, and Related Field on the model only). The signature is automatically generated using the data from the selected field.
Relational fields
Relational fields are used to link and display the data from records on another model.
Note
Non-default widgets, when available, are presented as bullet points below.
Many2One (many2one)
The Many2One field is used to link another record (from another model) to the record being edited. The record’s name from the other model is then displayed on the record being edited.
Example
On the Sales Order model, the Customer field is a Many2One field pointing at the Contact model. This allows many sales orders to be linked to one contact (customer).
Tip
- To prevent users from creating a new record in the linked model, tick Disable creation.
- To prevent users from opening records in a pop-up window, tick Disable opening.
- To help users only select the right record, click on Domain to create a filter.
- Badge: displays the value inside a rounded shape, similar to a tag. The value cannot be edited on the UI.
- Radio: displays all selectable values at the same time as radio buttons.
One2Many (one2many)
The One2Many field is used to display the existing relations between a record on the current model and multiple records from another model.
Example
You could add a One2Many field on the Contact model to look at one customer’s many sales orders.
Note
To use a One2Many field, the two models must have been linked already using a Many2One field. One2Many relations do not exist independently: a reverse-search of existing Many2One relations is performed.
Lines (one2many)
The Lines field is used to create a table with rows and columns (e.g., the lines of products on a sales order).
Tip
To modify the columns, click on the Lines field and then Edit List View. To edit the form that pops up when a user clicks on Add a line, click on Edit Form View instead.
Example
Many2Many (many2many)
The Many2Many field is used to link multiple records from another model to multiple records on the current model. Many2Many fields can use Disable creation, Disable opening, Domain, just like Many2One fields.
Example
On the Task model, the Assignees field is a Many2Many field pointing at the Contact model. This allows a single user to be assigned to many tasks and many users to be assigned to a single task.

- Checkboxes: users can select several values using checkboxes.
- Tags: users can select several values appearing in rounded shapes, also known as tags. This has the same effect as selecting the Tags field.
Tags (many2many)
The Tags field is used to display several values from another model appearing in rounded shapes, also known as tags. This field type is a Many2Many field with the Tags widget selected by default. Consequently, the Checkboxes and Many2Many widgets have the same effects as described under Many2Many.
Tip
To display tags with different background colors, tick Use colors.
Example

Related Field (related)
A Related Field is not a relational field per se; no relationship is created between models. It uses an existing relationship to fetch and display information from another record.
Example
To display the email address of a customer on the Sales Order model, use the Related Field partner_id.email by selecting Customer and then Email.
Properties
- Invisible: When it is not necessary for users to view a field on the UI, tick Invisible. It helps clear the UI by only showing the essential fields depending on a specific situation.
Example
On the Form view of the Contact model, the Title field only appears when Individual is selected, as that field would not be helpful for a Company contact.
Note
The Invisible attribute also applies to Studio. To view hidden fields inside Studio, click on a view’s View tab and tick Show Invisible Elements. - Required: If a field should always be completed by the user before being able to proceed, tick Required.
- Read only: If users should not be able to modify a field, tick Read only.
Note
You can choose to apply these three properties only for specific records by clicking on Conditional and creating a filter. - Label: The Label is the field’s name on the UI.
Note
This is not the same name as used in the PostgreSQL database. To view and change the latter, activate the Developer mode, and edit the Technical Name. - Help Tooltip: To explain the purpose of a field, write a description under Help Tooltip. It is displayed inside a tooltip box when hovering with your mouse over the field’s label.
- Placeholder: To provide an example of how a field should be completed, write it under Placeholder. It appears in light gray as a placeholder until a value is entered.
- Widget: To change the default appearance or functionality of a field, select one of the available widgets.
- Default value: To add a default value to a field when a record is created, use Default value.
- Limit visibility to groups: To limit which users can see the field, select a user access group.
On this page
Get Help
Contact Support Ask the Odoo Community
![]()
EN
Odoo 18
Views
Views are the interface that allows displaying the data contained in a model. One model can have several views, which are simply different ways to show the same data. In Studio, views are organized into four categories: general, multiple records, timeline, and reporting.
Tip
- To change the default view of a model, access Studio, go to Views, click the (ellipsis) icon next to the desired view, and click Set as Default.
- You can modify views using the built-in XML editor: Activate the Developer mode, go to the view you want to edit, select the View tab, and click </> XML.
Important
If you are editing a view using the XML editor, avoid making changes directly to standard and inherited views, as these would be reset and lost during updates or module upgrades. Always make sure you select the right Studio inherited views: When you modify a view in Studio by dragging and dropping a new field, for example, a specific Studio inherited view and its corresponding XPath, which defines the modified part of the view, are automatically generated.
General views
Note
The settings described below are found under the view’s View tab unless specified otherwise.
Form
The Form view is used when creating and editing records, such as contacts, sales orders, products, etc.
- To structure a form, drag and drop the Tabs and Columns element found under the + Add tab.
- To prevent users from creating, editing, or deleting records, untick Can Create, Can Edit, or Can Delete.
- To add a button, click Add a button at the top of the form, enter a Label, and select the button’s action:
- Run a Server Action: select the server action to be executed from the dropdown list;
- Call a method: specify an existing Python method already defined in Odoo.
- To change a button’s label or style, click the button and edit its Label or Class (either btn-primary or btn-secondary) in the Properties tab.
- To add a smart button, click the (plus) icon in the top-right corner of the form. Enter a Label, choose an Icon, and select a related field.
Example
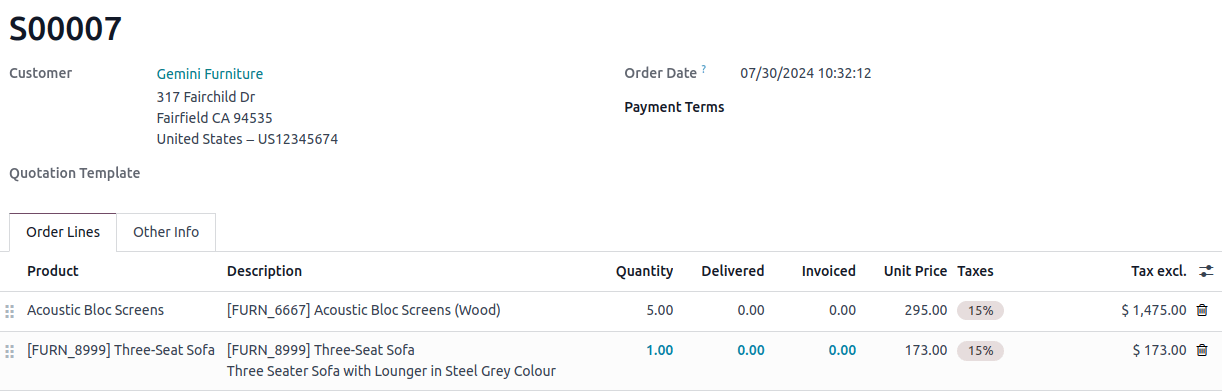
Activity
The Activity view is used to schedule and have an overview of activities (emails, calls, etc.) linked to records.
Note
This view can only be modified within Studio by editing the XML code.
Example
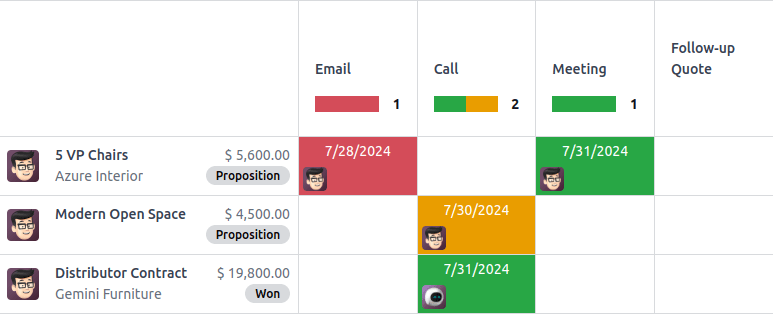
Search
The Search view is added on top of other views to filter, group, and search records.
- To add custom Filters and structure them using Separators, go to the + Add tab and drag and drop them under Filters.
- To add an existing field under the search dropdown menu, go to the + Add tab and drag and drop it under Autocompletion Fields.
Example
Multiple records views
Note
The settings described below are found under the view’s View tab unless specified otherwise.
Kanban
The Kanban view is often used to support business flows by moving records across stages or as an alternative way to display records inside cards.
Note
If the Kanban view exists, it is used by default to display data on mobile devices instead of the List view.
- To prevent users from creating new records, untick Can Create.
- To create records directly within the view, in a minimalistic form, enable Quick Create.
- To set a default grouping for records, select a field under Default Group By.
Example
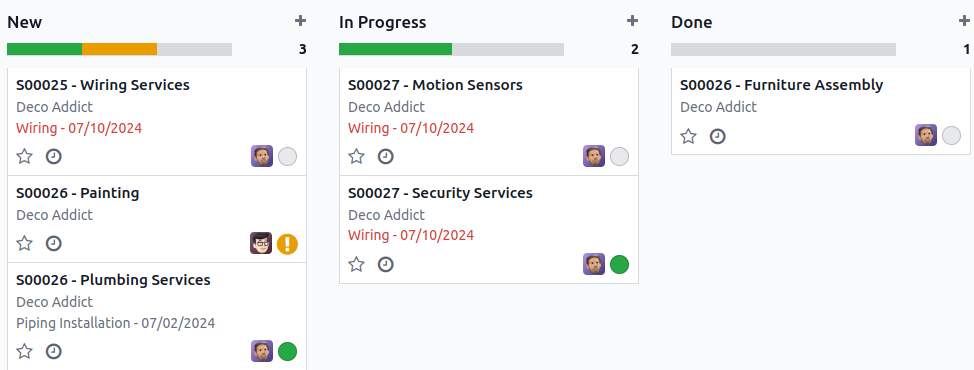
List
The List view is used to overview many records at once, look for records, and edit simple records.
- To prevent users from creating, editing, or deleting records, untick Can Create, Can Edit, or Can Delete.
- To create and edit records directly within the view, select either Add record at the bottom, Add record on top or Open form view under When Creating Record.
Note
This prevents users from opening records in Form view from the List view. - To edit several records at once, tick Enable Mass Editing.
- To change the way records are sorted by default, select a field under Sort By.
- To set a default grouping for records, select a field under Default Group By.
- To add a button, click Add a button at the top of the list, enter a Label, and select the button’s action:
- Run a Server Action: select the server action to be executed from the dropdown list;
- Call a method: specify an existing Python method already defined in Odoo.
Tip
To add a (drag handle) icon to reorder records manually, add an Integer field with the Handle widget.
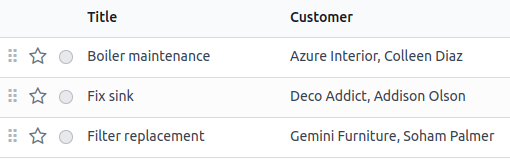
Example
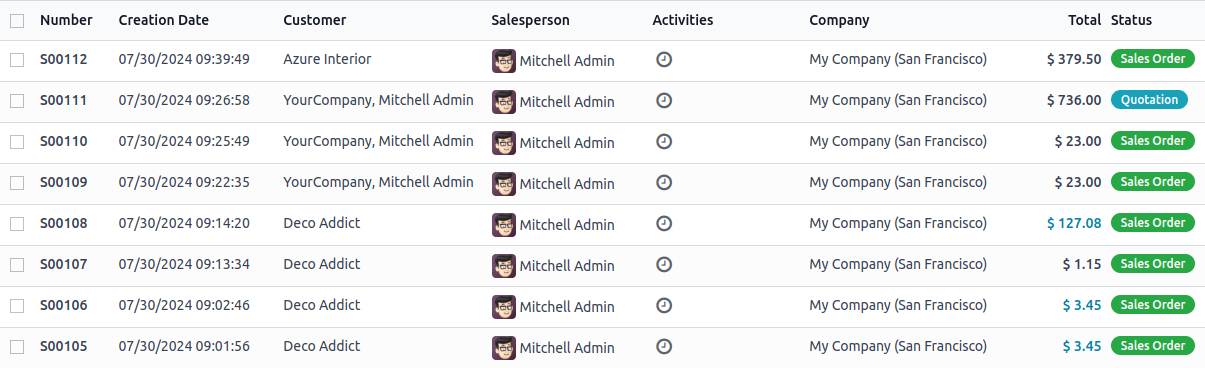
Map
The Map view is used to display records on a map. For example, it is used in the Field Service app to plan an itinerary between different tasks.
Note
A Many2One field linked to the Contact model is required to activate the view, as the contact address is used to position records on the map.
- To select which kind of contact should be used on the map, select it under Contact Field.
- To hide the name or the address of the record, tick Hide Name or Hide Address.
- To add information from other fields, select them under Additional Fields.
- To have a route suggested between the different records, tick Enable Routing and select which field should be used to sort records for the routing.
Example
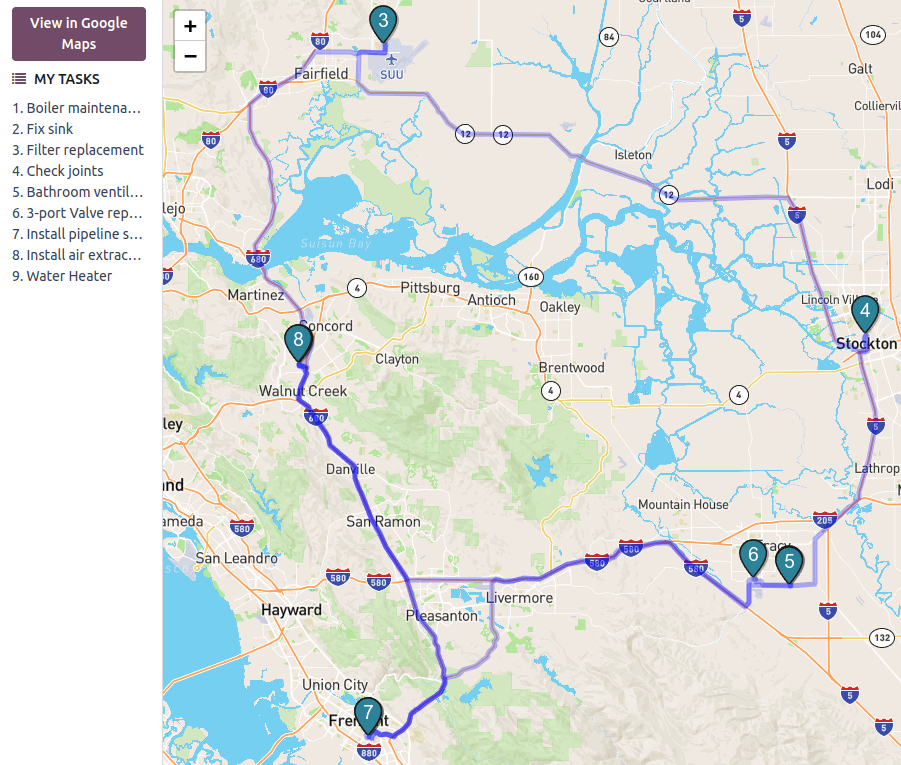
Timeline views
Note
- When you first activate one of the timeline views, you need to select which Date or Date & Time fields on your model should be used to define when the records start and stop in order to display them on the view. You can modify the Start Date Field and Stop Date Field after activating the view.
- The settings described below are found under the view’s View tab unless specified otherwise.
Calendar
The Calendar view is used to overview and manage records inside a calendar.
- To create records directly within the view instead of opening the Form view, enable Quick Create.
Note
This only works on specific models that can be quick-created using only a name. However, most models do not support quick creation and open the Form view to fill in the required fields. - To color records on the calendar, select a field under Color. All the records sharing the same value for that field are displayed using the same color.
Note
As the number of colors is limited, the same color can end up being assigned to different values. - To display events lasting the whole day at the top of the calendar, select a Checkbox field that specifies if the event lasts the whole day.
- To choose the default time scale used to display events, select Day, Week, Month, or Year under Default Display Mode.
Note
You can also use a Delay Field to display the duration of the event in hours by selecting a Decimal or Integer field on the model which specifies the duration of the event. However, if you set an End Date Field, the Delay Field will not be taken into account.
Example
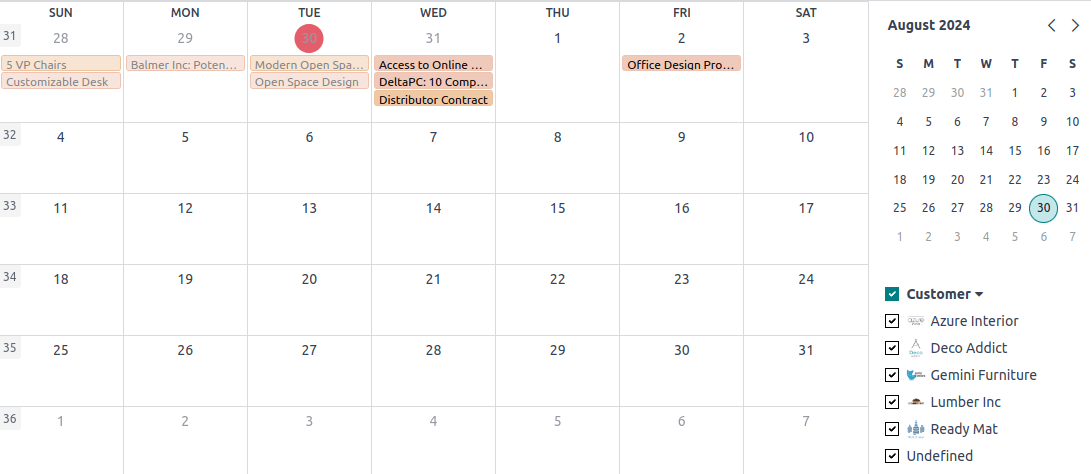
Cohort
The Cohort view is used to examine the life cycle of records over a time period. For example, it is used in the Subscriptions app to view the subscriptions’ retention rate.
- To display a measure (i.e., the aggregated value of a given field) by default on the view, select a Measure Field.
- To choose which time interval is used by default to group results, select Day, Week, Month, or Year under Interval.
- To change the cohort Mode, select either Retention the percentage of records staying over a period of time, it starts at 100% and decreases with time or Churn the percentage of records moving out over a period of time - it starts at 0% and increases with time.
- To change the way the Timeline (i.e., the columns) progresses, select either Forward (from 0 to +15) or Backward (from -15 to 0). For most purposes, the Forward timeline is used.
Example
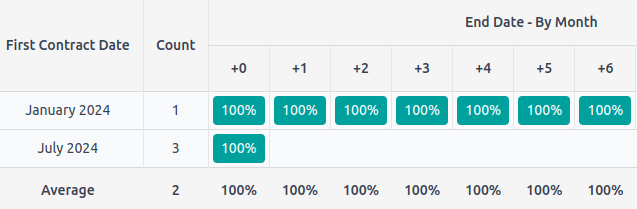
Gantt
The Gantt view is used to forecast and examine the overall progress of records. Records are represented by a bar under a time scale.
- To prevent users from creating or editing records, untick Can Create or Can Edit.
- To fill cells in gray whenever a record should not be created there (e.g., on weekends for employees), tick Display Unavailability.
Note
The underlying model must support this feature, and support for it cannot be added using Studio. It is supported for the Project, Time Off, Planning, and Manufacturing apps. - To show a total row at the bottom, tick Display Total row.
- To collapse multiple records in a single row, tick Collapse First Level.
- To choose which way records are grouped by default on rows (e.g., per employee or project), select a field under Default Group by.
- To define a default time scale to view records, select Day, Week, Month, or Year under Default Scale.
- To color records on the view, select a field under Color. All the records sharing the same value for that field are displayed using the same color.
Note
As the number of colors is limited, the same color can be assigned to different values. - To specify with which degree of precision each time scale should be divided by, select Quarter Hour, Half Hour, or Hour under Day Precision, Half Day or Day under Week Precision, and Month Precision.
Example
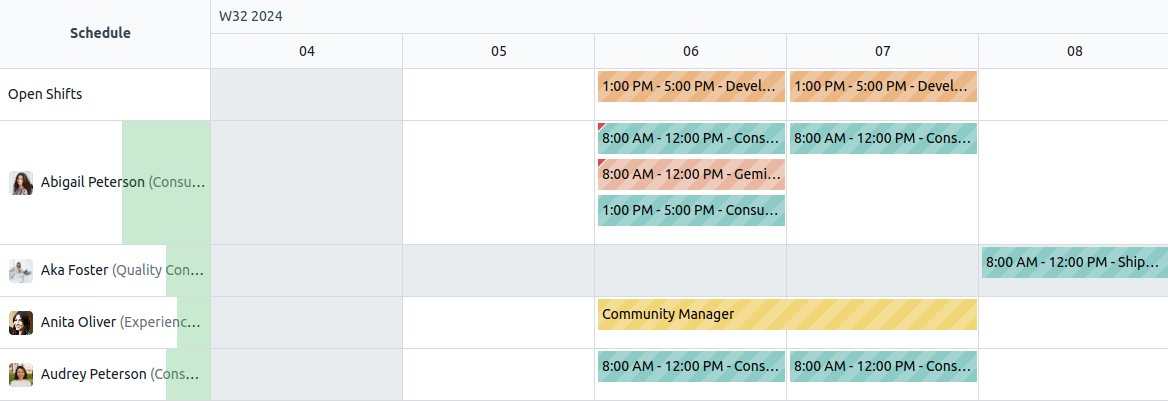
Reporting views
Note
The settings described below are found under the view’s View tab unless specified otherwise.
Pivot
The Pivot view is used to explore and analyze the data contained in records in an interactive manner. It is especially useful to aggregate numeric data, create categories, and drill down the data by expanding and collapsing different levels of data.
- To access all records whose data is aggregated under a cell, tick Access records from cell.
- To divide the data into different categories, select field(s) under Column grouping, Row grouping - First level, or Row grouping - Second level.
- To add different types of data to be measured using the view, select a field under Measures.
- To display a count of records that made up the aggregated data in a cell, tick Display count.
Example
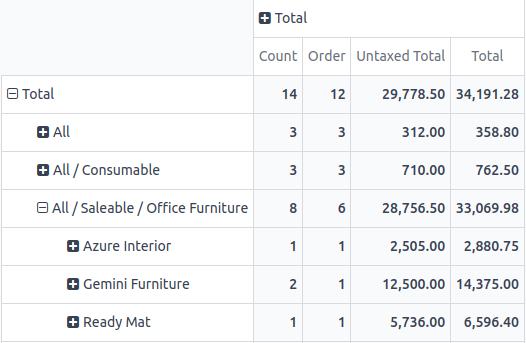
Graph
The Graph view is used to showcase data from records in a bar, line, or pie chart.
- To change the default chart, select Bar, Line, or Pie under Type.
- To choose a default data dimension (category), select a field under First dimension and, if needed, another under Second dimension.
- To select a default type of data to be measured using the view, select a field under Measure.
- For Bar and Line charts only: To sort the different data categories by their value, select Ascending (from lowest to highest value) or Descending (from highest to lowest) under Sorting.
- For Bar and Pie charts only: To access all records whose data is aggregated under a data category on the chart, tick Access records from graph.
- For Bar charts only: When using two data dimensions (categories), display the two columns on top of each other by default by ticking Stacked graph.
Example
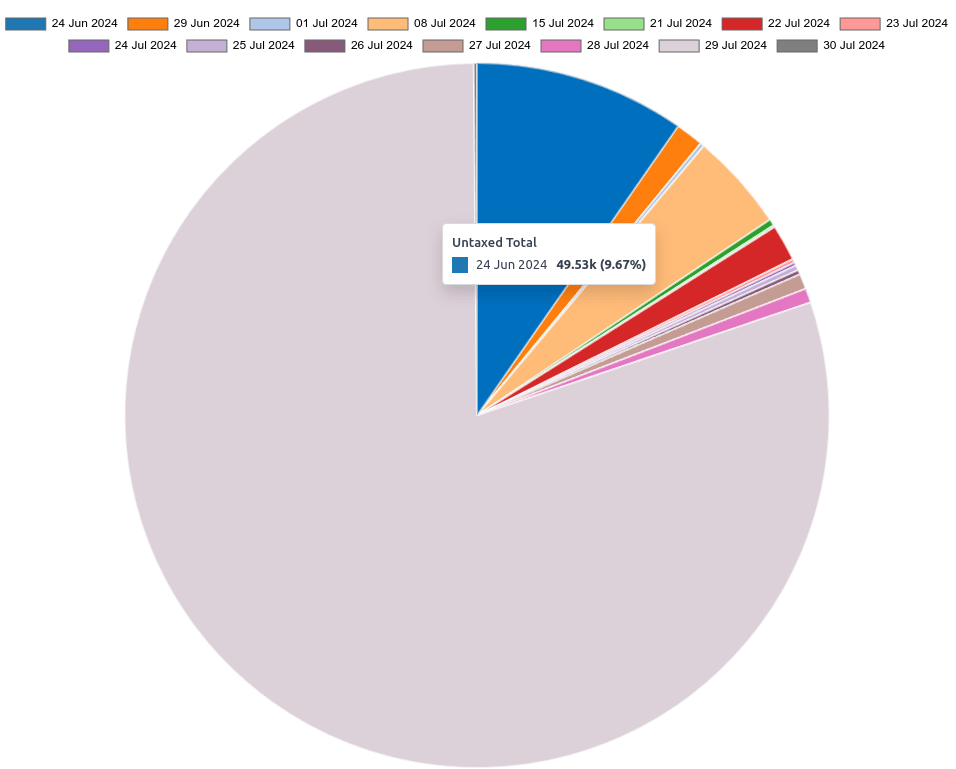
On this page
Get Help
Contact Support Ask the Odoo Community
![]()
EN
Odoo 18
Models, modules, and apps
Models determine the logical structure of a database and how data is stored, organized, and manipulated. In other words, a model is a table of information that can be linked with other tables. A model usually represents a business concept, such as a sales order, contact, or product.
Modules and apps contain various elements, such as models, views, data files, web controllers, and static web data.
Note
All apps are modules. Larger, standalone modules are typically referred to as apps, whereas other modules usually serve as add-ons to said apps.
Suggested features
When you create a new model or app with Studio, you can choose to add up to 14 features to speed up the creation process. These features bundle fields, default settings, and views that are usually used together to provide some standard functionality. Most of these features can be added later on, but adding them from the start makes the model creation process much easier. Furthermore, these features interact together in some cases to increase their usefulness.
Example
Creating a model with the Picture and Pipeline stages features enabled adds the image in the card layout of the Kanban view.
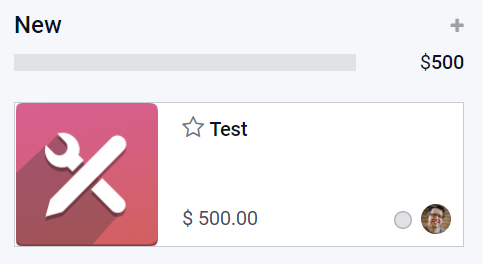
Contact details
Selecting Contact details adds to the Form view a Many2One field linked to the Contact model and two of its Related Fields: Phone and Email. The Contact field is also added to the List view, and the Map view is activated.
Example
User assignment
Selecting User assignment adds to the Form view a Many2One field linked to the Contact model, with the following Domain: Share User is not set to only allow the selection of Internal Users. In addition, the many2one_avatar_user widget is used to display the user’s avatar. The Responsible field is also added to the List view.
Example

Date & Calendar
Selecting Date & Calendar adds to the Form view a Date field and activates the Calendar view.
Date range & Gantt
Selecting Date range & Gantt adds to the Form view two Date fields next to each other: one to set a start date, the other to set an end date, using the daterange widget, and activates the Gantt view.
Pipeline stages
Selecting Pipeline stages activates the Kanban view, adds several fields such as Priority and Kanban State, and three stages: New, In Progress, and Done. The Pipeline status bar and the Kanban State field are added to the Form view. The Color field is added to the List view.
Note
The Pipeline stages feature can be added at a later stage.
Tags
Selecting Tags adds to the Form and List views a Tags field, creating a Tag model with preconfigured access rights in the process.
Picture
Selecting Picture adds to the top-right of the Form view an Image field.
Note
The Picture feature can be added at a later stage.
Lines
Selecting Lines: adds to the Form view a Lines field inside a Tab component.
Notes
Selecting Notes adds to the Form view an Html field using the full width of the form.
Monetary value
Selecting Monetary value adds to the Form and List views a Monetary field. The Graph and Pivot views are also activated.
Note
A Currency field is added and hidden from the view.
Company
Selecting Company adds to the Form and List views a Many2One field linked to the Company model.
Note
This is only useful if you work in a multi-company environment.
Custom Sorting
Selecting Custom Sorting adds to the List view a drag handle icon to manually reorder records.
Example
Chatter
Selecting Chatter adds to the Form view Chatter functionalities (sending messages, logging notes, and scheduling activities).
Note
The Chatter feature can be added at a later stage.
Example
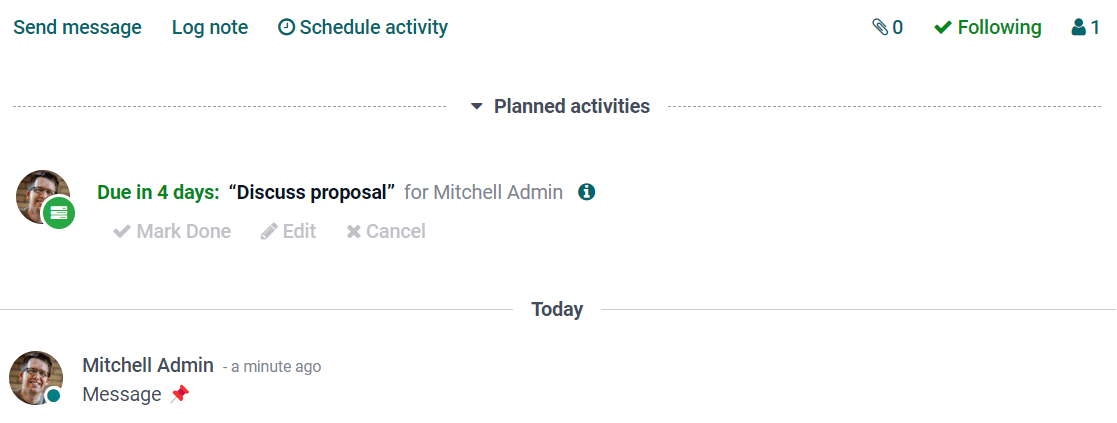
Archiving
Selecting Archiving adds to the Form and List views the Archive action and hides archived records from searches and views by default.
Export and import customizations
When you do any customization with Studio, a new module named studio_customization is added to your database. You can export this module as a ZIP file using the Studio Export function. The module can then be imported into another Odoo database. This may be useful, for example, when setting up a new module or for training purposes.
Note
Exporting and importing customizations in this way, rather than using the standard Odoo export and import functions, means data is imported in a logical way. For example, if the module contains customers and sales orders, the customers are created first, since these are required for the sales orders to be created.
Export customizations
To export customizations, click the (Toggle Studio) button on the main Odoo dashboard, then Export, then either:
- download all Studio customizations by clicking the Export button; or
- choose what data to export by clicking Configure data and demo data to export.
Configure data to export
To select specific models to export, click New on the Studio Export screen, then start typing the name of the relevant model or select it from the list.
Tip
Click Preset to see a list of all models in your database with records that have been modified using Studio and all custom models created using Studio. To configure one of these models for export, click on the model to open it and make the required changes.
Tick the following options as relevant:
- Demo: if the exported records should be considered as demo data when imported.
- Attachments: if attachments related to exported records should be included in the export.
- Updatable: if the exported records should be able to be updated during a module update.
If necessary, edit the Domain to determine which of the model’s records should be exported. To do so, click the Edit Domain button or (Modify filter) then Edit Domain, as appropriate. Proceed to make any required changes.
After configuring a model for export, click Studio Export to return to the main screen. To download a ZIP file with the customizations for all the listed models, click Export.
Note
It is not necessary to select one or more models as all listed models will be included in the export. To remove a model from the export, select it and click the Actions button then Delete.
In the Studio Export window:
- leave the checkboxes unticked to export only the customizations done with Studio.
- tick Include Data to include data from the selected models in the export.
- tick Include Demo Data to include data from the selected models that is flagged as demo data. Ticking this option also ticks Include Data.
Click the Export button to download the ZIP file.

Import customizations
Warning
Before importing, make sure the destination database is on the same Odoo version and contains the same apps and modules as the source database. Studio does not add the underlying modules as dependencies of the exported module.
To import and install Studio customizations in another Odoo database:
- Connect to the destination database.
- Click the (Toggle Studio) button on the main Odoo dashboard, then Import.
- Upload the exported ZIP file. If demo data should be imported, tick Load demo data.
- Click Install.
On this page
Get Help
Contact Support Ask the Odoo Community
![]()
EN
Odoo 18
Webhooks
Warning
It is highly recommended to consult with a developer, solution architect, or another technical role when deciding to use webhooks and throughout the implementation process. If not properly configured, webhooks may disrupt the Odoo database and can take time to revert.
Webhooks, which can be created in Studio, are automation rules triggered by external events via user-defined HTTP callbacks. When an external system sends data to an Odoo webhook’s URL (the “trigger”) with a data file (the “payload”), Odoo responds with a predefined action in the database.
Unlike scheduled actions or manual API calls, webhooks enable real-time communication and automation. For example, if a sales order is confirmed in an external POS system, a webhook can instantly update Odoo’s inventory, ensuring system synchronization.
Note
This article covers creating a webhook that takes in data from an external source. However, an automated action that sends an API call to an external webhook can also be created.
Create a webhook in Studio
Webhooks are configured in Studio, and their setup is split between their trigger and their actions.
Tip
- Setting up a webhook in Odoo requires no coding when connecting Odoo databases, but testing requires an external tool like Postman. Custom target records or actions may require programming skills.
- Activate developer mode to modify the model targeted by the webhook (e.g., sales orders or contact information) and to find the model’s technical name (which may be required for proper payload configuration).
Set the webhook’s trigger
To create a webhook with Studio, open Studio, click Webhooks, then New. From here, name the webhook, modify the webhook’s model (the kind of database entry to be targeted) if needed, and toggle whether calls made to the webhook URL should be logged (which would track the webhook’s call history for troubleshooting).
The webhook’s URL is automatically generated. This is the URL that should be used for testing the webhook and connecting it to the external system that will send updates to the database.
Danger
The webhook’s URL is confidential and should be treated with care. Sharing it online or without caution can provide unintended access to the Odoo database. Click Rotate Secret to change the URL if needed.
Finally, if the system sending the webhook is not Odoo, adjust the Target Record actions to look for the JSON record that is included in the API call’s payload when the call is made to the webhook’s URL. If the system sending the webhook is an Odoo database, then make sure that the id and model appear in the payload.
Tip
Although the Model is set in Odoo, it is the model’s technical name that must be included in the payload. Hover over the model name, then click the (Internal link) icon to find this technical name in the Model field. For example, a sales order webhook uses the Sales Order model, but the technical name sale.order is used in the payload.
Note
When creating a record in the Odoo database, the target record’s default format should not be used. Instead, use model.browse(i) or model.search(i).
Set the webhook’s action
To set a webhook’s action while configuring a webhook, click Add an action under the Actions To Do tab. Click the action’s Type and set the fields as needed.
Test the webhook
Note
Testing the webhook requires the webhook to be set up, a test payload to send to the webhook, and an external tool or system to send the payload through a POST API request. Consider using a tool like Postman so less technical skills are required.
If a message saying 200 OK or status: ok gets returned during testing, then the webhook is functioning properly on Odoo’s side. From here, implementation can begin with the other tool to automatically send those webhook calls into Odoo using the webhook’s URL.
If any other responses are returned, the number sent in the response helps to identify the problem. For example, a 500 Internal Server Error means that Odoo could not interpret the call properly. If this gets returned, ensure the fields found in the JSON file are properly mapped in the webhook’s configuration and in the system sending the test call. Turning on call logging in the webhook’s configuration provides error logs if the webhook is not functioning as intended.
Implement the webhook
Once the webhook is fully configured, begin connecting it to the system that sends data to the Odoo database through this webhook. Make sure that the API calls are sent to the webhook’s URL when setting that system up.
Webhook use cases
Below are two examples of how to use webhooks in Odoo. These webhooks require external tools (which are listed with the example).
Warning
Consult with a developer, solution architect, or another technical role when deciding to implement webhooks. If not properly configured, webhooks may disrupt the Odoo database and can take time to revert.
Update a sales order’s currency
This webhook updates a sales order in the Sales app to USD. It useful for subsidiaries outside the United States with a mother company located inside the United States or during mergers when consolidating data into one Odoo database.
Set the webhook’s trigger
To set up this webhook, open the Sales app. Then, set the trigger so the Model is set to Sales Order. Also, set the Target Record to model.env[payload.get('model')].browse(int(payload.get('id'))). This is broken down below.
- model: what gets updated in Odoo (in this case, sales orders). This matches the Model set earlier.
- env: where the action takes place. In this case, it is Odoo.
- payload: what is sent to the webhook’s URL. This contains the information that updates the sales order.
- get(‘model’): tells the webhook what database record to look at. In this case, the webhook retrieves (get) the data tied to a specific model. In this example, this is the Sales Order model.
- browse: tells the webhook to look in the model (Sales Order) set by the payload for what to update.
- int: turns the target into an integer (a whole number). This is important in case some words (a string) or a decimal number is included in the payload’s target record.
- get(‘id’): identifies the sales order number that is being updated in Odoo.
Set the webhook’s action
After setting the trigger, set the webhook’s action by clicking Add an action. For the Type, click Update Record. Then, select Update, choose the field Currency, and select USD to have the currency field updated to USD. Finally, click Save & Close.
Webhook setup summary
To summarize what is set up, the webhook targets sales orders, identified by their sales order number, and updates their currency to USD when a POST request is sent to the webhook’s URL that includes that sales order number (which is identified by the payload’s id record).
Test the webhook
Test the webhook’s setup to make sure everything is correct. This process uses a tool called Postman to send the simulated trigger.
This section walks through the steps to test this webhook in Postman, but does not offer help if there’s an issue within that tool. To get specific help with Postman, contact their support team.
Once Postman is open, create a new HTTP request and set its method to POST. Next, copy the webhook’s URL that is being tested and paste it into the URL field in Postman. After that, click the Body tab and select the raw option. Set the file type to JSON, then copy this code and paste it into the file.
{
    "model": "sale.order",
    "id": "SALES ORDER NUMBER"
}
From here, choose a sales order to test the webhook on. If it is not possible to test in a live Odoo database, consider creating a demo database with a sample sales order and the webhook that was configured. Replace SALES ORDER NUMBER with the sales order’s number without the S or any zeros before the number. For example, a sales order with the number S00007 should be entered as 7 in Postman. Finally, click Send in Postman.
If a message saying 200 OK or status: ok gets returned, then the webhook is functioning properly on Odoo’s side. The test sales order’s currency is updated. From here, implementation can begin with the other tool to automatically send those webhook calls into Odoo using the webhook’s URL.
If any other responses are returned, the number associated with them helps to identify the problem. For example, a 500 Internal Server Error means that Odoo could not interpret the call properly. If this gets returned, ensure the model and id fields are properly mapped in the webhook’s configuration and in Postman.
Create a new contact
This webhook uses custom code to create a new contact in an Odoo database. This could be helpful for automatically creating new vendors or customers.
Set the webhook’s trigger
To set up this webhook, open the Contacts app. Then, set the trigger so the Model is set to Contact. Also, set the Target Record to model.browse([2]). This is broken down below.
- model: what gets updated in Odoo (in this case, a contact). This matches the Model set earlier.
- browse: tells the webhook to look in the model (the contacts) set by the payload for what to create.
Set the webhook’s action
After setting the trigger, set the webhook’s action by clicking Add an action. For the Type, click Execute Code, then set the code to the sample code below. Finally, click Save & Close.
# variables to retrieve and hold data from the payload
contact_name = payload.get('name')
contact_email = payload.get('email')
contact_phone = payload.get('phone')

# a Python function to turn the variables into a contact in Odoo
if contact_name and contact_email:
    new_partner = env['res.partner'].create({
        'name': contact_name,
        'email': contact_email,
        'phone': contact_phone,
        'company_type':'person',
        'customer_rank': 1,
    })
# an error message for missing required data in the payload
else:
    raise ValueError("Missing required fields: 'name' and 'email'")
Webhook setup summary
To summarize what is set up, the webhook creates a contact when an API call is sent to the webhook’s URL that includes the contact’s information.
Test the webhook
Test the webhook’s setup to make sure everything is correct. This process uses a tool called Postman to send the simulated trigger.
This section walks through the steps to test this webhook in Postman, but does not offer help if there’s an issue within that tool. To get specific help with Postman, contact their support team.
Once Postman is open, create a new request, and set its method to POST. Next, copy the webhook’s URL that is being tested and paste it into the URL field in Postman. After that, click the Body tab and click raw. Set the file type to JSON, then copy this code and paste it into the file.
{
    "name": "CONTACT NAME",
    "email": "CONTACTEMAIL@EMAIL.COM",
    "phone": "CONTACT PHONE NUMBER"
}
Replace the fields above with a new contact’s information in Postman, and then click Send.
If a message saying 200 OK or status: ok gets returned, then the webhook is functioning properly on Odoo’s side. The new test contact appears in the Contacts app. From here, implementation can begin with the other tool to automatically send those webhook calls into Odoo using the webhook’s URL.
If any other responses are returned, the number associated with them helps to identify the problem. For example, a 500 Internal Server Error means that Odoo could not interpret the call properly. If this gets returned, ensure the fields found in the JSON file are properly mapped in the webhook’s configuration and in Postman.
On this page
Get Help
Contact Support Ask the Odoo Community
![]()
EN
Odoo 18
PDF reports
With Studio, you can edit existing PDF reports (e.g., invoices, quotations, etc.) or create new ones.
Default layout
The default layout of reports is managed outside Studio. Go to Settings, then, in the Companies section of the main page, click Configure Document Layout. Layout settings are company-specific but apply to all reports.
Tip
You can see how the different settings affect the report layout in the report preview on the right side of the Configure your document layout window. When creating or editing a report, you can see a preview of the report by clicking Print preview on the left side of the screen.
Use the following settings:
- Layout: Seven layouts are available:
LightBoxedBoldStripedBubbleWaveFolder
- Background: The following backgrounds are available:
- Blank: Nothing is displayed.
- Demo logo: A demo logo is displayed in the background.
- Custom: Upload a custom background image.
- Text: Eight fonts are available: Lato, Roboto, Open Sans, Montserrat, Oswald, Raleway, Tajawal (which supports Arabic and Latin scripts), and Fira Mono. Go to the Google Fonts website to preview them.
- Company logo: Click the Edit button to upload or change the logo. This adds the logo to the company’s record on the Company model, which you can access by going to Settings and then clicking Update Info in the Companies section.
- Colors: Change the primary and secondary colors used to structure reports. The default colors are automatically generated based on the colors of the logo.
- Address: The company name and address are displayed in the header of external reports. You can add multiple lines of text.
- Tagline: This is displayed in the header of external reports using the Light, Striped, Bubble, Wave and Folder layouts and in the footer of external reports using the Boxed and Bold layouts. You can add multiple lines of text.
- Footer: This text is used in the footer of external reports. You can add multiple lines of text. You can also edit the footer using the report editor.
- Paper format: This defines the default paper size of reports. You can select A4 (21 cm x 29.7 cm) and US Letter (21.59 cm x 27.54 cm). This can also be defined for individual reports in the Paper format field in Studio.
Note
Other paper formats may be available depending on which apps or modules you have installed, for example, label sheets for the Inventory app or event badges for the Events app.
Creating new PDF reports
To create a new report for a model, (e.g., sales orders) access the model, click the (Toggle Studio) button, then click Reports. Click New and, in the popup window that opens, select the type of report. This is solely used to determine what is displayed in the header and footer:
- External:
- The header displays the company’s logo and its name and address. For reports using the Light, Striped, Bubble, Wave and Folder layouts, the tagline also appears in the header.
- The footer displays the values set in the Footer field and the page number. For reports using the Boxed and Bold layouts, the tagline also appears in the footer.
- Internal: The header displays the user’s current date and time, the company’s name and address and the page number. There is no footer.
- Blank: There is neither a header nor a footer. Click in the upper left corner of the page to edit the report.
Once you have created the report, you can start editing it.
Editing PDF reports
To access the reports available for a model, access the model, click the (Toggle Studio) button, then click Reports. Select an existing report to open it.
Alternatively, you can also open Studio, click Reports, and search for a specific report or model.
Important
It is strongly recommended to duplicate the standard report and make changes in the duplicated version. To duplicate a report, hover the mouse pointer on the top right corner of the report, click the (vertical ellipsis) icon, and then select Duplicate.
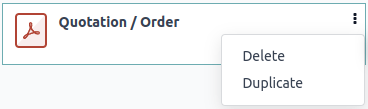
Options
Once you have selected or created a report, you can use the options in the left part of the screen to:
- Change the Report name: The new name is applied everywhere (in Studio, in the Print menu under the (gear) icon in the form view, and in the PDF file name).
- Modify the Paper format: If no value is selected, the format defined in the default layout is used.
- Show in print menu: to add the report to the Print menu in the form view.
- Reload from attachment: to save the report as an attachment on the record the first time it is generated and reload the original version of the report any subsequent time. This is legally required for invoices and is mainly used in this case.
- Limit visibility to groups: to limit the availability of the PDF report to specific user groups.
- Edit sources: to modify the report directly in the XML file.
- Reset report: to discard all changes made to the report and reset it to its standard version.
- Print preview: to generate and download a report preview.
Report editor
The report editor allows you to modify the content and formatting of the report.
Tip
- You can Undo or Redo changes using the related buttons or the shortcuts CTRL + Z and CTRL + Y.
- Changes are saved automatically when you leave the report or manually using the Save button.
- You can reset the report to its standard version by clicking the Reset report button in the left part of the screen.
Important
Editing the header and footer of a report impacts all standard and custom reports.
Conditional blocks
The dashed rectangles represent conditional blocks (if/else statements). These are used to show/hide content based on specific conditions. Click on the block to view the conditions.
Select a value to preview its corresponding output and edit it if necessary.

Note
Conditions can only be edited in the XML.
Other content
There are two types of text content in reports:
- Static text, i.e., the text that is not highlighted in blue, which can be modified directly in the editor.
- Dynamic text, i.e., the text that is highlighted in blue, which is replaced by field values when the report is generated, e.g., the sales order number or the quotation date.
You can add content (e.g., fields, lists, tables, images, banners, etc.) to the report using commands. Type / to open the powerbox, then type the command’s name or select it from the list.
To add static text to the report, type the text where you want it.
For more advanced changes, you can edit the report in the XML directly.
Add a field
To add a field, type / and select the Field command. In the list that opens, select or search for the field; click the right arrow next to the field name to access the list of related fields if needed. Then, specify the default value that will be shown if the field is not completed in the record and press Enter.
Add or edit a table
There are two types of tables in reports:
- Static tables, which are used to display static text or fields. For this type of table, you define the number of columns and rows when adding the table.
- Dynamic tables, which are used to display data from relational fields. For this type of table, you only define the number of columns when adding the table. The number of rows in the generated report will be determined by the number of records in the related model that are linked with the current model.
Example
In a sales order report, a dynamic table is used to show the order lines related to the sales order. If the sales order contains 10 order lines, the table in the generated report has 10 rows; if it contains two order lines, the table has two rows.
Add or edit a static table
To add a static table, type / and select the Table command. Determine the number of columns and rows for the table. Once the table has been added, you can start editing it.
You can insert, move and delete columns and rows using the table tools. Position the cursor on top of the column or to the left of the row then click the purple rectangle and select an option.

To resize a column, drag the column border to the desired position; reset all columns to their standard size by selecting Reset Size from the table tools.
Add the field of your choice in a cell or add static text by typing.
Tip
To add text in a structured way without using a table, you can use columns. Add columns by typing / and selecting the appropriate command: 2 columns, 3 columns or 4 columns.
Add or edit a dynamic table
Note
- Only relations of type one2many or many2many can be displayed as dynamic tables.
- An existing dynamic table in a standard report has a more complex structure than a dynamic table you add yourself. For such tables, it is possible to insert or delete columns; it is not possible to move columns or to insert, move or delete rows.
To add a dynamic table, type / and select the Dynamic Table command. In the list that opens, select or search for the relation the table will be based on and press Enter. Once the table has been added, you can start editing it.
You can insert, move and delete columns using the table tools, as for a static table. It is also possible to insert static rows that will appear above or below the generated rows.
To add a field to a cell, delete any placeholder text then add the field of your choice. The dialog box that opens shows the source object for the field (e.g., the Order Lines model) and the list of available fields.

Replace the Column name label by the label of your choice.
Note
The default row automatically iterates over the field’s content, generating a row on the report for each field value (e.g., one row per order line).
Formatting
To format text in the report, select it, then format it using the options in the text editor.

Editing the report’s XML
Warning
Modifying the XML directly may result in report issues during upgrades. If this happens, simply copy your changes from the old database into your upgraded database.
To edit the report’s XML, click Edit sources in the left pane.
Examples
Modify the widget of a field
Conditional blocks
Images
On this page
Get Help
Contact Support Ask the Odoo Community
![]()
EN
Odoo 18
Approval rules
Approval rules are used to automate approval processes for actions. They allow you to define the criteria for when an approval is required before an action can be performed using a button.
Configuration
To add approval rules with Studio, proceed as follows:
- Open Studio and switch to the required view.
- Select the button to which the rule should be applied.
- Click Add an approval step in the Properties tab.
- Specify which users are responsible for approving the action by using one of the following fields or both:
- Approvers to specify one or several users;
- Approver Group to specify one user group.
Note
An activity is created for all users set as Approvers when their approval is requested.
- (optional) Select the Users to Notify via an internal note when the action is approved or rejected.
- (optional) Add a Description to be displayed on the button.
Tip
You can specify under which condition(s) an approval step should be applied by clicking the (filter) icon next to the Approvers field.
To add another approval step, click Add an approval step. When there are multiple steps, you can:
- Enable Exclusive Approval on any step so that a user who approves a step cannot approve another step for the same record.
- Change the Approval Order of the steps by selecting a number, 1 being the first step, 2 the second step, and so on. A user responsible for a higher step can approve/reject previous step(s) unless Exclusive Approval is selected.
Click the (trash) icon next to the Approvers field to remove an approval step.
Tip
You can create user groups specifically for approvals.
Use
Once an approval rule has been defined for a button, a user avatar icon is displayed next to the button’s label for each approval step. Clicking an icon reveals the step(s).

Note
If an unauthorized user clicks the button, an error message is displayed and an activity is created for the users specified in the Approvers field, if any.
Authorized users can:
- Perform the action directly by clicking the button if it is the last/only approval step.
- Approve the action and let another user perform it - or move it to the next approval step - by clicking the user avatar icon next to the button’s label, then clicking the (approve).
- Reject the action by clicking the user avatar icon next to the button’s label and then the (reject) button.
- (only for users selected under the Approvers field) Delegate their approval rights to one or several users for all records by:
- Clicking the (kanban view) icon and then Delegate.
- Selecting one or several Approvers, Until when they will have approval rights (forever if left empty), and, optionally, the user(s) who should be notified via an internal note using the Notify to field.

Tip
- A user who approves/rejects an action can revoke their decision by clicking the user avatar icon next to the button’s label and then the (revoke) button. They can also revoke the decision of other users for steps with a lower Approval Order unless Exclusive Approval is enabled.
- Approvals are tracked in the record’s chatter. An approval entry is also created every time a Studio approval-related action is performed. To access approval entries, activate the developer mode and go to Settings ‣ Technical ‣ Studio Approval Entries.
On this page
Get Help
Contact Support Ask the Odoo Community
![]()
EN
Odoo 18
Apps and modules
Install, upgrade and uninstall any needed apps and modules from the Apps dashboard.
By default, an Apps filter is applied. To search for modules too, select Extra from the Filters.
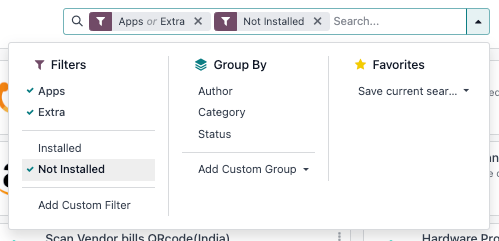
Warning
Adding or removing apps can significantly affect other apps in the database and modify subscription costs. Consider carefully or test the changes in a staging environment before proceeding.
- Administrators manage the database: The administrator of the database is responsible for its usage, as they know best how their organization works.
- Odoo apps can have dependencies: Installing some apps and features with dependencies may also install additional apps and modules that are technically required, even if database users do not actively use them.
- Duplicate the database to test apps: Testing on a duplicate database reveals what app dependencies may be required or what database may be erased. Learn how to duplicate an Odoo Online database or an Odoo On-premise database.
Install apps and modules
From the main Odoo dashboard, open the Apps app, then click on the search bar to find the app to be installed or scroll to find it. From here, click Activate on the app’s card.
Note
If the app or module to be installed is not listed, update the app list by activating developer mode, and then go to Apps ‣ Update Apps List, and then click Update.
Upgrade apps and modules
With each new Odoo release, new improvements or app features are added. Upgrade the app to use these new improvements and features.
Go to Apps and then on the app to upgrade, click the (vertical ellipsis) icon and select Upgrade.
Uninstall apps and modules
Danger
Uninstalling apps also deletes their database records. Test uninstalling apps on a duplicated database before removing apps on a production database.
Note
Some apps have dependencies, meaning that one app requires another. Therefore, uninstalling one app may uninstall multiple apps and modules.
Go to Apps and then on the app to uninstall, click the (vertical ellipsis) icon and select Uninstall to open the Uninstall module pop-up window.
The Apps to Uninstall section lists the applications to be uninstalled.
Tip
Select the Show All checkbox to display all module dependencies.
The Documents to Delete section lists the database records to be deleted.
To proceed with uninstalling the app, its dependencies, and all related database records, click Uninstall.
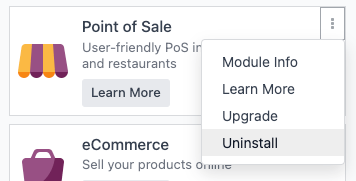
Example
The Restaurant app requires the Point of Sale app to function, so uninstalling the Point of Sale app will also uninstall the Restaurant app, and any related records.

On this page
Get Help
Contact Support Ask the Odoo Community
![]()
- User Docs
- Database management
- Developer
- Contributing
EN
Odoo 18
Users
Odoo defines a user as someone who has access to a database. An administrator can add as many users as the company needs and, in order to restrict the type of information each user can access, rules can be applied to each user. Users and access rights can be added and changed at any point.
See also
Add individual users
To add new users, navigate to Settings app ‣ Users section ‣ Manage Users, and click on New.

Fill in the form with all the required information. Under the Access Rights tab, choose the group within each application the user can have access to.
The list of applications shown is based on the applications installed on the database.
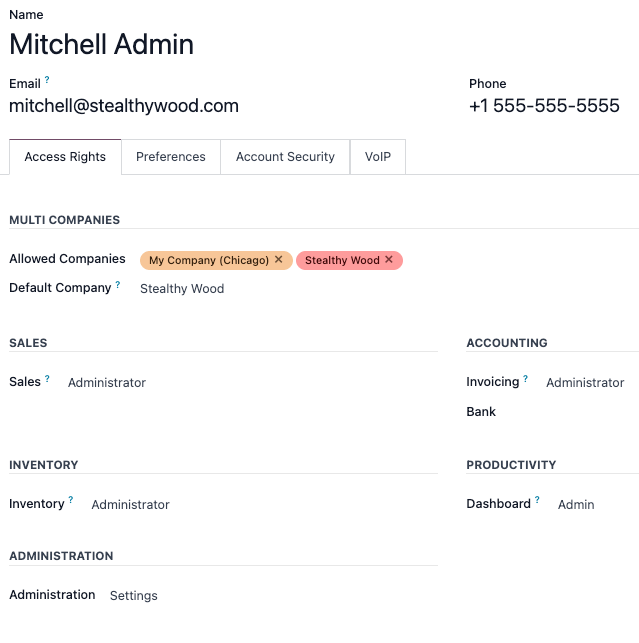
After filling out all the necessary fields on the page, manually Save. An invitation email is automatically sent to the user, using the email in the Email Address field. The user must click on the link included in the email to accept the invitation, and to create a database login.
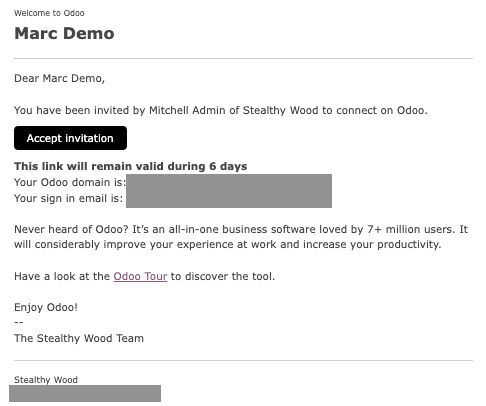
Warning
If the company is on a monthly subscription plan, the database automatically updates to reflect the added users. If the company is on a yearly or multi-year plan, an expiration banner appears in the database. An upsell quotation can be created by clicking the banner to update the subscription. Alternatively, send a support ticket to resolve the issue.
User type
User Type can be selected from the Access Rights tab of the user form, accessible via Settings app ‣ Users section ‣ Manage Users.
There are three types of users: Internal User, Portal, and Public.

Tip
Users are considered internal database users. Portal users are external users, who only have access to the database portal to view records. See the documentation on Portal access.
Public users are those visiting websites, via the website’s frontend.
The Portal and Public user options do not allow the administrator to choose access rights. These users have specific access rights pre-set (such as, record rules and restricted menus), and usually do not belong to the usual Odoo groups.
Deactivate users
To deactivate (i.e. archive) a user, navigate to Settings app ‣ Users section ‣ Manage Users. Then, tick the checkbox to the left of the user(s) to be deactivated.
After selecting the appropriate user to be archived, click the ⚙️ Actions icon, and select Archive from the resulting drop-down menu. Then, click OK from the Confirmation pop-up window that appears.
Danger
Never deactivate the main/administrator user (admin). Making changes to admin users can have a detrimental impact on the database. This includes impotent admin, which means that no user in the database can make changes to the access rights. For this reason, Odoo recommends contacting an Odoo Business Analyst, or our Support Team, before making changes.
Error: too many users
If there are more users in an Odoo database than provisioned in the Odoo Enterprise subscription, the following message is displayed.

When the message appears, the database administrator has 30 days to act before the database expires. The countdown is updated every day.
To resolve the issue, either:
- Add more users to the subscription by clicking the Upgrade your subscription link displayed in the message to validate the upsell quotation, and pay for the extra users.
- Deactivate users, and reject the upsell quotation.
Warning
If the company is on a monthly subscription plan, the database automatically updates to reflect the added users. If the company is on a yearly or multi-year plan, an expiration banner appears in the database. An upsell quotation can be created by clicking the banner to update the subscription. Alternatively, users can send a support ticket to resolve the issue.
Once the database has the correct number of users, the expiration message disappears automatically after a few days, when the next verification occurs.
Password management
Password management is an important part of granting users autonomous access to the database at all times. Odoo offers a few different methods to reset a user’s password.
Tip
Odoo has a setting to specify the length needed for a password. This setting can be accessed by navigating to Settings app ‣ Permissions section, and entering the desired password length in the Minimum Password Length field. By default the value is 8.
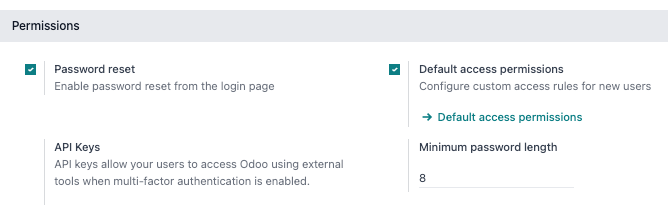
Reset password
Sometimes, users might wish to reset their personal password for added security, so they are the only ones with access to the password. Odoo offers two different reset options: one initiated by the user to reset the password, and another where the administrator triggers a reset.
Enable password reset from login page
It is possible to enable/disable password resets directly from the login page. This action is completed by the individual user, and this setting is enabled by default.
To change this setting, go to Settings app ‣ Permissions section, activate Password Reset, and then click Save.
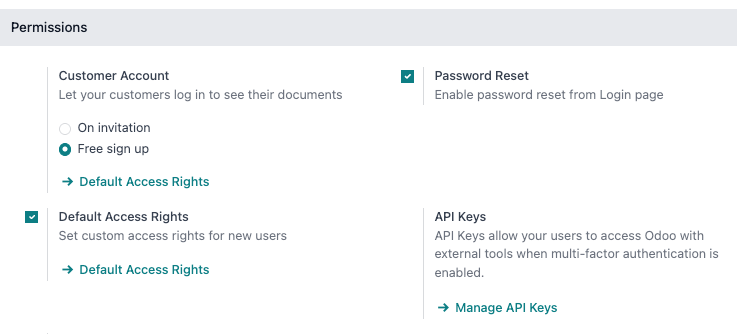
On the login page, click Reset Password to initiate the password reset process, and have a reset-token sent to the email on file.

Send reset instructions
Go to Settings app ‣ Users & Companies ‣ Users, select the user from the list, and click on Send Password Reset Instructions on the user form. An email is automatically sent to them with password reset instructions.
Note
The Send Password Reset Instructions button only appears if the Odoo invitation email has already been confirmed by the user. Otherwise, a Re-send Invitation Email button appears.
This email contains all the instructions needed to reset the password, along with a link redirecting the user to an Odoo login page.
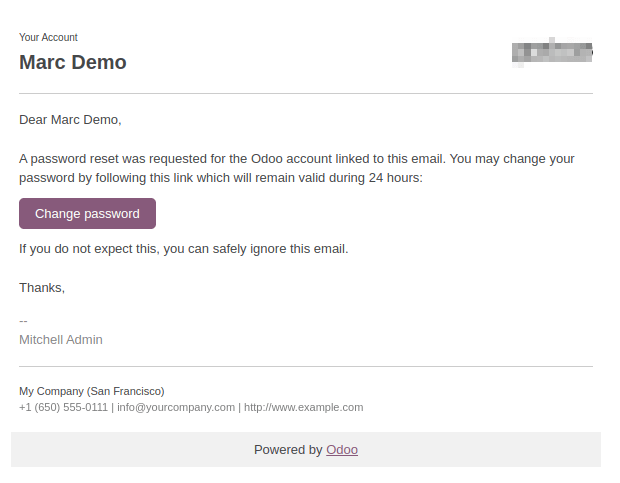
Change user password
Go to Settings app ‣ Users & Companies ‣ Users, and select a user to access its form. Click on the ⚙️ Actions icon, and select Change Password from, the resulting drop-down menu. Enter a new password in the New Password column of the Change Password pop-up window that appears, and confirm the change by clicking Change Password.

Note
This operation only modifies the password of the users locally, and does not affect their odoo.com account.
If the odoo.com password needs to be changed, use the send the password reset instructions. Odoo.com passwords grant access to the My Databases page, and other portal features.
After clicking Change Password, the page is redirected to an Odoo login page where the database can be re-accessed using the new password.
Multi Companies
The Multi Companies field on a user form allows an administrator to provide access to multiple companies for users. To configure a multi-company environment for a user, navigate to the desired user by going to: Settings app ‣ Users section ‣ Manage users. Then, select the user to open their user form, and configure with multi-company access.
Under Multi Companies in the Access Rights tab, set the fields labeled Allowed Companies and Default Company.
The Allowed Companies field can contain multiple companies. These are the companies the user can access and edit, according to the set access rights. The Default Company is the company the user defaults to, upon logging in each time. This field can contain only one company.
Warning
If multi-company access is not configured correctly, it could lead to inconsistent multi-company behaviors. Because of this, only experienced Odoo users should make access rights changes to users for databases with a multi-company configuration. For technical explanations, refer to the developer documentation on Multi-company Guidelines.
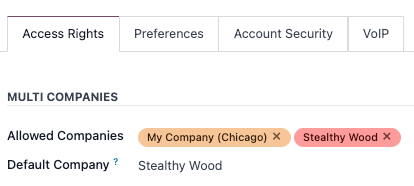
See also
On this page
Get Help
Contact Support Ask the Odoo Community
![]()
- User Docs
- Database management
- Developer
- Contributing
EN
Odoo 18
Change languages
You select the language of your database upon its creation. However, you can add and install additional languages to allow users to manage the database in another language or to translate your website.
Add languages
To download additional languages:
- either click the profile icon in the upper-right corner, select My profile, and click the (globe) icon next to the Language field;
- or go to the Settings app, and click Add Languages in the Languages section.
You can then select the languages you want from the dropdown menu and click Add.
See also
Change languages
To select their preferred language, users can click the profile icon in the upper-right corner, go to My profile, and select a Language in the dropdown list.
Change another user’s language
To change the database language for a user:
- Go to the Settings app and click Manage Users in the Users section.
- Click on the user whose language you want to change.
- Go to the Preferences tab and select a previously installed language from the Language dropdown menu.
Note
Emails and documents will be sent to the user in the selected language.
On this page
Get Help
Contact Support Ask the Odoo Community
![]()
- User Docs
- Database management
- Developer
- Contributing
EN
Odoo 18
Two-factor authentication
Two-factor authentication (2FA) is a way to improve security, and prevent unauthorized persons from accessing user accounts.
Practically, 2FA means storing a secret inside an authenticator, usually on a mobile phone, and exchanging a code from the authenticator when trying to log in.
This means an unauthorized user would need to guess the account password and have access to the authenticator, which is a more difficult proposition.
Requirements
Important
These lists are just examples. They are not endorsements of any specific software.
Phone-based authenticators are the easiest and most commonly used. Examples include:
Password managers are another option. Common examples include:
Note
The remainder of this document uses Google Authenticator as an example, as it is one of the most commonly used. This is not an endorsement of the product.
Two-factor authentication setup
After selecting an authenticator, log in to Odoo, then click the profile avatar in the upper-right corner, and select My Profile from the resulting drop-down menu.
Click the Account Security tab, then slide the Two-Factor Authentication toggle to active.
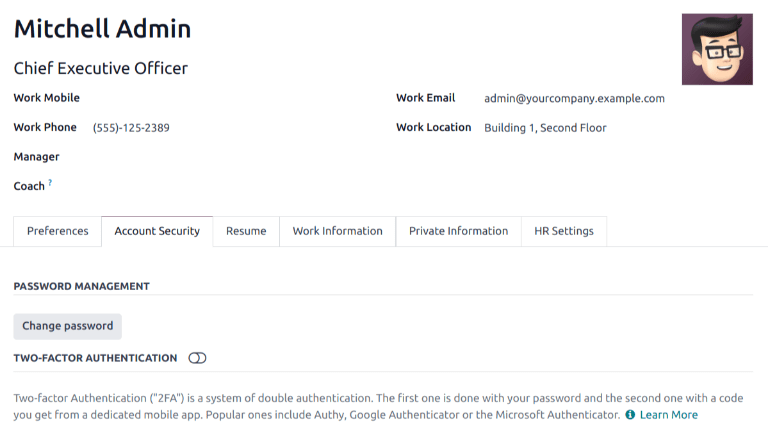
This generates a Security Control pop-up window that requires password confirmation to continue. Enter the appropriate password, then click Confirm Password. Next, a Two-Factor Authentication Activation pop-up window appears, with a QR code.
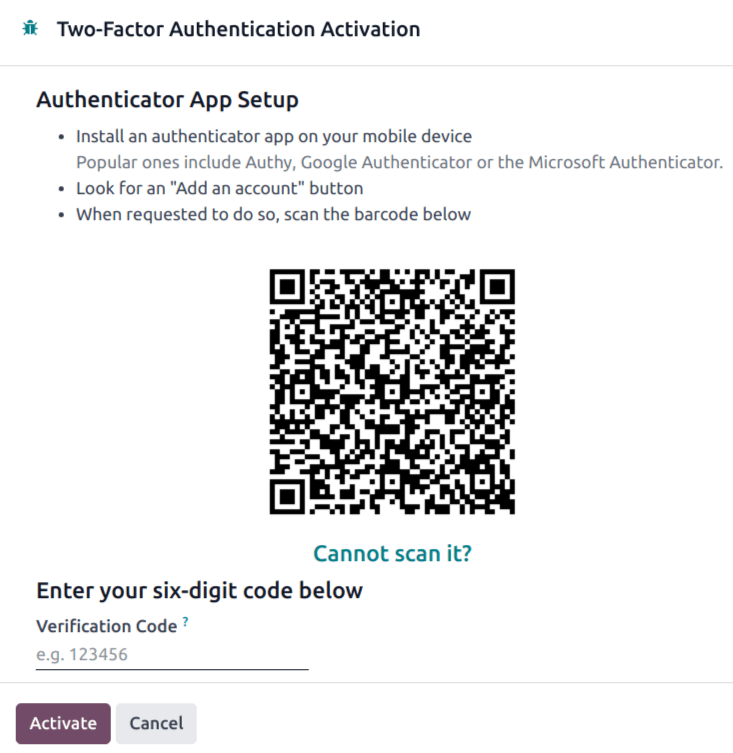
Using the desired authenticator application, scan the QR code when prompted.
Tip
If scanning the screen is not possible (e.g. the setup is being completed on the same device as the authenticator application), clicking the provided Cannot scan it? link, or copying the secret to manually set up the authenticator, is an alternative.
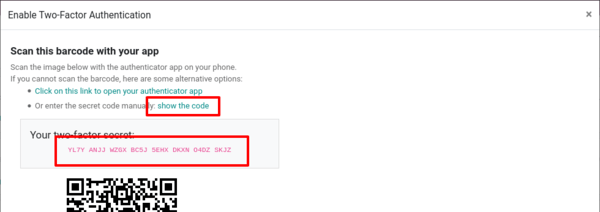
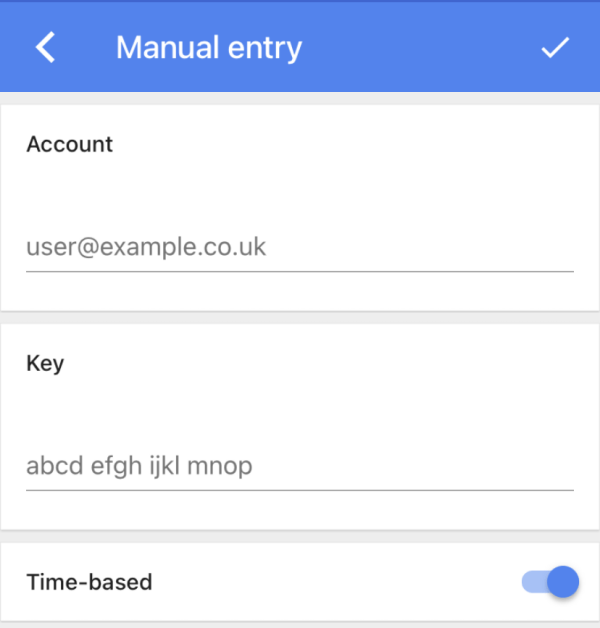
Afterwards, the authenticator should display a verification code.
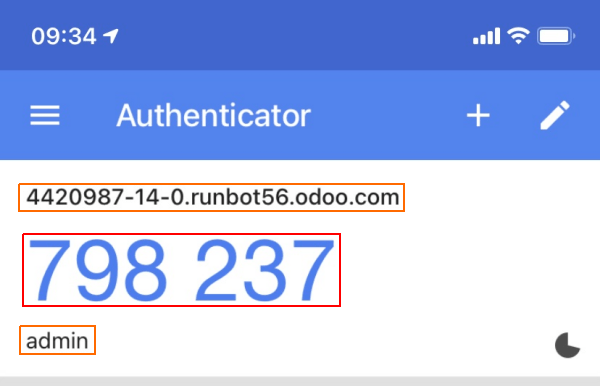
Enter the code into the Verification Code field, then click Activate.
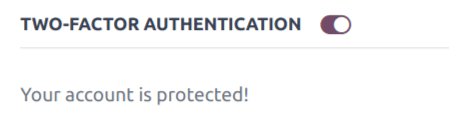
Logging in
To confirm 2FA setup is complete, log out of Odoo.
On the login page, input the username and password, then click Log in. On the Two-factor Authentication page, input the code provided by the chosen authenticator in the Authentication Code field, then click Log in.
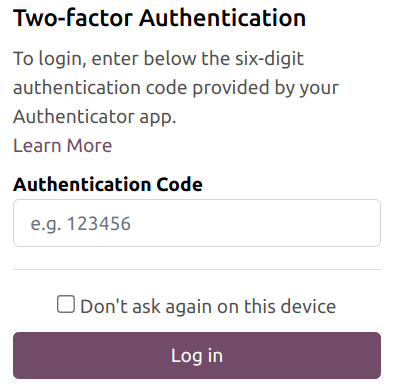
Danger
If a user loses access to their authenticator, an administrator must deactivate 2FA on the account before the user can log in.
Enforce two-factor authentication
To enforce the use of 2FA for all users, first navigate to Main Odoo Dashboard ‣ Apps. Remove the Apps filter from the Search… bar, then search for 2FA by mail.
Click Install on the Kanban card for the 2FA by mail module.
After installation is complete, go to Settings app: Permissions. Tick the checkbox labeled, Enforce two-factor authentication. Then, use the radio buttons to choose whether to apply this setting to Employees only, or All users.
Note
Selecting All users applies the setting to portal users, in addition to employees.
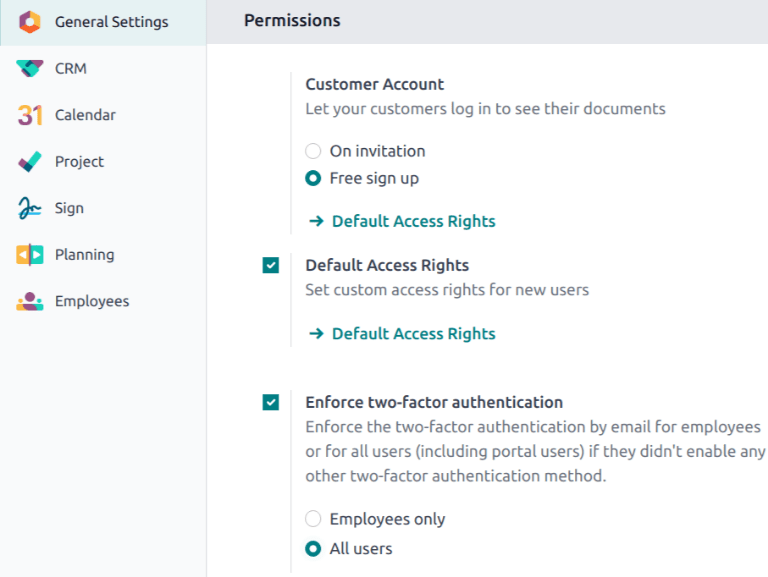
Click Save to commit any unsaved changes.
On this page
Get Help
Contact Support Ask the Odoo Community
![]()
- User Docs
- Database management
- Developer
- Contributing
EN
Odoo 18
Access rights
Access rights are permissions that determine the content and applications users can access and edit. In Odoo, these permissions can be set for individual users or for groups of users. Limiting permissions to only those who need them ensures that users do not modify or delete anything they should not have access to.
Only an administrator can change access rights.
Danger
Making changes to access rights can have a detrimental impact on the database. This includes impotent admin, which means that no user in the database can make changes to the access rights. For this reason, Odoo recommends contacting an Odoo Business Analyst, or our Support Team, before making changes.
Tip
A user must have the specific Administration access rights set on their user profile, in order to make changes on another user’s settings for access rights.
To access this setting, navigate to Settings app ‣ Manage users ‣ select a user ‣ Access Rights tab ‣ Administration section ‣ Administration field.
Once at the setting, an already existing administrator must change the setting in the Administration field to Access Rights.
Once complete, click Save to save the changes, and implement the user as an administrator.
Users
The access rights for individual users are set when the user is added to the database, but they can be adjusted at any point in the user’s profile.
To make changes to a user’s rights, click on the desired user to edit their profile.
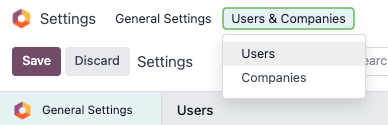
On the user’s profile page, in the Access Rights tab, scroll down to view the current permissions.
For each app, use the drop-down menu to select what level of permission this user should have. The options vary for each section, yet the most common are: Blank/None, User: Own Documents, User: All Documents, or Administrator.
The Administration field in the Access Rights tab has the following options: Settings or Access Rights.
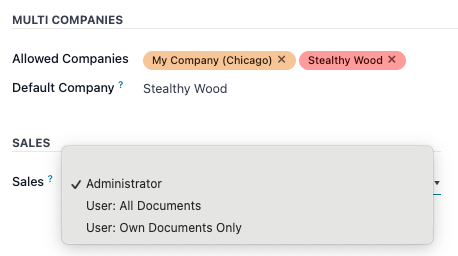
Create and modify groups
Groups are app-specific sets of permissions that are used to manage common access rights for a large amount of users. Administrators can modify the existing groups in Odoo, or create new ones to define rules for models within an application.
To access groups, first activate Odoo’s developer mode, then go to Settings app ‣ Users & Companies ‣ Groups.
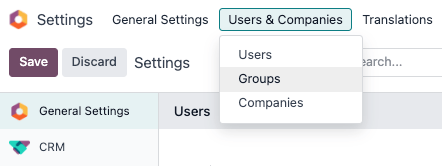
To create a new group from the Groups page, click Create. Then, from the blank group form, select an Application, and complete the group form (detailed below).
To modify existing groups, click on an existing group from the list displayed on the Groups page, and edit the contents of the form.
Enter a Name for the group and tick the checkbox next to Share Group, if this group was created to set access rights for sharing data with some users.
Important
Always test the settings being changed to ensure they are being applied to the correct users.
The group form contains multiple tabs for managing all elements of the group. In each tab, click Add a line to add a new row for users or rules, and click the (cancel) icon to remove a row.
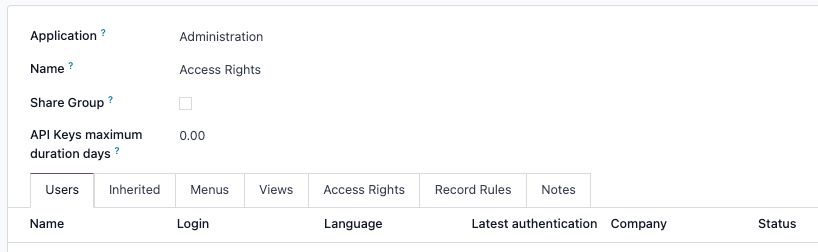
- Users tab: lists the current users in the group. Users listed in black have administrative rights. Users without administrative access appear in blue. Click Add a line to add users to this group.
- Inherited tab: Inherited means that users added to this group are automatically added to the groups listed on this tab. Click Add a line to add inherited groups.
Example
For example, if the group Sales/Administrator lists the group Website/Restricted Editor in its Inherited tab, then any users added to the Sales/Administrator group automatically receive access to the Website/Restricted Editor group, as well. - Menus tab: defines which models the group can have access to. Click Add a line to add a specific menu.
- Views tab: lists which views in Odoo the group has access to. Click Add a line to add a view to the group.
- Access Rights tab: lists the first level of rights (models) that this group has. The Name column represents the name for the current group’s access to the model selected in the Model column.
To link a new access right to a group, click Add a line. Select the appropriate model from the Model drop-down, then enter a name for the access right in the Name column. For each model, enable the following options as appropriate:- Read: Users can see the object’s existing values.
- Write: Users can edit the object’s existing values.
- Create: Users can create new values for the object.
- Delete: Users can delete values for the object.
While there are no conventions for naming access rights, it is advisable to choose a name that identifies its purpose.
For example, the access that purchase managers have to the Contact model could be named res.partner.purchase.manager. This consists of the technical name of the model, followed by a name identifying the group of users in question.
To find the model’s technical name from the current view, first enter a placeholder text in the Name field, then click the Model name, then the (Internal link) icon. - Record Rules: lists the second layer of editing and visibility rights. Record Rules overwrite, or refine, the group’s access rights. Click Add a line to add a record rule to this group. For each rule, choose values for the following options:
- Apply for Read.
- Apply for Write.
- Apply for Create.
- Apply for Delete.
Record rules are written using a domain, or conditions that filter data. A domain expression is a list of such conditions. For example:
[('mrp_production_ids', 'in', user.partner_id.commercial_partner_id.production_ids.ids)]
This record rule is to enable MRP consumption warnings for subcontractors.
Odoo has a library of preconfigured record rules for ease of use. Users without knowledge of domains (and domain expressions) should consult an Odoo Business Analyst, or the Odoo Support Team, before making changes.
Superuser mode
Superuser mode allows the user to bypass record rules and access rights. To activate Superuser mode, first, activate developer mode. Then, navigate to the debug menu, represented by a (debug) icon, located in the top banner.
Finally, towards the bottom of the menu, click Become Superuser.
Important
Only users with Settings access for the Administration section of the Access Rights (in their user profile) are allowed to log in to Superuser mode.
Danger
Superuser mode allows for circumvention of record rules and access rights, and therefore, should be exercised with extreme caution.
Upon exiting Superuser mode, users may be locked out of the database, due to changes that were made. This can cause impotent admin, or an administrator without the ability to change access rights/settings.
In this case contact Odoo Support here: new help ticket. The support team is able to restore access using a support login.
To leave Superuser mode, log out of the account, by navigating to the upper-right corner, and clicking on the OdooBot username. Then, select the Log out option.
Tip
An alternative way to activate Superuser mode is to login as a superuser. To do that, navigate to the login screen, and enter the appropriate Email and Password.
Instead of clicking Login, click Log in as superuser.
On this page
Get Help
Contact Support Ask the Odoo Community
![]()
- User Docs
- Database management
- Developer
- Contributing
EN
Odoo 18
Portal access
Portal access is given to users who need the ability to view certain documents or information within an Odoo database.
Some common use cases for providing portal access include allowing customers to read/view any or all of the following in Odoo:
- leads/opportunities
- quotations/sales orders
- purchase orders
- invoices & bills
- projects
- tasks
- timesheets
- tickets
- signatures
- subscriptions
Note
Portal users only have read/view access, and will not be able to edit any documents in the database.
Provide portal access to customers
From the main Odoo dashboard, select the Contacts application. If the contact is not yet created in the database, click on the Create button, enter the details of the contact, and then click Save. Otherwise, choose an existing contact, and then click on the Action drop-down menu located at the top-center of the interface.

Then select Grant portal access. A pop-up window appears, listing three fields:
- Contact: the recorded name of the contact in the Odoo database
- Email: the contact’s email address that they will use to log into the portal
- In Portal: whether or not the user has portal access
To grant portal access, first enter the contact’s Email they will use to log into the portal. Then, check the box under the In Portal column. Optionally, add text to the invitation message the contact will receive. Then click Apply to finish.
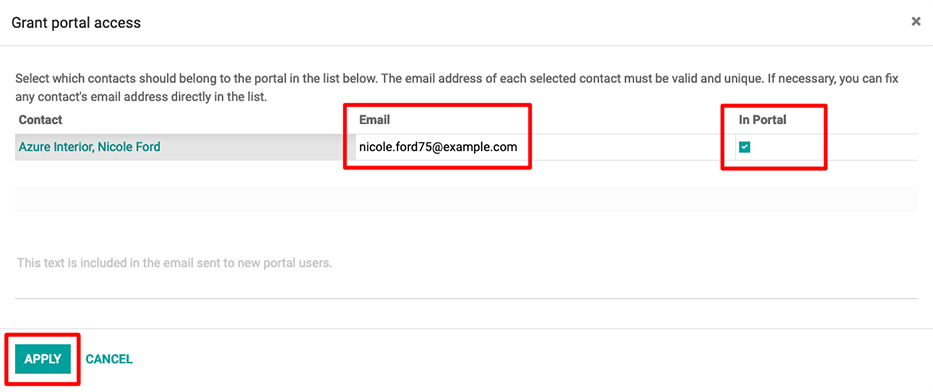
An email will be sent to the specified email address, indicating that the contact is now a portal user for that Odoo database.
Tip
To grant portal access to multiple users at once, navigate to a company contact, then click Action ‣ Grant portal access to view a list of all of the company’s related contacts. Check the box under the In Portal column for all the contacts that need portal access, then click Apply.
Note
At any time, portal access can be revoked by navigating to the contact, clicking Action ‣ Grant portal access, and then unselecting the checkbox under the In Portal column and clicking Apply.
Change portal username
There may be times when a portal user wants to change their user login. This can be done by any user in the database with administrator access rights. The following process outlines the necessary steps to change the portal user login.
See also
See the documentation on setting access rights.
First, navigate to Settings app ‣ Users. Then, under Filters, select Portal Users, or select Add Custom Filter and set the following configuration Groups > contains > portal. After making this selection, search for (and open) the portal user that needs to be edited.
Next, click Edit (if necessary), click into the Email Address field, and proceed to make any necessary changes to this field. The Email Address field is used to log into the Odoo portal.
Note
Changing the Email Address (or login) only changes the username on the customer’s portal login.
In order to change the contact email, this change needs to take place on the contact template in the Contacts app. Alternatively, the customer can change their email directly from the portal, but the login cannot be changed. See change customer info.
Customer portal changes
There may be times when the customer would like to make changes to their contact information, password/security, or payment information attached to the portal account. This can be performed by the customer from their portal. The following process is how a customer can change their contact information.
Change customer info
First enter the username and password (login) into the database login page to access the portal user account. A portal dashboard will appear upon successfully logging in. Portal documents from the various installed Odoo applications will appear with the number count of each.
See also
Next, navigate to the upper-right corner of the portal, and click the Edit button, next to the Details section. Then, change the pertinent information, and click Confirm.
Change password
First enter the username and password (login) into the database login page to access the portal user account. A portal dashboard will appear upon successfully logging in.
If the customer would like to change their password for portal access, click on the Edit Security Settings link, below the Account Security section. Then, make the necessary changes, by typing in the current Password, New Password, and verify the new password. Lastly, click on Change Password to complete the password change.
Note
If a customer would like to change the login, as documented above, contact the Odoo database point-of-contact. See above documentation on changing the portal username.
Note
Passwords for portal users and Odoo.com users remain separate, even if the same email address is used.
Add two-factor authentication
First enter the username and password (login) into the database login page to access the portal user account. A portal dashboard will appear upon successfully logging in.
If the customer would like to turn on two-factor authentication (2FA) for portal access, click on the Edit Security Settings link, below the Account Security section.
Click on Enable two-factor authentication to turn on 2FA. Confirm the current portal password in the Password field. Then, click on Confirm Password. Next, activate 2FA in a 2FA app (Google Authenticator, Authy, etc.), by scanning the QR code or entering a Verification Code.
Finally, click Enable two-factor authentication to complete the setup.
Change payment info
First enter the username and password (login) into the database login page to access the portal user account. A portal dashboard will appear upon successfully logging in.
If the customer would like to manage payment options, navigate to the Manage payment methods in the menu on the right. Then, add the new payment information, and select Add new card.
On this page
Get Help
Contact Support Ask the Odoo Community
![]()
- User Docs
- Database management
- Developer
- Contributing
EN
Odoo 18
Facebook sign-in authentication
The Facebook OAuth sign-in function allows Odoo users to sign in to their database with their Facebook account.
Danger
Databases housed on Odoo.com should not use OAuth login for the owner or administrator of the database, as it would unlink the database from their Odoo.com account. If OAuth is setup for that user, the database can no longer be duplicated, renamed, or otherwise managed from the Odoo.com portal.
Meta for Developers setup
Go to Meta for Developers and log in. Click My Apps. On the Apps page, click Create App.
On the Use cases page, select Authenticate and request data from users with Facebook Login, then click Next.
In the Add an app name field, enter Odoo Login OAuth, or a similar title.
Note
The App contact email automatically defaults to the email address associated with the Meta account. If this email address is not regularly monitored, it may be wise to use another email address.
Click Next. Review the Publishing requirements, the Meta Platform Terms, and Developer Policies. Then, click Create app.
Important
Clicking Create app may require password re-entry.
Customize app
After the new app is created, the Dashboard page appears, with a list of steps to be completed before the app can be published. From here, click Customize adding a Facebook Login button.

On the Customize page, click Settings.
In the Valid OAuth Redirect URIs field, enter https://<odoo base url>/auth_oauth/signin, replacing <odoo base url> with the URL of the applicable database.
Example
If a database has the URL https://example.odoo.com, the URL https://example.odoo.com/auth_oauth/signin would be entered in the Valid OAuth Redirect URIs field.
Click Save changes when finished.
Configure settings
At the far left of the page, click App settings ‣ Basic. This page contains additional settings that are required before the app can be submitted for approval.
In the Privacy Policy URL field, enter https://www.odoo.com/privacy.
Note
https://www.odoo.com/privacy is the default privacy policy for databases hosted on Odoo.com.
Click the App Icon field to open a file upload window. From here, select and upload an app icon.
In the User data deletion field, enter https://www.odoo.com/documentation/17.0/administration/odoo_accounts.html.
Note
This document provides instructions on how a user can delete their Odoo account.
Lastly, click the Category field, and select Business and pages from the drop-down menu.
Click Save changes.

Capture app ID
After the app is created, and approved, select and copy the App ID. Paste this information on a clipboard or notepad file, as it is needed in a later step to complete the setup.
Publish
On the left side of the page, click Publish. Depending on the status of the connected Facebook account, additional verification and testing steps may be required, and are listed on this page.
After reviewing the information, click Publish.
See also
Additional information regarding Meta App Development, including further details on building, testing, and use cases, can be found in the Meta for developers documentation.
Odoo setup
First, activate Developer mode.
Navigate to the Settings app, and scroll down to the Integrations section. There, tick the checkbox labeled, OAuth Authentication. Click Save.

Then, sign in to the database once the login screen loads.
After successfully logging in, navigate to Settings app ‣ Users & Companies ‣ OAuth Providers. Click Facebook Graph.
In the Client ID field, enter the App ID from the previous section, then tick the Allowed checkbox.

On this page
Get Help
Contact Support Ask the Odoo Community
![]()
- User Docs
- Database management
- Developer
- Contributing
EN
Odoo 18
Google Sign-In Authentication
The Google Sign-In Authentication is a useful function that allows Odoo users to sign in to their database with their Google account.
This is particularly helpful if the organization uses Google Workspace, and wants employees within the organization to connect to Odoo using their Google Accounts.
Warning
Databases hosted on Odoo.com should not use Oauth login for the owner or administrator of the database as it would unlink the database from their Odoo.com account. If Oauth is set up for that user, the database will no longer be able to be duplicated, renamed or otherwise managed from the Odoo.com portal.
See also
Configuration
The integration of the Google sign-in function requires configuration both on Google and Odoo.
Google API Dashboard
- Go to the Google API Dashboard.
- Make sure the right project is opened. If there isn’t a project yet, click on Create Project, fill out the project name and other details of the company, and click on Create.

Tip
Choose the name of the company from the drop-down menu.
OAuth consent screen
- On the left side menu, click on OAuth consent screen.

- Choose one of the options (Internal / External), and click on Create.

Warning
Personal Gmail Accounts are only allowed to be External User Type, which means Google may require an approval, or for Scopes to be added on. However, using a Google WorkSpace account allows for Internal User Type to be used.
Note, as well, that while the API connection is in the External testing mode, then no approval is necessary from Google. User limits in this testing mode is set to 100 users. - Fill out the required details and domain info, then click on Save and Continue.
- On the Scopes page, leave all fields as is, and click on Save and Continue.
- Next, if continuing in testing mode (External), add the email addresses being configured under the Test users step by clicking on Add Users, and then the Save and Continue button. A summary of the app registration appears.
- Finally, scroll to the bottom, and click on Back to Dashboard.
Credentials
- On the left side menu, click on Credentials.

- Click on Create Credentials, and select OAuth client ID.

- Select Web Application as the Application Type. Now, configure the allowed pages on which Odoo will be redirected.
In order to achieve this, in the Authorized redirect URIs field, enter the database’s domain immediately followed by /auth_oauth/signin. For example: https://mydomain.odoo.com/auth_oauth/signin, then click on Create. - Now that the OAuth client has been created, a screen will appear with the Client ID and Client Secret. Copy the Client ID for later, as it will be necessary for the configuration in Odoo, which will be covered in the following steps.
Google Authentication on Odoo
Retrieve the Client ID
Once the previous steps are complete, two keys are generated on the Google API Dashboard: Client ID and Client Secret. Copy the Client ID.

Odoo activation
- Go to Odoo General Settings ‣ Integrations and activate OAuth Authentication.
Note
Odoo may prompt the user to log-in again after this step. - Go back to General Settings ‣ Integrations ‣ OAuth Authentication, activate the selection and Save. Next, return to General Settings ‣ Integrations ‣ Google Authentication and activate the selection. Then fill out the Client ID with the key from the Google API Dashboard, and Save.
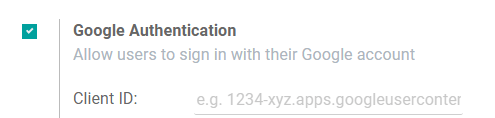
Note
Google OAuth2 configuration can also be accessed by clicking on OAuth Providers under the OAuth Authentication heading in Integrations.
Log in to Odoo with Google
To link the Google account to the Odoo profile, click on Log in with Google when first logging into Odoo.

Existing users must reset their password to access the Reset Password page, while new users can directly click on Log in with Google, instead of choosing a new password.
See also
On this page
Get Help
Contact Support Ask the Odoo Community
![]()
- User Docs
- Database management
- Developer
- Contributing
EN
Odoo 18
Microsoft Azure sign-in authentication
The Microsoft Azure OAuth sign-in authentication is a useful function that allows Odoo users to sign in to their database with their Microsoft Azure account.
This is particularly helpful if the organization uses Azure Workspace, and wants employees within the organization to connect to Odoo using their Microsoft Accounts.
Warning
Databases hosted on Odoo.com should not use OAuth login for the owner or administrator of the database as it would unlink the database from their Odoo.com account. If OAuth is set up for that user, the database will no longer be able to be duplicated, renamed, or otherwise managed from the Odoo.com portal.
See also
Configuration
Integrating the Microsoft sign-in function requires configuration on Microsoft and Odoo.
Odoo System Parameter
First activate the developer mode, and then go to Settings ‣ Technical ‣ System Parameters.
Click Create and on the new/blank form that appears, add the following system parameter auth_oauth.authorization_header to the Key field, and set the Value to 1. Then click Save to finish.
Microsoft Azure dashboard
Create a new application
Now that the system parameters in Odoo have been set up, it’s time to create a corresponding application inside of Microsoft Azure. To get started creating the new application, go to Microsoft’s Azure Portal. Log in with the Microsoft Outlook Office 365 account if there is one, otherwise, log in with a personal Microsoft account.
Important
A user with administrative access to the Azure Settings must connect and perform the following configuration steps below.
Next, navigate to the section labeled Manage Microsoft Entra ID (formally Azure Active Directory). The location of this link is usually in the center of the page.
Now, click on the Add (+) icon, located in the top menu, and then select App registration from the drop-down menu. On the Register an application screen, rename the Name field to Odoo Login OAuth or a similarly recognizable title. Under the Supported account types section select the option for Accounts in this organizational directory only (Default Directory only - Single tenant).
Warning
The Supported account types can vary by Microsoft account type and end use of the OAuth. For example: Is the login meant for internal users within one organization or is it meant for customer portal access? The above configuration is used for internal users in an organization.
Choose Personal Microsoft accounts only if the target audience is meant for portal users. Choose Accounts in this organizational directory only (Default Directory only - Single tenant) if the target audience is company users.
Under the Redirect URL section, select Web as the platform, and then input https://<odoo base url>/auth_oauth/signin in the URL field. The Odoo base URL is the canonical domain at which your Odoo instance can be reached (e.g. mydatabase.odoo.com if you are hosted on Odoo.com) in the URL field. Then, click Register, and the application is created.
Authentication
Edit the new app’s authentication by clicking on the Authentication menu item in the left menu after being redirected to the application’s settings from the previous step.
Next, the type of tokens needed for the OAuth authentication will be chosen. These are not currency tokens but rather authentication tokens that are passed between Microsoft and Odoo. Therefore, there is no cost for these tokens; they are used merely for authentication purposes between two APIs. Select the tokens that should be issued by the authorization endpoint by scrolling down the screen and check the boxes labeled: Access tokens (used for implicit flows) and ID tokens (used for implicit and hybrid flows).
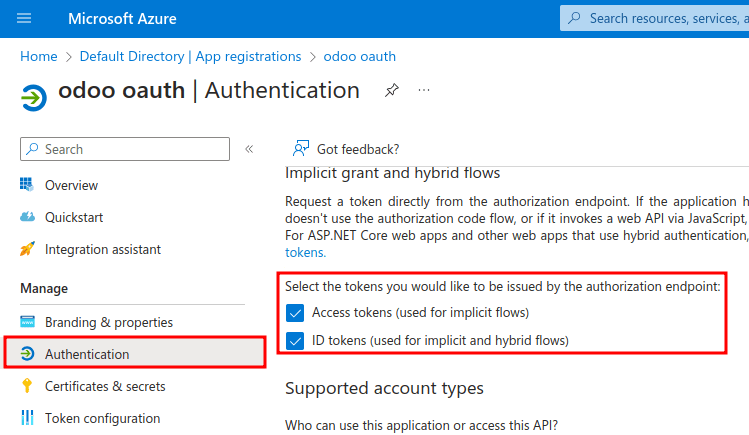
Click Save to ensure these settings are saved.
Gather credentials
With the application created and authenticated in the Microsoft Azure console, credentials will be gathered next. To do so, click on the Overview menu item in the left-hand column. Select and copy the Application (client) ID in the window that appears. Paste this credential to a clipboard / notepad, as this credential will be used in the Odoo configuration later.
After finishing this step, click on Endpoints on the top menu and click the copy icon next to OAuth 2.0 authorization endpoint (v2) field. Paste this value in the clipboard / notepad.

Odoo setup
Finally, the last step in the Microsoft Azure OAuth configuration is to configure some settings in Odoo. Navigate to Settings ‣ Integrations ‣ OAuth Authentication and check the box to activate the OAuth login feature. Click Save to ensure the progress is saved. Then, sign in to the database once the login screen loads.
Once again, navigate to Settings ‣ Integrations ‣ OAuth Authentication and click on OAuth Providers. Now, select New in the upper-left corner and name the provider Azure.
Paste the Application (client) ID from the previous section into the Client ID field. After completing this, paste the new OAuth 2.0 authorization endpoint (v2) value into the Authorization URL field.
For the UserInfo URL field, paste the following URL: https://graph.microsoft.com/oidc/userinfo
In the Scope field, paste the following value: openid profile email. Next, the Windows logo can be used as the CSS class on the login screen by entering the following value: fa fa-fw fa-windows, in the CSS class field.
Check the box next to the Allowed field to enable the OAuth provider. Finally, add Microsoft Azure to the Login button label field. This text will appear next to the Windows logo on the login page.

Save the changes to complete the OAuth authentication setup in Odoo.
User experience flows
For a user to log in to Odoo using Microsoft Azure, the user must be on the Odoo password reset page. This is the only way that Odoo is able to link the Microsoft Azure account and allow the user to log in.
Note
Existing users must reset their password to access the Odoo password reset page. New Odoo users must click the new user invitation link that was sent via email, then click on Microsoft Azure. Users should not set a new password.
To sign in to Odoo for the first time using the Microsoft Azure OAuth provider, navigate to the Odoo password reset page (using the new user invitation link). A password reset page should appear. Then, click on the option labeled Microsoft Azure. The page will redirect to the Microsoft login page.

Enter the Microsoft Email Address and click Next. Follow the process to sign in to the account. Should 2FA be turned on, then an extra step may be required.

Finally, after logging in to the account, the page will redirect to a permissions page where the user will be prompted to Accept the conditions that the Odoo application will access their Microsoft information.

On this page
Get Help
Contact Support Ask the Odoo Community
![]()
- User Docs
- Database management
- Developer
- Contributing
EN
Odoo 18
LDAP authentication
To configure LDAP authentication in Odoo:
- Open the Settings app, scroll down to the Integrations section, and enable LDAP Authentication.
- Click Save, then go back to the Integrations section and click LDAP Server.
- In the Set up your LDAP Server list, click New, then select the required company in the dropdown list.
- In the Server information section, enter the server’s IP address and port in the LDAP server address and LDAP Server port fields, respectively.
- Enable Use TLS to request secure TLS/SSL encryption when connecting to the LDAP server, providing the server has StartTLS enabled.
- In the Login information section, enter the ID and password of the account used to query the server in the LDAP binddn and LDAP password fields, respectively. If the fields are left empty, the server will perform the query anonymously.
- In the Process parameter section, enter:
- the LDAP server’s name in the LDAP base field using LDAP format (e.g., dc=example,dc=com);
- uid=%s in the LDAP filter field.
- In the User information section:
- Enable Create user to create a user profile in Odoo the first time someone logs in using LDAP;
- Select the User template to be used to create the new user profiles. If no template is selected, the administrator’s profile is used.
Note
When using Microsoft Active Directory (AD) for LDAP authentication, if users experience login issues despite using valid credentials, create a new system parameter to disable referral chasing in the LDAP client:
- Activate the developer mode.
- Go to Settings ‣ Technical ‣ System Parameters and click New.
- Fill in the fields:
- Key: auth_ldap.disable_chase_ref
- Value: True
Get Help
Contact Support Ask the Odoo Community
![]()
EN
Odoo 18
Companies
A centralized management environment allows an administrator to select multiple companies simultaneously, and set their specific warehouses, customers, equipment, and contacts. It provides the ability to generate reports of aggregated figures without switching interfaces, which facilitates daily tasks, and enhances the overall management process.
Warning
Enabling multi-company functionality in an Odoo database on a Standard plan automatically triggers an upsell to the Custom plan. This does not apply to databases on the One-App Free plan.
- For yearly or multi-year contracts: An upsell order is created with a 30-day limit.
- For monthly contracts: The subscription automatically switches to the Custom plan and the new rate is applied when the next bill is generated.
For more information, refer to Odoo’s pricing page or contact your account manager.
To create a new company, navigate to Settings app ‣ Companies section, and click Manage Companies. Then, click New to create a new company.
Proceed to fill out the new company form that appears.
Tip
To archive a company, navigate to Settings app ‣ Companies section ‣ Manage Companies. Then, tick the checkbox to the left of the company to be archived. If the Companies page is not in list view, click the ≣ (four bars) icon, located in the top-right corner of the page.
After selecting the appropriate company, click the ⚙️ Actions icon, and select Archive from the resulting drop-down menu.
To ensure all records related to the archived company are archived, contact Odoo’s Support Team.
Should a record not be archived, there is a risk of reactivating the archived company, and creating the upsell again.
Manage companies and records
Go to Settings app ‣ Companies section ‣ Manage Companies. Then, either click New, and fill in the form with the company’s information, or select a pre-existing company to edit it.
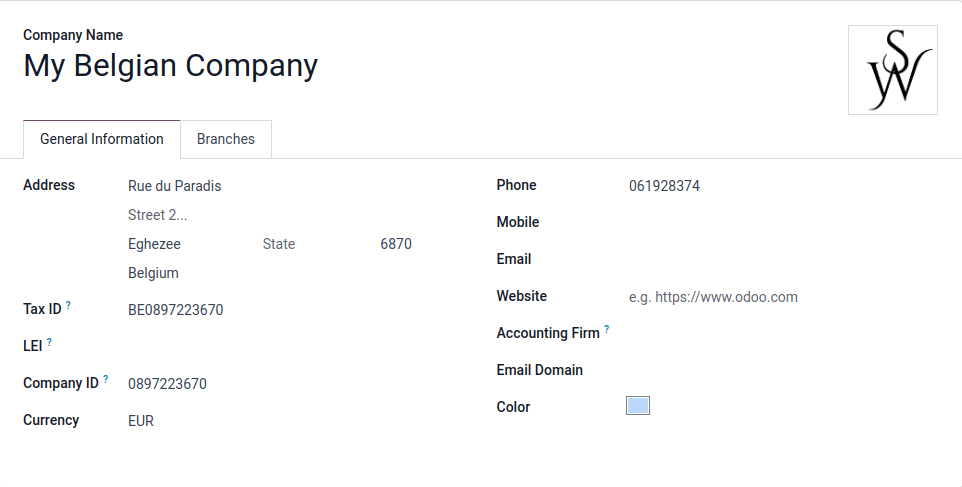
Tip
Activate the developer mode to set social media accounts and company-specific email parameters. See this documentation on Social Marketing and Communication in Odoo by email.
Companies also have a Parent Company set on the company form in developer mode.
Switch between companies
Switch between (or select) multiple companies, by clicking on the company name, located in the far-right corner of the header menu, anywhere throughout the database. Tick the checkboxes next to the desired company name(s) to activate them. The highlighted company represents the current environment that is in use. To switch environments, click on the desired company name.
Example
In the example below, the user has access to eight companies, two are activated, and the environment the database is in belongs to: My Company (San Francisco).
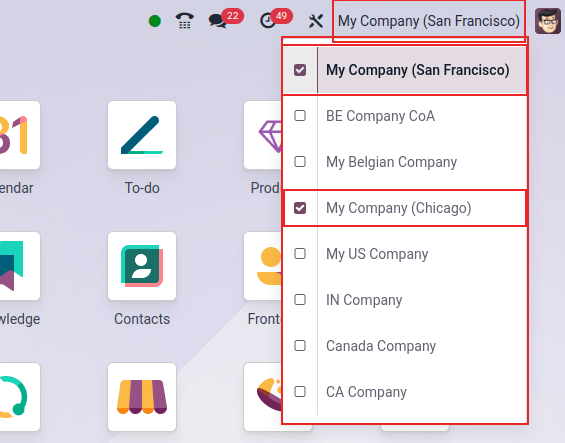
Share records
Data (such as, products, contacts, and equipment) can be shared, or set to be shown for a specific company only. To do so, on their forms, choose between:
- A blank field: the record is shared within all companies.
- Adding a company: the record is visible to users logged in to that specific company.

When an environment is selected from the top menu, along with an additional company, records are shared between the two companies.
Branches
Branches are available to add to a company. Branches can be added by navigating to Settings app ‣ Companies section ‣ Manage Companies. Then, select the desired company from the list. From the company detail form, open the Branches tab. To add a branch, click Add a line, and fill out the Create Branches pop-up form that appears.
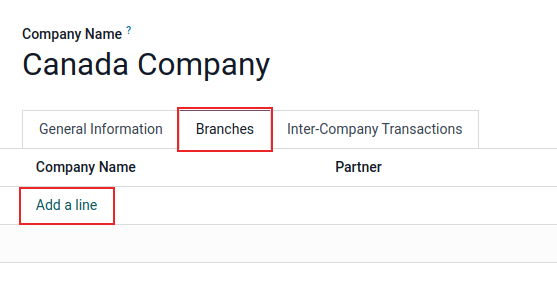
Tip
Activate the developer mode to set social media accounts and company-specific email system parameters. See this documentation on Social Marketing and Communication in Odoo by email.
Branches also have a Parent Company set on the branch form in developer mode. Accounting and fiscal localizations for the branch are set on the Parent Company. To do so, select the company from the company selector in the top menu, and go to Settings app ‣ Accounting ‣ Fiscal Localization.
Danger
If the database is on the standard Paid pricing plan, adding a branch to a company triggers an upsell. Since adding one or more branches turns the database into a multi-company setup, it will need to switch to the Custom pricing plan. This does not affect databases on the One-app free plan.
For more information on pricing, see Odoo’s pricing page.
Employee access
Once companies are created, manage the employees’ Access Rights for Multi Companies.
To access the Access Rights, navigate to Settings app ‣ Users section ‣ Manage Users.
From the Users page, select a user from the list to modify. Then, either change the fields for Allowed Companies or Default Company.
Multiple companies can be set for Allowed Companies, and only one can be set as the Default Company.
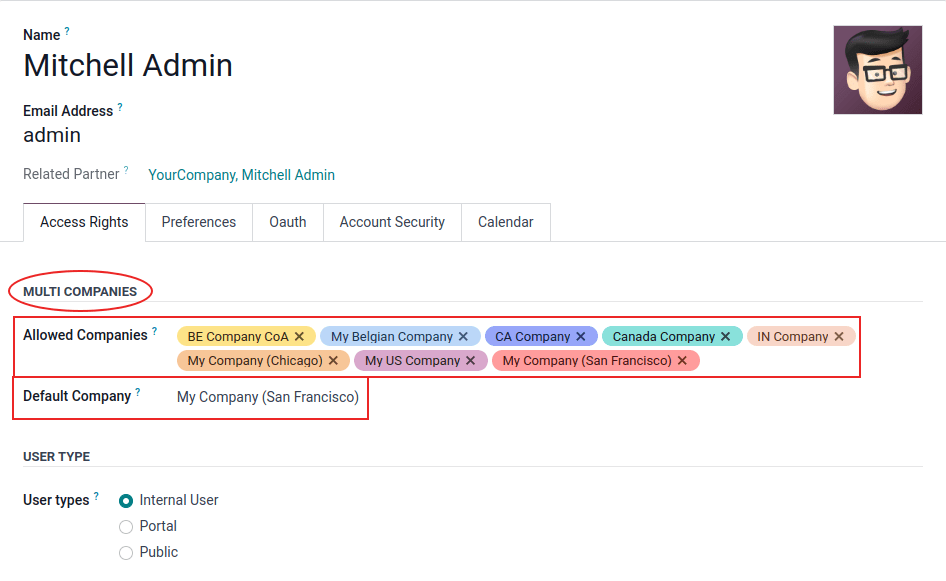
If an administrator has multiple companies activated on the database, and is editing a record, the editing occurs on the record’s related company.
Example
If editing a sale order issued under JS Store US, while working on the JS Store Belgium environment, the changes are applied under JS Store US (the company from which the sale order was issued).
When creating a record, the company taken into account is:
- The current company selected in the company selector, in the upper-right hand of the screen (the one that is highlighted/active)
OR
- No company is set (because none is set on the product and contact forms, for example)
OR
- The company set is the company linked to the document (the same as if a record is being edited)
Document format
To set document formats according to each company, activate and select the respective company, and, under the Settings app ‣ Companies section, click on Configure Document Layout and edit the information as needed.
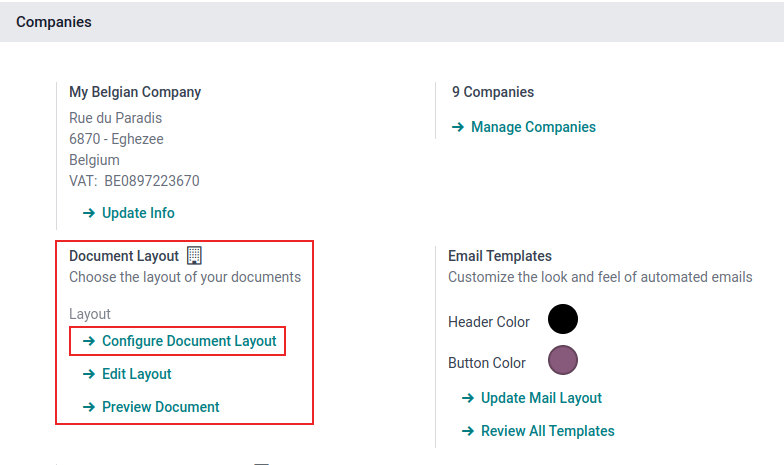
Company Details can be edited on the document layout. By default, this field is populated from the company information listed, when navigating here: Settings app ‣ Companies section ‣ Manage Companies, and select a company from the list.
Inter-company transactions
First, activate the developer mode. Then, make sure each one of the companies is properly set in relation to:
Next, navigate to Settings app ‣ Companies section ‣ Manage Companies. Then, select the desired company from the list. On the company form, select the Inter-Company Transactions tab, on the individual company’s detail form.
With the respective company activated and selected, choose one of the following Rule options:
- Do not synchronize: do not synchronize any inter-company transactions.
- Synchronized invoice/bills: generates a bill/invoice when a company confirms a bill/invoice for the selected company.
- Synchronize Sales Order: generates a drafted sales order using the selected company warehouse, when a sales order is confirmed for the selected company. If, instead of a drafted sales order, it should be validated, enable Automatic Validation.*
- Synchronize Purchase Order: generates a drafted purchase order using the selected company warehouse, when a purchase order is confirmed for the selected company. If, instead of a drafted purchase order, it should be validated, enable Automatic Validation.*
- Synchronize Sales and Purchase Order: generates a drafted purchase/sales order using the selected company warehouse, when a sales/purchase order is confirmed for the selected company. If, instead of a drafted purchase/sales order, it should be validated, enable Automatic Validation.*
* The given option needs to be selected, so Automatic Validation appears in the configuration.
![]()
Note
Products must be configured as Can be sold and shared between the companies. See Product type.
Example
Synchronize invoice/bills: an invoice posted on JS Store Belgium, for JS Store US, automatically creates a vendor bill, and generates a drafted purchase/sales order using the selected company warehouse, when a sales/purchase order is confirmed for the selected company. If, instead of a drafted purchase/sales order, it should be validated, enable Automatic Validation.
Synchronize sales/purchase order: when a sale order for JS Store US is confirmed on JS Store Belgium, a purchase order on JS Store Belgium is automatically created (and confirmed, if the Automatic Validation feature was enabled).
Tip
Remember to test all workflows as a user other than the administrator.
See also
On this page
Get Help
Contact Support Ask the Odoo Community
![]()
EN
Odoo 18
Digest emails
Digest Emails are periodic snapshots sent via email to users in an organization that include high-level information about how the business is performing.
To start sending digest emails, begin by navigating to Settings app ‣ Statistics section, activate the Digest Emails feature, and click Save.
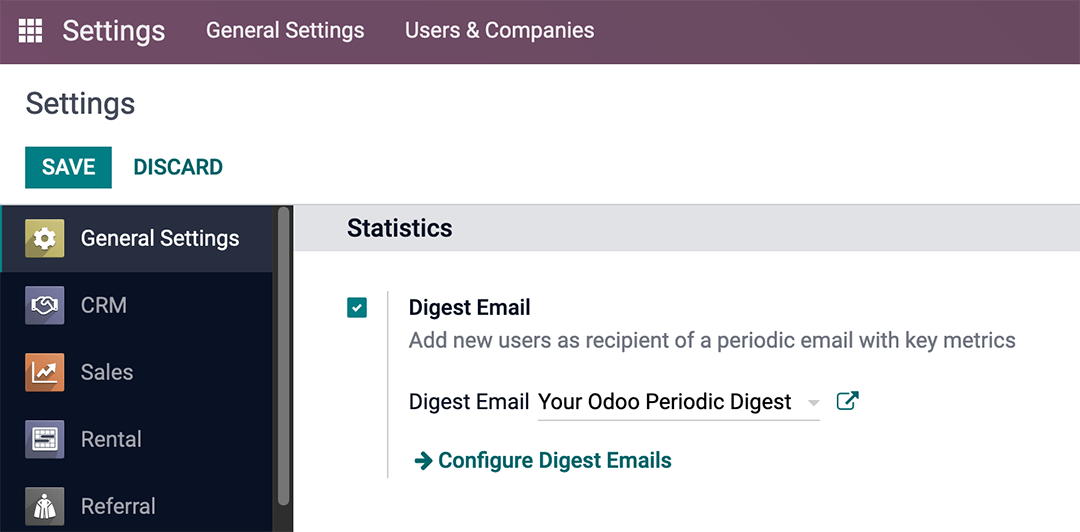
A variety of settings can be configured for digest emails, such as:
- Deciding which KPIs are shared in the digest emails
- Determining how often digest emails are sent
- Choosing who in the organization receives digest emails
- Creating custom digest email templates
- Adding additional KPIs (Studio app required)
Note
By default, the Digest Email feature is enabled. Your Odoo Periodic Digest serves as the primary template, which includes all KPI measurements across the Odoo database, and is sent daily to administrators.
Warning
When creating duplicates of databases that have sending capabilities (not testing-mode), the digest emails continue to send from the duplicate database, unless deactivated.
To deactivate the digest email, navigate to Settings ‣ Statistics section. Then, deactivate the Digest Emails feature, by un-ticking the checkbox, and clicking Save. See the section on Deactivate digest email.
Customize default digest email
To customize the default digest email (Your Odoo Periodic Digest), go to Settings app ‣ Statistics section ‣ Digest Email field. Then, select Your Odoo Periodic Digest, and click on the ↗️ (External link) icon, next to the drop-down menu selection.
A pop-up window appears, and presents a variety of editable settings, which include:
- Digest Name: the name of the digest email.
- Periodicity: control how often digest emails are sent (Daily, Weekly, Monthly, or Quarterly).
- Next Send Date: the date on which the digest email will be sent again.
- KPIs tab: check/uncheck each calculated KPI that appears in digest emails. A ticked box indicates an active KPI in the digest email. See the section on KPIs.
- Recipients tab: add/remove users who receive the digest emails. See the section on Recipients.
Note
The KPIs can be customized using Odoo Studio. Additional costs to the database subscription are incurred should Studio need to be installed. See this section on Custom KPIs with Odoo Studio.
Deactivate digest email
To manually deactivate an individual digest email, first navigate to Settings app ‣ Statistics section, and click Configure Digest Emails. Then, select the desired digest email from the list that should be deactivated.
Next, click DEACTIVATE FOR EVERYONE to deactivate the digest email for everyone, or UNSUBSCRIBE ME to remove the logged in user from the mailing list. These buttons are located in the top menu, just above the Digest Name.
Manually send digest email
To manually send a digest email, first navigate to Settings app ‣ Statistics section, and click Configure Digest Emails. Then, select the desired digest email, and click SEND NOW. This button is located in the top menu, just above the Digest Name.
KPIs
Pre-configured KPIs can be added to the digest email from the KPIs tab of the digest email template form.
First, navigate to Settings app ‣ Statistics section, and click Configure Digest Emails.
Then, select the desired digest email, and open the KPIs tab.
To add a KPI to the digest email, tick the checkbox next to the desired KPI. After all KPIs are added (or deselected), click Save.
The following KPIs are available in the KPIs tab on a digest email template form out-of-box in Odoo:
 General
- Connected Users
- Messages
Project
- Open Tasks
Recruitment
- Employees
CRM
- New Leads/Opportunities
- Opportunities Won
Sales
- All Sales
- eCommerce Sales
Point of Sale
- POS Sales
Live Chat
- % of Happiness
- Conversations handled
- Time to answer (sec)
Helpdesk
- Tickets Closed
Invoicing
- Revenue
- Banks and Cash Moves
Recipients
Digest email recipients are added from the Recipients tab of the digest email template form.
To add a recipient, navigate to Settings app ‣ Statistics section, and click Configure Digest Emails. Then, select the desired digest email, and open the Recipients tab.
To add a recipient, click Add a line, and an Add Recipients pop-up window appears, with all available users to add as recipients.
From the pop-up window, tick the checkbox next to the Name of the user(s), and click the Select button.
To remove a user as a recipient, click the ❌ (remove) icon to the far-right of the user listed in the Recipients tab.
Click Save to implement the changes.
Create digest emails
To create a new digest email, navigate to Settings app ‣ Statistics section, and click Configure Digest Emails. Then, click Create to create a new digest email.
A separate page, with a blank digest email template appears, and presents a variety of editable settings, including:
- Digest Name: the name of the digest email.
- Periodicity: control how often digest emails are sent (Daily, Weekly, Monthly, or Quarterly).
- Next Send Date: the date on which the digest email will be sent again.
- KPIs tab: check/uncheck each calculated KPI that appears in digest emails. A ticked box indicates an active KPI in the digest email. See the section on KPIs.
- Recipients tab: add/remove users who receive the digest emails. See the section on Recipients.
From there, give the digest email a Digest Name, specify Periodicity, choose the desired KPIs, and add Recipients, as needed.
After clicking Save, the new custom digest email is available as a selection in the Digest Email field, located in the Settings app ‣ Statistics section.
Custom KPIs with Odoo Studio
The KPIs on a digest email template form, in the KPIs tab, can be customized using Odoo Studio.
Warning
Additional costs to the database subscription are incurred, should Odoo Studio need to be installed.
To begin, click the 🛠️ (tools) icon in the top-right of the screen. This is the link to the Odoo Studio application.
In order to create additional fields, create two fields on the digest object:
- Create a boolean field called kpi_myfield, and display it in the KPIs tab.
- Create a computed field called kpi_myfield_value that computes the customized KPI.
- Select the KPIs in the KPIs tab.
Tip
Here is the source code for the digest.py file, which guides the programmer in the coding of the computed field.
See also
Users can also click the Recipients tab, and then the vertical three-dot (kebab) menu to edit this view. Either click EDIT LIST VIEW or EDIT FORM VIEW to modify this tab.
Computed values reference table
LABEL | VALUE |
|---|---|
Connected Users | kpi_res_users_connected_value |
Messages Sent | kpi_mail_message_total_value |
New Leads | kpi_crm_lead_created_value |
Opportunities Won | kpi_crm_opportunities_won_value |
Open Tasks | kpi_project_task_opened_value |
Tickets Closed | kpi_helpdesk_tickets_closed_value |
% of Happiness | kpi_livechat_rating_value |
Conversations handled | kpi_livechat_conversations_value |
Time to answer (sec) | kpi_livechat_response_value |
All Sales | kpi_all_sale_total_value |
eCommerce Sales | kpi_website_sale_total_value |
Revenue | kpi_account_total_revenue_value |
Bank & Cash Moves | kpi_account_bank_cash_value |
POS Sales | kpi_pos_total_value |
New Employees | kpi_hr_recruitment_new_colleagues_value |
On this page
Get Help
Contact Support Ask the Odoo Community
![]()
EN
Odoo 18
Email templates
Email templates are saved emails that are used repeatedly to send emails from the database. They allow users to send quality communications, without having to compose the same text repeatedly.
Creating different templates that are tailored to specific situations lets users choose the right message for the right audience. This increases the quality of the message and the overall engagement rate with the customer.
Note
Email templates in Odoo use QWeb or XML, which allows for editing emails in their final rendering, making customizations more robust, without having to edit any code whatsoever. This means that Odoo can use a Graphical User Interface (GUI) to edit emails, which edits the backend code. When the received email is read by the end user’s program, different formatting and graphics will appear in the final form of it.
Access email templates in developer mode by navigating to Settings app ‣ Technical menu ‣ Email ‣ Email Templates.
Editing email templates
The powerbox feature can be used when working with email templates. This feature provides the ability to directly edit the formatting and text in an email template, as well as the ability to add links, buttons, appointment options, or images.
Additionally, the XML/HTML code of the email template can be edited directly, via the </> icon. Dynamic placeholders (referencing fields within Odoo) are also available for use in the email template.
Powerbox
The powerbox feature is an enriched text editor with various formatting, layout, and text options. It can also be used to add XML/HTML features in an email template. The powerbox feature is activated by typing a forward slash / in the body of the email template.
When a forward slash / is typed in the body of an email template, a drop-down menu appears with the following options:
Structure
- Bulleted list: Create a simple bulleted list.
- Numbered list: Create a list with numbering.
- Checklist: Track tasks with a checklist.
- Table: Insert a table.
- Separator: Insert a horizontal rule separator.
- Quote: Add a blockquote section.
- Code: Add a code section.
- 2 columns: Convert into two columns.
- 3 columns: Convert into three columns.
- 4 columns: Convert into four columns.
Format
- Heading 1: Big section heading.
- Heading 2: Medium section heading.
- Heading 3: Small section heading.
- Switch direction: Switch the text’s direction.
- Text: Paragraph block.
Media
- Image: Insert an image.
- Article: Link an article.
Navigation
- Link: Add a link.
- Button: Add a button.
- Appointment: Add a specific appointment.
- Calendar: Schedule an appointment.
Widgets
- 3 Stars: Insert a rating over three stars.
- 5 Stars: Insert a rating over five stars.
Basic Blocks
- Signature: Insert your signature.
Marketing Tools
- Dynamic Placeholders: Insert personalized content.
Tip
To use any of these options, click on the desired feature from the powerbox drop-down menu. To format existing text with a text-related option (e.g. Heading 1, Switch direction, etc.), highlight the text, then type in the activator key (forward slash) /, and select the desired option from the drop-down menu.
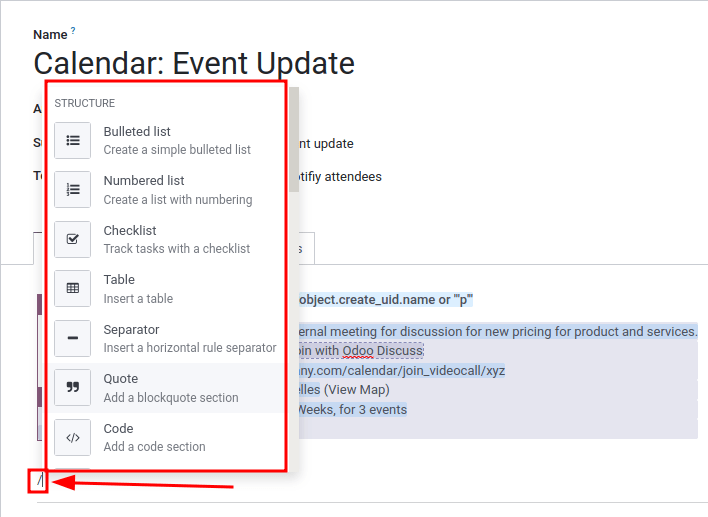
See also
XML/HTML code editor
To access the XML/HTML editor for an email template, first enter developer mode. Then, click the </> icon in the upper-right corner of the template, and proceed to edit the XML/HTML. To return to the standard text editor, click the </> icon again.
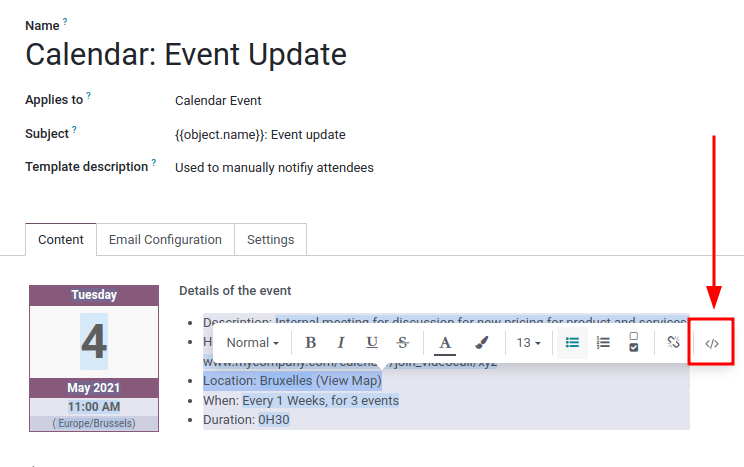
Warning
The XML/HTML editor should be accessed with caution as this is the backend code of the template. Editing the code can cause the email template to break immediately or when upgrading the database.
Dynamic placeholders
Dynamic placeholders reference certain fields within the Odoo database to produce unique data in the email template.
Example
Many companies like to customize their emails with a personalized piece of customer information to grab attention. This can be accomplished in Odoo by referencing a field within a model by inserting a dynamic placeholder. For example, a customer’s name can be referenced in the email from the Customer field on the Sales Order model. The dynamic placeholder for this field is: {{ object.partner_id }}.
Dynamic placeholders are encoded to display fields from within the database. Dynamic placeholders can be used in the Body (Content Tab) of the email template. They can also be used in the fields present in the Email Configuration tab, the Subject of the email, and the Language.
To use the dynamic placeholders in the Body of an email open the powerbox feature by typing in / into the body of the email template under the Content tab. Scroll to the bottom of the options list, to Marketing Tools. Next, select Dynamic Placeholder. Then select the dynamic placeholder from a list of available options and follow the prompts to configure it with the desired corresponding Odoo field. Each dynamic placeholder will vary in configuration.
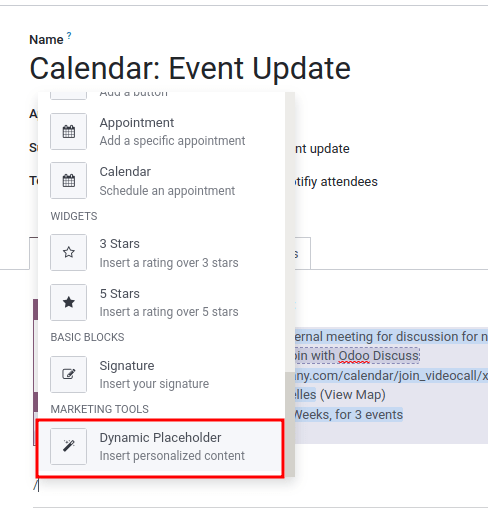
Note
Each unique combination of Fields, Sub-models and Sub-fields creates a different dynamic placeholder. Imagine it as a combination to the field that is being created.
To search the available fields, simply type in the front-end name (on user-interface) of the field in the search. This will find a result from all of the available fields for the model that the email template is created for.
Warning
Customizing email templates are out of the scope of Odoo Support.
Rich text editor
A rich text editor toolbar can be accessed by highlighting text in the email template. This can be used to change the heading, font size/style, color, add a list type, or a link.

Resetting email templates
Should the email template not work because the code has been altered it can be reset to restore it back to the out-of-box default template. Simply click on the Reset Template button in the upper left-hand of the screen and the template will be reset.
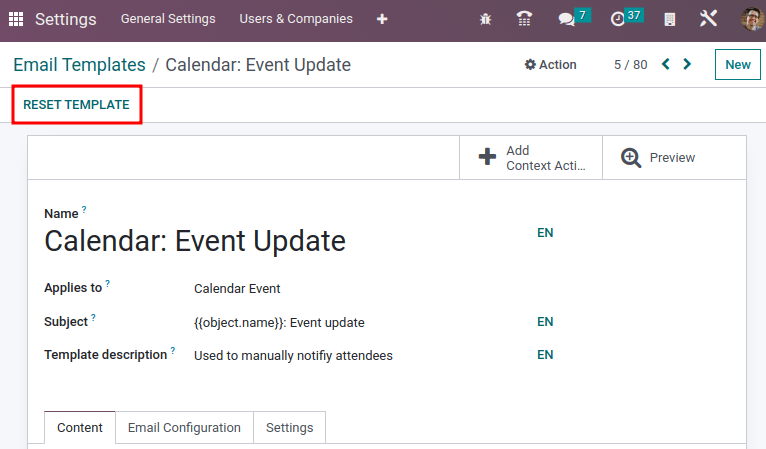
Default reply on email templates
Under the Email Configuration tab on an email template, there is a Reply To field. In this field, add email addresses to which replies are redirected when sending emails en masse using this template.
Tip
Add multiple email addresses by adding a comma , between the addresses or dynamic placeholders.
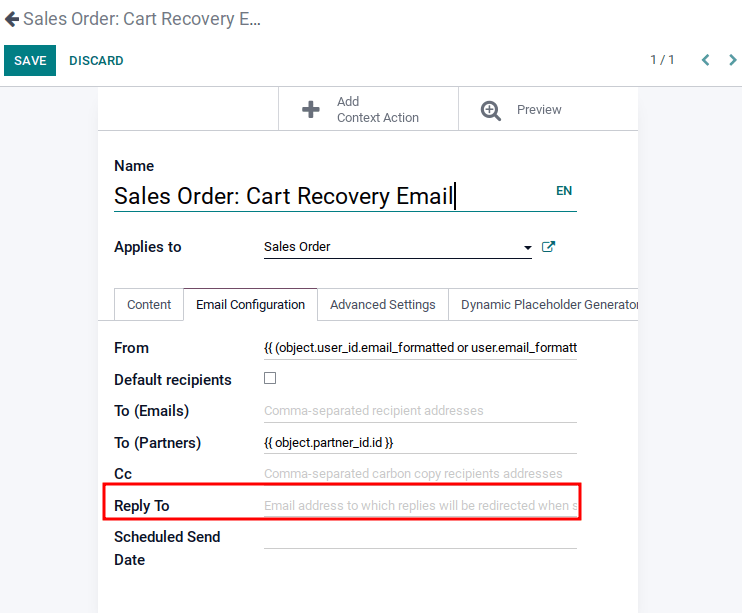
The Reply To field is only used for mass mailing (sending emails in bulk). Bulk emails can be sent in almost every Odoo application that has a list view option.
To send mass mails, while in list view, check the boxes next to the desired records where the emails are to be sent, click the Action button (represented by a ⚙️ (gear) icon), and select the desired email option from the Action drop-down menu. Email options can vary by the particular list view and application.
If it is possible to send an email, a mail composer pop-up window appears, with values that can be defined and customized. This option will be available on the Action button on pages where emails can be sent in bulk—for example, on the Customers page of the CRM app. This action occurs throughout the Odoo database.
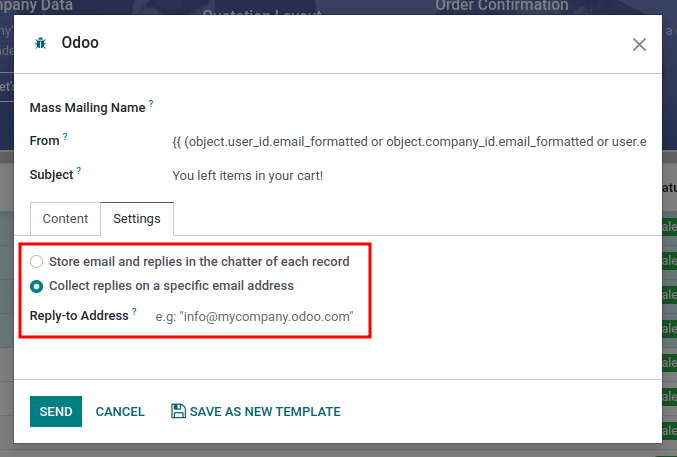
Transactional emails and corresponding URLs
In Odoo, multiple events can trigger the sending of automated emails. These emails are known as transactional emails, and sometimes contain links redirecting to the Odoo database.
By default, links generated by the database use the dynamic web.base.url key defined in the system parameters. For more information about this, see system parameters.
If the Website application is not installed, the web.base.url key will always be the default parameter used to generate all the links.
Important
The web.base.url key can only have a single value, meaning that, in a multi-website or multi-company database environment, even if there is a specific domain name for each website, the links generated to share a document (or the links within a transactional email) may remain the same, regardless of which website/company is related to the sending of the email/document.
Example
If the Value of the web.base.url system parameter is equal to https://www.mycompany.com and there are two separate companies in Odoo with different website URLs: https://www.mycompany2.com and https://www.mycompany1.com, the links created by Odoo to share a document, or send a transactional email, come from the domain: https://www.mycompany.com, regardless of which company sends the document or email.
This is not always the case, as some Odoo applications (eCommerce, for example) have a link established in the database with the Website application. In that case, if a specific domain is defined for the website, the URL generated in the email template uses the domain defined on the corresponding website of the company.
Example
When a customer makes a purchase on an Odoo eCommerce website, the order has an established link with that website. As a result, the links in the confirmation email sent to the customer use the domain name for that specific website.
Note
A document shared using the Documents application will always use the web.base.url key, as the document shared is not associated with any particular website. This means that the URL will always be the same (the web.base.url key value), no matter what company it’s shared from. This is a known limitation.
For more information about how to configure domains, check out the domain name documentation.
Updating translations within email templates
In Odoo, email templates are automatically translated for all users in the database for all of the languages installed. Changing the translations shouldn’t be necessary. However, if for a specific reason, some of the translations need to be changed, it can be done.
Warning
Like any modification in the code, if translation changes are not done correctly (for example, modifications leading to bad syntax), it can break the template, and as a result, the template will appear blank.
In order to edit translations, first enter developer mode. Then, on the email template, click on the Edit button, and then click on the language button, represented by the initials of the language currently being used (e.g. EN for English).
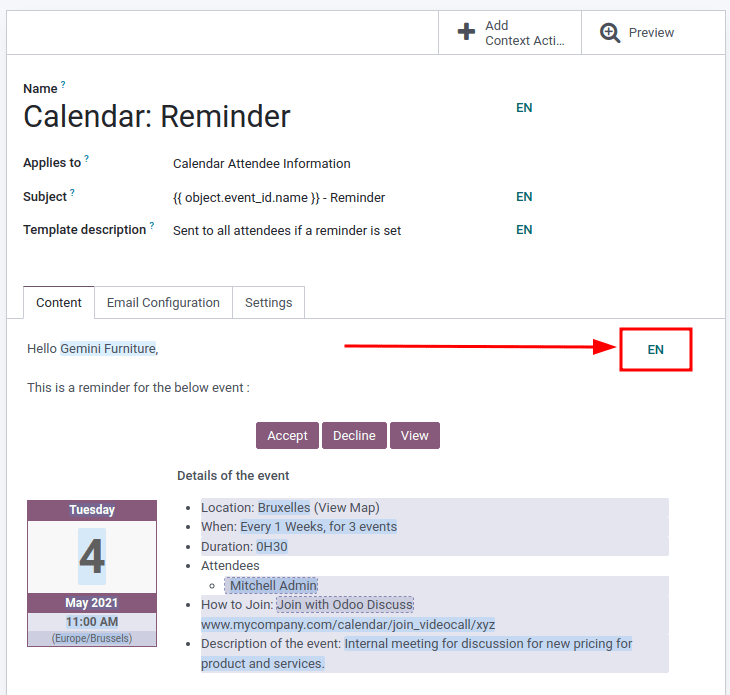
Note
If there aren’t multiple languages installed and activated in the database, or if the user does not have administration access rights, the language button will not appear.
A pop-up window with the different languages installed on the database appears. From this pop-up, editing of translations is possible. When the desired changes have been made, click the Save button to save the changes.
![]()
Note
When editing the translations, the default language set in the database appears in bold.
On this page
Get Help
Contact Support Ask the Odoo Community
![]()
EN
Odoo 18
Multi-company
In Odoo, multiple companies can exist within a single database. This allows for some data to be shared among companies, while still maintaining some level of separation between entities.
Before deciding to use the multi-company feature, there are several factors to consider.
Important
Multi-company is only available in One App Free databases, or with Custom plans.
Accessing multiple companies
The list of companies an employee has access to in a multi-company database can be found at the top-right of the main Odoo menu bar, where the active company is listed. Click on the company name to reveal a list of all allowed companies. To switch to a different company, click on the company name in the drop-down menu. To enable multiple companies at once, tick the checkbox next to each desired company name.
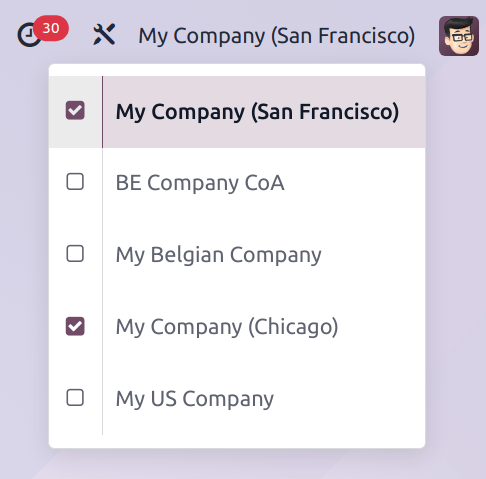
An example of a user with access to multiple companies. The current company is My Company (San Francisco), while My Company (Chicago) is also active.
Note
The database may refresh after each checkbox is ticked.
Multiple active companies
If more than one company is active at a time, one company is highlighted in purple, and is listed on the menu bar. This is the considered the current company.
When creating a new record, the current company is added to the record in the Company field, except under the following circumstances:
- The Company field for a new product, or a new contact, is left blank.
- If there is a related document already in the system, the Company field on the new record defaults to the same company.
Example
Mitchell Admin has multiple companies enabled, but the current company is My Company (Chicago). When he creates a new product record, the Company field is left blank by default.
When a new sales team is created, the Company field automatically defaults to My Company (Chicago).
Share data
In a multi-company database, certain records are able to be utilized by all of the companies (or several, based on permissions).
Products
In an multi-company database, new products are created with the Company field blank, by default. If the Company field remains blank, the product is shared across all companies.
Contacts
Similar to products, contact records are shared across companies, by default. To limit access to a single company, click the Company field on a contact form, and select a company to assign the contact to.
Inter-company transactions
The Inter-Company Transactions feature allows for one company in the database to sell or purchase goods and services from another company within the same database. Counterpart documents for orders and invoices can be automatically generated and synchronized, depending on the configuration settings.
Warning
To ensure inter-company transactions are handled appropriately, certain configurations, such as fiscal positions and localizations, need to be accurately assigned. See Inter-Company Transactions for additional information.
Use cases
Multinational companies
A multinational retail chain, which operates in the United States and Canada, needs to manage transactions in both USD and CAD currencies.
Additionally, because both countries have different tax laws and regulations, it is in the best interest of the customer to utilize the multi-company feature.
This allows for inter-company transactions they need to manage inventory moves across international borders, while making it simple to sell to customers in both countries in their own currency.
Separate processes
A small furniture company is developing a new line of products that require a separate procurement, inventory, and manufacturing process. The new products are drastically different from the existing catalog. The company is considering utilizing the multi-company feature to treat this new line as a different entity.
To keep their database from becoming overly complex, the furniture company does not need to add an entirely new company. Instead, they can take advantage of existing features, such as analytic accounting, and multiple warehouses, to manage the new product line, without having to overly complicate transactions.
Limitations
In some instances, a multi-company database may not be the best option, due to potential limitations.
Access rights
A user’s access rights are configured on a database level. If a user has access to more than one company in a multi-company database, their access rights are the same across every company.
Shared records
Individual records are either shared between all companies, or belong to a single company.
PDF Reports
Some customizations, specifically for PDF reports, apply to all companies. It is not always possible to separate reports for individual companies.
On this page
Get Help
Contact Support Ask the Odoo Community
![]()
- User Docs
- Database management
- Developer
- Contributing
EN
Odoo 18
Internet of Things (IoT)
Odoo Internet of Things (IoT) allows to connect physical devices such as barcode scanners, receipt printers, payment terminals, measurement tools, etc. to an Odoo database using an IoT system.
The following IoT systems are supported:
- IoT box: micro-computer, plug-and-play device (i.e., the Odoo IoT program is pre-installed);
- Windows virtual IoT: Odoo IoT program for Windows that can be installed on a Windows computer.
Note
- MRP devices, including cameras and measurement tools, are not compatible with Windows virtual IoT.
- Multiple IoT systems can be used at the same time.
- It is also possible to create a Windows Virtual Machine on a MacOS/Linux computer. However, this option is not supported by Odoo, and no troubleshooting assistance will be provided.
IoT box subscription
An IoT box subscription is required for production use of IoT systems. If you have issues related to your subscription, contact the database’s account manager or Odoo partner for assistance.
Tip
If the subscription is linked to an Odoo.com portal user, check the information on the portal’s subscription page.
See also
IoT box
Set up an IoT box.Windows virtual IoT
Set up Windows virtual IoT.IoT system connection to Odoo
Connect the IoT system to your Odoo database and troubleshoot potential connection issues.Devices
Connect devices such as printers, screens, measurement tools, etc., to the IoT system.HTTPS certificate
Verify your IoT system and database meet the eligibility requirements for HTTPS certificate generation and address any related issues.IoT system updates
Update your IoT system’s image, core code, and handlers to benefit from the latest IoT fixes and features or reset the IoT system if needed.Get Help
Contact Support Ask the Odoo Community
![]()
- User Docs
- Database management
- Developer
- Contributing
EN
Odoo 18
IoT box
To start using an IoT box:
- Make sure you have a valid IoT box subscription in addition to your Odoo subscription.
- Connect your devices to the IoT box.
- Connect the IoT box to the network.
- Connect the IoT box to your Odoo database.
See also
Video: How to Set Up and Use the Odoo IoT Box: A Beginner’s Guide
Note
Devices can also be connected after the IoT box is added to the network and/or connected to the database; however, a reboot of the IoT box might be required.
Network connection
The IoT box can be connected to the network via Ethernet or Wi-Fi.
Important
All devices must be connected to the same network: the IoT box, the device(s) connected to the IoT box, and the computer connected to Odoo.
Ethernet
Plug the Ethernet cable into the IoT box’s Ethernet port and an available port on your router, then connect the IoT box to a power source.
Wi-Fi
Make sure no Ethernet cable is connected to the IoT box and follow these steps:
- Connect the IoT box to a power source and wait a few minutes for it to power on.
- Access your computer’s Wi-Fi settings and select the IoT box’s network. The network name is in the format IoTBox-xxxxxxxxxxxx (where xxxxxxxxxxxx is a unique identifier).
- Connect to the IoT box’s Wi-Fi network and sign into it; your browser should automatically open and redirect to the IoT box’s homepage.
Note
Depending on your operating system, the browser might not open and redirect to the IoT box’s homepage. In this case, open your browser manually and navigate to http://10.11.12.1 or any url starting with http (e.g., http://odoo.com).- On the IoT box’s homepage, click Configure next to the Internet Status section.
- Wait a few minutes for the available networks to be scanned, select the network, enter the Wi-Fi’s password, and click Connect.
Note
Once connected to the Wi-Fi network, the IoT box stops emitting its Wi-Fi signal, and the computer should automatically reconnect to its original network. If it does not, reconnect to it manually.
IoT box homepage
To access the IoT box’s homepage, open a web browser on the same network as the IoT box and navigate to the IoT box’s IP address.

The IoT box’s IP address can be retrieved by:
- connecting the IoT box to an external monitor: the IP address is displayed on the screen.

- connecting the IoT box to a supported receipt or label printer with a USB cable: the IP address is automatically printed.
- accessing the administrator interface of the router to which the IoT box is connected or using third-party software to scan the network.
Once the IoT box is connected to the Odoo database, its homepage can be accessed from Odoo by opening the IoT app and clicking the URL displayed on the IoT box’s card.
On this page
Get Help
Contact Support Ask the Odoo Community
![]()
- User Docs
- Database management
- Developer
- Contributing
EN
Odoo 18
Windows virtual IoT
To start using the Windows virtual IoT:
- Make sure all prerequisites are met.
- Install the Windows virtual IoT on a Windows computer.
- Configure the Windows Firewall.
- Connect your devices to the Windows virtual IoT.
- Connect the Windows virtual IoT to your Odoo database.
Prerequisites
The following prerequisites must be met before setting up and using the Windows virtual IoT:
- A valid IoT box subscription.
- An updated and recent version of Windows (i.e., Windows 10 or Windows 11) installed on a Windows computer (laptop, desktop, or server).
Note
- MRP devices, including cameras and measurement tools, are not compatible with Windows virtual IoT.
- It is also possible to create a Windows Virtual Machine on a MacOS/Linux computer. However, this option is not supported by Odoo, and no troubleshooting assistance will be provided.
Installation
To install the Windows virtual IoT on a Windows computer:
- Access Odoo’s download page and download the Odoo installation package for Windows matching your database’s version.
- Open the downloaded .exe file, allow the app to make changes to your device, select a language, and click OK.
- Click Next, then I Agree to accept the terms and conditions and continue.
- Select Odoo IoT from the Select the type of install dropdown list. The following components should be selected: Odoo Server, Odoo IoT, Nginx WebServer, and Ghostscript interpreter.
- Verify you have the required space on your computer and click Next.
- In the Destination folder, enter C:\odoo and click Install.
Warning
Do not install Odoo’s Windows virtual IoT in any Windows user directory, as this can cause issues with HTTPS certificate generation. - Once the installation is complete, click Next.
- Set up GPL Ghostscript: Click Next, agree to the terms and conditions, click Install, then Finish.
- Click Next, Next, and Finish to complete the setup. The IoT system’s homepage automatically opens in a web browser with the URL http://localhost:8069.
Tip
If the web browser does not show anything, restart the Windows virtual IoT service. - Check that you can access the IoT system’s homepage in a web browser:
- on the Windows virtual IoT computer, and
- on another device on the same network as the IoT system by navigating to the URL http://xxx:8069 (where xxx is the IoT system’s IP address).
- on another device on the same network as the IoT system by navigating to the URL https://xxx (where xxx is the IoT system’s IP address) to test for HTTPS connection.
Tip
If you cannot access the IoT system’s homepage from another device, create a Windows Firewall rule to allow communication through port 8069.
Windows Firewall configuration
Firewalls help keep devices secure but can sometimes block legitimate connections. If the Windows virtual IoT isn’t accessible on the LAN, for example from another device, it could be due to a firewall blocking the connection. To prevent this issue, configure exceptions for network discovery in the OS or firewall settings.
Note
If third-party firewall software is installed on the Windows computer, refer to the software’s documentation to configure firewall exceptions.
To create a rule on Windows Defender and allow communication through port 8069, follow these steps:
- Search the Windows start menu for firewall and select the Windows Defender Firewall with Advanced Security app.
- In the left part of the window, select Inbound Rules.
- In the right part of the window, under Actions, click New Rule.
- In the New Inbound Rule Wizard that opens, select the Port type of rule and click Next.
- On the Protocols and Ports page, make sure TCP and Specified local ports are selected, enter the following in the field: 8069, 80, 443, and click Next.
Note
Other ports may be necessary depending on your IoT devices. For example, for the Worldline payment terminal, add the 9050 port. - On the Action page, select Allow the connection and click Next.
- On the Profile page, disable any connection type(s) that don’t apply to your Windows computer and click Next.
- On the Name page, provide a Name (e.g., Odoo) and, optionally, a brief Description, then click Finish.
See also
Windows Firewall rules documentation
Windows virtual IoT homepage
To access the Windows virtual IoT’s homepage, navigate to the URL http://localhost:8069 on the Windows virtual IoT computer or open a web browser from another computer on the same network as the IoT system and navigate to the URL http://xxx:8069 (where xxx is the IoT system’s IP address).
Once the Windows virtual IoT is connected to the Odoo database, its homepage can be accessed from Odoo by opening the IoT app and clicking the URL displayed on the IoT system’s card.

Note
Make sure the Windows Firewall is configured to allow access.
Device connection
Most devices automatically connect to the Windows computer used for the Windows Virtual IoT through Windows Plug and Play (PnP). However, if Windows does not recognize the device automatically upon connection, the administrator may need to manually install the appropriate drivers.
Tip
After connecting the devices to the computer, refresh the IoT system’s homepage to verify that the device is listed. If the device does not appear, reload the handlers from the IoT system’s homepage.
Windows virtual IoT restart
To manually restart the Windows IoT server, search the Windows start menu for services and select the Services app. Scroll down to the odoo-server-xxx service (where xxx is the odoo version), right-click it, and select Start or Restart.
Windows virtual IoT uninstall
To uninstall the Windows virtual IoT, uninstall the Odoo program on your Windows computer. Confirm the uninstallation and complete the steps in the Odoo Uninstall dialog.
On this page
Get Help
Contact Support Ask the Odoo Community
![]()
- User Docs
- Database management
- Developer
- Contributing
EN
Odoo 18
IoT system connection to Odoo
Prerequisites
To connect the IoT system to an Odoo database, the following prerequisites must be met:
- The Internet of Things (IoT) app must be installed.
- The IoT system must be connected to the network.
- The computer connecting to Odoo must be on the same network as the IoT system.
Note
It is recommended to connect the IoT system to a production instance, as other types of environments may cause issues (e.g., with HTTPS certificate generation).
See also
Connection
The IoT system can be connected to the Odoo database using a pairing code or a connection token.
Connection using a pairing code
Note
- The pairing code is displayed for up to 5 minutes after the IoT system starts. If the code is no longer visible, reboot the IoT box or restart the Windows virtual IoT service to display the pairing code again. Alternatively, connect the IoT system to the database using a connection token.
- The pairing code is not displayed if the IoT system is already connected to a database (e.g., a test database).
- Retrieve the IoT’s system pairing code:
IoT boxWindows virtual IoT
Connect the IoT box to an external monitor or printer. If the IoT box was already plugged prior to this, reboot it by unplugging it for a few seconds and replugging it.- External monitor: The pairing code should be displayed on the screen a few minutes after rebooting the IoT box.
- Printer: The pairing code should be printed automatically.
If no external monitor or printer is connected to the IoT box, access the IoT box’s homepage; the code is displayed in the Pairing Code section. - In Odoo, open the IoT app and click Connect.
- In the Connect an IoT Box popup that opens, enter the Pairing code.
- Click Pair.
Connection using a connection token
- In Odoo, open the IoT app and click Connect.
- In the Connect an IoT Box popup that opens, copy the Token.
- Access the IoT box’s or Windows virtual IoT’s homepage.
- In the Odoo database connected section, click Configure.
- Paste the token into the Server Token field and click Connect.
IoT system form
Once the IoT system is connected to the Odoo database, it is displayed as a card in the IoT app. Click the IP address on the card to access the IoT box’s or Windows virtual IoT’s homepage. Click the card to access the list of devices connected to the IoT system.
Tip
Enable the developer mode to access the IoT system’s Technical Information, such as its Identifier, Domain address, and Image version.
Note
By default, drivers are automatically updated every time the IoT system is restarted. To disable automatic updates, uncheck the Automatic drivers update option.
Troubleshooting
The pairing code does not appear or does not work
The pairing code might not be displayed or printed under the following circumstances:
- The IoT system is not connected to the Internet.
- The IoT system is already connected to an Odoo database.
- The pairing code display time has expired. Reboot the IoT box or restart the Windows virtual IoT service to display the pairing code again.
- The IoT system’s image version is too old and needs to be updated.
The IoT system is connected but does not appear in the database
The IoT system might take a few minutes to restart when it connects to a database. If it still does not appear after a few minutes:
- Verify that the IoT system can reach the database and the server does not use a multi-database environment.
- Reboot the IoT box or restart the Windows virtual IoT service.
The IoT box is connected to the Odoo database but cannot be reached
Verify that the IoT system and the computer running the Odoo database are connected to the same network.
The Windows virtual IoT’s homepage cannot be accessed from another device
Check the Windows Firewall configuration.
The IoT system is disconnected from the database after an Odoo upgrade
Update the IoT system’s image by flashing the IoT box’s card or uninstalling the Windows virtual IoT program and reinstalling the latest package for Windows matching your database’s version.
On this page
Get Help
Contact Support Ask the Odoo Community
![]()
- User Docs
- Database management
- Developer
- Contributing
EN
Odoo 18
HTTPS certificate (IoT)
Hypertext Transfer Protocol Secure (HTTPS) is the secure and encrypted version of Hypertext Transfer Protocol (HTTP), which is the primary protocol used for data communication between a web browser and a website. It secures communications by using an encryption protocol known as Transport Layer Security (TLS), previously called Secure Sockets Layer (SSL). The security of HTTPS relies on TLS /SSL certificates, which authenticate the provider and verify their identity.
The use of HTTPS is required to communicate with certain network devices, particularly payment terminals. If the HTTPS certificate is not valid, some devices cannot interact with the IoT system.
Note
In this documentation and throughout Odoo, the term HTTPS certificate refers to a valid SSL certificate that allows an HTTPS connection.
HTTPS certificate generation
The HTTPS certificate is generated automatically. When the IoT system is (re-)started (e.g., after it is connected to the Odoo database), a request is sent to https://www.odoo.com, which returns the HTTPS certificate if the IoT system and database meet the eligibility criteria:
- The database must be a production instance. The database instance should not be a copy, a duplicate, a staging, or a development environment.
- The Odoo subscription must be ongoing (In Progress status) and have an IoT box subscription line.
When the certificate has been received:
- The IoT system’s homepage address is updated to a new HTTPS URL ending with .odoo-iot.com. Click the URL to establish a secure HTTPS connection.

- The HTTPS certificate banner displays the certificate’s validity period. To view this information, click the (cogs) button on the IoT system’s homepage.

HTTPS certificate generation issues and errors
The HTTPS certificate does not generate
Potential causes include the following:
- No IoT box subscription is linked to your account.
- The IoT box subscription was added after connecting the IoT system to the database. In this case, refresh the IoT system’s homepage or reboot/restart the IoT system to regenerate the HTTPS certificate.
- The firewall is preventing the HTTPS certificate from generating correctly. In this case, deactivate the firewall until the certificate is successfully generated.
Note
Some devices, such as routers with a built-in firewall, can prevent the HTTPS certificate from generating.
The IoT system’s homepage can be accessed using its IP address but not the xxx.odoo-iot.com URL
Contact your system or network administrator to address the issue. Network-related problems are beyond the scope of Odoo support services.
- If the router allows manual DNS configuration, update the settings to use Google DNS.
- If the router does not support this, you need to update the DNS settings directly on each device that interacts with the IoT system to use Google DNS. Instructions for configuring DNS on individual devices can be found on the respective manufacturer’s website.
Note
- Some IoT devices, such as payment terminals, likely do not require DNS changes, as they are typically pre-configured with custom DNS settings.
- On some browsers, an error code mentioning the DNS (such as DNS_PROBE_FINISHED_NXDOMAIN) is displayed.
Errors
A specific error code is displayed on the IoT system’s homepage if any issues occur during the generation or reception of the HTTPS certificate.
Tip
When you access the IoT system’s homepage, it automatically checks for an HTTPS certificate and attempts to generate one if it is missing. If an error appears, refresh the page to see if the issue is resolved.
ERR_IOT_HTTPS_CHECK_NO_SERVER
The server configuration is missing, i.e., the Odoo instance is not connected to the IoT system.
ERR_IOT_HTTPS_CHECK_CERT_READ_EXCEPTION
An error occurred while attempting to read the existing HTTPS certificate. Verify that the HTTPS certificate file is readable.
ERR_IOT_HTTPS_LOAD_NO_CREDENTIAL
The contract and/or database UUID is missing form the IoT.
Verify that both values are correctly configured. To update them, access the IoT box’s or Windows virtual IoT’s homepage, click the (cogs) button, then click Credential.
ERR_IOT_HTTPS_LOAD_REQUEST_EXCEPTION
An unexpected error occurred while the IoT system tried to reach https://www.odoo.com. This is likely due to network-related issues, such as:
- The IoT system does not have Internet access.
- Network restrictions (e.g., firewalls or VPNs) are preventing communication with https://www.odoo.com.
Note
- To access the full request exception details with information regarding the error, enable the developer mode, click the IoT system’s card in the IoT app, and click Download logs on the IoT system’s form. To define the log levels recorded in the IoT system’s log file, access the IoT box’s or Windows virtual IoT’s homepage, click the (cogs) button, then Log level at the bottom of the page.
- To address network-related issues, contact your system or network administrator; these issues are beyond the scope of Odoo support services.
ERR_IOT_HTTPS_LOAD_REQUEST_STATUS
The IoT system successfully reached https://www.odoo.com but received an unexpected HTTP response (status codes).
This error code includes the HTTP status. For example, ERR_IOT_HTTPS_LOAD_REQUEST_STATUS 404 means the server returned a “Page Not Found” response.
To solve this issue:
- Open https://www.odoo.com in a web browser to check if the website is temporarily down for maintenance.
- If https://www.odoo.com is down for maintenance, wait for it to resume.
If the website is operational, open a support ticket and make sure to include the 3-digit HTTPS status code in the ticket.
ERR_IOT_HTTPS_LOAD_REQUEST_NO_RESULT
The IoT system successfully connected to https://www.odoo.com, but the server refused to provide the HTTPS certificate.
Check that the IoT system and database meet the eligibility requirements for an HTTPS certificate.
On this page
Get Help
Contact Support Ask the Odoo Community
![]()
- User Docs
- Database management
- Developer
- Contributing
EN
Odoo 18
IoT system updates
Due to the complexity of IoT systems, the term updating can refer to several processes, including:
- Updating the IoT system’s image and/or core code;
- Updating the handlers, which include the interfaces and drivers.
Image and core code update
IoT boxWindows virtual IoT
To check if the IoT box is up-to-date (and update it if needed), access the IoT box’s homepage, click the (cogs) button at the top-right, then Update in the Version section.
Tip
Enable the developer mode to view the current versions of the IoT box’s image and core code.
Image update
To update the IoT box’s image, flash its SD card. Flashing can be performed using balenaEtcher, a free and open-source tool for writing disk images to SD cards.
Note
- Updating the IoT system’s image is often required after upgrading the Odoo database to a newer version.
- A computer with a micro SD card reader/adapter is required to flash the micro SD card.
- An alternative software for flashing the micro SD card is Raspberry Pi Imager.
- Download balenaEtcher.
- Insert the IoT box’s micro SD card into the computer or adapter.
- Open balenaEtcher, click Flash from URL, and enter the following URL: http://nightly.odoo.com/master/iotbox/iotbox-latest.zip.
- Click Select target and select the SD card.
- Click Flash and wait for the process to finish.

Core code update
To update the IoT box’s core code, click Update under IoT Box Update in the Update popup.
Danger
This process may take over 30 minutes. Do not turn off or unplug the IoT box during this time, as doing so could leave the device in an inconsistent state, requiring the IoT box to be reflashed with a new image.
Handler (driver) update
To update the IoT system’s handlers (i.e., drivers and interfaces) and synchronize them with the configured server handler’s code, for example, to resolve issues where devices are not functioning properly with the IoT system, proceed as follows:
- Access the IoT box’s or Windows virtual IoT’s homepage and click the (cogs) button at the top-right.
- Click Update in the Version section.
- In the Update popup that opens, click Force Drivers Update.
Important
If you have an on-premise or Odoo.sh database, the configured server must be up-to-date to ensure the handlers’ code includes the latest fixes and patches.
Note
A handler update is also performed automatically every time the IoT system is restarted unless the Automatic drivers update option is disabled in the Technical information tab in the IoT system’s form in Odoo.
On this page
Get Help
Contact Support Ask the Odoo Community
![]()
- User Docs
- Database management
- Developer
- Contributing
EN
Odoo 18
IoT box SSH connection
Note
SSH connections are only available for IoT boxes, not the Windows virtual IoT.
Warning
- This feature should only be used with trusted parties, as it provides administrative access to the IoT box, which can create security issues.
- Managing an SSH connection is not covered under the standard Odoo support scope. Visit the Odoo Support page for additional information about what is covered.
To provide an SSH connection to an IoT box, you must generate a password:
- Access the IoT box’s homepage by opening the IoT app and clicking the IP address displayed on the IoT box’s card.
- Click the (cogs) button at the top-right, then Remote Debug.
- In the Remote Debugging popup that opens, click Generate and save the password securely. Once you close the popup, the password will no longer be available.
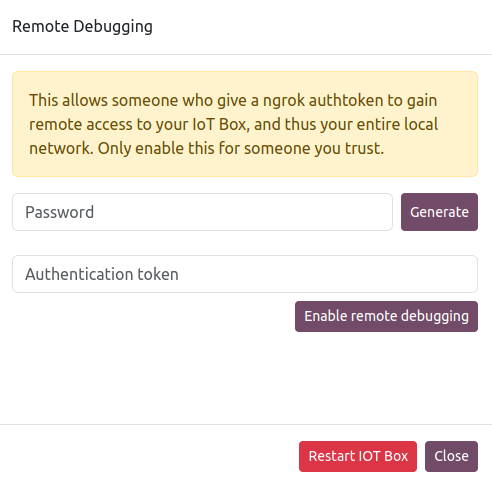
- Enter the Authentication Token provided by the user attempting to connect to the IoT box.
- Click Enable Remote Debugging.
See also
Get Help
Contact Support Ask the Odoo Community
![]()
- User Docs
- Database management
- Developer
- Contributing
EN
Odoo 18
Connect a screen
In Odoo, an IoT box can be connected to a screen display. After being configured, the screen can be used to display a Point of Sale (PoS) order to a client.
An example of a PoS (point of sale) order on a screen display.
Access the customer display by going to the IoT box homepage and clicking on the PoS Display button. To get to the IoT box homepage, navigate to IoT app ‣ IoT Boxes and click on the IoT box homepage link.
Connection
The way to connect the screen display to the IoT box differs depending on the model.
IoT Box model 4IoT Box model 3
Connect up to two screens with micro-HDMI cables on the side of the IoT box. If two screens are connected, they can display distinct content (see Screen Usage).
See also
Important
Screen(s) should be connected before the IoT box is switched on. If it is already on, connect the screen(s), and then restart the IoT box by unplugging it for ten seconds and plugging it back into its power source.
Warning
The usage of HDMI/micro-HDMI adapters may cause issues which will result in a blank, black screen on the screen display. Using the specific cable for the display connection is recommended.
If the connection was successful, the screen should display the POS Client display screen.
The screen should also appear in the list of Displays on the IoT box homepage. Alternatively, the display can be seen by accessing IoT app ‣ Devices.

Note
If no screen is detected, a default display named Distant Display will be displayed instead. This indicates that there is no hardware screen connected.

Usage
Show Point of Sale orders to customers
To use the screen in the Point of Sale app, go to Point of Sale ‣ Configuration ‣ Point of Sale, select a PoS, click Edit if necessary, and enable the IoT Box feature.
Next, select the screen from the Customer Display drop-down menu. Then click Save, if required.
The screen is now available for PoS sessions. A screen icon will appear in the menu at the top of the screen to indicate the screen’s connection status.
![]()
The screen will automatically show the PoS orders and update when changes are made to the order.
Display a website on the screen
Open the screen form view by accessing IoT app ‣ Devices ‣ Customer Display. This allows the user to choose a particular website URL to display on the screen using the Display URL field.
On this page
Get Help
Contact Support Ask the Odoo Community
![]()
- User Docs
- Database management
- Developer
- Contributing
EN
Odoo 18
Connect a measurement tool
With Odoo’s IoT box, it is possible to connect measurement tools to the Odoo database for use in the Quality app on a quality control point/quality check, or for use in a work center during the manufacturing process.
Find the list of supported devices here: Supported devices.
Connect with universal serial bus (USB)
To add a device connected by USB, plug the USB cable into the IoT box, and the device appears in the Odoo database.

Connect with bluetooth
Activate the Bluetooth functionality on the device (see the device manual for further explanation), and the IoT box automatically connects to the device.

Link a measurement tool to a quality control point in the manufacturing process
In the Quality app, a device can be set up on a quality control point. To do that, navigate to Quality app ‣ Quality Control ‣ Control Points, and open the desired control point to which the measurement tool should be linked.
From here, edit the control point, by selecting the Type field, and clicking Measure from the drop-down menu. Doing so reveals a field called Device, where the attached device can be selected.
Additionally, Norm and Tolerance can be configured. Save the changes, if required.
At this point, the measurement tool is linked to the chosen quality control point. The value, which usually needs to be changed manually, is automatically updated while the tool is being used.
Tip
Quality control points can also be accessed by navigating to IoT App ‣ Devices, then select the device. There is a Quality Control Points tab, where they can be added with the device.
Note
On a quality check detail form, the Type of check can also be specified to Measure. Access a new quality check detail page, by navigating to Quality app ‣ Quality Control ‣ Quality Checks ‣ New.
See also
Link a measurement tool to a work center in the Manufacturing app
To link a measurement tool to an action, it first needs to be configured on a work center. To do that, navigate to Manufacturing app ‣ Configuration ‣ Work Centers. Then, select the desired work center in which the measurement tool will be used.
On the work center page, add the device in the IoT Triggers tab, under the Device column, by selecting Add a Line. Then, the measurement tool can be linked to the Action drop-down menu option labeled Take Measure. A key can be added to trigger the action.
Important
It should be noted that the first listed trigger is chosen first. The order matters, and these triggers can be dragged into any order.
Note
On the Work Order screen, a status graphic indicates whether the database is correctly connected to the measurement tool.
See also
On this page
Get Help
Contact Support Ask the Odoo Community
![]()
- User Docs
- Database management
- Developer
- Contributing
EN
Odoo 18
Connect a camera
A camera can be connected to an IoT box with an Odoo database in just a few steps. Once a camera is connected to an IoT box, it can be used in a manufacturing process, or it can be linked to a quality control point/quality check. Doing so allows for the taking of pictures when a chosen quality control point/check has been reached, or when a specific key is pressed during manufacturing.
Connection
To connect a camera to an IoT box, simply connect the two via cable. This is usually done with a USB cable of some sort.
If the camera is supported, there is no need to set up anything, as it’ll be detected as soon as it’s connected.
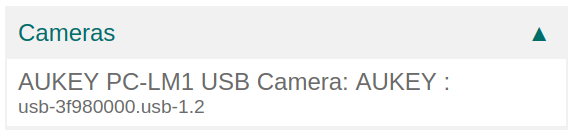
Link camera to quality control point in manufacturing process
In the Quality app, a device can be set up on a Quality Control Point. To do that, navigate to the Quality app ‣ Quality Control ‣ Control Points and open the desired Control Point that’ll be linked to the camera.
On the control point form, edit the control point by selecting the Type field, and clicking on Take a Picture from the drop-down menu. Doing so reveals a field called Device, wherein the attached device can be selected. Save the changes, if required.

The camera is now useable with the selected quality control point. When the quality control point is reached during the manufacturing process, the database prompts the operator to take a picture.
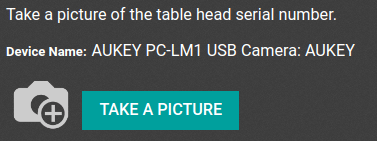
Note
Quality control points can also be accessed by navigating to IoT App ‣ Devices. From here, select the device. There is a Quality Control Points tab, where they can be added with the device.
Tip
On a quality check form, the Type of check can also be specified to Take a Picture. Navigate to Quality app ‣ Quality Control ‣ Quality Checks ‣ New to create a new quality check from the Quality Checks page.
See also
Link camera to a work center in the Manufacturing app
To link a camera to an action, it first needs to be configured on a work center. Navigate to Manufacturing app ‣ Configuration ‣ Work Centers. Next, go to the desired Work Center in which a camera will be used to reveal that specific work center’s detail form. From here, add the device in the IoT Triggers tab, in the Device column, by clicking Add a Line.
Now, the camera device can be linked to the Action column drop-down option labeled Take a Picture. A key can also be added to trigger the action.
Important
The first trigger listed is chosen first. The order of triggers matters, and they can be dragged into any desired order.
Note
On the Work Order screen, a status graphic indicates whether the database is correctly connected to the camera.
See also
On this page
Get Help
Contact Support Ask the Odoo Community
![]()
- User Docs
- Database management
- Developer
- Contributing
EN
Odoo 18
Connect a footswitch
When working in a manufacturing environment, it’s always better for an operator to have both hands available at all times. Odoo’s IoT box makes this possible when using a footswitch.
In fact, with a footswitch, the operator is able to go from one screen to another, and perform actions using their foot. This can be configured in just a few steps on the work center in the Manufacturing app.
Connection
To connect a footswitch to the IoT box, connect the two devices via cable. More often than not, this is done with a USB cable.
If the footswitch is a supported device, there is no need to take further action, since it’ll be automatically detected when connected.
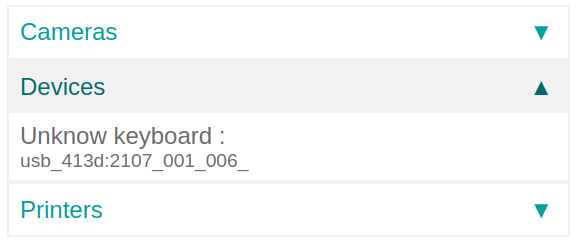
Link a footswitch to a work center in the Odoo Manufacturing app
To link a footswitch to an action, it first needs to be configured on a work center. Navigate to Manufacturing app ‣ Configuration ‣ Work Centers. From here, go to the desired Work Center in which the footswitch will be used, and add the device in the IoT Triggers tab, under the Device column, by selecting Add a Line. Doing so means the footswitch can be linked to an option in the Action column drop-down, and optionally, a key can be added to trigger it. An example of an Action in the Manufacturing app could be the Validate or Mark as Done buttons on a manufacturing work order.
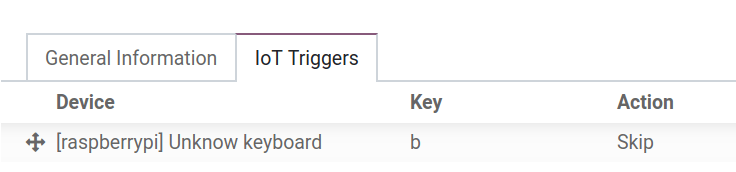
Important
It should be noted that the first listed trigger is chosen first. So, the order matters, and these triggers can be dragged into any order. In the picture above, using the footswitch automatically skips the part of the process that’s currently being worked on.
Note
On the Work Order screen, a status graphic indicates whether the database is correctly connected to the footswitch.
See also
On this page
Get Help
Contact Support Ask the Odoo Community
![]()
- User Docs
- Database management
- Developer
- Contributing
EN
Odoo 18
Connect a printer
Printer installation can be done in a few easy steps. The printer can be used to print receipts, labels, orders, or even reports from the different Odoo apps. In addition, printer actions can be assigned as an action on a trigger during the manufacturing process, or added onto a quality control point or a quality check.
Warning
The only way to connect a printer directly to an Odoo database is through the use of an IoT system. Without an IoT system, printing can still occur, but it is managed through the printer itself, which is not the recommended process.
Connection
IoT systems support printers connected through USB, network connection, or Bluetooth. Supported printers are detected automatically, and appear in the Devices list of the IoT app.
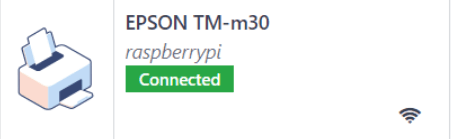
Note
Printers can take up to two minutes to appear in the IoT app Devices list.
Link a printer
Link work orders to a printer
Work orders can be linked to printers, via a quality control point, to print labels for manufactured products.
In the Quality app, a device can be set up on a quality control point. To do so, go to the Quality ‣ Quality Control ‣ Control Points, and open the desired control point.
Important
A manufacturing operation and work order operation need to be attached to a quality control point before the Type field allows for the Print Label option to be selected.
From here, edit the control point by selecting the Type field, and selecting Print Label from the dropdown menu of options. Doing so reveals the Device field, where the attached device can be selected.
The printer can now be used with the selected quality control point. When the quality control point is reached during the manufacturing process, the database presents the option to print labels for a specific product.
Tip
Quality control points can also be accessed by navigating to IoT ‣ Devices, then selecting the device. Go to the Quality Control Points tab to add them to the device.
Note
On a quality check form, the Type of check can also be set to Print Label.
See also
Link reports to a printer
It is possible to link report types to a specific printer. To do so:
- Go to IoT ‣ Devices and select the desired printer.
- Go to the Printer Reports tab and click Add a line.
- In the pop-up that opens, select the types of reports to be linked to the printer and click Select.
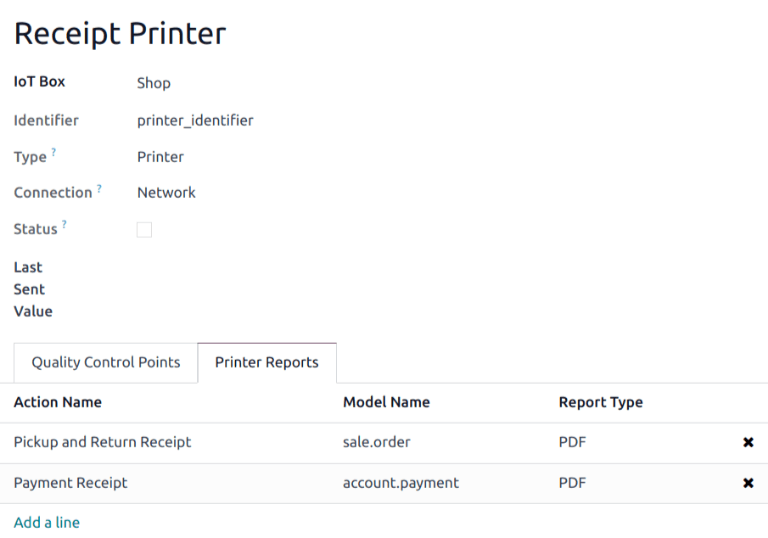
Tip
Reports can also be configured by enabling the developer mode and going to Settings ‣ Technical ‣ Reports. Select the desired report from the list and set an IoT Device.
The first time a linked report is selected to print, a Select Printers pop-up window appears. Tick the checkbox next to the correct printer for the report, and click Print. At that point, the report is linked to the printer.
Clear device printer cache
After a printer is linked to print a report, the setting is saved in a browser’s cache. This means a user can have different devices saved in their cache for different reports, based on the device they use to access Odoo. It also means different users can have a report automatically printed from different printers, based on their preferences.
To unlink a report from a printer, navigate to IoT ‣ Configuration ‣ Reset Linked Printers. This generates a list of reports that are linked to a printer on the current device. Click the Unlink button next to each report to remove the link.
Important
This step only prevents the report from automatically printing to the listed printer from the current browser. The report is still linked on the device, under the Printer Reports tab.
![]()
See also
Potential issues
The printer is not detected
If a printer does not appear in the devices list, go to the IoT box’s or Windows virtual IoT’s homepage, click Show in the Devices section, and make sure the printer is listed.
If the printer does not appear on the IoT system’s homepage, click Printer Server, then Administration, and Add Printer. If the printer is not in the list, it is likely not connected properly.
The printer outputs random text
For most printers, the correct driver should be automatically detected and selected. However, in some cases, the automatic detection mechanism might not be enough, and if no driver is found, the printer might print random characters.
The solution is to manually select the corresponding driver. On the IoT system’s homepage, click Printer Server, then Printers, and select the printer in the list. In the Administration dropdown menu, click Modify Printer. Follow the steps and select the printer’s make and model.
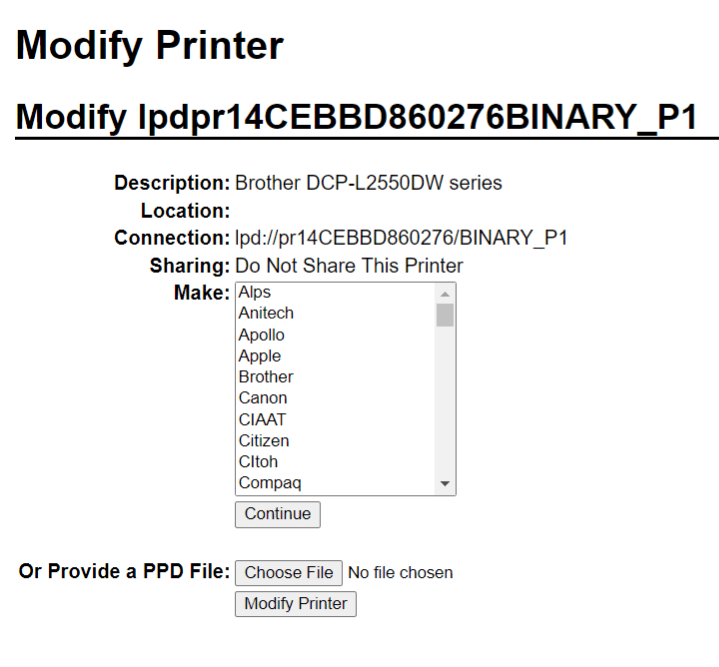
Note
Epson receipt printers and Zebra label printers do not need a driver to work. Make sure that no driver is selected for those printers.
The printer is detected but is not recognized correctly
If Odoo and the IoT system do not recognize the printer correctly, go to IoT ‣ Devices, click the device’s card to access its form, and set the Subtype field to the appropriate option: Receipt Printer, Label Printer, or Office Printer.
Epson configuration special case
Most Epson printers support printing receipts in Odoo Point of Sale using the GS v 0 command. However, the following Epson printer models do not support this command:
- TM-U220
- TM-U230
- TM-P60
- TMP-P60II
To bypass this issue, you can configure the printer to use the ESC * command.
First, review Epson’s website for compatibility for both the GS v 0 and ESC * commands.
If the printer is incompatible with GS v 0 but supports ESC *, configure the IoT system to use the ESC * command as follows:
- Access the IoT box’s or Windows virtual IoT’s homepage.
- Click the Printer server button, then click Administration on the CUPS page.
- Click Add Printer in the Printers section, select the printer, and click Continue.
Tip
If the printer’s name is still uncertain, take the following steps:- Take note of the listed printers on the CUPS page.
- Turn the printer off and refresh the page.
- Compare the difference with the first list to see which printer disappeared.
- Turn the printer back on and refresh the page again.
- Double-check the list again to see if the printer re-appears.
- The printer that disappeared and reappears again on the listed printers is the name of the printer in question. It can be Unknown under Local printers.
- On the Add Printer page, specify the printer’s Name using the following convention: <printer_name>__IMC_<param_1>_<param_2>_..._<param_n>__, where:
- printer_name is the printer’s name. It can contain any character except _, /, #, or ` ` (space character).
- IMC: This stands for Image Mode Column (the simplified name for ESC *).
- param_1: This stands for the specific parameter:
- SCALE<X>: Scale of the picture (with the same aspect ratio). X should be an integer describing the scale percentage that should be used. For example, 100 is the original size, 50 is half the size, and 200 is twice the size.
- LDV: Low Density Vertical (will be set to High Density Vertical if not specified).
- LDH: Low Density Horizontal (will be set to High Density Horizontal if not specified).
- Density parameters might need to be configured in a particular way, depending on the printer model.
- Refer to Epson’s ESC * documentation to determine if the printer requires these parameters to be set.
Example
The following are examples of proper and improper name formatting:
Proper name formatting:
- EPSONTMm30II__IMC__
- EPSON_TM_U220__IMC_LDV_LDH_SCALE80__
Improper name formatting (this will not prevent printing, but the result might not have the expected printed output):
- EPSON TMm 30II: The name cannot contain spaces.
- EPSONTMm30II: The name itself is correct, but it will not use ESC *.
- EPSONTMm30II__IMC: This name is missing the end __.
- EPSONTMm30II__IMC_XDV__: The parameter XDV does not match any existing parameters.
- EPSONTMm30II__IMC_SCALE__: The parameter SCALE is missing the scale value.
- Once the printer’s name has been defined using the appropriate naming convention, click Continue.
- Set the Make value to Raw and the Model value to Raw Queue (en).
- Click Add Printer. If everything was done correctly, the page should redirect to the Banners page.
- Wait a few minutes for the IoT system to detect the printer and sync to Odoo’s server.
- Access the POS settings and select your POS, or click the vertical ellipsis button (⋮) on a POS card and click Edit. Scroll down to the Connected Devices section, enable IoT Box, and select the printer in the Receipt Printer field. Click Save.
Note
If the printer was set up incorrectly (e.g., it continues to print random text, or the printed receipt is too large or too small), it cannot be modified via the printer’s name in CUPS. Instead, configure a new printer from scratch with modified parameters, following the steps above.
Example
DYMO LabelWriter print issue
The DYMO LabelWriter has a known issue in printing with IoT systems. The OpenPrinting CUPS server installs the printer using Local RAW Printer drivers. In order to print anything, the correct Make and Model needs to be set to reference the correct driver when using the device.
Additionally, a new printer needs to be added to reduce the print delay that occurs after updating the driver.
Important
The DYMO LabelWriter 450 DUO printer is the recommended DYMO printer for use with Odoo and IoT systems. This device combines two printers: a label printer and a tape printer. When configuring the following processes, it is essential to select the correct model (either DYMO LabelWriter 450 DUO Label (en) or DYMO LabelWriter 450 DUO Tape (en)). For consistency, the following processes outline configuration steps for the DYMO LabelWriter 450 DUO Label (en) model. Adjust the model selections as needed.
DYMO LabelWriter not printing
If the DYMO LabelWriter fails to print, install a new driver:
- Access the IoT system’s homepage and click Printer server to open the OpenPrinting CUPS console.
- Click Printers in the top menu, then click the printer in the list.
- Select Maintenance in the first dropdown menu.
- Select Modify Printer in the second dropdown menu.
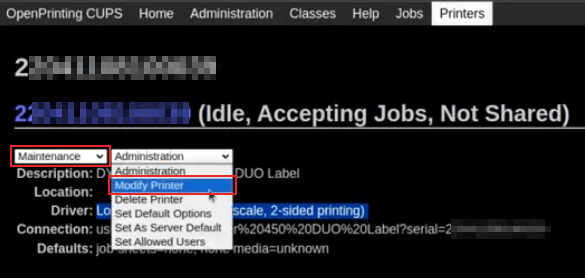
- Select the specific network connection/printer on which the modification should be made and click Continue.
- On the next page, click Continue, then select DYMO from the Make dropdown list.
- Click on Continue and set the Model to DYMO LabelWriter 450 DUO Label (en) (or whichever DYMO printer model is being used).
- Click Modify Printer to set the new driver; a confirmation page appears.
- Click Printers in the top menu; all printers installed on the OpenPrinting CUPS server appear, including the newly updated DYMO LabelWriter 450 DUO Label (or whichever DYMO printer model is being used).
- Click the newly updated printer, then click the Maintenance dropdown menu and select Print Test Page to print a test label. The test label is printed after a few seconds if the driver update was successful.
To reduce this delay, add a new printer using the steps below.
DYMO LabelWriter print delay
Tip
If the DYMO LabelWriter 450 DUO printer is not printing at all, or is not recognized (i.e., it has a RAW driver type), then update the drivers on the device.
To resolve the delay issue after modifying the driver, reinstall the printer:
- Access the IoT system’s homepage and click Printer server to open the OpenPrinting CUPS console.
- Click Administration in the top menu, then click Add a Printer.
- On the next page, in the Local Printers section, select DYMO LabelWriter 450 DUO Label (DYMO LabelWriter 450 DUO Label) (or whichever DYMO printer model is being used) pre-installed printer. Click Continue.
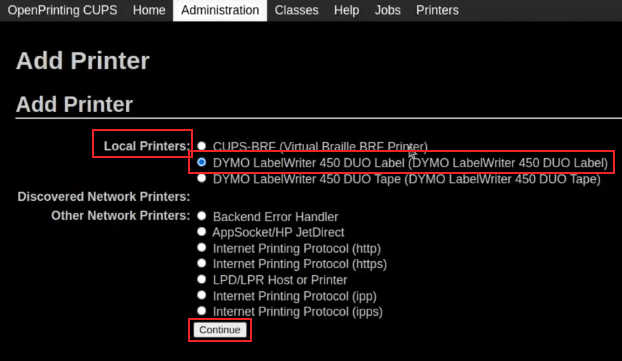
- On the following screen, update the Name to something easily identifiable, as the original printer will remain in the list. Then, click Continue.
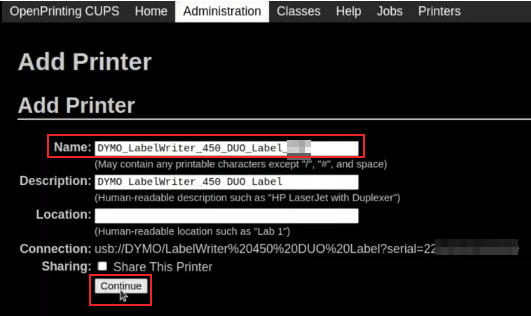
- Set the Model field to DYMO LabelWriter 450 DUO Label (en) (or whichever DYMO printer model is being used), then click Add Printer to complete the installation.
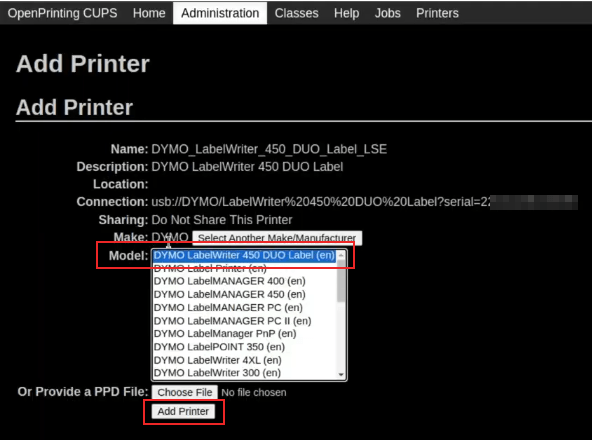
- Click Printers in the top menu and click the newly installed printer DYMO LabelWriter 450 DUO Label (or whichever DYMO printer model is being used) from in the list.

- Click the Maintenance dropdown list and select Print Test Page to print a test label. The test label should print out immediately, or after one or two seconds.
The Zebra printer does not print anything
Zebra printers are quite sensitive to the format of the printed Zebra Programming Language (ZPL) code. If nothing comes out of the printer or blank labels are printed, try changing the format of the report sent to the printer. To do so, activate the developer mode, go to Settings ‣ Technical ‣ User Interface ‣ Views, and search for the corresponding template.
See also
Zebra’s instructions on printing ZPL files
Barcode scanner issues
The characters read by the barcode scanner do not match the barcode
By default, most barcode scanners are configured in the US QWERTY format. If the barcode scanner uses a different layout, go to IoT ‣ Devices and click the barcode device’s card. Then, select the correct language in the Keyboard Layout field.
Note
The Keyboard Layout is language-specific, with available options varying based on the device and the language of the database (e.g., English (UK), English (US), etc.).
Nothing happens when a barcode is scanned
Make sure the correct device is selected in the Point of Sale settings (when applicable) and the barcode is configured to send an ENTER character (keycode 28) at the end of every barcode.
The barcode scanner is detected as a keyboard
Important
Some barcode scanners are identified as USB keyboards rather than barcode scanners and are not recognized by IoT systems.
To change the device type manually, go to IoT ‣ Devices and click the barcode device’s card. Then, enable Is scanner.
The barcode scanner processes barcode characters individually
When accessing the mobile version of Odoo from a mobile device or tablet paired with a barcode scanner via the IoT system, the scanner might interpret each character in a barcode as a separate scan. To resolve this, go to IoT ‣ Devices and click the barcode device’s card. Then, select the correct language in the Keyboard Layout field.
Note
The Keyboard Layout is language-specific, with available options varying based on the device and the language of the database (e.g., English (UK), English (US), etc.).
On this page
Get Help
Contact Support Ask the Odoo Community
![]()
- User Docs
- Database management
- Developer
- Contributing
EN
Odoo 18
Connect a scale
Important
- In EU member states, certification is legally required to use a scale as an integrated device.
- Odoo is not certified in several countries, including France, Germany, and Switzerland. If you reside in one of these countries, you can still use a scale but without integration into your Odoo database. Alternatively, you can acquire a non-integrated certified scale that prints certified labels, which can then be scanned into your Odoo database.
To connect a scale to the IoT system, use a USB cable. In some cases, you may need a serial-to-US adapter to complete the connection. If the scale is compatible with an IoT system, no additional setup is required; the scale is automatically detected as soon as it is connected. If the scale is not detected, reboot the IoT box or restart the Windows virtual IoT service and update the scale’s drivers.
Note
If the scale still does not function after updating the drivers, it might not be compatible with the Odoo IoT system. In such cases, a different scale must be used.
Once the scale is connected to the IoT system, follow these steps to configure it in the POS settings:
- Access the POS settings and select your POS, or click the vertical ellipsis button (⋮) on a POS card and click Edit.
- Scroll down to the Connected Devices section and enable IoT Box.
- Select the scale in the Electronic Scale field.
- Click Save.
See also
Connect an IoT system to a POS
The scale is then available in all the POS’s sessions. If a product is configured with a price per weight, selecting it on the PoS screen opens the scale popup. The cashier can then weigh the product to automatically add the correct price to the cart.
Ariva S scales
For Ariva S series scales (manufactured by Mettler-Toledo, LLC.) to function with IoT systems, a specific setting must be modified, and a dedicated Mettler USB-to-proprietary RJ45 cable is required.
Important
The official Mettler USB-to-RJ45 cable (Mettler part number 72256236) must be used. Contact Mettler or a partner to purchase an authentic cable. No other cable works for this configuration.
To configure the Ariva S scale for IoT system recognition, refer to page 17 of Mettler’s Setup Guide for Ariva S series scales and follow these steps:
- Hold the >T< button for eight seconds, or until CONF appears.
- Press >T< until GRP 3 appears, then press >0< to confirm.
- At step 3.1, make sure the value is set to 1 (USB Virtual COM ports) by pressing >T< to cycle through the options.
- Press >0< until 3.6 (if available, otherwise skip the next step).
- At step 3.6, make sure the value is set to 3 (8217 Mettler-Toledo (WO)) by pressing >T< to cycle through the options.
- Press >0< (multiple times if necessary) until GRP 4 appears.
- Press >T< until EXIT appears.
Important
Do not make any other changes unless otherwise needed. - Press >0<.
- Press >0< again to SAVE; the scale restarts.
- Reboot the IoT box or restart the Windows virtual IoT service. The scale should then appear as Toledo 8217, as opposed to the previous display, where it appeared as Adam Equipment Serial.
Get Help
Contact Support Ask the Odoo Community
![]()
- User Docs
- Database management
- Developer
- Contributing
EN
Odoo 18
Communication in Odoo by email
Communication in Odoo related to records such as CRM opportunities, sales orders, invoices, … have a discussion thread called chatter, often displayed on the right side of the record.
On the chatter, you can send direct emails or Odoo notifications to the followers of a document (depending on their notification preferences), log internal notes, send WhatsApp messages or SMSes, and schedule activities.
If a follower replies to a message, the reply updates the chatter, and Odoo relays it to the followers as a notification. All emails - outgoing and incoming - appear in the same chatter.
Odoo Online and Odoo.sh users
On Odoo Online and Odoo.sh, outgoing and incoming emails work out of the box, nothing needs to be done. Everything is already configured on your subdomain.
By default, outgoing emails use the following notification email address notifications@company-name.odoo.com.
Using another domain
If you prefer not to have outgoing emails sent from Odoo’s subdomain @company-name.odoo.com but instead from your own domain, additional configuration will be necessary on the domain and within Odoo. This introduces an extra layer of complexity and necessitates technical knowledge (mainly regarding DNS and mail protocols).
By adding a domain and configuring the administration access rights, you can also access the new domain alias page to configure the alias of your companies. If only one domain is configured, this domain will be shared by all companies on the database.
If you want to keep using Odoo’s mail server, you will have to configure the SPF and DKIM.
If you want to use your own mail server, you will have to follow the mail server provider’s specific documentation.
For incoming emails, after adding your own domain, replies from customers will come back to your domain, and you will need to use one of the three possible ways to get the emails back into Odoo (using either incoming mail server, redirection/forwarding or DNS MX record). Everything is covered in the Manage inbound messages documentation.
On-premise users
If you are on-premise, you will have to completely configure your outgoing and incoming emails:
- For outgoing emails, you will need to use an SMTP server and a custom domain.
- For incoming emails, set the frequency at which you fetch new emails low enough for responsiveness but high enough in order not to stress your system or provider. Due to this reason and the simplicity of this configuration, we usually advise on using incoming mail servers. To use an SMTP server, check out the “Use a custom domain for inbound messages” documentation.
Using a third-party provider’s mail server
Odoo’s documentation also covers several popular mail servers. As they require specific authorizations and configuration, they add a layer of complexity. For this reason, using Odoo’s outgoing mail server is recommended.
Note
Every provider has its own limitations. Research the desired provider before configuring it. For example, Outlook and Gmail might not be suitable for large marketing campaigns.
See also
- Activities
- Discuss app
- Digest emails
- Email Marketing app
- Email templates
- Expense creation using an email alias
- Helpdesk ticket creation using an email alias
- Lead creation using an email alias
- Project task creation using an email alias
- Technical mail gateway for on-premise users
- Technical start of Odoo database with an outgoing mail server configured from the command-line interface
On this page
Get Help
Contact Support Ask the Odoo Community
![]()
- User Docs
- Database management
- Developer
- Contributing
EN
Odoo 18
Manage inbound messages
An inbound message is an email delivered to an Odoo database. Anyone can send an email to an email alias created in the database or reply to an email that was previously sent from the database based on the reply-to header.
Email aliases
Model specific aliases
Some applications have their specific aliases (sales teams, helpdesk teams, projects, etc.). These aliases are used to:
- Create a record when an email is sent directly to the alias,
- Receive replies to an email initially sent from a record.
Example
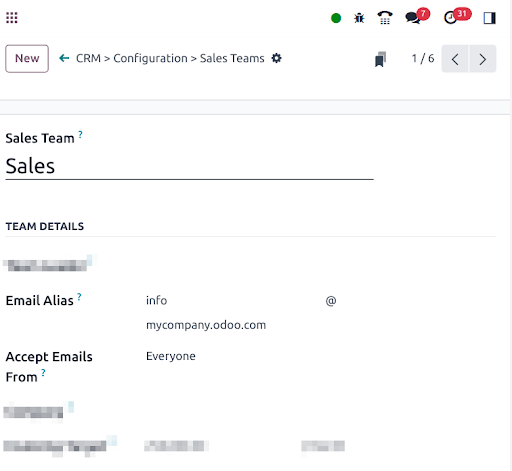
In the example displayed above, sending an email to info@company-name.odoo.com will create a new opportunity or a new lead automatically assigned to the corresponding sales team. If an email is sent from the chatter of an existing opportunity, the reply-to will be info@company-name.odoo.com. The reply will be posted in the right chatter, according to the message-id header.
Catchall
If an application does not have an alias, a generic fallback alias is used: the catchall. An email sent from a chatter has a reply address set to this catchall alias. A reply sent to the catchall is posted to the right chatter thanks to the message-id header.
By default, the local-part catchall will be used. Enable Developer mode (debug mode) and go to Settings ‣ Technical ‣ Emails: Alias Domains to access the configuration.
An email to the catchall always needs to be a reply to a previous email sent from the database. If an email is sent directly to the catchall, the sender will receive the following message:
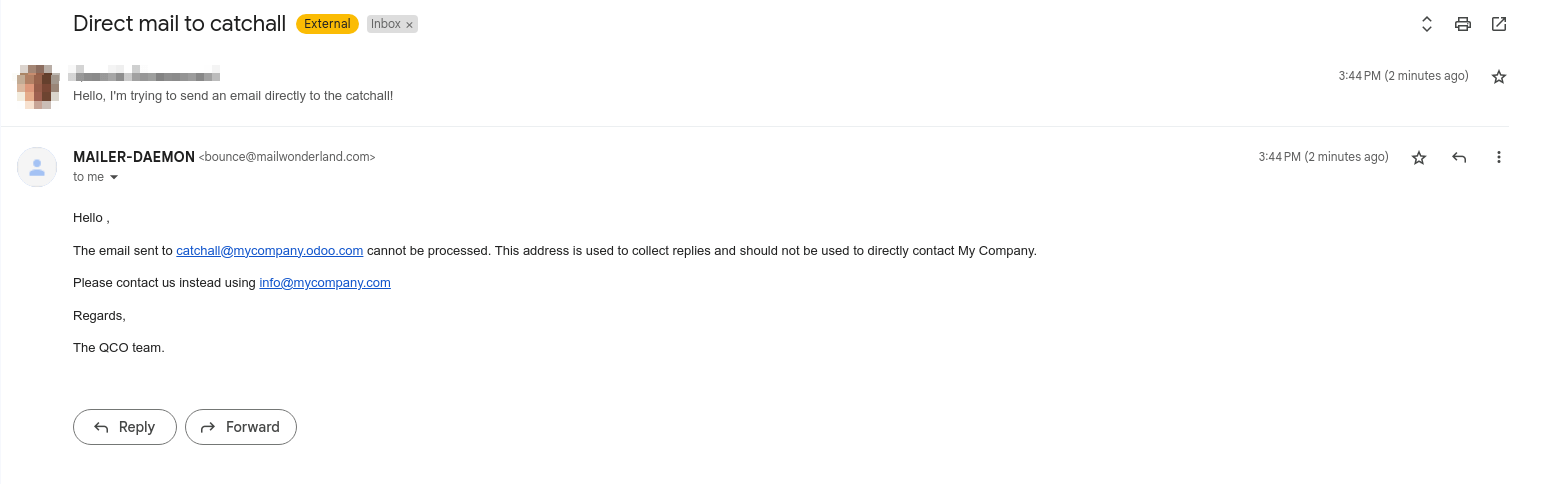
Note
The email address info@company-name.com displayed in the screenshot above is the email address set on the company. Upon entering the developer mode on a company profile, additional configuration options (such as catchall and bounce) become readable. It can be modified by clicking on the internal link of the Email Domain. It is generally not recommended to modify these options unless specific needs dictate, as it will affect all replies to previously sent emails.
Example
An alias can be configured on a sales team in the CRM app. When a customer replies to an email coming from the CRM app, the reply-to is info@company-name.odoo.com.
When an email is sent from the Contact app, the reply address is catchall@company-name.odoo.com because there is no alias on the contact model.
Note
It is advised to keep the local-part of the catchall and the bounce unchanged. If this value is modified, previous emails sent from the database will still have the previous local-part values. This could lead to replies not being correctly received in the database.
Bounce
In the same way the catchall alias is used to build the reply address, the bounce alias is used to build the return-path of the email. The return-path is used when emails cannot be delivered to the recipient and an error is returned to the sender.
By default the name bounce will be used. Enable Developer mode (debug mode) and go to Settings ‣ Technical ‣ Emails: Alias Domains to access the configuration.
Note
On Odoo Online, when using the default outgoing email server, the return-path address is forced to the value bounce@company-name.odoo.com independently of the value set as bounce alias.
When an error occurs, a notification is received and displayed in a red envelope in the chatter. In some cases, the red envelope can just contain a no error message, meaning there is an error that could not be handled by Odoo.
A notification will also be displayed in the Discuss icon on the navigation bar.
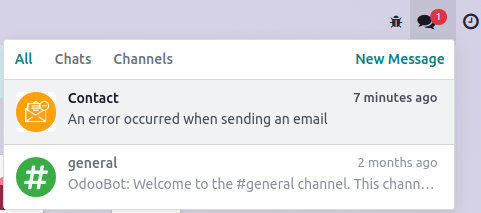
Example
If the email address of the recipient is incorrect, by clicking on the red envelope in the chatter an error message containing the reason for the failure will be given.

Receive emails with Odoo’s default configuration
On Odoo Online and Odoo.sh, the email alias, reply, and bounce addresses are pre-configured. These addresses use the alias domain automatically added to a standard database.
Example
Assuming the database URL is https://mydatabase.odoo.com, the alias domain mydatabase.odoo.com is automatically created. Catchall and bounce can be used and their address is respectively catchall@mydatabase.odoo.com, and bounce@mydatabase.odoo.com.
If the CRM app is installed, and a sales team with the alias info is created, the info@mydatabase.odoo.com address can be used immediately. The same goes for any other alias created in other applications.
The database domain is ready to be used to receive emails without any additional configuration.
Use multiple Odoo subdomains
On Odoo Online, the only Odoo subdomain is the one defined at the database creation.
On Odoo.sh, it is possible to use several Odoo subdomains. In the settings of the branch, additional Odoo subdomains can be added as long as they are not used yet in another branch. These domains must then be added to the alias domains to be used by a company.
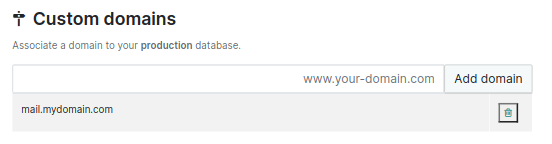
Use a custom domain for inbound messages
The alias domain must be selected in the general settings. If you have multiple companies, each one must be configured.
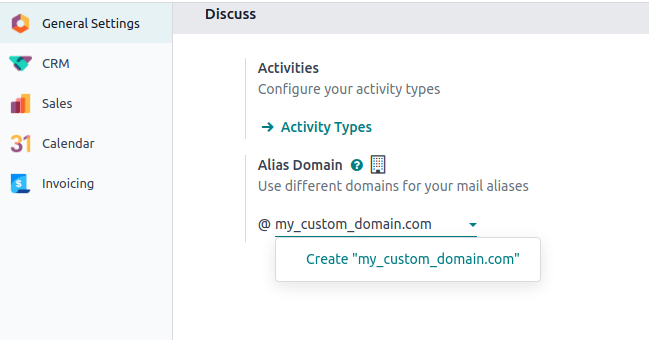
All the aliases will use this custom domain. Replies on models for which an alias is configured are done to [alias]@my-custom-domain.com. Replies to other models are sent to the catchall through catchall@my-custom-domain.com.
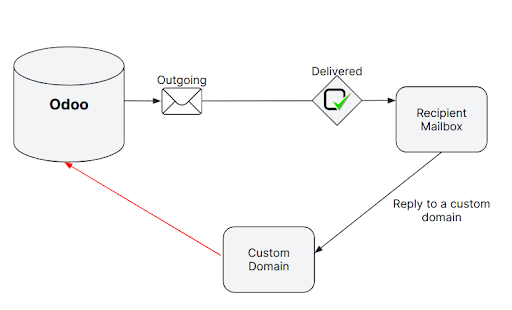
Important
If emails are sent using Odoo’s email servers while using a custom domain, follow the “Using a custom domain with Odoo’s email server” instructions.
Since this custom domain is used, all emails using an alias (replies, bounces and direct sends) are sent to an address of the domain. They are thus delivered to the email server linked to the domain (MX record). To display them in the chatter or to create new records, it is necessary to retrieve these incoming emails in the Odoo database.
Method | Benefits | Drawbacks |
|---|---|---|
Easy to set up, emails are directly sent to the database. | Each alias of a database needs to be configured. | |
Allows to keep a copy of the email in your mailbox (with IMAP). Allows to create records in the chosen model. | Depends on a CRON, meaning emails are not retrieved immediately in the database. Each alias of a database needs to be configured. | |
Only one record needs to be created to make all aliases work properly. | Using a subdomain is required. Requires advanced technical knowledge. |
Important
For on-premise databases, the redirection and the MX record methods also require configuring the mail gateway script. Going through this script requires advanced technical and infrastructure knowledge.
Important
Refer to your provider’s documentation for more detailed information on how to handle the methods detailed below.
Redirections
If the database is hosted on Odoo Online or Odoo.sh, using redirections is recommended. They allow messages to be received without delay in the database.
It is mandatory to redirect the catchall and bounce address to the Odoo subdomain of the database. Every other alias used must be redirected as well.
Example
With one sales team, the following redirections are required:
- catchall@company-name.com → catchall@company-name.odoo.com
- bounce@company-name.com → bounce@company-name.odoo.com
- info@company-name.com → info@company-name.odoo.com
Important
Some providers ask to validate the redirection by sending a link to the target email address. This procedure is an issue for catchall and bounce since they are not used to create records.
- Modify the catchall value on the mail alias domain. Developer mode (debug mode) must be enabled to access this menu. For example, it can be changed from catchall to temp-catchall. This will allow to use catchall as the local-part of another alias.
- Open an app that uses an alias. For example, CRM contains aliases for each sales team. Set catchall as the local-part of the alias of a sales team.
- The validation email will create a record in the CRM app. The email sent will be visible in the chatter, allowing you to validate the redirection.
- Do not forget to change back the alias of the sales team and the catchall value on the mail alias domain, just as they were before this procedure.
Note
An alternative to redirections is forwarding. With forwarding, the address forwarding the email will be identified as the sender, while with redirections, the original sender will always remain.
Incoming mail servers
As mentioned earlier, using redirections is the recommended method to receive emails in Odoo. However, it is also possible to set up incoming mail servers. Using this method means creating an incoming email server for each mailbox on your server, catchall, bounce, and every alias of the database, in order to fetch all incoming emails. Incoming mail servers are created by going to Settings ‣ Technical ‣ Emails: Incoming Mail Servers.
Important
We recommend using the IMAP protocol over the POP protocol, as IMAP fetches all unread emails, while POP fetches all the emails’ history and then tags them as deleted in your mailbox.
Tip
It is also possible to connect a mailbox through Gmail with Google OAuth or Outlook with Microsoft Azure OAuth.
Regardless of the protocol chosen, emails are fetched using the Mail: Fetchmail Service scheduled action.
Additionally, using an incoming mail server in Odoo gives the opportunity to create new records in a specified model. Each incoming mail server can create records in a different model.
Example
Emails received on task@company-name.com are fetched by the Odoo database. All fetched emails will create a new project task in the database.
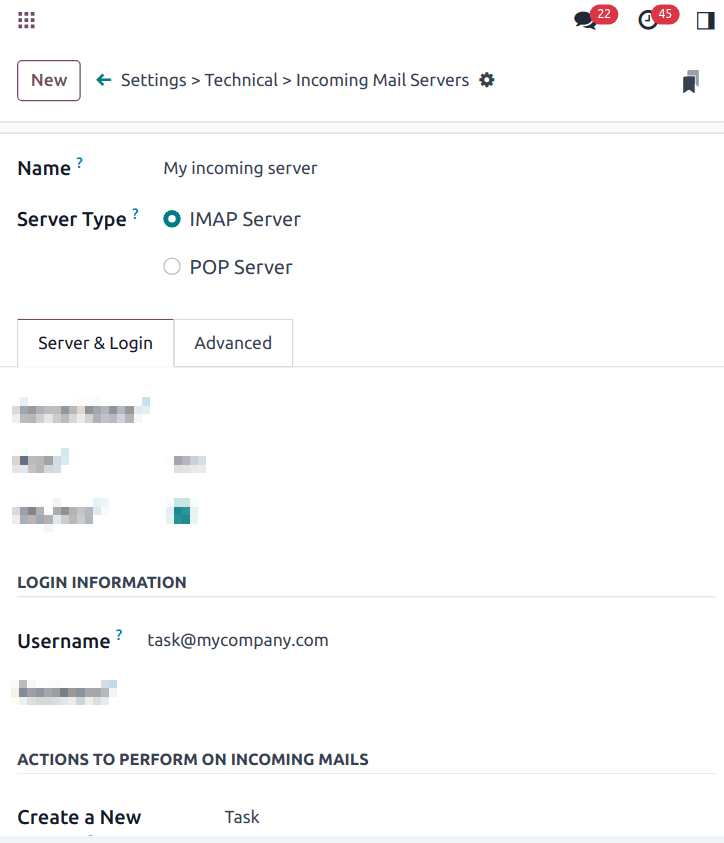
MX record
A third option is to create a MX record in your DNS zone which specifies the mail server managing emails sent to your domain. Advanced technical knowledge is required.
Important
This configuration only works with a subdomain on the Odoo Online or Odoo.sh infrastructure (e.g., @mail.mydomain.com)
Below are presented some specifications depending on the hosting type:
Odoo OnlineOdoo.sh
The custom subdomain must be added to your Odoo Portal.
Infinite email loops
In some cases, infinite mailing loops can be created. Odoo provides some protection against such loops, ensuring the same sender cannot send too many emails that would create records to an alias in a specific time span.
By default, an email address can send up to 20 emails in 120 minutes. If more emails are sent, they are blocked and the sender receives the following message:
To change the default behavior, enable Developer mode (debug mode), then go to Settings ‣ Technical ‣ Parameters: System Parameters to add two parameters.
- For the first parameter, enter mail.gateway.loop.minutes as the Key and choose a number of minutes as the Value (120 is the default behavior).
- For the second parameter, enter mail.gateway.loop.threshold as the Key and choose a number of emails as the Value (20 is the default behavior).
Important
These parameters are only used to prevent the creation of new records. They do not prevent replies from being added to the chatter.
Allow alias domain system parameter
Incoming aliases are set in the Odoo database to create records by receiving incoming emails. To view aliases set in the Odoo database, first activate the developer mode. Then, go to Settings app ‣ Technical ‣ Aliases.
The following system parameter, mail.catchall.domain.allowed, set with allowed alias domain values, separated by commas, filters out correctly addressed emails to aliases. Setting the domains for which the alias can create a ticket, lead, opportunity, etc., eliminates false positives where email addresses with only the prefix alias, not the domain, are present.
In some instances, matches have been made in the Odoo database when an email is received with the same alias prefix and a different domain on the incoming email address. This is true in the sender, recipient, and CC email addresses of an incoming email.
Example
When Odoo receives emails with the commercial prefix alias in the sender, recipient, or CC email addresses (e.g. commercial@example.com), the database falsely treats the email as the full commercial alias, with a different domain, and therefore, creates a ticket/lead/opportunity/etc.
To add the mail.catchall.domain.allowed system parameter, first, activate the developer mode. Then, go to Settings app ‣ Technical ‣ System Parameters. Click New. Then, type in mail.catchall.domain.allowed for the Key field.
Next, for the Value field, add the domains separated by commas. Manually (Save), and the system parameter takes immediate effect.

Local-part based incoming detection
When creating a new alias, there is an option to enable Local-part based incoming detection. If enabled, Odoo only requires the local-part to match for routing an incoming email. If this feature is turned off, Odoo requires the whole email address to match for routing an incoming email.
On this page
Get Help
Contact Support Ask the Odoo Community
![]()
- User Docs
- Database management
- Developer
- Contributing
EN
Odoo 18
Manage outbound messages
Sending emails with Odoo’s default configuration
On Odoo Online and Odoo.sh, sending and receiving emails works out of the box. No configuration is required.
When a database is created, the subdomain company-name.odoo.com is used to send and receive emails. The deliverability is optimized for this subdomain as it uses Odoo’s DNS configuration.
Example
If the database subdomain is company-name.odoo.com and all mailing configurations are the default ones, all emails will be sent from notifications@company-name.odoo.com.
Important
Only one subdomain can be used as a mailing server in Odoo. Subdomains for additional companies require an external email server with a custom domain.
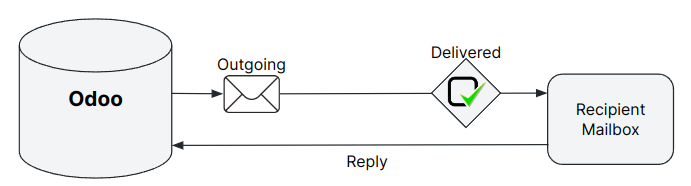
Emails are sent with catchall@company-name.odoo.com as the reply-to address. In addition, delivery errors are sent to bounce@company-name.odoo.com.
Note
The catchall, bounce, and notification addresses do not work like other aliases. They do not have the vocation to create records in a database. Emails sent to an alias are automatically routed and will reply to an existing and linked record or will create a new one in the database.
Using a custom domain to send emails
The database can be configured to use a custom domain, in which case all default email addresses are built using the custom domain. If the custom domain is company-name.com, the sender address will be notifications@company-name.com, the reply-to address catchall@company-name.com, and the bounce address bounce@company-name.com. The custom domain can be utilized when sending emails either with Odoo’s email servers or an external one.
This section assumes ownership of a custom domain. If not, a custom domain must be purchased from a domain registrar such as GoDaddy, Namecheap, or any alternative provider.
Using a custom domain with Odoo’s email server
On Odoo Online or Odoo.sh, some configurations are mandatory in the custom domain’s DNS to ensure good deliverability.
Warning
Most of the configuration will be done on the domain provider’s side, and it might require some configuration on the mail server itself. Some technical knowledge is required.
The first step is to configure the SPF and DKIM to be compliant with Odoo’s mail server.
Next, the custom domain must be set as the alias domain of a company. Select the company, open the Settings, and add the custom domain under the Alias Domain field.
After adding the alias domain, click the (internal link) icon to assign more companies to the custom domain if needed. Enable the Developer mode (debug mode) mode to modify the default aliases if desired:
- Bounce Alias: the mailbox used to catch delivery errors and populate the red envelope on the corresponding message.
- Catchall Alias: the default mailbox used to centralize all replies.
- Default From Alias: the default sender address.
Note
At the creation of the first alias domain, all companies will use it. If you create a new company, the alias domain automatically set is the one with the lowest priority (ad displayed on the alias domain list in Developer mode (debug mode)).
All email aliases (e.g., related to CRM or Helpdesk teams) must have their corresponding mailbox in the custom domain mail server.
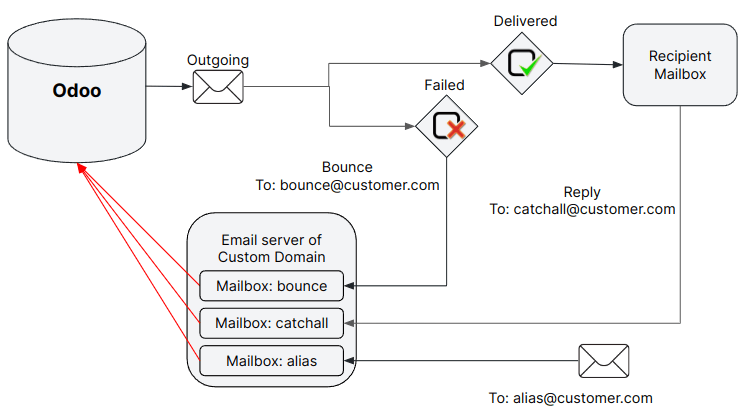
To receive emails in the Odoo database within the corresponding chatter (CRM, invoices, sales orders, etc.), one of these three methods must be used:
- Redirections/forwarding,
- Incoming mail servers,
- MX record (requires advanced technical knowledge)
Using a custom domain implies that specific local-parts might be used by Odoo to send emails.
Sending emails with an external SMTP server
Note
If utilizing your own outgoing mail server, it must be paired with your own domain, as updating the DNS of an Odoo subdomain is not feasible.
To add an external SMTP server in Odoo, open Settings, and enable the Use Custom Email Servers option found under the Emails section. Then, click Save at the top of the page to save the changes.
Returning to the Emails section, click Outgoing Email Servers, then New to create an outgoing mail server record. Most fields are the common parameters used to set up a connection to an SMTP server; use the values provided by your email provider.
Once completed, click Test Connection. Note that a successful test connection does not confirm that the email will go out as some restriction might remain on the provider side, thus, it is recommended to consult your provider’s documentation.
Local-part values
Below are presented the different local-part values that can be used by Odoo to send emails. It might be required to whitelist them in your mail server:
- The Alias Domain Bounce Alias (default value = bounce),
- The Alias Domain Default From (default value = notifications),
- The default admin address admin@company-name.odoo.com or, if changed, the new value),
- The default Odoobot address odoobot@company-name.odoo.com or, if changed, the new value),
- The specific FROM defined on an email marketing campaign,
- The specific FROM that can be defined in an email template.
See also
Setting up different servers for transactional and mass emails
Personalized mail servers
Transactional emails and mass mailings can be sent using separate email servers in Odoo. Doing so means day-to-day emails, quotations, or invoices sent to clients will be handled as transactional emails. Mass mailing emails, including the sending of batches of invoices or quotations, will be managed by the Marketing Automation or Email Marketing application.
Example
You can use services like Gmail, Amazon SES, or Brevo for transactional emails, and services like Mailgun, Sendgrid, or Mailjet for mass mailings.
First, activate the Developer mode (debug mode) and go to Settings ‣ Technical ‣ Email: Outgoing Mail Servers. There, add two outgoing email server records, one for the transactional emails server and one for the mass mailings server. Enter a lower Priority value for the transactional server (e.g., 1) over the mass mailings server (e.g., 2) so transactional emails are given priority.
![]()
Now, go to Email Marketing ‣ Configuration ‣ Settings, enable Dedicated Server, and select the appropriate email server. Odoo uses the server with the lowest priority value for transactional emails, and the server selected here for mass mailings.
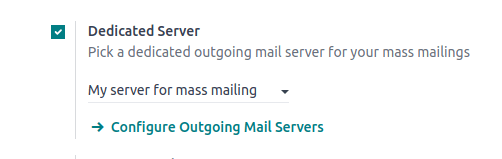
FROM filtering
Important
It’s highly recommended to configure the FROM Filtering on the outgoing mail servers as per the instructions of your provider.
The FROM Filtering field allows for the use of a specific outgoing email server depending on the From email address or domain that Odoo is sending on behalf of. The value must be a domain or a complete address that matches the sender’s email address and is trusted on the outgoing mail server provider’s side.
If FROM filtering is not used, emails will go out using the notification address.
Warning
Some outgoing mail servers require a specific configuration of the FROM filter.
When an email is sent from Odoo, the following sequence is used to choose the outgoing email server:
- First, Odoo searches for a server that has the same FROM filtering value as the From value (i.e., email address) defined in the outgoing email. This configuration is ideal if all users of a company share the same domain but have different local-parts.
Example
If the sender’s email address is test@example.com, only an email server having a FROM filtering value equal to test@example.com or example.com can be used.
- If no server is found based on the first criteria, Odoo looks for the first server without a FROM filtering value set. The email will be overridden with the notification address.
- If no server is found based on the second criteria, Odoo uses the first server, and the email will be overridden with the notification address.
Note
To determine which server is first, Odoo uses the priority value (the lower the value is, the higher the priority is). Failing to do so, the first server is determined by the servers’ names, using alphabetical order.
It is also possible to use Odoo’s mail server for transactional emails in addition to mass mailings.
Using an external email server and Odoo’s default server
On Odoo Online and Odoo.sh, databases are started with Odoo’s SMTP server. If no outgoing mail server is set, the default Odoo’s SMTP server will be used.
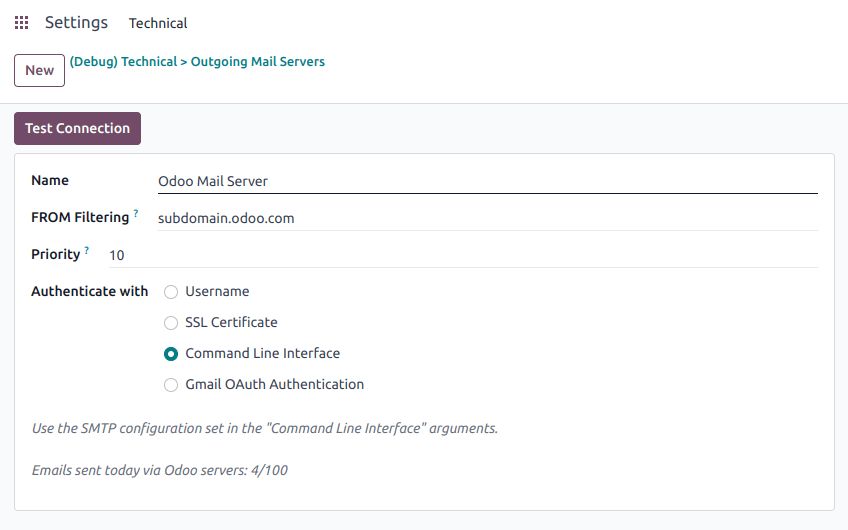
Example
If an outgoing mail server is used simultaneously with Odoo’s default server (CLI), the FROM filter of the outgoing mail server must contain a custom domain, and the FROM filter of the CLI must contain Odoo’s subdomain. If there is no FROM filtering, the email will go out using the notification address.
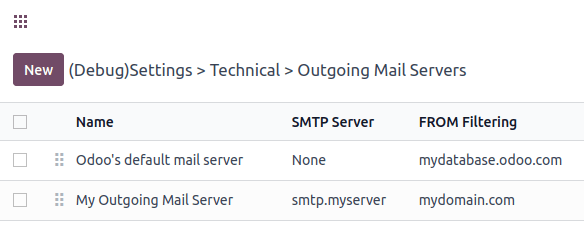
Note
On Odoo Online, the command line interface is equivalent to the default Odoo mail server, using the same limit as if there was no outgoing mail server in place.
Tip
On Odoo Online, the page also shows your daily email usage and your daily limit. On Odoo.sh, you need to check on the monitor page the number of outgoing emails that were sent.
Note
On Odoo.sh, to use the command-line interface, an outgoing mail server can be configured on the configuration file.
Warning
Odoo’s mail server is meant for transactional emails and small-scale marketing campaigns. The daily limit depends on the database type and the applications used.
Using a custom domain with an external email server
Similar to the previous chapter, proper configuration might be needed to ensure that the external email server is allowed to send emails using your custom domain. Refer to your provider’s documentation to properly set up the relevant records (SPF, DKIM, and DMARC). A list of the most common providers is available.
Note
DNS configuration is required when you use your own domain. If an external outgoing mail server is used, configuring the records as described in the Odoo DNS configuration for our mail servers documentation will not have the desired effect, as it is independent of Odoo when using a custom email server. Odoo does not allow the configuration of Odoo’s subdomain.
Port restriction
Port 25 is blocked for security reasons on Odoo Online and Odoo.sh. Try using port 465, 587, or 2525 instead.
Alias domain
The catchall domain is company-specific. By default, all companies share Odoo’s subdomain (e.g., company-name.odoo.com), but each company may have its own custom email domain.
When the Developer mode (debug mode) is activated, the alias domain options are available by going to Settings ‣ Technical ‣ Email: Alias Domains.
Warning
Any modification of the alias domain must be done very carefully. If one of the aliases (bounce, catchall, default from) is changed, all previous emails that are not properly redirected to the new aliases will be lost.
The Default From Alias field can be filled with a local-part of the email address (by default notifications) or a full email address. Configure it to determine the FROM header of your emails. If a full email address is used, all outgoing emails will be overwritten with this address.
Notification system
When an email is sent from the chatter, customers can reply directly to it. If a customer replies directly to an email, the answer is logged in the same chatter, thus functioning as a message thread related to the record.
Upon receiving the reply, Odoo then uses the subscribed followers (based on the subscribed subtypes) to send them a notification by email, or in the Odoo inbox, depending on the user’s preferences.
Example
If a customer with the email address “Mary” <mary@customer.example.com> makes a direct reply to an email coming from the Odoo database, Odoo’s default behavior is to redistribute the email’s content to all other followers within the thread.
As Mary’s domain does not belong to the alias domain, Odoo overrides the email address and uses the notification email address to notify the followers. This override depends on the configuration done in the database. By default, on Odoo Online and Odoo.sh, the email FROM address will be overridden with the value notifications@company-name.odoo.com instead of mary@customer.example.com.
The address is constructed using the name of the sender and {alias domain, default from alias}`@`{alias domain, domain name}, by default, notifications@company-name.odoo.com.
Using a unique email address for all outgoing emails
To force the email address from which emails are sent, activate the Developer mode (debug mode), and go to Settings ‣ Technical ‣ Email: Alias Domains. On the Default From Alias, use the the local-part or a complete email address as the value.
Warning
If a complete address is used as the Default From Alias value, all outgoing emails will be overwritten by this address.
On this page
Get Help
Contact Support Ask the Odoo Community
![]()
- User Docs
- Database management
- Developer
- Contributing
EN
Odoo 18
Configure DNS records to send emails in Odoo
This documentation presents three complementary authentication protocols (SPF, DKIM, and DMARC) used to prove the legitimacy of an email sender. Not complying with these protocols will greatly reduce chances of your emails to reach their destination.
Odoo Online and Odoo.sh databases using the default Odoo subdomain address (e.g., @company-name.odoo.com) are pre-configured to send authenticated emails compliant with the SPF, DKIM, and DMARC protocols.
If choosing to use a custom domain instead, configuring SPF and DKIM records correctly is essential to prevent emails from being quarantined as spam or not being delivered to recipients.
If using the default Odoo email server to send emails from a custom domain, the SPF and DKIM records must be configured as presented below. If using an outgoing email server, it is required to use the SPF and DKIM records specific to that email service and a custom domain.
Note
Email service providers apply different rules to incoming emails. An email may be classified as spam even if it passes the SPF and DKIM checks.
SPF (Sender Policy Framework)
The Sender Policy Framework (SPF) protocol allows the owner of a domain name to specify which servers are allowed to send emails from that domain. When a server receives an incoming email, it checks whether the IP address of the sending server is on the list of allowed IPs according to the sender’s SPF record.
In Odoo, the SPF test is performed on the bounce address defined under the Alias Domain field found under the database’s General Settings. If using a custom domain as Alias Domain, it is necessary to configure it to be SPF-compliant.
The SPF policy of a domain is set using a TXT record. The way to create or modify this record depends on the provider hosting the DNS zone of the domain name.
If the domain name does not yet have an SPF record, create one using the following input:
v=spf1 include:_spf.odoo.com ~all
If the domain name already has an SPF record, the record must be updated. Do not create a new one, as a domain must have only one SPF record.
Example
If the TXT record is v=spf1 include:_spf.google.com ~all, edit it to add include:_spf.odoo.com: v=spf1 include:_spf.odoo.com include:_spf.google.com ~all
Check the SPF record using a tool like MXToolbox SPF Record Check. The process to create or modify an SPF record depends on the provider hosting the DNS zone of the domain name. The most common providers and their documentation are listed below.
DKIM (DomainKeys Identified Mail)
The DomainKeys Identified Mail (DKIM) allows a user to authenticate emails with a digital signature.
When sending an email, the Odoo email server includes a unique DKIM signature in the headers. The recipient’s server decrypts this signature using the DKIM record in the database’s domain name. If the signature and the key contained in the record match, it proves the message is authentic and has not been altered during transport.
Enabling DKIM is required when sending emails from a custom domain using the Odoo email server.
To enable DKIM, add a CNAME record to the DNS zone of the domain name:
odoo._domainkey IN CNAME odoo._domainkey.odoo.com.
Tip
If the domain name is company-name.com, make sure to create a subdomain odoo._domainkey.company-name.com whose canonical name is odoo._domainkey.odoo.com..
The way to create or modify a CNAME record depends on the provider hosting the DNS zone of the domain name. The most common providers and their documentation are listed below.
Check if the DKIM record is valid using a tool like MXToolbox DKIM Record Lookup. Enter example.com:odoo in the DKIM lookup tool, specifying that the selector being tested is odoo for the custom domain example.com.
DMARC (Domain-based Message Authentication, Reporting and Conformance)
The DMARC record is a protocol that unifies SPF and DKIM. The instructions contained in the DMARC record of a domain name tell the destination server what to do with an incoming email that fails the SPF and/or DKIM check.
Note
The aim of this documentation is to help understand the impact DMARC has on the deliverability of emails, rather than give precise instructions for creating a DMARC record. Refer to a resource like DMARC.org to set the DMARC record.
There are three DMARC policies:
- p=none
- p=quarantine
- p=reject
p=quarantine and p=reject instruct the server that receives an email to quarantine that email or ignore it if the SPF or DKIM check fails.
Note
For the DMARC to pass, the DKIM or SPF check needs to pass and the domains must be in alignment. If the hosting type is Odoo Online, DKIM configuration on the sending domain is required to pass the DMARC.
Passing DMARC generally means that the email will be successfully delivered. However, it’s important to note that other factors like spam filters can still reject or quarantine a message.
p=none is used for the domain owner to receive reports about entities using their domain. It should not impact the deliverability.
Example
_dmarc IN TXT “v=DMARC1; p=none; rua=mailto:postmaster@example.com” means that aggregate DMARC reports will be sent to postmaster@example.com.
SPF, DKIM and DMARC documentation of common providers
- OVH DNS
- GoDaddy TXT record
- GoDaddy CNAME record
- NameCheap
- CloudFlare DNS
- Squarespace DNS records
- Azure DNS
To fully test the configuration, use the Mail-Tester tool, which gives a full overview of the content and configuration in one sent email. Mail-Tester can also be used to configure records for other, lesser-known providers.
See also
Using Mail-Tester to set SPF Records for specific carriers
On this page
Get Help
Contact Support Ask the Odoo Community
![]()
- User Docs
- Database management
- Developer
- Contributing
EN
Odoo 18
Connect Microsoft Outlook 365 to Odoo using Azure OAuth
Odoo is compatible with Microsoft’s Azure OAuth for Microsoft 365. In order to send and receive secure emails from a custom domain, all that is required is to configure a few settings on the Azure platform and on the back end of the Odoo database. This configuration works with either a personal email address or an address created by a custom domain.
See also
Microsoft Learn: Register an application with the Microsoft identity platform
See also
Setup in Microsoft Azure Portal
Create a new application
To get started, go to Microsoft’s Azure Portal. Log in with the Microsoft Outlook Office 365 account if there is one, otherwise log in with the personal Microsoft account. A user with administrative access to the Azure Settings will need to connect and perform the following configuration. Next, navigate to the section labeled Manage Microsoft Entra ID (formally Azure Active Directory).
Now, click on Add (+), located in the top menu, and then select App registration. On the Register an application screen, rename the Name to Odoo or something recognizable. Under the Supported account types section select Accounts in any organizational directory (Any Microsoft Entra ID directory - Multitenant) and personal Microsoft accounts (e.g. Skype, Xbox).
Under the Redirect URL section, select Web as the platform, and then input https://<web base url>/microsoft_outlook/confirm in the URL field. The web.base.url is subject to change depending on the URL used to log in to the database.
Note
The documentation about the web.base.url explains how to freeze a unique URL. It is also possible to add different redirect URLs on the Microsoft app.
After the URL has been added to the field, Register the application, so it is created.
API permissions
The API permissions should be set next. Odoo will need specific API permissions to be able to read (IMAP) and send (SMTP) emails in the Microsoft 365 setup. First, click the API permissions link, located in the left menu bar. Next, click on the (+) Add a Permission button and select Microsoft Graph under Commonly Used Microsoft APIs. After, select the Delegated Permissions option.
In the search bar, search for the following Delegated permissions and click Add permissions for each one:
- SMTP.Send
- IMAP.AccessAsUser.All
Note
The User.Read permission will be added by default.

Assign users and groups
After adding the API permissions, navigate back to the Overview of the Application in the top of the left sidebar menu.
Now, add users to this application. Under the Essentials overview table, click on the link labeled Managed Application in Local Directory, or the last option on the bottom right-hand side of the table.
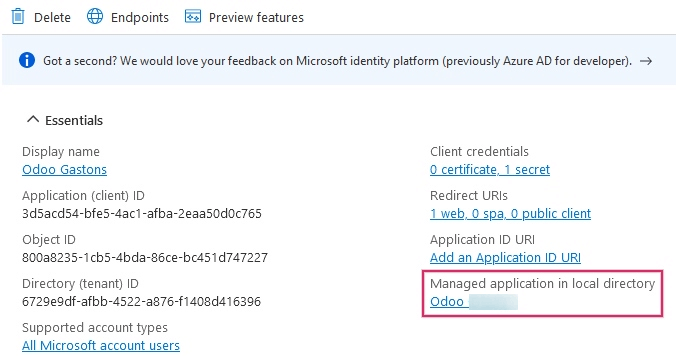
In the left sidebar menu, select Users and Groups. Next, click on (+) Add User/Group. Depending on the account, either a Group and a User can be added, or only Users. Personal accounts will only allow for Users to be added.
Under Users or Groups, click on None Selected and add the users or group of users that will be sending emails from the Microsoft account in Odoo. Add the users/groups, click Select, and then Assign them to the application.
Create credentials
Now that the Microsoft Azure app is set up, credentials need to be created for the Odoo setup. These include the Client ID and Client Secret. To start, the Client ID can be copied from the Overview page of the app. The Client ID or Application ID is located under the Display Name in the Essentials overview of the app.
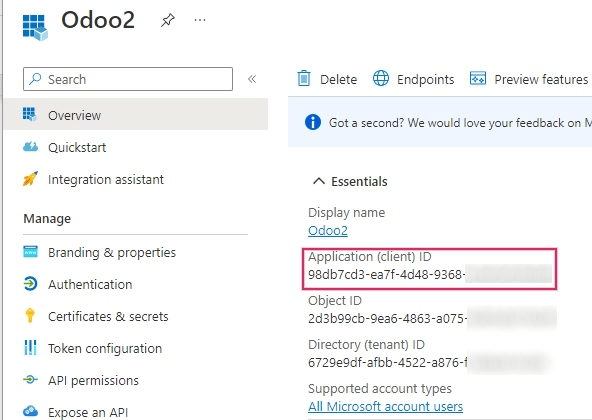
Next, the Client Secret Value needs to be retrieved. To get this value, click on Certificates & Secrets in the left sidebar menu. Then, a Client Secret needs to be produced. In order to do this, click on the (+) New Client Secret button.
A window on the right will populate with a button labeled Add a client secret. Under Description, type in Odoo Fetchmail or something recognizable, and then set the expiration date.
Important
A new Client Secret will need to be produced and configured if the first one expires. In this event, there could be an interruption of service, so the expiration date should be noted and set to the furthest possible date.
Next, click on Add when these two values are entered. A Client Secret Value and Secret ID will be created. It is important to copy the Value or Client Secret Value into a notepad as it will become encrypted after leaving this page. The Secret ID is not needed.
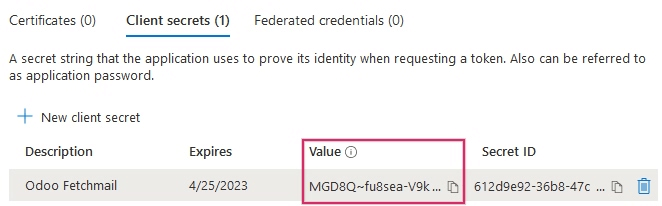
After these steps, the following items should be ready to be set up in Odoo:
- A client ID (Client ID or Application ID)
- A client secret (Value or Client Secret Value)
This completes the setup on the Microsoft Azure Portal side.
Setup in Odoo
Enter Microsoft Outlook credentials
First, open the Odoo database and navigate to the Apps module. Then, remove the Apps filter from the search bar and type in Outlook. After that, install the module called Microsoft Outlook.
Next, navigate to Settings ‣ General Settings, and under the Discuss section, ensure that the checkbox for Custom Email Servers is checked. This populates a new option for Outlook Credentials.
Save the progress.
Then, copy and paste the Client ID (Application ID) and Client Secret (Client Secret Value) into the respective fields and Save the settings.

Configure outgoing email server
On the General Settings page, under the Custom Email Servers setting, click the Outgoing Email Servers link to configure the Microsoft account.
Then, create a new email server and check the box for Outlook. Next, fill in the Name (it can be anything) and the Microsoft Outlook email Username.
If the From Filter field is empty, enter either a domain or email address.
Then, click on Connect your Outlook account.
A new window from Microsoft opens to complete the authorization process. Select the appropriate email address that is being configured in Odoo.
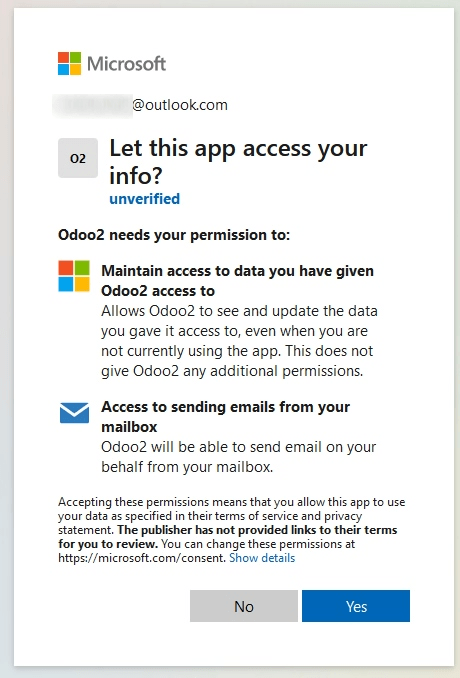
Then, allow Odoo to access the Microsoft account by clicking on Yes. After this, the page will navigate back to the newly configured Outgoing Mail Server in Odoo. The configuration automatically loads the token in Odoo, and a tag stating Outlook Token Valid appears in green.
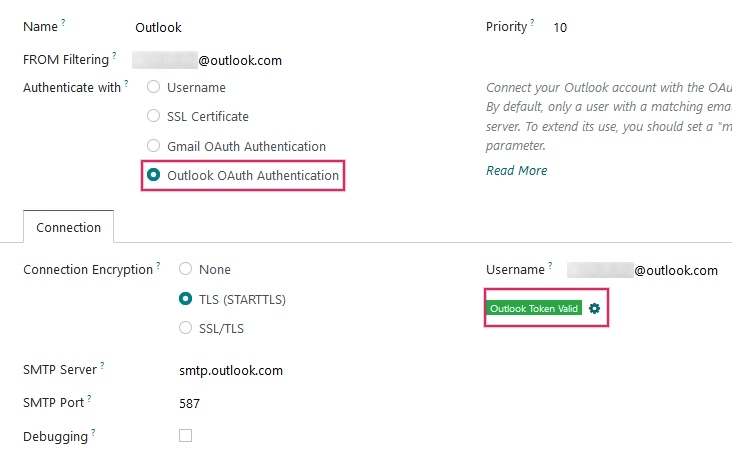
Finally, click Test Connection. A confirmation message should appear. The Odoo database can now send safe, secure emails through Microsoft Outlook using OAuth authentication.
Configuration with a single outgoing mail server
Configuring a single outgoing server is the simplest configuration available for Microsoft Azure and it doesn’t require extensive access rights for the users in the database.
A generic email address would be used to send emails for all users within the database. For example it could be structured with a notifications alias (notifications@example.com) or contact alias (contact@example.com). This address must be set as the FROM Filtering on the server. This address must also match the {mail.default.from}@{mail.catchall.domain} key combination in the system parameters.
See also
Visit the From Filtering documentation for more information.
Note
The System Parameters can be accessed by activating Developer mode (debug mode) in the Settings ‣ Technical ‣ Parameters ‣ System Parameters menu.
When using this configuration, every email that is sent from the database will use the address of the configured notification mailbox. However it should be noted that the name of the sender will appear but their email address will change:

Example
Single outgoing mail server configuration:
- Outgoing mail server username (login) = notifications@example.com
- Outgoing mail server FROM Filtering = notifications@example.com
- mail.catchall.domain in system parameters = example.com
- mail.default.from in system parameters = notifications
User-specific (multiple user) configuration
In addition to a generic email server, individual email servers can be set up for users in a database. These email addresses must be set as the FROM Filtering on each individual server for this configuration to work.
This configuration is the more difficult of the two Microsoft Azure configurations, in that it requires all users configured with email servers to have access rights to settings in order to establish a connection to the email server.
Setup
Each user should have a separate email server set up. The FROM Filtering should be set so that only the user’s email is sent from that server. In other words, only a user with an email address that matches the set FROM Filtering is able to use this server.
See also
Visit the From Filtering documentation for more information.
A fallback server must be setup to allow for the sending of notifications. The FROM Filtering for this server should have the value of the {mail.default.from}@{mail.catchall.domain}.
Note
The System Parameters can be accessed by activating Developer mode (debug mode) in the Settings ‣ Technical ‣ Parameters ‣ System Parameters menu.
Important
The configuration for this transactional email server can work alongside an outgoing mass-mailing email server. The FROM Filtering for the mass-mailing email server can remain empty, but it’s require to be added in the settings of the Email Marketing application.
See also
For more information on setting the mass-mailing email server visit Sending emails with an external SMTP server.
Example
Multiple user outgoing mail server configuration:
- User #1 mailbox
- Outgoing mail server #1 username (login) = john@example.com
- Outgoing mail server #1 FROM Filtering = john@example.com
- User #2 mailbox
- Outgoing mail server #2 username (login) = jane@example.com
- Outgoing mail server #2 FROM Filtering = jane@example.com
- Notifications mailbox
- Outgoing mail server #3 username (login) = notifications@example.com
- Outgoing mail server #3 FROM Filtering = notifications@example.com
- System Parameters
- mail.catchall.domain in system parameters = example.com
- mail.default.from in system parameters = notifications
Configure incoming email server
The incoming account should be configured in a similar way to the outgoing email account. Navigate to the Incoming Mail Servers in the Technical Menu and Create a new configuration. Check or Select the button next to Outlook Oauth Authentication and enter the Microsoft Outlook username. Click on Connect your Outlook account. Odoo will state: Outlook Token Valid Now Test and Confirm the account. The account should be ready to receive email to the Odoo database.
On this page
Get Help
Contact Support Ask the Odoo Community
![]()
- User Docs
- Database management
- Developer
- Contributing
EN
Odoo 18
Connect Gmail to Odoo using Google OAuth
Odoo is compatible with Google’s OAuth for Gmail. In order to send secure emails from a custom domain, all that is required is to configure a few settings on Google’s Workspace platform, as well as on the back end of the Odoo database. This configuration works by using either a personal email address or an address created by a custom domain.
Tip
For more information, visit Google’s documentation on setting up OAuth.
See also
Setup in Google
Create a new project
To get started, go to the Google API Console. Log in with your Google Workspace account if you have one, otherwise log in with your personal Gmail account (this should match the email address you want to configure in Odoo).
After that, click on Create Project, located on the far right of the OAuth consent screen. If a project has already been created in this account, then the New Project option will be located on the top right under the Select a project drop-down menu.
On the New Project screen, rename the Project name to Odoo and browse for the Location. Set the Location as the Google Workspace organization. If you are using a personal Gmail account, then leave the Location as No Organization.
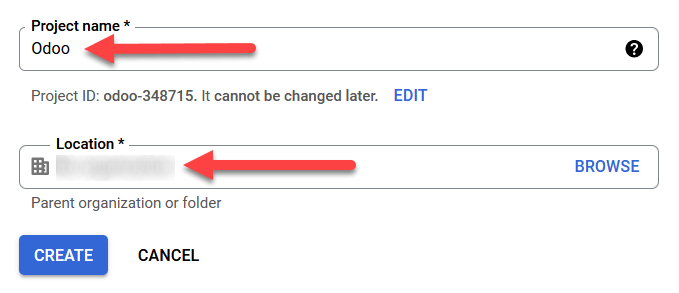
Click on Create to finish this step.
OAuth consent screen
If the page doesn’t redirect to the User Type options, click on OAuth consent screen in the left menu.
Under User Type options, select the appropriate User Type, and then click on Create again, which will finally navigate to the Edit app registration page.
Warning
Personal Gmail Accounts are only allowed to be External User Type, which means Google may require an approval, or for Scopes to be added on. However, using a Google WorkSpace account allows for Internal User Type to be used.
Note, as well, that while the API connection is in the External testing mode, then no approval is necessary from Google. User limits in this testing mode is set to 100 users.
Edit app registration
Next we will configure the app registration of the project.
On the OAuth consent screen step, under the App information section, enter Odoo in the App name field. Select the organization’s email address under the User support email field.
Next, under App Domain ‣ Authorized domains, click on Add Domain and enter odoo.com.
After that, under the Developer contact information section, enter the organization’s email address. Google uses this email address to notify the organization about any changes to your project.
Next, click on the Save and Continue button. Then, skip the Scopes page by scrolling to the bottom and clicking on Save and Continue.
If continuing in testing mode (External), add the email addresses being configured under the Test users step, by clicking on Add Users, and then the Save and Continue button. A summary of the app registration appears.
Finally, scroll to the bottom and click on Back to Dashboard to finish setting up the project.
Create Credentials
Now that the project is set up, credentials should be created, which includes the Client ID and Client Secret. First, click on Credentials in the left sidebar menu.
Then, click on Create Credentials in the top menu and select OAuth client ID from the dropdown menu.
- Under Application Type, select Web Application from the dropdown menu.
- In the Name field, enter Odoo.
- Under the Authorized redirect URIs label, click the button ADD URI, and then input https://yourdbname.odoo.com/google_gmail/confirm in the URIs 1 field. Be sure to replace the yourdbname part of the URL with the actual Odoo database name.
- Next, click on Create to generate an OAuth Client ID and Client Secret. Finally, copy each generated value for later use when configuring in Odoo, and then navigate to the Odoo database.
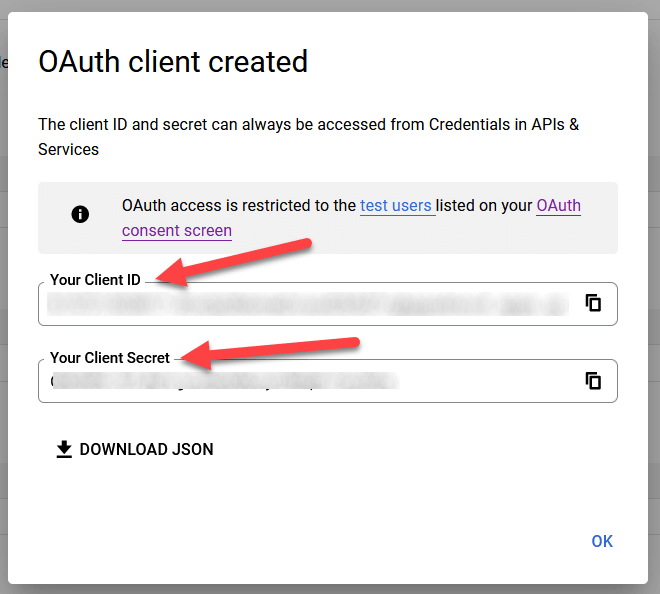
Setup in Odoo
Enter Google Credentials
First, open Odoo and navigate to the Apps module. Then, remove the Apps filter from the search bar and type in Google. Install the module called Google Gmail.
Next, navigate to Settings ‣ General Settings, and under the Discuss section, ensure that the checkbox for Custom Email Servers or External Email Servers is checked. This populates a new option for Gmail Credentials or Use a Gmail Sever. Then, copy and paste the respective values into the Client ID and Client Secret fields and Save the settings.
Configure outgoing email server
To configure the external Gmail account, return to the top of the Custom Email Servers setting and then click the Outgoing Email Servers link.
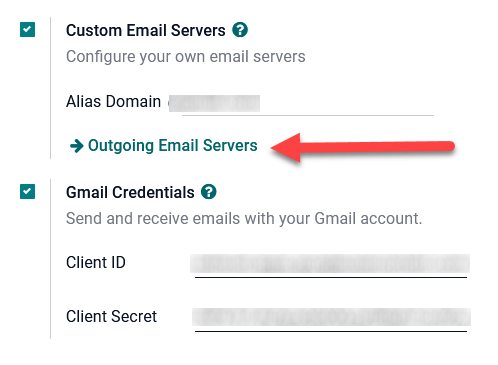
Then, click on New or Create to create a new email server, and fill in the Name, Description, and the email Username (if required).
Next, click on Gmail OAuth Authentication or Gmail (under the Authenticate with or Connection section). Finally, click on Connect your Gmail Account.
A new window labeled Google opens to complete the authorization process. Select the appropriate email address that is being configured in Odoo.
If the email address is a personal account, then an extra step pops up, so click Continue to allow the verification and connect the Gmail account to Odoo.
Then, allow Odoo to access the Google account by clicking on Continue or Allow. After that, the page navigates back to the newly configured outgoing email server in Odoo. The configuration automatically loads the token in Odoo, and a tag stating Gmail Token Valid appears in green.
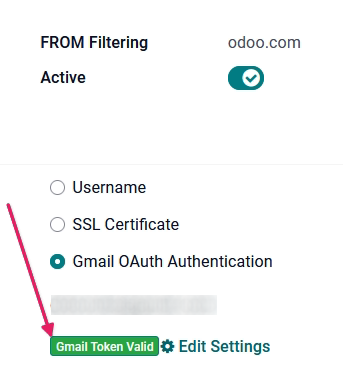
Finally, Test the Connection. A confirmation message should appear. The Odoo database can now send safe, secure emails through Google using OAuth authentication.
Google OAuth FAQ
Production VS Testing Publishing Status
Choosing Production as the Publishing Status (instead of Testing) will display the following warning message:
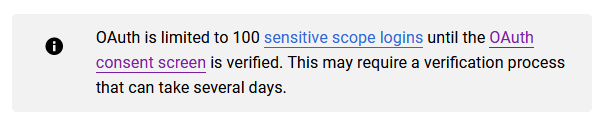
To correct this warning, navigate to the Google API Platform. If the Publishing status is In Production, click Back to Testing to correct the issue.
No Test Users Added
If no test users are added to the OAuth consent screen, then a 403 access denied error will populate.
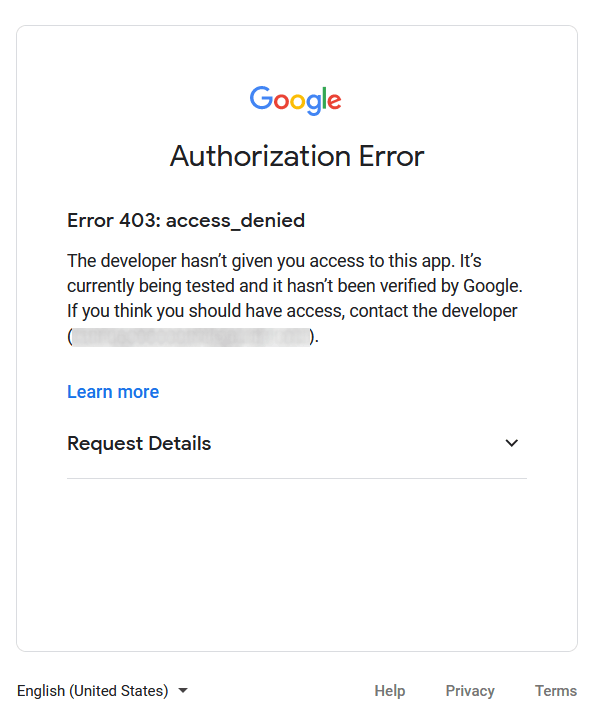
To correct this error, return to the OAuth consent screen under APIs & Services and add test user(s) to the app. Add the email that you are configuring in Odoo.
Gmail Module not updated
If the Google Gmail module in Odoo has not been updated to the latest version, then a Forbidden error message populates.
To correct this error, go to the Apps module and clear out the search terms. Then, search for Gmail or Google and upgrade the Google Gmail module. Finally, click on the three dots on the upper right of the module and select Upgrade.
Application Type
When creating the credentials (OAuth Client ID and Client Secret), if Desktop App is selected for the Application Type, an Authorization Error appears.
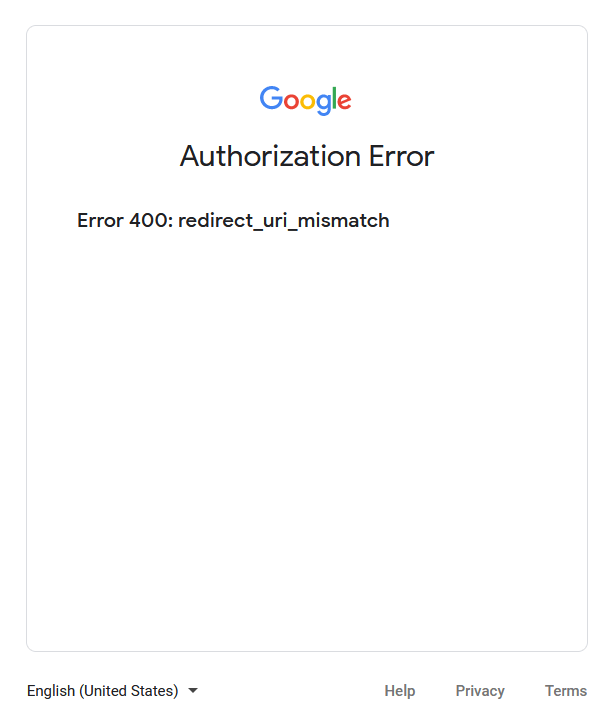
To correct this error, delete the credentials already created and create new credentials, selecting Web Application for the Application Type. Then, under Authorized redirect URIs, click ADD URI and type: https://yourdbname.odoo.com/google_gmail/confirm in the field, being sure to replace yourdbname in the URL with the Odoo database name.
On this page
Get Help
Contact Support Ask the Odoo Community
![]()
- User Docs
- Database management
- Developer
- Contributing
EN
Odoo 18
Mailjet API
Odoo is compatible with Mailjet’s API for mass mailing. Set up a dedicated mass mailing server through Mailjet by configuring settings in the Mailjet account and the Odoo database. In some circumstances, settings need to be configured on the custom domain’s DNS settings as well.
Set up in Mailjet
Create API credentials
To get started, sign in to the Mailjet Account Information page. Next, navigate to the Senders & Domains section and click on SMTP and SEND API Settings.
Then, copy the SMTP configuration settings onto a notepad. They can be found under the Configuration (SMTP only) section. The SMTP configuration settings include the server address, the security option needed (Use SSL/TLS), and the port number. The settings are needed to configure Mailjet in Odoo, which is covered in the last section.
See also
Mailjet: How can I configure my SMTP parameters?
Important
Odoo blocks port 25 on Odoo Online and Odoo.sh databases.
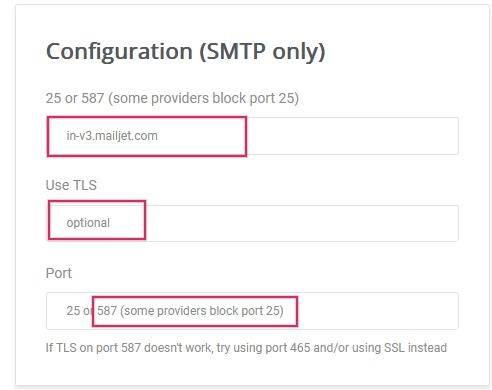
Next, click on the button labeled Retrieve your API credentials to retrieve the Mailjet API credentials.
Then, click on the eye icon to reveal the API key. Copy this key to a notepad, as this serves as the Username in the Odoo configuration. Next, click on the Generate Secret Key button to generate the Secret Key. Copy this key to a notepad, as this serves as the Password in the Odoo configuration.
Add verified sender address(es)
The next step is to add a sender address or a domain to the Mailjet account settings so that the email address or domain is approved to send emails using Mailjet’s servers. First, navigate to the Mailjet Account Information page. Next, click on the Add a Sender Domain or Address link under the Senders & Domains section.
Determine if a sender’s email address or the entire domain needs to be added to the Mailjet settings. It may be easier to configure the domain as a whole if DNS access is available. Jump to the Add a domain section for steps on adding the domain.
Note
Either all email addresses of the Odoo database users who are sending emails using Mailjet’s servers need to be configured or the domain(s) of the users’ email addresses can be configured.
By default, the email address originally set up in the Mailjet account is added as a trusted sender. To add another email address, click on the button labeled Add a sender address. Then, add the email address that is configured to send from the custom domain.
At minimum the following email addresses should be set up in the provider and verified in Mailjet:
- notifications@yourdomain.com
- bounce@yourdomain.com
- catchall@yourdomain.com
Note
Replace yourdomain with the custom domain for the Odoo database. If there isn’t one, then use the mail.catchall.domain system parameter.
After that, fill out the Email Information form, making sure to select the appropriate email type: transactional email or mass emails. After completing the form, an activation email is sent to the email address and the trusted sender can be activated.
It is recommended to set up the SPF/DKIM/DMARC settings on the domain of the sender.
See also
Mailjet’s SPF/DKIM/DMARC documentation
Important
If the database is not using a custom domain, then in order to verify the sender’s address, a temporary alias (of the three email addresses mentioned above) should be set up in Odoo CRM to create a lead. Then, the database is able to receive the verification email and verify the accounts.
Add a domain
By adding an entire domain to the Mailjet account, all the sender addresses related to that domain are automatically validated for sending emails using Mailjet servers. First, navigate to the Mailjet Account Information page. Next, click on Add a Sender Domain or Address link under the Senders & Domains section. Then, click on Add domain to add the custom domain.
Note
The domain needs to be added to the Mailjet account and then validated through the DNS.
After that, fill out the Add a new Domain page on Mailjet and click Continue.
After adding the domain, a validation page will populate. Unless the Odoo database is on-premise (in which case, choose Option 1), choose Option 2: Create a DNS Record. Copy the TXT record information to a notepad and then navigate to the domain’s DNS provider to complete validation.
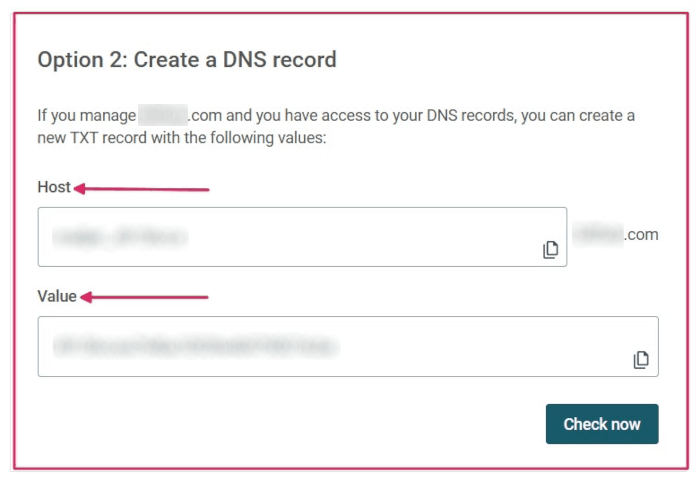
Setup in the domain’s DNS
After getting the TXT record information from the Mailjet account, add a TXT record to the domain’s DNS. This process varies depending on the DNS provider. Consult the provider for specific configuration processes. The TXT record information consists of the Host and Value. Paste these into the corresponding fields in the TXT record.
Return to Mailjet account information
After adding the TXT record to the domain’s DNS, navigate back to the Mailjet account. Then, navigate to Account Information ‣ Add a Sender Domain or Address, click the gear icon next to Domain, and select Validate.
This action can also be done by going to the Sender domains & addresses page on the Mailjet account information and clicking on Manage.
Next, click Check Now to validate the TXT record that was added on the domain. A success screen will appear if the domain is configured correctly.
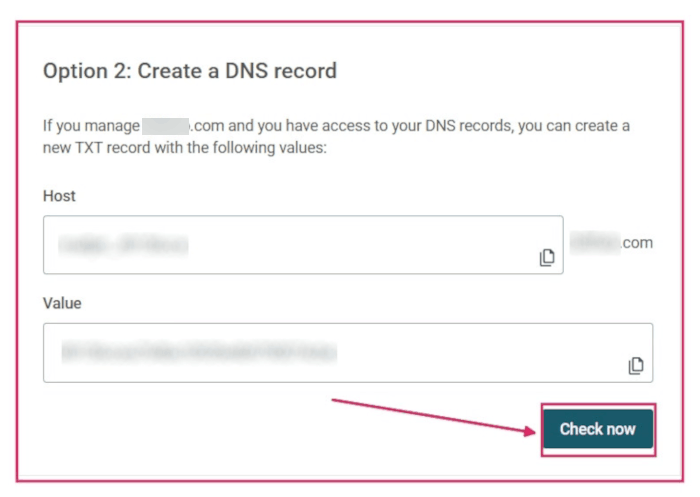
After successfully setting up the domain, there is an option to Authenticate this domain (SPF/DKIM). This button populates SPF & DKIM provider.
See also
Mailjet’s SPF/DKIM/DMARC documentation
Set up in Odoo
To complete the setup, navigate to the Odoo database and go to the Settings. With Developer mode (debug mode) turned on, go to the Technical Menu ‣ Email ‣ Outgoing Mail Servers. Then, create a new outgoing server configuration by clicking on the Create button.
Next, input the SMTP server (in-v3.mailjet.com), port number (587 or 465), and Security (SSL/TLS) that was copied earlier from the Mailjet account. They can also be found here. It is recommended to use SSL/TLS even though Mailjet may not require it.
For the Username, input the API KEY. For the Password, input the SECRET KEY that was copied from the Mailjet account to the notepad earlier. These settings can be found on Mailjet ‣ Account Settings ‣ SMTP and SEND API Settings.
Then, if the Mailjet server is used for mass emailing, set the Priority value higher than that of any transactional email server(s). Finally, save the settings and Test the Connection.

On this page
Get Help
Contact Support Ask the Odoo Community
![]()
- User Docs
- Database management
- Developer
- Contributing
EN
Odoo 18
Common emailing issues and solutions
This page lists the most common emailing issues and their solutions.
Odoo is not an email provider
Odoo does not function like a classic email inbox, such as Gmail, Outlook, Yahoo, etc.
While Odoo uses emails as a way to notify and communicate with users/customers, it is, by design, not a replacement for a dedicated email server. Therefore, it might not behave in the expected way when compared to a traditional email inbox.
The main differences are the following:
- By default, once a notification or transactional email (quote, invoice, direct message to a contact) is sent out successfully, the email object is deleted. The email message’s content lives in the chatter of the related record. It prevents cluttering the database with multiple copies of the content of the same email (when sent to multiple recipients) if the content is already present in the chatter.
- There is no concept of (blind) carbon copy ([B]CC). Odoo uses the concept of followers added to a chatter to automatically decide when and how a contact is notified or receives a copy of an email.
- Incoming emails are handled by checking if the TO email address is a valid email address in the Odoo database or, in case of a reply email, if there is a reference in the email header that matches a message sent from the Odoo database. All other emails will be bounced and not temporarily parked in a spam or quarantine folder. In other words, any email unrelated to an Odoo database is lost.
Outgoing emails
Changing the email address of the admin user account
When an Odoo database is created, the main admin account is assigned a placeholder email address. It is recommended to replace the admin email address with a valid email address to prevent outgoing email issues.
To do so, on the admin account, click the user icon, click My Profile (or Preferences), and update the Email field found under the Preferences tab. Either use any other email address or use your Odoo subdomain (e.g., company-name.odoo.com) and admin for the local-part (e.g., admin@company-name.odoo.com).
Delivery failure
When a message is sent, an (envelope) icon is displayed in the chatter. The icon turns red when delivery has failed for at least one recipient.

Left-click the envelope to display information about the delivery, and, if possible, the relevant error messages.
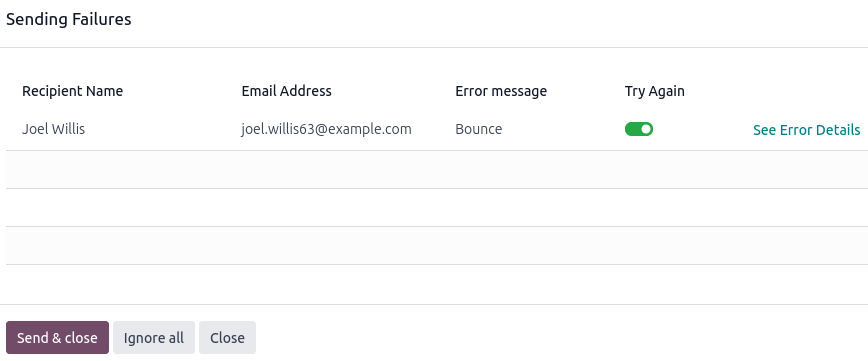
Click See Error Details to get extra information for the fail reason, if Odoo was able to process the original error or bounce email.
Click Send & close to retry sending the email to all toggled-on () recipients under the Try Again column. All toggled-off () recipients will be ignored.
Click Ignore all to ignore all currently failing emails and turn the envelope icon from red to white.
Unsent emails also appear in the Odoo email queue. To access it, activate the developer mode and go to Settings ‣ Technical ‣ Email: Emails.
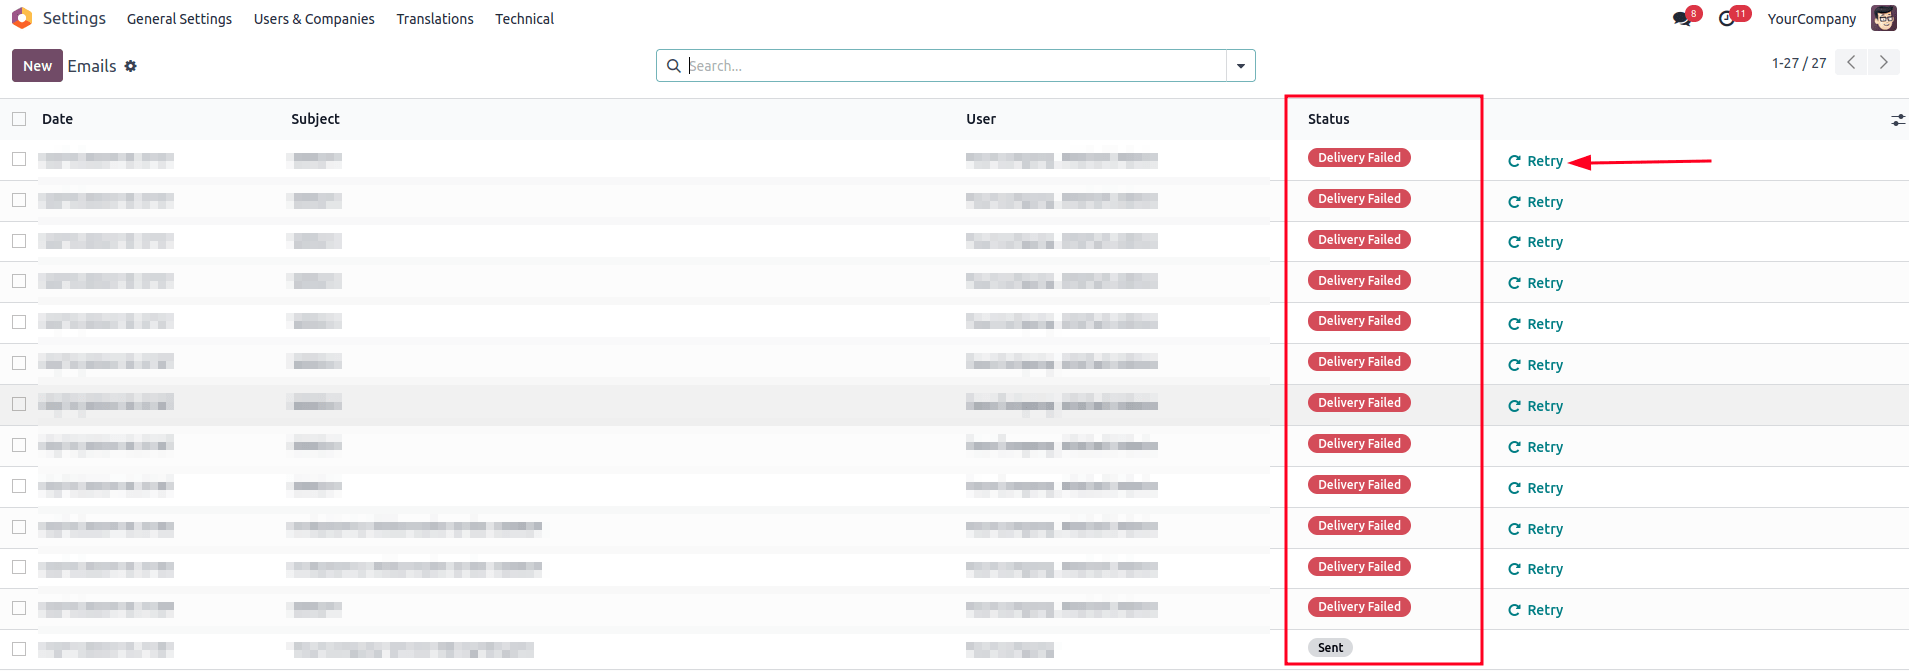
Failed emails display the Delivery Failed status. Click Retry to put a failed email in the email queue again. It will then appear with the Outgoing status. The email will be sent again the next time the scheduled action for the email queue runs.
Optionally, queued emails can be sent immediately by clicking Send Now. Click Cancel Email to remove it from the email queue.
Note
Sent emails are periodically cleaned from the queue. This is controlled by the Auto-Vacuum scheduled action that cleans redundant data on your Odoo database.
Common error messages
Daily limit reached

Odoo limits the number of emails that can be sent from an Odoo Online database. Most email service providers (e.g., Google, Yahoo, etc.) will blacklist Odoo’s server IP if Odoo’s email server is sending too many emails to addresses that do not exist or are no longer valid. It also applies to unsolicited spam emails sent through an Odoo database.
The default daily email limit varies between 5 and 200 emails. The exact limit is depends on several factors (subject to change):
- Type of database subscription (one app free, trial, paying subscription)
- Apps installed (i.e., Email Marketing, Marketing Automation)
- If a database migration is ongoing
If the daily limit is reached, you can:
- Contact Odoo Support to increase your email quota. The following factors will be taken into account:
- Numbers of users on the database
- Apps installed
- Bounce rate (the percentage of email addresses that did not receive emails because they were returned by an email server on their way to the final recipient).
- Whether your email aliases are correctly set up and use the appropriate custom domains.
Tip
When using a custom domain, verify that SPF, DKIM, and DMARC are correctly configured so that Odoo’s email servers are allowed to send emails on your custom domain’s behalf.
- Use an external outgoing email server to be independent of Odoo’s email limit.
- Wait until the next day, and retry sending the email. To do so, activate the developer mode, go to Settings ‣ Technical ‣ Email: Emails, and click Retry next to the unsent email.
Important
The daily email limit counts every email leaving your Odoo database, triggered either manually or automatically. By default, any internal message, notification, logged note, etc., counts as an email if it notifies someone via email. This can be mitigated by receiving notifications in Odoo instead of by email.
SMTP error
Simple Mail Transport Protocol (SMTP) is a standard used to transmit emails between email servers and/or email clients.
If you use an external STMP server to send emails, a standard set of SMTP error codes exists. While the code numbers are not specific to Odoo, the exact content of the error message might vary from email server to email server.
Example
A 550 SMTP permanent delivery error from sendgrid.com:
Mail Delivery Failed
Mail delivery failed via SMTP server 'None'.
SMTPDataError: 550
The from address does not match a verified Sender Identity. Mail cannot be sent until this
error is resolved. Visit https://sendgrid.com/docs/for-developers/sending-email/sender-identity/
to see the Sender Identity requirements
The error message indicates that you tried sending an email from an unverified email address. Investigating the outgoing email server configuration or the default FROM address of your database is a good starting point to troubleshoot the issue, and verify that you whitelisted the email address on the side of sendgrid.com.
Usually, inputting the error message content in a Google search can yield information on what the root cause might be and how to correct the issue.
If the issue cannot be resolved and keeps occurring, contact Odoo Support.
No error populated
Odoo is not always capable of providing information on the reason a delivery failed. The different email providers implement their own policy on bounced emails, and it is not always possible for Odoo to interpret it correctly.
If there is a recurring problem with the same customer or the same domain, contact Odoo Support.
Note
One of the most common reasons for an email failing to be sent with no error message is related to the SPF or DKIM configuration. Also, verify that the implemented email notification setup is adapted to your business needs. See the Communication in Odoo by email documentation for more information.
Execution time
The exact time of an email is sent is handled by a system utility cron (scheduled action) that can be used to schedule tasks to run automatically at predetermined intervals. Odoo uses this approach to send emails that are considered “not urgent” (i.e., newsletters formats such as mass mailing, marketing automation, and events). This avoids cluttering the mail servers and, instead, prioritizes individual communication.
What is a cron?
By default, for the normal email queue, the Mail: Email Queue Manager cron runs every 60 minutes. The lowest running interval for a cron is 5 minutes. Odoo recommends an interval of 15 minutes to ensure proper operation. If the interval is too short, not all emails may be processed, which may cause the cron to timeout.
Emails that are considered urgent (from one person to another, such as sales orders, invoices, purchase orders, etc.) are sent immediately. They do not show up under Settings ‣ Technical ‣ Email: Emails, unless their delivery fails.

Email campaigns are sent as soon as possible (after clicking the Send button) or at a scheduled time (after clicking the Schedule button).
For the email marketing queue, the Mail Marketing: Process queue cron runs once a day, but will be automatically triggered early if a campaign is scheduled outside of this default frequency. If a mailing list contains a large number of recipients, triggering the cron manually multiple times is not recommended, as it will not accelerate the processing time and might create errors.
Tip
To edit crons, enable the developer mode and go to Settings ‣ Technical ‣ Automation: Scheduled Actions.
See also
For more information about crons when using Odoo.sh, check out Odoo.sh frequent technical questions.
Email Marketing campaigns stuck in the queue
If multiple Email Marketing campaigns are put in the queue, they are processed in chronological order based on their creation date.
Example
If there are three campaigns: Campaign_1 (created 1st of January), Campaign_2 (created 2nd of January), and Campaign_3 (created 3rd of January), they are put in the queue by clicking Send on all three of them.
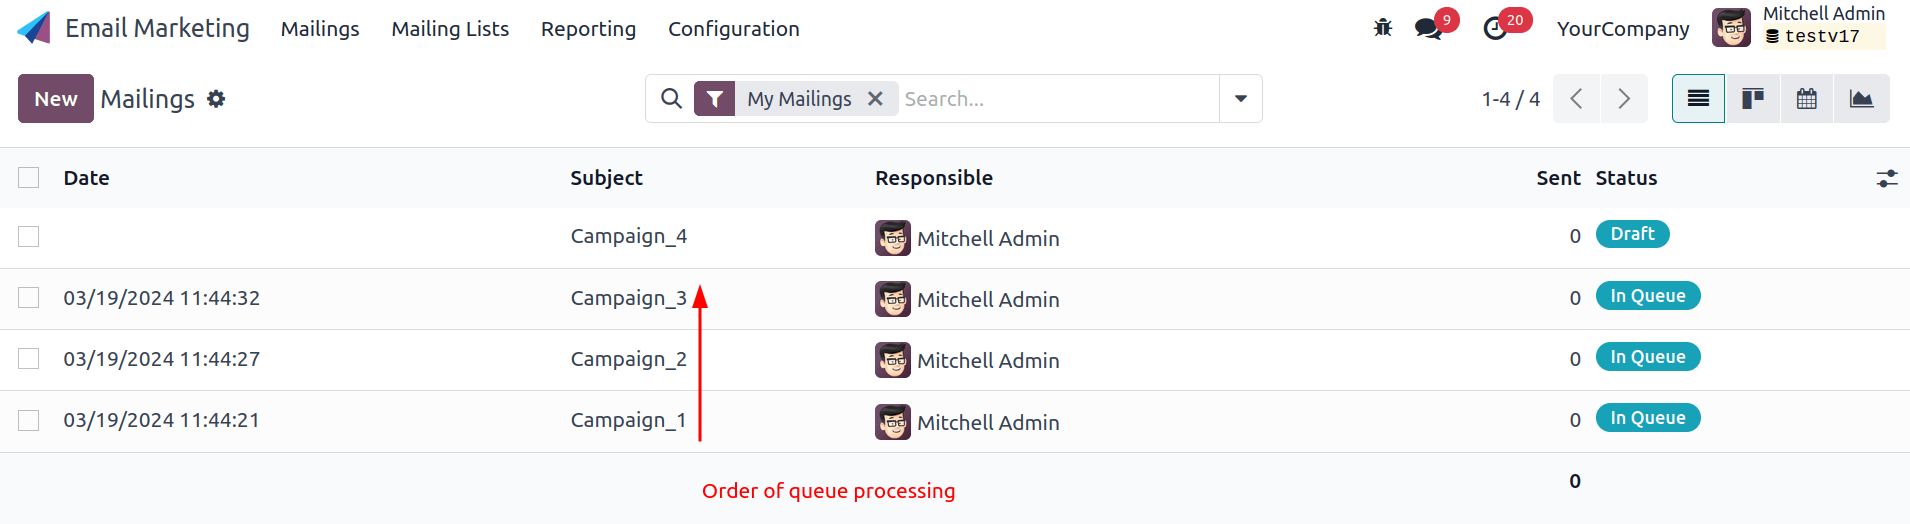
The cron will try to process Campaign_1, then Campaign_2, and finally Campaign_3. It will not start processing Campaign_2 until it finishes processing Campaign_1.
If an email campaign never leaves the queue, there might be an issue with the campaign at the top of the queue. To troubleshoot, we could remove Campaign_1 from the queue by clicking the Cancel button, and see if the two other campaigns are sent. Then we could try to fix Campaign_1 or contact Odoo Support.
Incoming emails
When there is an issue with incoming emails, there might not be an indication, per se, in Odoo. It is the sending email client, who tries to contact a database, that will get a bounce message (most of the time a 550: mailbox unavailable error message).
Email is not received
Odoo OnlineOdoo.sh
Contact Odoo Support if there is a recurring issue with the same client or domain.
Information for Odoo Support
Here is a list of helpful information to include when reaching out to Odoo Support:
- An export of the full email from the inbox. These are usually in .eml or .msg file formats containing technical information required for an investigation. The exact process to download the file depends on your third-party email provider.
See also- Gmail Help Center: Trace an email with its full header
- Microsoft Support: View internet message headers in Outlook
Tip
If possible, the EML/MSG file should be based on the original email that was sent and is failing or is causing issues.
For incoming emails: if possible contact the original email sender and request an EML/MSG copy of the original email. Sending a copy of the original email (forwarded) only contains partial information related to the troubleshooting.
For outgoing emails: either provide the EML/MSG of the email or specify what record in the database is affected (e.g., sales order number, contact name, invoice number) and the date/time when the email was sent (e.g., email sent on the 10th January 2024 11:45 AM Central European Time). - An explanation of the exact flow that is being followed to normally receive those emails in Odoo. Try to answer the following questions:
- Is this a notification message from a reply being received in Odoo?
- Is this a message being sent from the Odoo database?
- Is there an incoming email server being used, or is the email being redirected/forwarded through a custom email server or provider?
- Is there an example of an email that has been correctly forwarded?
- Have you changed any email-related settings recently? Did it stop working after those changes?
- An answer to the following questions:
- Is it a generic issue or is it specific to a use case? If specific to a use case, which one?
- Is it working as expected? In case the email is sent using Odoo, the bounce email should reach the Odoo database and display the red envelope.
On this page
Get Help
Contact Support Ask the Odoo Community
![]()
- User Docs
- Database management
- Developer
- Contributing
EN
Odoo 18
Mail Plugins
Mail Plugins are connectors that bridge your mailbox with your Odoo database. With them, you can interact with your Odoo database directly from your mailbox by:
- Creating leads and centralizing prospects’ emails into the CRM app.
- Generating tasks in any Odoo project.
- Creating tickets in the Helpdesk app.
- Searching and storing insights on your contacts.
Mail Plugins are available for Outlook and Gmail.
Pricing
Mail Plugins are free to install and use.
However, they can provide Lead Enrichment, which is part of a paid service known as Lead Generation.
Mail plugins allow you to test Lead Enrichment for free, whether you connect the plugins to a database or not. After a while, the plugins ask you to buy In-app purchases (IAP) credits if you would like to keep using this service.
Lead Generation IAP service
Lead Enrichment uses the Lead Generation IAP service. Each request consumes one Lead Generation credit.
To buy credits, go to Settings ‣ CRM ‣ Lead Enrichment ‣ Buy credits and select a package.
Note
- If you are out of credits, the only information populated when clicking on the suggested company is its website link and logo.
- Check out the Lead Generation IAP service Privacy Policy.
See also
On this page
Get Help
Contact Support Ask the Odoo Community
![]()
- User Docs
- Database management
- Developer
- Contributing
EN
Odoo 18
Outlook Plugin
Outlook allows for third-party applications to connect in order to execute database actions from emails. Odoo has a plugin for Outlook that allows for the creation of an opportunity from the email panel.
Configuration
The Outlook Mail Plugin needs to be configured both on Odoo and Outlook.
Enable Mail Plugin
First, enable the Mail Plugin feature in the database. Go to Settings ‣ General Settings ‣ Integrations, enable Mail Plugin, and Save the configuration.
Install the Outlook Plugin
Download (Save Page As ‣ Web Page XML only) the following XML file to upload later: https://download.odoocdn.com/plugins/outlook/manifest.xml.
Next, open the Outlook mailbox, and select any email. After completing this, click on the More actions button in the upper right-side and select Get Add-ins.

Tip
For locally installed versions of Microsoft Outlook, access the Get Add-ins menu item while in preview mode (not with a message open). First, click on the … (ellipsis) icon in the upper right of the previewed message, then scroll down, and click on Get Add-ins.
Following this step, select the My add-ins tab on the left-side.
Under Custom add-ins towards the bottom, click on + Add a custom add-in, and then on Add from file…
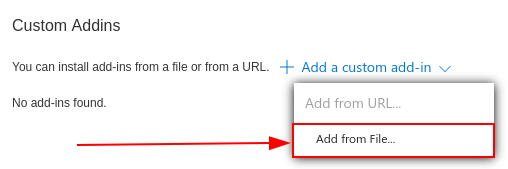
For the next step, attach the manifest.xml file downloaded above, and press OK. Next, read the warning and click on Install.
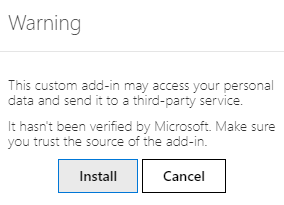
Connect the database
Now, Outlook will be connected to the Odoo database. First, open any email in the Outlook mailbox, click on the More actions button in the upper right-side, and select Odoo for Outlook.
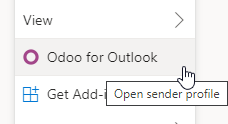
The right-side panel can now display Company Insights. At the bottom, click on Login.
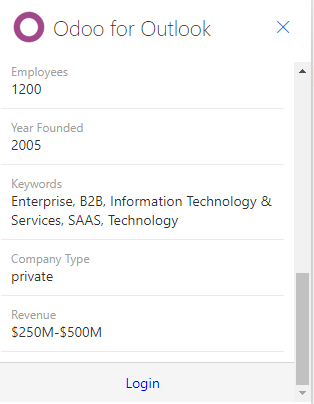
Note
Only a limited amount of Company Insights (Lead Enrichment) requests are available as a trial database. This feature requires prepaid credits.
Tip
If, after a short while, the panel is still empty, it is possible that the browser cookie settings prevented it from loading. Note that these settings also change if the browser is in “Incognito” mode.
To fix this issue, configure the browser to always allow cookies on Odoo’s plugin page.
For Google Chrome, change the browser cookie settings by following the guide at: https://support.google.com/chrome/answer/95647 and adding download.odoo.com to the list of Sites that can always use cookies.
Once this is complete, the Outlook panel needs to be opened again.
Now, enter the Odoo database URL and click on Login.
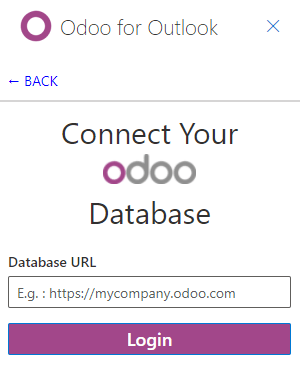
Next, click on Allow to open the pop-up window.
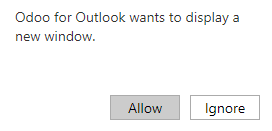
If the user isn’t logged into the database, enter the credentials. Click on Allow to let the Outlook Plugin connect to the database.
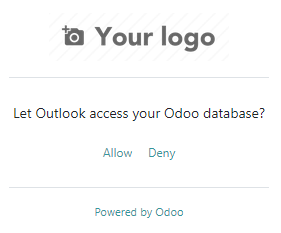
Add a shortcut to the plugin
By default, the Outlook Plugin can be opened from the More actions menu. However, to save time, it’s possible to add it next to the other default actions.
In the Outlook mailbox, click on Settings, then on View all Outlook settings.
Now, select Customize actions under Mail, click on Odoo for Outlook, and then Save.
Following this step, open any email; the shortcut should be displayed.
Using the plugin
Now that the plug-in is installed and operational, all that needs to be done to create a lead is to click on the O [Odoo icon] or navigate to More actions and click on Odoo for Outlook. The side panel will appear on the right-side, and under Opportunities click on New. A new window with the created opportunity in the Odoo database will populate.
On this page
Get Help
Contact Support Ask the Odoo Community
![]()
- User Docs
- Database management
- Developer
- Contributing
EN
Odoo 18
Gmail Plugin
The Gmail Plugin integrates an Odoo database with a Gmail inbox, so users can keep track of all their work between Gmail and Odoo, without losing any information.
Odoo Online users
For databases hosted on Odoo Online (or Odoo.sh), follow the steps below to configure the Gmail Plugin.
Install the Gmail Plugin
First, log in to the Gmail account that the user wishes to connect to Odoo.
From the Gmail inbox, click the plus sign icon on the right side panel to get add-ons. If the side panel is not visible, click on the arrow icon at the bottom right corner of the inbox to reveal it.
Then, use the search bar to search for Odoo and locate the Odoo Inbox Addin.
Or, go directly to the Odoo Inbox Addin page on the Google Workspace Marketplace.
Once the plugin is located, click Install. Then, click Continue to start the installation.
Next, select which Gmail account the user wishes to connect to Odoo. Then click Allow to let Odoo access the Google account. Google will then show a pop-up window confirming that the installation was successful.
Configure the Odoo database
The Mail Plugin feature must be enabled in the Odoo database in order to use the Gmail Plugin. To enable the feature, go to Settings ‣ General Settings. Under the Integrations section, activate Mail Plugin, and then click Save.
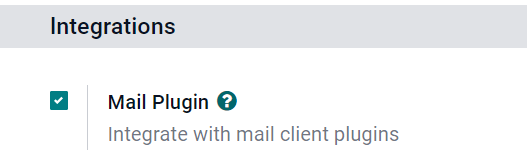
Configure the Gmail inbox
In the Gmail inbox, a purple Odoo icon is now visible on the right side panel. Click on the Odoo icon to open up the Odoo plugin window. Then, click on any email in the inbox. Click Authorize Access in the plugin window to grant Odoo access to the Gmail inbox.

Next, click Login. Then, enter the URL of the Odoo database that the user wishes to connect to the Gmail inbox, and log in to the database.
Note
Use the general URL for the database, not the URL of a specific page in the database. For example, use https://mycompany.odoo.com, not https://mycompany.odoo.com/web#cids=1&action=menu.
Finally, click Allow to let Gmail access the Odoo database. The browser will then show a Success! message. After that, close the window. The Gmail inbox and Odoo database are now connected.
Odoo On-Premise users
For databases hosted on servers other than Odoo Online (or Odoo.sh), follow the steps below to configure the Gmail Plugin.
Note
As part of their security guidelines, Google requires add-on creators to provide a list of URLs that can be used in actions and redirections launched by the add-on. This protects users by ensuring, for example, that no add-on redirects users toward a malicious website. (Read more on Google Apps Script.)
Since Odoo can only list the odoo.com domain and not every on-premise customer’s unique server domain, on-premise customers cannot install the Gmail Plugin from the Google Workspace Marketplace.
Install the Gmail Plugin
First, access the GitHub repository for the Odoo Mail Plugins. Next, click on the green Code button. Then, click Download ZIP to download the Mail Plugin files onto the user’s computer.
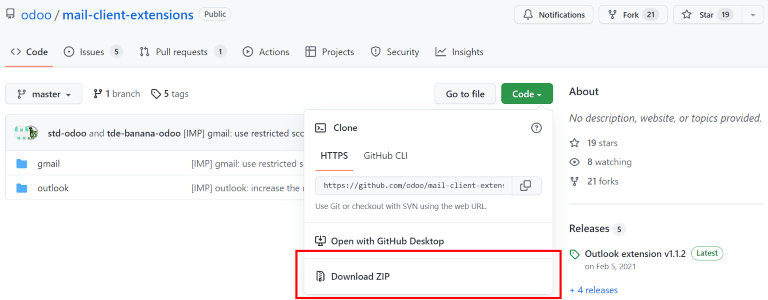
Open the ZIP file on the computer. Then, go to mail-client-extensions-master ‣ gmail ‣ src ‣ views, and open the login.ts file using any text editor software, such as Notepad (Windows), TextEdit (Mac), or Visual Studio Code.
Delete the following three lines of text from the login.ts file:
if (!/^https:\/\/([^\/?]*\.)?odoo\.com(\/|$)/.test(validatedUrl)) {
     return notify("The URL must be a subdomain of odoo.com");
}
This removes the odoo.com domain constraint from the Gmail Plugin program.
Next, in the ZIP file, go to mail-client-extensions-master ‣ gmail, and open the file called appsscript.json. In the urlFetchWhitelist section, replace all the references to odoo.com with the Odoo customer’s unique server domain.
Then, in the same gmail folder, open the file called README.md. Follow the instructions in the README.md file to push the Gmail Plugin files as a Google Project.
Note
The computer must be able to run Linux commands in order to follow the instructions on the README.md file.
After that, share the Google Project with the Gmail account that the user wishes to connect to Odoo. Then, click Publish and Deploy from manifest. Lastly, click Install the add-on to install the Gmail Plugin.
Configure the Odoo database
The Mail Plugin feature must be enabled in the Odoo database in order to use the Gmail Plugin. To enable the feature, go to Settings ‣ General Settings. Under the Integrations section, activate Mail Plugin, and then click Save.
Configure the Gmail inbox
In the Gmail inbox, a purple Odoo icon is now visible on the right side panel. Click on the Odoo icon to open up the Odoo plugin window. Then, click on any email in the inbox. Click Authorize Access in the plugin window to grant Odoo access to the Gmail inbox.
Next, click Login. Then, enter the URL of the Odoo database that the user wishes to connect to the Gmail inbox, and log in to the database.
Note
Use the general URL for the database, not the URL of a specific page in the database. For example, use https://mycompany.odoo.com, not https://mycompany.odoo.com/web#cids=1&action=menu.
Finally, click Allow to let Gmail access the Odoo database. The browser will then show a Success! message. After that, close the window. The Gmail inbox and Odoo database are now connected.
On this page
Get Help
Contact Support Ask the Odoo Community
![]()
- User Docs
- Database management
- Developer
- Contributing
EN
Odoo 18
Unsplash
Unsplash is a recognized stock photography library integrated with Odoo.
If your database is hosted on Odoo Online, you can access Unsplash pictures without configuration.
If your database is hosted on Odoo.sh or on-premise, proceed as follows:
- To generate an Unsplash access key, create or sign in to an Unsplash account.
- Access your applications dashboard, click New Application, select all checkboxes, and click Accept terms.
- In the pop-up window, enter your Application Name, starting with the prefix Odoo: (e.g., Odoo: connection), so Unsplash recognizes it as an Odoo instance. Then, add a Description and click Create application.
- On the application details page, scroll down to the Keys section and copy the Access Key and Application ID.
- In Odoo, go to General Settings and enable the Unsplash Image Library feature. Then, enter the Unsplash Access Key and Application ID.
Warning
As a non-Odoo Online user, you are limited to a test key with a maximum of 50 Unsplash requests per hour.
Get Help
Contact Support Ask the Odoo Community
![]()
- User Docs
- Database management
- Developer
- Contributing
EN
Odoo 18
Geolocation
You can locate contacts or places and generate routes on a map in Odoo.

To use the feature, open the Settings app, and, under the Integrations, section, activate Geo Localization. Then, choose between using the OpenStreetMap or Google Places API.
OpenStreetMap
OpenStreetMap is a free, open geographic database updated and maintained by volunteers. To use it, select Open Street Map.
Important
OpenStreetMap might not always be accurate. You can join the OpenStreetMap community to fix any issues encountered.
Google Places API map
The Google Places API map provides detailed info on places, businesses, and points of interest. It supports location-based features like search, navigation, and recommendations.
Important
Using the Google Places API could require payment to Google.
To use it, select Google Place Map and enter your API Key.

See also
Get Help
Contact Support Ask the Odoo Community
![]()
- User Docs
- Database management
- Developer
- Contributing
EN
Odoo 18
Google Translate
Google Translate can be used to translate user generated text in the Odoo chatter.
Google API console
A majority of the setup for integrating Google Translate into Odoo is done with the Google API console. Once the following processes are complete, an API key is created to input in Odoo.
See also
Google Translate setup on Google
Create a new project
To get started, go to the Google API Console. Then, log in with a Google Workspace account, if there is one. If not, log in with a personal Gmail account (this should match the email address that has billing attached to it).
Next, click Create Project on the far-right of the OAuth consent screen.
Tip
If the Google API Console has existing projects, click the drop-down menu next to the Google Cloud icon, and a pop-over window appears. Next, click New Project top-right of the pop-over window.
On the New Project screen, rename the Project name to Odoo Translate, and browse for the Location. Set the Location as the Google Workspace organization. If a personal Gmail account is being used, leave the Location as No Organization.
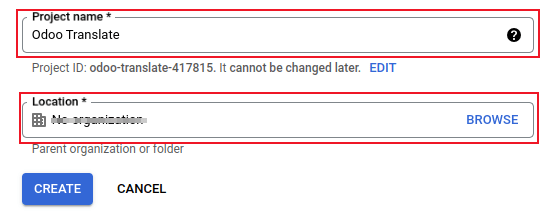
Click on Create to finish this step.
API library
Next, the Cloud Translation API needs to be installed on this newly-created project. To do that, click Library in the left menu. Then, search the term Cloud Translation API, and click into the result. This should be a Google Enterprise API labeled Cloud Translation API.
Click Enable to install the library on this project.
Important
Using the Google Translate API requires a current billing account with Google.
Once a billing account is setup with Google and the library is enabled, click Manage to finish configuration on the API.
Create credentials
Now that the project is set up, and the Cloud Translation API is enabled, credentials must be created. This includes the API key.
To begin this process, click Credentials in the left sidebar menu.
Then, click Create Credentials in the top menu, and select API key from the drop-down menu.
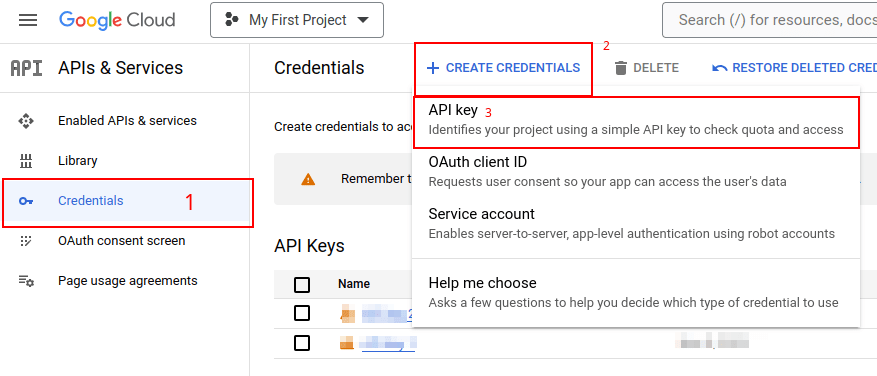
Copy the API key for use in the next section.
Important
For security purposes, the usage of the API key can be restricted.
To do that, go to the API restrictions by clicking on Edit API key in the pop-over window, or by clicking on the listed API key on the Credentials page. From here, key restrictions can be set. This includes setting an application to restrict the use of the API key, and whether this API key can call any API.
It is recommended that the Odoo Translate API be restricted to only allow requests from the configured Odoo database and to the Cloud Translation API.
To add the website restriction, click Websites, under the Set an application restriction. Then, enter the address of the database Google Translate is being used in, by clicking on Add. Lastly, add the URL, and click Done.
To restrict use of the key to a selected API, first, select Restrict key, under the API restrictions section. Then use the drop-down menu to choose the API being configured (Cloud Translation API).
Tip
- Save the API key: copy the API key and store it somewhere secure.
- Do not share the API key publicly or expose it in client-side code.
Odoo configuration
To access the integration in Odoo, navigate to the Settings app ‣ Discuss section. Enter the API key into the field labeled Message Translation. Then, Save the settings, and Google Translate can be used in any chatter throughout the database.
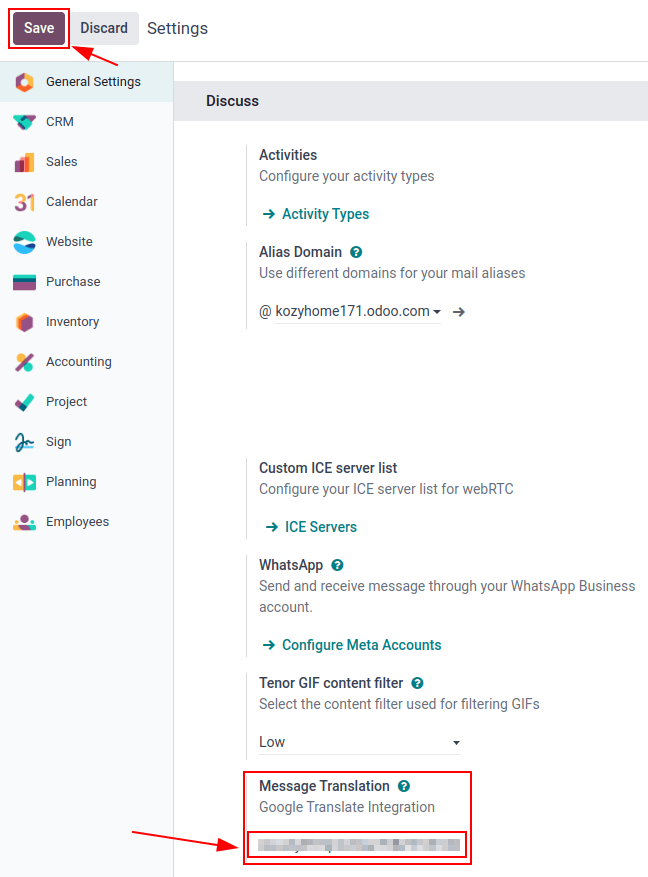
Translate chatter
To translate a user’s text from another language, click the … (three dot) icon menu to the right of the chatter. Then, select Translate. The content translates to the language set on the user’s preferences.
![]()
See also
On this page
Get Help
Contact Support Ask the Odoo Community
![]()
- User Docs
- Database management
- Developer
- Contributing
EN
Odoo 18
Barcode Lookup
Barcode Lookup allows you to scan (or enter) products’ barcodes (UPC, EAN, or ISBN) to automatically create them in your Odoo database, complete with product names, descriptions, images, categories, etc.
Configuration
If your database is hosted on Odoo Online, you can use Barcode Lookup without configuration.
If your database is hosted on Odoo.sh or on-premise, proceed as follows:
- Visit the Barcode Lookup website and click Sign Up for the API.
- Choose the appropriate plan based on the number of barcodes you need to scan.
- Fill in the required details and complete the registration process.
- Copy the API key.
- In Odoo, open the Settings app, scroll down to the Integrations section, and, under Barcode Database, paste the Barcode Lookup API Key.
Use
To fill in product information using Barcode Lookup, create a new product and fill in the Barcode field. The product’s details are then automatically imported from Barcode Lookup, updating the following fields: Name, Price, Description, Tax, Image, Weight, Attributes, Product category, and Volume. You can then modify any field(s) as needed.
See also
Create new products during internal transfers using the Barcode Lookup database.
On this page
Get Help
Contact Support Ask the Odoo Community
![]()
EN
Odoo 18
Developer mode (debug mode)
The developer mode, also known as debug mode, unlocks access to advanced tools and settings in Odoo.
Warning
Proceed with caution, as some developer tools and technical settings are considered advanced and may have associated risks. Only use them if you understand the implications and are confident in your actions.
Note
The developer mode is also available with assets, which are used to debug JavaScript code, and with tests assets, which are used to run test tours.
Activation
To activate it, open the Settings app, scroll down to the Developer Tools section, and click Activate the developer mode.
Once activated, the Deactivate the developer mode option becomes available.
To activate the developer mode from anywhere in the database, add ?debug=1 at the end of the URL (e.g., https://example.odoo.com/odoo?debug=1). To deactivate it, use ?debug=0 instead.
Use ?debug=assets to activate the developer mode with assets and ?debug=tests to activate it with tests assets.
Tip
Open the command palette by pressing Ctrl + K or Cmd ⌘ + K, then type debug to activate the developer mode with assets or deactivate it.
Browser extension
The Odoo Debug browser extension adds an icon to toggle developer mode on or off from the browser’s toolbar. It is available on the Chrome Web Store and Firefox Add-ons.
Developer tools and technical menu
Once the developer mode is activated, the developer tools can be accessed by clicking the (bug) icon. The menu contains tools useful for understanding or editing technical data, such as a view’s field, filters, or actions. The options available depend on where the menu is accessed from.

Database administrators can access the technical menu from the Settings app. It contains advanced database settings, such as ones related to the database structure, security, actions, etc.

On this page
Get Help
Contact Support Ask the Odoo Community
![]()
EN
Odoo 18
Accounting and Invoicing
Odoo Invoicing is a standalone invoicing app to create invoices, send them to your customers, and manage payments.
Odoo Accounting is a full featured accounting app. Accountant productivity is at the core of its development with features such as AI-powered invoice recognition, synchronization with your bank accounts, smart matching suggestions, etc.
See also
Get started
Basic concepts of accounting and initial setup of your accountingTaxes
Taxes, fiscal positions, and integrationsCustomer invoices
Customer invoices, payment terms, and electronic invoicingVendor bills
Vendor bills, assets, and invoice digitization (OCR)Payments
Invoices and bills payments (online, checks, batches) and follow-up on invoicesBank and cash accounts
Bank synchronization, reconciliation, and cash registersReporting
Reporting, declarations, and analytic accountingDouble-entry bookkeeping
Odoo automatically creates all the underlying journal entries for all accounting transactions (e.g., customer invoices, vendor bills, point-of-sales orders, expenses, inventory valuations, etc.).
Odoo uses the double-entry bookkeeping system, whereby every entry needs a corresponding and opposite counterpart in a different account, with one account debited and the other credited. It ensures that all transactions are recorded accurately and consistently and that the accounts always balance.
See also
Accrual and cash basis
Both accrual and cash basis accounting are supported in Odoo. This allows reporting income and expense either when the transaction occurs (accrual basis) or when the payment is made or received (cash basis).
See also
Multi-company
Several companies can be managed within the same database. Each company has its chart of accounts, but it is possible to share accounts between them for scenarios in which such a configuration would be required. Users can then access several companies but only work on a single company’s accounting at a time.
See also
Multi-currency environment
A multi-currency environment with an automated exchange rate to ease international transactions is available in Odoo. Every transaction is recorded in the company’s default currency; for transactions occurring in another currency, Odoo stores both the value in the company’s currency and the transactions’ currency value. Odoo generates currency gains and losses after reconciling the journal items.
See also
Manage a bank in a foreign currency
Branch management
Multiple branches can be managed thanks to multi-company hierarchies. This allows to post journal entries on each branch as well as setting up a common lock date managed by the main company.
International standards
Odoo Accounting supports more than 70 countries. It provides the central standards and mechanisms common to all nations, and thanks to country-specific modules, local requirements are fulfilled. Fiscal positions exist to address regional specificities like the chart of accounts, taxes, or any other requirements.
See also
Accounts receivable and payable
By default, there is a single account for the account receivable entries and one for the account payable entries. As transactions are linked to your contacts, you can run a report per customer, vendor, or supplier.
The Partner Ledger report displays the balance of your customers and suppliers. It is available by going to Accounting ‣ Reporting ‣ Partner Ledger.
Reporting
The following financial reports are available and updated in real-time:
Financial reports | |
|---|---|
Statement | Balance sheet |
Profit and loss | |
Cash flow statement | |
Tax report | |
ES sales list | |
Audit | General ledger |
Trial balance | |
Journal report | |
Intrastat report | |
Check register | |
Partner | Partner ledger |
Aged receivable | |
Aged payable | |
Management | Invoice analysis |
Unrealized currency gains/losses | |
Depreciation schedule | |
Disallowed expenses | |
Budget analysis | |
Product margins | |
1099 report |
Tip
Create and customize reports with Odoo’s report engine.
Tax report
Odoo computes all accounting transactions for the specific tax period and uses these totals to calculate the tax obligation.
Important
Once the tax report has been generated for a period, Odoo locks it and prevents the creation of new journal entries involving VAT. Any correction to customer invoices or vendor bills has to be recorded in the next period.
Note
Depending on the country’s localization, an XML version of the tax report can be generated to be uploaded to the VAT platform of the relevant taxation authority.
Bank synchronization
The bank synchronization system directly connects with your bank institution to automatically import all transactions into your database. It gives an overview of your cash flow without logging into an online banking system or waiting for paper bank statements.
See also
Inventory valuation
Both periodic (manual) and perpetual (automated) inventory valuations are supported in Odoo. The available methods are standard price, average price, LIFO and FIFO (First-In, First-Out).
See also
Retained earnings
Retained earnings are the portion of income retained by a business. Odoo calculates current year earnings in real-time, so no year-end journal or rollover is required. The profit and loss balance is automatically reported on the balance sheet report.
See also
Fiduciaries
The Accounting Firms mode can be activated by going to Accounting ‣ Configuration ‣ Settings ‣ Accounting Firms mode. When enabled:
- The document’s sequence becomes editable on all documents;
- The Total (tax incl.) field appears to speed up and control the encoding by automating line creation with the right account and tax;
- Invoice Date and Bill Date are pre-filled when encoding a transaction.
- A Quick encoding option is available for customer invoices and vendor bills.
On this page
Get Help
Contact Support Ask the Odoo Community
![]()
- User Docs
- Database management
- Developer
- Contributing
EN
Odoo 18
Get started
When you first open your Odoo Accounting app, the Accounting Dashboard welcomes you with a step-by-step onboarding banner, a wizard that helps you get started. This onboarding banner is displayed until you choose to close it.
The settings visible in the onboarding banner can still be modified later by going to Accounting ‣ Configuration ‣ Settings.
Note
Odoo Accounting automatically installs the appropriate Fiscal Localization Package for your company, according to the country selected at the creation of the database. This way, the right accounts, reports, and taxes are ready-to-go. Click here for more information about Fiscal Localization Packages.
Accounting onboarding banner
The step-by-step Accounting onboarding banner is composed of four steps:

Accounting Periods
Define the Fiscal Years’ opening and closing dates, which are used to generate reports automatically, and set your Tax Return Periodicity, along with a reminder to never miss a tax return deadline.
By default, the opening date is set on the 1st of January and the closing date on the 31st of December, as this is the most common use.
Note
You can also change these settings by going to Accounting ‣ Configuration ‣ Settings ‣ Fiscal Periods and updating the values.
Bank Account
Connect your bank account to your database and have your bank statements synced automatically. To do so, find your bank in the list, click Connect, and follow the instructions on-screen.
Note
Click here for more information about this feature.
If your Bank Institution can’t be synchronized automatically, or if you prefer not to sync it with your database, you can also configure your bank account manually by typing its name, clicking Create your Bank Account, and filling out the form.
- Name: the bank account’s name, as displayed in Odoo.
- Account Number: your bank account number (IBAN in Europe).
- Bank: click Create and edit to configure the bank’s details. Add the bank institution’s Name and its Identifier Code (BIC or SWIFT).
- Code: this code is your Journal’s Short Code, as displayed in Odoo. By default, Odoo creates a new Journal with this short code.
- Journal: This field is displayed if you have an existing bank journal that is not linked yet to a bank account. If so, then select the Journal you want to use to record the financial transactions linked to this bank account or create a new one by clicking Create and Edit.
Note
- You can add as many bank accounts as needed with this tool by going to Accounting ‣ Configuration ‣ Add a Bank Account.
- Click here for more information about Bank Accounts.
Taxes
This menu allows you to create new taxes, (de)activate, or modify existing taxes. Depending on the localization package installed on your database, taxes required for your country are already configured.
Note
Click here for more information about taxes.
Chart of Accounts
With this menu, you can add accounts to your Chart of Accounts and indicate their initial opening balances.
Basic settings are displayed on this page to help you review your Chart of Accounts. To access all the settings of an account, click on the Setup button at the end of the line.
Note
Click here for more information on how to configure your Chart of Accounts.
Invoicing onboarding banner
There is another step-by-step onboarding banner that helps you take advantage of your Odoo Invoicing and Accounting apps. The Invoicing onboarding banner is the one that welcomes you if you use the Invoicing app rather than the Accounting app.
If you have Odoo Accounting installed on your database, you can reach it by going to Accounting ‣ Customers ‣ Invoices.
The Invoicing onboarding banner consists of four main steps:

Company Data
Add your company’s details, such as the name, address, logo, website, phone number, email address, and Tax ID or VAT number. These details are then displayed on your documents, such as invoices.
Note
You can also change the company’s details by going to Settings ‣ General Settings, scrolling down to the Companies section, and Update Info.
Documents Layout
Customize the default invoice layout.
Note
You can also change the invoice layout by going to Settings ‣ General Settings, scrolling down to the Companies section, and clicking Configure Document Layout.
Create Invoice
Create your first invoice.
Tip
Add your bank account number and a link to your General Terms & Condition in the footer. This way, your contacts can find the full content of your GT&C online without having to print them on the invoices you issue.
Online Payments
Get started with Stripe and enable secure integrated credit and debit card payments within Odoo.
Tip
To use other payment providers, go to Invoicing –> Configuration –> Payment Providers and enable the desired providers.
See also
- Bank and cash accounts
- Chart of accounts
- Consolidation
- Bank synchronization
- Fiscal localizations
- Odoo Tutorials: Accounting and Invoicing - Getting started [video]
On this page
Get Help
Contact Support Ask the Odoo Community
![]()
- User Docs
- Database management
- Developer
- Contributing
EN
Odoo 18
Accounting cheat sheet
The Balance Sheet is a snapshot of the company’s finances at a specific date (as opposed to the Profit and Loss, which is an analysis over a period).
- Assets represent the company’s wealth and the goods it owns. Fixed assets include buildings and offices, while current assets include bank accounts and cash. The money owed by a client is an asset. An employee is not an asset.
- Liabilities are obligations from past events that the company will have to pay in the future (utility bills, debts, unpaid suppliers). Liabilities could also be defined as a source of financing which is provided to the company, also called leverage.
- Equity is the amount of the funds contributed by the owners of the company (founders or shareholders) plus previously retained earnings (or losses). Each year, net profits (or losses) may be reported as retained earnings or distributed to the shareholders (as a dividend).
What is owned (an asset) has been financed through debts to reimburse (liabilities) or equity (profits, capital).
A difference is made between assets and expenses:
- An asset is a resource with economic value that an individual, corporation, or country owns or controls with the expectation that it will provide a future benefit. Assets are reported on a company’s balance sheet. They are bought or created to increase a firm’s value or benefit its operations.
- An expense is the costs of operations a company bears to generate revenues.
The profit and loss (P&L) report shows the company’s performance over a specific period of time, usually a quarter or a fiscal year.
- The revenue refers to the money earned by the company by selling goods and/or services.
- The cost of goods sold (COGS, or also known as “Cost of Sale”) refers to the sale of goods’ costs (e.g., the cost of the materials and labor used to create the goods).
- The Gross profit equals the revenues from sales minus the cost of goods sold.
- Operating expenses (OPEX) include administration, sales and R&D salaries, rent and utilities, miscellaneous costs, insurances, and anything beyond the costs of products sold or the cost of sale.
Profit & Loss
Net Profit
Gross Profit
RevenueRevenueLess Costs of RevenueCost of Goods Sold
Operating Income or Loss
Less Operating ExpensesR&D
Sales, General & AdministrativePlus Other IncomeForeign Exchange Gains
Asset write-downsLess Other ExpensesInterest on debt
Depreciation
Balance Sheet
Net Assets
Total Assets
Current AssetsCash & Bank Accounts
Accounts Receivable
Deferred Tax AssetsPlus Non-current AssetsLand & buildings
Intangible AssetsLess Current LiabilitiesAccounts Payable
Deferred Revenue
Deferred Tax LiabilitiesLess Non-current liabilitiesLong-term loans
Total Equity
EquityCommon StockPlus Retained Earnings
Assets = Liabilities + Equity
Chart of accounts
The chart of accounts lists all the company’s accounts: both Balance sheet accounts and P&L accounts. Every transaction is recorded by debiting and crediting multiple accounts in a journal entry. In a way, a chart of accounts is like a company’s DNA!
Every account listed in the chart of accounts belongs to a specific category. In Odoo, each account has a unique code and belongs to one of these categories:
- Equity and subordinated debts
- Equity is the amount of money invested by a company’s shareholders to finance the company’s activities.
- Subordinated debts are the amount of money lent by a third party to a company to finance its activities. In the event of the dissolution of a company, these third parties are reimbursed before the shareholders.
- Fixed assets are tangible (i.e., physical) items or properties that a company purchases and uses to produce its goods and services. Fixed assets are long-term assets. This means the assets have a useful life of more than one year. They also include properties, plants, and equipments (also known as “PP&E”) and are recorded on the balance sheet with that classification.
- Current assets and liabilities
- The current assets account is a balance sheet line item listed under the Assets section, which accounts for all company-owned assets that can be converted to cash within one year. Current assets include cash, cash equivalents, accounts receivable, stock inventory, marketable securities, prepaid liabilities, and other liquid assets.
- Current liabilities are a company’s short-term financial obligations due within one year. An example of a current liability is money owed to suppliers in the form of accounts payable.
- Bank and cash accounts
- A bank account is a financial account maintained by a bank or other financial institution in which the financial transactions between the bank and a customer are recorded.
- A cash account, or cash book, may refer to a ledger in which all cash transactions are recorded. The cash account includes both the cash receipts and the cash payment journals.
- Expenses and income
- An expense is the costs of operations a company bears to generate revenues. It is simply defined as the cost one is required to spend on obtaining something. Common expenses include supplier payments, employee wages, factory leases, and equipment depreciation.
- The term “income” generally refers to the amount of money, property, and other transfers of value received over a set period of time in exchange for services or products.
Example
Company Incorporation (Initial Capital $1,000) Customer Invoice ($100 + 9% tax) & Shipping of the Goods Goods Shipment to Customer Customer Refund* Customer Payment* Vendor Goods Received (Purchase Order: $50) Vendor Bill (Invoice: $50) Vendor Bill (Invoice: $52 but PO $50) Vendor Bill Paid ($52 + 9% tax) Acquire a building (purchase contract) Pay for building Yearly Asset Depreciation (10% per year) Customer Invoice (3 years service contract, $300) Revenue Recognition (each year, including first) Pay Taxes Due
*: Customer Refund and Customer Payment boxes cannot be simultaneously selected as they are contradictory.
Balance = Debit - Credit
| Debit | Credit | Balance | |
|---|---|---|---|
| 1 Assets | |||
| 11000 Cash | |||
| 13100 Accounts Receivable | |||
| 14000 Inventory | |||
| 14600 Goods Issued Not Invoiced | |||
| 17200 Buildings | |||
| 17800 Accumulated Depreciation | |||
| 19000 Deferred Tax Assets | |||
| 2 Liabilities | |||
| 21000 Accounts Payable | |||
| 22300 Deferred Revenue | |||
| 23000 Goods Received Not Purchased | |||
| 26200 Deferred Tax Liabilities | |||
| 3 Equity | |||
| 31000 Common Stock | |||
| 4 Revenue | |||
| 41000 Goods | |||
| 42000 Services | |||
| 5 Expenses | |||
| 51100 Cost of Goods Sold | |||
| 52500 Other Operating Expenses | |||
| 53000 Price Difference |
Journal entries
Every financial document of the company (e.g., an invoice, a bank statement, a pay slip, a capital increase contract) is recorded as a journal entry, impacting several accounts.
For a journal entry to be balanced, the sum of all its debits must be equal to the sum of all its credits.
Company Incorporation Customer Invoice ($100 + 9% tax) Customer payment Supplier Bill (Purchase Order $50 but Invoice $52) Supplier Goods Received (Purchase Order: $50) Buy an asset ($300,000 - no tax) Pay supplier invoice Cash sale (Sales Receipt) Customer pays invoice, 5% early payment rebate Fiscal year closing — positive earnings and 50% dividends
| Debit | Credit | |
|---|---|---|
| Assets: Cash | 1000 | |
| Equity: Common Stock | 1000 |
Explanation:
- The company receives $1,000 in cash
- Shares worth of $1,000 belong to the founders
The initial capital can be cash, but could also be intellectual property, goodwill from a previous company, licences, know how, etc…
Sometimes, capital is not released immediately, accounts for "capital to be released" may be necessary.
Reconciliation
Reconciliation is the process of linking journal items of a specific account and matching credits and debits.
Its primary purpose is to link payments to their related invoices to mark them as paid. This is done by doing a reconciliation on the accounts receivable account and/or the accounts payable account.
Reconciliation is performed automatically by the system when:
- the payment is registered directly on the invoice
- the links between the payments and the invoices are detected at the bank matching process
Customer Statement Example
Accounts Receivable | Debit | Credit |
|---|---|---|
Invoice 1 | 100 | |
Partial payment 1/2 | 70 | |
Invoice 2 | 65 | |
Partial payment 2/2 | 30 | |
Payment 2 | 65 | |
Invoice 3 | 50 | |
Total to pay | 50 |
Reconcile
Bank Reconciliation
Bank reconciliation is the matching of bank statement lines (provided by your bank) with transactions recorded internally (payments to suppliers or from customers). For each line in a bank statement, it can be:
- matched with a previously recorded payment: a payment is registered when a check is received from a customer, then matched when checking the bank statement.
- recorded as a new payment: the payment’s journal entry is created and reconciled with the related invoice when processing the bank statement.
- recorded as another transaction: bank transfer, direct charge, etc.
Odoo should automatically reconcile most transactions; only a few should need manual review. When the bank reconciliation process is finished, the balance on the bank account in Odoo should match the bank statement’s balance.
Checks Handling
There are two approaches to managing checks and internal wire transfers:
- Two journal entries and a reconciliation
- One journal entry and a bank reconciliation
The first journal entry is created by registering the payment on the invoice. The second one is created when registering the bank statement.
Account | Debit | Credit | Reconciliation |
|---|---|---|---|
Account Receivable | 100 | Invoice ABC | |
Undeposited funds | 100 | Check 0123 |
Account | Debit | Credit | Reconciliation |
|---|---|---|---|
Undeposited funds | 100 | Check 0123 | |
Bank | 100 |
Get Help
Contact Support Ask the Odoo Community
![]()
- User Docs
- Database management
- Developer
- Contributing
EN
Odoo 18
Chart of accounts
The chart of accounts (COA) is the list of all the accounts used to record financial transactions in the general ledger of an organization. The chart of accounts can be found under Accounting ‣ Configuration ‣ Chart of Accounts.
When browsing your chart of accounts, you can sort the accounts by Code, Account Name, or Type, but other options are available in the drop-down menu

Configuration of an account
The country you select during the creation of your database (or additional company in your database) determines which fiscal localization package is installed by default. This package includes a standard chart of accounts already configured according to the country’s regulations. You can use it directly or set it according to your company’s needs.
To create a new account, go to Accounting ‣ Configuration ‣ Chart of Accounts, click Create, and fill in (at the minimum) the required fields (Code, Account Name, Type).
Warning
It is not possible to modify the fiscal localization of a company once a journal entry has been posted.
Code and name
Each account is identified by its Code and Name, which also indicate the account’s purpose.
Type
Correctly configuring the account type is critical as it serves multiple purposes:
- Information on the account’s purpose and behavior
- Generate country-specific legal and financial reports
- Set the rules to close a fiscal year
- Generate opening entries
To configure an account type, open the Type field’s drop-down selector and select the corresponding type from the following list:
Report | Category | Account Types |
|---|---|---|
Balance Sheet | Assets | Receivable |
Bank and Cash | ||
Current Assets | ||
Non-current Assets | ||
Prepayments | ||
Fixed Assets | ||
Liabilities | Payable | |
Credit Card | ||
Current Liabilities | ||
Non-current Liabilities | ||
Equity | Equity | |
Current Year Earnings | ||
Profit & Loss | Income | Income |
Other Income | ||
Expense | Expense | |
Depreciation | ||
Cost of Revenue | ||
Other | Other | Off-Balance Sheet |
Assets
Some account types can automate the creation of asset entries. To automate entries, click View on an account line and go to the Automation tab.
You have three choices for the Automation tab:
- No: this is the default value. Nothing happens.
- Create in draft: whenever a transaction is posted on the account, a draft entry is created but not validated. You must first fill out the corresponding form.
- Create and validate: you must also select a Deferred Expense Model. Whenever a transaction is posted on the account, an entry is created and immediately validated.
Default taxes
In the View menu of an account, select a default tax to be applied when this account is chosen for a product sale or purchase.
Tags
Some accounting reports require tags to be set on the relevant accounts. To add a tag, under View, click the Tags field and select an existing tag or Create a new one.
Account groups
Account groups are useful to list multiple accounts as sub-accounts of a bigger account and thus consolidate reports such as the Trial Balance. By default, groups are handled automatically based on the code of the group. For example, a new account 131200 is going to be part of the group 131000. You can attribute a specific group to an account in the Group field under View.
Create account groups manually
Note
Regular users should not need to create account groups manually. The following section is only intended for rare and advanced use cases.
To create a new account group, activate developer mode and head to Accounting ‣ Configuration ‣ Account Groups. Here, create a new group and enter the name, code prefix, and company to which that group account should be available. Note that you must enter the same code prefix in both From and to fields.

To display your Trial Balance report with your account groups, go to Accounting ‣ Reporting ‣ Trial Balance, then open the Options menu and select Hierarchy and Subtotals.

Allow reconciliation
Some accounts, such as accounts made to record the transactions of a payment method, can be used for the reconciliation of journal entries.
For example, an invoice paid with a credit card can be marked as paid if reconciled with its payment. Therefore, the account used to record credit card payments needs to be configured as allowing reconciliation.
To do so, check the Allow Reconciliation box in the account’s settings, and Save; or enable the button from the chart of accounts view.
Shared Accounts
The Shared Accounts feature allows the creation of a single account for a specific purpose and sharing it between multiple companies. It is especially useful for multi-company environments where a similar account might be used across different companies.
Deprecated
It is not possible to delete an account once a transaction has been recorded on it. You can make them unusable by using the Deprecated feature: check the Deprecated box in the account’s settings, and Save.
See also
- Accounting cheat sheet
- Non-current assets and fixed assets
- Deferred expenses
- Deferred revenues
- Fiscal localizations
- Odoo Tutorials: Chart of accounts
- Odoo Tutorials: Update your chart of accounts
On this page
Get Help
Contact Support Ask the Odoo Community
![]()
- User Docs
- Database management
- Developer
- Contributing
EN
Odoo 18
Consolidation
Consolidation allows combining financial data from multiple separate companies, each with its own books, into a unified view, providing a “fair image” of the entire group’s financial health.
It helps create a clear, comprehensive view of the group’s financial performance by combining data from multiple companies.
How it Works in Odoo
Consolidation Tools
Several tools combined together will contribute to the construction of the financial consolidation:
- Account Mapping: Similar accounts from different companies can be mapped together. This allows Odoo to combine them correctly in consolidated reports. To map accounts, go to Accounting ‣ Configuration ‣ Chart of Accounts. Click View on the account line. In the Mapping tab, enter a code in the corresponding company Code column to map the account.
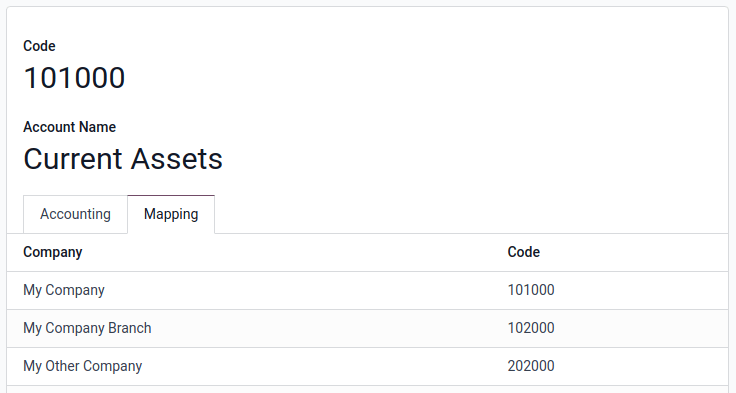
Note
Import mapping or merge existing accounts using the merging tool can simplify the process. - Multi-Ledgers: Ledgers are fundamental to the process of consolidation. They are either:
- Regular Ledgers: Each company in the consolidation scope has its own standard accounting ledger where all the regular day-to-day transactions are recorded. It excludes the company’s consolidation adjustment journals.
- Multi-Ledger for Consolidation: The company doing the actual consolidation also has a special multi-ledger. This one includes all the other companies’ consolidation adjustments journals (the ones excluded from their own ledgers). This allows for viewing the total impact of all the adjustments.
- Multi-Company Selector: The consolidated view can be accessed using the multi-company
selector. Selecting the consolidating company as the current company and making the other companies visible in the selector, all the journal items are displayed from the consolidating company’s perspective.
- Horizontal Groups: Odoo’s reporting tools allow for combining multi-ledgers and using
horizontal groups to view the consolidated Balance Sheet or P&L. They also show how much each company contributes to the overall consolidated figures.
Follow these steps to create an Horizontal Group:- Activate the developer mode.
- Go to Accounting ‣ Configuration ‣ Horizontal Groups and click New.
- Add a Group Name and select the Reports where the horizontal group can be used.
- In the Field column, click Add a line.
- In the Create rules window, add a Field and create a new Domain rule if needed. Then, click Save & Close.

Important
When opened, financial reports usually default to a statutory view, using the company’s regular ledger (including its consolidation adjustment). To see the full consolidation picture, make sure to select the multi-ledger that includes all the consolidation adjustments. - Cumulative Translation Adjustments: When consolidating companies with different currencies, Odoo handles the translation.
- Equity accounts: Use the historical exchange rate.
- Profit & Loss (P&L) accounts: Use the average exchange rate.
- Balance sheet accounts (excluding equity): Use the closing exchange rate.
The rates used are those of the company currently selected.
Consolidating Companies vs. Branch Management
Consolidating companies involves legally separate entities whereas branches are subdivisions of a single legal entity which often share the head office’s resources (journals, taxes, accounts, fiscal positions) and are not consolidated in the same way.
Account Merging
Accounts can be merged to reduce the number of accounts and standardize them across companies. This is optional; consolidation works without it.
To use the merge tool, select all the companies with an account that needs to be merged in the company selector in the top right corner of the screen.

Then, go to Accounting ‣ Configuration ‣ Chart of Accounts and select the accounts to merge. Click the Actions menu and select Merge accounts.
In the Merge accounts window, enable the Group by name? option if needed and click Merge.
The selected accounts are then merged into a single shared account, accessible by all the chosen companies, just as if the account had been directly created to be shared.
Account Unmerging
Accounts can also be unmerged if needed.
Warning
Note that unmerging accounts will not unmerge the chatters of the accounts. Once merged, the changes’ histories are permanently merged.
To unmerge accounts, select a company with a shared account in the company selector at the top right corner of the screen. Then, go to Accounting ‣ Configuration ‣ Chart of Accounts and select the account to unmerge. Click the Actions menu and select Unmerge accounts.
An Odoo Warning confirmation pop-up window will appear, listing how the accounts will be split.

Click Unmerge. A new account linked to each company will be created for the previously shared account.
Import a Mapping
To import an account mapping, select all the related companies in the company selector at the top right corner of the screen and go to Accounting ‣ Configuration ‣ Chart of Accounts.
First, to choose the fields to export, select the accounts, click the Actions button and select Export. Then, in the Export data window, add the Code mapping/Code, Code Mapping/Company and External ID fields using the icon and click Export. No other field is required.
Second, rework it in a spreadsheet adding the desired code for each company on desired accounts.
Third, to reimport the file (xlsx or csv format) in Odoo, click Import and, in the Import Chart of Accounts section, click Import CoA. In the Accounting Import Guide, drop or click Upload Data File to import the file. Then, click Import.
Finally, the codes now take into account the mapping company per company.
On this page
Get Help
Contact Support Ask the Odoo Community
![]()
- User Docs
- Database management
- Developer
- Contributing
EN
Odoo 18
Multi-currency system
Odoo allows you to issue invoices, receive bills, and record transactions in currencies other than the main currency configured for your company. You can also set up bank accounts in other currencies and run reports on your foreign currency activities.
See also
Configuration
Main currency
The main currency is defined by default according to the company’s country. You can change it by going to Accounting ‣ Configuration ‣ Settings ‣ Currencies and changing the currency in the Main Currency setting.
Enable foreign currencies
Go to Accounting ‣ Configuration ‣ Currencies, and enable the currencies you wish to use by toggling the Active button.
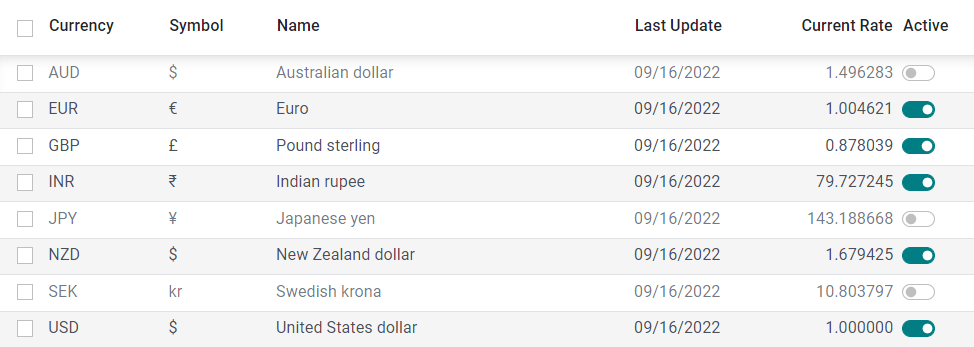
Currency rates
Manual update
To manually create and set a currency rate, go to Accounting ‣ Configuration ‣ Currencies, click on the currency you wish to change the rate of, and under the Rates tab, click Add a line to create a new rate.
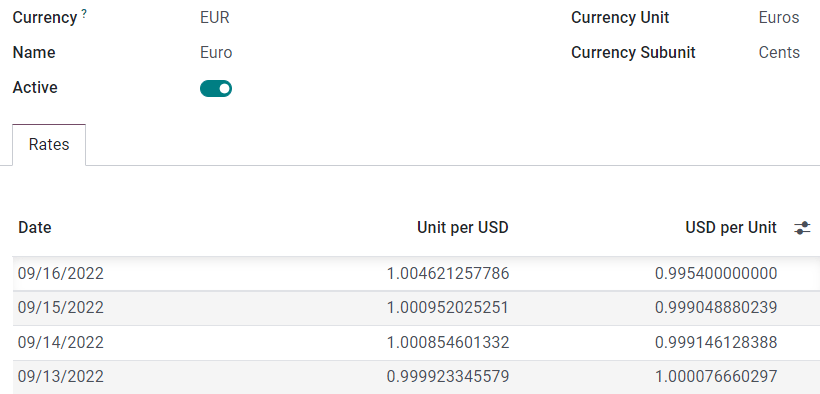
Automatic update
When you activate a second currency for the first time, Automatic Currency Rates appears under Accounting Dashboard ‣ Configuration ‣ Settings ‣ Currencies. By default, you have to click on the Update now button (🗘) to update the rates.
Odoo can update the rates at regular intervals. To do so, change the Interval from Manually to Daily, Weekly, or Monthly. You can also select the web service from which you want to retrieve the latest currency rates by clicking on the Service field.
Exchange difference entries
Odoo automatically records exchange differences entries on dedicated accounts, in a dedicated journal.
You can define which journal and accounts to use to post exchange difference entries by going to Accounting ‣ Configuration ‣ Settings ‣ Default Accounts and editing the Journal, Gain Account, and Loss Account.
Example
If you receive a payment for a customer invoice one month after it was issued, the exchange rate has likely changed since. Therefore, this fluctuation implies some profit or loss due to the exchange difference, which Odoo automatically records in the default Exchange Difference journal.
Chart of accounts
Each account can have a set currency. By doing so, all moves relevant to the account are forced to have that account’s currency.
To do so, go to Accounting ‣ Configuration ‣ Charts of Accounts and select a currency in the field Account Currency. If left empty, all active currencies are handled instead of just one.
Journals
If a currency is set on a journal, that journal only handles transactions in that currency.
To do so, go to Accounting ‣ Configuration ‣ Journals, open the journal you want to edit, and select a currency in the field Currency.
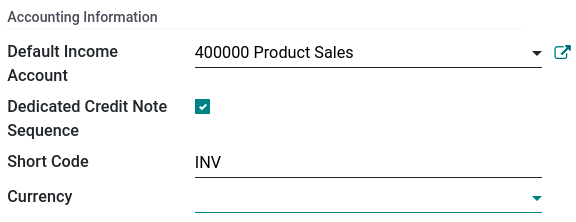
Multi-currency accounting
Invoices, bills, and other documents
For all documents, you can select the currency and journal to use for the transaction on the document itself.
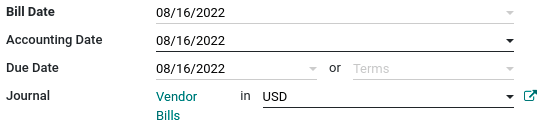
Payment registration
To register a payment in a currency other than your company’s main currency, click on the Register Payment payment button of your document and, in the pop-up window, select a currency in the Amount field.
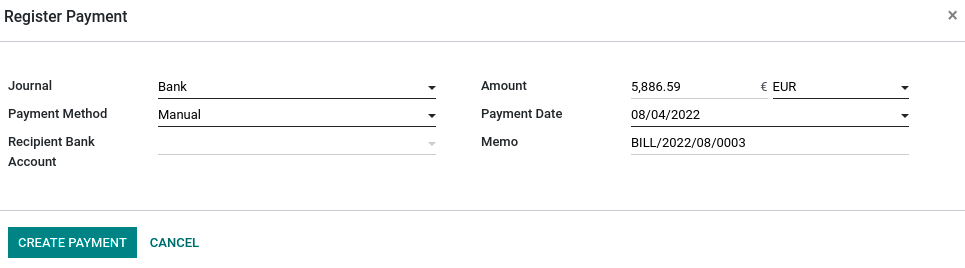
Bank transactions
When creating or importing bank transactions, the amount is in the company’s main currency. To input a foreign currency, select a currency in the Foreign Currency. Once selected, enter the Amount in your main currency for it to automatically get converted in the foreign currency in the Amount in Currency field.
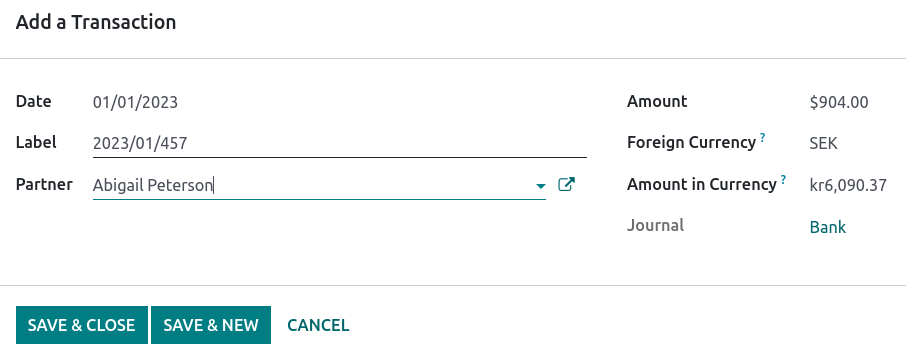
When reconciling, Odoo displays both the foreign currency amount and the equivalent amount in your company’s main currency.
Exchange rate journal entries
To see exchange difference journal entries, go to Accounting Dashboard ‣ Accounting ‣ Journals: Miscellaneous.
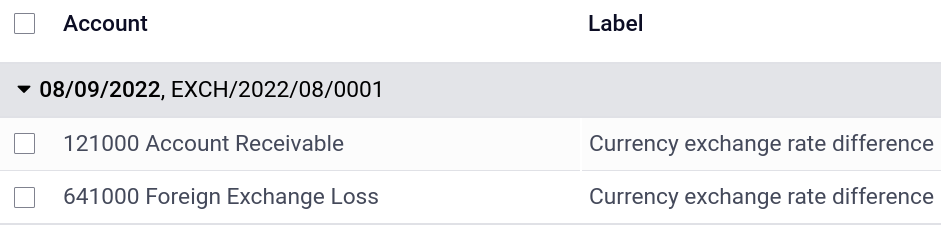
On this page
Get Help
Contact Support Ask the Odoo Community
![]()
- User Docs
- Database management
- Developer
- Contributing
EN
Odoo 18
Average price on returned goods
Average cost valuation (AVCO) is an inventory valuation method that evaluates cost based on the total cost of goods bought or produced during a period, divided by the total number of items on-hand. Inventory valuation is used to:
- reflect the value of a company’s assets;
- keep track of the amount of unsold goods;
- account for monetary value in goods that have yet to generate profit;
- report on flow of goods throughout the quarter.
Because AVCO uses the weighted average to evaluate the cost, it is a good fit for companies that sell only a few different products in large quantities. In Odoo, this costing analysis is automatically updated each time products are received.
Thus, when shipments are returned to their supplier, Odoo automatically generates accounting entries to reflect the change in inventory valuation. However, Odoo does not automatically update the AVCO calculation, because this can potentially create inconsistencies with inventory valuation.
Note
This document addresses a specific use case for theoretical purposes. For instructions on how to set up and use AVCO, refer to the inventory valuation configuration doc.
See also
Configuration
To use average cost inventory valuation on a product, navigate to Inventory ‣ Configuration ‣ Product Categories and select the category that will be using AVCO. On the product category page, set Costing Method to Average Cost (AVCO) and Inventory Valuation to Automated.
See also
Inventory valuation configuration
Using average cost valuation
The average cost method adjusts the inventory valuation when products are received in the warehouse. This section explains how it works, but if the explanation is unnecessary, skip to the return to supplier use case section.
Formula
When new products arrive, the new average cost for each product is recomputed using the formula:
Avg Cost=(Old Qty×Old Avg Cost)+(Incoming Qty×Purchase Price)Final Qty
- Old Qty: product count in stock before receiving the new shipment;
- Old Avg Cost: calculated average cost for a single product from the previous inventory valuation;
- Incoming Qty: count of products arriving in the new shipment;
- Purchase Price: estimated price of products at the reception of products (since vendor bills may arrive later). The amount includes not only the price for the products, but also added costs, such as shipping, taxes, and landed costs. At reception of the vendor bill, this price is adjusted;
- Final Qty: quantity of on-hand stock after the stock move.
Important
When products leave the warehouse, the average cost does not change. Read about why the average cost valuation is not adjusted here.
Compute average cost
To understand how the average cost of a product changes with each shipment, consider the following table of warehouse operations and stock moves. Each is a different example of how the average cost valuation is affected.
Operation | Incoming Value | Inventory Value | Qty On Hand | Avg Cost |
|---|---|---|---|---|
$0 | 0 | $0 | ||
Receive 8 tables at $10/unit | 8 * $10 | $80 | 8 | $10 |
Receive 4 tables at $16/unit | 4 * $16 | $144 | 12 | $12 |
Deliver 10 tables | -10 * $12 | $24 | 2 | $12 |
Exercise
Ensure comprehension of the above computations by reviewing the “Receive 8 tables at $10/unit” example.
Initially, the product stock is 0, so all values are $0.
In the first warehouse operation, 8 tables are received at $10 each. The average cost is calculated using the formula:
Avg Cost=0+8×$108=$808=$10
- Since the incoming quantity of tables is 8 and the purchase price for each is $10,
- The inventory value in the numerator is evaluated to $80;
- $80 is divided by the total amount of tables to store, 8;
- $10 is the average cost of a single table from the first shipment.
To verify this in Odoo, in the Purchase app, order 8 quantities of a new product, Table, with no previous stock moves, for $10 each.
In the table’s Product Category field in the General Information tab of the product form, click the ➡️ (arrow) icon, to open an External Link to edit the product category. Set the Costing Method to Average Cost (AVCO) and Inventory Valuation to Automated.
Then, return to the purchase order. Click Confirm Order, and click Receive Products to confirm receipt.
Next, check the inventory valuation record generated by the product reception by navigating to Inventory ‣ Reporting ‣ Inventory Valuation. Select the drop-down for Table, and view the Total Value column for the valuation layer (inventory valuation at a specific point in time = on-hand quantity * unit price). The 8 tables in-stock are worth $80.

Tip
When the product category’s Costing Method is set to AVCO, then the average cost of a product is also displayed on the Cost field, under the General Information tab, on the product page itself.
Product delivery (use case)
For outgoing shipments, outbound products have no effect on the average cost valuation. Although the average cost valuation is not recalculated, the inventory value still decreases because the product is removed from stock and delivered to the customer location.
Exercise
To demonstrate that the average cost valuation is not recalculated, examine the “Deliver 10 tables” example.
Avg Cost=12×$12+(−10)×$1212−10=242=$12
- Because 10 tables are being sent out to customers, the incoming quantity is -10. The previous average cost ($12) is used in lieu of a vendor’s purchase price;
- The incoming inventory value is -10 * $12 = -$120;
- The old inventory value ($144) is added to the incoming inventory value (-$120), so $144 + -$120 = $24;
- Only 2 tables remain after shipping out 10 tables from 12. So the current inventory value ($24) is divided by the on-hand quantity (2);
- $24 / 2 = $12, which is the same average cost as the previous operation.
To verify this in Odoo, sell 10 tables in the Sales app, validate the delivery, and then review the inventory valuation record by going to in Inventory ‣ Reporting ‣ Inventory Valuation. In the topmost valuation layer, delivering 10 tables reduces the product’s value by -$120.
Note: What is not represented in this stock valuation record is the revenue made from this sale, so this decrease is not a loss to the company.

Return items to supplier (use case)
Because the price paid to suppliers can differ from the price the product is valued at with the AVCO method, Odoo handles returned items in a specific way.
- Products are returned to suppliers at the original purchase price, but;
- The internal cost valuation remains unchanged.
The above example table is updated as follows:
Operation | Qty*Avg Cost | Inventory Value | Qty On Hand | Avg Cost |
|---|---|---|---|---|
$24 | 2 | $12 | ||
Return 1 table bought at $10 | -1 * $12 | $12 | 1 | $12 |
In other words, returns to vendors are perceived by Odoo as another form of a product exiting the warehouse. To Odoo, because the table is valued at $12 per unit, the inventory value is reduced by $12 when the product is returned; the initial purchase price of $10 is unrelated to the table’s average cost.
Example
To return a single table that was purchased for $10, navigate to the receipt in the Inventory app for the 8 tables purchased in Exercise 1 by going to the Inventory Overview, clicking on Receipts, and selecting the desired receipt.
Then, click Return on the validated delivery order, and modify the quantity to 1 in the reverse transfer window. This creates an outgoing shipment for the table. Select Validate to confirm the outgoing shipment.
Return to Inventory ‣ Reporting ‣ Inventory Valuation to see how the outgoing shipment decreases the inventory value by $12.

Eliminate stock valuation errors in outgoing products
Inconsistencies can occur in a company’s inventory when the average cost valuation is recalculated on outgoing shipments.
To demonstrate this error, the table below displays a scenario in which 1 table is shipped to a customer and another is returned to a supplier at the purchased price.
Operation | Qty*Price | Inventory Value | Qty On Hand | Avg Cost |
|---|---|---|---|---|
$24 | 2 | $12 | ||
Ship 1 product to customer | -1 * $12 | $12 | 1 | $12 |
Return 1 product initially bought at $10 | -1 * $10 | $2 | 0 | $12 |
In the final operation above, the final inventory valuation for the table is $2 even though there are 0 tables left in stock.
Correct method
Use the average cost to value the return. This does not mean the company gets $12 back for a $10 purchase; the item returned for $10 is valued internally at $12. The inventory value change represents a product worth $12 no longer being accounted for in company assets.
Anglo-Saxon accounting
In addition to using AVCO, companies that use Anglo-Saxon accounting also keep a holding account that tracks the amount to be paid to vendors. Once a vendor delivers an order, inventory value increases based on the vendor price of the products that have entered the stock. The holding account (called stock input) is credited and only reconciled once the vendor bill is received.
See also
The table below reflects journal entries and accounts. The stock input account stores the money intended to pay vendors when the vendor bill has not yet been received. To balance accounts when returning products that have a price difference between the price the product is valued at and the price it was bought for, a price difference account is created.
Operation | Stock Input | Price Diff | Inventory Value | Qty On Hand | Avg Cost |
|---|---|---|---|---|---|
$0 | 0 | $0 | |||
Receive 8 tables at $10 | ($80) | $80 | 8 | $10 | |
Receive vendor bill $80 | $0 | $80 | 8 | $10 | |
Receive 4 tables at $16 | ($64) | $144 | 12 | $12 | |
Receive vendor bill $64 | $0 | $144 | 12 | $12 | |
Deliver 10 tables to customer | $0 | $24 | 2 | $12 | |
Return 1 table initially bought at $10 | $10 | $2 | $12 | 1 | $12 |
Receive vendor refund $10 | $0 | $2 | $12 | 1 | $12 |
Product reception
Summary
At product reception, Odoo ensures companies can pay for goods that were purchased by preemptively moving an amount matching the price of received goods into the liability account, Stock Input. Then, once the bill has been received, the amount in the holding account is transferred to Accounts Payable. Transfers into this account means the bill has been paid. Stock Input is reconciled once the vendor bill is received.
Inventory valuation is a method of calculating how much each in-stock product is worth internally. Since there is a difference between the price the product is valuated at and the price the product was actually purchased for, the Inventory Valuation account is unrelated to the crediting and debiting operations of the Stock Input account.
To conceptualize all this, follow the breakdown below.
Accounts balanced at received products
In this example, a company starts with zero units of a product, table, in stock. Then, 8 tables are received from the vendor:
- The Stock Input account stores $80 of credit owed to the vendor. The amount in this account is unrelated to the inventory value.
- $80 worth of tables came in (debit the Inventory Value account $80), and
- $80 must be paid out for received goods (credit the Stock Input account $80).
In Odoo
Odoo generates an accounting journal entry when shipments that use AVCO costing method are received. Configure a Price Difference Account by selecting the ➡️ (arrow) icon next to the Product Category field on the product page.
Under Account Properties, create a new Price Difference Account by typing in the name of the account and clicking Create and Edit. Then set the account Type as Expenses, and click Save.

Then, receive the shipment in the Purchase app or Inventory app, and navigate to the Accounting app ‣ Accounting ‣ Journal Entries. In the list, find the Reference that matches the warehouse reception operation for the relevant product.
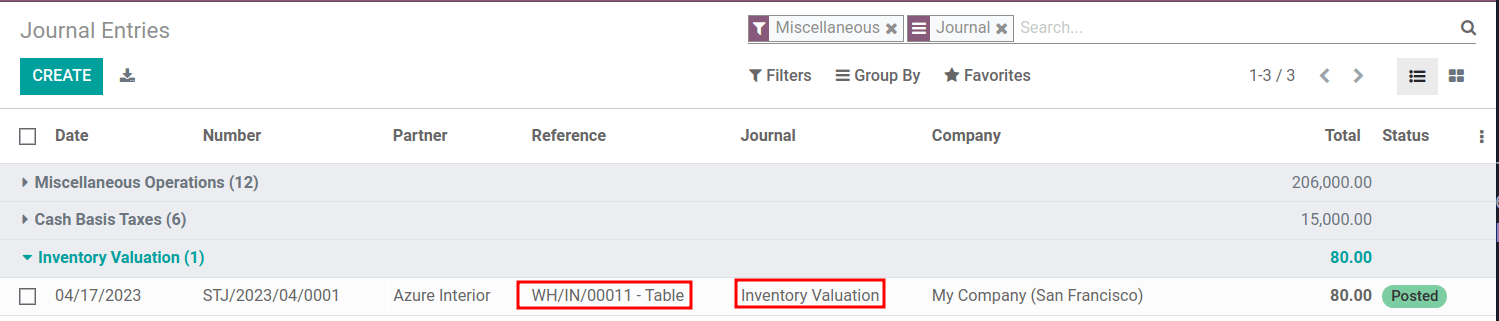
Click on the line for 8 tables. This accounting journal entry shows that when the 8 tables were received, the Stock Valuation account increased by $80. Conversely, the Stock Input account (set as Stock Interim (Received) account by default) is credited $80.
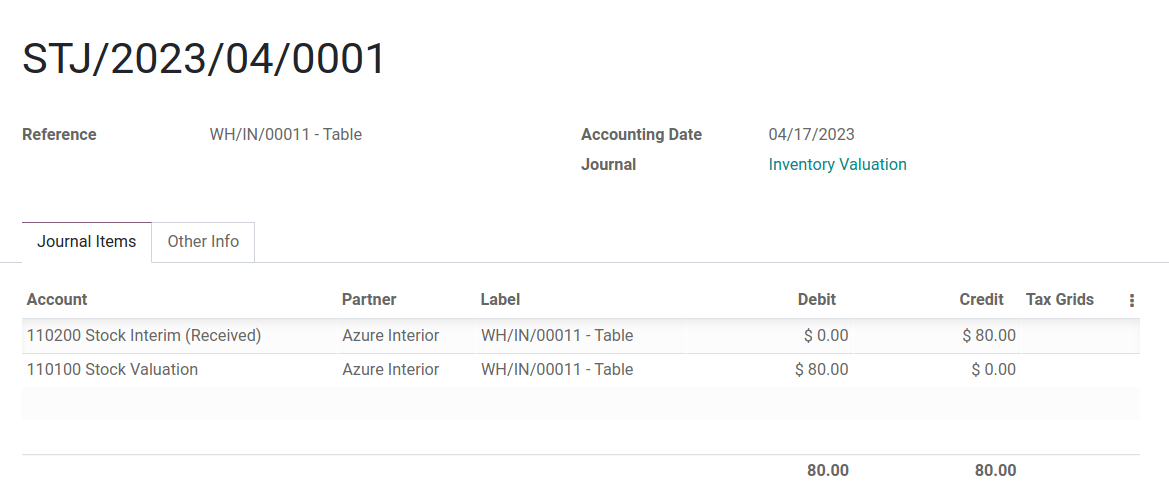
Accounts balanced at received vendor bill
In this example, a company starts with zero units of a product, table, in stock. Then, 8 tables are received from the vendor. When the bill is received from vendor for 8 tables:
- Use $80 in the Stock Input account to pay the bill. This cancels out and the account now holds $0.
- Debit Stock Input $80 (to reconcile this account).
- Credit Accounts payable $80. This account stores the amount the company owes others, so accountants use the amount to write checks to vendors.
In Odoo
Once the vendor requests payment, navigate to the Purchase app ‣ Orders ‣ Purchase and select the PO for 8 tables. Inside the PO, select Create Bill.
Switch to the Journal Items tab to view how $80 is transferred from the holding account, Stock Interim (Received) to Accounts Payable. Confirm the bill to record the payment to the vendor.

On product delivery
In the above example table, when 10 products are delivered to a customer, the Stock Input account is untouched because there are no new products coming in. To put it simply:
- Inventory valuation is credited $120. Subtracting from inventory valuation represents $120 worth of products exiting the company.
- Debit Accounts Receivable to record revenue from the sale.
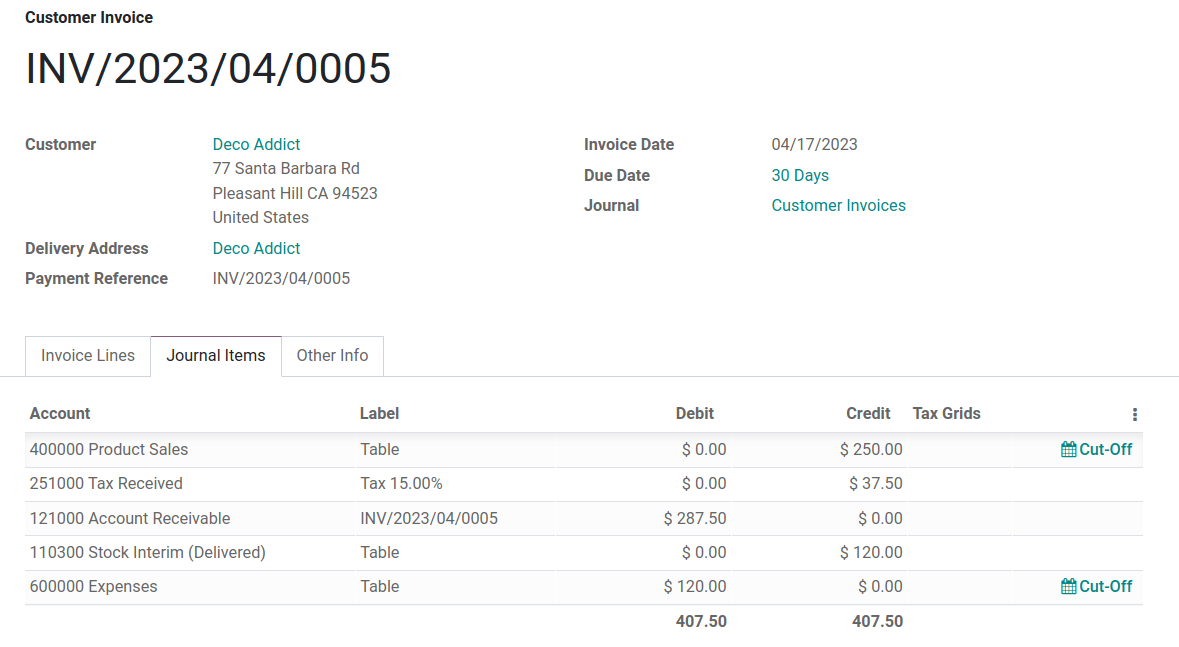
Understand Anglo-Saxon expensing
On product return
In the above example table, when returning 1 product to a vendor purchased at $10, a company expects $10 in the Accounts Payable account from the vendor. However, Stock Input account must be debited $12 because the average cost is $12 at the time of the return. The missing $2 is accounted for in the Price Difference Account, which is set up in the product’s Product Category.
Note
Behavior of price difference accounts varies from localization. In this case, the account is intended to store differences between vendor price and automated inventory valuation methods.
Summary:
- Debit Stock Input account $10 to move the table from stock to stock input. This move is to indicate that the table is to be processed for an outgoing shipment.
- Debit Stock Input an additional $2 to account for the Price Difference.
- Credit Stock Valuation $12 because the item is leaving the stock.
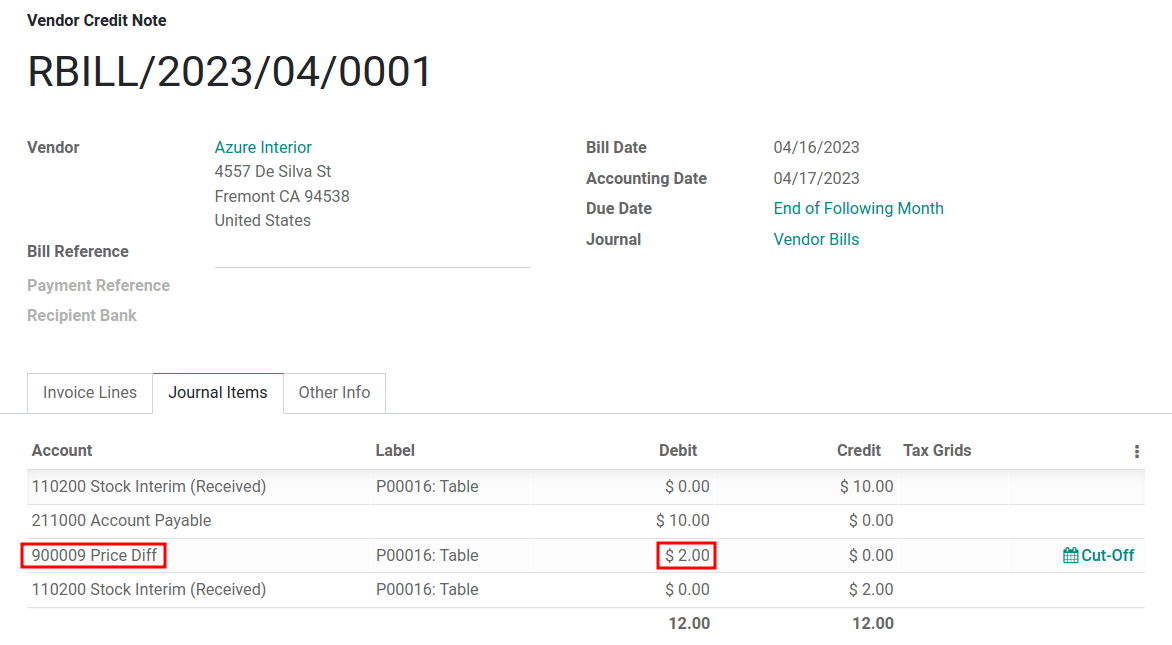
Once the vendor’s refund is received,
- Credit Stock Input account $10 to reconcile the price of the table.
- Debit Accounts Payable $10 to have the accountants collect and register the payment in their journal.
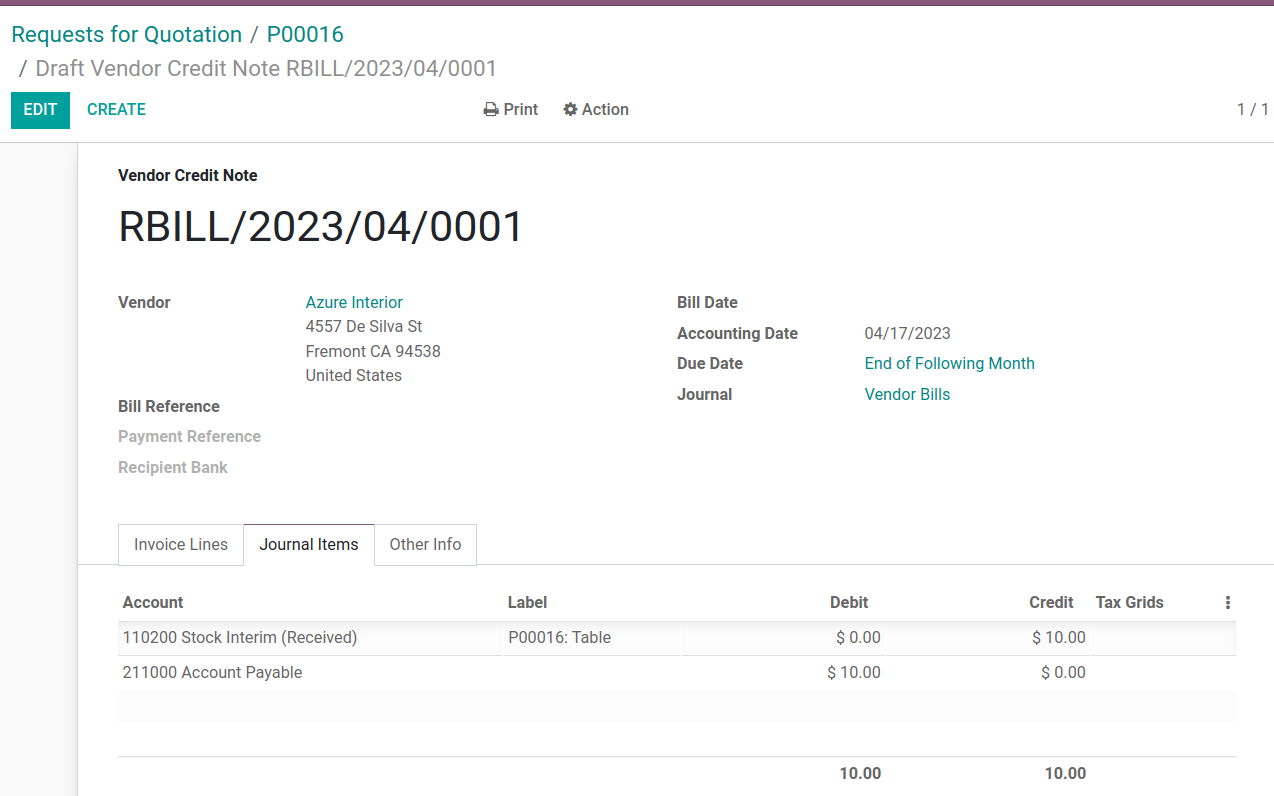
On this page
Get Help
Contact Support Ask the Odoo Community
![]()
- User Docs
- Database management
- Developer
- Contributing
EN
Odoo 18
Tax units
Important
This is only applicable to multi-company environments.
A tax unit is a group of VAT-taxable enterprises that are legally independent of each other but are closely linked financially, organizationally, and economically and therefore considered the same VAT-taxable enterprise. Tax units are not mandatory, but if created, constituent companies of the unit must belong to the same country, use the same currency, and one company must be designated as the representative company of the tax unit. Tax units receive a specific tax ID intended only for tax returns. Constituent companies keep their tax ID used for commercial purposes.
Example
Enterprise A owes €300.000,00 of VAT taxes and enterprise B can recover €280.000,00 of VAT taxes. They form up as a tax unit so that the two amounts balance out and must conjointly only pay €20.000,00 of VAT taxes.
Configuration
To create a tax unit, go to Accounting ‣ Configuration ‣ Tax Units, and click New. Enter a name for the unit, select a Country, the Companies to incorporate in the unit, the Main Company, and the Tax ID of the constituent company of that tax unit.
Fiscal position
As transactions between constituents of the same tax unit are not subject to VAT, it is possible to create a tax mapping (fiscal position) to avoid the application of VAT on inter-constituent transactions.
Be sure a constituent company has been selected before, then go to Accounting ‣ Configuration ‣ Fiscal Positions, and Create a new fiscal position. Click the Tax Mapping tab, select the Tax on Product usually applied for non-constituent transactions, and in Tax to Apply, select the 0% tax to apply for constituent transactions.
Do the same for the Account Mapping tab if required, and repeat this process for each constituent company on your database.
Example
Depending on your localization package, taxes may vary from the screenshot displayed.

Then, assign the fiscal position by opening the Contacts app. Search for a constituent company, and open the contact’s card. Click the Sales & Purchase tab, and in the Fiscal Position field, input the fiscal position created for the tax unit. Repeat the process for each constituent company card form, on each company database.
See also
Fiscal positions (tax and account mapping).
Tax report
The representative company can access the aggregated tax report of the tax unit by going to Accounting ‣ Reporting ‣ Tax Report, and selecting the tax unit in Tax Unit. This report contains the aggregated transactions of all constituents and the .XML export contains the name and VAT number of the main company.
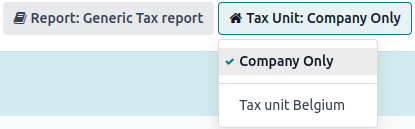
On this page
Get Help
Contact Support Ask the Odoo Community
![]()
- User Docs
- Database management
- Developer
- Contributing
EN
Odoo 18
Taxes
There are numerous types of taxes, and their application varies greatly, depending mostly on your company’s localization. To make sure they are recorded with accuracy, Odoo’s tax engine supports all kinds of uses and computations.
Default taxes
Default taxes define which taxes are automatically selected when creating a new product. They are also used to prefill the Taxes field when adding a new line on an invoice in Accounting Firms mode.
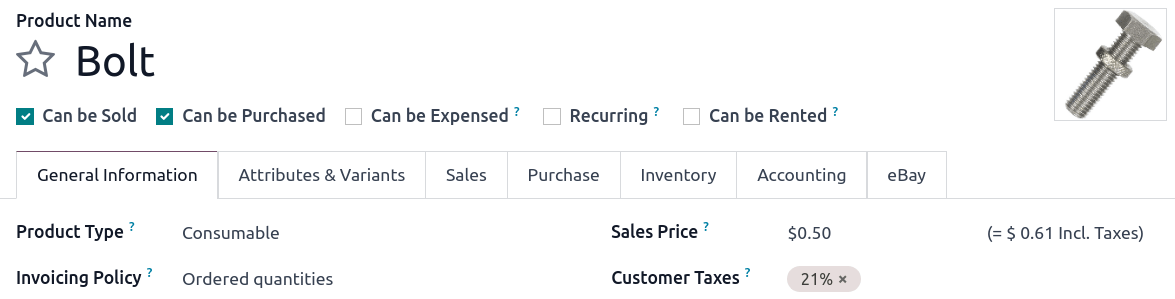
To change your default taxes, go to Accounting ‣ Configuration ‣ Settings ‣ Taxes ‣ Default Taxes, select the appropriate taxes for your default sales tax and purchase tax, and click on Save.

Note
Default taxes are automatically set up according to the country selected at the creation of your database, or when you set up a fiscal localization package for your company.
Activate sales taxes from the list view
As part of your fiscal localization package, most of your country’s sales taxes are already preconfigured on your database. However, only a few taxes are activated by default. To activate taxes relevant to your business, go to Accounting ‣ Configuration ‣ Taxes and enable the toggle button under the Active column.
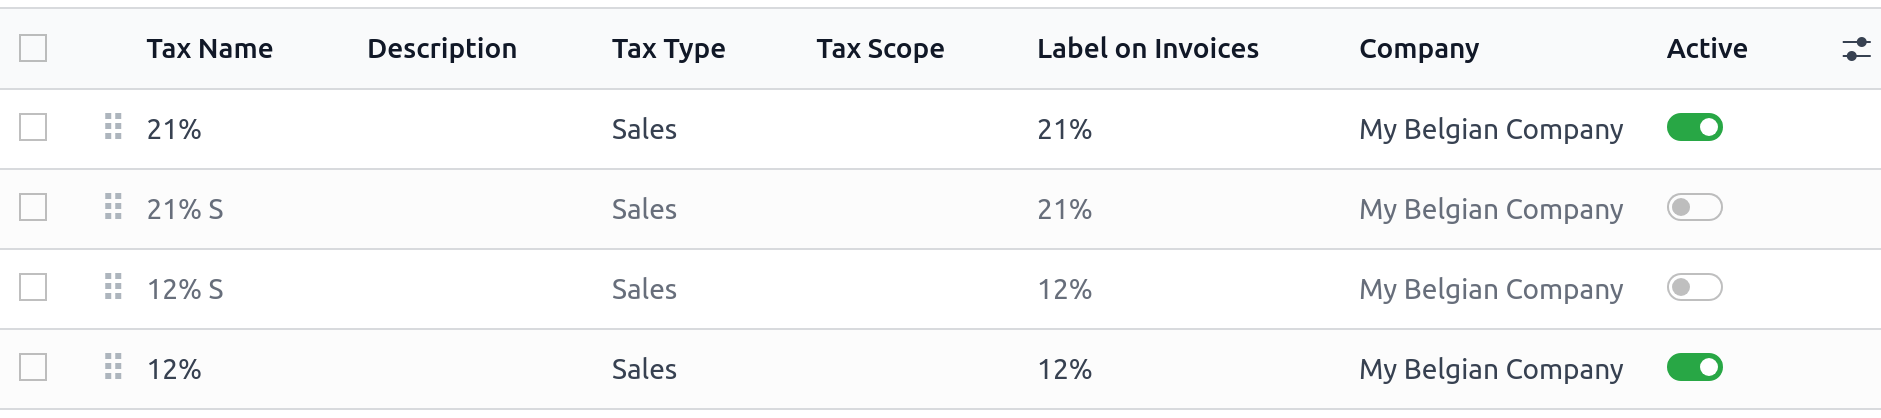
Configuration
To edit or create a tax, go to Accounting ‣ Configuration ‣ Taxes and open a tax or click on New.
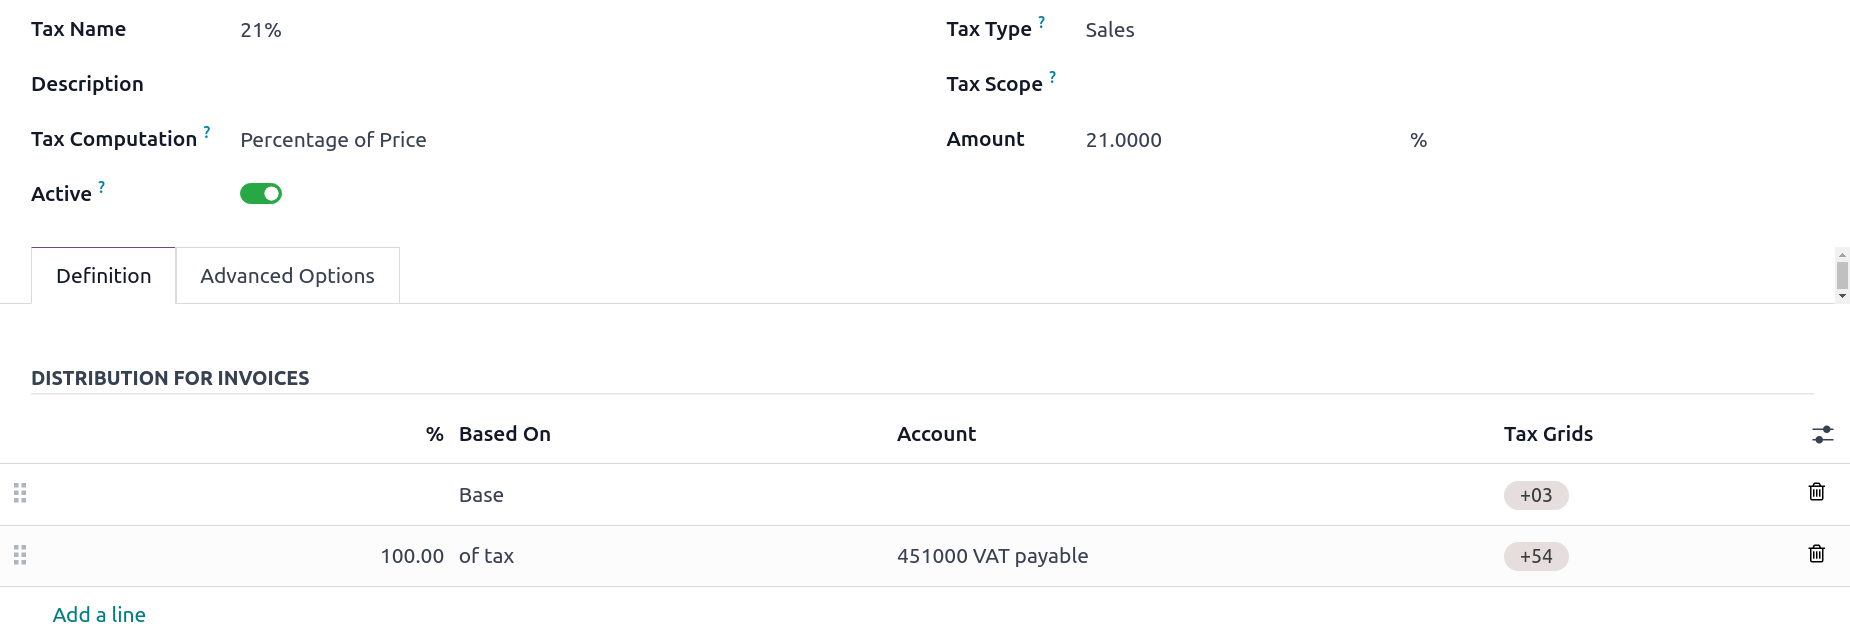
Basic options
Tax name
The tax name is displayed for backend users in the Taxes field in sales orders, invoices, product forms, etc.
Tax computation
- Group of Taxes
The tax is a combination of multiple sub-taxes. You can add as many taxes as you want, in the order you want them to be applied.
Important
Make sure that the tax sequence is correct, as the order in which they are may impact the taxes’ amounts computation, especially if one of the taxes affects the base of the subsequent ones. - Fixed
The tax has a fixed amount in the default currency. The amount remains the same, regardless of the sales price.
Example
A product has a sales price of $1000, and we apply a $10 fixed tax. We then have:
Product sales price | Price without tax | Tax | Total |
|---|---|---|---|
1,000 | 1,000 | 10 | 1,010.00 |
- Percentage of price
The sales price is the taxable basis: the tax amount is computed by multiplying the sales price by the tax percentage.
Example
A product has a sales price of $1000, and we apply a 10% of Price tax. We then have:
Product sales price | Price without tax | Tax | Total |
|---|---|---|---|
1,000 | 1,000 | 100 | 1,100.00 |
- Percentage of Price Tax Included
The total is the taxable basis: the tax amount is a percentage of the total.
Example
A product has a Sales Price of $1000, and we apply a 10% of Price Tax Included tax. We then have:
Product sales price | Price without tax | Tax | Total |
|---|---|---|---|
1,000 | 1,000 | 111.11 | 1,111.11 |
- Python code
A tax defined as Python code consists of two snippets of Python code that are executed in a local environment containing data such as the unit price, product or partner. Python Code defines the amount of the tax, and Applicable Code defines if the tax is to be applied. The formula is found at the bottom of the Definition tab.
Example
Python Code: result = price_unit * 0.10 Applicable Code: result = true
Active
Only active taxes can be added to new documents.
Important
It is not possible to delete taxes that have already been used. Instead, you can deactivate them to prevent future use.
Note
This field can be modified from the list view.
Tax type
The Tax Type determines the tax application, which also restricts where it is displayed.
- Sales: Customer invoices, product customer taxes, etc.
- Purchase: Vendor bills, product vendor taxes, etc.
- None
Tip
You can use None for taxes that you want to include in a Group of Taxes but that you do not want to list along with other sales or purchase taxes.
Tax scope
The Tax Scope restricts the use of taxes to a type of product, either goods or services.
Definition tab
Allocate with precision the amount of the taxable basis or percentages of the computed tax to multiple accounts and tax grids.
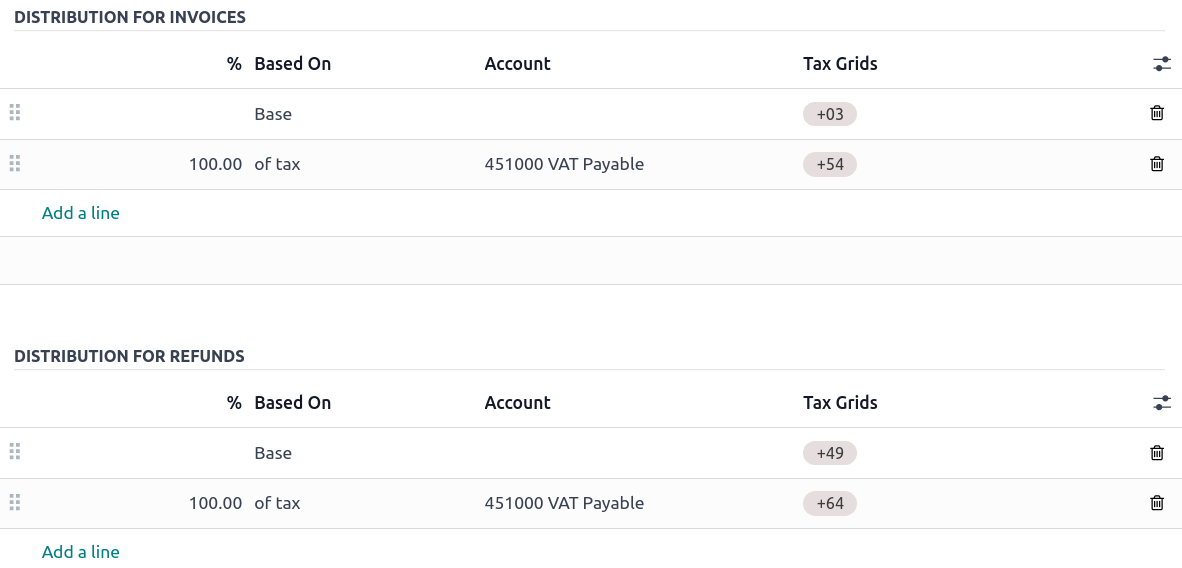
- Based On:
- Base: the price on the invoice line
- % of tax: a percentage of the computed tax.
- Account: if defined, an additional journal item is recorded.
- Tax Grids: used to generate tax reports automatically, according to your country’s regulations.
Advanced options tab
Label on invoices
The tax label is displayed on each invoice line in the Taxes column. This is visible to front-end users on exported invoices, in customer portals, etc.

Tax group
Select which tax group the tax belongs to. The tax group name is the displayed above the total line on exported invoices and in customer portals.
Tax groups include different iterations of the same tax. This can be useful when you must record the same tax differently according to fiscal positions.
Example
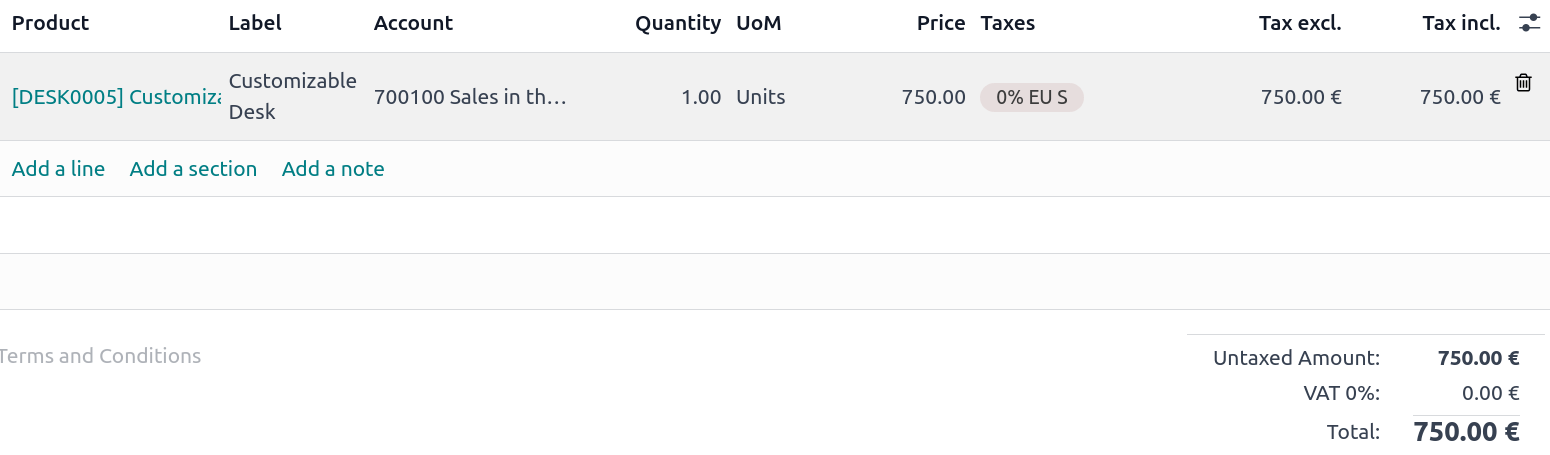
In the example above, the 0% EU S tax for intra-community customers in Europe records the amount on specific accounts and tax grids. However, it remains a 0% tax to the customer. This is why the label indicates 0% EU S, and the tax group name above the Total line indicates VAT 0%.
Important
Taxes have three different labels, each one having a specific use. Refer to the following table to see where they are displayed.
Backend | Taxes column on exported invoices | Above the Total line on exported invoices |
Include in analytic cost
With this option activated, the tax amount is assigned to the same analytic account as the invoice line.
Included in price
With this option activated, the total (including the tax) equals the sales price.
Total = Sales Price = Computed Tax-Excluded price + Tax
Example
A product has a sales price of $1000, and we apply a 10% of Price tax, which is included in the price. We then have:
Product sales price | Price without tax | Tax | Total |
|---|---|---|---|
1,000 | 900.10 | 90.9 | 1,000.00 |
Note
If you need to define prices accurately, both tax-included and tax-excluded, please refer to the following documentation: B2B (tax excluded) and B2C (tax included) pricing.
Note
By default, only the Tax excluded column is displayed on invoices. To display the Tax included column, click the dropdown toggle button and check Tax incl..
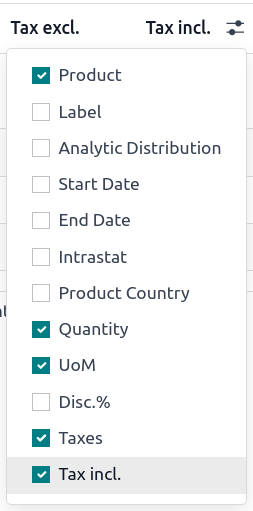
Affect base of subsequent taxes
With this option, the total tax-included becomes the taxable basis for the other taxes applied to the same product.
You can configure a new group of taxes to include this tax or add it directly to a product line.

Warning
The order in which you add the taxes on a product line has no effect on how amounts are computed. If you add taxes directly on a product line, only the tax sequence determines the order in which they are applied.
To reorder the sequence, go to Accounting ‣ Configuration ‣ Taxes, and drag and drop the lines with the handles next to the tax names.

Extra taxes
“Extra taxes” is a broad term referring to additional taxes beyond the standard or basic taxes imposed by governments. These extra taxes can be luxury taxes, environmental taxes, import or export duties taxes, etc.
Note
The method to compute these taxes varies across different countries. We recommend consulting your country’s regulations to understand how to calculate them for your business.
To compute an extra tax in Odoo, create a tax, enter a tax name, select a Tax Computation, set an Amount, and in the Advanced Options tab, check Affect Base of Subsequent Taxes. Then, drag and drop the taxes in the order they should be computed.
Example
- In Belgium, the formula to compute an environmental tax is: (product price + environmental tax) x sales tax. Therefore, our environmental tax has to come before the sales tax in the computation sequence.
- In our case, we created a 5% environmental tax (Ecotax) and put it before the Belgian base tax of 21%.

See also
- Fiscal positions (tax and account mapping)
- B2B (tax excluded) and B2C (tax included) pricing
- Tax return (VAT declaration)
On this page
Get Help
Contact Support Ask the Odoo Community
![]()
- User Docs
- Database management
- Developer
- Contributing
EN
Odoo 18
Customer invoices
A customer invoice is a document issued by a company for products and/or services sold to a customer. It records receivables as they are sent to customers. Customer invoices can include amounts due for the goods and/or services provided, applicable sales taxes, shipping and handling fees, and other charges. Odoo supports multiple invoicing and payment workflows.
See also
From draft invoice to profit and loss report, the process involves several steps once the goods (or services) have been ordered/shipped (or rendered) to a customer, depending on the invoicing policy:
- Invoice creation
- Invoice confirmation
- Invoice sending
- Payment and reconciliation
- Payment follow-up
- Reporting
Invoice creation
Draft invoices can be created directly from documents like sales orders or purchase orders or manually from the Customer Invoices journal in the Accounting Dashboard.
An invoice must include the required information to enable the customer to pay promptly for their goods and services. Make sure the following fields are appropriately completed:
- Customer: When a customer is selected, Odoo automatically pulls information from the customer record like the invoice address, preferred payment terms, fiscal positions, receivable account, and more onto the invoice. To change these values for this specific invoice, edit them directly on the invoice. To change them for future invoices, change the values on the contact record.
- Invoice Date: If not set manually, this field is automatically set as the current date upon confirmation.
- Due Date or payment terms: To specify when the customer has to pay the invoice.
- Journal: Automatically set and can be changed if needed.
- Currency. If the invoice’s currency differs from the company’s currency, the currency exchange rate is automatically displayed.
In the Invoice Lines tab:
- Product: Click Add a line, then search for and select the product.
- Quantity
- Price
- Taxes (if applicable)
To access the product catalog and view all items in an organized display, click Catalog. When the products and quantities are selected, click Back to Invoice to return to the invoice; the selected catalog items will appear in the invoice lines.
Tip
To display the total amount of the invoice in words, go to Accounting ‣ Configuration ‣ Settings and activate the Total amount of invoice in letters option.
The Journal Items tab displays the accounting entries created. Additional invoice information such as the Customer Reference, Payment Reference, Fiscal Positions, Incoterms, and more can be added or modified in the Other Info tab.
Note
Odoo initially creates invoices in Draft status. Draft invoices have no accounting impact until they are confirmed.
See also
Invoice confirmation
Click Confirm when the invoice is completed. The invoice’s status changes to Posted, and a journal entry is generated based on the invoice configuration. On confirmation, Odoo assigns each invoice a unique number from a defined sequence.
Note
- Once confirmed, an invoice can no longer be updated. Click Reset to draft if changes are needed.
- If required, invoices and other journal entries can be locked once posted using the Secure posted entries with hash feature.
Invoice sending
To set a preferred Invoice sending method for a customer, go to Accounting ‣ Customers ‣ Customers and select the customer. In the Accounting tab of the contact form, select the preferred Invoice sending method in the Customer Invoices section.
Note
Sending letters in Odoo requires In-App Purchase (IAP) credit or tokens.
To send the invoice to the customer, navigate back to the invoice record and follow these steps:
- Click Print & Send.
- If the default invoice layout has not been customized yet, a Configure your document layout pop-up window appears. Configure the layout and click Continue.
Note- The document layout can be changed at any time in the general settings.
- To add a QR code for banking app payments to the invoice, enable the QR Code option in the Configure Your Document Layout window. To modify this option, go to Accounting ‣ Configuration ‣ Settings, scroll down to the Customer Payments section, and enable/disable the QR Codes option.
- In the Print & Send window:
- If a preferred Invoice sending method was set in the contact form, it is selected by default. Select another one if needed.
- If no preferred Invoice sending method was set in the contact form, select the method to use for sending the invoice to the customer.
- Click Print & Send if the by Email option is selected, or click Print.
Sending multiple invoices
To send and print multiple invoices, go to Accounting ‣ Customers ‣ Invoices, select them in the Invoices list view and click Print & Send. The Print & Send window displays the selected invoice sending methods based on the preferred method set.
A banner is added to the selected invoices to indicate they are part of an ongoing send and print batch. This helps prevent the process from being triggered manually again, as it may take some time to complete for exceptionally large batches.
To check all invoices that have not yet been sent, go to Accounting ‣ Customers ‣ Invoices. In the Invoices list view, click into the search bar and filter on Not Sent.
Payment and reconciliation
In Odoo, an invoice is considered Paid when the associated accounting entry has been reconciled with a corresponding bank transaction.
See also
Payment follow-up
Odoo’s follow-up actions help companies follow up on customer invoices. Different actions can be set up to remind customers to pay their outstanding invoices, depending on how much the customer is overdue. These actions are bundled into follow-up levels that trigger when an invoice is overdue by a certain number of days. If there are multiple overdue invoices for the same customer, the actions are performed on the most overdue invoice.
Reporting
Partner reports
Partner Ledger
The Partner Ledger report shows the balance of customers and suppliers. To access it, go to Accounting ‣ Reporting ‣ Partner Ledger.
Aged Receivable
To review outstanding customer invoices and their related due dates, use the Aged Receivable report. To access it, go to Accounting ‣ Reporting ‣ Aged Receivable.
Aged Payable
To review outstanding vendor bills and their related due dates, use the Aged Payable report. To access it, go to Accounting ‣ Reporting ‣ Aged Payable.
Profit and Loss
The Profit and Loss statement shows details of income and expenses.
Balance sheet
The Balance Sheet summarizes the company’s assets, liabilities, and equity at a specific time.
On this page
Get Help
Contact Support Ask the Odoo Community
![]()
- User Docs
- Database management
- Developer
- Contributing
EN
Odoo 18
Invoicing processes
Depending on your business and the application you use, there are different ways to automate the customer invoice creation in Odoo. Usually, draft invoices are created by the system (with information coming from other documents like sales order or contracts) and accountant just have to validate draft invoices and send the invoices in batch (by regular mail or email).
Depending on your business, you may opt for one of the following way to create draft invoices:
Sales
Sales Order ‣ Invoice
In most companies, salespeople create quotations that become sales order once they are validated. Then, draft invoices are created based on the sales order. You have different options like:
- Invoice manually: use a button on the sale order to trigger the draft invoice
- Invoice before delivery: invoice the full order before triggering the delivery order
- Invoice based on delivery order: see next section
Invoice before delivery is usually used by the eCommerce application when the customer pays at the order and we deliver afterwards. (pre-paid)
For most other use cases, it’s recommended to invoice manually. It allows the salesperson to trigger the invoice on demand with options: invoice the whole order, invoice a percentage (advance), invoice some lines, invoice a fixed advance.
This process is good for both services and physical products.
See also
Sales Order ‣ Delivery Order ‣ Invoice
Retailers and eCommerce usually invoice based on delivery orders, instead of sales order. This approach is suitable for businesses where the quantities you deliver may differs from the ordered quantities: foods (invoice based on actual Kg).
This way, if you deliver a partial order, you only invoice for what you really delivered. If you do back orders (deliver partially and the rest later), the customer will receive two invoices, one for each delivery order.
See also
eCommerce Order ‣ Invoice
An eCommerce order will also trigger the creation of the order when it is fully paid. If you allow paying orders by check or wire transfer, Odoo only creates an order and the invoice will be triggered once the payment is received.
Contracts
Regular Contracts ‣ Invoices
If you use contracts, you can trigger invoice based on time and material spent, expenses or fixed lines of services/products. Every month, the salesperson will trigger invoice based on activities on the contract.
Activities can be:
- fixed products/services, coming from a sale order linked to this contract
- materials purchased (that you will re-invoice)
- time and material based on timesheets or purchases (subcontracting)
- expenses like travel and accommodation that you re-invoice to the customer
You can invoice at the end of the contract or trigger intermediate invoices. This approach is used by services companies that invoice mostly based on time and material. For services companies that invoice on fix price, they use a regular sales order.
See also
Recurring Contracts ‣ Invoices
For subscriptions, an invoice is triggered periodically, automatically. The frequency of the invoicing and the services/products invoiced are defined on the contract.
See also
Others
Creating an invoice manually
Users can also create invoices manually without using contracts or a sales order. It’s a recommended approach if you do not need to manage the sales process (quotations), or the delivery of the products or services.
Even if you generate the invoice from a sales order, you may need to create invoices manually in exceptional use cases:
- if you need to create a refund
- If you need to give a discount
- if you need to change an invoice created from a sales order
- if you need to invoice something not related to your core business
Specific modules
Some specific modules are also able to generate draft invoices:
- membership: invoice your members every year
- repairs: invoice your after-sale services
Resequencing of the invoices
It remains possible to resequence the invoices but with some restrictions:
- The feature does not work when entries are previous to a lock date.
- The feature does not work if the sequence is inconsistent with the month of the entry.
- It does not work if the sequence leads to a duplicate.
- The order of the invoice remains unchanged.
- It is useful for people who use a numbering from another software and who want to continue the current year without starting over from the beginning.
Invoice digitization with optical character recognition (OCR)
Invoice digitization is the process of automatically encoding traditional paper invoices into invoices forms in your accounting.
Odoo uses OCR and artificial intelligence technologies to recognize the content of the documents. Vendor bills and customer invoices forms are automatically created and populated based on scanned invoices.
See also
On this page
Get Help
Contact Support Ask the Odoo Community
![]()
- User Docs
- Database management
- Developer
- Contributing
EN
Odoo 18
Delivery and invoice addresses
Companies often have multiple locations, and it is common that a customer invoice should be sent to one address and the delivery should be sent to another. Odoo’s Customer Addresses feature is designed to handle this scenario by making it easy to specify which address to use for each case.
See also
Configuration
To specify a sales order’s invoice and delivery addresses, first go to Accounting ‣ Configuration ‣ Settings. In the Customer Invoices section, enable Customer Addresses and click Save.
On quotations and sales orders, there are now fields for Invoice Address and Delivery Address. If the customer has an invoice or delivery address listed on their contact record, the corresponding field uses that address, by default, but any contact’s address can be used instead.
See also
For more information, refer to the documentation on Contact Form Configuration.
Invoice and deliver to different addresses
Delivery orders and their delivery slip reports use the address set as the Delivery Address on the sales order. By default, invoice reports show both the shipping address and the invoice address to assure the customer that the delivery is going to the correct location.
Emails also go to different addresses. The quotation and sales order are sent to the main contact’s email, as usual, but the invoice is sent to the email of the address set as the Invoice Address on the sales order.
Note
- Reports, such as the delivery slip and invoice report, can be customized using Studio.
- If Send by Post is checked when you click Send & Print, the invoice will be mailed to the invoice address.
On this page
Get Help
Contact Support Ask the Odoo Community
![]()
- User Docs
- Database management
- Developer
- Contributing
EN
Odoo 18
Payment terms and installment plans
Payment terms specify all the conditions of a sale’s payment to help ensure customers pay their invoices correctly and on time.
Payment terms are generally defined on documents such as sales orders, customer invoices, and vendor bills. Payment terms cover:
- The due date(s)
- Early payment discounts
- Any other conditions on the payment
An installment plan allows the customers to pay an invoice in parts, with the amounts and payment dates defined beforehand by the seller.
Example
Immediate Payment
The full payment is due on the day of the invoice’s issuance.
15 Days (or Net 15)
The full payment is due 15 days after the invoice date.
21 MFI
The full payment is due by the 21st of the month following the invoice date.
30% Advance End of Following Month
30% is due on the day of the invoice’s issuance. The remaining balance is due at the end of the following month.
2% 10, Net 30 EOM
A 2% cash discount if the payment is received within ten days. Otherwise, the full payment is due at the end of the month following the invoice date.
Note
- Payment terms are not to be confused with down payment invoices. If, for a specific order, you issue multiple invoices to your customer, that is neither a payment term nor an installment plan but an invoicing policy.
- This page is about the payment terms feature, not terms & conditions, which can be used to declare contractual obligations regarding content use, return policies, and other policies surrounding the sale of goods and services.
See also
Configuration
To create new payment terms, follow these steps:
- Go to Accounting ‣ Configuration ‣ Payment Terms and click on New.
- Enter a name in the Payment Terms field. This field is the name displayed both internally and on sales orders.
- Tick the Early Discount checkbox and fill out the discount percentage, discount days, and tax reduction fields to add a cash discount, if desired.
- In the Due Terms section, add a set of rules (terms) to define what needs to be paid and by which due date(s). Defining terms automatically calculates the payments’ due date(s). This is particularly helpful for managing installment plans (payment terms with multiple terms).
To add a term, click on Add a line, define the discount’s value and type in the Due fields, then fill out the After fields to determine the due date. - Enter the text to be displayed on the document (sales order, invoice, etc.) in the gray textbox in the Preview column.
- Tick the Show installment dates checkbox to display a breakdown of each payment and its due date on the invoice report, if desired.
Tip
To instead specify a number of days before the end of the month, use a negative value in the After field.
To test that your payment terms are configured correctly, enter an invoice date on the Example line to generate the payments that would be due and their due dates using these payment terms.
Important
Terms are computed in the order of their due dates.
Example
In the following example, 30% is due on the day of issuance, and the remaining 70% is due at the end of the following month.
Using payment terms
Payment terms can be defined using the Payment Terms field on:
- Contacts: To automatically set default payment terms on a contact’s new sales orders, invoices, and bills. This can be modified in the contact form, under the Sales & Purchase tab.
- Quotations/Sales Orders: To set specific payment terms automatically on all invoices generated from a quotation or sales order.
Payment terms can be defined using the Due Date field, with the Terms drop-down list on:
- Customer invoices: To set specific payment terms on an invoice.
- Vendor bills: To set specific payment terms on a bill.
Tip
Setting payment terms on a vendor bill is mostly useful for managing vendor terms with multiple installments or cash discounts. Otherwise, manually setting the due date is enough. If payment terms are already defined, empty the field to select a date.
Journal entries
Invoices with specific payment terms generate different journal entries, with one journal item for every computed due date.
This makes for easier follow-ups and reconciliation since Odoo takes each due date into account, rather than just the balance due date. It also helps to get an accurate aged receivable report.
Example
In this example, an invoice of $1000 has been issued with the following payment terms: 30% is due on the day of issuance, and the remaining 70% is due at the end of the following month.
Account | Due date | Debit | Credit |
|---|---|---|---|
Account Receivable | February 21 | 300 | |
Account Receivable | March 31 | 700 | |
Product Sales | 1000 |
The $1000 debited to the account receivable is split into two distinct journal items. Both of them have their own due date.
On this page
Get Help
Contact Support Ask the Odoo Community
![]()
- User Docs
- Database management
- Developer
- Contributing
EN
Odoo 18
Default terms and conditions (T&C)
Specifying terms and conditions is essential to establish important contractual points, such as return and refunds, warranty, and after-sale services.
You can add default terms and conditions at the bottom of all customer invoices, sales orders, and quotations, either as text or a link to a web page.
See also
Odoo Tutorial: Terms & Conditions
Configuration
Go to Accounting ‣ Configuration ‣ Settings. Under the Customer Invoices, enable Default Terms & Conditions. By default, the Add a Note option is selected, and the terms and conditions are displayed at the bottom of the document. Enter the terms and conditions in the text box below.
Tip
You can also add a PDF version of your terms and conditions as an attachment when sending the document via email. Edit the email templates if you want to include them by default.
Alternatively, to display the terms and conditions on a web page, select the Add a link to a Web Page option and click Save. Click Update Terms, edit the content, and click Save. The link to that page is then added as a note in your document.
Note
You can edit the layout and content of the page using the Website app. If the Website app is activated, the Edit in Website Builder option then replaces Update Terms.
Get Help
Contact Support Ask the Odoo Community
![]()
- User Docs
- Database management
- Developer
- Contributing
EN
Odoo 18
Cash discounts and tax reduction
Cash discounts are reductions in the amount a customer must pay for goods or services offered as an incentive for paying their invoice promptly. These discounts are typically a percentage of the total invoice amount and are applied if the customer pays within a specified time. Cash discounts can help a company maintain a steady cash flow.
Example
You issue a €100 invoice on the 1st of January. The full payment is due within 30 days, and you also offer a 2% discount if your customer pays you within seven days.
The customer can pay €98 up to the 8th of January. After that date, they would have to pay €100 by the 31st of January.
A tax reduction can also be applied depending on the country or region.
See also
Configuration
To grant cash discounts to customers, you must first verify the gain and loss accounts. Then, configure payment terms and add a cash discount by checking the Early Discount checkbox and filling in the discount percentage, discount days, and tax reduction fields.
Cash discount gain/loss accounts
With a cash discount, the amount you earn depends on whether the customer benefits from the cash discount or not. This inevitably leads to gains and losses, which are recorded on default accounts.
To modify these accounts, go to Accounting ‣ Configuration ‣ Settings, and, in the Default Accounts section, select the accounts you want to use for the Cash Discount Gain account and Cash Discount Loss account.
Payment terms
Cash discounts are defined on payment terms. Configure them to your liking by going to Accounting ‣ Configuration ‣ Payment Terms, and make sure to fill out the discount percentage, discount days, and tax reduction fields.
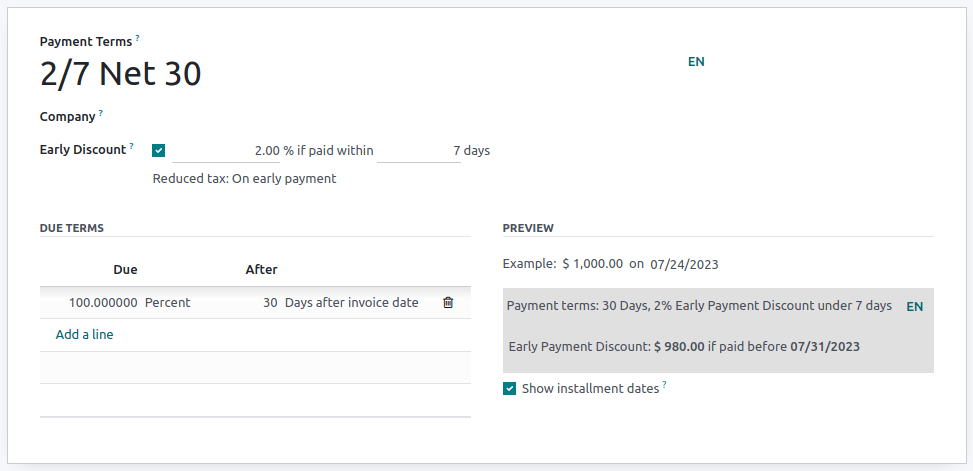
Tax reductions
Depending on the country or region, the base amount used to compute the tax can vary, which can lead to a tax reduction. Since tax reductions are set on individual payment terms, each term can use a specific tax reduction.
To configure how the tax reduction is applied, go to a payment term with the Early Discount checkbox enabled, and select one of the three following options:
- Always (upon invoice)
The tax is always reduced. The base amount used to compute the tax is the discounted amount, whether the customer benefits from the discount or not. - On early payment
The tax is reduced only if the customer pays early. The base amount used to compute the tax is the same as the sale: if the customer benefits from the reduction, then the tax is reduced. This means that, depending on the customer, the tax amount can vary after the invoice is issued. - Never
The tax is never reduced. The base amount used to compute the tax is the full amount, whether the customer benefits from the discount or not.
Example
You issue a €100 invoice (tax-excluded) on the 1st of January, with a 21% tax rate. The full payment is due within 30 days, and you also offer a 2% discount if your customer pays you within seven days.
Always (upon invoice)On early paymentNever
Due date | Total amount due | Computation |
|---|---|---|
8th of January | €118.58 | €98 + (21% of €98) |
31st of January | €120.58 | €100 + (21% of €98) |
Note
- Tax grids, which are used for the tax report, are correctly computed according to the type of tax reduction you configured.
- The type of cash discount tax reduction may be correctly pre-configured, depending on your fiscal localization package.
Apply a cash discount to a customer invoice
On a customer invoice, apply a cash discount by selecting the payment terms you created. Odoo automatically computes the correct amounts, tax amounts, due dates, and accounting records.
Under the Journal Items tab, you can display the discount details by clicking on the “toggle” button and adding the Discount Date and Discount Amount columns.
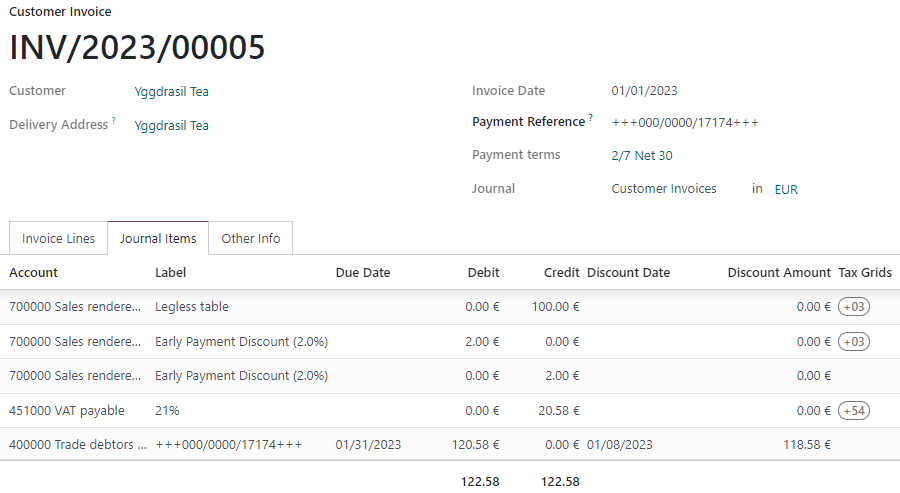
The discount amount and due date are also displayed on the generated invoice report sent to the customer if the Show installment dates option is checked on the payment terms.
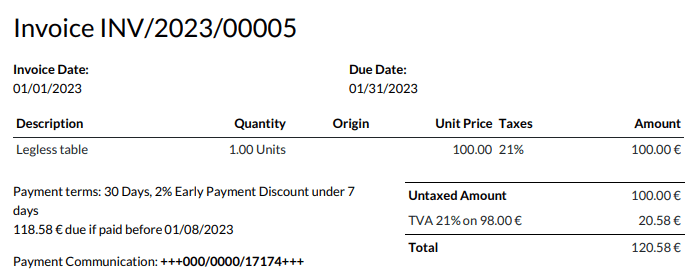
Payment reconciliation
When you record a payment or reconcile your bank transactions, Odoo takes the customer payment’s date into account to determine if the customer can benefit from the cash discount or not.
Note
If your customer pays the discount amount after the discount date, you can always decide to mark the invoice as fully paid with a write-off or as partially paid.
On this page
Get Help
Contact Support Ask the Odoo Community
![]()
- User Docs
- Database management
- Developer
- Contributing
EN
Odoo 18
Credit notes and refunds
A credit/debit note, or credit/debit memo, is a document sent to a customer to inform them that they have been credited/debited a certain amount.
Several use cases can lead to a credit note, such as:
- a mistake in the invoice
- a return of the goods, or a rejection of the services
- the goods delivered are damaged
Debit notes are less common but are most frequently used to track debts owed by customers or to vendors because of modifications to confirmed customer invoices or vendor bills.
Note
Issuing a credit/debit note is the only legal method for canceling, refunding, or modifying a validated invoice. Make sure to register the payment afterward if money is being refunded to the customer and/or validate the return if a storable product is being returned.
Issue a customer credit note
In most cases, credit notes are created directly from the corresponding invoices. To do so, go to Accounting ‣ Customers ‣ Invoices, open the relevant Invoice, and click Credit Note.
In the Credit Note window, fill in the Reason displayed on Credit Note and update the Journal and Reversal date if needed. There are two options:
- Click Reverse to open a draft credit note prefilled with the exact details from the original invoice. Update the Product and Quantity and click Confirm. This option allows for a partial refund or modifications to the credit note.
- Click Reverse and Create invoice to create a credit note, validate it automatically, reconcile it with the related invoice, and open a new draft invoice prefilled with the exact details from the original invoice.
To create a credit note from scratch, go to Accounting ‣ Customers ‣ Credit Notes, and click New. Filling out a credit note follows the same process as completing an invoice.
Note
A credit note sequence starts with R and is followed by the related document number (e.g., RINV/2025/0004 is associated with the invoice INV/2025/0004).
Issue a customer debit note
To create a debit note, go to Accounting ‣ Customers ‣ Invoices and follow these steps:
- Select the desired invoice(s), click Actions and select Create Debit Note.
- In the Create Debit Note window, fill in the Reason and update the Use Specific Journal and Debit Note Date fields if needed.
- Enable the Copy Lines option to copy the invoice lines and click Create Debit Note.
- In the debit note, update the Product and Quantity and click Confirm.
Tip
To create a debit note from the invoice form view, click the (gear) icon and select Debit Note.
Record a vendor refund
Vendor refunds or vendor credit notes are recorded the same way as credit notes:
To record a vendor refund or a vendor credit note directly from the corresponding vendor bill, go to Accounting ‣ Vendors ‣ Bills, open the relevant vendor bill, and click Credit Note.
To record it from scratch, go to Accounting ‣ Vendors ‣ Refund, and click on New.
Record a vendor debit note
Debit notes from vendors are recorded the same way debit notes are issued to customers.
To record a debit note, go to Accounting ‣ Vendors ‣ Bills and select the desired bill(s). Click Actions and select Create Debit Note.
Tip
To create a debit note from the vendor bill form view, click the (gear) icon and select Debit Note.
Journal entries
Creating a credit/debit note from an invoice/bill generates a reverse entry that cancels out the journal items from the original invoice.
Example
The journal entry of an invoice:

The credit note’s journal entry generated to reverse the original invoice above:

On this page
Get Help
Contact Support Ask the Odoo Community
![]()
- User Docs
- Database management
- Developer
- Contributing
EN
Odoo 18
Cash rounding
Cash rounding is required when the lowest physical denomination of currency, or the smallest coin, is higher than the minimum unit of account.
For example, some countries require their companies to round up or down the total amount of an invoice to the nearest five cents, when the payment is made in cash.
Configuration
Go to Accounting ‣ Configuration ‣ Settings and enable Cash Rounding, then click on Save.

Go to Accounting ‣ Configuration ‣ Cash Roundings, and click on Create.
Define here your Rounding Precision, Rounding Strategy, and Rounding Method.
Odoo supports two rounding strategies:
- Add a rounding line: a rounding line is added on the invoice. You have to define which account records the cash roundings.
- Modify tax amount: the rounding is applied in the taxes section.
Apply roundings
When editing a draft invoice, open the Other Info tab, go to the Accounting Information section, and select the appropriate Cash Rounding Method.
On this page
Get Help
Contact Support Ask the Odoo Community
![]()
- User Docs
- Database management
- Developer
- Contributing
EN
Odoo 18
Deferred revenues
Deferred revenues, or unearned revenues, are invoices addressed to customers for goods yet to be delivered or services yet to be rendered.
The company cannot report them on the current profit and loss statement, or income statement, since the goods and services will be effectively delivered/rendered in the future.
These future revenues must be deferred on the company’s balance sheet among the current liabilities until they can be recognized, at once or over a defined period, on the profit and loss statement.
For example, let’s say a business sells a software license of $1200 for 1 year. They immediately invoice it to the customer but can’t consider it earned yet, as the future months of licensing have not yet been delivered. Therefore, they post this new revenue in a deferred revenue account and recognize it on a monthly basis. Each month, for the next 12 months, $100 will be recognized as revenue.
Odoo Accounting handles deferred revenues by spreading them in multiple entries that are posted periodically.
Note
The server checks once a day if an entry must be posted. It might then take up to 24 hours before you see a change from Draft to Posted.
Configuration
Make sure the default settings are correctly configured for your business. To do so, go to Accounting ‣ Configuration ‣ Settings. The following options are available:
Journal
The deferral entries are posted in this journal.
Deferred Revenue
Revenues are deferred on this Current Liability account until they are recognized.
Generate Entries
By default, Odoo automatically generates the deferral entries when you post a customer invoice. However, you can also choose to generate them manually by selecting the Manually & Grouped option instead.
Based on
Suppose an invoice of $1200 must be deferred over 12 months.
- The Months option accounts for $100 each month prorated to the number of days in that month (e.g., $50 for the first month if the Start Date is set to the 15th of the month).
- The Full Months option considers each month started to be full (e.g., $100 for the first month even if the Start Date is set to the 15th of the month); this means that with the Full Months option, a full $100 is recognized in the first partial month, eliminating the need for a 13th month to recognize any remainder as would be the case when using the Months option.
- The Days option accounts for different amounts depending on the number of days in each month (e.g., ~$102 for January and ~$92 for February).
Generate deferral entries on validation
Tip
Make sure the Start Date and End Date fields are visible in the Invoice Lines tab. In most cases, the Start Date should be in the same month as the Invoice Date. Deferred revenue entries are posted from the invoice date and are displayed in the report accordingly.
For each line of the invoice that should be deferred, specify the start and end dates of the deferral period.
If the Generate Entries field in the Settings is set to On invoice/bill validation, Odoo automatically generates the deferral entries when the invoice is validated. Click the Deferred Entries smart button to see them.
One entry, dated on the same day as the invoice’s accounting date, moves the invoice amounts from the income account to the deferred account. The other entries are deferral entries which, month after month, move the invoice amounts from the deferred account to the income account to recognize the revenue.
Example
You can defer a January invoice of $1200 over 12 months by specifying a start date of 01/01/2023 and an end date of 12/31/2023. At the end of August, $800 is recognized as an income, whereas $400 remains on the deferred account.
Reporting
The deferred revenue report computes an overview of the necessary deferral entries for each account. To access it, go to Accounting ‣ Reporting ‣ Deferred Revenue.
To view the journal items of each account, click on the account name and then Journal Items.

Note
Only invoices whose accounting date is before the end of the period of the report are taken into account.
Generate grouped deferral entries manually
If you have a lot of deferred revenues and wish to reduce the number of journal entries created, you can generate deferral entries manually. To do so, set the Generate Entries field in the Settings to Manually & Grouped. Odoo then aggregates the deferred amounts in a single entry.
At the end of each month, go to Accounting ‣ Reporting ‣ Deferred Revenue and click the Generate Entries button. This generates two deferral entries:
- One dated at the end of the month which aggregates, for each account, all the deferred amounts of that month. This means that a part of the deferred revenue is recognized at the end of that period.
- The reversal of this created entry, dated on the following day (i.e., the first day of the next month) to cancel the previous entry.
Example
There are two invoices:
- Invoice A: $1200 to be deferred from 01/01/2023 to 12/31/2023
- Invoice B: $600 to be deferred from 01/01/2023 to 12/31/2023
In January
At the end of January, after clicking the Generate Entries button, there are the following entries:
- Entry 1 dated on the 31st January:
- Line 1: Expense account -1200 -600 = -1800 (cancelling the total of both invoices)
- Line 2: Expense account 100 + 50 = 150 (recognizing 1/12 of invoice A and invoice B)
- Line 3: Deferred account 1800 - 150 = 1650 (amount that has yet to be deferred later on)
- Entry 2 dated on the 1st February, the reversal of the previous entry:
- Line 1: Expense account 1800
- Line 2: Deferred account -150
- Line 3: Expense account -1650
In February
At the end of February, after clicking the Generate Entries button, there are the following entries:
- Entry 1 dated on the 28th February:
- Line 1: Expense account -1200 -600 = -1800 (cancelling the total of both invoices)
- Line 2: Expense account 200 + 100 = 300 (recognizing 2/12 of invoice A and invoice B)
- Line 3: Deferred account 1800 - 300 = 1500 (amount that has yet to be deferred later on)
- Entry 2 dated on the 1st March, the reversal of the previous entry.
From March to October
The same computation is done for each month until October.
In November
At the end of November, after clicking the Generate Entries button, there are the following entries:
- Entry 1 dated on the 30th November:
- Line 1: Expense account -1200 -600 = -1800 (cancelling the total of both invoices)
- Line 2: Expense account 1100 + 550 = 1650 (recognizing 11/12 of invoice A and invoice B)
- Line 3: Deferred account 1800 - 1650 = 150 (amount that has yet to be deferred later on)
- Entry 2 dated on the 1st December, the reversal of the previous entry.
In December
There is no need to generate entries in December. Indeed, if we do the computation for December, we have an amount of 0 to be deferred.
In total
If we aggregate everything, we would have:
- invoice A and invoice B
- two entries (one for the deferral and one for the reversal) for each month from January to November
Therefore, at the end of December, invoices A and B are fully recognized as income only once in spite of all the created entries thanks to the reversal mechanism.
On this page
Get Help
Contact Support Ask the Odoo Community
![]()
- User Docs
- Database management
- Developer
- Contributing
EN
Odoo 18
Electronic invoicing (EDI)
EDI, or electronic data interchange, is the inter-company communication of business documents, such as purchase orders and invoices, in a standard format. Sending documents according to an EDI standard ensures that the machine receiving the message can interpret the information correctly. Various EDI file formats exist and are available depending on your company’s country.
EDI feature enables automating the administration between companies and might also be required by some governments for fiscal control or to facilitate the administration.
Electronic invoicing of your documents such as customer invoices, credit notes or vendor bills is one of the application of EDI.
Odoo supports e-invoicing in many countries. Refer to the country’s page for more details:
- Argentina
- Austria
- Belgium
- Brazil
- Chile
- Colombia
- Croatia
- Denmark
- Ecuador
- Estonia
- Finland
- France
- Germany
- Hungary
- Ireland
- Italy
- Latvia
- Lithuania
- Luxembourg
- Mexico
- Netherlands
- Norway
- Peru
- Poland
- Portugal
- Romania
- Slovenia
- Spain
- Spain - Basque Country
- Uruguay
See also
Fiscal localizations documentation
Configuration
By default, the format available in the send window depends on your customer’s country.
You can define a specific e-invoicing format for each customer. To do so, go to Accounting ‣ Customers ‣ Customers, open the customer form, go to the Accounting tab and select the appropriate format.
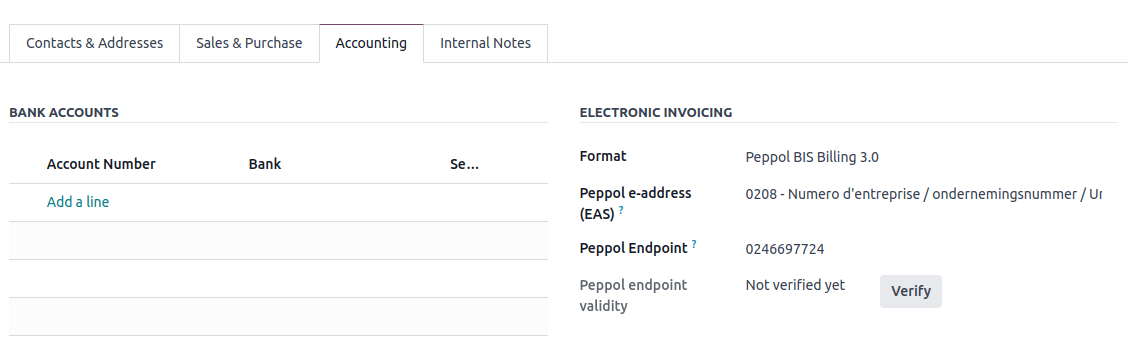
National electronic invoicing
Depending on your company’s country (e.g., Italy, Spain, Mexico, etc.), you may be required to issue e-invoicing documents in a specific format for all your invoices. In this case, you can define a default e-invoicing format for your sales journal.
To do so, go to Accounting ‣ Configuration ‣ Journals, open your sales journal, go to the Advanced Settings tab, and enable the formats you need for this journal.
E-invoices generation
From a confirmed invoice, click Send & Print to open the send window. Check the e-invoicing option to generate and attach the e-invoice file.
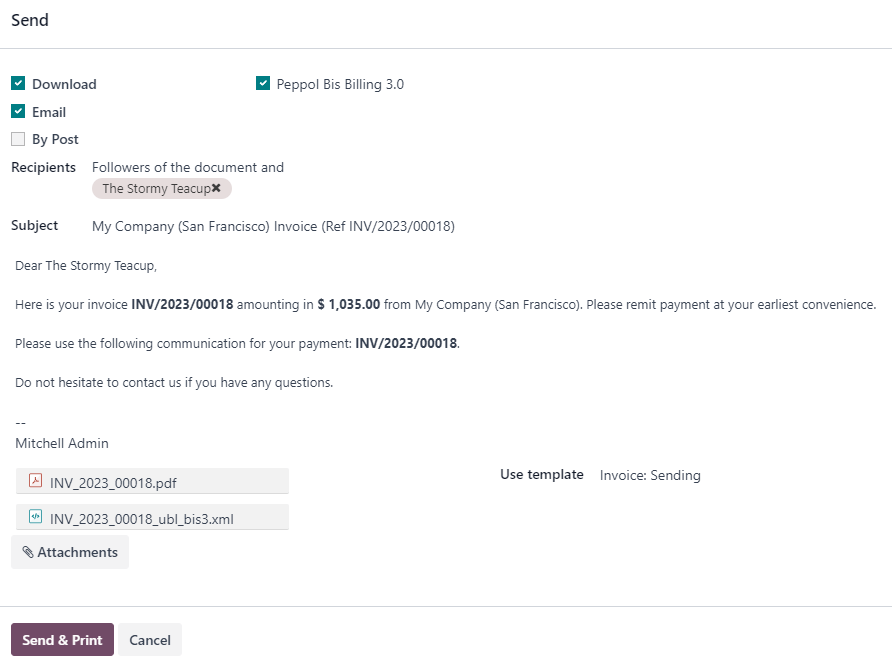
Peppol
The Peppol network ensures the exchange of documents and information between enterprises and governmental authorities. It is primarily used for electronic invoicing, and its access points (connectors to the Peppol network) allow enterprises to exchange electronic documents.
Odoo is an access point and an SMP, enabling electronic invoicing transactions without the need to send invoices and bills by email or post.
If not done yet, install the Peppol module (account_peppol).
Important
- Peppol registration is free and available in Odoo Community
- You can send Customer Invoices and Credit Notes and receive Vendor Bills and Refunds via Peppol.
- You can send and receive in one of the following supported document formats: BIS Billing 3.0, XRechnung CIUS, NLCIUS.
- The following countries are eligible for Peppol registration in Odoo:
Andorra, Albania, Austria, Bosnia and Herzegovina, Belgium, Bulgaria, Switzerland, Cyprus, Czech Republic, Germany, Denmark, Estonia, Spain, Finland, France, United Kingdom, Greece, Croatia, Hungary, Ireland, Iceland, Italy, Liechtenstein, Lithuania, Luxembourg, Latvia, Monaco, Montenegro, North Macedonia, Malta, Netherlands, Norway, Poland, Portugal, Romania, Serbia, Sweden, Slovenia, Slovakia, San Marino, Turkey, Holy See (Vatican City State)
Registration
Go to Accounting ‣ Configuration ‣ Settings. If you do not have the Peppol module installed, first tick the Enable PEPPOL checkbox and then manually save. Click Start sending via Peppol to open the registration form.
Note
This registration form also pops up if you choose to Send & Print an invoice via Peppol without completing the registration process.
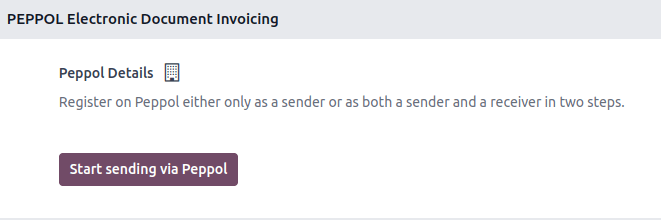
You can register either as a sender or a receiver. A sender can only send invoices and credit notes on Odoo via Peppol, without ever registering as a Peppol participant on Odoo SMP. If you have an existing Peppol registration elsewhere that you want to keep, but want to send invoices from your Odoo database and receive other documents in another software, register as a sender.
Tip
- You can always register as a sender first and register to receive documents later.
- When registering, you can specify if you would also like to receive documents.
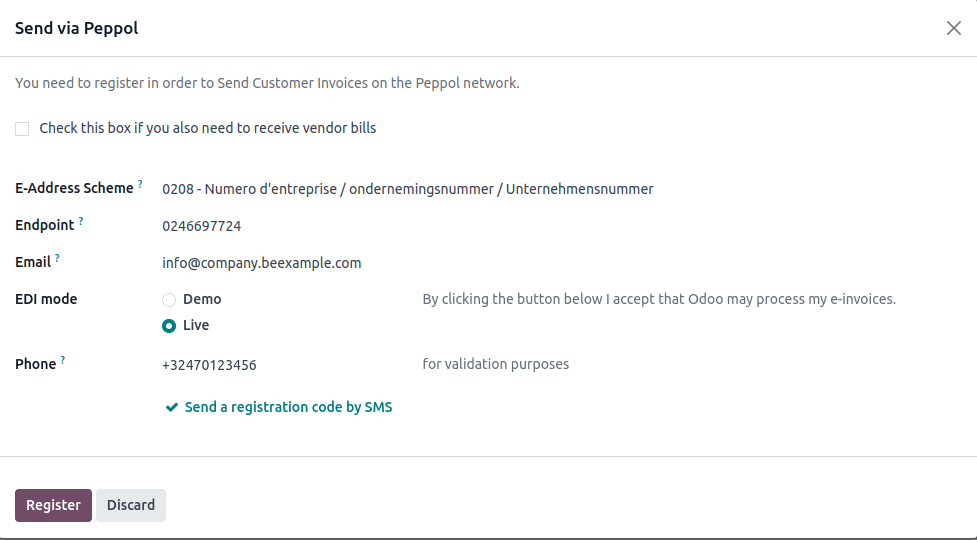
Fill in the following information:
- Check the receiver box if you want to register on Odoo SMP. If you are migrating from another service provider, insert the Migration key from the previous provider (the field becomes visible after you tick the checkbox).
- E-Address Scheme: the Peppol Electronic Address Scheme usually depends on your company’s country. Odoo often prefills this with the most commonly used EAS code in your country. For example, the preferred EAS code for most companies in Belgium is 0208.
- Endpoint: this is usually a Company Registry number or a VAT number.
- Phone: phone number including the country code (e.g., +32 in Belgium).
- Email: this is the email Odoo can use to contact you regarding your Peppol registration.
If you want to explore or demo Peppol, you can choose to register in Demo mode. Otherwise, select Live.
Tip
- Selecting Demo simulates everything in Odoo. There is no sending, receiving, or partner verification.
- For advanced users only, it is possible to run tests on Peppol’s test network. The server allows to register on Peppol and send/receive test invoices to/from other participants. To do so, enable the Developer mode (debug mode), open the Settings app, go to Technical ‣ System Parameters, and search for account_peppol.edi.mode. Click the parameter and change the Value to test. Go back to the Peppol setup menu in the Settings app. The option Test is now available.
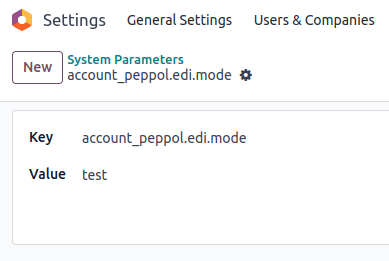
See also
- Peppol EAS - European Commision
- Peppol Endpoint - OpenPeppol eDEC Code Lists (open the “Participant Identifier Schemes” as HTML page)
When set up, request a verification code to be sent to you by clicking Send a registration code by SMS. A text message containing a code is sent to the phone number provided to finalize the verification process.
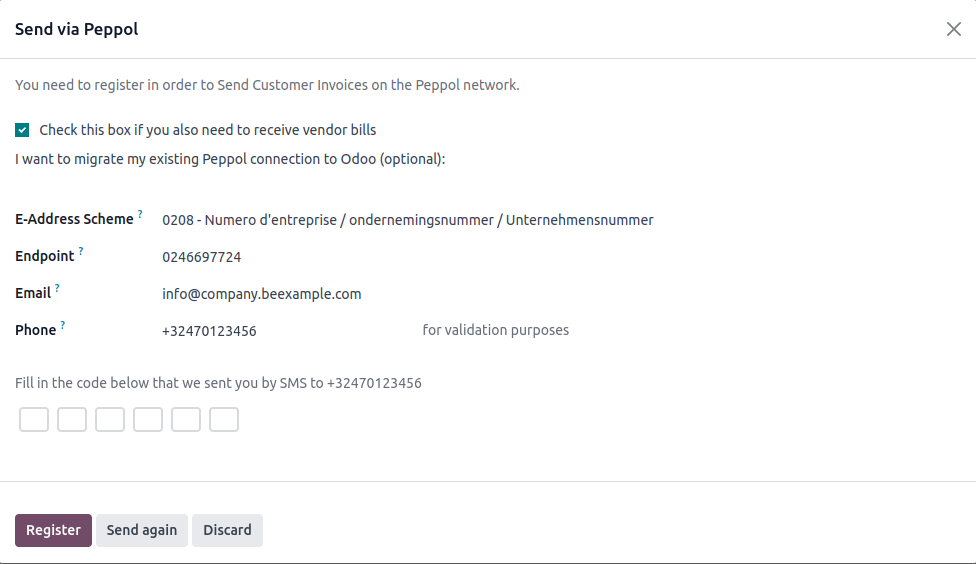
Once you enter the code and click Register, your Peppol participant status is updated. If you chose to only send documents, then the status changes to Can send but not receive. If you opted to receive documents as well, the status changes to Can send, pending registration to receive. In that case, it should be automatically activated within a day.
Then, set the default journal for receiving vendor bills in the Incoming Invoices Journal.
Tip
To manually trigger the cron that checks the registration status, enable the Developer mode (debug mode), then go to Settings ‣ Technical ‣ Scheduled Actions, and search for the PEPPOL: update participant status action.
Your receiver application status should be updated soon after you are registered on the Peppol network.
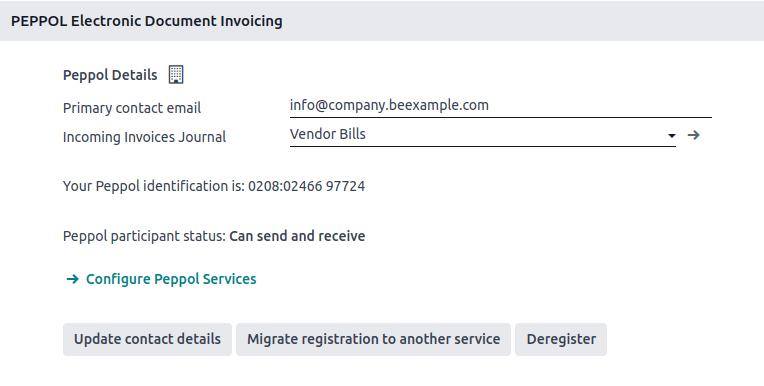
All invoices and vendor bills can now be sent directly using the Peppol network.
Important
To update the email that Odoo can use to contact you, modify the email and click Update contact details.
Configure Peppol services
Once you are registered on Odoo SMP, the Configure Peppol Services button becomes visible to allow you to enable or disable document formats that other participants can send you via Peppol. By default, all document formats supported by Odoo are enabled (depending on the installed modules).
Contact verification
Before sending an invoice to a contact using the Peppol network, it is necessary to verify that they are also registered as a Peppol participant.
To do so, go to Accounting ‣ Customers ‣ Customers and open the customer’s form. Then go to Accounting tab ‣ Electronic Invoicing, select the correct format, and make sure their Peppol EAS code and the Endpoint are filled in. Then, click Verify. If the contact exists on the network, their Peppol endpoint validity is set to Valid.
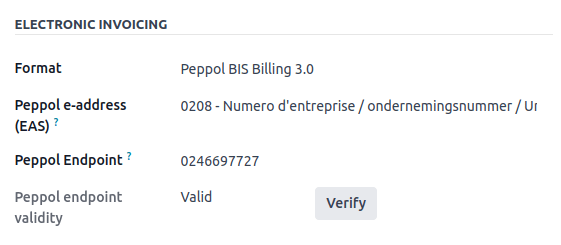
Important
While Odoo prefills both the EAS code and the Endpoint number based on the information available for a contact, it is better to confirm these details directly with the contact.
It is possible to verify the Peppol participant status of several customers at once. To do so, go to Accounting ‣ Customers ‣ Customers and switch to the list view. Select the customers you want to verify and then click Actions ‣ Verify Peppol.
If the participant is registered on the Peppol network but cannot receive the format you selected for them, the Peppol endpoint validity label changes to Cannot receive this format.
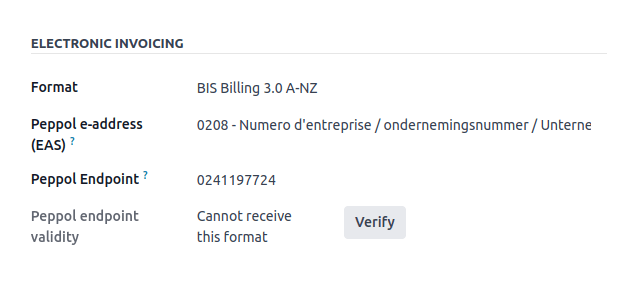
Send invoices
Once ready to send an invoice via the Peppol network, simply click Send & Print on the invoice form. To queue multiple invoices, select them in the list view and click Actions ‣ Send & Print; they will be sent in a batch later on. Both BIS Billing 3.0 and Send via PEPPOL checkboxes need to be ticked.
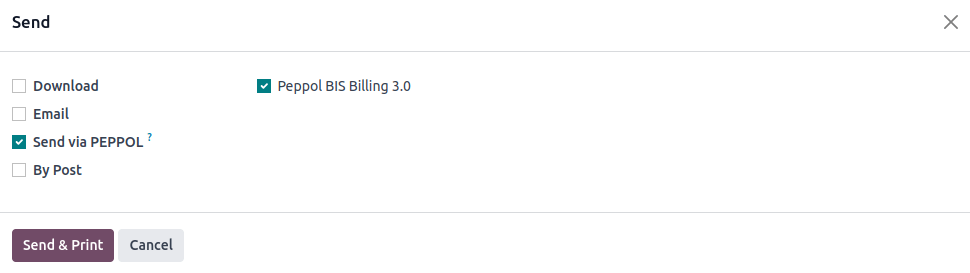
Posted invoices that can be sent via Peppol are marked as Peppol Ready. To display them, use the Peppol Ready filter or access the Accounting dashboard and click Peppol ready invoices on the corresponding sales journal.
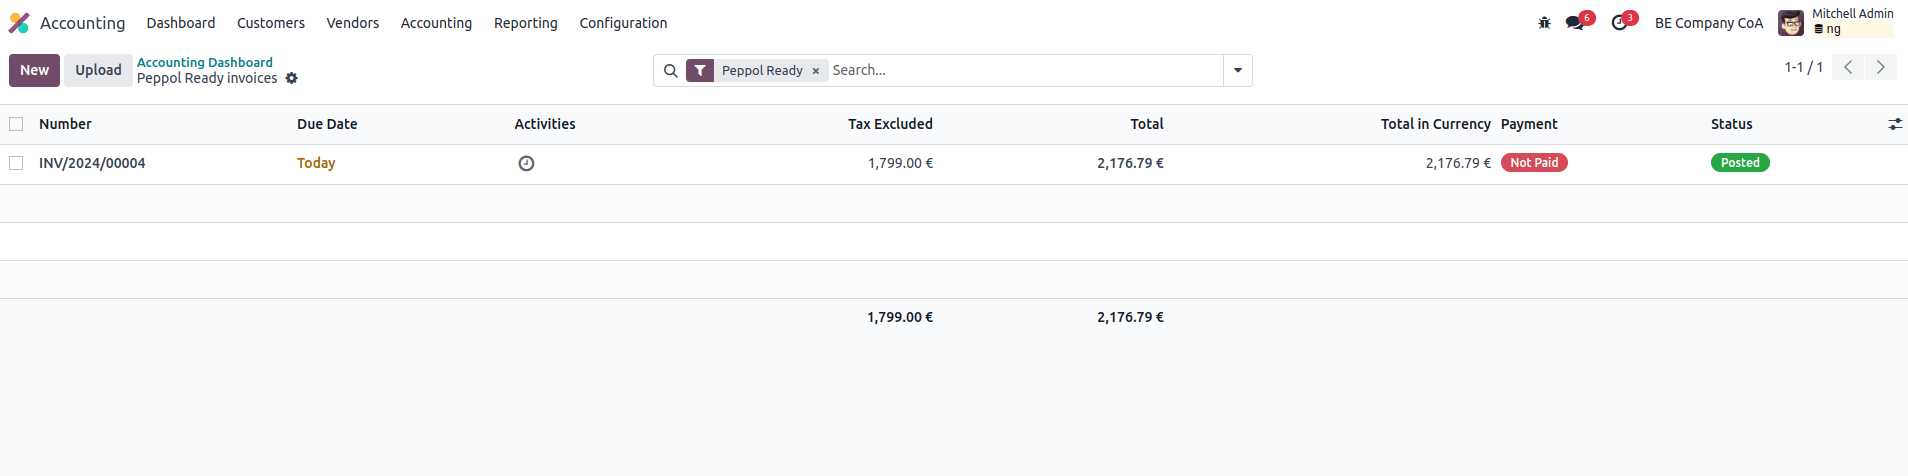
Once the invoices are sent via Peppol, the status is changed to Processing. The status is changed to Done after they have been successfully delivered to the contact’s Access Point.
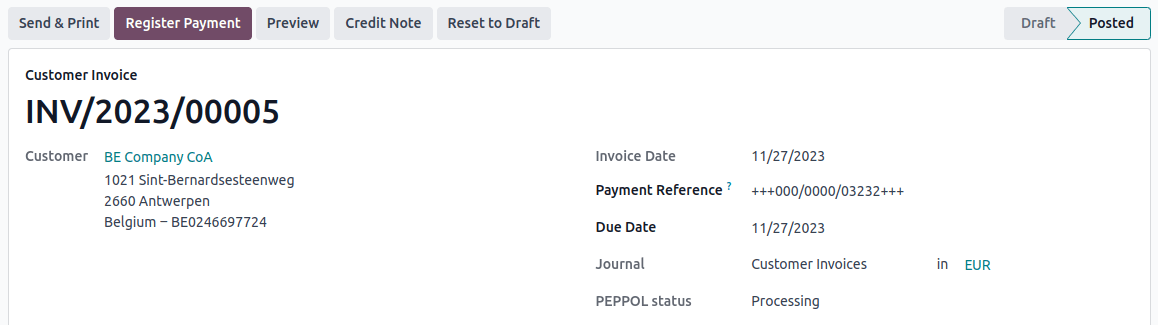
Tip
By default, the Peppol status column is hidden on the Invoices list view. You can choose to have it displayed by selecting it from the optional columns, accessible from the top right corner of the Invoices list view.
A cron runs regularly to check the status of these invoices. It is possible to check the status before the cron runs by clicking Fetch Peppol invoice status in the corresponding sales journal on the Accounting dashboard.
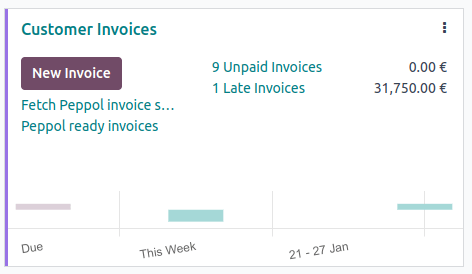
Receive vendor bills
Once a day, a cron checks whether any new documents have been sent to you via the Peppol network. These documents are imported, and the corresponding vendor bills are created automatically as drafts.
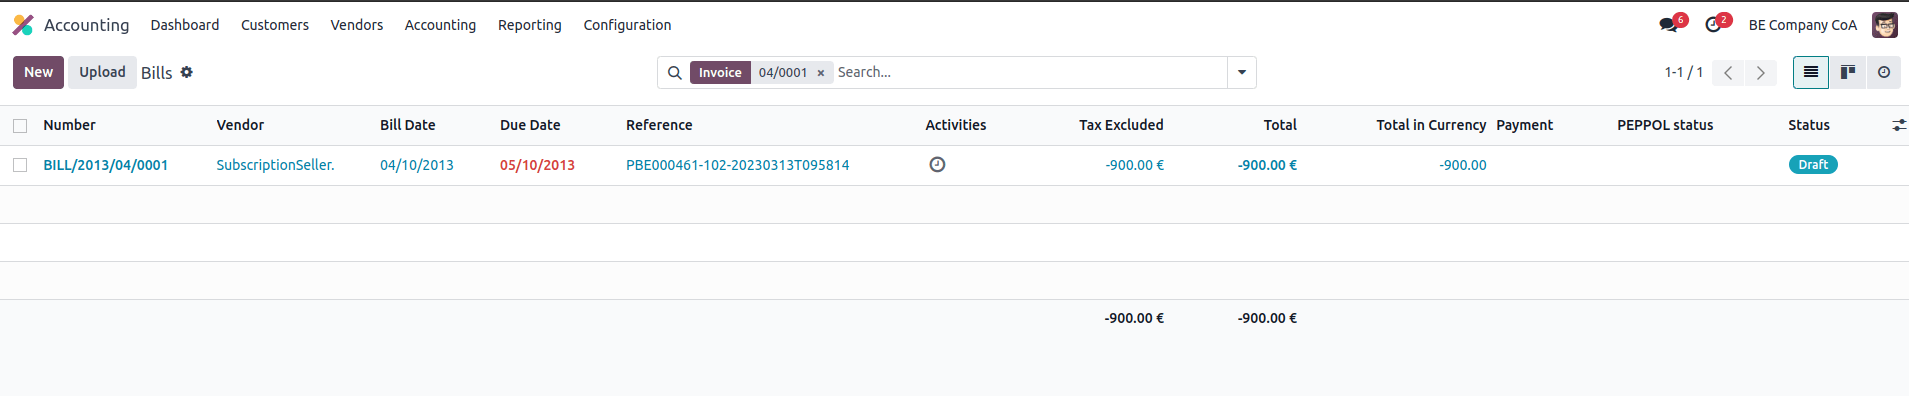
If you want to retrieve incoming Peppol documents before the cron runs, you can do so from the Accounting dashboard on the main Peppol purchase journal that you set up in the settings. Just click Fetch from Peppol.
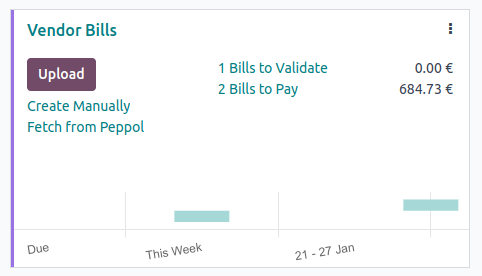
On this page
Get Help
Contact Support Ask the Odoo Community
![]()
EN
Odoo 18
Odoo electronic invoicing in Mexico
Odoo Invoicing is your trusted partner for safe, efficient, and legally compliant e-invoicing solutions tailored to meet Mexico’s regulatory requirements and fully compatible with the guidelines established by the SAT.
Legal framework for e-invoicing in Mexico
Mexico has one of the most advanced e-invoicing systems globally, with electronic invoicing CFDI being mandatory for most taxpayers. Key elements include:
- CFDI: A mandatory electronic invoice format for B2B, B2C, and B2G transactions, fully compliant with SAT requirements.
- Digital tax receipt validation: All CFDIs must be digitally signed and validated by SAT-authorized PACs before issuance.
- Complementos: Specific complements are required for certain transaction types, such as payroll or foreign trade.
- XML Format: The XML format is mandatory, ensuring interoperability and compliance with SAT’s technical standards.
Compliance with Mexican e-invoicing regulations
Odoo Invoicing simplifies compliance with Mexico’s e-invoicing requirements by offering tailored features:
- Supported formats: Odoo supports CFDI in SAT-compliant XML formats, including all mandatory fields, digital signatures, and complements for specialized transactions.
- Integration with PACs: Odoo integrates with SAT-authorized PACs to automate the validation, certification, and issuance of CFDIs, ensuring real-time compliance.
- Secure storage and retrieval: In compliance with Mexico’s five-year mandatory storage requirement, Odoo provides tamper-proof archiving for easy access to invoices during audits or inspections.
- Automatic tax calculation and reporting: Odoo automates tax calculations for VAT (IVA) and other applicable taxes, ensuring accuracy and compliance with SAT’s tax reporting standards.
See also
Mexican fiscal localization documentation
Disclaimer
This page provides a general overview of Mexican e-invoicing regulations and how Odoo supports compliance with SAT requirements. It is not intended as legal or tax advice. We recommend consulting with a tax advisor or legal professional familiar with Mexico’s e-invoicing regulations to ensure compliance tailored to your specific business needs.
On this page
Get Help
Contact Support Ask the Odoo Community
![]()
- User Docs
- Odoo essentials
- Finance
- Accounting and Invoicing
- Expenses
- Online payments
- Fiscal localizations
- Argentina
- Australia
- Austria
- Belgium
- Brazil
- Canada
- Chile
- Colombia
- Denmark
- Ecuador
- Egypt
- France
- Germany
- Hong Kong
- India
- Indonesia
- Italy
- Jordan
- Kenya
- Luxembourg
- Malaysia
- Mexico
- Netherlands
- New Zealand
- Peru
- Philippines
- Romania
- Saudi Arabia
- Singapore
- Spain
- Switzerland
- Thailand
- United Arab Emirates
- United Kingdom
- United States
- Uruguay
- Vietnam
- Employment Hero Payroll
- Sales
- Websites
- Supply Chain
- Human resources
- Marketing
- Services
- Productivity
- Studio
- General settings
- Database management
- Developer
- Contributing
EN
Odoo 18
Mexico
Webinars
A video on the Mexican localization is also available. This video covers how to implement this localization from scratch, including how to set up the configurations, how to complete common workflows, and provides an in-depth look at several specific use cases, as well.
Introduction
The Odoo Mexican localization modules allow for the signing of electronic invoices, according to the specifications of the SAT for version 4.0 of the CFDI, a legal requirement, as of January 1, 2022. These modules also add relevant accounting reports (such as: the DIOT, enables foreign trade, and the creation of delivery guides).
Note
In order to electronically sign any documents in Odoo, ensure the Sign application is installed.
See also
Documentation on e-invoicing’s legality and compliance in Mexico
Configuration
Requirements
It is necessary to meet the following requirements before configuring the Mexican localization modules in Odoo:
- Be registered in the SAT, with a valid RFC.
- Have a Certificate of Digital Seal (CSD).
- Choose a PAC (Proveedor Autorizado de Certificación / Authorized Certification Provider). Currently, Odoo works with the following PACs: Solución Factible, Quadrum (formerly Finkok) and SW Sapien - Smarter Web.
- Have knowledge and experience with billing, sales, and accounting in Odoo. This documentation only contains the necessary information needed to use Odoo.
Installing modules
Install the following modules to get all the features of the Mexican localization. The Accounting and Contacts modules are required to be installed for this configuration:
Name | Technical name | Description |
|---|---|---|
Mexico - Accounting | l10n_mx | The default fiscal localization package, adds accounting characteristics for the Mexican localization, such as: the most common taxes and the chart of accounts – based on the SAT account grouping code. |
EDI for Mexico | l10n_mx_edi | Includes all the technical and functional requirements to generate and validate Electronics Documents — based on the technical documentation published by the SAT. This allows you to send invoices (with or without addedums) and payment complements to the government. |
EDI v4.0 for Mexico | l10n_mx_edi_40 | Necessary to create XML documents with the correct specifications of the CFDI 4.0. |
Odoo Mexican Localization Reports | l10n_mx_reports | Adapts reports for Mexico’s Electronic Accounting: Chart of Accounts, Trial Balance, and DIOT. |
Mexico - Localization Reports for Closing | l10n_mx_reports_closing | Necessary to create the Closing Entry (Also known as the month 13th move). |
Odoo Mexican XML Polizas Export | l10n_mx_xml_polizas | Allows the export of XML files of Journal Entries for a compulsory audit. |
Odoo Mexican XML Polizas Export Edi bridge | l10n_mx_xml_polizas_edi | Complements the module l10n_mx_xml_polizas. |
Note
When installing a database from scratch and selecting Mexico as the country, Odoo automatically installs the following modules: Mexico - Accounting, EDI for Mexico, and EDI v4.0 for Mexico.
The following modules are optional. It’s recommended to install them only if meeting a specific requirement. Make sure that they are needed for the business.
Name | Technical name | Description |
|---|---|---|
EDI for Mexico (Advanced Features) | l10n_mx_edi_extended | Adds the external trade complement to invoices: A legal requirement for selling products to foreign countries. |
EDI v4.0 for Mexico (COMEX) | l10n_mx_edi_extended_40 | Adapts the module l10n_mx_edi_extended for CFDI 4.0. |
Mexico - Electronic Delivery Guide | l10n_mx_edi_stock | Lets you create a Carta Porte: A bill of lading that proves to the government you are sending goods between A & B with a signed electronic document. |
Electronic Delivery Guide for Mexico CFDI 4.0 | l10n_mx_edi_stock_40 | Adapts the module l10n_mx_edi_stock for CFDI 4.0 |
Odoo Mexico Localization for Stock/Landing | l10n_mx_edi_landing | Allows managing customs numbers related to landed costs in electronic documents. |
Configure your company
After installing the correct modules, the next step is to verify that your company is configured with the correct data. To do so, go to Settings ‣ General Settings ‣ Companies, and select Update Info under your company name.
Enter the full Address in the resulting form, including: ZIP code, State, Country, and RFC (VAT number).
According to the requirements of the CFDI 4.0, the name of the main company contact must coincide with your business name registered in the SAT, without the legal entity abbreviation.
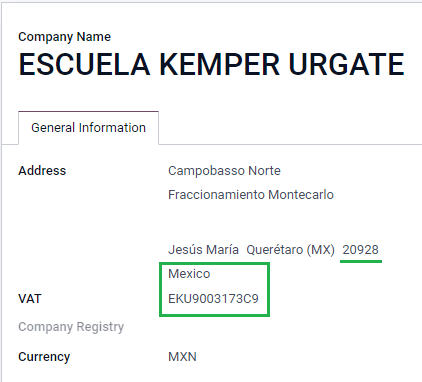
Important
From a legal point of view, a Mexican company must use the local currency (MXN). Therefore, Odoo does not provide features to manage an alternative configuration. If you want to manage another currency, let MXN be the default currency and use a pricelist, instead.
Next, go to Settings ‣ Accounting ‣ Electronic Invoicing (MX) ‣ Fiscal Regime, then select the regime that applies to your company from the drop-down list, and click Save.
Tip
If you want to test the Mexican localization, the company can be configured with a real address within Mexico (including all fields), and add EKU9003173C9 as the VAT and ESCUELA KEMPER URGATE as the Company Name. For the Fiscal Regime, use General de Ley Personas Morales.
Contacts
To create a contact that can be invoiced, go to Contacts ‣ Create. Then, enter the contact name, full Address including: ZIP code, State, Country, and RFC (VAT number).
Important
As with your own company, all of your contacts needs to have their correct business name registered in the SAT. This also applies to the Fiscal Regime, which needs to be added in the MX EDI tab.
Taxes
Some additional configurations for factor type and tax objects need to be added to the sales taxes in order to properly sign invoices.
Factor type
The Factor Type field is pre-loaded in the default taxes. If new taxes are created, you need to make sure to configure this field. To do so, go to Accounting ‣ Configuration ‣ Taxes, then enable the Factor Type field in the Advanced Options tab for all records, with the Tax Type set as Sales.
Tip
Mexico manages two different kinds of 0% VAT to accommodate two scenarios:
- 0% VAT set the Factor Type as Tasa
- VAT Exempt set the Factor Type as Exento
Tax object
One requirement of the CFDI 4.0 is that the resulting XML file needs (or does not need) to break down the taxes of the operation. There are three different possible values that are added in the XML file:
- 01: Not subject to tax - this value is added automatically if your invoice line doesn’t contain any taxes.
- 02: Subject to tax - this is the default configuration of any invoice line that contains taxes.
- 03: Subject to tax and not forced to break down - this value can be triggered on-demand for certain customers to replace the value 02.
To use the 03 value, navigate to Contacts ‣ your customer’s invoice ‣ MX EDI tab, and activate the No Tax Breakdown checkbox.
Important
The No Tax Breakdown value applies only to specific fiscal regimes and/or taxes. Consult your accountant first to see if it is needed for your business before making any modification.
Other tax configurations
When registering a payment, Odoo will carry out the movement of taxes from the Cash Basis Transition Account to the account set in the Definition tab. For such movement, a tax base account will be used: (Base Imponible de Impuestos en Base a Flujo de Efectivo) in the journal entry when reclassifying taxes. Do not delete this account.
If you create a new tax in Accounting ‣ Configuration ‣ Taxes, you need to add the correct Tax Grids for it (IVA, ISR or IEPS). Odoo only supports these three groups of taxes.
Products
To configure products, go to Accounting ‣ Customers ‣ Products, then select a product to configure, or Create a new one. In the Accounting tab, and in the UNSPSC Product Category field, select the category that represents the product. The process can be done manually, or through a bulk import.
Note
All products need to have an SAT code associated with them in order to prevent validation errors.
Electronic invoicing
PAC credentials
After you have processed your Private Key (CSD) with the SAT, you must register directly with the PAC of your choice before you start creating invoices from Odoo.
Once you’ve created your account with any of these providers, go to Settings ‣ Accounting ‣ Electronic Invoicing (MX). Under the MX PAC section, enter the name of your PAC with your credentials (PAC username and PAC password).
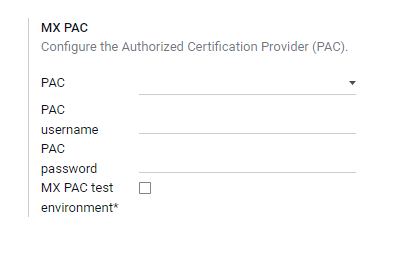
Tip
If you do not have credentials, but want to test the electronic invoicing, you can activate the MX PAC test environment checkbox, and select Solucion Factible as the PAC. You do not need to add a username or password for a test environment.
.cer and .key certificates
The digital certificates of the company must be uploaded within the MX Certificates section. To do so, navigate to Settings ‣ Accounting ‣ Electronic Invoicing (MX). Under the MX Certificates section, select Add a line, and a window will open. Click Create, and from there, upload your digital Certificate (.cer file), your Certificate Key (.key file), and your Certificate Password. To finish, click on Save & Close.
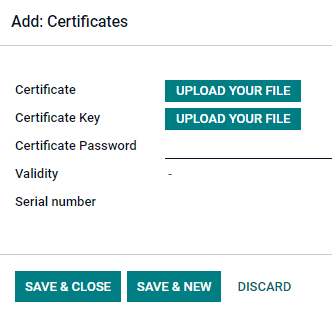
Tip
If you still do not have one of the contracted PACs and you want to test electronic invoicing, you can use the following SAT test certificates:
- Certificate
- Certificate Key
- Password: 12345678a
Workflows
Electronic invoicing
The invoicing process in Odoo is based on Annex 20 version 4.0 of electronic invoicing of the SAT.
Customer invoices
To start invoicing from Odoo, a customer invoice must be created using the standard invoicing flow.
While the document is in draft mode, changes can be made to it (the correct Payment Way or Usage that the customer might require can be added, for example.)
After you Confirm the customer invoice, a blue message appears stating: The invoice will be processed asynchronously by the following E-invoicing service: CFDI (4.0).
Pressing the Process Now button sends the document to the government so it can be signed. After receiving the signed document back from the government, the Fiscal Folio field appears on the document, and the XML file is attached in the chatter.
Tip
If you click Retry in the SAT status field on the invoice, you can confirm if the XML file is valid in the SAT.
If you are in a testing environment, you will always receive the message Not Found.
To send the signed invoice to your client by mail, you can send both the XML and PDF files together, directly from Odoo, by clicking the Send & Print button. You can also download the PDF file to your computer, by clicking the Print button, and selecting the desired print option.
Credit notes
While an invoice is a document type “I” (Ingreso), a credit note is a document type “E” (Egreso).
The only addition to the standard flow for credit notes is that, as a requirement of the SAT, there has to be a relation between a credit note and an invoice through the fiscal folio.
Because of this requirement, the field CFDI Origin adds this relation with a 01|, followed by the fiscal folio of the original invoice.

Tip
For the CFDI Origin field to be automatically added, use the Add Credit Note button from the invoice, instead of creating it manually.
Payment complements
Payment policy
One addition of the Mexican localization is the Payment Policy field. According to the SAT documentation, there are two types of payments:
- PUE (Pago en una Sola Exhibición/Payment in a Single Exhibition)
- PPD (Pago en Parcialidades o Diferido/Payment in Installements or Deferred)
See also
The difference lies in the Due Date or Payment Terms of the invoice.
To configure PUE invoices, navigate to Accounting ‣ Customers ‣ Invoices, and either select an invoice Due Date within the same month, or choose a payment term that does not imply changing the due month (immediate payment, 15 days, 21 days, all falling within the current month).
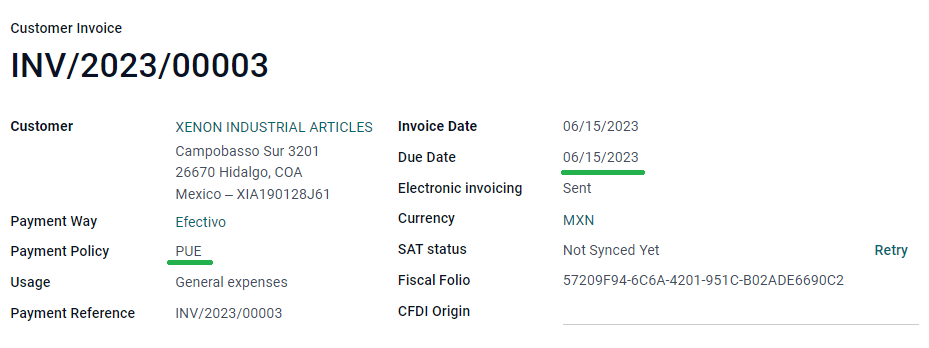
Tip
Some Payment Terms are already installed by default, and can be managed from Accounting ‣ Configuration ‣ Payment Terms.
To configure PPD invoices, navigate to Accounting ‣ Customers ‣ Invoices, and select an invoice with a Due Date after the first day of the following month. This also applies if your Payment Term is due in the following month.
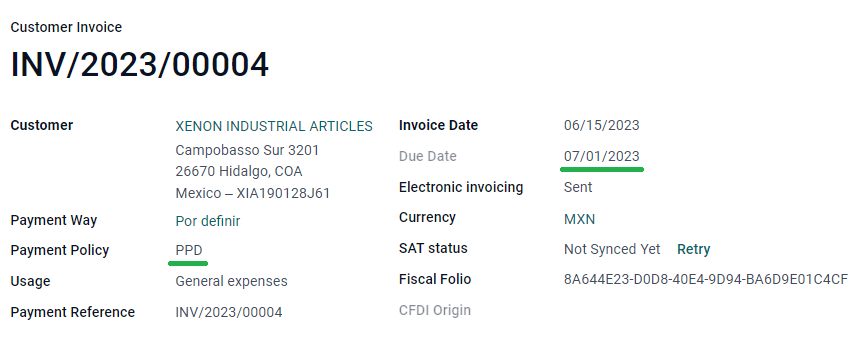
Important
Because the PPD policy implies that an invoice is not going to get paid at the moment, the correct Payment Way for the PPD invoices is 99 - Por Definir (To define).
Payment flow
In both cases, the payment process in Odoo is the same, the main difference being payments related to PPD invoices trigger the creation of a document type “P” (Pago).
If a payment is related to a PUE invoice, it can be registered with the wizard, and be associated with the corresponding invoice. To do so, navigate to Accounting ‣ Customers ‣ Invoices, and select an invoice. Then, click the Register Payment button. The invoice status changes to In Payment, since the payment is effectively validated when it is bank reconciled.
See also
While this process is the same for PPD invoices, the addition of the creating an electronic document means some additional requirements are needed to correctly send the document to the SAT.
From an invoice, you need to confirm the specific Payment Way where you received the payment. Because of this, the Payment Way field cannot be set as 99 - Por Definir (To Define).
If you are going to add a bank account number in the Accounting tab of a customer’s contact card, it must have a valid account number.
Note
The exact configurations are in the Anexo 20 of the SAT. Usually, the Bank Account needs to be 10 or 18 digits for transfers, 16 for credit or debit cards.
If a payment is related to a signed invoice with the Payment Policy PPD, Odoo generates the corresponding payment complement automatically, once you click Process Now.
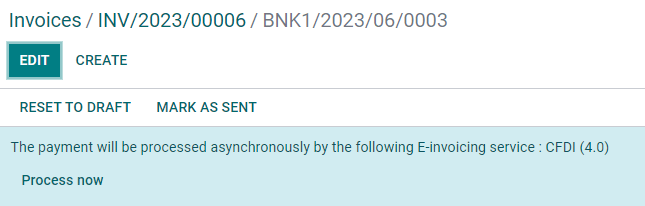
Warning
A payment in MXN cannot be used to pay multiple invoices in USD. Instead, the payment should be separated into multiple payments, using the Register Payment button on the corresponding invoices.
Invoice cancellations
It is possible to cancel the EDI documents sent to the SAT. According to the Reforma Fiscal 2022, since January 1st, 2022, there are two requirements for this:
- With all cancellation requests, you must specify a cancellation reason.
- After 24 hours from the invoice creation, the client must be asked to approve the cancellation. If there is no response within 72 hours, the cancellation is processed automatically.
Invoice cancellations can be made for one of the following reasons:
- 01 - Invoice issued with errors (with related document)
- 02 - Invoice issued with errors (no replacement)
- 03 - The operation was not carried out
- 04 - Nominative operation related to the global invoice
To initiate a cancellation, go to Accounting ‣ Customers ‣ Invoices, select the posted invoice to cancel, and click Request Cancel. Then, refer to the Cancellation reason 01 - Invoice issued with errors (with related document) or Cancellation reasons 02, 03, and 04 sections, depending on the cancellation reason.
Tip
Alternatively, request a cancellation from the CFDI tab by clicking Cancel on the line item.
Cancellation reason 01 - Invoice issued with errors (with related document)
- In the Request CFDI Cancellation pop-up window, select 01 - Invoice issued with errors (with related document) from the Reason field and click Create Replacement Invoice to create a new draft invoice. This new draft invoice replaces the previous invoice, along with the related CFDI.
- Confirm the draft and Send & Print the invoice.
- Return to the initial invoice (i.e., the invoice from which you first requested the cancellation). Notice the Substituted By field appears with a reference to the new replacement invoice.
- Click Request Cancel. In the Request CFDI Cancellation pop-up window, the 01 - Invoice issued with errors (with related document) option is automatically selected in the Reason field.
- Click Confirm.
The invoice cancellation is then generated with a reason line item in the CFDI tab.

Note
- If the client rejects the cancellation, the invoice cancellation line item is removed from the CFDI tab.
- When using the 01 - Invoice issued with errors (with related document) cancellation reason, the 04| prefix may appear in the Fiscal Folio field. This is an internal prefix used by Odoo to complete the cancellation and does not mean that the cancellation reason was 04 - Nominative operation related to the global invoice.
Cancellation reasons 02, 03, and 04
In the Request CFDI Cancellation pop-up window, select the desired cancellation Reason and Confirm the cancellation.
Upon doing so, the invoice cancellation is generated with a reason line item in the CFDI tab.
Note
If the client rejects the cancellation, the invoice cancellation line item is removed from the CFDI tab.
Payment cancellations
It is also possible to cancel Payment Complements. For this, go to the payment, via Accounting ‣ Customers ‣ Payments, and select Request EDI Cancellation. As with invoices, a blue button will appear. Click Process now, and the document will be sent to the SAT. After a few seconds, you can click Retry to confirm the current SAT status.
Finally, the payment status is moved to Cancelled.
Note
Just like invoices, when you create a new Payment Complement, you can add the relation of the original document, by adding a 04| plus the fiscal folio in the CFDI Origin field.
Invoicing special use cases
CFDI to public
If the customer you are selling goods or services to does not require an invoice, a CFDI to Public has to be created.
If you use the Customer name PUBLICO EN GENERAL, an error will be triggered. This is a main change in the CFDI 4.0 that requires invoices with that specific name to need additional fields, which Odoo does not currently support. So, for a CFDI to Public to be created, you need to add any name to your customer that is not PUBLICO EN GENERAL. (For example: CLIENTE FINAL).
In addition to this, it is required that the ZIP code of your company is added, the generic RFC is set as XAXX010101000, and the Fiscal Regime of your customer must be set as: Sin obligaciones fiscales.
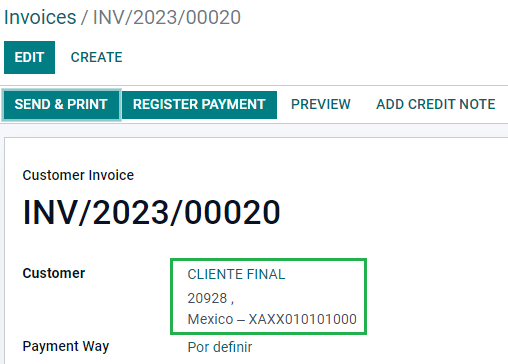
Multicurrency
The main currency in Mexico is MXN. While this is mandatory for all Mexican companies, it is possible to send and receive invoices (and payments) in different currencies. To enable the use of multicurrency, navigate to the Accounting ‣ Settings ‣ Currencies, and set Mexican Bank as the Service in the Automatic Currency Rates section. Then, set the Interval field to the frequency you wish to update the exchange rates.
This way, the XML file of the document will have the correct exchange rate, and the total amount, in both the foreign currency and in MXN.
It is highly recommended to use a bank account for each currency.
Note
The only currencies that automatically update their exchange rate daily are: USD, EUR, GBP, and JPY.
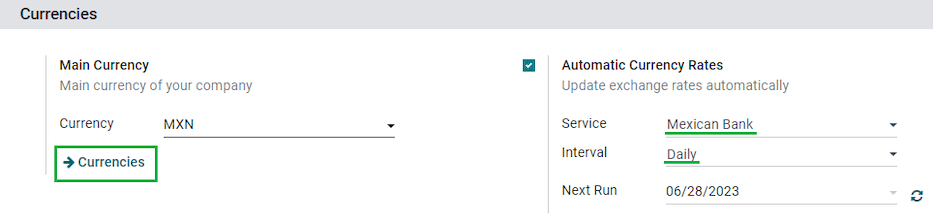
Down payments
There can be cases where you receive a payment in advance from a customer that needs to be applied to an invoice later. In order to do this in Odoo, it is required to properly link invoices to each other with the CFDI Origin field. To do so, it is necessary to have the Sales app installed.
See also
The official documentation for registration of down payments in Mexico.
First, navigate to the Sales app to create a product Anticipo and configure it. The Product Type must be Service, and use the UNSPSC Category must be: 84111506 Servicios de facturación.
Then, go to Sales ‣ Settings ‣ Invoicing ‣ Down Payments, and add the Anticipo product as the default.
Create a sales order with the total amount, and create a down payment (either using a percentage or fixed amount). Then, sign the document, and Register the Payment.
When the time comes for the customer to get the final invoice, create it again from the same sales order. In the Create Invoices wizard, select Regular Invoice, and uncheck Deduct down payments.
Then, copy the Fiscal Folio from the first invoice, and paste it into the CDFI Origin of the second invoice, adding the prefix 07| before the value. Then, sign the document.
After this, create a credit note for the first invoice. Copy the Fiscal Folio from the second invoice, and paste it in the CFDI Origin of the credit note, adding the prefix 07|. Then, sign the document.
With this, all electronic documents are linked to each other. The final step is to fully pay the new invoice. At the bottom of the new invoice, you can find the credit note in the Outstanding credits - add it as payment. Finally, register the remaining amount with the Register Payment wizard.
External trade
The external trade is a complement to a regular invoice that adds certain values in both the XML and PDF, to invoices with a foreign customer according to SAT regulations, such as:
- The specific address of the receiver and the sender
- The addition of a Tariff Fraction that identifies the type of product
- The correct Incoterm (International Commercial Terms), among others (certificate of origin and special units of measure).
This allows the correct identification of exporters and importers, in addition to expanding the description of the merchandise sold.
Since January 1, 2018, external trade is a requirement for taxpayers, who carry export operations of type A1. While the current CFDI is 4.0, the external trade is currently on version 1.1
In order to use this feature, the modules l10n_mx_edi_extended and l10n_mx_edi_extended_40 have to be installed.
Important
Before installing, make sure your business needs to use this feature. Consult your accountant first, if needed, before installing any modules.
Configuration
Contacts
To configure your company contact for external trade, navigate to Accounting ‣ Customers ‣ Customers, and select your Company. While the CFDI 4.0 requirements ask you to add a valid ZIP code in your contact, the external trade complement adds the requirement that your City and the State must also be valid. All three fields must coincide with the Official SAT Catalog, or you will receive an error.
Warning
Add the City and State in the company’s contact, not in the company itself. You can find your company’s contact in Accounting ‣ Customers ‣ Customers.
The fields Locality and Colony Code are optional and can be added in the company directly in Settings ‣ General Settings ‣ Companies. These two fields have to coincide with the data in the SAT.
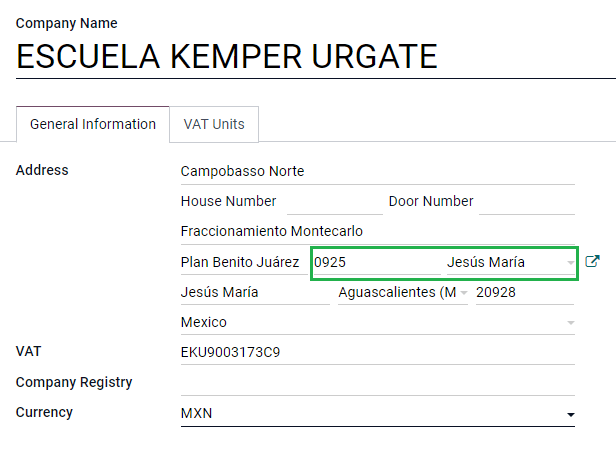
To configure the contact data for a foreign receiving client, navigate to Accounting ‣ Customers ‣ Customers, and select the foreign client’s contact. The contact must have the following fields completed to avoid errors:
- The entire company Address, including a valid ZIP code and the foreign Country.
- The format of the foreign VAT (tax identification number, for example: Colombia 123456789-1)
- In the MX EDI tab, you need to address if the customer receives goods for a period of time temporarily (Temporary) or permanently (Definitive).
Important
If the new contact was created by duplicating another existing contact from Mexico, make sure to delete any carried over information from the Fiscal Regime field. In addition, do not enable the No Tax Breakdown option. Selecting this option hides mandatory fields that are required for external trade contact configuration.
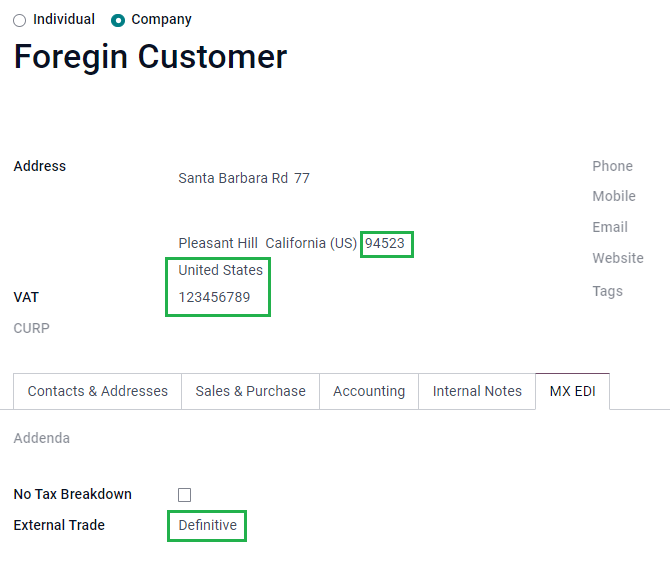
Note
In the resulting XML and PDF files, the VAT is automatically replaced by the generic VAT for abroad transactions: XEXX010101000.
Products
All products involved with external trade have four fields that are required, two of them exclusive to external trade.
- The Internal Reference of the product is in the General Information tab.
- The Weight of the product must be more than 0.
- The correct Tariff Fraction of the product in the Accounting tab.
- The UMT Aduana corresponds to the Tariff Fraction.

Tip
- If the UoM code of the Tariff Fraction is 01, the correct UMT Aduana is kg.
- If the UoM code of the Tariff Fraction is 06, the correct UMT Aduana is Units.
Invoicing flow
Before creating an invoice, it is important to take into account that external trade invoices require to convert the amounts of your product into USD. Therefore, multicurrency must be enabled and USD must be activated in the Currencies section. The correct Service to run is Mexican Bank.
Then, with the correct exchange rate set up in Accounting ‣ Settings ‣ Currency, the only fields left are Incoterm and the optional Certificate Source in the Other Info tab.
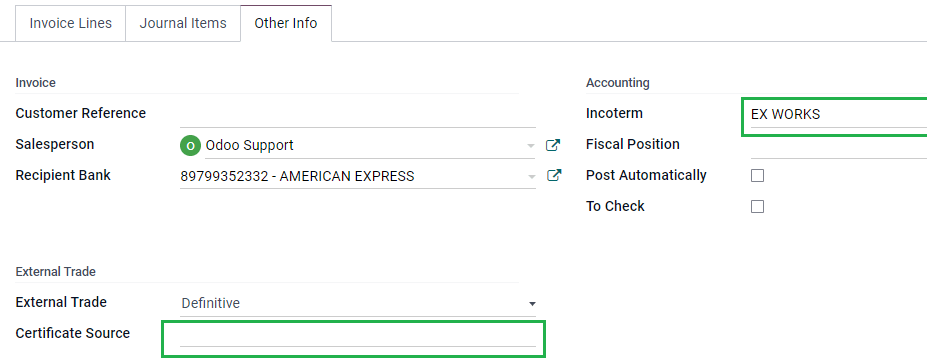
Finally, sign the invoice with the same process as a regular invoice, and click the Process Now button.
Delivery guide
A Carta Porte is a bill of lading: a document that states the type, quantity, and destination of goods being carried.
On December 1st, 2021, version 2.0 of this CFDI was implemented for all transportation providers, intermediaries, and owners of goods. Odoo is able to generate a document type “T” (Traslado), which, unlike other documents, is created in a delivery order instead of an invoice or payment.
Odoo can create XML and PDF files with (or without) ground transport, and can process materials that are treated as Dangerous Hazards.
In order to use this feature, the modules l10n_mx_edi_extended, l10n_mx_edi_extended_40, l10n_mx_edi_stock and l10n_mx_edi_stock_40 have to be installed.
In addition to this, it is necessary to have the Inventory and Sales apps installed, as well.
Important
Odoo does not support Carta Porte type document type “I” (Ingreso), air, or marine transport. Consult your accountant first if this feature is needed before doing any modifications.
Configuration
Odoo manages two different types of CFDI:
- No Federal Highways: Is used when the Distance to Destination is less than 30 KM.
- Federal Transport: Is used when the Distance to Destination exceeds 30 KM.
Other than the standard requirements of regular invoicing (The RFC of the customer, the UNSPSC code, etc.), if you are using No Federal Highways, no external configuration is needed.
For Federal Transport, several configurations have to be added to contacts, vehicle setups, and products. Those configurations are added to the XML and PDF files.
Contacts and vehicles
Like the external trade feature, the Address in both the company and the final customer must be complete. The ZIP code, City, and State must coincide with the Official SAT Catalog for Carta Porte <sat-catalog_>_.
Tip
The field, Locality, is optional for both addresses.
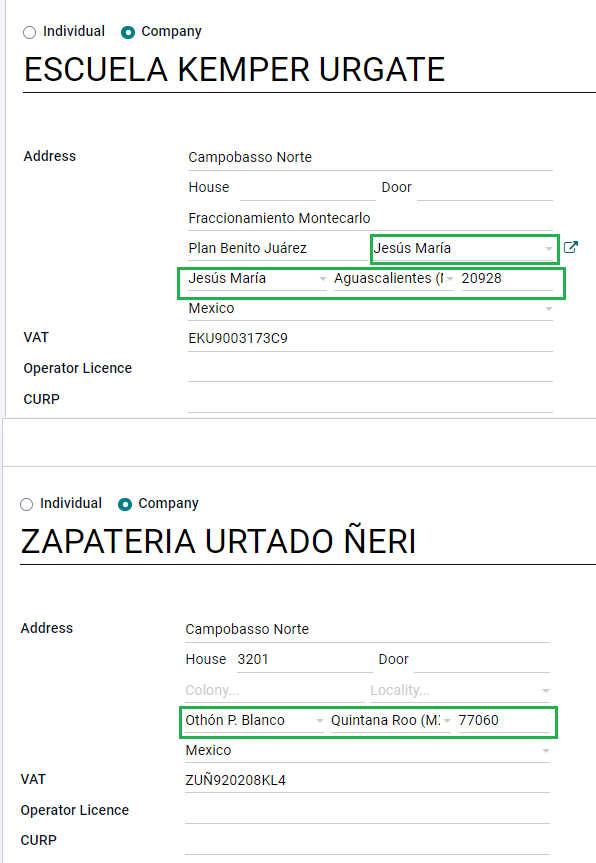
Important
The origin address used for the delivery guide is set in Inventory ‣ Configuration ‣ Warehouses Management ‣ Warehouses. While this is set as the company address by default, you can change it according to your correct warehouse address.
Another addition to this feature is the Vehicle Setups menu found in Inventory ‣ Settings ‣ Mexico. This menu lets you add all the information related to the vehicle used for the delivery order.
All fields are mandatory to create a correct delivery guide.
Tip
The fields, Vehicle Plate Number and Number Plate, must contain between 5 to 7 characters.
In the Intermediaries section, you must add the operator of the vehicle. The only mandatory fields for this contact are the VAT and Operator Licence.
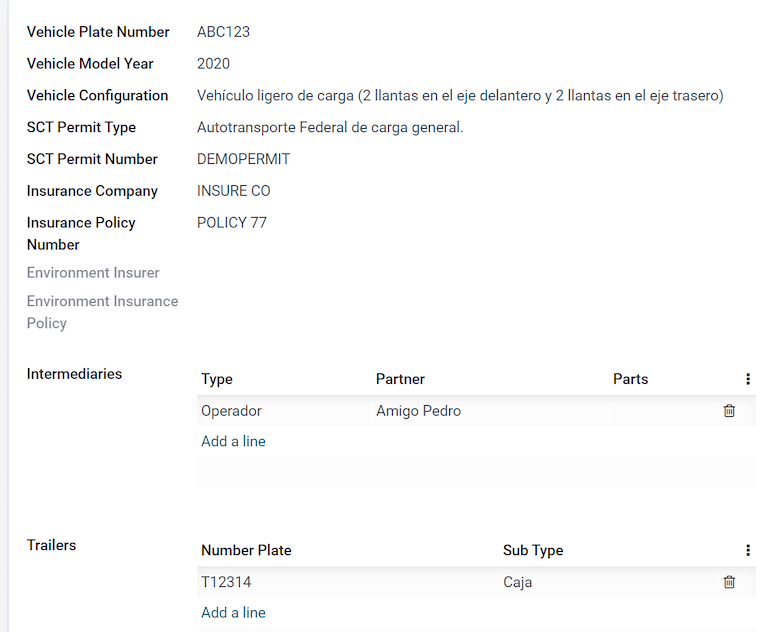
Products
Similar to regular invoicing, all products must have a UNSPSC category. In addition to this, there are two extra configurations for products involved in delivery guides:
- The Product Type must be set as Storable Product for stock movements to be created.
- In the Inventory tab, the field Weight should have more than 0.
Warning
Creating a delivery guide of a product with the value 0 will trigger an error. As the Weight has been already stored in the delivery order, it is needed to return the products, and create the delivery order (and delivery guide) again with the correct amounts.
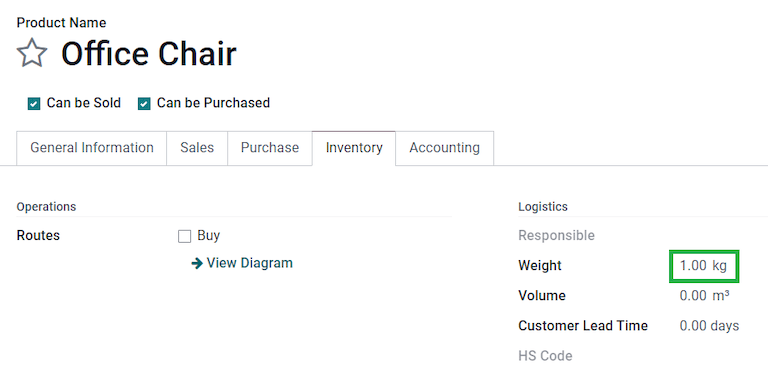
Sales and inventory flow
To create a delivery guide, first, you need to create and confirm a sales order from Sales ‣ Sales Order. This generates a Delivery smart button. Click it, and Validate the transfer.
After the status is set to Done, you can edit the transfer, and select the Transport Type (either No Federal Highways or Federal Transport).
If your delivery guide has the type No Federal Highways, you can save the transfer, and then click Generate Delivery Guide. The resulting XML can be found in the chatter.
Note
Other than the UNSPSC in all products, delivery guides that use No Federal Highways do not require any special configuration to be sent to the government.
If your delivery guide has the type, Federal Transport, the tab MX EDI appears. There, enter a value in Distance to Destination (KM) bigger than 0, and select the Vehicle Setup used for this delivery.
![]()
Dangerous hazards
Certain values in the UNSPSC Category are considered in the official SAT catalog as dangerous hazards. These categories need additional considerations when creating a delivery guide with Federal Transport.
First, select your product from Inventory ‣ Products ‣ Products. Then, in the Accounting tab, the fields Hazardous Material Designation Code (MX) and Hazardous Packaging (MX) must be filled with the correct code from the SAT catalog.

In Inventory ‣ Settings ‣ Mexico ‣ Vehicle Setup, the data from the Environment Insurer and Environment Insurance Policy has to be filed, as well. After this, continue with the regular process to create a delivery guide.
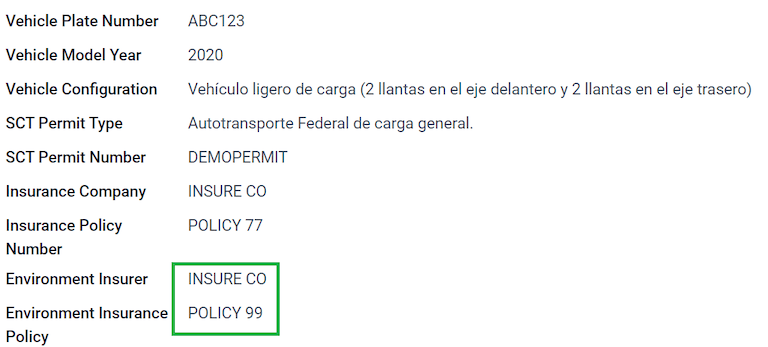
Customs numbers
A customs declaration (Pedimento Aduanero) is a fiscal document that certifies that all contributions to the fiscal entity (the SAT) has been paid for, including the import/export of goods.
According to the Annex 20 of CFDI 4.0, in documents where the invoiced goods come from a first-hand import operation, the field, Customs Number, needs to be added to all lines of products involved with the operation.
To do so, the module l10n_mx_edi_landing must be installed, in addition to the Inventory, Purchase and Sales apps.
Important
Do not confuse this feature with external trade. The customs numbers are directly related to importing goods, while the external trade complement is related to exporting. Consult your accountant first if this feature is needed before doing any modifications.
Configuration
In order to track the correct customs number for a specific invoice, Odoo uses landed costs. Go to Inventory ‣ Configuration ‣ Settings ‣ Valuation. Make sure that Landed Costs is activated.
Begin by creating a service-type product called, Pedimento. In the Purchase tab, activate Is a Landed Cost, and select a Default Split Method.
Then, configure the storable products that hold the customs numbers. To do so, create the storable products, and make sure the Product Category has the following configuration.
- Costing Method: Either FIFO or AVCO
- Inventory Valuation: Automated
- Stock Valuation Account: 115.01.01 Inventario
- Stock Journal: Inventory Valuation
- Stock Input Account: 115.05.01 Mercancías en tránsito
- Stock Output Account: 115.05.01 Mercancías en tránsito
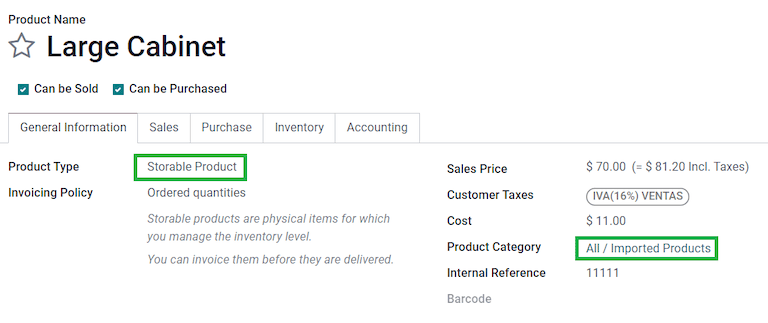
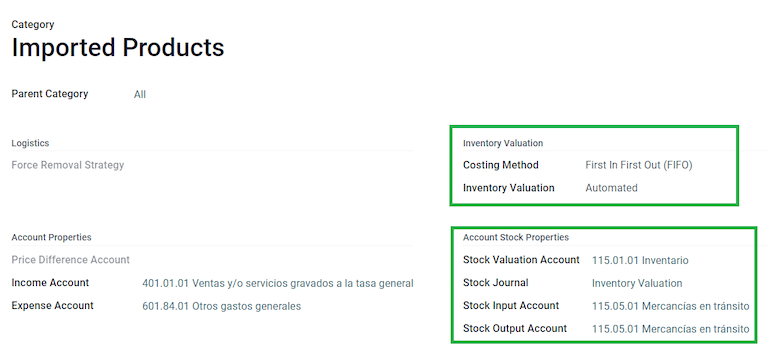
Purchase and sales flow
After you configure your product, follow the standard purchase flow.
Create a purchase order from Purchase ‣ Orders ‣ Purchase Order. Then, confirm the order to display a Receipt smart button. Click on the Receipt smart button to Validate the receipt.
Go to Inventory ‣ Operations ‣ Landed Costs, and create a new record. Add the transfer that you just created, and both: the product Pedimento and Customs number.
Optionally, you can add a cost amount. After this, validate the landed cost. Once Posted, all products related to that receipt have the customs number assigned.
Warning
You can only add the Pedimentos number once, so be careful when associating the correct number with the transfer(s).
Now, create a sales order, and confirm it. This should trigger a Delivery smart button. Validate it.
Finally, create an invoice from the sales order, and confirm it. The invoice line related to your product has a customs number in it. This number should match the customs number added in the Landed Costs record you created earlier.
Electronic accounting
For Mexico, Electronic Accounting refers to the obligation to keep accounting records and entries through electronic means, and to enter accounting information on a monthly basis, through the SAT website.
It consists of three main XML files:
- The updated list of the chart of accounts that you are currently using.
- A monthly trial balance, plus a closing entry report, also known as: Trial Balance Month 13.
- Either optional, or for a compulsory audit, an export of the journal entries in your general ledger.
The resulting XML files follow the requirements of the Anexo Técnico de Contabilidad Electrónica 1.3.
In addition to this, you can generate the DIOT: A report of vendor’s journal entries that involve IVA taxes that can be exported in a .txt file.
In order to use these reports, the modules l10n_mx_reports, l10n_mx_reports_closing, l10n_mx_xml_polizas and l10n_mx_xml_polizas_edi have to be installed, as well as the Accounting.
Important
The specific characteristics and obligations of the reports that you send might change according to your fiscal regime. Always contact your accountant before sending any documents to the government.
Chart of accounts
The chart of accounts in México follows a specific pattern based on SAT’s’ Código agrupador de cuentas.
You can create any account, as long as it respects SAT’s encoding group: the pattern is NNN.YY.ZZ or NNN.YY.ZZZ.
Example
Some examples are 102.01.99 or 401.01.001.
When a new account is created in Accounting ‣ Configuration ‣ Chart of Accounts, with the SAT encoding group pattern, the correct grouping code appears in Tags, and your account appears in the COA report.
Once you create all your accounts, make sure the correct Tags are added.
Note
You cannot use any pattern that ends a section with a 0 (such as 100.01.01, 301.00.003 or 604.77.00). This triggers errors in the report.
Once everything is set up, go to Accounting ‣ Reporting ‣ Trial Balance, click the (down arrow) next to the PDF button, and select COA SAT (XML). This generates an XML file with your accounts, which you can upload directly to the SAT website.
Trial balance
The trial balance reports the initial balance, credit, and total balance of your accounts, provided that you added their correct encoding group.
To generate this report in an XML format, go to Accounting ‣ Reporting ‣ Trial Balance. Select the month you want to download in the calendar, then click the (down arrow) next to the PDF button, and select SAT (XML).
Note
Odoo does not generate the Balanza de Comprobación Complementaria.
Month 13 trial balance
The Month 13 report is a closing balance sheet that shows any adjustments or movements made in the accounting to close the year.
To generate it, proceed as follows:
- Go to Accounting ‣ Accounting ‣ Journal Entries and create a new entry for all the amounts to be changed, balancing the debit and/or credit of each one.
- In the Other Info tab, enable the Month 13 Closing option.
- Go to Accounting ‣ Reporting ‣ Trial Balance, click the calendar, and select Month 13.
- Click the (down arrow) next to the PDF button, and select SAT (XML).
General ledger
By law, all transactions in Mexico must be recorded digitally. Since Odoo automatically creates all the underlying journal entries of your invoicing and payments, you can export your journal entries to comply with SAT’s audits and/or tax refunds.
Tip
You can filter by period, or by journal, according to your current needs.
To create the XML, go to Accounting ‣ Reporting ‣ General Ledger, click the (down arrow) next to the PDF button, and select XML (Polizas). In the XML Polizas Export Options window, choose between four different Export types:
- Tax audit
- Audit certification
- Return of goods
- Compensation
For Tax audit or Audit certification, you need to write the Order Number provided by the SAT. For Return of goods, or Compensation, you need to write your Process Number, also provided by the SAT.
Note
If you want to see this report without sending it, use ABC6987654/99 for Order Number and AB123451234512 for Process Number.
DIOT report
The DIOT (Declaración Informativa de Operaciones con Terceros / Informative Declaration of Operations with Third Parties) is an additional obligation with the SAT, where the current status of creditable and non-creditable payments, withholdings, and refunds of VAT from your vendor bills, are provided to the SAT.
Unlike other reports, the DIOT is uploaded to a software provided by the SAT that contains the A-29 form. In Odoo, you can download the records of your transactions as a .txt file that can be uploaded to the form, avoiding direct capture of this data.
The transactions file contains the total amount of your payments registered in vendor bills, broken down into the corresponding types of IVA. The VAT and Country is mandatory for all vendors.
To generate the DIOT report, go to Accounting ‣ Reporting ‣ Tax Reports. Select the month you want to download in the calendar, then click the (down arrow) next to the PDF button to select Report: DIOT (MX) and download the .txt file.
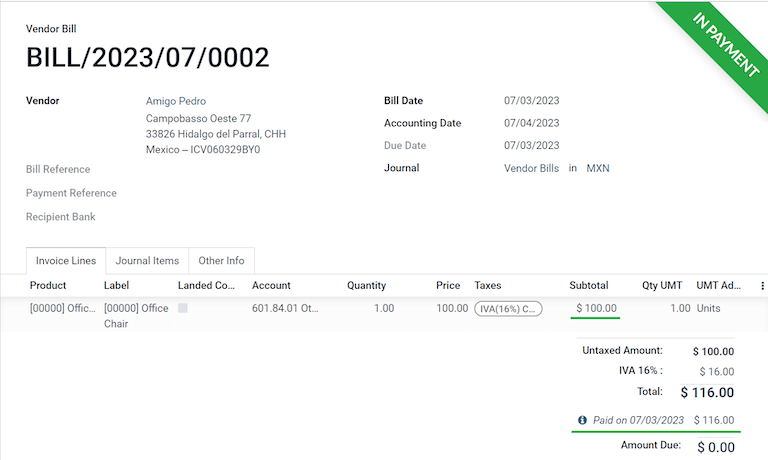
Important
You need to fill the L10N Mx Type of Operation field in the Accounting tab of each one of your vendors to prevent validation errors. Make sure that your foreign customers have their country set up for L10N Mx Nationality to appear automatically.
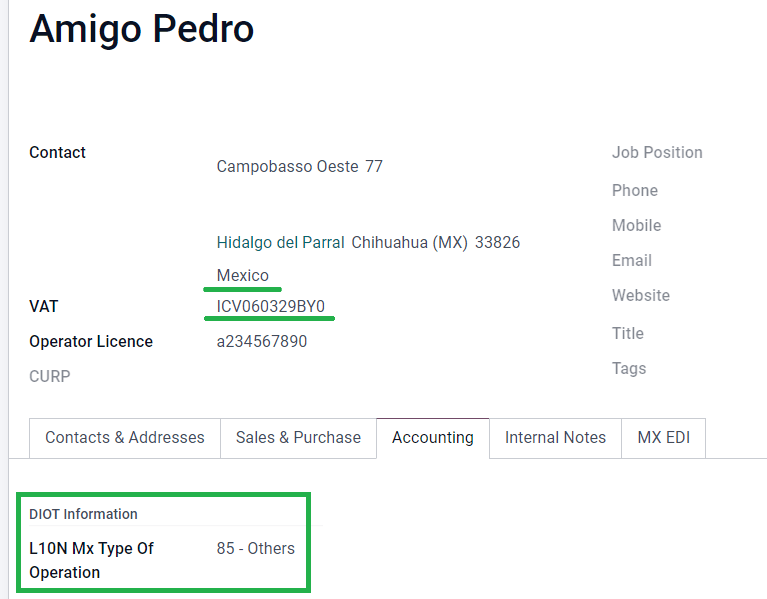
On this page
Get Help
Contact Support Ask the Odoo Community
![]()
- User Docs
- Database management
- Developer
- Contributing
EN
Odoo 18
Invoice sequence
When confirming an invoice, Odoo generates a unique invoice reference number. By default, Odoo uses the following sequence format INV/year/incrementing-number (e.g., INV/2025/00001), which restarts from 00001 each year.
However, it is possible to change the sequence format and its periodicity, and to mass-resequence invoices.
Note
Changes made to reference numbers are logged in the chatter.
Changing the default sequence
To customize the default sequence, open the last confirmed invoice, click Reset to Draft, and edit the invoice’s reference number.

Odoo then explains how the detected format will be applied to all future invoices. For example, if the current invoice’s month is added, the sequence’s periodicity will change to every month instead of every year.

Tip
The sequence format can be edited directly when creating the first invoice of a given sequence period.
Mass-resequencing invoices
It can be helpful to resequence multiple invoice numbers. For example, when importing invoices from another invoicing or accounting system and the reference originates from the previous software, continuity for the current year must be maintained without restarting from the beginning.
Note
This feature is only available to users with administrator or advisor access.
Follow these steps to resequence invoice numbers:
- Activate the developer mode.
- From the Accounting Dashboard, open the Customer Invoices journal.
- Select the invoices that need a new sequence.
- Click the Actions menu and select Resequence.
- In the Ordering field, choose to
- Keep current order: The order of the numbers remains the same.
- Reorder by accounting date: The number is reordered by accounting date.
- Set the First New Sequence.
- Preview Modifications and click Confirm.
The first invoice using the new sequence appears in red in the Customer Invoices list.

On this page
Get Help
Contact Support Ask the Odoo Community
![]()
- User Docs
- Database management
- Developer
- Contributing
EN
Odoo 18
Incoterms
Incoterms are standardized trade terms used in international transactions to define the rights and responsibilities of buyers and sellers. They establish the obligations related to the delivery of goods, the transfer of risks, and the distribution of costs between the parties involved. Incoterms specify important details, such as the point at which the risk and costs transfer from the seller to the buyer, the responsibility for transportation, insurance, customs clearance, and other relevant aspects of the transaction.
Note
By default, all 11 Incoterms are available in Odoo:
- EXW: Ex works
- FCA: Free carrier
- FAS: Free alongside ship
- FOB: Free on board
- CFR: Cost and freight
- CIF: Cost, insurance and freight
- CPT: Carriage paid to
- CIP: Carriage and insurance paid to
- DPU: Delivered at place unloaded
- DAP: Delivered at place
- DDP: Delivered duty paid
See also
Define an Incoterm
To define an Incoterm manually, create an invoice or bill, click the Other Info tab, and select the Incoterm.
Incoterm location
A location relevant to the chosen Incoterm can be added to the invoice or bill under Other Info in the Incoterm Location field.
Example
If the chosen Incoterm code is CIF (Cost, Insurance, Freight), the associated location might be the destination port where the goods will be delivered.
Default Incoterm configuration
You can set a default Incoterm rule to automatically populate the Incoterm field on all newly created invoices and bills. Under Accounting/Invoicing ‣ Configuration ‣ Settings, scroll down to the Customer Invoices section, and select an Incoterm in the Default Incoterm field.
On this page
Get Help
Contact Support Ask the Odoo Community
![]()
- User Docs
- Database management
- Developer
- Contributing
EN
Odoo 18
Vendor bills
In Odoo, we can register vendor bills manually or automatically, while the Aged Payable report provides an overview of all outstanding bills to help us pay the correct amounts on time.
See also
Bill creation
Manually
Create a vendor bill manually by going to Accounting ‣ Vendors ‣ Bills and clicking Create.
Automatically
Vendor bills can be automatically created by sending an email to an email alias associated with the purchase journal, or by uploading a PDF in Accounting ‣ Vendors ‣ Bills and then clicking Upload.
Bill completion
Whether the bill is created manually or automatically, make sure the following fields are appropriately completed:
- Vendor: Odoo automatically fills some information based on the vendor’s registered information, previous purchase orders, or bills.
- Bill Reference: add the sales order reference provided by the vendor and is used to do the matching when you receive the products.
- Auto-Complete: select a past bill/purchase order to automatically complete the document. The Vendor field should be completed prior to completing this field.
- Bill Date: is the issuance date of the document.
- Accounting Date: is the date on which the document is registered in your accounting.
- Payment Reference: when registering the payment, it is automatically indicated in the Memo field.
- Recipient Bank: to indicate to which account number the payment has to be made.
- Due Date or Terms to pay the bill.
- Journal: select in which journal the bill should be recorded and the Currency.

Note
- Bills can be digitized for automatic completion by clicking Send for Digitization.
- If you upload the bill, the PDF document is displayed on the right of the screen, allowing you to easily fill in the bill information.
Bill confirmation
Click Confirm when the document is completed. The status of your document changes to Posted and a journal entry is generated based on the configuration on the invoice.
Note
Once confirmed, it is no longer possible to update it. Click Reset to draft if changes are required.
Bill Payment
Upon payment of the vendor bill, click on Register Payment to open a new payment window.
Select the Journal, the Payment Method, the Amount you wish to pay (full or partial payment), and the Currency. In the case of a partial payment (when the Amount paid is less than the total remaining amount on the vendor bill), the Payment Difference field displays the outstanding balance. You have two options:
- Keep open: to keep the bill open and mark it with a Partial banner;
- Mark as fully paid: In this case, select an account in the Post Difference In field and change the Label if needed. A journal entry will be created to balance the account receivable with the selected account.

The Memo field is filled automatically if the Payment Reference has been set correctly in the vendor bill. If the field is empty, select the vendor invoice number as a reference.
Once confirmed, an In Payment banner appears on the bill until it is reconciled.
Aged payable report
To get an overview of your open vendor bills and their related due dates, you can use the Aged Payable report. Go to Accounting ‣ Reporting ‣ Partner Reports: Aged payable.
Click on a vendor’s name to open up the details of all outstanding bills, the amounts due, the due dates, etc.
Note
- By clicking the Save button, you can export the information available on the screen as a PDF or XLSX file and save it in the folder of your choice.
- You might receive several bills for the same purchase order if your vendor is in back-order and is sending you invoices as they ship the products, or if your vendor is sending you a partial bill or asking for a deposit.
On this page
Get Help
Contact Support Ask the Odoo Community
![]()
- User Docs
- Database management
- Developer
- Contributing
EN
Odoo 18
AI-powered document digitization
Invoice digitization is the process of converting paper documents into vendor bill and customer invoice forms in your accounting.
Odoo uses OCR and artificial intelligence technologies to recognize the content of the documents. Vendor bill and customer invoice forms are automatically created and populated based on the scanned invoices.
See also
Configuration
In Accounting ‣ Configuration ‣ Settings ‣ Digitization, check the box Document Digitization and choose whether Vendor Bills and Customer Invoices (this includes customer credit notes) should be processed automatically or on demand.
If you enable the Single Invoice Line Per Tax option, only one line is created per tax in the new bill, regardless of the number of lines on the invoice.
Invoice upload
Upload invoices manually
From the Accounting Dashboard, click on the Upload button of your vendor bills journal. Alternatively, go to Accounting ‣ Customers ‣ Invoices or Accounting ‣ Vendors ‣ Bills and select Upload.
Upload invoices using an email alias
You can configure your connected scanner to send scanned documents to an email alias. Emails sent to these aliases are converted into new draft customer invoices or vendor bills.
You can modify the email alias of a journal. To do so, go to the Settings app. Under General Settings: Discuss, enable Custom Email Servers, add an Alias Domain, and Save.
The email alias is now available in the Advanced Settings tab of the journal. Emails sent to this address will be converted automatically into new invoices or bills.
Note
If you use the Documents app, you can automatically send your scanned invoices to the Finance workspace (e.g., inbox-financial@example.odoo.com).
The default email aliases vendor-bills@ and customer-invoices@ followed by the Alias Domain you set are automatically created for the Vendor Bills and Customer Invoices journals, respectively. Emails sent to these addresses are converted automatically into new invoices or bills.
To change a default email alias, go to Accounting ‣ Configuration ‣ Accounting: Journals. Select the journal you want to edit, click on the Advanced Settings tab, and edit the Email Alias.
Invoice digitization
According to your settings, the document is either processed automatically, or you need to click on Send for digitization to do it manually.
Once the data is extracted from the PDF, you can correct it if necessary by clicking on the respective tags (available in Edit mode) and selecting the proper information instead.
Data recognition with AI
It is essential to review and correct (if needed) the information uploaded during digitization. Then, you have to post the document by clicking on Confirm. In this manner, the AI learns, and the system identifies the correct data for future digitizations.
Pricing
The invoice digitization is an In-App Purchase (IAP) service that requires prepaid credits to work. Digitizing one document consumes one credit.
To buy credits, go to Accounting ‣ Configuration ‣ Settings ‣ Digitization and click on Buy credits, or go to Settings ‣ Odoo IAP and click on View My Services.
Note
Enterprise Odoo users with a valid subscription get free credits to test IAP features before deciding to purchase more credits for the database. This includes demo/training databases, educational databases, and one-app-free databases.
See also
On this page
Get Help
Contact Support Ask the Odoo Community
![]()
- User Docs
- Database management
- Developer
- Contributing
EN
Odoo 18
Non-current assets and fixed assets
Non-current Assets, also known as long-term assets, are investments that are expected to be realized after one year. They are capitalized rather than being expensed and appear on the company’s balance sheet. Depending on their nature, they may undergo depreciation.
Fixed Assets are a type of Non-current Assets and include the properties bought for their productive aspects, such as buildings, vehicles, equipment, land, and software.
For example, let’s say we buy a car for $ 27,000. We plan to amortize it over five years, and we will sell it for $ 7,000 afterward. Using the linear, or straight-line, depreciation method, $ 4,000 are expensed each year as depreciation expenses. After five years, the Accumulated Depreciation amount reported on the balance sheet equals $ 20,000, leaving us with $ 7,000 of Not Depreciable Value, or Salvage value.
Odoo Accounting handles depreciation by creating all depreciation entries automatically in draft mode. They are then posted periodically.
Odoo supports the following Depreciation Methods:
- Straight Line
- Declining
- Declining Then Straight Line
Note
The server checks once a day if an entry must be posted. It might then take up to 24 hours before you see a change from draft to posted.
Prerequisites
Such transactions must be posted on an Assets Account rather than on the default expense account.
Configure an Assets Account
To configure your account in the Chart of Accounts, go to Accounting ‣ Configuration ‣ Chart of Accounts, click on Create, and fill out the form.
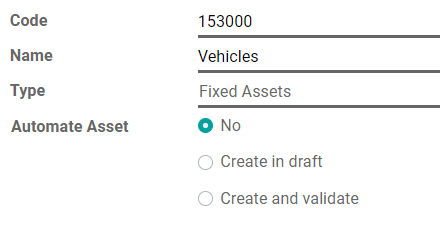
Note
This account’s type must be either Fixed Assets or Non-current Assets.
Post an expense to the right account
Select the account on a draft bill
On a draft bill, select the right account for all the assets you are buying.

Choose a different Expense Account for specific products
Start editing the product, go to the Accounting tab, select the right Expense Account, and save.

Tip
It is possible to automate the creation of assets entries for these products.
Change the account of a posted journal item
To do so, open your Purchases Journal by going to Accounting ‣ Accounting ‣ Purchases, select the journal item you want to modify, click on the account, and select the right one.
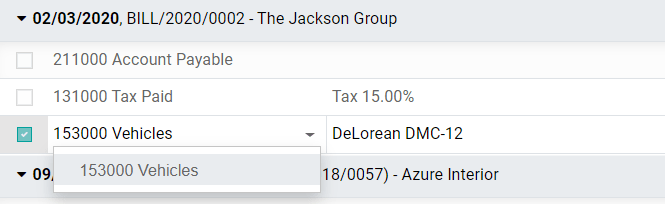
Assets entries
Create a new entry
An Asset entry automatically generates all journal entries in draft mode. They are then posted one by one at the right time.
To create a new entry, go to Accounting ‣ Accounting ‣ Assets, click on Create, and fill out the form.
Click on select related purchases to link an existing journal item to this new entry. Some fields are then automatically filled out, and the journal item is now listed under the Related Purchase tab.
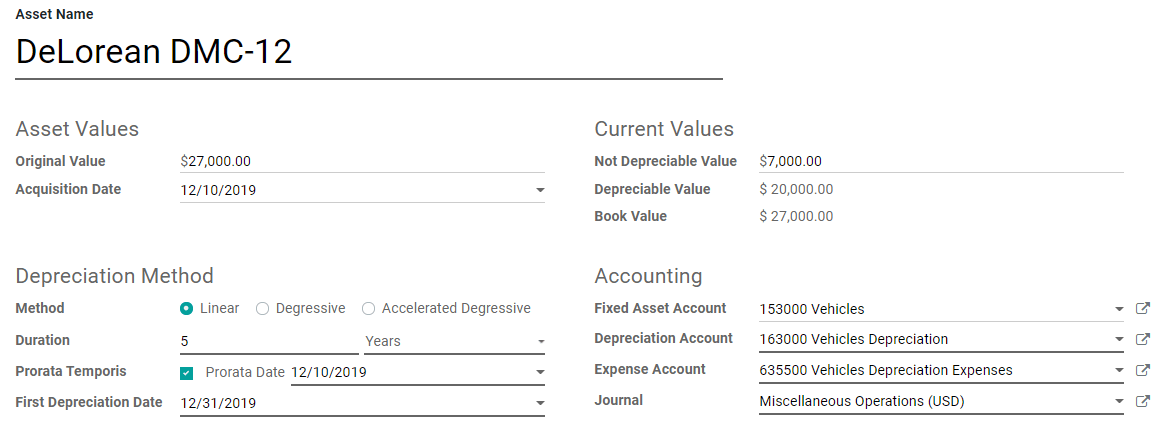
Once done, you can click on Compute Depreciation (next to the Confirm button) to generate all the values of the Depreciation Board. This board shows you all the entries that Odoo will post to depreciate your asset, and at which date.
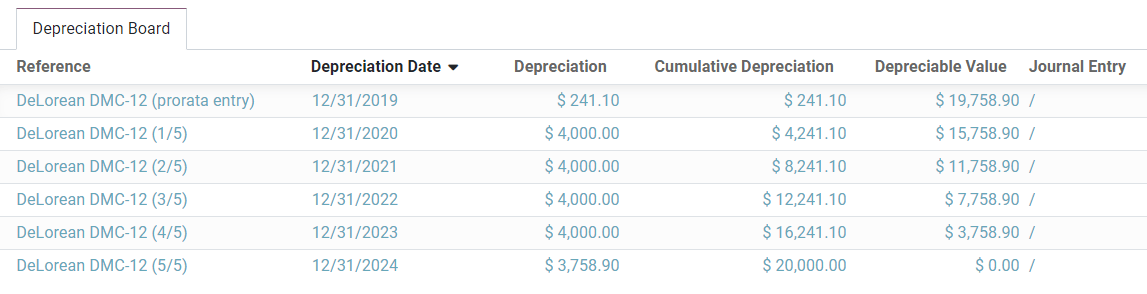
What does “Prorata Temporis” mean?
The Prorata Temporis feature is useful to depreciate your assets the most accurately possible.
With this feature, the first entry on the Depreciation Board is computed based on the time left between the Prorata Date and the First Depreciation Date rather than the default amount of time between depreciations.
For example, the Depreciation Board above has its first depreciation with an amount of $ 241.10 rather than $ 4,000.00. Consequently, the last entry is also lower and has an amount of $ 3758.90.
What are the different Depreciation Methods
The Straight Line Depreciation Method divides the initial Depreciable Value by the number of depreciations planned. All depreciation entries have the same amount.
The Declining Depreciation Method multiplies the Depreciable Value by the Declining Factor for each entry. Each depreciation entry has a lower amount than the previous entry. The last depreciation entry doesn’t use the declining factor but instead has an amount corresponding to the balance of the depreciable value so that it reaches $0 by the end of the specified duration.
The Declining Then Straight Line Depreciation Method uses the Declining Method, but with a minimum Depreciation equal to the Straight Line Method. This method ensures a fast depreciation at the beginning, followed by a constant one afterward.
Assets from the Purchases Journal
You can create an asset entry from a specific journal item in your Purchases Journal.
To do so, open your Purchases Journal by going to Accounting ‣ Accounting ‣ Purchases, and select the journal item you want to record as an asset. Make sure that it is posted in the right account (see: Change the account of a posted journal item).
Then, click on Action, select Create Asset, and fill out the form the same way you would do to create a new entry.
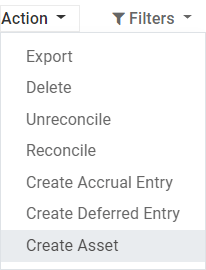
Modification of an Asset
You can modify the values of an asset to increase or decrease its value.
To do so, open the asset you want to modify, and click on Modify Depreciation. Then, fill out the form with the new depreciation values and click on Modify.
A decrease in value posts a new Journal Entry for the Value Decrease and modifies all the future unposted Journal Entries listed in the Depreciation Board.
An increase in value requires you to fill out additional fields related to the account movements and creates a new Asset entry with the Value Increase. The Gross Increase Asset Entry can be accessed with a Smart Button.
Disposal of Fixed Assets
To sell an asset or dispose of it implies that it must be removed from the Balance Sheet.
To do so, open the asset you want to dispose of, click on Sell or Dispose, and fill out the form.
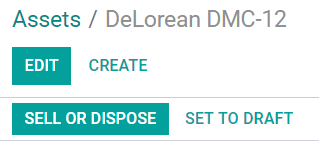
Odoo Accounting then generates all the journal entries necessary to dispose of the asset, including the gain or loss on sale, which is based on the difference between the asset’s book value at the time of the sale and the amount it is sold for.
Note
To record the sale of an asset, you must first post the related Customer Invoice so you can link the sale of the asset with it.
Assets Models
You can create Assets Models to create your Asset entries faster. It is particularly useful if you recurrently buy the same kind of assets.
To create a model, go to Accounting ‣ Configuration ‣ Assets Models, click on Create, and fill out the form the same way you would do to create a new entry.
Tip
You can also convert a confirmed Asset entry into a model by opening it from Accounting ‣ Accounting ‣ Assets and then, by clicking on the button Save Model.
Apply an Asset Model to a new entry
When you create a new Asset entry, fill out the Fixed Asset Account with the right asset account.
New buttons with all the models linked to that account appear at the top of the form. Clicking on a model button fills out the form according to that model.
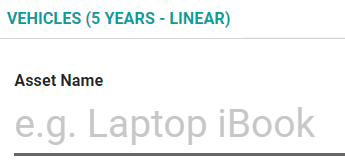
Automate the Assets
When you create or edit an account of which the type is either Non-current Assets or Fixed Assets, you can configure it to create assets for the expenses that are credited on it automatically.
You have three choices for the Automate Assets field:
- No: this is the default value. Nothing happens.
- Create in draft: whenever a transaction is posted on the account, a draft Assets entry is created, but not validated. You must first fill out the form in Accounting ‣ Accounting ‣ Assets.
- Create and validate: you must also select an Asset Model (see: Assets Models). Whenever a transaction is posted on the account, an Assets entry is created and immediately validated.
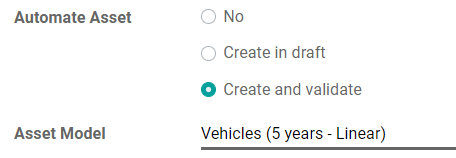
Tip
You can, for example, select this account as the default Expense Account of a product to fully automate its purchase. (see: Choose a different Expense Account for specific products).
See also
On this page
Get Help
Contact Support Ask the Odoo Community
![]()
- User Docs
- Database management
- Developer
- Contributing
EN
Odoo 18
Deferred expenses
Deferred expenses and prepayments (also known as prepaid expenses) are both costs that have already occurred for products or services yet to be received.
Such costs are assets for the company that pays them since it already paid for products and services but has either not yet received them or not yet used them. The company cannot report them on the current profit and loss statement, or income statement, since the payments will be effectively expensed in the future.
These future expenses must be deferred on the company’s balance sheet until the moment in time they can be recognized, at once or over a defined period, on the profit and loss statement.
For example, let’s say we pay $1200 at once for one year of insurance. We already pay the cost now but haven’t used the service yet. Therefore, we post this new expense in a prepayment account and decide to recognize it on a monthly basis. Each month, for the next 12 months, $100 will be recognized as an expense.
Odoo Accounting handles deferred expenses by spreading them across multiple entries that are posted periodically.
Note
The server checks once a day if an entry must be posted. It might then take up to 24 hours before you see a change from Draft to Posted.
Configuration
Make sure the default settings are correctly configured for your business. To do so, go to Accounting ‣ Configuration ‣ Settings. The following options are available:
Journal
The deferral entries are posted in this journal.
Deferred Expense
Expenses are deferred on this Current Asset account until they are recognized.
Generate Entries
By default, Odoo automatically generates the deferral entries when you post a vendor bill. However, you can also choose to generate them manually by selecting the Manually & Grouped option instead.
Based on
Suppose a bill of $1200 must be deferred over 12 months.
- The Months option accounts for $100 each month prorated to the number of days in that month (e.g., $50 for the first month if the Start Date is set to the 15th of the month).
- The Full Months option considers each month started to be full (e.g., $100 for the first month even if the Start Date is set to the 15th of the month); this means that with the Full Months option, a full $100 is recognized in the first partial month, eliminating the need for a 13th month to recognize any remainder as would be the case when using the Months option.
- The Days option accounts for different amounts depending on the number of days in each month (e.g., ~$102 for January and ~$92 for February).
Generate deferral entries on validation
Tip
Make sure the Start Date and End Date fields are visible in the Invoice Lines tab. In most cases, the Start Date should be in the same month as the Bill Date. Deferred expense entries are posted from the bill date and are displayed in the report accordingly.
For each line of the bill that should be deferred, specify the start and end dates of the deferral period.
If the Generate Entries field is set to On invoice/bill validation, Odoo automatically generates the deferral entries when the bill is validated. Click on the Deferred Entries smart button to see them.
One entry, dated on the same day as the bill’s accounting date, moves the bill amounts from the expense account to the deferred account. The other entries are deferral entries which will, month after month, move the bill amounts from the deferred account to the expense account to recognize the expense.
Example
You can defer a January bill of $1200 over 12 months by specifying a start date of 01/01/2023 and an end date of 12/31/2023. At the end of August, $800 is recognized as an expense, whereas $400 remains on the deferred account.
Reporting
The deferred expense report computes an overview of the necessary deferral entries for each account. To access it, go to Accounting ‣ Reporting ‣ Deferred Expense.
To view the journal items of each account, click on the account name and then Journal Items.

Note
Only bills whose accounting date is before the end of the period of the report are taken into account.
Generate grouped deferral entries manually
If you have a lot of deferred revenues and wish to reduce the number of journal entries created, you can generate deferral entries manually. To do so, set the Generate Entries field in the Settings to Manually & Grouped. Odoo then aggregates the deferred amounts in a single entry.
At the end of each month, go to the Deferred Expenses report and click the Generate Entries button. This generates two deferral entries:
- One dated at the end of the month which aggregates, for each account, all the deferred amounts of that month. This means that at the end of that period, a part of the deferred expense is recognized.
- The reversal of this created entry, dated on the following day (i.e., the first day of the next month) to cancel the previous entry.
Example
There are two bills:
- Bill A: $1200 to be deferred from 01/01/2023 to 12/31/2023
- Bill B: $600 to be deferred from 01/01/2023 to 12/31/2023
In January
At the end of January, after clicking the Generate Entries button, there are the following entries:
- Entry 1 dated on the 31st January:
- Line 1: Expense account -1200 -600 = -1800 (cancelling the total of both bills)
- Line 2: Expense account 100 + 50 = 150 (recognizing 1/12 of bill A and bill B)
- Line 3: Deferred account 1800 - 150 = 1650 (amount that has yet to be deferred later on)
- Entry 2 dated on the 1st February, the reversal of the previous entry:
- Line 1: Expense account 1800
- Line 2: Deferred account -150
- Line 3: Expense account -1650
In February
At the end of February, after clicking the Generate Entries button, there are the following entries:
- Entry 1 dated on the 28th February:
- Line 1: Expense account -1200 -600 = -1800 (cancelling the total of both bills)
- Line 2: Expense account 200 + 100 = 300 (recognizing 2/12 of bill A and bill B)
- Line 3: Deferred account 1800 - 300 = 1500 (amount that has yet to be deferred later on)
- Entry 2 dated on the 1st March, the reversal of the previous entry.
From March to October
The same computation is done for each month until October.
In November
At the end of November, after clicking the Generate Entries button, there are the following entries:
- Entry 1 dated on the 30th November:
- Line 1: Expense account -1200 -600 = -1800 (cancelling the total of both bills)
- Line 2: Expense account 1100 + 550 = 1650 (recognizing 11/12 of bill A and bill B)
- Line 3: Deferred account 1800 - 1650 = 150 (amount that has yet to be deferred later on)
- Entry 2 dated on the 1st December, the reversal of the previous entry.
In December
There is no need to generate entries in December. Indeed, if we do the computation for December, we will have an amount of 0 to be deferred.
In total
If we aggregate everything, we would have:
- bill A and bill B
- two entries (one for the deferral and one for the reversal) for each month from January to November
Therefore, at the end of December, bills A and B are fully recognized as expense only once in spite of all the created entries thanks to the reversal mechanism.
On this page
Get Help
Contact Support Ask the Odoo Community
![]()
- User Docs
- Database management
- Developer
- Contributing
EN
Odoo 18
Vendor bill sequence
When confirming a vendor bill, Odoo generates a unique vendor bill reference number. By default, it uses the following sequence format BILL/year/month/incrementing-number (e.g., BILL/2025/01/00001), which restarts from 00001 each year.
However, it is possible to change the sequence format and its periodicity, and to mass-resequence vendor bills.
Note
Changes made to reference numbers are logged in the chatter.
Changing the default sequence
To customize the default sequence, open the last confirmed vendor bill, click Reset to Draft, and edit the vendor bill’s reference number.
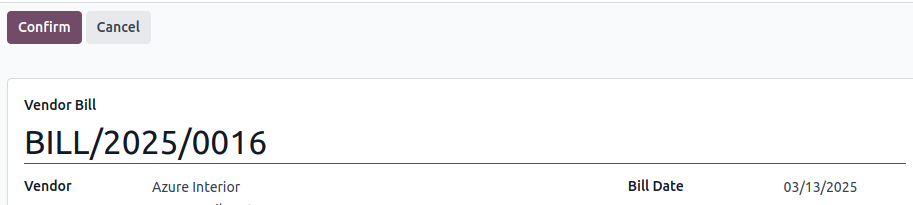
Odoo then explains how the detected format will be applied to all future vendor bills. For example, if the current vendor bill’s month is withdrawn, the sequence’s periodicity will change to every year instead of every month.

Tip
The sequence format can be edited directly when creating the first vendor bill of a given sequence period.
Mass-resequencing vendor bills
It can be helpful to resequence multiple vendor bill numbers. For example, when importing vendor bills from another accounting system and the reference originates from the previous software, continuity for the current year must be maintained without restarting from the beginning.
Note
This feature is only available to users with administrator or advisor access.
Follow these steps to resequence vendor bill numbers:
- Activate the developer mode.
- In the vendor bills list view, select the vendor bills that need a new sequence.
- Click the Actions menu and select Resequence.
- In the Ordering field, choose to
- Keep current order: The order of the numbers remains the same.
- Reorder by accounting date: The number is reordered by accounting date.
- Set the First New Sequence.
- Preview Modifications and click Confirm.
The first vendor bill using the new sequence appears in red in the Bills list view.
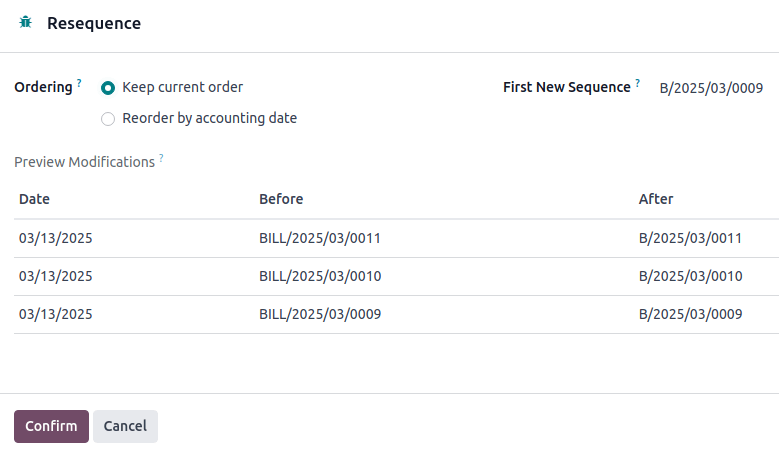
On this page
Get Help
Contact Support Ask the Odoo Community
![]()
- User Docs
- Database management
- Developer
- Contributing
EN
Odoo 18
Payments
In Odoo, payments can either be automatically linked to an invoice or bill or be stand-alone records for use at a later date:
- If a payment is linked to an invoice or bill, it reduces/settles the amount due on the invoice. Multiple payments on the same invoice are possible.
- If a payment is not linked to an invoice or bill, the customer has an outstanding credit with the company, or the company has an outstanding debit with a vendor. Those outstanding amounts reduce/settle unpaid invoices/bills.
See also
Payment methods
Several payment methods are available in Odoo to allow different configurations for different types of payments. Examples of payment methods include manual payments (such as cash), checks, and batch payment files (such as NACHA and SEPA). Payment methods can be configured in the Incoming Payments and Outgoing Payments tabs of a bank or cash journal.
See also
Payment methods for Point of Sale
Preferred payment method
A contact’s preferred payment method can be set so that when a payment is created for that contact, the payment method is automatically selected by default. Invoices and bills can be filtered by Payment Method to simplify group payments.
To set a preferred Payment Method for a customer or a vendor, go to Accounting ‣ Customers ‣ Customers or Accounting ‣ Vendors ‣ Vendors and select the customer or vendor. In the Sales & Purchase tab of the contact form, select the preferred Payment Method in the Sales section for invoice payments or for vendor bill payments in the Purchase section.
Tip
Access a full list of all contacts from the Customers or Vendors list view by removing the Customers or Vendors filter. Alternatively, access the full contact list through the Contacts app.
Registering payment from an invoice or bill
To register a payment for an invoice or a bill, follow these steps:
- Click Pay on a customer invoice or vendor bill. In the Pay window, select the Journal and the Payment Date.
- If previously set, the contact’s preferred Payment Method is automatically selected by default but can be updated if necessary.
- If using payment terms, the Amount is automatically set based on the installment amounts defined by the payment term. To pay the full amount instead, click full amount.
- If necessary, edit the Memo.
- Click Create Payment.
After the payment is registered, the customer invoice or vendor bill is marked as In payment.
Without outstanding accountsUsing outstanding accounts
If no outstanding accounts are configured, no journal entry is created. To display more information about the payment, click the Payments smart button.
When the invoice or vendor bill is reconciled with a bank transaction, its status is updated to Paid.
Note
- If a bank transaction is reconciled in a different currency, a journal entry is automatically created to post the currency exchange gains/loss amount.
- When a bank transaction is reconciled with an invoice with cash-basis, a journal entry is automatically created to post the cash-basis tax amount.
Registering payments not tied to an invoice or bill
When a new payment is registered via Customers / Vendors ‣ Payments, it is not directly linked to an invoice or bill.
Without outstanding accountsUsing outstanding accounts
Payments that are not linked to an invoice or bill should not be registered without using outstanding accounts, as there is no way to associate the payment with the invoice or bill since no journal entry is created for the payment. The amount paid or received is not reflected in the accounting and the Amount Due is not updated based on the payment amount.
Payments matching
Note
During the bank reconciliation process, a remaining balance is identified if the total debits and credits do not match when records are compared with bank transactions. This balance must either be reconciled later or written off immediately.
For a single invoice or bill
Without outstanding accountsUsing outstanding accounts
By default, payments in Odoo do not create journal entries. As a result, there is no payment to match.
For multiple invoices or bills
Without outstanding accountsUsing outstanding accounts
By default, payments in Odoo do not create journal entries. As a result, there is no payment to match, but this feature can still be used to match miscellaneous journal items.
Auto-Reconcile Feature
Without outstanding accountsUsing outstanding accounts
To use the Auto-Reconcile feature, follow these steps:
- In the Journal Items to reconcile list view, click Auto-Reconcile next to the receivable or payable account (or a specific contact’s group of journal items in that account).
- In the Reconcile automatically window, click Reconcile.
Registering payments on multiple invoices/credit notes or bills/refunds (group payments)
To register payments on multiple invoices/credit notes or bills/refunds, follow these steps:
- Go to Accounting ‣ Customers ‣ Invoices/Credit Notes or Accounting ‣ Vendors ‣ Bills/Refunds.
- In the list view, click into the search bar, group by Payment Method, select the relevant invoices/credit notes or bills/refunds and click Pay.
- In the Pay window, select the Journal and the Payment Date.
- If previously set, the contact’s preferred Payment Method is automatically selected by default but can be updated if necessary.
- If using payment terms, the Amount is automatically set based on the installment amounts defined by the payment term. To pay the full amount instead, click full amount.
- To combine all payments from the same contact into a single payment, enable the Group Payments option, or leave it unchecked to create separate payments.
- Click Create payment.
Without outstanding accountsUsing outstanding accounts
The invoices or bills are then marked as In payment until they are reconciled with the bank transactions.
Registering a single payment for multiple customers or vendors (batch payments)
Batch payments allow grouping payments from multiple contacts to ease reconciliation. They are also useful when depositing checks to the bank or for generating bank payment files such as SEPA or NACHA. To do so, go to Accounting ‣ Customers ‣ Payments or Accounting ‣ Vendors ‣ Payments. In the payments list view, select the payments to be grouped in a batch, click Actions, and select Create Batch Payment.
Note
All payments in a batch must have the same payment method.
See also
Payments matching
The Payments matching tool opens all unreconciled journal items and allows them to be processed individually, matching all payments and journal items. Go to the Accounting Dashboard, go to Accounting ‣ Accounting ‣ Reconcile or click the (ellipsis) button from the Customer Invoices or Vendor Bills journals, and select Payments Matching.
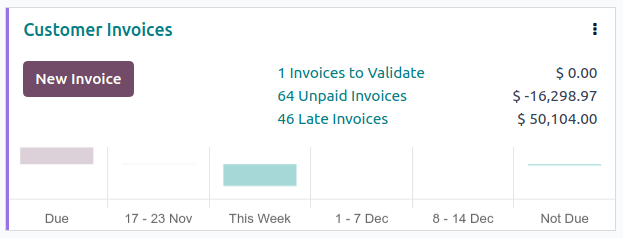
Note
During the reconciliation, if the sum of the debits and credits does not match, there is a remaining balance. This either needs to be reconciled at a later date or written off directly.
Registering a partial payment
To register a partial payment, click on Pay from the related invoice or bill.
Without outstanding accountsUsing outstanding accounts
In the case of a partial payment (when the Amount paid is less than the total remaining amount on the invoice or the bill), fill in the Amount in the Pay window.
Reconciling payments with bank transactions
Without outstanding accountsUsing outstanding accounts
Once a payment has been registered, the status of the invoice or bill is In payment. The next step is reconciling the related bank transaction line with the invoice or bill to finalize the payment workflow and mark the invoice or bill as Paid.
On this page
- Payment methods
- Registering payment from an invoice or bill
- Registering payments not tied to an invoice or bill
- Registering payments on multiple invoices/credit notes or bills/refunds (group payments)
- Registering a single payment for multiple customers or vendors (batch payments)
- Registering a partial payment
- Reconciling payments with bank transactions
Get Help
Contact Support Ask the Odoo Community
![]()
- User Docs
- Database management
- Developer
- Contributing
EN
Odoo 18
Online payments
To make it more convenient for your customers to pay the invoices you issue, you can activate the Invoice Online Payment feature, which adds a Pay Now button on their Customer Portal. This allows your customers to see their invoices online and pay directly with their favorite payment method, making the payment process much easier.
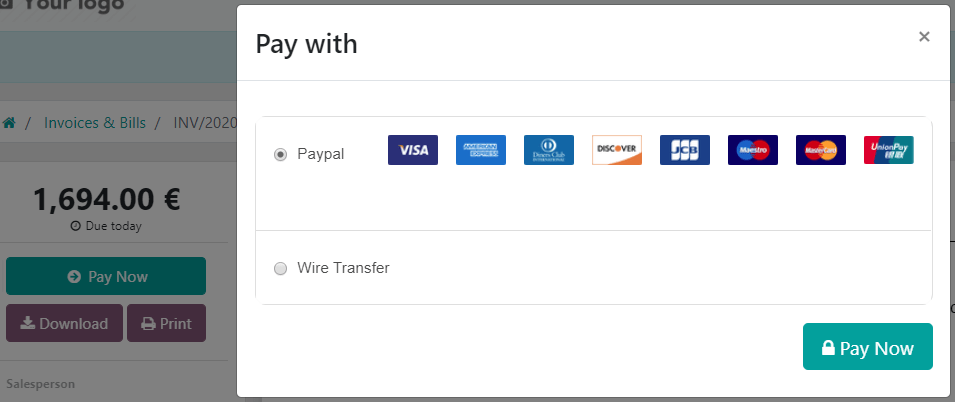
Configuration
Make sure your payment providers are correctly configured.
Note
By default, “Wire Transfer” is the only payment provider activated, but you still have to fill out the payment details.
To activate the Invoice Online Payment, go to Accounting ‣ Configuration ‣ Settings ‣ Customer Payments, enable Invoice Online Payment, and click on Save.
Customer Portal
After issuing the invoice, click on Send & Print and send the invoice by email to the customer. They will receive an email with a link that redirects them to the invoice on their Customer Portal.

They can choose which Payment Provider to use by clicking on Pay Now.
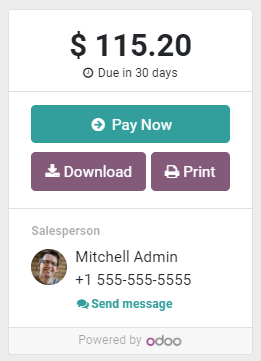
See also
On this page
Get Help
Contact Support Ask the Odoo Community
![]()
- User Docs
- Database management
- Developer
- Contributing
EN
Odoo 18
Batch payments by bank deposit
A batch deposit is a convenient way to group customer payments and deposit them into your bank account. The feature lets you list multiple payments and generate a detailed deposit slip with a batch reference. This reference can be used when reconciling to match bank statement lines with transactions in the batch deposit.
Configuration
Go to Accounting ‣ Configuration ‣ Settings ‣ Customer Payments and tick Batch Payments to activate the feature.
Deposit multiple payments in batch
Register payments
Before performing a batch deposit, it is necessary to register each transaction’s payment. To do so, open the corresponding customer invoice and click Register Payment. In the pop-up window, select the Journal linked to your bank account and Batch Deposit as the Payment Method, and click Create Payment.

Add payments to a batch deposit
To add payments to a batch deposit, go to Accounting ‣ Customers ‣ Batch Payments, and click New. Next, select the Bank and choose Batch Deposit as the Payment Method.

Click Add a line. In the pop-up window, tick all payments to include in the batch deposit, then click Select.

Once done, click Validate to finalize the batch deposit.
Tip
Click Print to download a PDF file to include with the deposit slip.
Bank reconciliation
Once the bank transactions are on your database, you can reconcile bank statement lines with the batch payment. To do so, go to the Accounting Dashboard and click Reconcile Items on the related bank account. Go to the Batch Payments tab to select a specific batch and click Validate to finalize the process.

Note
If a specific payment could not be processed by the bank or is missing, remove the related payment before reconciling.
See also
On this page
Get Help
Contact Support Ask the Odoo Community
![]()
- User Docs
- Database management
- Developer
- Contributing
EN
Odoo 18
Follow-up on invoices
Follow-up messages can be sent to customers when payments are overdue. Odoo helps identify late payments and allows scheduling and sending the appropriate reminders using follow-up actions according to the number of overdue days. Follow-ups can be sent through different methods, including email, post, or SMS.
See also
Configuration
To configure Follow-up actions, go to Accounting ‣ Configuration ‣ Follow-up Levels. In the Follow-up Levels list view, several follow-up levels and actions are configured by default.
To modify a follow-up level, click on the record. From the form view, edit the Description or adjust the number of days before a reminder is sent. In the Notification tab, select Actions such as Send Email, Send a Letter, and Send SMS Message.
Note
Sending letters or SMS messages in Odoo requires In-App Purchase (IAP) credit or tokens.
To use a pre-filled template when sending an email or letter, select a Content Template. To modify it, click the (internal link arrow) icon next to the Content Template field. If enabled, SMS messages use a specific Sms Template field that can be modified by clicking the (internal link arrow) icon.
Other options can be enabled in the Options section within the specific follow-up level:
- Automate the reminder with the Automatic option.
- Attach Invoices that are overdue in the reminder.
- Add followers on the related customer to receive notifications about any email reply made on the reminder’s email.
In the Activity tab, enable the option to automatically schedule activities when the follow-up level is triggered. Select the Responsible user and the Activity Type, and enter a Summary.
To add a new Follow-up Level, click New and fill in the fields.
Tip
Set a negative number of days to send a reminder before the invoice due date.
Invoice follow-ups
Note
Reconcile all bank transactions before starting the follow-up process to avoid sending reminders for invoices that have already been paid.
To view all overdue invoices, go to Accounting ‣ Customers ‣ Invoices. In the Invoices list view, click into the search bar and filter on Overdue.
Follow-ups for one customer
For a detailed overview of a customer’s invoice follow-up status, go to Accounting ‣ Customers ‣ Customers. Open the customer’s form and click the Accounting tab. In the Invoice follow-ups section, click on the different levels to view the Follow-up Status of each level. If actions are needed, click Overdue Invoices to have a detailed list of the overdue invoices.
Additional options can be set:
- Reminders: Automatic or Manual.
- Next reminder: The date by which the next follow-up actions should be taken is automatically set when follow-ups are processed, but can be manually adjusted if needed.
- Responsible: The user handling follow-up actions, who is automatically added as a follower in the chatter.
To manually send a payment reminder to a customer, click Send and select the actions in the Send and Print window:
- Print;
- Email;
- Sms;
- By post.
Enable the Attach Invoices option and change the Content Template if needed. Then, click Send or Send & Print.
See also
Note
- The contact information on the invoice or the contact form is used to send the reminder.
- The chatter keeps a full record of all follow-up actions.
Follow-ups for all customers due for action
After setting up the additional follow-up options, review which customers have overdue invoices or require follow-up. To do so, go to Accounting ‣ Customers ‣ Customers. In the Customers kanban view, click the search bar and filter by Overdue Invoices or Requires Follow-up.
To take follow-up actions for all relevant customers, switch to the list view and select the customers requiring follow-up. Then, click (Actions) and select Process Follow-ups.
Customer statement
To get a comprehensive overview of a customer’s account status, click the Customer Statement smart button on the customer’s form. This statement corresponds to the Partner Ledger report’s portion specific to that customer.
To send it to the customer, click Send, change the Email Template if needed, and click Print & Send.
To view the customer statements for multiple customers at once, select the customers from the Customers list view, click (Actions), and select Open Customer Statements.
Click PDF or XLSX to generate a PDF or XLSX file, respectively.
On this page
Get Help
Contact Support Ask the Odoo Community
![]()
- User Docs
- Database management
- Developer
- Contributing
EN
Odoo 18
Forecast future bills to pay
In Odoo, you can manage payments by setting automatic Payments Terms and follow-ups.
Configuration: payment terms
In order to track vendor conditions, we use Payment Terms in Odoo. They allow keeping track of due dates on invoices. Examples of Payment Terms are:
- 50% within 30 days
- 50% within 45 days
To create them, go to Accounting ‣ Configuration ‣ Invoicing: Payment Terms and click on Create to add new terms or click existing ones to modify them.
See also
Once Payment Terms are defined, you can assign them to your vendor by default. To do so, go to Vendors ‣ Vendors, select a vendor, click the Sales & Purchase tab, and select a specific Payment Term. This way, every time you purchase from this vendor, Odoo automatically proposes the chosen Payment Term.
Note
If you do not set a specific Payment Term on a vendor, you can still set one on the vendor bill.
Forecast bills to pay with the aged payable report
To track amounts to be paid to the vendors, use the Aged Payable report. To access it, go to Accounting ‣ Reporting ‣ Partner Reports: Aged Payable. This report gives you a summary per vendor of the amounts to pay, compared to their due date (the due date being computed on each bill using the terms). This report tells you how much you will have to pay within the following months.
Select bills to pay
You can get a list of all your vendor bills by going to Vendors ‣ Bills. To view only the bills that you need to pay, click Filters ‣ Bills to Pay. To view only overdue payments, select the Overdue filter instead.
You can also group bills by their due date by clicking Group By ‣ Due Date and selecting a time period.
On this page
Get Help
Contact Support Ask the Odoo Community
![]()
- User Docs
- Database management
- Developer
- Contributing
EN
Odoo 18
Trusted accounts (send money)
To protect users from sending money to scammers, vendor bank account numbers must be marked as trusted before you can use them to make an outgoing payment.
To do so, open the vendor bank account and click on the Send Money toggle switch button.

Note
All accounts are initially marked as untrusted.
Phishing attacks
A phishing attack is an online scam designed to trick individuals or companies into giving away sensitive information or money by sending out fraudulent communication. Fraudsters pretend to be legitimate companies and may use partial information to give credibility to their requests.
There are several types of phishing attacks, including invoice fraud. In this case, the fraudster pretends to be a genuine supplier following up on unpaid bills or sending a new invoice, but with different payment information than usual and with fake contact details.
To protect yourself from these types of phishing attacks, remain vigilant when you receive unexpected invoices or payment requests.
Important
In case of doubt, we recommend contacting the vendor by phone. Make sure to call an official phone number by searching yourself, as the URLs, email addresses, and phone numbers written in the communication you received may be fake.
Elements to check
There are several elements you can check by yourself when you receive an outgoing payment request to a new account:
Communication style
Fraudulent emails and invoices often use a different communication style, such as different wording, and may include spelling and grammatical mistakes. Examine and compare them with previous ones that you know to be authentic (e.g., payment instructions, language, company logo, etc.).*
Urgency
Invoice frauds often use urgent or threatening language and change the payment deadline. Check if you really received a late payment reminder previously.
Type of account
A company is unlikely to replace a bank account with a money transfer service.
Email and links domain names
Double-check the email address domain (example@domain.com). However, be wary that fraudsters can make their email addresses look genuine or even hack email addresses from your vendor’s employees or even someone within your own organization.
Hover over the links in your email and check that the URLs they redirect to are genuine. Your internet browser usually displays the link’s target at the bottom left of the window.
On this page
Get Help
Contact Support Ask the Odoo Community
![]()
- User Docs
- Database management
- Developer
- Contributing
EN
Odoo 18
Bank and cash accounts
You can manage as many bank or cash accounts as needed on your database. Configuring them correctly allows you to have all your banking data up-to-date and ready for reconciliation with your journal entries.
In Odoo Accounting, each bank account has a dedicated journal set to post all entries in a dedicated account. Both the journal and the account are automatically created and configured whenever you add a bank account.
Note
Cash journals and accounts must be configured manually.
Bank journals are displayed by default on the Accounting Dashboard in the form of cards which include action buttons.
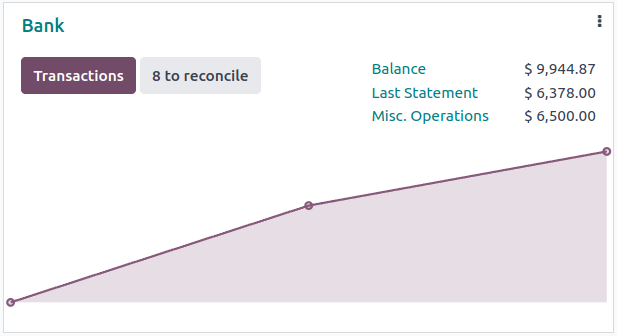
Manage bank and cash accounts
Connect a bank for automatic synchronization
To connect your bank account to your database, go to Accounting ‣ Configuration ‣ Add a Bank Account, select your bank in the list, click on Connect, and follow the instructions.
See also
Create a bank account
If your banking institution is not available in Odoo, or if you don’t want to connect your bank account to your database, you can configure your bank account manually.
To manually add a bank account, go to Accounting ‣ Configuration ‣ Add a Bank Account, click on Record transactions manually (at the bottom right), fill out the bank information, and click Create.
Note
- Odoo automatically detects the bank account type (e.g., IBAN) and enables some features accordingly.
- A default bank journal is available and can be used to configure your bank account by going to Accounting ‣ Configuration ‣ Accounting: Journals ‣ Bank. Open it and edit the different fields to match your bank account information.
Create a cash journal
To create a new cash journal, go to Accounting ‣ Configuration ‣ Accounting: Journals, click on Create and select Cash in the Type field.
For more information on the accounting information fields, read the Configuration section of this page.
Note
A default cash journal is available and can be used straight away. You can review it by going to Accounting ‣ Configuration ‣ Accounting: Journals ‣ Cash.
Edit an existing bank or cash journal
To edit an existing bank journal, go to Accounting ‣ Configuration ‣ Accounting: Journals and select the journal you want to modify.
Configuration
You can edit the accounting information and bank account number according to your needs.
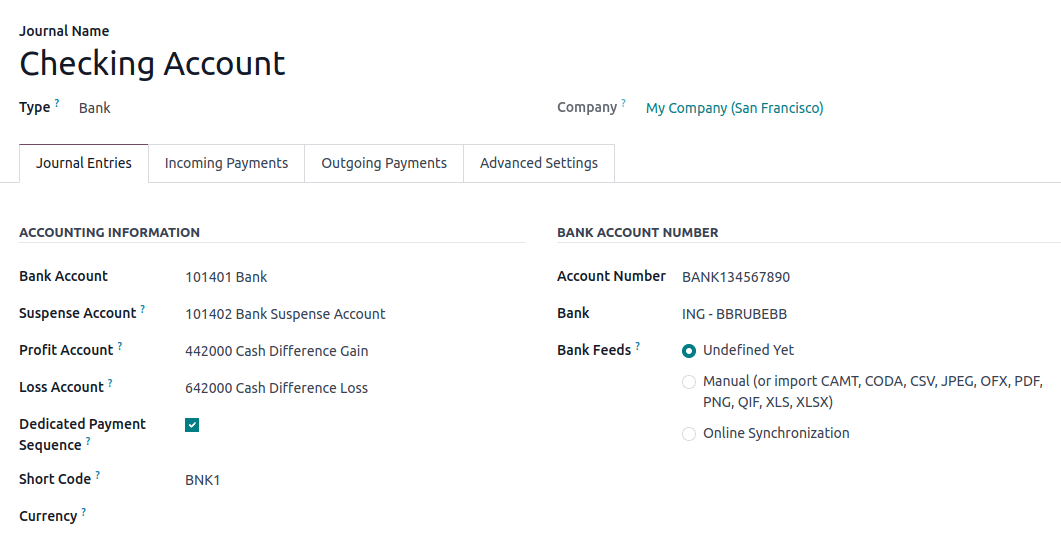
See also
Suspense account
Bank statement transactions are posted on the suspense account until they are reconciled. At any moment, the suspense account’s balance in the general ledger shows the balance of transactions that have not yet been reconciled.
Note
When a bank transaction is reconciled, the journal entry is modified to replace the bank suspense account with the account of the journal item it is reconciled with. This account is usually the outstanding receipts or payments account if reconciling with a registered payment or the account receivable or payable if reconciling with an invoice or bill directly.
Profit and loss accounts
The Profit Account is used to register a profit when the ending balance of a cash register differs from what the system computes, while the Loss Account is used to register a loss when the ending balance of a cash register differs from what the system computes.
Currency
You can edit the currency used to enter the transactions.
See also
Account number
If you need to edit your bank account details, click on the external link arrow next to your Account Number. On the account page, click on the external link arrow next to your Bank and update your bank information accordingly. These details are used when registering payments.
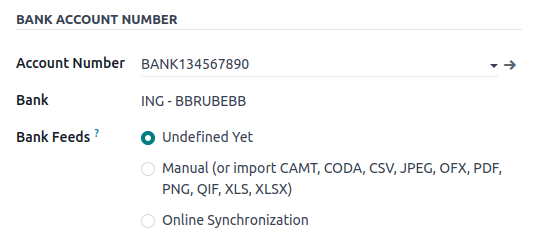
Bank feeds
Bank Feeds defines how the bank transactions are registered. Three options are available:
- Undefined yet, which should be selected when you don’t know yet if you will synchronize your bank account with your database or not.
- Import (CAMT, CODA, CSV, OFX, QIF), which should be selected if you want to import your bank statements and transactions using a different format.
- Automated Bank Synchronization, which should be selected if your bank is synchronized with your database.
See also
Outstanding accounts
By default, payments in Odoo do not create journal entries, but they can easily be configured to create journal entries using outstanding accounts.
- An outstanding receipts account is where incoming payments are posted until they are linked with incoming bank transactions.
- An outstanding payments account is where outgoing payments are posted until they are linked with outgoing bank transactions.
These accounts are usually of type Current Assets and Current Liabilities.
Payments that are registered in Odoo are posted to the outstanding receipts and outstanding accounts until they are reconciled. At any moment, the outstanding receipts account’s balance in the general ledger shows the balance of registered incoming payments that have not yet been reconciled, and the outstanding payments account’s balance in the general ledger shows the balance of registered outgoing payments that have not yet been reconciled.
Bank and cash journal configuration
To configure payments to create journal entries, set outstanding accounts for the journal’s payment methods. This can be done for any journal with the type Bank or Cash.
To configure the outstanding accounts for a journal’s payment methods, first go to Accounting ‣ Configuration ‣ Journals and select a bank or cash journal. In the Incoming Payments and Outgoing Payments tabs, set Outstanding Receipts accounts and Outstanding Payments accounts for each payment method that you want to create journal entries.
Note
- If the main bank account of the journal is added as an outstanding receipts account or outstanding payments account, when a payment is registered, the invoice or bill’s status is directly set to Paid.
- If the outstanding receipts or outstanding payments account for a payment method is left blank, registering a payment with that payment method will not create any journal entry.
On this page
Get Help
Contact Support Ask the Odoo Community
![]()
- User Docs
- Database management
- Developer
- Contributing
EN
Odoo 18
Bank synchronization
Odoo can synchronize directly with your bank institution to get all bank statements imported automatically into your database.
To check if your bank is compatible with Odoo, go to Odoo Accounting Features, and click on See list of supported institutions.
Odoo supports more than 26,000 institutions around the world.
To connect to the banks, Odoo uses multiple web-services:
- Plaid: United States of America and Canada
- Yodlee: Worldwide
- Salt Edge: Worldwide
- Ponto: Europe
- Enable Banking: Scandinavian countries
See also
Configuration
On-Premise users
To be able to use this service, you need to have a valid Odoo Enterprise subscription. So make sure that your database is registered with your Odoo Enterprise contract. We also use a proxy between your database and the third party provider so, in case of a connection error, please check that you don’t have a firewall or a proxy blocking the following address:
First synchronization
You can start synchronization either by going to the Accounting app and Accounting ‣ Configuration ‣ Add a Bank Account.
Now you can search for your bank institution. Select it and follow the steps to synchronize with it.
Note
If you have any issues during your first synchronization, please verify that your web browser doesn’t block pop-ups and that your ad-blocker is disabled.
Important
When setting up the bank statement synchronization, Odoo automatically starts recording the accounting transactions from the last transaction’s date +1 day (if the last transaction day is 31/12/2022, the recording starts on 01/01/2023). If the journal contains no transaction, Odoo retrieves transactions as far back as possible. You can limit how far back Odoo retrieves transactions by opening the Accounting app, going to Accounting ‣ Lock Dates, and setting a date in the Journal Entries Lock Date field.
You must provide a phone number during your first synchronization to secure your account. We ask for such information because we don’t want your data falling into the wrong hands. Therefore, if we detect suspicious activities on your account, we block all requests coming from your account, and you need to reactivate it using that phone number.
The third-party provider may request more information in order to connect with your bank institution. This information is not stored on Odoo’s servers.
By default, transactions fetched from an online source are grouped inside the same statement, and one bank statement is created per month. You can change the bank statement creation periodicity in your journal settings.
To view all your synchronizations, activate the developer mode and go to Accounting ‣ Configuration ‣ Online Synchronization.
Synchronize manually
After your first synchronization, the created journals are synchronized by default every 12 hours. If you wish, you can synchronize them manually by clicking on the Synchronize Now button on the dashboard.
Alternatively, activate the developer mode, go to Accounting ‣ Configuration ‣ Online Synchronization, select your institution, and then click the Fetch transactions button.
Important
Some institutions do not allow transactions to be fetched automatically. For such institutions, during the automatic synchronization of the account, you receive an error message asking you to disable the automatic synchronization. This message can be found in the chatter of your online synchronizations. In this case, make sure to perform manual synchronizations.
Issues
Synchronization in error
To report a connection error to the Odoo support, activate the developer mode, go to Accounting ‣ Configuration ‣ Online Synchronization, select the connection that failed, and copy the error description and the reference.
Synchronization disconnected
If your connection with the proxy is disconnected, you can reconnect with the proxy using the Fetch Account button.
Note
If you are unable to reconnect using the Reconnect button, please contact the support directly with your client id or the reference of the error listed in the chatter.
Migration process for users having installed Odoo before December 2020
If you are on-premise, please first make sure that your source is up-to-date with the latest version of Odoo.
Users who have created a database before December 2020 need to install the new module manually to use the new functionalities.
To do so, go to Apps ‣ Update Apps List, remove the default filter in the search bar and type account_online_synchronization. You can then click on Install. Finally, make sure all your users refresh their Odoo page by pressing CTRL+F5.
Note
- All previous synchronizations are disconnected during the installation and will not work anymore. To view them, activate the developer mode and go to Accounting ‣ Configuration ‣ Online Synchronization). It is not possible to resynchronize these connections; you have to make new ones.
- Do not uninstall the account_online_sync module, which is the previous module for online synchronization. The new one overrides it.
- By default, the account_online_synchronization module is installed automatically with Accounting.
FAQ
The synchronization is not working in real-time. Is that normal?
The process is not intended to work in real-time as third party providers synchronize your accounts at different intervals. To force the synchronization and fetch the statements, go to your Accounting Dashboard, and click on the Synchronize Now button. Synchronize and fetch transactions by activating the developer mode and going to Accounting ‣ Configuration ‣ Online Synchronization. Some providers only allow one refresh per day, so it is possible that clicking on Synchronize Now does not get your latest transactions if you already performed such action earlier in the day.
A transaction can be visible on your bank account but not be fetched if it has the status Pending. Only transactions with the Posted status will be retrieved. If the transaction is not Posted yet, you will have to wait until the status changes.
Is the Online Bank Synchronization feature included in my contract?
- Community Edition: No, this feature is not included in the Community Version.
- Online Edition: Yes, even if you benefit from the One App Free contract.
- Enterprise Edition: Yes, if you have a valid enterprise contract linked to your database.
Some banks have a status “Beta.” What does this mean?
This means that banking institutions are not yet fully supported by our Third Party Provider. Bugs or other problems may arise. Odoo does not support technical problems that occur with banks in the Beta phase, but the user may still choose to connect. Connecting with these banks contributes to the development process since the Provider will have real data and feedback from the connection.
Why do my transactions only synchronize when I refresh manually?
Some banks have additional security measures and require extra steps, such as an SMS/email authentication code or another type of MFA. Because of this, the integrator cannot pull transactions until the security code is provided.
Not all of my past transactions are in Odoo, why?
For some institutions, transactions can only be fetched up to 3 months in the past.
Why don’t I see any transactions?
During your first synchronization, you selected the bank accounts you decided to synchronize with Odoo. If you didn’t synchronize any of your accounts, activate the developer mode, go to Accounting ‣ Configuration ‣ Online Synchronization, and click the Fetch Account button on the connection.
There may also be no new transactions.
If your bank account is properly linked to a journal and posted transactions are not visible in your database, please submit a support ticket.
How can I update my bank credentials?
To update your credentials, activate the developer mode and go to Accounting ‣ Configuration ‣ Online Synchronization. Open the connection you want to update your credentials and click the Update Credentials button.
On this page
Get Help
Contact Support Ask the Odoo Community
![]()
- User Docs
- Database management
- Developer
- Contributing
EN
Odoo 18
Transactions
Importing transactions from your bank statements allows keeping track of bank account transactions and reconciling them with the ones recorded in your accounting.
Bank synchronization automates the process. However, if you do not want to use it or if your bank is not yet supported, other options exist:
- Import bank transactions delivered by your bank;
- Register bank transactions manually.
Note
Grouping transactions by statement is optional.
Import transactions
Odoo supports multiple file formats to import transactions:
- SEPA recommended Cash Management format (CAMT.053)
- Comma-separated values (CSV)
- Open Financial Exchange (OFX)
- Quicken Interchange Format (QIF)
- Belgium: Coded Statement of Account (CODA)
To import a file, go to the Accounting Dashboard, and in the Bank journal, click on Import File.
Tip
Alternatively, you can also:
- click the (ellipsis) icon on the Bank journal and select Import file;
- or access the transaction list by clicking the (ellipsis) icon on the Bank journal and selecting Transactions, then click the (gear) icon and select Import records.
Next, select the file and upload it.
After setting the necessary formatting options and mapping the file columns with their related Odoo fields, you can run a Test and Import your bank transactions.
See also
Register bank transactions manually
You can also record your bank transactions manually. To do so, go to Accounting Dashboard, click on the Bank journal, and then on New. Make sure to fill out the Partner and Label fields to ease the reconciliation process.
Statements
A bank statement is a document provided by a bank or financial institution that lists the transactions that have occurred in a particular bank account over a specified period of time.
In Odoo Accounting, it is optional to group transactions by their related statement, but depending on your business flow, you may want to record them for control purposes.
Important
If you want to compare the ending balances of your bank statements with the ending balances of your financial records, don’t forget to create an opening transaction to record the bank account balance as of the date you begin synchronizing or importing transactions. This is necessary to ensure the accuracy of your accounting.
To access a list of existing statements, go to the Accounting Dashboard, click the (ellipsis) icon next to the bank or cash journal you want to check, then click Statements.
Statement creation from the kanban view
Open the bank reconciliation (kanban) view from the Accounting Dashboard by clicking on the name of the bank journal and identify the transaction corresponding to the last (most recent) transaction of your bank statement. Click on the Statement button when hovering on the upper separator line to create a statement from that transaction down to the oldest transaction that is not yet part of a statement.
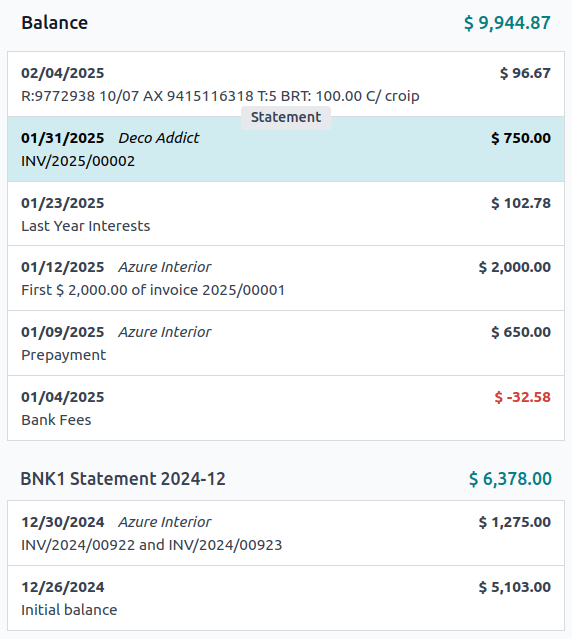
In the Create Statement window, fill out the statement’s Reference, verify its Starting Balance and Ending Balance, and click Save.
Statement creation from the list view
Open the list of transactions by clicking on the name of the bank journal and switching to the list view. Select all the transactions corresponding to the bank statement, and, in the Statement column, select an existing statement or create a new one by typing its reference, clicking on Create and edit…, filling out the statement’s details, and saving.
Statement viewing, editing, and printing
To view an existing statement, click on the statement amount in the reconciliation (kanban) view or click on the statement name in the bank transaction list view. From here, you can edit the Reference, Starting Balance, or Ending Balance.
Note
Manually updating the Starting Balance automatically updates the Ending Balance based on the new value of the Starting Balance and the value of the statement’s transactions.
Warning
If the Starting Balance doesn’t equal the previous statement’s Ending Balance, or if the Ending Balance doesn’t equal the running balance (Starting Balance plus the statement’s transactions), a warning appears explaining the issue. To maintain flexibility, it is still possible to save without first resolving the issue.
To attach a digital copy (i.e., JPEG, PNG, or PDF) of the bank statement for enhanced recordkeeping, click the Attachments button and select the file to attach.
To generate and print a PDF of the bank statement, click the Print button (if accessed via the reconciliation view) or click on the (gear) icon and click Statement (if accessed via the list view).
Note
When a bank statement is generated to be printed, it is automatically added to the Attachments.
On this page
Get Help
Contact Support Ask the Odoo Community
![]()
- User Docs
- Database management
- Developer
- Contributing
EN
Odoo 18
Bank reconciliation
Bank reconciliation is the process of matching your bank transactions with your business records, such as customer invoices, vendor bills, and payments. Not only is this compulsory for most businesses, but it also offers several benefits, such as reduced risk of errors in financial reports, detection of fraudulent activities, and improved cash flow management.
Thanks to the bank reconciliation models, Odoo pre-selects the matching entries automatically.
See also
Bank reconciliation view
To access a bank journal’s reconciliation view, go to your Accounting Dashboard and either:
- click the journal name (e.g., Bank) to display all transactions, including those previously reconciled or
- click the Reconcile items button to display all transactions Odoo pre-selected for reconciliation. You can remove the Not Matched filter from the search bar to include previously reconciled transactions.
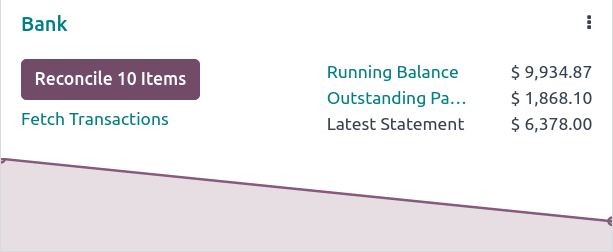
The bank reconciliation view is structured into three distinct sections: transactions, counterpart entries, and resulting entry.
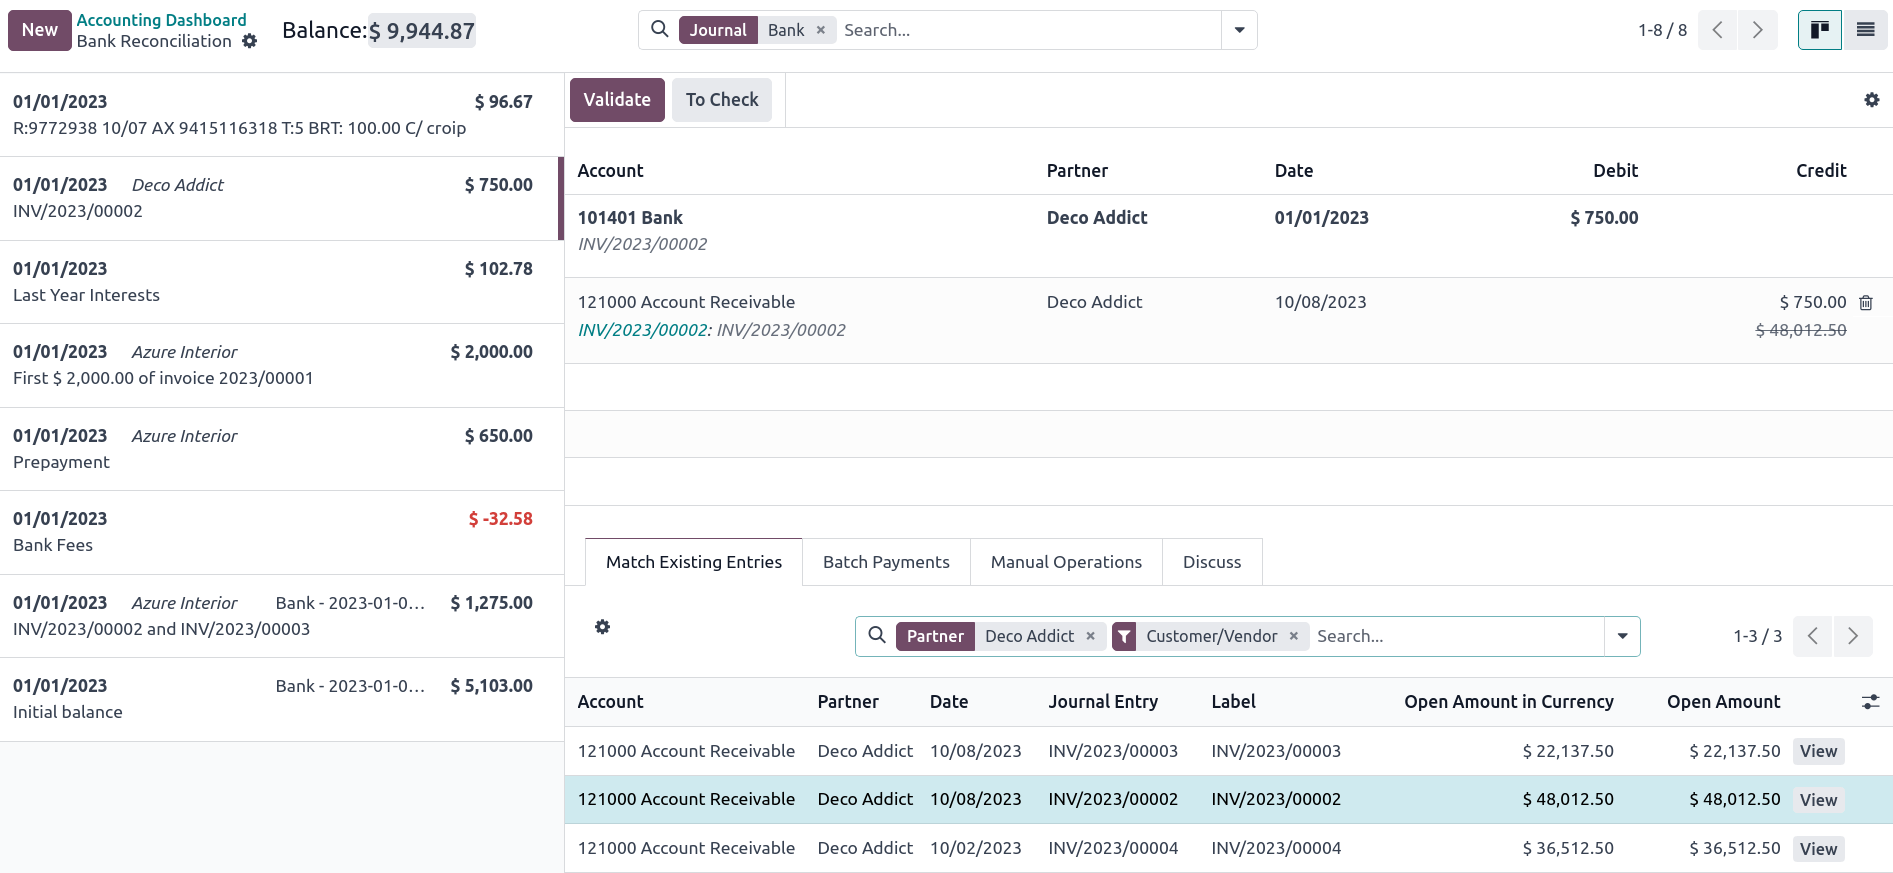 Transactions
The transactions section on the left shows all bank transactions, with the newest displayed first. Click a transaction to select it.
Counterpart entries
The counterpart entries section on the bottom right displays the options to match the selected bank transaction. Multiple tabs are available, including Match existing entries, Batch payments, Manual operations, and Discuss, which contains the chatter for the selected bank transaction.
Resulting entry
The resulting entry section on the top right displays the selected bank transaction matched with the counterpart entries and includes any remaining debits or credits. In this section, you can validate the reconciliation or mark it as To Check. Any reconciliation model buttons are also available in the resulting entry section.
Reconcile transactions
Transactions can be matched automatically with the use of reconciliation models, or they can be matched with existing entries, batch payments, manual operations, and reconciliation model buttons.
- Select a transaction among unmatched bank transactions.
- Define the counterpart. There are several options for defining a counterpart, including matching existing entries, manual operations, batch payments, and reconciliation model buttons.
- If the resulting entry is not fully balanced, balance it by adding another existing counterpart entry or writing it off with a manual operation.
- Click the Validate button to confirm the reconciliation and move to the next transaction.
Tip
If you are not sure how to reconcile a particular transaction and would like to deal with it later, use the To Check button instead. All transactions marked as To Check can be displayed using the To Check filter.
Note
Bank transactions are posted on the journal’s suspense account until reconciliation. At this point, reconciliation modifies the transaction journal entry by replacing the bank suspense account with the corresponding receivable, payable, or outstanding account.
Match existing entries
This tab contains matching entries Odoo automatically pre-selects according to the reconciliation models. The entry order is based on reconciliation models, with suggested entries appearing first.
Tip
The search bar within the Match Existing Entries tab allows you to search for specific journal items.
Batch payments
Batch payments allow you to group different payments to ease reconciliation. Use the Batch Payments tab to find batch payments for customers and vendors. Similarly to the Match Existing Entries tab, the Batch Payments tab has a search bar that allows you to search for specific batch payments.
Manual operations
If there is not an existing entry to match the selected transaction, you may instead wish to reconcile the transaction manually by choosing the correct account and amount. Then, complete any of the relevant optional fields.
Tip
You can use the fully paid option to reconcile a payment, even in cases where only a partial payment is received. A new line appears in the resulting entry section to reflect the open balance registered on the Account Receivable by default. You can choose another account by clicking on the new line in the resulting entry section and selecting the Account to record the open balance.
Note
Lines are silently reconciled unless a write-off entry is required, which launches a reconciliation wizard.
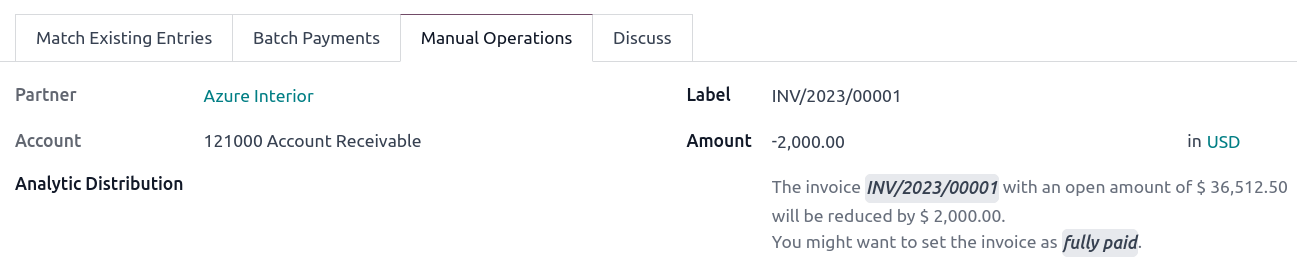
Reconciliation model buttons
Use a reconciliation model button for manual operations that are frequently used. These custom buttons allow you to quickly reconcile bank transactions manually and can also be used in combination with existing entries.
On this page
Get Help
Contact Support Ask the Odoo Community
![]()
- User Docs
- Database management
- Developer
- Contributing
EN
Odoo 18
Reconciliation models
Reconciliation models are used to automate the bank reconciliation process, which is especially handy when dealing with recurring entries like bank fees. Reconciliation models can also be helpful in handling cash discounts.
Each model is created based on a model type and bank transaction conditions.
See also
Reconciliation model types
The reconciliation models are available by going to Accounting ‣ Configuration ‣ Banks: Reconciliation Models. For each reconciliation model, a Type must be set. Three types of models exist:
- Button to generate counterpart entry: a button is created in the resulting entry section of the bank reconciliation view. If clicked, this button generates a counterpart entry to reconcile with the active transaction based on the rules set in the model. The rules specified in the model determine the counterpart entry’s account(s), amount(s), label(s), and analytic distribution;
- Rule to suggest counterpart entry: used for recurring transactions to match the transaction to a new entry based on conditions that must match the information on the transaction;
- Rule to match invoices/bills: used for recurring transactions to match the transaction to existing invoices, bills, or payments based on conditions that must match the information on the transaction.
Default reconciliation models
In Odoo, different models are available by default depending on the company’s fiscal localization. These can be updated if needed. Users can also create their own reconciliation models by clicking New.
Important
If a record matches with several reconciliation models, the first one in the sequence of models is applied. You can rearrange the order by dragging and dropping the handle next to the name.
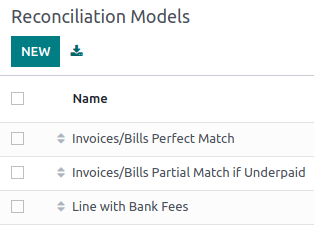
Invoices/Bills perfect match
This model should be at the top of the sequence of models, as it enables Odoo to suggest matching existing invoices or bills with a bank transaction based on set conditions.
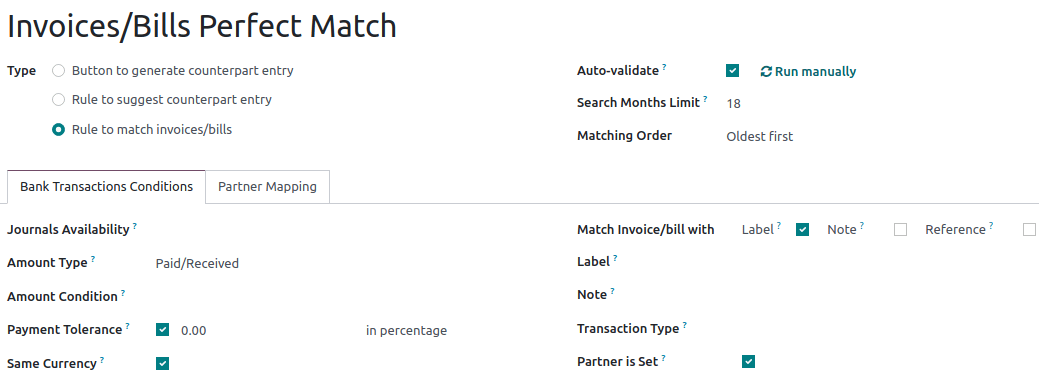
Odoo automatically reconciles the payment when the Auto-validate option is selected, and the model conditions are perfectly met. In this case, it expects to find on the bank statement’s line the invoice/payment’s reference (as Label is selected) and the partner’s name (as Partner is set is selected) to suggest the correct counterpart entry and reconcile the payment automatically.
Invoices/Bills partial match if underpaid
This model suggests a customer invoice or vendor bill that partially matches the payment when the amount received is slightly lower than the invoice amount, for example in the case of cash discounts. The difference is reconciled with the account indicated in the counterpart entries tab.
The reconciliation model Type is Rule to match invoices/bills, and the Payment tolerance should be set.
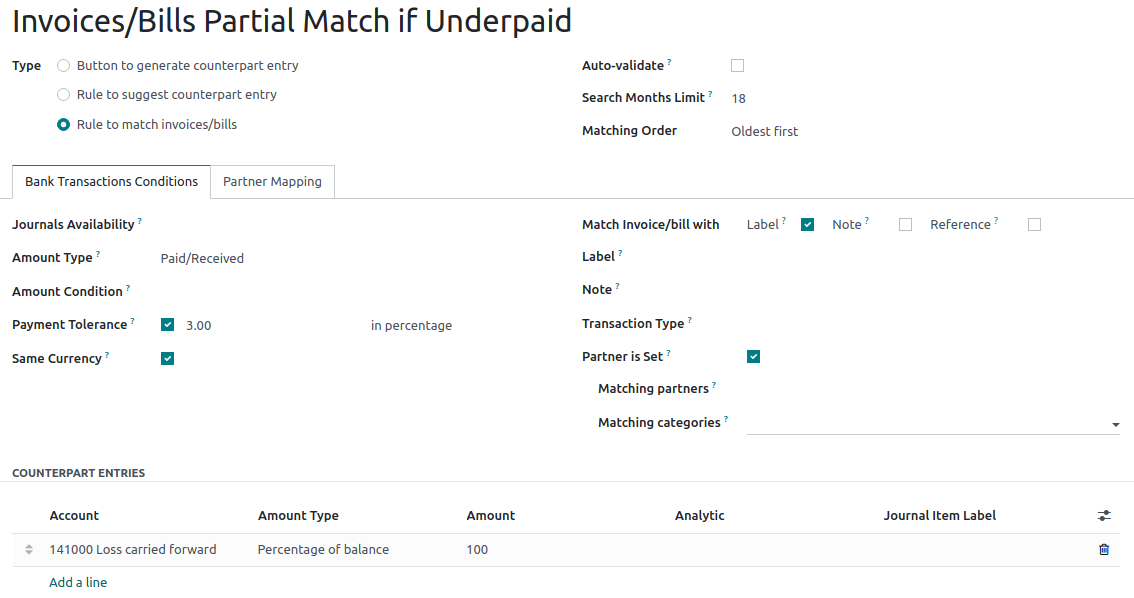
Note
The Payment tolerance is only applicable to lower payments. It is disregarded when an overpayment is received.
See also
Cash discounts and tax reduction
Line with bank fees
This model suggests a counterpart entry according to the rules set in the model. In this case, the reconciliation model Type is Rule to suggest counterpart entry, and the Label can be used for example, to identify the information referring to the Bank fees in the label of the transaction.

Note
Regular expressions, often abbreviated as Regex, can be used in Odoo in various ways to search, validate, and manipulate data within the system. Regex can be powerful but also complex, so it’s essential to use it judiciously and with a good understanding of the patterns you’re working with.
To use regular expressions in your reconciliation models, set the Transaction Type to Match Regex and add your expression. Odoo automatically retrieves the transactions that match your Regex expression and the conditions specified in your model.

Partner mapping
Partner mapping allows you to establish rules for automatically matching transactions to the correct partner account, saving time and reducing the risk of errors that can occur during manual reconciliation. For example, you can create a partner mapping rule for incoming payments with specific reference numbers or keywords in the transaction description. When an incoming payment meets these criteria, Odoo automatically maps it to the corresponding customer’s account.
To create a partner mapping rule, go to the Partner Mapping tab and enter the Find Text in Label, Find Text in Notes, and Partner.

On this page
Get Help
Contact Support Ask the Odoo Community
![]()
- User Docs
- Database management
- Developer
- Contributing
EN
Odoo 18
Internal transfers
Internal money transfers can be handled in Odoo. At least two bank or cash accounts are needed to make internal transfers.
See also
How to add an additional bank account
Configuration
An internal transfer account is automatically created on your database based on your company’s localization and depending on your country’s legislation. To modify the default Internal Transfer account, go to Accounting ‣ Configuration ‣ Settings and scroll down to the Default Accounts section.
Register an internal transfer from one bank to another
When money is transferred from one bank or cash account to another, that amount appears as two transactions on the corresponding journals, whether the transactions are created manually, via import, or via bank synchronization. When reconciling the transaction, select the Internal Transfers reconciliation model button. This reconciliation model button writes the transaction off to the Internal Transfer account.
Tip
Remember to reconcile the transaction for both the outgoing transaction on the journal that sends the payment and the incoming transaction on the journal that receives the payment.
Example
Take, for example, a transfer of $1000 from Bank A to Bank B:
- Bank journal (Bank A)
Account
Debit
Credit
Bank A account
$1,000
Internal transfer account
$1,000
- Bank journal (Bank B)
Account
Debit
Credit
Bank B account
$1,000
Internal transfer account
$1,000
See also
Bank reconciliation Reconciliation models
On this page
Get Help
Contact Support Ask the Odoo Community
![]()
- User Docs
- Database management
- Developer
- Contributing
EN
Odoo 18
Manage a bank account in a foreign currency
In Odoo, every transaction is recorded in the default currency of the company, and reports are all based on that default currency. When you have a bank account in a foreign currency, for every transaction, Odoo stores two values:
- The debit/credit in the currency of the company;
- The debit/credit in the currency of the bank account.
Currency rates are updated automatically using the web services of a banking institution. By default, Odoo uses the European Central Bank’s web services but other options are available.
Configuration
Activate multi-currencies
To work with multiple currencies, go to Accounting ‣ Configuration ‣ Settings ‣ Currencies and tick Multi-Currencies. Under Post Exchange difference entries in:, provide a Journal, a Gain Account, a Loss Account, and then click on Save.
Configure currencies
Once Odoo is configured to support multiple currencies, they are all created by default, but not necessarily active. To activate the new currencies, click on Activate Other Currencies under the Multi-Currencies setting or go to Accounting ‣ Configuration ‣ Accounting: Currencies.
When the currencies are activated, you can choose to automate the currency rate update, or leave it on manual. To configure the rate update, go back to Accounting ‣ Configuration ‣ Settings ‣ Currencies, check Automatic Currency Rates, set Interval to your desired frequency, and then click on Save. You also have the option to choose the Service you wish to obtain currency rates from.
Click on the Update now button (🗘) besides the Next Run field to update the currency rates manually.
Create a new bank account
In the accounting application, go to Accounting ‣ Configuration ‣ Journals and create a new one. Enter a Journal Name and set the Type to Bank. In the Journal Entries tab, enter a short code, a currency, and then finally click on the Bank Account field to create a new account. In the pop-up window of the account creation, enter a name, a code (ex.: 550007), set its type to Bank and Cash, set a currency type, and save. When you are back on the journal, click on the Account Number field, and in the pop-up window, fill out the Account Number, Bank of your account, and save.
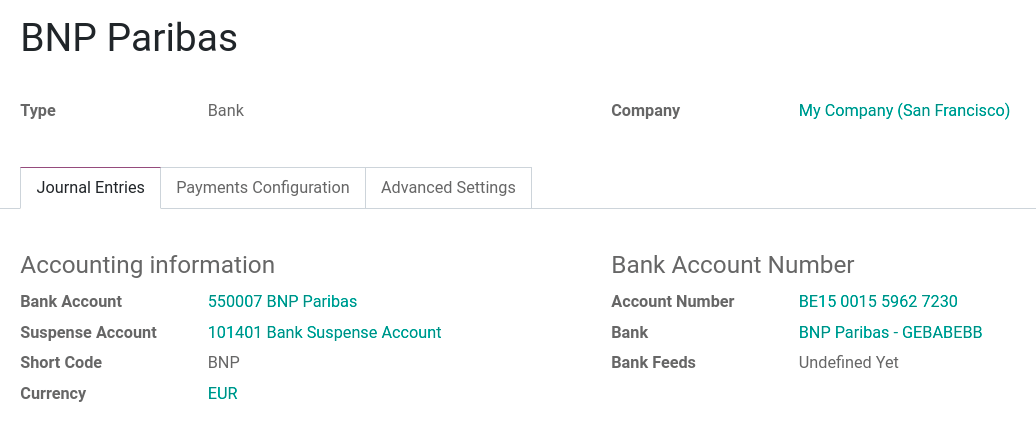
Upon creation of the journal, Odoo automatically links the bank account to the journal. It can be found under Accounting ‣ Configuration ‣ Accounting: Chart of Accounts.
Vendor bill in a foreign currency
To pay a bill in a foreign currency, simply select the currency next to the Journal field and register the payment. Odoo automatically creates and posts the foreign exchange gain or loss as a new journal entry.
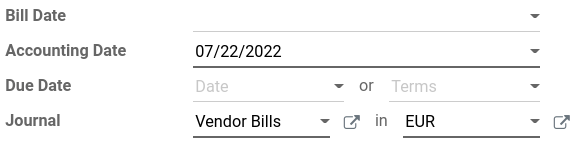
Note
Note that you can pay a foreign bill with another currency. In that case, Odoo automatically converts between the two currencies.
Unrealized Currency Gains/Losses Report
This report gives an overview of all unrealized amounts in a foreign currency on your balance sheet, and allows you to adjust an entry or manually set an exchange rate. To access this report, go to Reporting ‣ Management: Unrealized Currency Gains/Losses. From here, you have access to all open entries in your balance sheet.

If you wish to use a different currency rate than the one set in Accounting ‣ Configuration ‣ Settings ‣ Currencies, click the Exchange Rates button and change the rate of the foreign currencies in the report.
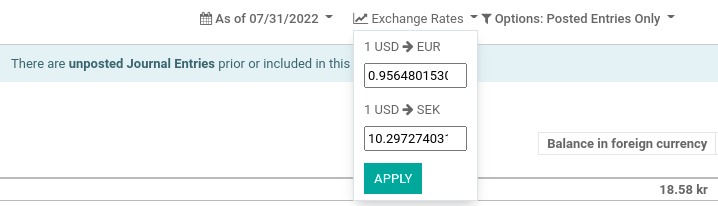
When manually changing exchange rates, a yellow banner appears allowing you to reset back to Odoo’s rate. To do so, simply click on Reset to Odoo’s Rate.
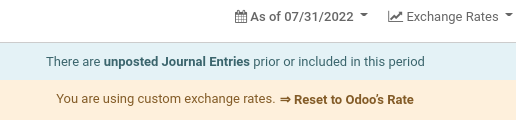
In order to update your balance sheet with the amount of the adjustment column, click on the Adjustment Entry button. In the pop-up window, select a Journal, Expense Account and Income Account to calculate and process the unrealized gains and losses.
You can set the date of the report in the Date field. Odoo automatically reverses the booking entry to the date set in Reversal Date.
Once posted, the adjustment column should indicate 0.00, meaning all unrealized gains/losses have been adjusted.

On this page
Get Help
Contact Support Ask the Odoo Community
![]()
- User Docs
- Database management
- Developer
- Contributing
EN
Odoo 18
Loans management
Odoo’s loan management gives a comprehensive list of all loans undertaken by your company in order to maintain a holistic and forecasted view of upcoming due dates (e.g., cash forecast). Set up amortization schedules—or import them—and let Odoo automatically handle monthly interest and principal adjustments so that your financial reports are always accurate with minimal effort.
Create a new loan
Create a new loan by going to Accounting ‣ Accounting ‣ Loans. When creating a new loan, there are three options for how to create amortization schedules:
- importing it from a supported file;
- calculating it from multiple input values (e.g., the Amount Borrowed, the Duration, etc.) using the Compute button;
- manually filling in the lines of the schedule.
In each case, three different fields are required for each line of the amortization schedule: the Date, the Principal, and the Interest.
The Amount Borrowed, Interest, and Duration fields will be red if the sum of the lines does not match the total of the amortization schedule lines.
Loan entries mechanism
When the amount borrowed is credited to a bank account, it should be transferred to a long-term account (defined in the Loan Settings tab). Then, upon the validation of the loan, Odoo creates the necessary journal entries so that there is always a holistic and forecasted view of upcoming due dates. The entire process is completely automated with a long-term and short-term principal reclassification mechanism.
For each line of the amortization schedule, Odoo creates the following entries:
A payment entry on the same date that
- debits the principal amount to the long-term account;
- debits the interest amount to the expense account;
- credits the payment amount to the short-term account: this is the amount that will be withdrawn by the bank.
A reclassification entry on the same date that
- debits the sum of the principal amounts of the next 12 months to the long-term account;
- credits the sum of the principal amounts of the next 12 months to the short-term account.
A reversed entry of the reclassification entry on the next day that simply reverses the previous one.
With this mechanism, month after month, the short-term account is always up to date with the current short-term due amounts.
Closing a loan
By default, a loan will be closed whenever its last payment entry is posted. However, it can also be manually closed (e.g., because it is being paid off early) by clicking on the Close button. A wizard will appear asking from which date the loan should be closed. All draft entries after this date will be deleted too.
A loan can also be cancelled. In that case, all entries will be deleted even if they were already posted.
Loans Analysis Report
By going to Accounting ‣ Reporting ‣ Loans Analysis, you can access a report with a pivot view of your ongoing loans. By default, the report shows the principal, interest, and total payment for each year for the loan duration.
On this page
Get Help
Contact Support Ask the Odoo Community
![]()
- User Docs
- Database management
- Developer
- Contributing
EN
Odoo 18
Reporting
Odoo includes generic and dynamic reports available for all countries, regardless of the localization package installed:
- Balance Sheet
- Profit and Loss
- Executive Summary
- General Ledger
- Aged Receivable
- Aged Payable
- Cash Flow Statement
- Tax Report
To expand the lines of a report and view its details, click the (right arrow) on the left. Then click the (down arrow) to the right of the account, journal entry, payment, invoice, etc. to Annotate and view the details.
To export reports in PDF or XLSX format, click PDF at the top or click the (down arrow) icon next to the PDF button and select XLSX.
To compare values across periods, click the Comparison menu and select the periods you want to compare.
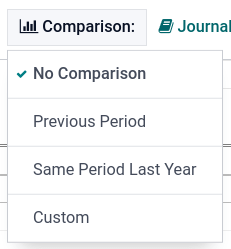
Balance Sheet
The Balance Sheet shows a snapshot of your organization’s assets, liabilities, and equity at a particular date.
Profit and Loss
The Profit and Loss report (or Income Statement) shows your company’s net income by deducting expenses from revenue for the reporting period.
Executive Summary
The Executive Summary provides an overview of all the important figures for overseeing your company’s performance.
It includes the following items:
- Performance:
- Gross profit margin:
The contribution of all sales your business makes minus any direct costs needed to make those sales (labor, materials, etc.). - Net profit margin:
The contribution of all sales made by your business minus any direct costs needed to make those sales and fixed overheads your company has (electricity, rent, taxes to be paid as a result of those sales, etc.). - Return on investment (per annum):
The ratio of the net profit to the amount of assets the company used to make those profits.
- Gross profit margin:
- Position:
- Average debtors days:
The average number of days it takes your customers to (fully) pay you across all your customer invoices. - Average creditors days:
The average number of days it takes you to (fully) pay your suppliers across all your bills. - Short-term cash forecast:
How much cash is expected in or out of your business in the next month, i.e., the balance of your Sales account for the month minus the balance of your Purchases account for the month. - Current assets to liabilities:
Also referred to as the current ratio, this is the ratio of current assets (assets that could be turned into cash within a year) to the current liabilities (liabilities that will be due in the next year). It is typically used to measure a company’s ability to service its debt.
- Average debtors days:
General Ledger
The General Ledger report shows all transactions from all accounts for a selected date range. The initial summary report shows the totals for each account. To expand an account and view its details, click the (right arrow) on the left. This report is useful for reviewing each transaction that occurred during a specific period.
Aged Receivable
The Aged Receivable report shows the sales invoices awaiting payment during a selected month and several months prior.
Aged Payable
The Aged Payable report displays information on individual bills, credit notes, and overpayments you owe and how long these have gone unpaid.
Cash Flow Statement
The Cash Flow Statement shows how changes in balance sheet accounts and income affect cash and cash equivalents and breaks the analysis down to operating, investing, and financing activities.
Tax Report
The Tax Report shows the NET and TAX amounts for all the taxes grouped by type (Sales/Purchases).
On this page
Get Help
Contact Support Ask the Odoo Community
![]()
- User Docs
- Database management
- Developer
- Contributing
EN
Odoo 18
Tax return (VAT declaration)
Companies with a registered VAT number must submit a tax return on a monthly or quarterly basis, depending on their turnover and the registration regulation. A tax return - or VAT return - gives the tax authorities information about the taxable transactions made by the company. The output tax is charged on the number of goods and services sold by a business, while the input tax is the tax added to the price when goods or services are purchased. Based on these values, the company can calculate the tax amount they have to pay or be refunded.
Note
You can find additional information about VAT and its mechanism on this page from the European Commission: “What is VAT?”.
Prerequisites
Tax Return Periodicity
The configuration of the Tax Return Periodicity allows Odoo to compute your tax return correctly and also to send you a reminder to never miss a tax return deadline.
To do so, go to Accounting ‣ Configuration ‣ Settings. Under the Tax Return Periodicity, you can set:
- Periodicity: define here whether you submit your tax return on a monthly or quarterly basis;
- Reminder: define when Odoo should remind you to submit your tax return;
- Journal: select the journal in which to record the tax return.
Note
This is usually configured during the app’s initial set up.
Tax Grids
Odoo generates tax reports based on the Tax Grids settings that are configured on your taxes. Therefore, it is crucial to make sure that all recorded transactions use the right taxes. You can see the Tax Grids by opening the Journal Items tab of any invoice and bill.
To configure your tax grids, go to Accounting ‣ Configuration ‣ Taxes, and open the tax you want to modify. There, you can edit your tax settings, along with the tax grids that are used to record invoices or refunds.
Note
Taxes and reports are usually already pre-configured in Odoo: a fiscal localization package is installed according to the country you select at the creation of your database.
Close a tax period
Tax lock date
Any new transaction whose accounting date prior to the Lock Tax Return date has its tax values moved to the next open tax period. This is useful to make sure that no change can be made to a report once its period is closed.
Therefore, we recommend locking your tax date before working on your Closing Journal Entry. This way, other users cannot modify or add transactions that would have an impact on the Closing Journal Entry, which can help you avoid some tax declaration errors.
To check the current Lock Tax Return date, or to edit it, go to Accounting ‣ Accounting ‣ Lock Dates.
Tax return
Once all the transactions involving taxes have been posted for the period you want to report, open the Tax Return report by going to Accounting ‣ Reporting ‣ Tax Return. Select the period you want to declare using the date filter to have an overview of the tax return. Then, click Closing Entry to create a tax closing journal entry. Odoo automatically proposes the details of the journal entry. Make any necessary changes and click Post.
From the report, click PDF to download a PDF of the tax return. Alternatively, click the (gear) icon, then click Download Excel to download an XLSX of the tax return. To save the report to the Documents app, click the (gear) icon, then click Copy to Documents. Select the format to Export to, the Documents Name, the Folder to store it in, and add any Tags.
The report includes all the values to report to the tax authorities, along with the amount to be paid or refunded.
Note
If you forgot to lock your tax date before clicking on Closing Journal Entry, then Odoo automatically locks your fiscal period on the same date as the accounting date of your entry. This safety mechanism can prevent some fiscal errors, but it is advised to lock your tax date manually before, as described above.
See also
On this page
Get Help
Contact Support Ask the Odoo Community
![]()
- User Docs
- Database management
- Developer
- Contributing
EN
Odoo 18
Tax carryover
When performing tax reports, the tax carryover feature allows carrying amounts from one period to another without creating new entries.
It has been created to meet the legal requirements of specific locations, where amounts must be transferred from period to period (for example, because the total of the line is negative).
The feature is activated by default in countries where it is required, such as Belgium, France, and Italy. There is no specific configuration required.
Let’s take an example of a Belgian company that created a credit note of 100 for one of their customers. The due tax is 21%.
In this case, as per local regulation, grid 81 of the tax report may contain a negative amount. But it must be declared to the government as zero, and the negative amount should be carried over to the next period.
If we go to Accounting app ‣ Reporting ‣ Tax Report, a pop-up on line 81 explains that the amount will be carried over in the next period.
At the time of the tax closing period, the tax report shows that the amount was carried over from the previous period. It also indicates the amount that will be carried over to this line in the next period based on the existing transactions and the carryover from the previous period.
Get Help
Contact Support Ask the Odoo Community
![]()
- User Docs
- Database management
- Developer
- Contributing
EN
Odoo 18
Analytic accounting
Analytic accounting helps you track costs and revenues, as well as analyze the profitability of a project or service. When creating your journal entries, the analytic widget allows the distribution of costs in one or more analytic accounts.
Configuration
Enable the Analytic Accounting feature by going to Accounting ‣ Configuration ‣ Settings ‣ Analytics.
Analytic accounts
The analytic accounts give an overview of your costs and revenue.
Access your existing analytic accounts by going to Accounting ‣ Configuration ‣ Analytic Accounting: Analytic Accounts. To create a new analytic account, click New, and fill in the required information:
- Analytic Account: add the name of your analytic account;
- Customer: select the customer related to your project;
- Reference: add a reference to make it easier to find the account when you are on your bill;
- Plan: add an analytic plan;
- Company: if you are managing multiple companies, select the company for which the analytic account will be used;
- Currency: select the currency of the analytic account;
Then, fill in your budget information.
Analytic plans
The analytic plans allow you to analyze your accounting. For example, to track costs and revenues by project or department.
You can access the analytic plans by going to Accounting ‣ Configuration ‣ Analytic Accounting: Analytic Plans. Click New to create a new plan.
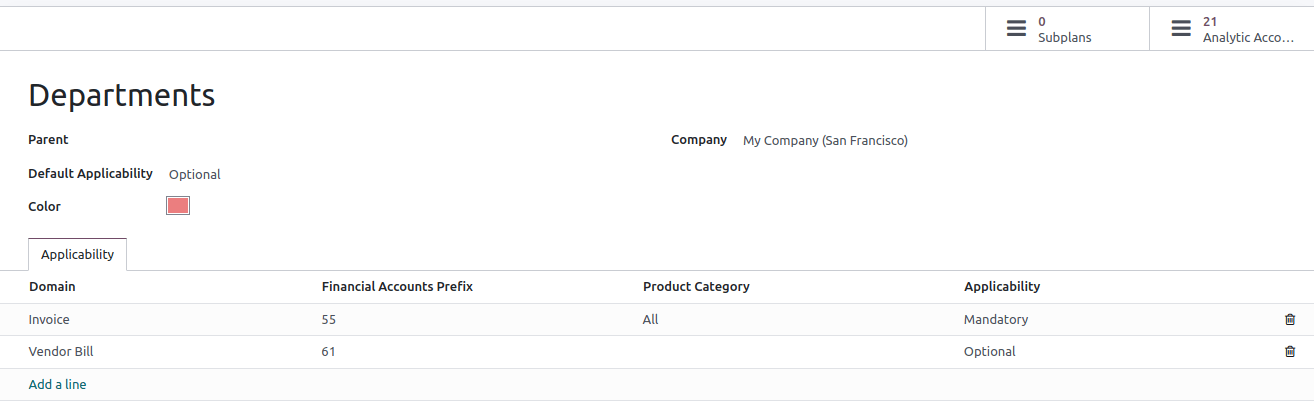
The following information must be completed:
- Parent: link your plan to another Analytic Plan to build a hierarchy between your plans;
- Default Applicability: decide how your plan behaves in the widget when creating a new journal entry:
- Optional: if selected, it is not mandatory to add the analytic plan in the widget;
- Mandatory: if selected, an orange bullet is visible in the widget next to the plan until the analytic distribution is done (the bullet then turns to green); it is not possible to confirm the entry if no analytic account is selected;
- Unavailable: if selected, the plan is not available in the widget.
- Color: select the color of the tag related to this specific plan;
- Company: add the company to which the plan applies;
You can also fine-tune your plans’ applicability by filling in the Applicability tab:
- Domain: choose to which accounting document your plan applies;
- Financial Accounts Prefix: select the prefix of the account(s) to which this plan should be applied;
- Product Category: decide to which product category the plan applies;
- Applicability: decide how your plan behaves in the widget when creating a new journal
entry. The applicability you set here always overrides the default applicability.
Two smart buttons are available in the top-right corner:
- Subplans: can be created to have a more complex analytic structure. Click the Subplans smart button, and then New to add a subplan;
- Analytic Accounts: to reach the analytic accounts related to the plan.
Note
- The analytic widget is prefilled based on the applicability, and the Analytic Distribution Models;
- Each analytic plan must have at least one analytic account.
Analytic distribution
Add a plan in the Analytic column when creating an invoice or bill. This field is mandatory only if you previously linked your analytic plan to at least one analytic account. After adding the plan, a widget opens where you can fill in the different information. You can add tags to reflect the related analytic accounts and decide how to split the costs between the accounts by modifying the percentage.
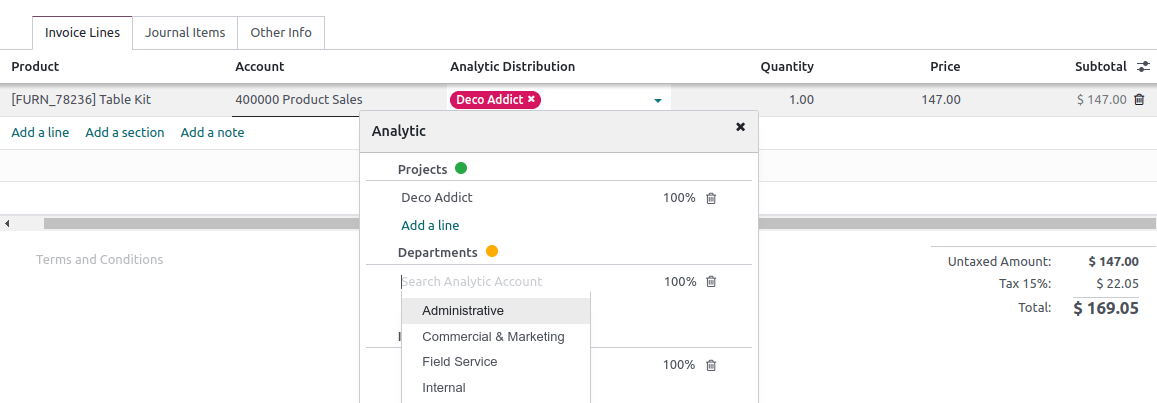
Analytic distribution models
The analytic distribution models automatically apply a specific distribution based on defined criteria.
To create a new analytic distribution model, go to Accounting ‣ Configuration ‣ Analytic Distribution Models, click New and set the conditions your model has to meet to automatically apply:
- Accounts Prefix: this analytic distribution will apply to all financial accounts sharing the prefix specified;
- Partner: select a partner for which the analytic distribution will be used;
- Partner Category: this field is not visible by default: add it by clicking on the columns selection button, and tick the Partner Category box. Add the partner category for which the analytic distribution will be used;
- Product: select a product for which the analytic distribution will be used;
- Product Category: this field is not visible by default: add it by clicking on the columns selection button, and tick the Product Category box. Select a product category for which the analytic distribution will be used;
- Analytic: add the analytic accounts and their distribution;
- Company: select a company for which the analytic distribution will be used;
- Analytic Distribution: if the above conditions are met, the Analytic plan defined in this field as well as the distribution to be applied between the different analytic accounts is selected automatically on the entry.
Tip
To mass edit several entries simultaneously, go to Accounting ‣ Accounting ‣ Journal items, and select the ones that need to be updated. Add the required distribution in the Analytic Distribution column, and click on the floppy disk icon to save. The analytic distribution template pops up, and you can save it for later use.
On this page
Get Help
Contact Support Ask the Odoo Community
![]()
Budgets
Analytic budgets track specific activities and projects using analytic accounts, helping businesses make informed decisions about specific departments, projects, or other groups of transactions. In contrast, financial budgets are tied to the general ledger accounts that appear on the profit and loss and focus on the company’s overall economic position.
Analytic budgets
Analytic budgets allow for allocating and tracking income and expenses in detail, breaking down costs and revenues by specific projects, departments, or groups of transactions. Analytic budgets can be applied across various departments or projects to measure profitability and performance. Odoo manages analytic budgets using analytic accounting.
To activate the option for creating analytic budgets, go to Accounting ‣ Configuration ‣ Settings, and enable Budget Management in the Analytics section.
Important
Odoo structures budgets using plans and accounts, which must be configured before creating a budget.
Set an analytic budget
To create a new budget, go to Accounting ‣ Accounting ‣ Analytic Budgets and click New. Make sure the following fields are appropriately completed: Budget Name, Period, and Budget Type.
Click Add a line in the Budget Lines tab to structure the budget with the analytic plans and accounts previously created. While the analytic plans correspond to the column names, select the analytic accounts to define the budget lines and set the amounts for each in the Budgeted column. Once all the budget lines are settled, click Open. If changes need to be made once the budget’s status is Open, there are two options:
- Reset to Draft: To overwrite the data, then reopen the budget.
- Revise: A new budget will be created. Once it is Open, a Rev reference is added to the Budget Name. The original budget is then Revised.
Check an analytic budget
Once the budget is Open, two additional columns are available: Committed and Achieved. These columns’ amounts are automatically calculated based on the related analytic distribution of journal items. When the analytic distribution of a journal item within the budget’s period is updated, the budget’s columns for the analytic account(s) selected in the distribution are automatically updated. The Achieved amount reflects the current result according to the items of confirmed journal entries for the associated analytic account. In contrast, the Committed amount displays the full value of the Achieved amount, plus any confirmed sales or purchase orders that have not yet been invoiced or billed.
Note
- When a line in a request for quotation or purchase order includes an analytic distribution, a Budget smart button appears, providing a link to the budget report for more details.
- For Open budgets, if a request for quotation or a purchase order is created using the associated analytic distribution and exceeds the allocated budget amount, the corresponding purchase order line is highlighted in red.
To reveal the Theoretical amount or percentage, use the (adjust settings) icon in the Budget Lines’ header. The Theoretical amount represents the amount of money that could theoretically have been spent or should have been received based on the current date relative to the start/end dates. Click Details to open a filtered view of the budget report related to that specific budget line.

Note
Deleting a budget is only allowed in the Draft and Cancelled stages.
To view the budget lines of one or multiple budgets directly from the Budgets list view, select the budget(s) and click Budget Lines.
Generate periodic budgets
To create periodic budgets (monthly, quarterly, and yearly) for the selected Analytic Plans, click Generate. A new budget is created for each Period between the start and end dates:
- If a single analytic plan is selected, each budget includes a line for each account in that analytic plan.
- If multiple analytic plans are selected, each budget includes a line for each account/analytic plan combination.
To generate periodic budgets, follow these steps:
- In the Budgets list view, click Generate.
- In the Generate Budget window, set the dates and select the Period and the Analytic Plans.
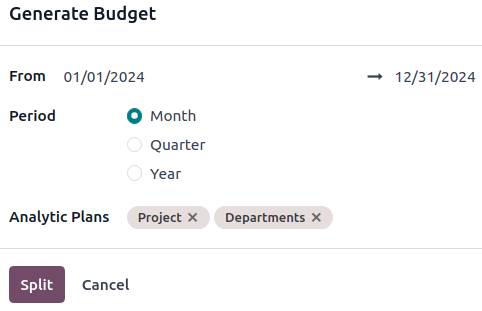
- Click Split to create the periodic budgets.
- Click Budgets in the top-left corner to return to the Budgets list view.
- One by one, click on the different periodic budgets with the Draft status to open them and set the amounts in the Budgeted column for each analytic account linked to the chosen analytic plans.
- Click Open for each periodic budget.
Reporting
To perform various reporting actions, go to Accounting ‣ Reporting ‣ Budget Report, then:
- Track, analyze, and compare budget data.
- Filter and group data using the (plus-square) or (minus-square) icon.
- Drill down into the report to see more details on the actual amounts and transactions.
- Export the data for further analysis or reporting needs.
Financial budgets
Financial budgets are structured around specific income and expense accounts and transactions for official financial reporting and compliance purposes.
Note
Financial budgets are available on the Profit and Loss report.
Set a financial budget
To create a new financial budget, follow these steps:
- Go to Accounting ‣ Reporting ‣ Profit and Loss to open the Profit and Loss report.
- Click the (calendar) button to use the date selector and choose a period.
- Click the Budget button and name the budget. A new column labeled with the budget name will appear next to the Balance column.
- Assign amounts to each account requiring analysis.
- A new % column will appear to the right of the new budget column, indicating the current status.
Different financial budgets can be created using these steps for comparison purposes.
Note
The date selector enables the division of periods and navigation between periods, automatically updating the amounts accordingly.
- User Docs
- Database management
- Developer
- Contributing
EN
Odoo 18
Intrastat
Intrastat is the data collection and statistics production system for goods traded among EU member states. It collects data on:
- Commercial transactions of goods for use, consumption, investment, or resale with ownership transfer;
- Goods movements without transfer of ownership (e.g., stock relocations or moves of goods before or after outsourced production or processing, and after maintenance or repair);
- Returns of goods.
Note
Although the Intrastat system continues to be used, the term Intrastat is not used in the latest legislation, referring instead to intra-Union trade in goods statistics.
See also
Eurostat Statistics Explained - Glossary: Intrastat
General configuration
Enable the Intrastat report by going to Accounting ‣ Configuration ‣ Settings. Under the Customer Invoices section, tick Intrastat and then Save.
Default transaction codes: invoice and refund
You can set a default transaction code for all newly created invoice and refund transactions. Under Accounting ‣ Configuration ‣ Settings, select a Default invoice transaction code and/or a Default refund transaction code and then Save. The code will be set automatically on all respective invoice lines.
Region code
The region code is only used by Belgian companies. Under Accounting ‣ Configuration ‣ Settings, select the Company Intrastat Region where the company is located and then Save.
Tip
If your warehouses are located in more than one region, you can define the region code at the level of each warehouse instead. To do so, go to Inventory ‣ Configuration ‣ Warehouses, select a warehouse, set its Intrastat region, and then Save.
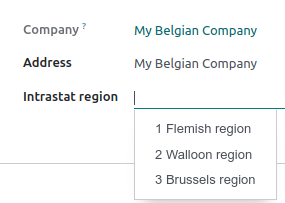
Product configuration
All products must be properly configured to be included in the Intrastat report.
Commodity code
Commodity codes are internationally recognized reference numbers used to classify goods depending on their nature. Intrastat uses the Combined Nomenclature.
To add a commodity code, go to Accounting ‣ Customers ‣ Products and select a product. Under the Accounting tab, set the product’s Commodity Code.
See also
National Bank of Belgium - Intrastat commodity codes
Quantity: weight and supplementary unit
Depending on the nature of the goods, it is necessary to specify either the product’s weight in kilos (without packaging) or the product’s supplementary unit, such as square meter (m2), number of items (p/st), liter (l), or gram (g).
To add a product’s weight or supplementary unit, go to Accounting ‣ Customers ‣ Products and select a product. Under the Accounting tab, depending on the commodity code set, either fill in the product Weight or its Supplementary Units.
Country of origin
To add the product’s country of origin, go to Accounting ‣ Customers ‣ Products and select a product. Under the Accounting tab, set the Country of Origin.
Invoices and bills configuration
Once products are properly configured, several settings must be configured on the invoices and bills you create.
Transaction code
Transaction codes are used to identify a transaction’s nature. Default transaction codes can be set for invoice and refund transactions.
To set a transaction code on an invoice line, create an invoice or a bill, click the columns selection button, tick Intrastat, and use the newly-added Intrastat column to select a transaction code.
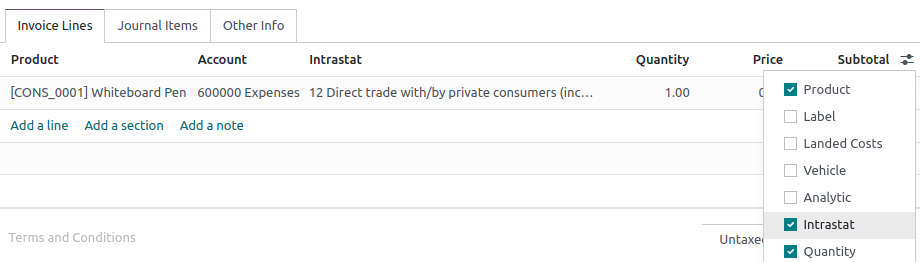
See also
National Bank of Belgium - Intrastat: Nature of transactions from January 2022
Partner country
The partner country represents the vendor’s country for bills and the customer’s country for invoices. It is automatically filled in using the country set in the contact’s Country field.
To edit the partner country manually, create an invoice or a bill, click the Other Info tab, and select the Intrastat Country.
Transport code
The transport code identifies the presumed mode of transport used to send the goods (arrival or dispatch).
To add the transport code, create an invoice or a bill, go to the Other info tab, and select the Intrastat Transport Mode.
Value of the goods
The value of a good is the untaxed Subtotal (Price multiplied by Quantity) of an invoice line.
Partner configuration
Two fields from the partner’s contact form are used with Intrastat: VAT and Country. The country can be manually set on the invoice or bill.
Generate the Intrastat report
Generate the report by going to Accounting ‣ Reporting ‣ Audit Reports: Intrastat Report. It is automatically computed based on the default configuration and the information found on the products, invoices and bills, and partners.
Export the report as a PDF, XLSX, or XML file to post it to your legal administration.
Each report line refers to a single invoice line and contains the following information:
- Invoice or bill reference number;
- System, which is a code automatically generated depending on whether the document is an invoice (dispatch) or a bill (arrival);
- Country, which is the vendor’s country for arrivals and the customer’s country for dispatches;
- Transaction Code;
- (If your company is located in Belgium) Region Code;
- Commodity Code;
- Origin Country;
- Partner VAT;
- Transport Code;
- Incoterm Code;
- Weight;
- Supplementary Units; and
- Value, which is always expressed in euros even if the original invoice or bill used another currency.
On this page
Get Help
Contact Support Ask the Odoo Community
![]()
- User Docs
- Database management
- Developer
- Contributing
EN
Odoo 18
Data inalterability check report
Tax authorities in some countries require companies to prove their posted accounting entries are unaltered, meaning that once an entry has been secured, it can no longer be changed.
To do so, Odoo creates a unique fingerprint for each secured entry thanks to the SHA-256 algorithm. This fingerprint is called a hash. The hash is generated by taking an entry’s essential data (the values of the name, date, journal_id, company_id, debit, credit, account_id, and partner_id fields), concatenating it, and inputting it to the SHA-256 hash function, which then outputs a fixed size (256-bit) string of characters. The hash function is deterministic (the same input always creates the same output): any minor modification to the original data would completely change the resulting hash. Consequently, the SHA-256 algorithm is often used, among others, for data integrity verification purposes.
In addition, the previous entry’s hash is always added to the next entry to form a hash chain. This is used to ensure a new entry is not added afterward between two secured entries, as doing so would break the hash chain.
Note
Hashes generated by the SHA-256 algorithm are theoretically not unique, as there is a finite number of possible values. However, this number is exceptionally high: 2²⁵⁶, which is a lot bigger than the number of atoms in the known universe. This is why hashes are considered unique in practice.
Inalterability features
Inalterability features can be enabled by activating the secure posted entries with hash option on any journal or using the secure entries wizard.
- Two indicators are added to the journal entry’s form view. They show whether the entry is secured or not.
- A or (lock icon) next to the Posted state.
- A Secured checkbox in the Other info tab.
- A Not Secured filter is available on journal entries and journal items’ list views. It can be used to find posted journal entries that are not secured yet.
- The option to open the secure entries wizard is displayed in the Accounting menu.
Secure posted entries with hash
To activate the hashing function on a specific journal, go to Accounting ‣ Configuration ‣ Journals. Open a sales, purchase, or miscellaneous journal, go to the Advanced Settings tab, and enable Secure Posted Entries with Hash. Journals for which the feature is activated are called “restricted”.
To compute the hash of an entry, Odoo retrieves the predecessor entries of the chain (i.e., the entries with the same sequence prefix) and hashes them in a continuous way from the last hashed entry to the new entry to hash.
Warning
Once you post an entry in a restricted journal, you cannot disable the feature anymore, nor edit any secured entry.
Secure entries wizard
You can also use the Secure Entries Wizard to secure all journal entries, in all journals, up to a specific date.
Note
The wizard operates independently of the journal settings and journal types.
To open it, activate the developer mode, go to Accounting ‣ Accounting, and click on Secure Entries. If the inalterability features are activated, it is also visible outside the debug mode.
To secure entries, select a date up to which all entries should be secured and press Secure Entries.
Warning
After securing the entries, you can no longer edit them.
Note
It can happen that entries that are past the selected date are secured. This is possible since the hash chain corresponds to the sequence prefix, ordered by sequence number.
Report download
To download the data inalterability check report, go to Accounting ‣ Configuration ‣ Settings ‣ Reporting and click on Download the Data Inalterability Check Report.
The report’s first section is an overview of all journal sequence prefixes containing hashed entries. In the Restricted column, you can see whether or not a journal has the secure posted entries with hash option (V) activated or not (X). The Check column tells you whether all entries are correctly hashed.

The second section gives a more detailed result of the data consistency check for each hashed journal sequence prefix. You can view the first hashed entry and its corresponding hash, as well as the last hashed entry and its corresponding hash.

On this page
Get Help
Contact Support Ask the Odoo Community
![]()
- User Docs
- Database management
- Developer
- Contributing
EN
Odoo 18
Custom reports
Odoo comes with a powerful and easy-to-use reporting framework. The engine allows you to create new reports, such as tax reports, or balance sheets and income statements with specific groupings and layouts.
Important
Activate the developer mode to access the accounting report creation interface.
To create a new report, go to Accounting ‣ Configuration ‣ Management: Accounting Reports. From here, you can either create a root report or a variant.
Root reports
Root reports can be regarded as generic, neutral accounting reports. They serve as models on which local accounting versions are built. If a report has no root report, it is considered to be a root report itself.
Example
A tax report for Belgium and the US would both use the same generic version as a base and adapt it for their domestic regulations.
When creating a new root report, you need to create a menu item for it. To do so, open the report and then, on that same report, click on Action ‣ Create Menu Item. Refresh the page; the report is now available under Accounting ‣ Reporting.
Note
Cases that require creating a new root report are rare, such as when a country’s tax authorities require a new and specific type of report.
Variants
Variants are country-specific versions of root reports and, therefore, always refer to a root report. To create a variant, select a generic (root) report in the Root Report field when creating a new report.
When a root report is opened from one of the accounting app’s main menus, all its variants are displayed in the variant selector in the top right corner of the view.
Example
In the following image, VAT Report (BE) is the variant of the root Generic Tax report.
Lines
After having created a report (either root or variant), you need to fill it with lines. You can either create a new one by clicking on Add a line, or modify an existing line by clicking on it. All lines require a Name, and can have an optional additional Code (of your choice) if you wish to use their value in formulas.
Expressions
Each line can contain one or multiple expressions. Expressions can be seen as sub-variables needed by a report line. To create an expression, click on Add a line within a line report.
When creating an expression, you must attribute a label used to refer to that expression. Therefore, it has to be unique among the expressions of each line. Both a Computation Engine and a Formula must also be indicated. The engine defines how your formula(s) and subformula(s) are interpreted. It is possible to mix expressions using different computation engines under the same line if you need to.
Note
Depending on the engine, subformulas may also be required.
‘Odoo Domain’ engine
With this engine, a formula is interpreted as an Odoo domain targeting account.move.line objects.
The subformula allows you to define how the move lines matching the domain are used to compute the value of the expression:
sum
The result is the sum of all the balances of the matched move lines.
sum_if_pos
The result is the sum of all the balances of the matched move lines if this amount is positive. Otherwise, it is 0.
sum_if_neg
The result is the sum of all the balances of the matched move lines if this amount is negative. Otherwise, it is 0.
count_rows
The result is the number of sub-lines of this expression. If the parent line has a group-by value, this will correspond to the number of distinct grouping keys in the matched move lines. Otherwise, it will be the number of matched move lines.
You can also put a - sign at the beginning of the subformula to reverse the sign of the result.

‘Tax Tags’ engine
A formula made for this engine consists of a name used to match tax tags. If such tags do not exist when creating the expression, they will be created.
When evaluating the expression, the expression computation can roughly be expressed as: (amount of the move lines with + tag) - (amount of the move lines with - tag).
Example
If the formula is tag_name, the engine matches tax tags +tag_name and -tag_name, creating them if necessary. To exemplify further: two tags are matched by the formula. If the formula is A, it will require (and create, if needed) tags +A and -A.
‘Aggregate Other Formulas’ engine
Use this engine when you need to perform arithmetic operations on the amounts obtained for other expressions. Formulas here are composed of references to expressions separated by one of the four basic arithmetic operators (addition +, subtraction -, division /, and multiplication *). To refer to an expression, type in its parent line’s code followed by a period . and the expression’s label (ex. code.label).
Subformulas can be one of the following:
if_above(CUR(amount))
The value of the arithmetic expression will be returned only if it is greater than the provided bound. Otherwise, the result will be 0.
if_below(CUR(amount))
The value of the arithmetic expression will be returned only if it is lower than the provided bound. Otherwise, the result will be 0.
if_between(CUR1(amount1), CUR2(amount2))
The value of the arithmetic expression will be returned only if it is strictly between the provided bounds. Otherwise, it will be brought back to the closest bound.
if_other_expr_above(LINE_CODE.EXPRESSION_LABEL, CUR(amount))
The value of the arithmetic expression will be returned only if the value of the expression denoted by the provided line code and expression label is greater than the provided bound. Otherwise, the result will be 0.
if_other_expr_below(LINE_CODE.EXPRESSION_LABEL, CUR(amount))
The value of the arithmetic expression will be returned only if the value of the expression denoted by the provided line code and expression label is lower than the provided bound. Otherwise, the result will be 0.
CUR is the currency code in capital letters, and amount is the amount of the bound expressed in that currency.
You can also use the cross_report subformula to match an expression found in another report.
‘Prefix of Account Codes’ engine
This engine is used to match amounts made on accounts using the prefixes of these accounts’ codes as variables in an arithmetic expression.
Example
21
Arithmetic expressions can also be a single prefix, such as here.
Example
21 + 10 - 5
This formula adds the balances of the move lines made on accounts whose codes start with 21 and 10, and subtracts the balance of the ones on accounts with the prefix 5.
It is also possible to ignore a selection of sub-prefixes.
Example
21 + 10\(101, 102) - 5\(57)
This formula works the same way as the previous example but ignores the prefixes 101, 102, and 57.
You can apply ‘sub-filtering’ on credits and debits using the C and D suffixes. In this case, an account will only be considered if its prefix matches, and if the total balance of the move lines made on this account is credit/debit.
Example
Account 210001 has a balance of -42 and account 210002 has a balance of 25. The formula 21D only matches the account 210002, and hence returns 25. 210001 is not matched, as its balance is credit.
Prefix exclusions can be mixed with the C and D suffixes.
Example
21D + 10\(101, 102)C - 5\(57)
This formula adds the balances of the move lines made on accounts whose code starts with 21 if it is debit (D) and 10 if it is credit (C), but ignores prefixes 101, 102, and subtracts the balance of the ones on accounts with the prefix 5, ignoring the prefix 57.
To match the letter C or D in a prefix and not use it as a suffix, use an empty exclusion ().
Example
21D\()
This formula matches accounts whose code starts with 21D, regardless of their balance sign.
In addition to using code prefixes to include accounts, you can also match them with account tags. This is especially useful, for example, if your country lacks a standardized chart of accounts, where the same prefix might be used for different purposes across companies.
Example
tag(25)
This formula matches accounts whose associated tags contain the one with id 25.
If the tag you reference is defined in a data file, an xmlid can be used instead of the id.
Example
tag(my_module.my_tag)
This formula matches accounts whose associated tags include the tag denoted by my_module.my_tag.
You can also use arithmetic expressions with tags, possibly combining them with prefix selections.
Example
tag(my_module.my_tag) + tag(42) + 10
The balances of accounts tagged as my_module.my_tag will be summed with those of accounts linked to the tag with ID 42 and accounts with the code prefix 10
C and D suffixes can be used in the same way with tags.
Example
tag(my_module.my_tag)C
This formula matches accounts with the tag my_module.my_tag and a credit balance.
Prefix exclusion also works with tags.
Example
tag(my_module.my_tag)\(10)
This formula matches accounts with the tag my_module.my_tag and a code not starting with 10.
‘External Value’ engine
The ‘external value’ engine is used to refer to manual and carryover values. Those values are not stored using account.move.line, but with account.report.external.value. Each of these objects directly points to the expression it impacts, so very little needs to be done about their selection here.
Formulas can be one of the following:
sum
If the result must be the sum of all the external values in the period.
most_recent
If the result must be the value of the latest external value in the period.
In addition, subformulas can be used in two ways:
rounding=X
Replacing X with a number instructs to round the amount to X decimals.
editable
Indicates this expression can be edited manually, triggering the display of an icon in the report, allowing the user to perform this action.
Note
Manual values are created at the date_to currently selected in the report.
Both subformulas can be mixed by separating them with a ;.
Example
editable;rounding=2
is a correct subformula mixing both behaviors.
‘Custom Python Function’ engine
This engine is a means for developers to introduce custom computation of expressions on a case-by-case basis. The formula is the name of a python function to call, and the subformula is a key to fetch in the dictionary returned by this function. Use it only if you are making a custom module of your own.
Columns
Reports can have an indefinite number of columns to display. Each column gets its values from the expressions declared on the lines. The field expression_label of the column gives the label of the expressions whose value is displayed. If a line has no expression in that field, then nothing is displayed for it in this column. If multiple columns are required, you must use different expression labels.
When using the period comparison feature found under the Options tab of an accounting report, all columns are repeated in and for each period.
On this page
Get Help
Contact Support Ask the Odoo Community
![]()
- User Docs
- Database management
- Developer
- Contributing
EN
Odoo 18
Year-end closing
Year-end closing is vital for maintaining financial accuracy, complying with regulations, making informed decisions, and ensuring transparency in reporting.
Fiscal years
By default, the fiscal year is set to last 12 months and end on December 31st. However, its duration and end date can vary due to cultural, administrative, and economic considerations.
To modify these values, go to Accounting ‣ Configuration ‣ Settings. Under the Fiscal Periods section, change the Last Day field if necessary.
If the period lasts more than or less than 12 months, enable Fiscal Years and Save. Go back to the Fiscal Periods section and click ➜ Fiscal Years. From there, click Create, give it a Name, and both a Start Date and End Date.
Note
Once the set fiscal period is over, Odoo automatically reverts to the default periodicity, taking into account the value specified in the Last Day field.
Year-end checklist
Before closure
Before closing a fiscal year, ensure first everything is accurate and up-to-date:
- Make sure all bank accounts are fully reconciled up to year-end, and confirm that the ending book balances match the bank statement balances.
- Verify that all customer invoices have been entered and approved and that there are no draft invoices.
- Confirm that all vendor bills have been entered and agreed upon.
- Validate all expenses, ensuring their accuracy.
- Corroborate that all received payments have been encoded and recorded accurately.
- Close all suspense accounts.
- Book all depreciation and deferred revenue entries.
Closing a fiscal year
Then, to close the fiscal year:
- Run a tax report, and verify that all tax information is correct.
- Reconcile all accounts on the balance sheet:
- Update the bank balances in Odoo according to the actual balances found on the bank statements.
- Reconcile all transactions in the cash and bank accounts by running the aged receivables and aged payables reports.
- Audit all accounts, being sure to fully understand all transactions and their nature, making sure to include loans and fixed assets.
- Optionally, match payments to validate any open vendor bills and customer invoices with their payments. While this step is optional, it could assist the year-end closing process if all outstanding payments and invoices are reconciled, potentially finding errors or mistakes in the system.
Next, the accountant likely verifies balance sheet items and book entries for:
- year-end manual adjustments,
- work in progress,
- depreciation journal entries,
- loans,
- tax adjustments,
- etc.
If the accountant is going through the year-end audit, they may want to have paper copies of all balance sheet items (such as loans, bank accounts, prepayments, sales tax statements, etc.) to compare these with the balances in Odoo.
Tip
During this process, it is good practice to set a Journal Entries Lock Date to the last day (inclusive) of the preceding fiscal year by going to Accounting ‣ Accounting ‣ Lock Dates. This way, the accountant can be confident that nobody changes the transactions while auditing the books. Users from the accountant access group can still create and modify entries.
Current year’s earnings
Odoo uses a unique account type called current year’s earnings to display the amount difference between the income and expenses accounts.
Note
The chart of accounts can only contain one account of this type. By default, it is a 999999 account named Undistributed Profits/Losses.
To allocate the current year’s earnings, create a miscellaneous entry to book them to any equity account. Once done, confirm whether or not the current year’s earnings in the balance sheet is correctly reporting a balance of zero. If that is the case, set an All Users Lock Date to the last day of the fiscal year by going to Accounting ‣ Accounting ‣ Lock Dates.
Tip
Install the Irreversible Lock Date (account_lock) module to make the All Users Lock Date irreversible once set.
Note
A specific year-end closing entry is optional in order to close out the profit and loss statement. The reports are created in real-time, meaning that the profit and loss statement corresponds directly with the year-end date specified in Odoo. Therefore, any time the income statement is generated, the beginning date corresponds with the beginning of the fiscal year and all account balances should equal zero.
On this page
Get Help
Contact Support Ask the Odoo Community
![]()
EN
Odoo 18
Expenses
Odoo Expenses streamlines the management of expenses. After an employee submits their expenses in Odoo, they are reviewed by management and accounting teams. Once approved, payments can then be processed, and disbursed back to the employee for reimbursement.
See also
Set expense categories
The first step to track expenses is to configure the different types of expenses for the company (managed as expense categories in Odoo). Each category can be as specific or generalized as needed. Go to Expenses app ‣ Configuration ‣ Expense Categories to view the current expensable categories in a default list view.
To create a new expense category, click New. A product form will appear, with the description field labeled Product Name.
Note
Expense categories are managed like products in Odoo. The expense category form follows the standard product form in Odoo, and the information entered is similar. Expense products will be referred to as expense categories throughout this document since the main menu refers to these as Expense Categories.
Only two fields are required, the Product Name and the Unit of Measure. Enter the Product Name in the field, and select the Unit of Measure from the drop-down menu (most products will be set to Units).
Tip
The Sales app is where specification on the units of measure are created and edited (e.g. units, miles, nights, etc.). Go to Sales app ‣ Configuration ‣ Settings and ensure Units of Measure is enabled in the Product Catalog section. Click on the Units of Measure internal link to view, create, and edit the units of measure.
The Cost field on the product form is populated with a value of 0.00 by default. When a specific expense should always be reimbursed for a particular price, enter that amount in the Cost field. Otherwise, leave the Cost set to 0.00, and employees will report the actual cost when submitting an expense report.
Note
The Cost field is always visible on the expense category form, but the Sales Price field is only visible if the Sales Price is selected under the Re-Invoice Expenses section. Otherwise, the Sales Price field is hidden.
Example
Here are some examples for when to set a specific Cost on a product vs. leaving the Cost at 0.00:
- Meals: set the Cost to 0.00. When an employee logs an expense for a meal, they enter the actual amount of the bill and will be reimbursed for that amount. An expense for a meal costing $95.23 would equal a reimbursement for $95.23.
- Mileage: set the Cost to 0.30. When an employee logs an expense for “mileage”, they enter the number of miles driven in the Quantity field, and are reimbursed 0.30 per mile they entered. An expense for 100 miles would equal a reimbursement for $30.00.
- Monthly Parking: set the Cost to 75.00. When an employee logs an expense for “monthly parking”, the reimbursement would be for $75.00.
- Expenses: set the Cost to 0.00. When an employee logs an expense that is not a meal, mileage, or monthly parking, they use the generic Expenses product. An expense for a laptop costing $350.00 would be logged as an Expenses product, and the reimbursement would be for $350.00.
Select an Expense Account if using the Odoo Accounting app. It is recommended to check with the accounting department to determine the correct account to reference in this field as it will affect reports.
Set a tax on each product in the Vendor Taxes and Customer Taxes fields, if applicable. It is considered good practice to use a tax that is configured with Tax Included in Price. Taxes will be automatically configured if this is set.
See also
Get Help
Contact Support Ask the Odoo Community
![]()
EN
Odoo 18
Log expenses
Before expenses can be reimbursed, each individual expense needs to be logged in the database. Expense records can be created in three different ways: manually enter an expense record, upload a receipt, or email a receipt to a preconfigured email address.
Manually enter expenses
To record a new expense, open the Expenses app, which displays the My Expenses page, by default.
Tip
This view can also be accessed from Expenses app ‣ My Expenses ‣ My Expenses.
Then, click New, and then fill out the following fields on the form that appears:
- Description: Enter a short description for the expense. This should be concise and informative, such as lunch with client or hotel for conference.
- Category: Select the expense category from the drop-down menu that most closely corresponds to the expense.
- Total: Enter the total amount paid for the expense in one of two ways:
- If the expense is for a single item/expense, and the category selected was for a single item, enter the cost in the Total field (the Quantity field is hidden).
- If the expense is for multiples of the same item/expense with a fixed price, the Unit Price is displayed. Enter the quantity in the Quantity field, and the total cost is automatically updated with the correct total. The total cost appears below the Quantity.
Example
In the case of mileage driven, the Unit Price is populated as the cost per mile. Set the Quantity to the number of miles driven, and the total is calculated.
- Included Taxes: If taxes were configured on the expense category, the tax percentage and amount appear automatically after entering either the Total or the Quantity.
Note
When a tax is configured on an expense category, the Included Taxes value updates in real time, as the Total or Quantity is updated. - Employee: Using the drop-down menu, select the employee this expense is for.
- Paid By: Click the radio button to indicate who paid for the expense, and should be reimbursed. Select either Employee (to reimburse) or Company. Depending on the expense category selected, this field may not appear.
- Expense Date: Using the calendar popover window that appears when this field is clicked, enter the date the expense was incurred.
- Account: Using the drop-down menu, select the expense account the expense should be logged in.
- Customer to Reinvoice: If the expense is something that should be paid for by a customer, select the SO and customer that should be invoiced for this expense from the drop-down menu. All sales orders in the drop-down menu list both the SO, as well as the company the sales order is written for. After the expense is saved, the customer name disappears, and only the SO is visible on the expense.
Example
A customer wishes to have an on-site meeting for the design and installation of a custom garden, and agrees to pay for the expenses associated with it (such as travel, hotel, meals, etc). All expenses tied to that meeting would indicate the sales order for the custom garden (which also references the customer) as the Customer to Reinvoice. - Analytic Distribution: Select the account the expense should be written against from the drop-down menu for either Projects, Departments, or both. Multiple accounts can be listed for each category, if needed. Adjust the percentage for each analytic account by typing in the percentage value next to each account.
- Company: If multiple companies are set up, select the company the expense should be filed for from the drop-down menu. The current company automatically populates this field.
- Notes…: If any notes are needed to clarify the expense, enter them in the notes field.
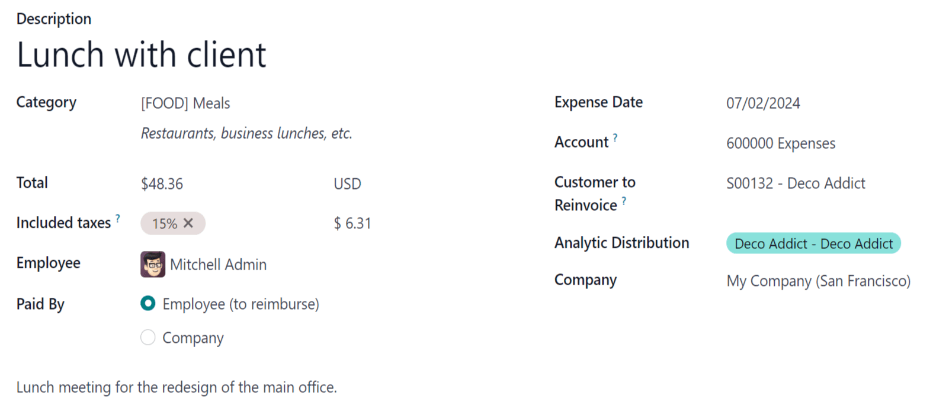
Attach receipts
After the expense record is created, the next step is to attach a receipt. Click the Attach Receipt button, and a file explorer appears. Navigate to the receipt to be attached, and click Open.
The new receipt is recorded in the chatter, and the number of receipts appears next to the (paperclip) icon. Multiple receipts can be attached to an individual expense record, as needed.
![]()
Upload expenses
It is possible to have expense records created automatically, by uploading a PDF receipt. This feature requires the enabling of a setting, and the purchasing of IAP credits.
Digitalization settings
To enable receipt scanning, navigate to Expenses app ‣ Configuration ‣ Settings, and tick the checkbox beside the Expense Digitization (OCR) option. Then, click Save. When enabled, additional options appear. Click on the corresponding radio button to select one of the following options:
- Do not digitize: turns off receipt digitization.
- Digitize on demand only: only digitizes receipts when requested. A Digitize document button appears on expense records. When clicked, the receipt is scanned and the expense record is updated.
- Digitize automatically: automatically digitizes all receipts when they are uploaded.
Beneath these options are two additional links. Click the Buy credits link to purchase credits for receipt digitization. Click the View My Services link to view a list of all current services, and their remaining credit balances.
For more information on document digitization and IAPs, refer to the In-app purchase (IAP) documentation.
Note
When the Expense Digitization (OCR) option is enabled, a necessary module is installed, so receipts can be scanned. Disabling this option uninstalls the module.
If, at some point, there is a desire to temporarily stop digitizing receipts, select the Do not digitize option. The reason this option is available is so the module is not uninstalled, allowing for digitization to be enabled in the future by selecting one of the other two options.
Upload receipts
Open the Expenses app, and from the My Expenses dashboard, click Upload, and a file explorer appears. Navigate to the desired receipt, select it, then click Open.

The receipt is scanned, and a new expense record is created. The Expense Date field is populated with today’s date, along with any other fields based on the scanned data, such as the Total.
Click on the new entry to open the individual expense form, and make any changes, if needed. The scanned receipt appears in the chatter.
Email expenses
Instead of individually creating each expense in the Expenses app, expenses can be automatically created by sending an email to an email alias.
To do so, an email alias must first be configured. Navigate to Expenses app ‣ Configuration ‣ Settings. Ensure the checkbox beside Incoming Emails is ticked. The default email alias is expense@(domain).com. Change the email alias by entering the desired email in the field to the right of Alias. Then, click Save.
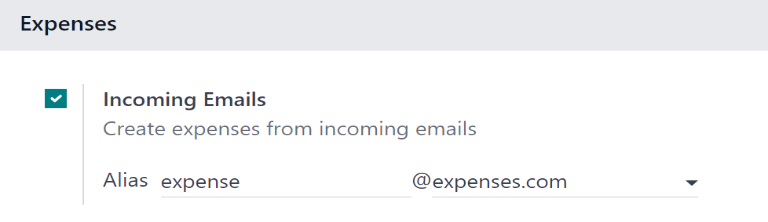
Note
If the domain alias needs to be set up, Setup your domain alias appears beneath the Incoming Emails checkbox, instead of the email address field.
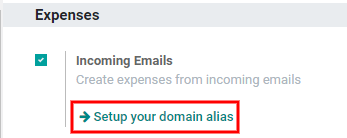
Refer to the Domain names documentation for setup instructions and more information.
Once the domain alias is configured, the email address field is visible beneath the Incoming Emails feature on the Settings page in the Expenses app.
Once the email address has been entered, emails can be sent to that alias to create new expenses, without having to be in the Odoo database.
To submit an expense via email, create a new email, and enter the product’s internal reference code (if available) and the amount of the expense as the subject of the email. Next, attach the receipt to the email. Odoo creates the expense by taking the information in the email subject, and combining it with the receipt.
To check an expense category’s internal reference, go to Expenses app ‣ Configuration ‣ Expense Categories. If an internal reference is listed on the expense category, it is listed in the Internal Reference column.

To add an internal reference on an expense category, click on the category to open the expense category form. Enter the Internal Reference in the corresponding field. Beneath the Internal Reference field, this sentence appears: Use this reference as a subject prefix when submitting by email.
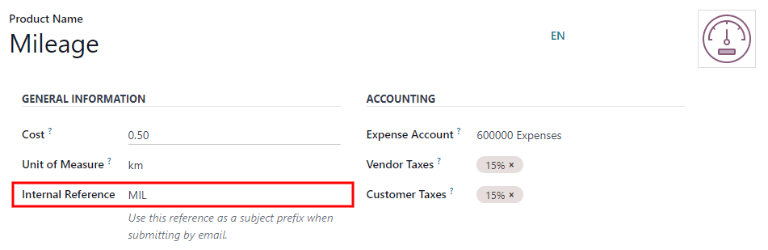
Example
If submitting an expense, via email, for a $25.00 meal during a work trip, the email subject would be FOOD $25.00.
Explanation:
- The Internal Reference for the expense category Meals is FOOD
- The Cost for the expense is $25.00
Note
For security purposes, only authenticated employee emails are accepted by Odoo when creating an expense from an email. To confirm an authenticated employee email address, go to the employee card in the Employees app, and refer to the Work Email field.
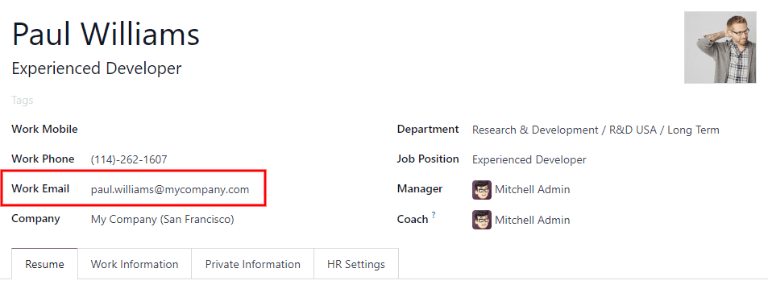
On this page
Get Help
Contact Support Ask the Odoo Community
![]()
EN
Odoo 18
Expense reports
When expenses are ready to submit (such as, at the end of a business trip, or once a month), an expense report needs to be created. Open the main Expenses app dashboard, which displays the My Expenses dashboard, by default. Alternatively, navigate to Expenses app ‣ My Expenses ‣ My Expenses.
Expenses are color-coded by status. Any expense with a status of To Report (expenses that still need to be added to an expense report) is shown in blue text. All other statuses (To Submit, Submitted, and Approved) the text appears in black.
Create expense reports
First, select each desired expense to be added to the report on the My Expenses dashboard, by ticking the checkbox next to each entry, or quickly select all the expenses in the list by ticking the checkbox next to the Expense Date column title, if needed.
Another way to quickly add all expenses that are not on a expense report, is to click the Create Report button, without selecting any expenses, and Odoo automatically selects all expenses with a status of To Submit that are not already on a report.
Note
Any expense can be selected from the My Expenses list, except for expenses with a status of Approved.
The Create Report button is visible as long as there is a minimum of one expense on the list with a status of either To Report or To Submit.
When the Create Report button is clicked, all expenses with a status of To Submit that are not currently on another expense report appears in the newly-created expense report.
If all expenses on the My Expenses report are already associated with another expense report, an Invalid Operation pop-up window appears, stating You have no expenses to report.
Once the expenses have been selected, click the Create Report button. The new report appears with all the expenses listed in the Expense tab. If there is a receipt attached to an individual expense, a (paperclip) icon appears between the Customer to Reinvoice and Analytic Distribution columns.
When the report is created, the date range for the expenses appears in the Expense Report Summary field, by default. It is recommended to edit this field with a short summary for each report to help keep expenses organized. Enter a description for the expense report, such as Client Trip NYC, or Office Supplies for Presentation, in the Expense Report Summary field.
The Employee, Paid By, and Company fields autopoulate with the information listed on the individual expenses.
Next, select a Manager from the drop-down menu to assign a manager to review the report. If needed, update the Journal field, using the drop-down menu.
If some expenses are missing from the report, they can still be added from this report form. To do so, click Add a line at the bottom of the Expense tab.
An Add: Expense Lines pop-up window appears, displaying all the available expenses (with a To Submit status) that can be added to the report.
If a new expense needs to be added that does not appear on the list, click New to create a new expense and add it to the report.
Tick the checkbox next to each expense being added, then click Select.
Doing so removes the pop-up window, and the items now appear on the report.

Note
Expense reports can be created in one of three places:
- Navigate to the main Expenses app dashboard (also accessible, via Expenses app ‣ My Expenses ‣ My Expenses)
- Navigate to Expenses app ‣ My Expenses ‣ My Reports
- Navigate to Expenses app ‣ Expense Reports
In any of these views, click New to create a new expense report.
Submit expense reports
When an expense report is completed, the next step is to submit the report to a manager for approval. To view all expense reports, navigate to Expenses app ‣ My Expenses ‣ My Reports. Open the specific report from the list of expense reports.
Note
Reports must be individually submitted, and cannot be submitted in batches.
If the list is large, grouping the results by status may be helpful, since only reports with a To Submit status need to be submitted; reports with an Approved or Submitted status do not.
The To Submit expenses are identifiable by the To Submit status, and by the blue text, while all other expense text appears in black.
Note
The status of each report is shown in the Status column. If the Status column is not visible, click the (additional options) icon at the end of the row, and tick the checkbox beside Status from the resulting drop-down menu.
Click on a report to open it, then click Submit To Manager. After submitting a report, the next step is to wait for the manager to approve it.
Important
Approving expenses, posting expenses, and reimbursing expenses are only for users with the appropriate access rights documentation.
On this page
Get Help
Contact Support Ask the Odoo Community
![]()
Approve expenses
In Odoo, not just anyone can approve expense reports, only users with the necessary rights (or permissions) can. This means that a user must have at least Team Approver rights for the Expenses app. Employees with the necessary rights can review expense reports, approve or reject them, and provide feedback thanks to the integrated communication tool.
Please refer to the access rights documentation to learn more about managing users and their access rights.
View expense reports
Users who are able to approve expense reports, typically managers, can easily view all expense reports they have access rights to. Go to Expenses app ‣ Expense Reports, to view the All Reports dashboard.
A list of all expense reports with a status of either To Submit, Submitted, Approved, Posted, or Done appears. Expense reports with a status of Refused are hidden, by default.
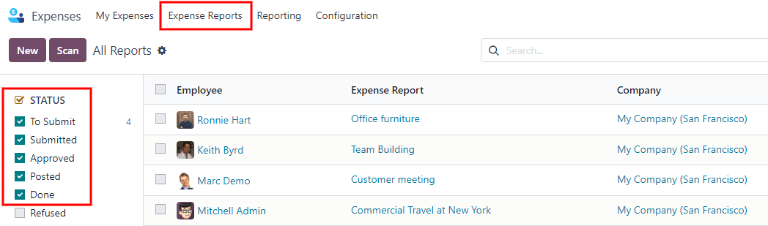
Approve expense reports
Expense reports can be approved in two ways: individually or in bulk.
Important
Only reports with a status of Submitted can be approved.
It is recommended to display only Submitted reports by ticking the checkbox beside the Submitted filter, in the left column, under the Status section.
If a report is not able to be approved, the Approve Report button does not appear on the All Reports page.
Approve individual reports
To approve an individual report, navigate to Expenses app ‣ Expense Reports, and click on an individual report to view the report form.
From here, several options are presented: Approve, Refuse, and Reset to draft.
Click Approve to approve the report.
Approve multiple reports
To approve multiple expense reports at once, first navigate to Expenses app ‣ Expense Reports to view a list of expense reports. Next, select the reports to approve by ticking the checkbox next to each report being approved, or tick the checkbox next to the Employee column title to select all the reports in the list.
Next, click the Approve Report button.

Tip
It is possible for team managers to view all the expense reports for just their team members.
To do so, while on the All Reports page, click the (down arrow) to the right of the search bar, then click My Team in the Filters section.
This presents all the reports for only the manager’s team.
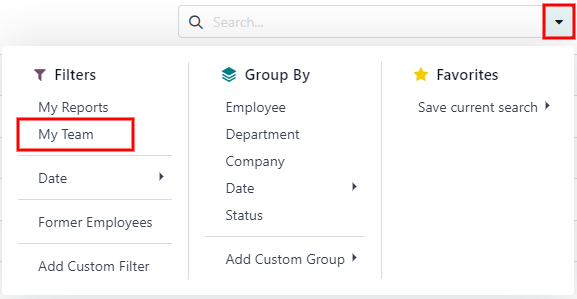
Refuse expense reports
Expense reports can only be refused on the individual expense report, and not from the All Reports dashboard. To open an individual expense report, navigate to Expenses app ‣ Expense Reports, then click on an individual expense report to view the report form.
If more information is needed, such as a missing receipt, communicate any necessary information requests in the chatter of the report form. On the individual expense report, click Send message to open a message text box.
Type in a message, tagging the proper people, and post it to the chatter by clicking Send. The message is posted in the chatter, and the tagged people are notified, via email.
Note
The only people that can be tagged in a message are followers of the specific report. To see who is a follower, click the (user) icon to display the followers of the expense report.
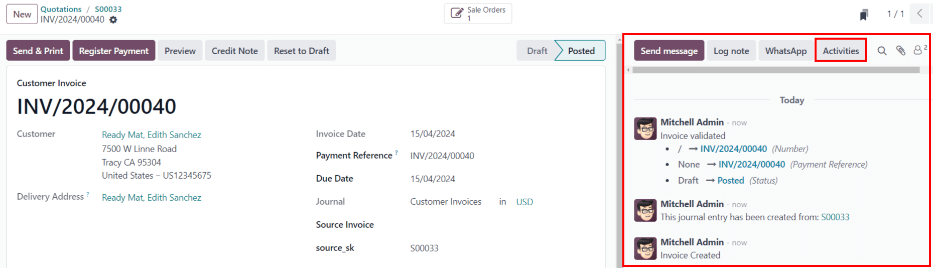
To refuse an expense report, click Refuse, and a Refuse Expense pop-up window appears. Enter a brief explanation for the refusal beneath the REASON TO REFUSE EXPENSE field, then click Refuse.
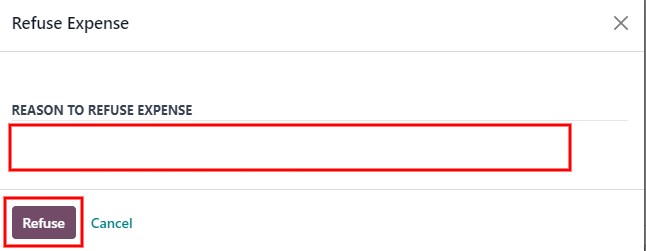
Once the expense report is refused, the status changes to Refused, and the only button that appears in the top-left is Reset to Draft.
Post expenses
Once an expense report is approved, the next step is to post the expense report to the proper accounting journal.
Important
To post expense reports to an accounting journal, the user must have the following access rights:
- Accounting: Accountant or Adviser
- Expenses: Manager
Only expense reports with an Approved status can post the expenses to a journal. To view all expense reports, navigate to Expenses app ‣ Expense Reports. Next, to view only approved expense reports that need to be posted, adjust the filters on the left side, so only the Approved checkbox is ticked.

Note
The default All Reports dashboard displays all expense reports, except reports with a status of Refused.
Expense reports can be posted to accounting journals in two ways: individually or in bulk.
Post individual reports
To post an individual report, navigate to Expenses app ‣ Expense Reports, and click on an individual report with a Status of Approved, to view the report form. In this view, several options are presented: Post Journal Entries, Report In Next Payslip, Refuse, or Reset to Draft.
Click Post Journal Entries to post the report.
The accounting journal the expenses are posted to is listed in the Journal field of the expense report.
After posting the expenses to an accounting journal, a Journal Entry smart button appears at the top of the screen. Click the Journal Entry smart button, and the details for the journal entry appear, with a status of Posted.
Post multiple reports
To post multiple expense reports at once, navigate to Expenses app ‣ Expense Reports to view a list of expense reports. Next, select the reports to approve by ticking the checkbox next to each report being approved.
Note
Only expense reports with a status of Approved are able to post the expenses to an accounting journal. If an expense report is selected that cannot be posted, such as an unapproved report, or the report has already been posted to a journal, the Post Entries button is not visible.
Tip
To select only approved expense reports, adjust the filters on the left side, so that only the Approved checkbox is ticked. Next, tick the checkbox next to the Employee column title to select all the Approved reports in the list at once.
Next, click the Post Entries button.
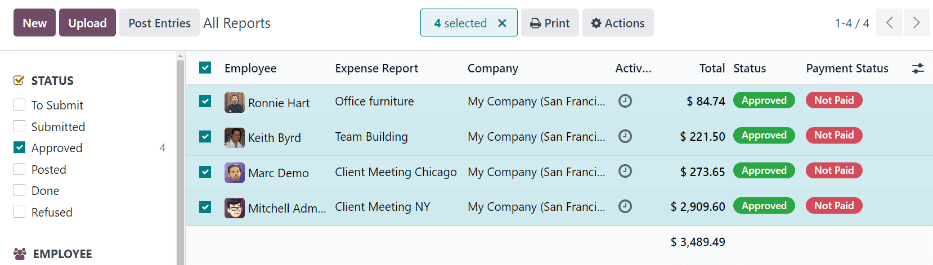
On this page
- Journal: Select the accounting journal to post the payment to using the drop-down menu. The default options are Bank or Cash.
- Payment Method: Select how the payment is made using the drop-down menu. If Cash is selected for the Journal, the only option available is Manual. If Bank is selected for the Journal, the default options are Manual or Checks.
- Recipient Bank Account: Select the employee’s bank account the payment is being sent to. If the employee has a bank account on file in the Private Information tab of their employee form in the Employees app, that bank account populates this field, by default.
- Amount: The total amount being reimbursed populates this field, by default. The currency, located to the right of the field, can be modified using the drop-down menu.
- Payment Date: Enter the date the payments are issued in this field. The current date populates this field, by default.
- Memo: The text entered in the Expense Report Summary field of the expense report populates this field, by default.
- Journal: Select the accounting journal the payment should be posted to, using the drop-down menu. The default options are Bank or Cash.
- Payment Method: Select how the payment is made using the drop-down menu. If Cash is selected for the Journal, the only option available is Manual. If Bank is selected for the Journal, the default options are Manual or Checks.
- Group Payments: When multiple expense reports are selected for the same employee, this option appears. Tick the checkbox to have only one payment made, rather than issuing multiple payments to the same employee.
- Payment Date: Enter the date the payments are issued. The current date populates this field, by default.
- User Docs
- Database management
- Developer
- Contributing
Reimburse employees
After an expense report is posted to an accounting journal, the next step is to reimburse the employee. Just like approving and posting expenses, employees can be reimbursed in two ways: with cash, check, or direct deposit (individually or in bulk), or reimbursed in a payslip.
Settings
Reimbursements can be paid via paycheck, check, cash, or bank transfer. To set up payment options, first configure the various settings by navigating to Expenses app ‣ Configuration ‣ Settings.
To reimburse employees for expenses in their paychecks, tick the checkbox beside the Reimburse in Payslip option in the Expenses section.
Next, set how payments are made in the Accounting section. Click the drop-down menu under Payment Methods, and select the desired payment option. Default options include paying by Manual (Cash), Checks (Bank), NACHA (Bank), and others. Leaving this field blank allows for all available payment options to be used.
When all desired configurations are complete, click Save to activate the settings.
Reimburse individually
To reimburse an individual expense report, first navigate to Expenses app ‣ Expense Reports. All expense reports are presented in a default list view. Click on the expense report being reimbursed to view the report details.
Important
Only expense reports with a status of Posted can be reimbursed.
Click the Register Payment button in the top-left corner of the expense report, and a Register Payment pop-up window appears. Enter the following information in the pop-up window:
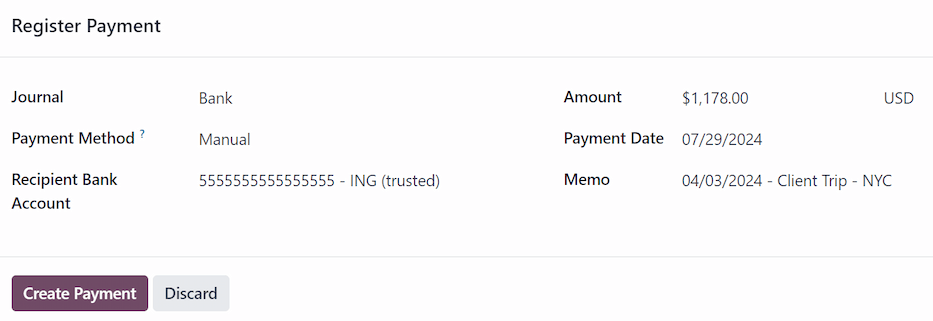
When the fields of the pop-up window are completed, click the Create Payment button to register the payment, and reimburse the employee.
Reimburse in bulk
To reimburse multiple expense reports at once, navigate to Expenses app ‣ Expense Reports to view all expense reports in a list view. Next, adjust the STATUS filters on the left side to only present expense reports with a status of Posted.
Tip
Adjusting the STATUS filters to only show Posted expense reports is not necessary, but removes the step of selecting each individual report in the list.
Tick the checkbox next to the Employee column title to select all the reports in the list. Once ticked, the number of selected expense reports appears at the top of the page ((#) Selected). Additionally, a Register Payment button also appears in the upper-left corner.
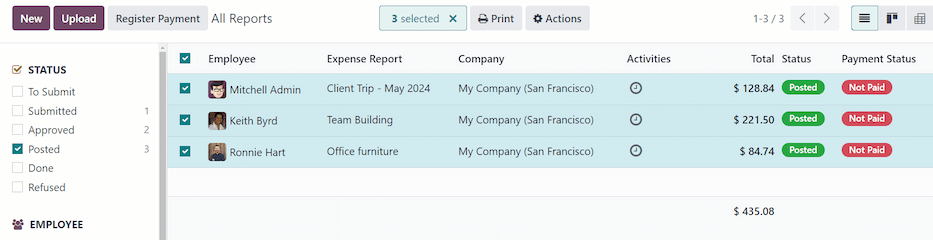
Click the Register Payment button, and a Register Payment pop-up window appears. Enter the following information in the pop-up window:
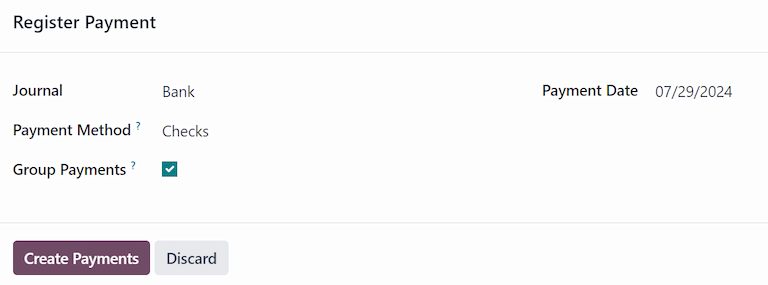
When the fields on the pop-up window are completed, click the Create Payments button to register the payments, and reimburse the employees.
Report in next payslip
If the Reimburse in Payslip option is activated on the Settings page, payments can be added to their next payslip, instead of issued manually.
Important
Reimbursing expenses on payslips can only be done individually, on an expense report with a status of Approved. Once an expense report has a status of Posted, the option to reimburse in the following payslip does not appear.
Navigate to Expenses app ‣ Expense Reports, and click on the individual expense report being reimbursed on the following paycheck. Click the Report in Next Payslip smart button, and the expenses are added to the next payslip issued for that employee. Additionally, a message is logged in the chatter stating the expense is added to the following payslip.
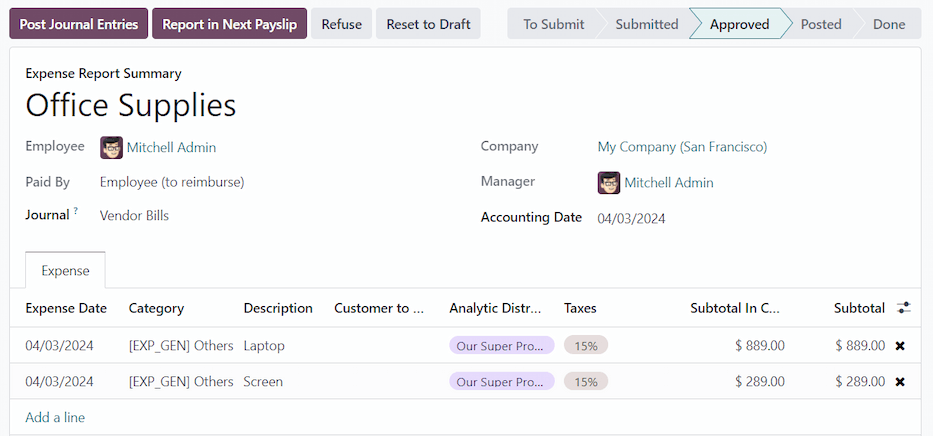
The status for the expense report remains Approved. The status only changes to Posted (and then Done), when the paycheck is processed.
See also
Refer to the Payslips documentation for more information about processing paychecks.
Edit on GitHubOn this page
EN
Odoo 18
Re-invoice expenses
If expenses are tracked on customer projects, they can be automatically charged back to the customer. This is done by creating an expense, referencing the sales order the expense is added to, and then creating an expense report.
Next, managers approve the expense report, before the accounting department posts the journal entries.
Finally, once the expense report is posted to a journal, the expenses appears on the specified SO. The SO is then invoiced, thus charging the customer for the expenses.
Important
Approving expenses, posting expenses to accounting, and reinvoicing expenses on SOs is only possible for users with the appropriate access rights.
See also
This document provides lower-level instructions for the creation, submission, approval, and posting of expenses. For fully-detailed instructions for any of these steps, refer to the following documentation:
Setup
First, specify the invoicing policy for each expense category. Navigate to Expenses app ‣ Configuration ‣ Expense Categories. Click on an expense category to view the expense category form. Under the INVOICING section, click the radio button next to the desired selection for Re-Invoice Expenses:
- No: The expense category cannot be re-invoiced.
- At cost: The expense category invoices expenses at the cost set on the expense category form.
- Sales price: The expense category invoices at the sales price set on the expense form.
Create an expense
First, when creating a new expense, the correct information needs to be entered to re-invoice the expense to a customer. Using the drop-down menu, select the SO to add the expense to in the Customer to Reinvoice field.
Next, select the Analytic Distribution the expense is posted to. Multiple accounts can be selected, if desired.
To add another Analytic Distribution, click on the line to reveal the Analytic pop-over window. Click Add a line, then select the desired Analytic Distribution from the drop-down field. If selecting more than one Analytic Distribution, the Percentage fields must be modified. By default, both fields are populated with 100%. Adjust the percentages for all the fields, so the total of all selected accounts equals 100%.
Example
A painting company agrees to paint an office building that houses two different companies. During the estimate, a meeting is held at the office location to discuss the project.
Both companies agree to pay for the travel expenses for the painting company employees. When creating the expenses for the mileage and hotels, both companies are listed in the Analytic Distribution line, for 50% each.
Create an expense report
After the expenses are created, the expense report must be created and submitted, in the same manner as all other expenses.
Once the expense report is submitted, a Sales Orders smart button appears at the top-center of both the expense report, and each individual expense record being reinvoiced.
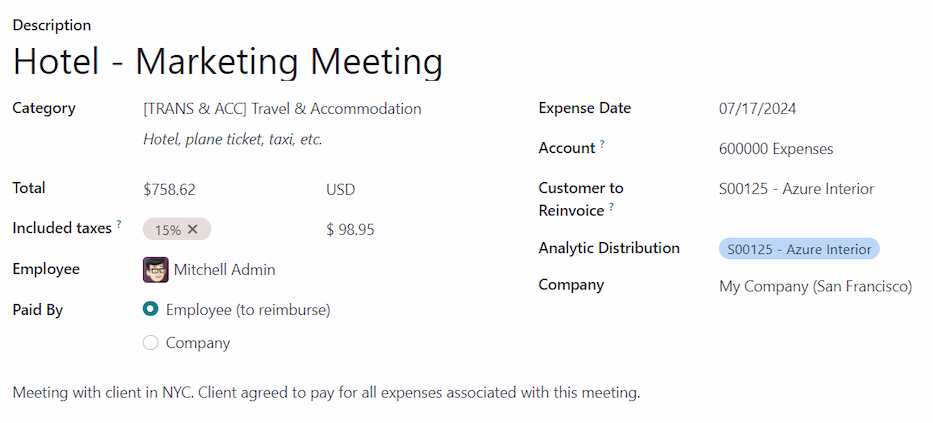
Important
Selecting the proper SO in the Customer to Reinvoice field is critical, since this is how expenses are automatically invoiced after an expense report is approved.
The Customer to Reinvoice field can be modified only until an expense report is approved. After an expense report is approved, the Customer to Reinvoice field is no longer able to be modified.
Approve and post expenses
Before approving an expense report, ensure the Analytic Distribution section is populated for every expense line.
If an Analytic Distribution entry is missing, assign the correct accounts from the drop-down menu, then click Approve.
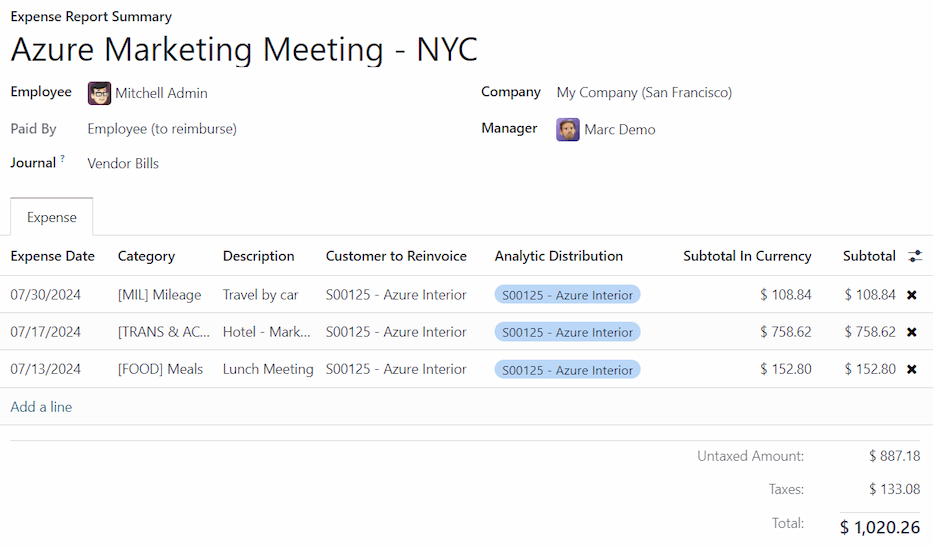
Note
The Approve button only appears after an expense report has been submitted.
The accounting department is typically responsible for posting journal entries. To post expenses to an accounting journal, click Post Journal Entries. Once an expense report is approved, it can then be posted.
The SO is only updated after the journal entries are posted. Once the journal entries are posted, the expenses now appear on the referenced SO.
Invoice expenses
After the expense report has been approved, and the journal entries have been posted, the SO is updated, and the customer can be invoiced.
Select the expense report, and click the Sales Orders smart button to open the SO. The expenses to be re-invoiced now appear on the SO.
Note
More than one SO can be referenced on an expense report. If more than one SO is referenced, clicking the Sales Orders smart button opens a list displaying all the SOs associated with that expense report. Click on a SO to open the individual SO details.
The expenses are listed in the SO Order Lines tab.
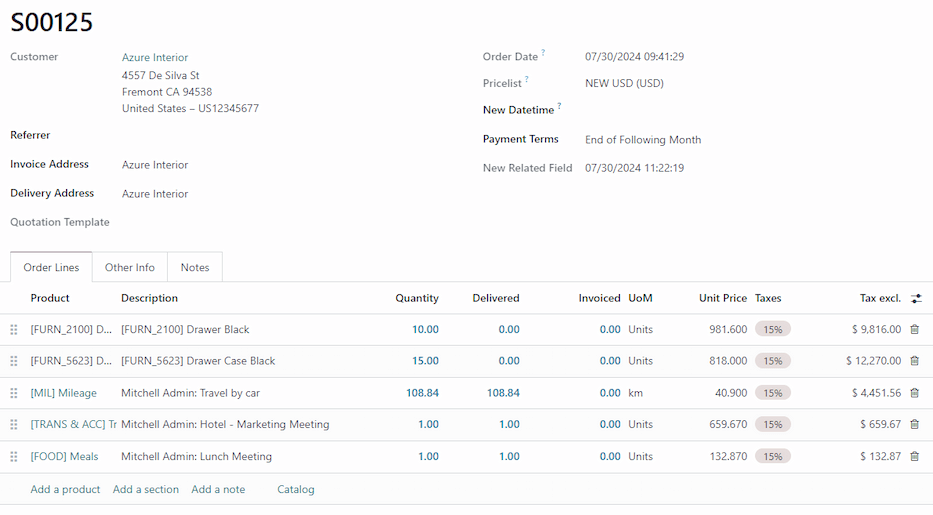
Next, click Create Invoice, and a Create invoices pop-up window appears. Select if the invoice is a Regular invoice, a Down payment (percentage), or a Down payment (fixed amount). Then, click Create Draft Invoice. Doing so creates a draft invoice for the customer. Click Confirm to confirm the invoice, and the customer is invoiced for the expenses.
On this page
Get Help
Contact Support Ask the Odoo Community
![]()
- User Docs
- Database management
- Developer
- Contributing
EN
Odoo 18
Online payments
Odoo embeds several payment providers that allow your customers to pay online, on their customer portals, or on your eCommerce website. They can pay sales orders, invoices, or subscriptions with recurring payments using their favorite payment methods, such as credit cards.
Each payment provider is linked to a list of supported payment methods that can be (de)activated based on your needs.
Note
Odoo apps delegate the handling of sensitive information to the certified payment provider so that you don’t ever have to worry about PCI compliance. No sensitive information (such as credit card numbers) is stored on Odoo servers or Odoo databases hosted elsewhere. Instead, Odoo apps use a unique reference number for the data stored safely in the payment providers’ systems.
Supported payment providers
To access the supported payment providers, go to Accounting ‣ Configuration ‣ Payment Providers, Website ‣ Configuration ‣ Payment Providers, or Sales ‣ Configuration ‣ Payment Providers.
Online payment providers
Payment flow from | |||||
|---|---|---|---|---|---|
Odoo | ✔ | Full and partial | Full and partial | ||
The provider’s website | |||||
The provider’s website | |||||
Odoo | ✔ | Full only | Full only | ||
The provider’s website | |||||
The provider’s website | ✔ | ||||
The provider’s website | |||||
The provider’s website | |||||
The provider’s website | |||||
The provider’s website | |||||
Odoo | ✔ | Full only | Full and partial | ||
Odoo | ✔ | Full only | Full and partial | ✔ | |
The provider’s website | ✔ | ||||
Odoo or the provider’s website | ✔ |
Note
- Each provider has its own specific configuration flow, depending on which feature is available.
- Some of these online payment providers can also be added as bank accounts, but this is not the same process as adding them as payment providers. Payment providers allow customers to pay online, and bank accounts are added and configured in the Accounting app to do a bank reconciliation.
Tip
In addition to the regular payment providers that integrate with an API, such as Stripe, PayPal, or Adyen, Odoo bundles the Demo payment provider. This payment provider allows you to test business flows involving online payments. No credentials are required as the demo payments are dummy payments.
Bank payments
- Wire TransferWhen selected, Odoo displays your payment information with a payment reference. You have to approve the payment manually once you have received it in your bank account.
- SEPA Direct DebitYour customers can make a bank transfer to register a SEPA Direct Debit mandate and get their bank account charged directly.
Enabling a payment provider
To add a new payment provider and make its related payment methods available to your customers, proceed as follows:
- Go to the payment provider’s website, create an account, and make sure you have the API credentials requested for third-party use. These are necessary for Odoo to communicate with the payment provider.
- In Odoo, navigate to the Payment providers by going to Accounting ‣ Configuration ‣ Payment Providers, Website ‣ Configuration ‣ Payment Providers, or Sales ‣ Configuration ‣ Payment Providers.
- Select the provider and configure the Credentials tab.
- Set the State field to Enabled.
Note
- The fields available in the Credentials tab depend on the payment provider. Refer to the related documentation for more information.
- Once you have enabled the payment provider, it is automatically published on your website. If you wish to unpublish it, click the Published button. Customers cannot make payments through an unpublished provider, but they can still manage (delete and assign to a subscription) their existing tokens linked to such a provider.
Test mode
If you wish to try the payment provider as a test, set the State field in the payment provider form to Test mode, then enter your provider’s test/sandbox credentials in the Credentials tab.
Note
By default, the payment provider remains unpublished in test mode so that it’s not visible to visitors.
Warning
We recommend using the test mode on a duplicate or a test database to avoid potential issues with your invoice numbering.
Payment methods
Each payment provider is related to a list of supported payment methods; the methods listed in the Payment methods field in the Configuration tab of the payment provider form are the ones that have been activated. To activate or deactivate a payment method for a provider, click Enable Payment Methods, then click the toggle button of the related method.
Tip
Payment methods are displayed on your website based on their sequence order. To reorder them, click Enable Payment Methods in the payment provider form, then, in the Payment Methods list, drag and drop the payment methods in the desired order.
Icons and brands
The icons displayed next to the payment method on your website are either the icons of the brands activated for the payment method or, if there aren’t any, the icons of the payment methods themselves. To modify them, go to Accounting ‣ Configuration ‣ Payment Methods, Website ‣ Configuration ‣ Payment Methods or Sales ‣ Configuration ‣ Payment Methods, then click on the payment method.
To modify a payment method’s icon, hover your mouse over the image in the upper-right corner of the payment method’s form and click the (pencil) icon.
Select the Brands tab to view the brands that have been activated for the payment method. The brands and their related icons are displayed based on their sequence order; to reorder them, drag and drop them in the desired order. To modify a brand’s icon, select the brand, then, in the popup window that opens, hover the mouse over the image in the upper-right corner and click the (pencil) icon.
Advanced configuration
To configure payment methods further, go to Accounting ‣ Configuration ‣ Payment Methods, Website ‣ Configuration ‣ Payment Methods or Sales ‣ Configuration ‣ Payment Methods. Click on the payment method, then activate the developer mode. Click the Configuration tab to adapt the features.
Danger
- Each payment method is preconfigured in a way that aligns with the payment providers’ behavior and their integration with Odoo. Any change to this configuration may result in errors and should be tested on a duplicate or test database first.
- Modifications to the payment method’s configuration only work to the extent of the method’s and provider’s capabilities. For example, adding countries for a payment method only supported in one country or enabling tokenization for a method linked to a provider that does not support it will not produce the intended results.
Tokenization
If the payment provider supports this feature, customers can save their payment method details for later. To enable this feature, go to the Configuration tab of the selected payment provider and enable Allow Saving Payment Methods.
In this case, a payment token is created in Odoo to be used as a payment method for subsequent payments without the customer having to enter their payment method details again. This is particularly useful for the eCommerce conversion rate and subscriptions that use recurring payments.
Tip
To add or delete their saved payment method details, customers can click Manage payment methods in the customer portal.
PCI DSS and Attestation of Compliance
Odoo is not PCI DSS-certified because it does not store cardholder data or process payments. Instead, it outsources tokenization and payment to external payment providers, which means that as an Odoo customer, you only need to complete the minimal Self-Assessment Questionnaire (SAQ) with the provider to obtain the Attestation of Compliance (AoC) and achieve PCI compliance. Odoo should not be mentioned as a payment processor or a third-party service provider in the SAQ.
Manual capture
If the payment provider supports this feature, you can authorize and capture payments in two steps instead of one. To enable this feature, go to the Configuration tab of the selected payment provider and enable Capture Amount Manually.
When you authorize a payment, the funds are reserved on the customer’s payment method but not immediately charged. They are charged when you manually capture the payment later on. You can also void the authorization to cancel it and release the reserved funds. Capturing payments manually is helpful in many situations:
- Receive the payment confirmation and wait until the order is shipped to capture the payment.
- Review and verify that orders are legitimate before the payment is completed and the fulfillment process starts.
- Avoid potentially high refund fees for refunded payments: payment providers will not charge you for voiding an authorization.
- Hold a security deposit to return later, minus any deductions (e.g., in case of damages).
To capture the payment after it was authorized, go to the related sales order or invoice and click the Capture Transaction button. To release the funds, click the Void Transaction button.
Note
- Some payment providers support capturing only part of the authorized amount. The remaining amount can then be either captured or voided. These providers have the value Full and partial in the table above. The providers that only support capturing or voiding the total amount have the value Full only.
- The funds are likely not reserved forever. After a certain time, they may be automatically released back to the customer’s payment method. Refer to your payment provider’s documentation for the exact reservation duration.
- Odoo does not support this feature for all payment providers, but some allow the manual capture from their website interface.
Refunds
If your payment provider supports this feature, you can refund payments directly from Odoo. It does not need to be enabled first. To refund a customer payment, navigate to it and click the Refund button.
Note
- Some payment providers support refunding only part of the amount. The remaining amount can then optionally be refunded, too. These providers have the value Full and partial in the table above. The providers that only support refunding the total amount have the value Full only.
- Odoo does not support this feature for all payment providers, but some allow to refund payments from their website interface.
Express checkout
If the payment provider supports this feature, you can allow customers to use the Google Pay and Apple Pay buttons and pay their eCommerce orders in one click. When they use one of these buttons, customers go straight from the cart to the confirmation page without filling out the contact form. They just have to validate the payment on Google’s or Apple’s payment form.
To enable this feature, go to the Configuration tab of the selected payment provider and enable Allow Express Checkout.
Note
All prices shown on the express checkout payment form always include taxes.
Availability
You can adapt the payment provider’s availability by specifying the Maximum amount allowed and modifying the Currencies and Countries in the Configuration tab.
Tip
To display an availability report for payment providers and payment methods, and to help diagnose potential availability issues on the payment form, enable the Developer mode (debug mode), then click the (bug) icon next to the Choose a payment method heading on the payment form. The report includes a list of enabled payment providers and payment methods, reasons for any payment providers or methods not being available, if applicable, and a list of supported providers for each payment method.
Currencies and countries
All payment providers have a different list of available currencies and countries. They serve as a first filter during payment operations, i.e., the payment methods linked to the payment provider are not available for selection if the customer’s currency or country is not in the supported list. As there might be errors, updates, and unknowns in the lists of available currencies and countries, adding or removing a payment provider’s supported currencies or countries is possible.
Note
- Payment methods also have their own list of available currencies and countries that serves as another filter during payment operations.
- If the list of supported currencies or countries is empty, it means the list is too long to be displayed, or Odoo does not have information on that payment provider. The payment provider remains available, even though it is possible the payment will be refused at a later stage should the country or currency not be supported.
Maximum amount
You can restrict the Maximum Amount that can be paid with the selected provider. Leave the field to 0.00 to make the payment provider available regardless of the payment amount.
Important
This feature is not intended to work on pages that allow the customer to update the payment amount, e.g., the Donation snippet and the Checkout page when paid shipping methods are enabled.
Payment journal
A payment journal must be defined for the payment provider to record the payments on an outstanding account. By default, the Bank journal is added as the payment journal for all payment providers. To modify it, go to the Configuration tab of the selected payment provider and select another Payment journal.
Note
- The payment journal must be a Bank journal.
- The same journal can be used for several payment providers.
- Payment journals must only be configured if the Invoicing or Accounting app is installed.
Accounting perspective
From an accounting perspective, there are two types of online payment workflows: the payments that are directly deposited into your bank account and follow the usual reconciliation workflow, and those coming from third-party online payment providers and require you to follow another accounting workflow. For these payments, you need to consider how you want to record your payments’ journal entries. We recommend you ask your accountant for advice.
By default, the Bank Account defined for the payment journal is used, but you can also specify an outstanding account for each payment provider to separate the provider’s payments from other payments.
See also
- Wire transfers
- Adyen
- Authorize.Net
- AsiaPay
- Buckaroo
- Demo
- Mercado Pago
- Mollie
- Nuvei
- PayPal
- Razorpay
- Stripe
- Worldline
- Xendit
- Bank and cash accounts
On this page
Get Help
Contact Support Ask the Odoo Community
![]()
- User Docs
- Database management
- Developer
- Contributing
EN
Odoo 18
Wire transfers
The Wire transfer payment method allows you to provide payment instructions to your customers, such as the bank details and communication. They are displayed:
- at the end of the checkout process, once the customer has selected Wire transfer as a payment method and clicked the Pay now button:

- on the customer portal:

Note
- While this method is very accessible and requires minimal setup, it is very inefficient process-wise. We recommend setting up a payment provider instead.
- Online orders remain in the Quotation sent (i.e., unpaid order) stage until you receive the payment and Confirm the order.
Tip
Wire transfer can be used as a template for other payment methods that are processed manually, such as checks, by renaming or duplicating it.
Configuration
To configure Wire Transfer, go to Accounting / Website ‣ Configuration ‣ Payment Providers, and open the Wire Transfer card. Then, in the Configuration tab:
- Select the Communication to be used;
- Based on Document Reference: sales order or invoice number
- Based on Customer ID: customer identifier
- Tick the Enable QR codes check box to activate QR code payments.
Define the payment instructions in the Messages tab:
If you have already defined a bank account, the account number will be automatically added to the default message generated by Odoo. You can also add it afterwards and update the message by clicking Reload pending message.
See also
Get Help
Contact Support Ask the Odoo Community
![]()
- User Docs
- Database management
- Developer
- Contributing
EN
Odoo 18
Mercado Pago
Mercado Pago is an online payment provider covering several countries, currencies and payment methods in Latin America.
Configuration on Mercado Pago Dashboard
- Log into the Mercado Pago Dashboard and select your application or create a new one.
- Select Credenciales de producción in the left part of the application page, then select the industry, optionally enter your domain, and click Activar credenciales de producción.
- Copy the Access token and save it for later.
Tip
If you are trying Mercado Pago as a test, select Credienciales de prueba in the left part of the application page, then copy the test Access token.
Configuration on Odoo
- Navigate to the payment provider Mercado Pago and change its state to Enabled.
- In the Credentials tab, fill in the Access Token with the value you saved at the Configuration on Mercado Pago Dashboard step.
- Configure the rest of the options to your liking.
See also
On this page
Get Help
Contact Support Ask the Odoo Community
![]()
- User Docs
- Database management
- Developer
- Contributing
EN
Odoo 18
PayPal
Paypal is an American online payment provider available worldwide and one of the few that does not charge a subscription fee.
Note
While PayPal is available in over 200 countries/regions, only a selection of currencies are supported.
Configuration in PayPal
- Log into your PayPal Developer Dashboard.
- Click Apps & Credentials and click Create App.
- Enter an App Name and click Create App.
- Copy the Client ID and Secret and save them for later.
Important
If you use customer names or addresses that include accented or non-Latin characters, you must configure the encoding format of the payment request sent by Odoo to PayPal to avoid transaction failures without notice. To do so, access the PayPal button language encoding setting, click More Options, and set the Encoding field to UTF-8.
If you are trying PayPal as a test, access your PayPal Sandbox account and configure the encoding format for your sandbox account.
Tip
For encrypted website payments & EWP_SETTINGS errors, please check the PayPal documentation.
Configuration in Odoo
- Navigate to the payment provider PayPal.
- In the Credentials tab, enter the Email linked to your PayPal account, then fill in the Client ID and Client Secret fields with the values you saved at the step Configuration in PayPal.
- Click Generate your webhook to create the Webhook ID.
- Set the State field to Enabled, and make sure the PayPal payment provider is Published.
- Configure the remaining options as desired.
Testing
PayPal provides two sandbox accounts that you can use to simulate live transactions:
- A business account (to use as the merchant account, e.g., ab-1abc12345678@business.example.com);
- A default personal account (to use as the shopper account, e.g., ba-9cba87654321@personal.example.com).
To test the PayPal payment workflow in Odoo:
- Log into the Paypal Developer Site using your PayPal credentials and go to Testing Tools ‣ Sandbox Accounts.
- Click the (ellipsis) icon next to the sandbox business account and select View/Edit account.
- Copy the Email, Client ID, and Secret and save them for the next step.
- In Odoo, configure the PayPal payment provider with the values saved at the previous step and set the State field to Test Mode.
You can then run a test transaction from Odoo using the sandbox personal account.
See also
On this page
Get Help
Contact Support Ask the Odoo Community
![]()
- User Docs
- Database management
- Developer
- Contributing
EN
Odoo 18
Stripe
Stripe is a United States-based online payment solution provider allowing businesses to accept credit cards and other payment methods.
See also
Create your Stripe account with Odoo
The method to acquire your credentials depends on your hosting type:
Odoo OnlineOdoo.sh or On-premise
- Navigate to the payment provider Stripe and click Connect Stripe.
- Go through the setup process and confirm your email address when Stripe sends you a confirmation email.
- At the end of the process, click Agree and submit. If all requested information has been submitted, you are then redirected to Odoo, and your payment provider is enabled.
Tip
- To use an existing Stripe account, activate the Developer mode and enable Stripe manually. You can then Fill in your credentials, generate a webhook, and enable the payment provider.
- You can also test Stripe using the Test mode. To do so, first, log into your Stripe dashboard and switch to the Test mode. Then, in Odoo, activate the Developer mode, navigate to the payment provider Stripe, fill in your API credentials with the test keys, and set the State field to Test Mode.
Fill in your credentials
If your API credentials are required to connect with your Stripe account, proceed as follows:
- Go to the API keys page on Stripe, or log into your Stripe dashboard and go to Developers ‣ API Keys.
- In the Standard keys section, copy the Publishable key and the Secret key and save them for later.
- In Odoo, navigate to the payment provider Stripe.
- In the Credentials tab, fill in the Publishable Key and Secret Key fields with the values you previously saved.
Generate a webhook
If your Webhook Signing Secret is required to connect with your Stripe account, you can create a webhook automatically or manually.
Create the webhook automaticallyCreate the webhook manually
Make sure your Publishable and Secret keys are filled in, then click Generate your webhook.
Enable Apple Pay
To allow customers to use the Apple Pay button to pay their eCommerce orders, go to the Configuration tab, enable Allow Express Checkout, and click Enable Apple Pay.
See also
On this page
Get Help
Contact Support Ask the Odoo Community
![]()